1866L - Screen ELO - Free user manual and instructions
Find the device manual for free 1866L ELO in PDF.


| Product Type | Touchscreen Monitor |
| Model | 1866L |
| Brand | Elo |
| Screen Size | 18.6 inches |
| Resolution | 1366 x 768 pixels |
| Aspect Ratio | 16:9 |
| Touch Technology | Projected Capacitive (PCAP) |
| Brightness | 250 cd/m² |
| Contrast Ratio | 1000:1 |
| Viewing Angle | 178° horizontal / 178° vertical |
| Dimensions (W x H x D) | 17.1 x 13.4 x 7.9 inches |
| Weight | 11.2 lbs (5.1 kg) |
| Power Supply | 100-240V AC, 50/60 Hz, external power adapter |
| Power Consumption | 30W typical |
| Connectivity | VGA, DVI-D, USB (touch), audio in/out |
| Mounting | VESA 100 x 100 mm |
| Operating Temperature | 0°C to 40°C |
| Certifications | UL, CE, FCC, RoHS |
| Cleaning Instructions | Use a soft, dry cloth; no abrasive cleaners |
| Warranty | 3 years limited |
Frequently Asked Questions - 1866L ELO
User questions about 1866L ELO
0 question about this device. Answer the ones you know or ask your own.
Ask a new question about this device
Download the instructions for your Screen in PDF format for free! Find your manual 1866L - ELO and take your electronic device back in hand. On this page are published all the documents necessary for the use of your device. 1866L by ELO.
USER MANUAL 1866L ELO
Elo Entuitive Touchmonitor User Guide
For 18" LCD Touchmonitor
Version 1.0
P/N 80-8025-01-A
1800L Series
Models
ET1825L-8SWA-1
ET1825L-7SWA-1
ET1866L-8SNA-1
ET1866L-7SNA-1
ET1886L-8SNA-1
ET1886L-7SNA-1
Elo TouchSystems, Inc.
1-800-ELOTOUCH
www.elotouch.com
Copyright © 2000 Elo TouchSystems Inc. All Rights Reserved.
No part of this publication may be reproduced, transmitted, transcribed, stored in a retrieval system, or translated into any language or computer language, in any form or by any means, including, but not limited to, electronic, magnetic, optical, chemical, manual, or otherwise without prior written permission of Elo TouchSystems.
Disclaimer
The information in this document is subject to change without notice. Elo TouchSystems makes no representations or warranties with respect to the contents hereof, and specifically disclaims any implied warranties of merchantability or fitness for a particular purpose. Elo TouchSystems reserves the right to revise this publication and to make changes from time to time in the content hereof without obligation of Elo TouchSystems to notify any person of such revisions or changes.
Trademark Acknowledgments
IntelliTouch, SecureTouch, AccuTouch, Entuitive, and MonitorMouse are trademarks of Elo TouchSystems, Inc.
Other product names mentioned herein may be trademarks or registered trademarks of their respective companies. Elo TouchSystems claims no interest in trademarks other than its own.
Chapter 1. Introduction......4
Precautions....4
About the Product....4
Chapter 2. Installation and Setup....5
Unpacking Your Touchmonitor....5
Touch Interface Connection....6
Optimizing the LCD Display....6
VESA Mount on Your Touchmonitor......6
Installing the Driver Software....7
Installing Windows 2000, 9X, NT 4.0 Drivers.....7
Installing MS-DOS and Windows 3.1 Drivers.....8
Chapter 3. Operation ......9
About Touchmonitor Adjustments....9
Using the On-Screen Display Menus 9
Auto Adjustment 10
First OSD Menu....10
Contrast....10
Horizontal Position....11
Vertical Position....11
Horizontal Size....11
Tracking....11
Reset....11
Chapter 4. Troubleshooting ....12
Chapter 5. Care and Handling....13
Cleaning Your Touchmonitor....14
Screen....14
Cabinet....14
Safety....14
Appendix A. Native Resolution....15
Appendix B. Technical Specifications......16
Appendix C. Mechanical Specifications......17
Warranty 18
Contacting Elo 19
Congratulations on your purchase of an Elo TouchSystems Entuitive LCD touchmonitor. Your new high-resolution touchmonitor combines the reliable performance of Elo's touch technology with the latest advances in LCD display design. This combination of features creates a natural flow of information between a user and your touchmonitor.
Precautions
Follow all warnings, precautions and maintenance as recommended in this user's manual to maximize the life of your unit. See Chapter 5 "Care and Handling of your Touchmonitor" for more information on touchmonitor safety.
About the Product
Your LCD Touchmonitor is a 18.1" Analog TFT/ Active matrix LCD color display with the following features:
Dual Inputs (BNC/D-Sub)
18.1" diagonal screen size
Unlimited number of displayable colors
1280 x 1024 resolution
XGA/ SVGA/ VGA/ VESA/ Mac/ NEC PC-98 compatible
24\~80kHz horizontal scan
56\~76z high refresh rate
Auto adjustment capability
High quality full screen re-scaling
VESA DPMS power saving
VESA flat panel monitor physical mounting interface (100mm)
For full Technical Specifications refer to Appendix B.
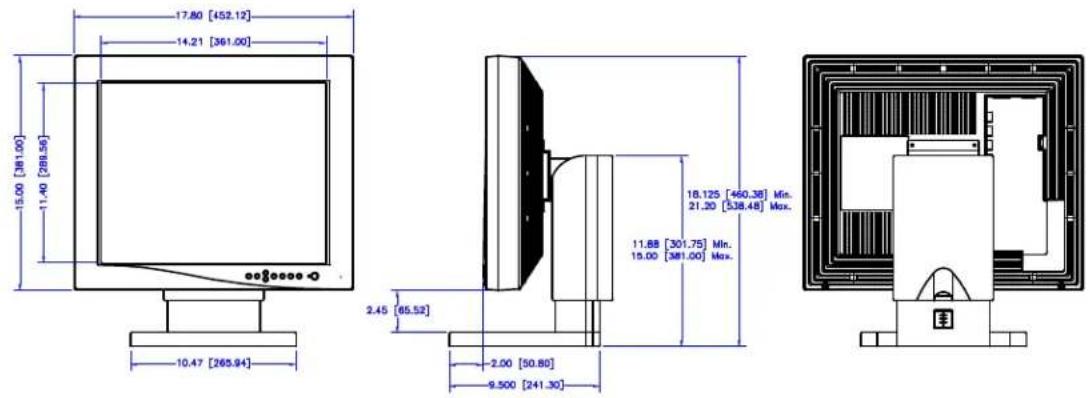
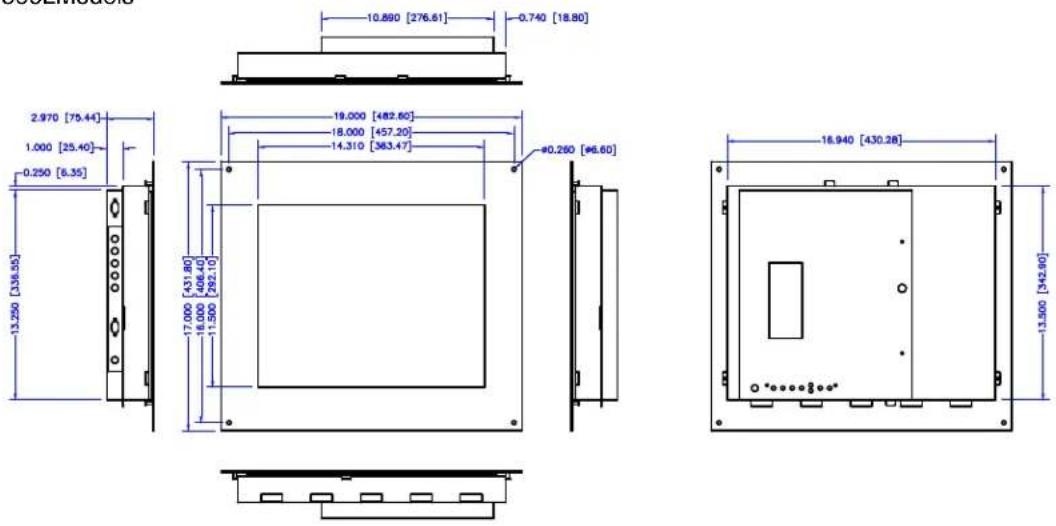
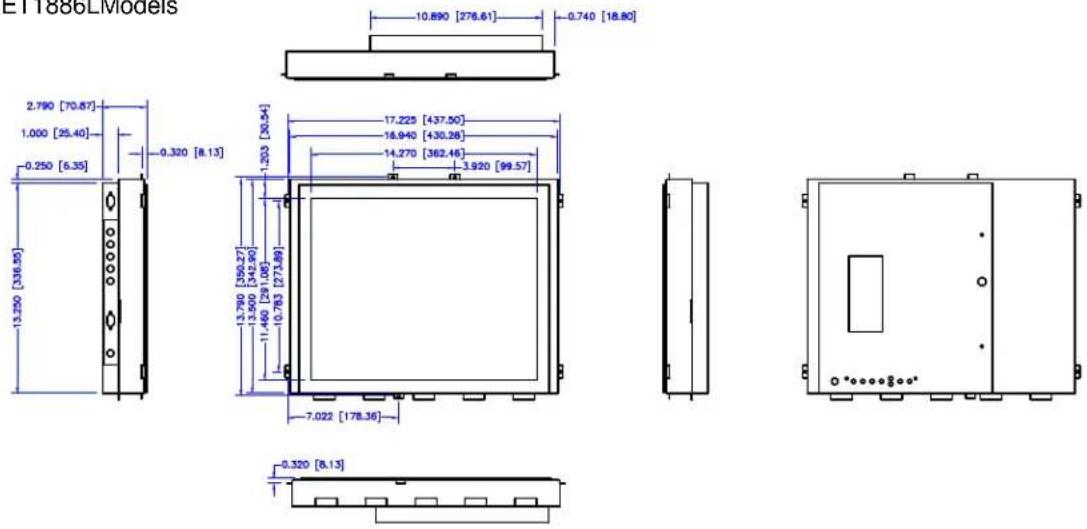
For full Mechanical Specifications refer to Appendix C.
This chapter discusses how to install your LCD touchmonitor and how to install EloTouchSystems driver software.
Unpacking Your Touchmonitor
Carefully unpack your touchmonitor. Check that you have everything you need and that none of the components have been damaged during shipping. Save the box and packaging in case##you need to ship the touchmonitor..f
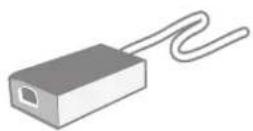
External AC Power Adaptor
natural_image
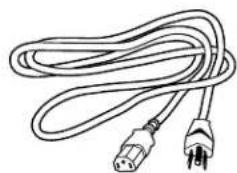
Line drawing of a coiled electrical plug with two terminal connectors (no text or symbols)Power Cord
natural_image
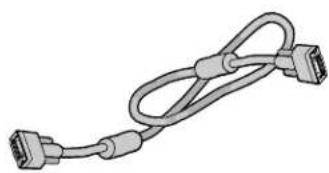
Illustration of a USB cable with two connectors (no text or symbols)Video Cable
Touchscreen Cable (ET1866L & ET1886L Models Only)

Elo TouchTools CD (Contains drivers and documentation)
Touch Interface Connection
Note: Your interface cables may have been pre-connected to your monitor at the factory.
- Before connecting the cables to your touchmonitor and PC, be sure that the computer and the touchmonitor are turned off.
- Connect the ferrite end of the video cable to the video connector on your PC. Connect the other end of the video cable to the touchmonitor. Secure the cable to your touchmonitor and PC by turning the screws on the connector.
- Connect the female end of the serial (RS-232) cable to the serial port on the back of your PC. Connect the male end of the cable to the touchscreen connector on your touchmonitor.
- Power on your PC then your touchmonitor. After a brief pause the picture should appear.
- Install the driver software using the procedure described in the documentation accompanying the driver disk.
Optimizing the LCD Display
To ensure the LCD display works well with your computer, configure the display mode of your graphic card to make it less than or equal to 1280 x 1024 resolution, and make sure the timing of the display mode is compatible with the LCD display. Refer to Appendix A for more information about resolution. Compatible video modes for your touchmonitor are listed in Appendix B.
VESA Mount on Your Touchmonitor (Desktops Only)
Your desktop touchmonitor comes with a VESA standard mounting holes for additional mounting options. Your touchmonitor conforms to the VESA Flat Panel Monitor Physical Mounting Interface (FPMPMI™) Standard, which defines a physical mounting interface for flat panel monitors, and corresponding standards for flat panel monitor mounting devices, such as wall and table arms.
The following companies provide VESA mounting devices compatible with your touchmonitor
Ergotron
800-888-8458
651-681-7600
www.ergotron.com
Innovative Office Products
800-524-2744
800-524-2744
www.innov-office-prod.com
GCX
800-228-2555
707-773-1100
www.gcx.com
Installing the Driver Software
Elo TouchSystems provides driver software that allows your touchmonitor to work with your computer. Drivers are located on the enclosed CD-ROM for the following operating systems:
Windows 2000
Windows 98
Windows 95
Windows NT 4.0
Windows 3.x
MS-DOS 2.x or later
Additional drivers and driver information for other operating systems (including OS/2, Macintosh and Linux) are available on the Elo TouchSystems web site at www.elotouch.com.
Your Elo touchmonitor is plug-and-play compliant. Information on the video capabilities of your touchmonitor is sent to your video display adapter when Windows starts. If Windows detects your touchmonitor, follow the instructions on the screen to install a generic plug-and-play monitor.
Installing the Serial Touch Driver for Windows 2000, 95/98 and NT 4.0
Note: For Windows 2000 and NT 4.0 you must have administrator access rights to install the driver.
- Insert the Elo CD-ROM in your computer's CD-ROM drive.
- If the AutoStart feature for your CD-ROM drive is active, the system automatically detects the CD and starts the setup program.
Follow the directions on the screen to complete the driver setup for your version of Windows.
- If the AutoStart feature is not active:
Click Start > Run.
Click the Browse button to locate the touch.exe program on the CD-ROM.
Click Open, then OK to run touch.exe.
Follow the directions on the screen to complete the driver setup for your version of Windows.
Installing the Serial Touch Driver for MS-DOS and Windows 3.1
- Insert the Elo CD-ROM in your computer's CD-ROM drive.
- From DOS, type d:\EIoDW to change to the correct directory on the CD-ROM (your CD-ROM drive may be mapped to a different drive letter).
- Type install and press Enter to start the installation.
- Align the touchscreen.
You must have already completed Steps 1 and 2 before proceeding. Refer to Chapter 2 of the Elo DOS and Windows Driver Guide as necessary for additional installation information.
- Type INSTALL at the DOS prompt in the directory containing the driver install files.
- INSTALL asks you to select the software to install. Then choose d:\EIoDW from the displayed list.
- INSTALL also asks you for the paths to use during installation, or you may use its defaults. INSTALL creates directories as necessary, and warns you if they exist.
- If you are updating your software, you may wish to specify the paths containing the earlier versions, and overwrite the obsolete files. All executable programs are upward compatible. For a list of differences from each previous version of the drivers, be sure to select "Differences from Previous Versions" during the installation process.
- INSTALL updates your AUTOEXEC.BAT file with the drivers you select. INSTALL makes a copy of your original AUTOEXEC.BAT file, called AUTOEXEC.OLD. If you already have Elo driver commands in your AUTOEXEC.BAT file, they will be commented out.
- When INSTALL is finished, it leaves a file called GO.BAT in the subdirectory you specified. GO loads the touchscreen driver, runs the calibration program ELOCALIB, and gives you some final instructions.
- If you are using Windows 3.1, you will also align the touchscreen within Windows 3.1 with the Touchscreen Control Panel.
About Touchmonitor Adjustments
Your touchmonitor will likely require adjustment. Variations in video output and application will require you to adjust your touchmonitor to optimize the quality of the display.
For best performance, your monitor should be operating in native resolution, that is 1280 x 1024 @ 60 Hz. Use the Display control panel in Windows to choose 1280 x 1024 resolution.
Operating in other resolutions will degrade video performance. For further information, please refer to Appendix A.
All adjustments you make to the controls are automatically memorized. This feature saves you from having to reset your choices every time you unplug or power your touchmonitor off and on. If there is a power failure your touchmonitor settings will not default to the factory specifications.
Using the On-Screen Display Menus
All adjustments are made by using the on-screen display (OSD) menus. All menu items can be selected by using the buttons on the side bezel.
The user controls are labeled and are mounted on the front of the touchmonitor for all Desktop models.
Panel Mount and Chassis Mount touchmonitors have user controls that are labeled and located at the rear of the unit.
User Controls
(The following is an excerpt taken from pages 10 - 12 of the NEC user manual)
BNC/D-SUB: Allows you to change between the BNC and D-SUB signal inputs.
OSM™ (On-Screen Manager) control buttons on the front of the monitor function as follows:
| To access OSM menu, press any of the control buttons (◀, ▶, ▲, ▼) or the PROCEED or EXIT button.To rotate OSM between Landscape and Portrait modes, press the RESET button.NOTE: OSM menu must be closed in order to rotate. | ||
| Main Menu Sub-Menu | ||
| EXIT Exits the OSM controls. Exits to the OSM main | menu. | |
| CONTROL ▲/ Moves the highlighted area up/down to select one of the controls. | area up/down to select one of the controls. | |
| CONTROL ◀/ Moves the highlighted area Moves the bar left/left/right to select control menus. | right to increase or decrease the adjustment. | |
| PROCEED | Has no function | Activates Auto Adjust and ALL RESET functions. |
| RESET | Resets the highlighted control menu to the factory setting. | Resets the highlighted control to the factory setting. |
NOTE: When RESET is pressed in the main and sub-menu, a warning window will appear allowing you to cancel the RESET function by pressing the EXIT button.

● Brightness/Contrast Controls

BRIGHTNESS
Adjusts the overall image and background screen brightness.
CONTRAST
Adjusts the image brightness in relation to the background.
AUTO
AUTO ADJUST CONTRAST
Adjusts the image displayed for non-standard video inputs.
OSM LOCK OUT
The OSM LOCK OUT control completely locks out access to all OSM control functions. When attempting to activate OSM controls while in the LOCK OUT mode, a screen will appear indicating that OSM controls are locked out.
- To enter the LOCK OUT mode, simultaneously press the PROCEED and ▼ button. The LOCK OUT window will appear.
- To activate the LOCK OUT function, simultaneously press and hold down the PROCEED and ▲button. The OSM window will disappear within seconds and the LOCK OUT function will be activated.
User Controls (Continued)
- To deactivate the LOCK OUT mode, simultaneously press the PROCEED and ▲ button.
AUTO
Auto Adjust
Automatically adjusts the Image Position, H. Size and Fine settings.

Position Controls
H. POSITION
Controls Horizontal Image Position within the display area of the LCD.

V. POSITION
Controls Vertical Image Position within the display area of the LCD.
AUTO
AUTO
Automatically sets the Horizontal and Vertical Image Position within the display area of the LCD.

Image Adjust Controls
H. SIZE
Adjusts the horizontal size by increasing or decreasing this setting.

FINE
Improves focus, clarity and image stability by increasing or decreasing this setting.
AUTO Automatically adjusts the H Size settings.

AccuColor® Control System
Five color presets select the desired color setting. Each color setting is adjusted at the factory.
R,G,B: Increases or decreases Red, Green or Blue color depending upon which is selected. The change in color will appear on screen and the direction (increase or decrease) will be shown by the bars.

Tools
DSM→OSM H POS.
OSM V POS.
* You can choose where you would like the OSM™ control window to appear on your screen. Selecting OSM Location allows you to manually adjust the position of the OSM control menu left, right, up or down.

ALL RESET
Selecting ALL RESET when D-SUB input is selected allows you to reset all OSM control settings for the D-SUB input back to the factory settings. Selecting ALL RESET when BNC input is selected allows you to reset all OSM control settings for the BNC input back to the factory settings. Individual settings can be reset by highlighting the control to be used and pressing the RESET button.

Information
Indicates the current display resolution, frequency setting and type of Sync signal the monitor is using.
NOTE: Mode Change should only be used if a resolution is not recognized by the monitor. The user can change to the appropriate resolution by selecting the Mode information and selecting (increase or decrease) the corresponding option.
NOTE: If the ◀or ▶button is pressed while TYPE is highlighted, then Sync Type is switched between Separate Sync and Sync On Green.
If you are experiencing trouble with the video of your touchmonitor, refer to the following excerpt from page 17 of the original NEC users manual. If the problem persists, please contact your local dealer or our service center.
Troubleshooting
No picture
- The signal cable should be completely connected to the display card/computer.
- The display card should be completely seated in its slot.
- Power Button and computer power switch should be in the ON position.
- Check to make sure that a supported mode has been selected on the display card or system being used. (Please consult display card or system manual to change graphics mode.)
- Check the monitor and your display card with respect to compatibility and recommended settings.
- Check the signal cable connector for bent or pushed-in pins.
- Check that the BNC/D-SUB button is in the correct position.
Power Button does not respond
- Unplug the power cord of the monitor from the AC outlet to turn off and reset the monitor, or simultaneously press the RESET and Power buttons.
Image persistence
- Image persistence is when a "ghost" of an image remains on the screen even after the monitor has been turned off. Unlike CRT monitors, LCD monitors' image persistence is not permanent. To alleviate image persistence, turn the monitor off for as long as an image was displayed. If an image was on the monitor for one hour and a "ghost" of that image remains, the monitor should be turned off for one hour to erase the image.
NOTE: As with all personal display devices, NEC Technologies recommends using a screen saver at regular intervals whenever the screen is idle.
Image is unstable, unfocused or swimming is apparent
- Signal cable should be completely attached to the computer.
- Use the OSM™ Image Adjust controls to focus and adjust display by increasing or decreasing the Fine control. When the display mode is changed, the OSM Image Adjust settings may need to be re-adjusted.
- Check the monitor and your display card with respect to compatibility and recommended signal timings.
- If your text is garbled, change the video mode to non-interlace and use 60Hz refresh rate.
LED on monitor is not lit (no green or amber color can be seen)
- Power Button should be in the ON position and power cord should be connected.
- Make certain the computer is not in a power-saving mode (touch the keyboard or mouse).
Display image has a green cast to it
- Select "TYPE" in the OSM Information menu ⓘ and press the ◀ or ▶ Control button.
Display image is not sized properly
- Use the OSM Image Adjust controls to increase or decrease the H. Size.
- Check to make sure that a supported mode and signal timing has been selected on the display card or system being used. (Please consult display card or system manual to change graphics mode or refresh rate.)
Selected resolution is not displayed properly
- Select the Display Resolution in the OSM Information menu ⓘ to confirm that the appropriate resolution has been selected. If not, select corresponding option by pressing the ◀or ▶Control button.
If you are experiencing trouble with the touch screen of your touchmonitor, ensure that the touch screen cable is properly attached. If the problem persists, please contact your local dealer or our service center. You may also seek online support at our website: www.elotouch.com.
Care and Handling Of Your Touchmonitor
The following tips will help you keep your Touchmonitor functioning at the optimal level:

Protect your touchmonitor from extremely low or high temperatures (see Appendix C, Technical Specifications).

Keep your touchmonitor dry. Do not wash it with a wet cloth or pour fluid into it.
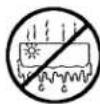
Check your touchmonitor for condensation. If condensation develops, do not power your touchmonitor on until the condensation evaporates.

Protect your touchmonitor from being bumped or dropped.

Keep your touchmonitor away from dust, sand and dirt.

Keep your touchmonitor away from humid environments.
Cleaning Your LCD Touchmonitor
Prevent damage to your touchmonitor (and PC) by powering off the computer system and disconnecting the touchmonitor from the AC out-let before you clean it. After you finish cleaning, make sure the touch-monitor is completely dry before you reconnect the cables and power it on. Do not apply liquid or aerosol spray cleaners directly on the screen or cabinet. Do not use any type of abrasive pad, alkaline cleaner, scouring powder or solvent (such as alcohol or benzine) to clean your touch-monitor. Avoid getting liquids inside your touchmonitor. If liquid does get inside, have a qualified service technician check it before you power it on again.
Screen
Remove dust and dirt by wiping the touch screen with a soft, clean, lint-free cloth. Moisten a soft cloth with an ammonia-based glass cleaner and use it to remove fingerprints and smudges.
Case
Clean the touchmonitor cabinet with a soft cloth slightly moistened with a mild detergent solution. Rinse the cloth with clear water, wring it dry, and wipe the cabinet to remove any detergent residue.
Safety
This manual contains information that is important for the proper setup and maintenance of your touchmonitor. Before setting up and powering on your new touchmonitor, read through this manual, especially Chapter 2 (Installation), and Chapter 3 (Operation).
To reduce the risk of electric shock, follow all safety notices and never open the touchmonitor case.
Turn off the product before cleaning.
Your new touchmonitor is equipped with a 3-wire, grounding power cord. The power cord plug will only fit into a three-prong safety ground outlet. Do not attempt to fit the plug into an outlet that has not been configured for this purpose. Do not use a damaged power cord. Use only the power cord that comes with your Elo TouchSystems Touchmonitor. Use of an unauthorized power cord may invalidate your warranty.
The slots located on the sides and top of the touchmonitor case are for ventilation. Do not block or insert anything inside the ventilation slots.
It is important that your touchmonitor remains dry. Do not pour liquid into or onto your touchmonitor. If your touchmonitor becomes wet do not attempt to repair it yourself.
The native resolution of a monitor is the resolution level at which the LCD panel is designed to perform best. For the Elo LCD touchmonitor, the native resolution is 1280 x 1024 @ 60Hz for the 18.1" inch size. In almost all cases, screen images look best when viewed at their native resolution. You can lower the resolution setting of a monitor but not increase it.
The native resolution of an LCD is the actual number of pixels horizontally in the LCD by the number of pixels vertically in the LCD. LCD resolution is usually represented by the following symbols:
As an example, a SVGA resolution LCD panel has 800 pixels horizontally by 600 pixels vertically. Input video is also represented by the same terms. XGA input video has a format of 1024 pixels horizontally by 768 pixels vertically. When the input pixels contained in the video input format match the native resolution of the panel, there is a one to one correspondence of mapping of input video pixels to LCD pixels. As an example, the pixel in 45 column and 26 row of the input video is in 45 column and 26 row of the LCD. For the case when the input video is at a lower resolution than the native resolution of the LCD, the direct correspondence between the video pixels and the LCD pixels is lost. The LCD controller can compute the correspondence between video pixels and LCD pixels using algorithms contained in the controller. The accuracy of the algorithms determines the fidelity of conversion of video pixels to LCD pixels. Poor fidelity conversion can result in artifacts in the LCD displayed image such as varying width characters.
| Technical Specifications | Model | ||
| ET1825L-8SWA-1ET1825L-7SWA-1 | ET1866L-8SNA-1ET1866L-7SNA-1 | ET1886L-8SNA-1ET1886L-7SNA-1 | |
| Display Size & Type | 18.1" (46.3 cm) diagonal active matrix color TFT LCD | ||
| Useable Screen Area | 14.4" (359 mm) x 11.3" (287mm) | ||
| Optimal (Native) Resolution | 1280 x 1024 @ 60Hz | ||
| Other Supported Resolutions | 720 x 400*: VGA text640 x 480 @ 60Hz to 76Hz800 x 600* @ 56Hz to 76Hz832 x 624* @ 75Hz1024 x 768* @ 60Hz to 76Hz1152 x 900* @ 66Hz (SUN)1280 x 960 @ 60Hz to 76Hz | ||
| Colors | Unlimited (Depends on Display Card) | ||
| Viewing Angle | ± 85? or 170? total | ||
| Contrast Ratio | 150: 1 | ||
| Brightness | AccuTouch 150 cd/m2: Intellitouch 185 cd/m2 | ||
| Input Video Signal | ANALOG 0.7 Vp-p/75 OhmsSeparate sync. TTL LevelHorizontal sync. Positive/NegativeVertical sync. Positive/NegativeComposite sync. (Positive/Negative) (TTL Level)Sync on Green video (Positive) 0.7 Vp-p and sync.Negative 0.3 Vp-p | ||
| Input Power Source | External Universal AC/DC power adaptor. 12Vdc0.9A @ 100 - 120 V/0.5A @ 220 - 240 V | ||
| Scanning Frequency | |||
| Horizontal | 24-80 kHz Automatically | ||
| Vertical | 56-76 Hz Automatically | ||
| Environmental | |||
| Operating Temperature | 5?C to 35?C, 41?F to 95?F | ||
| Storage Temperature | -10?C to 60?C, 14?F to 140?F | ||
| Humidity | 80% max. | ||
| Altitude | 0 to 10,000' | ||
| Touchscreen Connector | DB9 Attached Cable | Serial DB9 Serial | DB9 |
| Physical Dimensions | |||
| Width | 17.80" (452 mm) | 19.0" (483 mm) | 17.23" (437 mm) |
| Height | 15" (382 mm) | 17" (432 mm) | 14.6" (371 mm) |
| Depth | 10.3" (262 mm) | 3.00" (76 mm) | 2.9" (74 mm) |
| Weight (Approximate) | |||
| Actual | 24 lbs (10.9 kg) | 14 lbs (6.35 kg) | 12 lbs (5.4 kg) |
| Shipping | 26 lbs (11.8 kg) | 16 lbs (7.3 kg) | 14 lbs (6.35 kg) |
* Interpolated Resolutions: When resolutions are shown that are lower than the pixel count of the LCD module, text may appear choppy or lines may appear to be bold. This is normal and necessary for all current flat panel technologies when displaying non-native resolutions full screen. In flat panel technologies, each dot on the screen is actually one pixel, so to expand resolutions to full screen, an interpolation of the resolution must be done. When the interpolated resolution is not an exact multiple of the native resolution, the mathematical interpolation necessary may cause some lines to appear thicker than others.
NOTE: Technical specifications are subject to change without notice.
ET1825LModels
ET1866LModels
ET1886LModels
Except as otherwise stated herein or in an order acknowledgment delivered to Buyer, Seller warrants to Buyer that the Product shall be free of defects in materials and workmanship. The warranty for the touchmonitors and components of the product are: 3 years monitor, 10 years IntelliTouch screen, 5 years Accu- Touch screen, 5 years Controller.
Seller makes no warranty regarding the model life of components. Seller's suppliers may at any time and from time to time make changes in the components delivered as Products or components.
Buyer shall notify Seller in writing promptly (and in no case later than thirty (30) days after discovery) of the failure of any Product to conform to the warranty set forth above; shall describe in commercially reasonable detail in such notice the symptoms associated with such failure; and shall provide to Seller the opportunity to inspect such Products as installed, if possible. The notice must be received by Seller during the Warranty Period for such product, unless otherwise directed in writing by the Seller. Within thirty (30) days after submitting such notice, Buyer shall package the allegedly defective Product in its original shipping carton(s) or a functional equivalent and shall ship to Seller at Buyer's expense and risk.
Within a reasonable time after receipt of the allegedly defective Product and verification by Seller that the Product fails to meet the warranty set forth above, Seller shall correct such failure by, at Seller's options, either (i) modifying or repairing the Product or (ii) replacing the Product. Such modification, repair, or replacement and the return shipment of the Product with minimum insurance to Buyer shall be at Seller's expense. Buyer shall bear the risk of loss or damage in transit, and may insure the Product. Buyer shall reimburse Seller for transportation cost incurred for Product returned but not found by Seller to be defective. Modification or repair, of Products may, at Seller's option, take place either at Seller's facilities or at Buyer's premises. If Seller is unable to modify, repair, or replace a Product to conform to the warranty set forth above, then Seller shall, at Seller's option, either refund to Buyer or credit to Buyer's account the purchase price of the Product less depreciation calculated on a straight-line basis over Seller's stated Warranty Period.
THESE REMEDIES SHALL BE THE BUYER'S EXCLUSIVE REMEDIES FOR BREACH OF WARRANTY. EXCEPT FOR THE EXPRESS WARRANTY SET FORTH ABOVE, SELLER GRANTS NO OTHER WARRANTIES, EXPRESS OR IMPLIED BY STATUTE OR OTHERWISE, REGARDING THE PRODUCTS, THEIR FITNESS FOR ANY PURPOSE, THEIR QUALITY, THEIR MERCHANTABILITY, THEIR NONINFRINGEMENT, OR OTHERWISE. NO EMPLOYEE OF SELLER OR ANY OTHER PARTY IS AUTHORIZED TO MAKE ANY WARRANTY FOR THE GOODS OTHER THAN THE WARRANTY SET FORTH HEREIN. SELLER'S LIABILITY UNDER THE WARRANTY SHALL BE LIMITED TO A REFUND OF THE PURCHASE PRICE OF THE PRODUCT. IN NO EVENT SHALL SELLER BE LIABLE FOR THE COST OF PROCUREMENT OR INSTALLATION OF SUBSTITUTE GOODS BY BUYER OR FOR ANY SPECIAL, CONSEQUENTIAL, INDIRECT, OR INCIDENTAL DAMAGES.
Buyer assumes the risk and agrees to indemnify Seller against and hold Seller harmless from all liability relating to (i) assessing the suitability for Buyer's intended use of the Products and of any system design or drawing and (ii) determining the compliance of Buyer's use of the Products with applicable laws, regulations, codes, and standards. Buyer retains and accepts full responsibility for all warranty and other claims relating to or arising from Buyer's products, which include or incorporate Products or components manufactured or supplied by Seller. Buyer is solely responsible for any and all representations and warranties regarding the Products made or authorized by Buyer. Buyer will indemnify Seller and hold Seller harmless from any liability, claims, loss, cost, or expenses (including reasonable attorney's fees) attributable to Buyer's products or representations or warranties concerning same.
Contacting Elo
Elo TouchSystems, Inc.
6500 Kaiser Drive
Fremont, CA 94555
USA
Elo TouchSystems GmbH & Co. KG.
Voice: (800) 356-8682 (Toll Free in United States)
(510) 651-2340 (Pacific Time)
+49 (1) 8161/ 670 42 (Europe excepting Germany)
0180/ 530 41 70 (Germany)
FAX: (510) 651-3511
+49 (1) 8161/ 660 43 (Europe)
Technical Support
Voice: (423) 220-4299 (Pacific Time; voice mail after hours)
+49 8161/ 670 42 (Europe excepting Germany)
0180/ 530 41 70 (Germany)
FAX: (800) 489-9935 (toll free in United States)
+49 (1) 8161/ 660 43 (Europe)
E-mail: elotech@elotouch.com
BBS: (510) 651-1224
- Elo Entuitive Touchmonitor User Guide
- Copyright © 2000 Elo TouchSystems Inc. All Rights Reserved.
- Disclaimer
- Trademark Acknowledgments
- Chapter 1. Introduction......4
- Chapter 2. Installation and Setup....5
- Chapter 3. Operation ......9
- Chapter 4. Troubleshooting ....12
- Chapter 5. Care and Handling....13
- Appendix A. Native Resolution....15
- Appendix B. Technical Specifications......16
- Appendix C. Mechanical Specifications......17
- Warranty 18
- Contacting Elo 19
- Precautions
- About the Product
- Unpacking Your Touchmonitor
- Touch Interface Connection
- Optimizing the LCD Display
- VESA Mount on Your Touchmonitor (Desktops Only)
- Installing the Driver Software
- Installing the Serial Touch Driver for Windows 2000, 95/98 and NT 4.0
- Installing the Serial Touch Driver for MS-DOS and Windows 3.1
- About Touchmonitor Adjustments
- Using the On-Screen Display Menus
- User Controls
- ● Brightness/Contrast Controls
- BRIGHTNESS
- CONTRAST
- AUTO ADJUST CONTRAST
- OSM LOCK OUT
- User Controls (Continued)
- Auto Adjust
- Position Controls
- POSITION
- POSITION
- AUTO
- Image Adjust Controls
- SIZE
- FINE
- AccuColor® Control System
- Tools
- DSM→OSM H POS.
- OSM V POS.
- ALL RESET
- Information
- Troubleshooting
- No picture
- Power Button does not respond
- Image persistence
- Image is unstable, unfocused or swimming is apparent
- Display image has a green cast to it
- Display image is not sized properly
- Selected resolution is not displayed properly
- Care and Handling Of Your Touchmonitor
- Cleaning Your LCD Touchmonitor
- Screen
- Case
- Safety
- Contacting Elo
- Technical Support
Brand : ELO
Model : 1866L
Category : Screen