
The Crispy Crust BPZ600XL - Pizza oven BREVILLE - Free user manual and instructions
Find the device manual for free The Crispy Crust BPZ600XL BREVILLE in PDF.


| Product type | Countertop electric pizza oven |
| Brand | Breville |
| Model | The Crispy Crust BPZ600XL |
| Power | 1800 W |
| Power supply voltage | 120 V ~ 60 Hz |
| Dimensions (L x D x H) | 43 x 38 x 20 cm |
| Weight | 9 kg |
| Max pizza capacity | 30 cm (12 inches) |
| Temperature range | 100 °C to 260 °C |
| Timer | Yes, up to 60 minutes with auto shut-off |
| Cooking modes | Pizza, Bake, Broil, Keep Warm |
| Interior material | Stainless steel |
| Included accessories | Pizza stone, baking tray, drip tray |
| Special features | Crispy Crust technology, independent upper and lower heating elements |
| Safety | Auto shut-off, cool-touch handle, burn-resistant surface |
| Cleaning | Pizza stone hand washable, exterior wipe with a damp cloth |
| Maintenance | Do not use abrasive cleaners |
| Repairability | Spare parts available via Breville after-sales service |
| Warranty | 2 years |
Frequently Asked Questions - The Crispy Crust BPZ600XL BREVILLE
User questions about The Crispy Crust BPZ600XL BREVILLE
0 question about this device. Answer the ones you know or ask your own.
Ask a new question about this device
Download the instructions for your Pizza oven in PDF format for free! Find your manual The Crispy Crust BPZ600XL - BREVILLE and take your electronic device back in hand. On this page are published all the documents necessary for the use of your device. The Crispy Crust BPZ600XL by BREVILLE.
USER MANUAL The Crispy Crust BPZ600XL BREVILLE
Breville Consumer Service Center
USA
Mail: Breville USA 19400 S. Western Ave Torrance CA 90501-1119
Phone: 1-866-273-8455 1-866-BREVILLE
Email: askus@brevilleusa.com
Canada
Mail: Breville Canada 2555, Avenue de l'Aviation Pointe-Claire (Montreal) Quebec H9P 2Z2
Phone: 1-855-683-3535
Email: askus@breville.ca
www.breville.com
Breville is a registered trademark of Breville Pty. Ltd. A.B.N. 98 000 092 928. Copyright Breville Pty. Ltd. 2013.
Due to continued product improvement, the products illustrated/photographed in this booklet may vary slightly from the actual product.
Model BPZ600XL Issue - E13
Breville®
the Crispy Crust™
natural_image
Exterior view of a modern electric cooktop device with metallic casing and handle (no visible text or symbols)CONGRATULATIONS
on the purchase of your Breville product
Register online for product support and exclusive offers.\*
USA Consumers: www.brevilleusa.com
Canadian Consumers: www.breville.ca
CONTENTS
4 Breville recommends safety first
7 Know your Breville Product
9 Operating your Breville Product
13 Cooking guide
15 Care, cleaning and storage
18 Troubleshooting
20 Recipes
At Breville we are very safety conscious. We design and manufacture consumer products with the safety of you, our valued customer, foremost in mind. In addition we ask that you exercise a degree of care when using any electrical appliance and adhere to the following precautions.
IMPORTANT SAFEGUARDS

READ ALL INSTRUCTIONS BEFORE USE AND SAvE fOR fUTURE REFERENCE
- Remove and safely discard any packaging material and promotional stickers before using the appliance for the first time.
- To eliminate a choking hazard for young children, remove and safely discard the protective cover that is fitted to the power plug of this appliance.
- Do not place the appliance near the edge of a bench or table during operation. Ensure the surface is level, clean and free of water and other substances.
- Do not place the appliance on or near a hot gas or electric burner, or where it could touch a heated oven.
- Position the appliance at a minimum distance of 8 inches (20cm) away from walls, curtains, cloths and other heat sensitive materials.
• Always operate the appliance on a stable, heat-resistant surface. Do not use on a cloth-covered surface, near curtains or other flammable materials. Do not use on a metal surface, for example, a sink drain board. -
When operating the appliance, ensure the power cord is kept away from any heat source including the surface of the appliance. Ensure the power cord does not become trapped between the lid and base of the appliance.
• Always ensure the appliance is properly assembled before use. Follow instructions provided in this book. -
The appliance is not intended to be operated by means of an external timer or separate remote control system.
- When operating the appliance, insert the power plug into a single power outlet. Do not plug into a double adaptor, or similar, and use with other appliances.
- Do not place cardboard, plastic, paper, or other flammable materials near or in the appliance.
- The outer surface of the appliance may be very hot when operating at high temperatures. Always wear protective, insulated oven gloves when inserting, removing or handling items from the pizza oven when hot. Alternatively, allow the pizza oven to cool before handling.
- Do not lean or stand over the appliance when opening the lid as steam may be released.
- Do not place anything on top of the appliance.
- Do not leave the lid open for extended periods of time.
- Do not place hands inside the appliance during operation.
- Do not insert oversized foods into the appliance as this may create risk of fire.
- Cook on one side of the pizza stone only. Do not reverse pizza stone to cook on the clean side if it becomes stained or discolored.
-
Do not store any materials other than the supplied accessories in the pizza oven when not in use.
-
Do not attempt to operate the pizza oven by any method other than those described in this booklet. Do not leave the pizza oven unattended when in use.
- Always ensure the pizza oven has cooled, is unplugged before attempting to move the appliance, when not in use, if left unattended and before disassembling, cleaning or storing.
- To protect against electric shock do not immerse the pizza oven, cord or power plug in water or any other liquid.
- Keep the appliance clean. Follow the cleaning instructions provided in this book.
- Caution should be exercised when cooking foods with high oil content such as pine nuts, walnuts and cheese. Broiling these foods, cooking them for extended periods of time or at high temperature may create a fire risk.
- In the event that any foods catch fire in the pizza oven, keep the oven lid closed. Turn the pizza oven off and unplug from the power outlet. Wait until the fire goes out before opening the pizza oven lid.
- Do not touch hot surfaces. Use handles or knobs.
- The use of accessory attachments not recommended by the appliance manufacturer may cause injuries.

CAUTION
Do not operate the pizza oven without the pizza stone in place.
fOR HOUSEHOLD USE ONLY SAvE THESE INSTRUCTIONS
IMPORTANT SAFEGUARDS FOR ALL ELECTRICAL APPLIANCES
- Unwind the cord fully before use.
- Do not let the cord hang over the edge of a table or counter, touch hot surfaces or become knotted.
- To protect against electric shock do not immerse the power cord, power plug or appliance in water or any other liquid.
- This appliance is not intended for use by persons (including children) with reduced physical, sensory or mental capabilities, or lack of experience and knowledge, unless they have been given supervision or instruction concerning use of the appliance by a person responsible for their safety.
• Children should be supervised to ensure that they do not play with the appliance. - This appliance is for household use only. Do not use that appliance for anything other than its intended use. Do not use in moving vehicles or boats. Do not use outdoors. Misuse may cause injury.
- It is recommended to regularly inspect the appliance. Do not use the appliance if power supply cord, plug or appliance becomes damaged in any way. Immediately cease use and call Breville Consumer Service for examination, repair or adjustment.
- For any maintenance other than cleaning, visit www.Breville.com or call Breville Consumer Service.
-
The installation of a residual current device (safety switch) is recommended to provide additional safety protection when using electrical appliances. It is advisable that a safety switch with a rated residual operating current not exceeding 30mA be installed in the electrical circuit supplying the appliance. See your electrician for professional advice.
-
The Breville One-Year Limited Product Warranty excludes defects to the pizza stone caused by the product not being used in accordance with instructions, misuse, accidental damage or breakage.
- Any maintenance, other than cleaning, should be performed at an authorized Breville Service Center.
- This appliance is equipped with a power cord having a grounding wire with a grounding plug. The appliance must be grounded using a 3-hole properly grounded outlet. In the event of an electrical short circuit, grounding reduces the risk of electrical shock.
- If the power outlet is a standard 2-prong wall outlet, it is your personal responsibility and obligation to have it replaced with a properly grounded 3-prong wall outlet.
- Do not, under any circumstances, cut or remove the third (ground) prong from the power cord or us an adapter.
- Consult a qualified electrician if the grounding instructions are not completely understood, or if doubt exists as to whether the appliance is properly grounded.
BREvILLE ASSIST™ PLUG
Your Breville appliance comes with a unique Assist™ Plug, conveniently designed with a finger hole in the power plug for easy and safe removal from the wall outlet. For safety reasons it is recommended you plug your Breville appliance directly into its own electrical outlet on a dedicated circuit separate from other appliances. If the electric circuit is overloaded with other appliances, your appliance may not function properly. Use in conjunction with a power strip or extension cord is not recommended.
SHORT CORd INSTRUCTIONS
- Your Breville appliance is fitted with a short power supply cord as a safety precaution to prevent personal injury or property damage resulting from pulling, tripping or becoming entangled with a longer cord. Do not allow children to use or be near this appliance without close adult supervision. If an extension cord is used, (1) the marked electrical rating of the cord set or extension cord should be at least as great as the electrical rating of the appliance, (2) the cord should be arranged so that it will not drape over the countertop or tabletop where it can be pulled on by children or tripped over unintentionally and (3) the extension cord must include a 3-prong grounding plug.
- Longer detachable power-supply cords or extension cords are available and may be used if care is exercised in their use.
WARNING
The outer surface of the appliance becomes very hot when operating at high temperatures. Always wear insulated oven gloves when inserting, removing or handling items from the appliance when hot.
CALIFORNIA PROPOSITION 65:
(Applicable to California residents only).
This product contains chemicals known to the State of California to cause cancer, birth defects or other reproductive harm.
KNOW
your Breville product
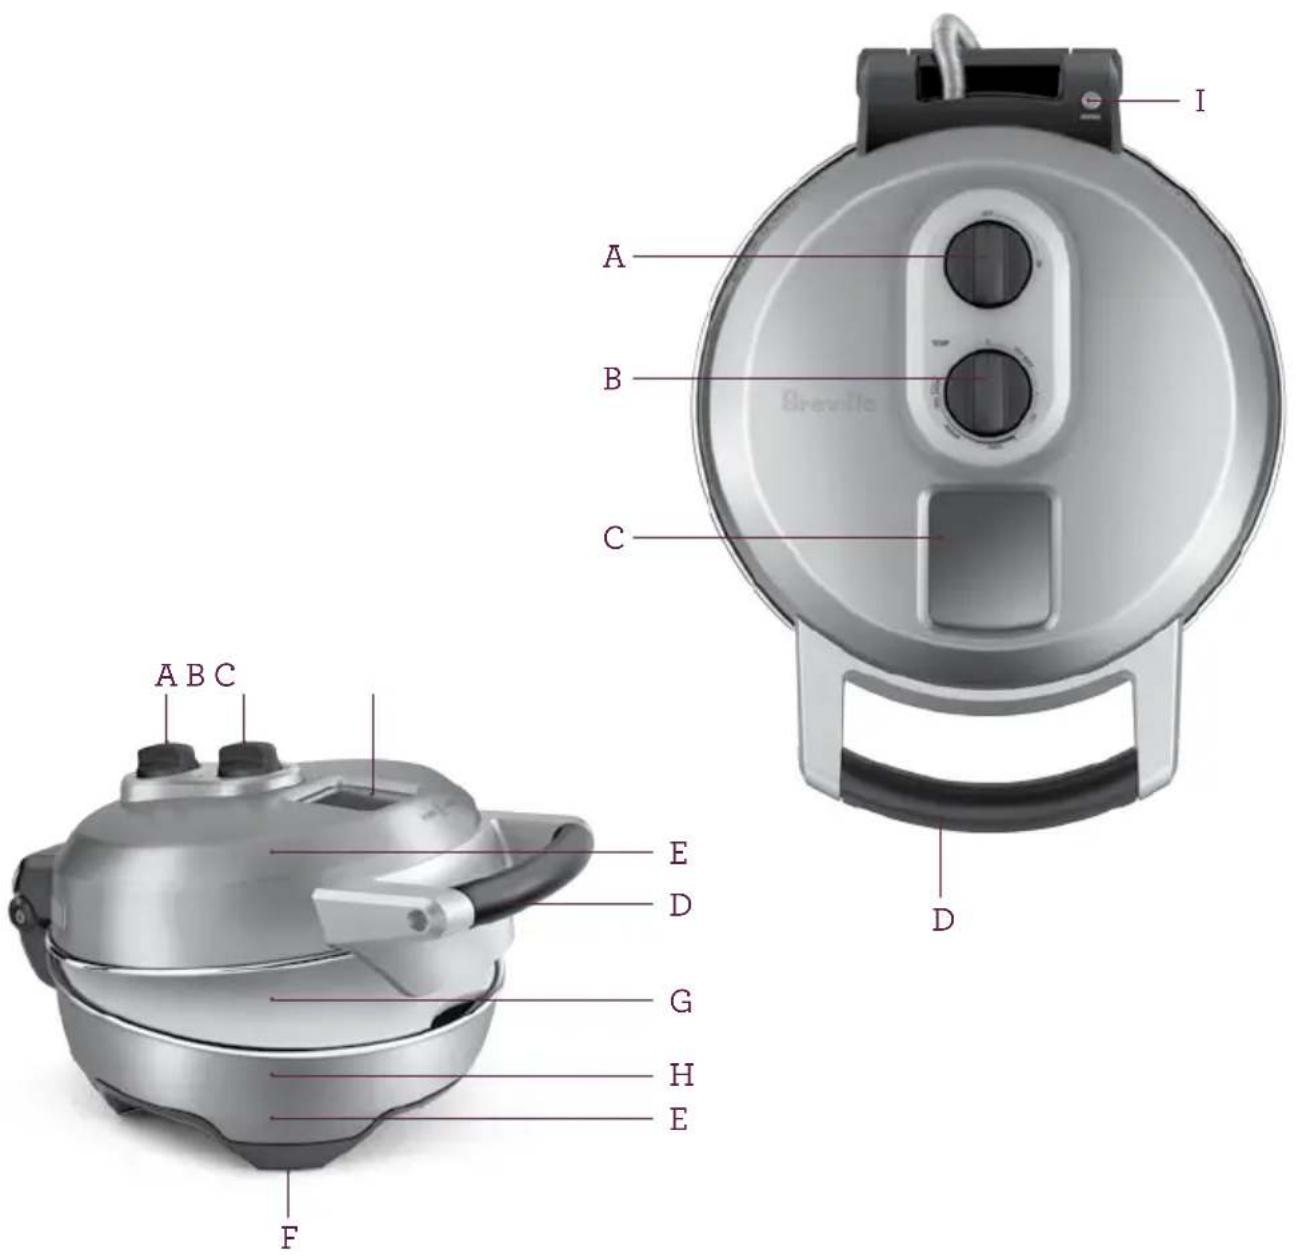
A. ON/OFF switch
Switches pizza oven ON or OFF.
B. Variable temperature control
For thick to thin crust pizzas plus low heat and keep warm.
C. Viewing window
Monitor the cooking progress without having to open up the lid.
D. Cool touch handle
For safe and easy handling.
E. Top and bottom heating elements
Heats the pizza stone to a maximum of 660^ F to recreate the effects of a traditional brick oven.
F. Sturdy non slip feet
G. Removable 12" pizza stone
Absorbs moisture and distributes heat evenly for a crispy crust.
H. 1200 watts of power
Pizza cooks in as little as 10 minutes.
I. Heating indicator light
Tells you when the pizza oven is heating.
OPERATING
your Breville product
BEFORE FIRST USE
Before using the pizza oven for the first time, remove and safely discard any packaging material, promotional labels and ensure the power cord is unplugged.
Remove the pizza stone from the pizza oven and wipe with a soft, damp cloth. Dry thoroughly. Wipe the interior surfaces of the pizza oven with a soft, damp cloth. Dry thoroughly. Re-insert the pizza stone and close the lid.
There is no need to season the pizza stone before using it for the first time.
The stone will season itself over time with repetitive use.
Residue flour or semolina used to roll out the dough will be enough to prevent the pizza dough from sticking.
THE PIZZA OvEN IS NOW REAdy TO USE
- Insert the power plug into the power outlet. Turn the ON | OFF switch to ON position. When first switched on, the heating indicator light will illuminate to indicate that the pizza oven is in heating mode.
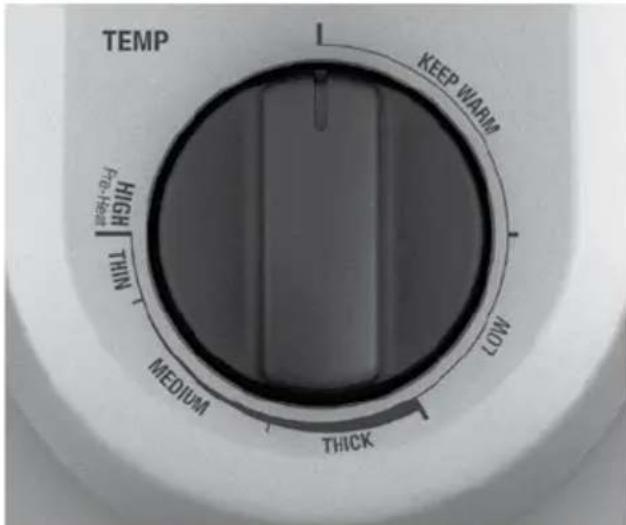
- Preheat the pizza oven before use. To do this, set the variable temperature control to preheat setting.

CAUTION
Do not operate the pizza oven without the pizza stone in place.
NOTE
When switched on for the first time, the pizza oven may give of vapors for a short period of time. This is due to the oil residue that may have been used in the manufacturing process. This is not detrimental to the performance of the pizza oven and will dissipate with use.
- The heating indicator light will illuminate when the pizza oven is preheating. Recommend pre-heating for at least 30 minutes when first switched on.
- Turn the variable temperature control to either THIN, MEDIUM or THICK crust range to suit your pizza preference. Temperature increases as selector dial is turned clockwise. When selecting MEDIUM or THICK crusts, allow pizza oven to stand for 5 minutes to adjust to selected heat setting before starting to cook.
OPERATING yOUR BREvILLE PROdUCT

CAUTION
Carefully open the lid using oven mitts. Do not lean or stand over the pizza oven when opening the lid as steam may be released.
NOTE
The heating indicator light may turn on and off during operation. This is the automatic thermostat light indicating that the correct temperature is being maintained.
- Place fresh pizza dough directly onto a floured pizza peel and roll out to desired thickness. Prick pizza dough evenly with a docker or a fork. Assemble ingredients onto pizza dough and transfer pizza onto pizza stone.
NOTE
If cooking a pre-purchased pizza, ensure that all packaging materials are removed before cooking. Some pre-purchased pizzas are packed on a sheet of paper or polystyrene which may stick to the dough of the pizza or to the pizza stone.
- Carefully close the lid and cook to desired cooking time (see cooking table on page 14 for suggested cooking times). Use the viewing window to check on the cooking progress.
-
When the pizza is cooked to desired doneness, carefully open the lid using oven mitts. Do not lean or stand over the pizza oven when opening the lid as steam may be released.
-
Remove the pizza using a pizza peel or heat proof spatula.
- To prevent smoking and burning, scrape off hot melted cheese and ingredients that may have fallen onto the stone after each pizza has been cooked.
NOTE
Never use a knife or pizza cutter on the stone as this could damage the fine-grain cooking surface. Remove the pizza from the stone prior to cutting.
NOTE
The pizza stone will darken in color with use. This is a normal part of the natural seasoning process. Scrape the pizza stone after each use.
LOW SETTING
Ideal for reheating cold, previously cooked pizza slices and garlic bread. Also suitable to heat up flat breads such as tortillas.
Turn variable temperature control dial within the LOW range to engage this setting.
KEEP WARM
Used to keep cooked pizzas warm when there is a delay in serving.
Turn variable temperature control dial within the KEEP WARM range to engage this setting.
PIZZA PEEL OPTIONAL ALTERNATIvE
We recommend that the best method for transferring your pizza onto the pizza stone is with the use of a pizza peel. If you do not have a pizza peel or find it difficult to use, follow this optional alternative method.
- Follow Operating Instructions 1-4.
- Place fresh pizza dough directly onto a large square of parchment paper the size of the pizza stone and roll out to desired thickness. Prick pizza base evenly with a docker or a fork. Assemble ingredients onto the pizza base and transfer the pizza and parchment paper onto the pizza stone.
NOTE
Wax paper should not be used as a replacement for parchment paper.
- Carefully close the lid and cook for 2 minutes; open lid, using oven mitts and gently slide parchment paper out, leaving the pizza inside the pizza oven. Close the lid again and cook to desired cooking time (see cooking table on page 14 for suggested cooking times).
NOTE
The parchment paper must be removed after 2 minutes of cook time. If the paper is left in, it could char and cause the oven to smoke.
- Follow Operating Instructions 7-9 for the remainder of the cooking process.
COOKING GUIDE
COOKING GUIDE
The following table should be used as a guide only. It does not allow for individual tastes and preferences. The time may vary due to the size, shape and thickness of the pizza. As you become familiar with the pizza oven, adjust the cooking times and temperature on the variable temperature control accordingly.
| TyPE Of PIZZA TyPE Of | dOUGH | TEMPERATURE SETTING | COOK TIME |
| Fresh pizza dough | Thin Crust (approx 6oz) | THIN CRUST SETTING | 4-6 minutes |
| Fresh pizza dough | Medium Crust (approx 8oz) | MEDIUM CRUST SETTING | 7-10 minutes |
| Fresh pizza dough | Thick crust (approx 10oz) | THICK CRUST SETTING | 10-12 minutes |
| Frozen pizza All types | THIN CRUST SETTING | 6-10 minutes | |
| Stored bought pre-made chilled pizza | All types | THIN CRUST SETTING | 5-8 minutes |
| Non-chilled pre-made pizza dough | All types | MEDIUM CRUST SETTING | 8-10 minutes |
| Wraps and flat breads All types | MEDIUM CRUST SETTING | 6-10 minutes | |
NOTE
These times are based on the maximum temperature for each setting.

WARNING
Do not immerse power cord, pizza stone, power plug, or appliance into water or any other liquid. Do not use harsh abrasives, chemicals or oven cleaners to clean the pizza oven as this may scratch or damage the surface of the appliance.

CAUTION
Do not operate the pizza oven without the pizza stone in place.
CARE, CLEANING AND STORAGE
your Breville product
CLEANING AFTER USE
- Always ensure the pizza oven ON|OFF switch is set to the OFF position and the power cord is unplugged prior to moving or cleaning.
- While stone is still warm, scrape off any cheese or pizza ingredients that may have fallen onto the stone.
- Allow the pizza oven to cool completely.
CLEANING THE OUTER BOdy
- After each use, wipe the outer body with a soft, damp cloth and dry thoroughly. A non-abrasive liquid cleanser may be used to avoid build-up of food residue and stains.
- Allow all parts and surfaces to dry thoroughly before plugging the pizza oven in and using.
CLEANING THE INTERIOR
To clean any food splattering, wipe the interior with a soft cloth dampened with warm water. Dry thoroughly.
CLEANING THE VIEWING WINDOW AND REAR vENT AREA
Viewing window and rear vent area will darken from cooking vapors with ongoing use.
To clean, make a paste from 2 teaspoons baking soda, 1 teaspoon white vinegar and 1 teaspoon of water.
Rub paste onto viewing window or rear vent area and wipe clean with a damp cloth.
IMPORTANT
It is important to do this process regularly and always once the pizza oven has completely cooled.
CARE AND CLEANING THE PIZZA STONE
Pizza stones are porous and will absorb fats and oils. It is normal for pizza stones to accumulate stains from dripping cheese and fatty toppings. This will not affect the taste of the pizza or the performance of the stone, however, cooking residue may create excess smoke and odor to form.
To remove stains, cool stone completely and follow instructions below:
- Small stains can be cleaned easily by scrubbing with a toothbrush and a paste made from equal parts of baking soda and water. Work in small circles until stains are removed. Wipe clean with a damp cloth and dry completely before reusing.
- To remove burnt on food, use a scouring pad lightly over stubborn areas.
- If the accumulation is heavy, use a hard abrasive paper like sand paper to clean the surface.
- Make sure to wipe the stone clean with a damp cloth and allow plenty of time for the stone to dry out completely before use.
NOTE
Do not immerse the pizza stone in water or use cleaning liquids or detergents. Immersing the pizza stone in water could cause it to crack. Cleaning liquids or detergents will absorb into the stone and transfer to the pizza during baking.
NOTE
For a deep clean, prepare a paste by mixing 13 cup of baking soda with 3 tablespoons of water. Apply the paste to the desired areas of the pizza stone and leave for 15–20 minutes. Scrape off excess paste and food from the surface of the pizza stone. Using a damp cloth, wipe off excess food, and dry thoroughly. Do not reverse pizza stone to cook on the clean side if it becomes stained or discolored.
STORAGE
When storing the pizza oven, remove the power plug from the power outlet. Ensure the appliance is completely cool, clean and dry. Ensure the lid is closed and do not place any objects on top. Store the appliance standing on its support legs.
TROUBLESHOOTING
TROUBLESHOOTING
| POSSIBLE PROBLEM SOLUTION / CHECK | |
| Unit does not switch on Make sure the power plug is plugged into the outlet. Rotate the on and off dial to “ON” position. | |
| Unit does not heat up to desired temperature level | Check to make sure the temperature set dial is correctly positioned. If not hot enough, adjust the temperature dial to hotter setting. |
| Heating light does not stay on | Heating light will turn on and off during normal usage. Heating light will only turn on when the unit is in heating cycle. |
| Pizza sticks to pizza peel Ensure that enough flour has been added to the pizza peel to allow the pizza to slide off.Do not add too much sauce or ingredients. Heavy pizza's will be difficult to slide off of the peel. | |
RECIPES
PIZZA dOUGH
Makes 4 twelve inches pizzas
INGREDIENTS
15 oz 00 (strong bakers) flour or plain flour
1 tablespoon dry yeast
1 tablespoon sugar
2 teaspoons salt
1 tablespoon olive oil
9 fl oz lukewarm water
METHOD
-
Place flour into a large mixing bowl and make a well in the center.
-
Add yeast, sugar, salt, olive oil and water and stir until combined.
-
Turn out onto a lightly floured surface and knead for 5-10 minutes or until a smooth ball forms.
-
Place dough ball into a lightly oiled bowl, cover with plastic wrap or clean cloth. Set aside in a warm drought free place for 30 minutes or until dough has doubled in size.
-
Turn dough out on a floured surface and knock back (punch) the dough to remove excess air, lightly knead.
-
Divide dough as required.
PIZZA BIANCO
Makes 4 serves
INGREDIENTS
6 oz fresh pizza dough
^1/_3 cup fresh ricotta, crumbled
^1/_4 cup grated mozzarella cheese
^1/_4 cup grated provolone cheese
2 tablespoons grated Parmigian
1 garlic clove, finely sliced
1 teaspoon finely chopped fresh rosemary
Sea salt to taste
METHOD
-
Turn the ON/OFF switch to the ON position.
-
Preheat pizza oven on PRE-HEAT setting for 20-30 minutes.
-
Roll out pizza dough to form a 9½ inch disc and place onto a floured pizza peel.
-
Prick dough with a fork or pizza docker
-
Spread dough with ricotta, mozzarella, provolone and parmesan. Sprinkle over garlic and rosemary.
-
Select THIN crust setting.
-
Transfer pizza onto pizza stone and close lid.
-
Cook pizza for 6-8 minutes or until cooked to your liking.
-
Monitor cooking progress through viewing window. Topping should be melted and golden and dough crisp and brown.
-
Open lid carefully with oven mitt and remove pizza onto a cutting board.
Season with sea salt and cut into 8 wedges.
Serve immediately.
RECIPES
MEXICAN PIZZA
Makes 4 serves
INGREdIENTS
10 oz fresh pizza dough
2 tablespoons medium tomato salsa
14 cup grated mozzarella
13 cup grated cheddar cheese
1 chorizo (2 oz), thinly sliced
2 tablespoons canned black beans, rinsed and drained
2 tablespoons chopped cilantro sprigs
^1/_2 avocado, sliced
2 tablespoons crème fraiche
Jalapenos and lime wedges to serve
METHOD
-
Turn the ON/OFF switch to the ON position.
-
Preheat pizza oven on PRE-HEAT setting for 20-30 minutes.
-
Roll out pizza dough to form a 9½ inch disc and place onto a floured pizza peel.
-
Prick dough with a fork or pizza docker
-
Spread dough with salsa and top with mozzarella, cheddar cheese, chorizo and beans.
-
Select THICK crust setting.
-
Transfer pizza onto pizza stone and close lid.
-
Cook pizza for 12-14 minutes or until cooked to your liking.
-
Monitor cooking progress through viewing window. Topping should be melted and golden and dough crisp and brown.
-
Open lid carefully with oven mitt and remove pizza onto a cutting board.
-
Sprinkle over cilantro and avocado. Spoon a large dollop of crème fraiche into the center of the pizza.
Cut into 8 wedges and serve immediately with jalapenos and lime wedges.
NOTE
Cooking times are based on the maximum for each crust setting.
RECIPES
SPICy LAMB PIZZA
Makes 4 serves
INGREdIENTS
Pizza paste
3 oz roasted red peppers, chopped
1 large red chili, chopped
1 tablespoon olive oil
Sea salt, to season
Spice rub
1 clove garlic, crushed
1 teaspoon ground cumin
1 teaspoon ground coriander
12 teaspoon smoked paprika
12 teaspoon sea salt
1 tablespoon oil
5 oz lamb fillet, trimmed
6 oz fresh pizza dough
3 cherry tomatoes, halved
1 tablespoon pine nuts
3½ oz haloumi cheese, shredded
3 tablespoons Greek-style yogurt
1 garlic clove, crushed
Lemon juice, to taste
Sea salt, to season
Fresh mint leaves
METHOD
- Turn the ON/OFF switch to the ON position.
- Preheat pizza oven on PRE-HEAT setting for 20-30 minutes.
- In the meantime combine peppers, chili and the oil in a food processor or blender and process until smooth; season and set aside.
- Combine garlic and spices. Coat lamb in spice rub.
-
In a pan, heat oil and cook lamb on each side for 1 minute. Remove from heat but keep in the pan and cover with foil to rest.
-
Roll out pizza dough to form a 9½ inch disc and place onto a floured pizza peel.
- Prick dough with a fork or pizza docker.
- Spread dough with 2 12 tablespoons pureed peppers and top with tomatoes, pine nuts and haloumi.
- Select THIN crust setting.
- Transfer pizza onto pizza stone and close lid.
- Cook pizza for 6-8 minutes or until cooked to your liking.
- Monitor cooking progress through viewing window. Topping should be melted and golden and dough crisp and brown.
- Open lid carefully with oven mitt and remove pizza onto a cutting board. Combine yoghurt, garlic and season with lemon juice and salt.
- Slice lamb thinly and put onto pizza. Add dollops of yoghurt and sprinkle with mint.
Cut into 8 wedges and serve immediately.
NOTE
Use leftover pepper puree for another pizza or add to Bolognese sauce.
NOTE
Adjust dial selector within each crust setting range to suit your cooked pizza preference.
RECIPES
ITALIAN MEATBALL PIZZA
Makes 4 serves
INGREdIENTS
Meatballs (makes 24)
7 oz pork and veal mince
14 cup dry breadcrumbs
1 teaspoon fennel seeds
2 tablespoons grated Parmigian
1 clove garlic, crushed
1 small egg
Freshly ground black pepper
Pizza
10 oz fresh pizza dough
^1/4 cup pizza sauce
^1/3 cup cheddar cheese
1 tablespoon chopped parsley
4 cherry tomatoes, halved
10 pitted black olives
1 teaspoon baby capers, drained
- Arrange meatballs over the top of the pizza and press down a little.
- Select THICK crust setting.
- Transfer pizza onto pizza stone and close lid.
- Cook pizza for 12-15 minutes or until cooked to your liking.
- Monitor cooking progress through viewing window. Topping should be melted and golden and dough crisp and brown.
- Open lid carefully with oven mitt and remove pizza onto a cutting board.
Cut into 8 wedges and serve immediately.
NOTE
You'll only need 12 meatballs for one pizza. The other half can be used for a second pizza, or frozen until needed.
METHOD
- Combine meatball ingredients and mix well. Roll heaped teaspoons of mixture into balls and cook in a hot pan for 2-3 minutes or until browned but not cooked through; set aside.
- Turn the ON/OFF switch to the ON position.
- Preheat pizza oven on PRE-HEAT setting for 20-30 minutes.
- Roll out pizza dough to form 9 inch disc and place onto a floured pizza peel.
- Prick dough with a fork or pizza docker.
- Spread dough with pizza sauce and top with cheese, parsley, tomatoes, olives and capers.
RECIPES
BREAKFAST PIZZA
Makes 4 serves
INGREDIENTS
8 oz fresh pizza dough
2 tablespoons tomato puree
12 cup pizza cheese
4 bacon strips, trimmed and chopped
3 oz roasted peppers, drained, cut into strips
1 egg
Sea salt
Fresh oregano leaves to garnish
METHOD
-
Turn the ON/OFF switch to the ON position.
-
Preheat pizza oven on PRE-HEAT setting for 20-30 minutes.
-
Roll out pizza dough to form a 9 inch disc and place onto a floured pizza peel.
-
Prick dough with a fork or pizza docker.
-
Spread dough with puree and top with cheese, bacon.
-
Make an indentation in the center of the pizza for the egg to fit in. Lay half of the pepper strips around the indentation to keep the egg white in place.
-
Select MEDIUM crust setting.
-
Transfer pizza onto pizza stone and close lid. Cook for 4 minutes.
-
Open lid and carefully crack egg into the center indentation. Close lid and cook for 7-10 minutes or until cooked to your preference.
-
Monitor cooking progress through viewing window. Topping should be melted and golden and dough crisp and brown.
-
Open lid carefully with oven mitt and remove pizza onto a cutting board. Season with sea salt and sprinkle with oregano.
Cut into 8 wedges and serve immediately.
fÉLICITATIONS
fONCTIONNEMENT dE vOTRE PROdUIT BREvILLE

ATTENTION
- Breville Consumer Service Center
- USA
- Canada
- Breville®
- CONGRATULATIONS
- Register online for product support and exclusive offers.\*
- CONTENTS
- IMPORTANT SAFEGUARDS
- READ ALL INSTRUCTIONS BEFORE USE AND SAvE fOR fUTURE REFERENCE
- CAUTION
- fOR HOUSEHOLD USE ONLY SAvE THESE INSTRUCTIONS
- IMPORTANT SAFEGUARDS FOR ALL ELECTRICAL APPLIANCES
- BREvILLE ASSIST™ PLUG
- SHORT CORd INSTRUCTIONS
- WARNING
- CALIFORNIA PROPOSITION 65:
- KNOW
- OPERATING
- BEFORE FIRST USE
- THE PIZZA OvEN IS NOW REAdy TO USE
- NOTE
- OPERATING yOUR BREvILLE PROdUCT
- LOW SETTING
- KEEP WARM
- PIZZA PEEL OPTIONAL ALTERNATIvE
- COOKING GUIDE
- CARE, CLEANING AND STORAGE
- CLEANING AFTER USE
- CLEANING THE OUTER BOdy
- CLEANING THE INTERIOR
- CLEANING THE VIEWING WINDOW AND REAR vENT AREA
- IMPORTANT
- CARE AND CLEANING THE PIZZA STONE
- STORAGE
- TROUBLESHOOTING
- RECIPES
- PIZZA dOUGH
- INGREDIENTS
- METHOD
- PIZZA BIANCO
- MEXICAN PIZZA
- SPICy LAMB PIZZA
- Pizza paste
- Spice rub
- ITALIAN MEATBALL PIZZA
- Meatballs (makes 24)
- Pizza
- BREAKFAST PIZZA
- fÉLICITATIONS
- fONCTIONNEMENT dE vOTRE PROdUIT BREvILLE
- ATTENTION
Brand : BREVILLE
Model : The Crispy Crust BPZ600XL
Category : Pizza oven