
Advocate CS - Car seat BRITAX - Free user manual and instructions
Find the device manual for free Advocate CS BRITAX in PDF.


| Product Type | Convertible Car Seat |
| Brand | Britax |
| Model | Advocate CS |
| Rear-Facing Use (Weight) | 2.3 to 15.9 kg (5 to 35 lb) |
| Rear-Facing Use (Height) | 45.7 to 81.3 cm (18 to 32 in) |
| Forward-Facing Use (Weight) | 9.1 to 29.5 kg (20 to 65 lb) and age ≥ 1 year |
| Forward-Facing Use (Height) | 73.7 to 124.5 cm (29 to 49 in) |
| Attachment Systems | LUAS, vehicle seat belt (3-point or lap-only), Versa-Tether strap |
| Orientation | Rear-facing and forward-facing |
| Recline | Adjustable: recline (30-45°) in rear-facing; upright in forward-facing for children > 15.1 kg |
| Harness | 5-point with Click & Safe™ indicator |
| Side Protection | Side cushions (Side Impact Cushion technology) |
| HUGS™ Chest Pads | Required in forward-facing, removable in rear-facing |
| Versa-Tether® Strap | Integrated, energy-absorbing; required in forward-facing |
| Safety Standards | Compliant with Canada Motor Vehicle Safety Standards (Regulations 213 and 213.1) |
| Airline Use | Yes, certified |
| Cover Care | Hand wash in cold water, mild soap; air dry |
| Harness and Buckle Care | Sponge clean with warm water and mild soap |
| Warranty | 1 year on defects in materials and workmanship |
| Manufacturer | Britax Child Safety, Inc. |
Frequently Asked Questions - Advocate CS BRITAX
User questions about Advocate CS BRITAX
0 question about this device. Answer the ones you know or ask your own.
Ask a new question about this device
Download the instructions for your Car seat in PDF format for free! Find your manual Advocate CS - BRITAX and take your electronic device back in hand. On this page are published all the documents necessary for the use of your device. Advocate CS by BRITAX.
USER MANUAL Advocate CS BRITAX
Safety Information ....2
Warnings 2
Certification....5
Registration....5
Important Harness Adjustments 6
Child Seat Features 8
Vehicle Seat Belt Information ....10
Compatible Vehicle Seat Belts 10
Lap-Shoulder (3-Point) Belt 10
Lap Belt....12
Incompatible Vehicle Belts 14
Vehicle Compatibility ....15
Vehicle Buckle Positions....15
Vehicle Seating Positions 15
Installation: Rear-Facing 16
Lower Universal Anchorage System Installation (LUAS) 16
Lap-Shoulder Belt Installation 18
Lap-Belt Installation....20
Installation: Forward-Facing 22
Lower Universal Anchorage System Installation (LUAS) 22
Lap-Shoulder Belt Installation 24
Lap-Belt Installation....26
Aircraft Installation 28
Installation: Versa-Tether 29
Safety Information....29
Using the Versa-Tether....30
Tether Connector Strap....31
Energy-Absorbing Tether....32
Child Seat Functions ....33
Securing Your Child ....36
Adjusting the Harness Height 36
Buckling and Tightening the Harness 36
Care and Maintenance ....39
Warranty 43
©2009 Britax Child Safety, Inc. All rights reserved. Printed in USA P363800_R1:04.09
This product and its components are subject to change without notice.
! WARNING!
DEATH or SERIOUS INJURY can occur:
Use only with children who weigh between 2.3 – 29.5 kg (5 – 65 lbs) • and whose height is between 45.7 and 124.5 cm (18 – 49 in.).
Use rear-facing for children who weigh between 2.3–15.9 kg (5–35 lbs) and whose height is between 45.7 and 81.3 cm (18–32 in.)
Use forward-facing for children who weigh between 9.1 – 29.5 kg (20 – • 65 lbs) and whose height is between 73.7 – 124.5 cm (29 – 49 in.).
This child seat must be in the recline position when installed rear-facing. • Child seat must be in the upright position when installed in forward-• facing mode with children who weigh more than 15.1 kg (33 lbs).
Adjust the belts provided with this child seat so they fit snugly around your child. A snug strap should not allow any slack. It lies in a relatively straight line without sagging. It does not press on the child's flesh or push the child's body into an unnatural position.
Secure the top anchorage strap provided with this child seat.
The child seat must be secured to the vehicle by means of a • lower connector system if it is installed in a seating position that is equipped with a lower universal anchorage system or by means of a vehicle seat belt if it is installed in a seating position that is not equipped with a lower universal anchorage system, and by means of a tether strap, as shown in the installation instructions. Use of the tether strap is required forward-facing and is optional rear-facing.
Follow all instructions on the child seat labels and in this user guide.
Register your child seat with the manufacturer, Britax Child Safety, Inc. by visiting www.BritaxUSA.com/registration, OR complete and return the registration card that was shipped with this child seat.
HUGS ^™ chest pads must be used in forward-facing mode. Removal of HUGS is optional only for rear-facing mode.
To prevent injury due to deterioration or hidden damage, discontinue use of a child seat that is older than six years or has been in a moderate or severe crash. See Serial Number and Manufactured Date Label located on child seat (page 9).
This child seat must not be used in the home, in boats, or other non-certified applications.
Based on crash statistics, Britax recommends that parents select the • back seat as the safest location for a properly installed child seat. Please study Vehicle Compatibility on page 15 to ensure your child's safety and consult your vehicle owner's manual.
Secure this child seat even when it is not occupied. In a crash, an unsecured child seat may injure vehicle occupants.
- When using in a vehicle with air bags, refer to your vehicle owner's manual for child seat installation instructions and precautions. Never use the harness adjuster strap to lift or carry this child seat. • Doing so could cause damage to harness adjuster and webbing. Always carry this child seat by its shell or top anchorage straps.
- The primary protection for occupants of a vehicle in a collision is the body of the vehicle itself; a child seat will not protect a child when a vehicle is seriously impacted. However, correctly installed, a child seat will substantially improve chances for survival in most crashes. Make sure all users fully understand the correct ways to use this child seat in a vehicle.
- Refer to your vehicle owner's manual or contact the vehicle manufacturer for the maximum weight rating for their LUAS anchors. Use vehicle belt (not LCS connectors) for installations with children who weigh more than the vehicle LUAS anchor limit. Unless specified otherwise by the vehicle manufacturer, assume a 18.1 kg (40 lb) child is the vehicle LUAS anchor limit.
- Prevent the Side Impact Cushions from being punctured. Puncture damage will cause the cushions not to perform as intended in a crash.
- The use of non-Britax Child Safety, Inc., covers, inserts, toys, accessories, or tightening devices is not approved by Britax. Their use could cause this child seat not perform as intended in a crash.
Safety Information
Safety Information
Important Notes
Verify that the child seat is securely installed and the harness is • properly adjusted around the child each time the child seat is used.
Adjust the harness to fit the clothes the child is wearing. Remove • bulky coats and/or jackets before putting the child in child seat.
Cover the child seat when the vehicle is parked in direct sunlight. • Parts of child seat could become hot enough to burn a child.
Store the child seat in a safe place when it is not being used. Avoid • placing heavy objects on top of it.
Do not leave children alone in a vehicle, even for a short time.
Do not, except as described in this booklet, attempt to disassemble any part of the child seat or change the way the harness or vehicle's seat belts are used.
Do not leave loose objects, e.g. books, bags, etc., in the back of a vehicle. In the event of a sudden stop, loose objects will keep moving, potentially causing serious injuries.
Do not leave folding vehicle seats unlatched or unsecured. In the event of a sudden stop, a loose seat back could cause the child seat not to perform as intended.
Do not allow children to play with this child seat.
Do not use anything to raise the child seat off the vehicle seat except as described in these instructions. In a crash, this could cause the child seat not to perform as intended.
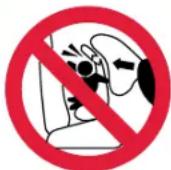
WARNING! DO NOT place child seat rear-facing in the front seat of a vehicle with a passenger air bag unless deactivated. DEATH or SERIOUS INJURY can occur. See your vehicle owner's manual for child seat installation instructions. The back seat is the safest place for children 12 and under.
Certification
This child seat system conforms to all applicable Federal Motor Vehicle Safety Standards (CMVSS 213 and 213.1). This child seat is certified for use in motor vehicles and aircraft.
Registration
Child seats can be recalled for safety reasons. You must register this child seat to be reached in a recall. Send your name, address, and the child's model number and manufacturing date to Britax Child Safety, Ltd., P.O Box 7289, RPO Brunswick Square, Saint John NB E2L 9Z9, or call 1-888-427-4829, or register online at www.BritaxUSA.com/registration.
Serial Number: ____
Batch Number: ____
Date of Manufacture: ____
Safety Information
Safety Information
Important Harness Adjustments
According to the American Academy of Pediatrics:
All infants should ride rear-facing until they have reached at least 1 year of age and weigh at least 9.1 kg (20 pounds). That means that if your infant reaches 9.1 kg (20 pounds) before her first birthday, she should remain rear-facing at least until she turns 1 year old. It is best for children to ride rear-facing to the highest weight or height allowed by the manufacturer.
Rear-Facing
Weight 2.3 - 15.9 kg (5 - 35 pounds).
Use rear-facing only with children:
• who weigh between 2.3 – 15.9 kg (5 – 35 lbs) and
the top of the child's head is at least 2.5 cm • (1 in.) below the top of the child seat shell (Fig. A) and
the harness straps are at or slightly below the child's shoulders.
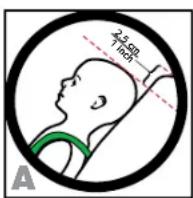
If the child cannot be secured within these requirements because the child exceeds height or weight requirements, review the forward-facing guidelines on page 7.
If the child cannot be secured within these requirements because the child is too small, selection of a different child seat (such as an infant carrier) may be required.
IMPORTANT: See Adjusting the Harness Height on page 36.

WARNING! DO NOT use the child seat rear-facing if any of
the following apply:
• the child is less than 2.3 kg (5 lbs) in weight or
• the child exceeds 15.9 kg (35 lbs) in weight or
- the top of the head is less than 2.5 cm (1in.) from the top of the child seat shell (Fig. A) or
- the harness straps are above the child's shoulders.
Forward-Facing
Weight 9.1 - 29.5 kg (AND 1 year) (20 pounds - 65 pounds).
Use forward-facing only with children:
who are at least one year of age • and
• who weigh between 9.1 – 29.5 kg (20 – 65 lbs) and
who are 124.5 cm (49 in.) or less in height • and
the top of the child's ears are below the top of the child seat shell • and
the harness straps are at or above the child's shoulders, parallel to level ground (Fig. B).
IMPORTANT: When using forward-facing recline mode, it may become necessary to adjust the harness to a higher height than would be used when the seat is upright. See Adjusting the Harness Height on page 36.
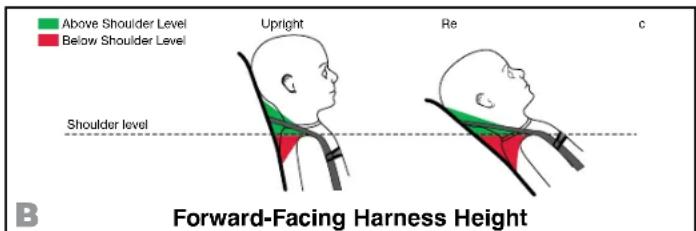

WARNING! DO NOT use the child seat forward-facing if any
of the following apply:
• the child is less than one year of age or
• the child is less than 9.1 kg (20 lbs) in weight or
• the child exceeds 29.5 kg (65 lbs) in weight or
• the child exceeds 124.5 cm (49 in.) in height or
- the top of the ears are above the top of the child seat shell or
- the harness straps are below the child's shoulders, parallel to level ground (Fig. B)
Child Seat Features
Child Seat Features
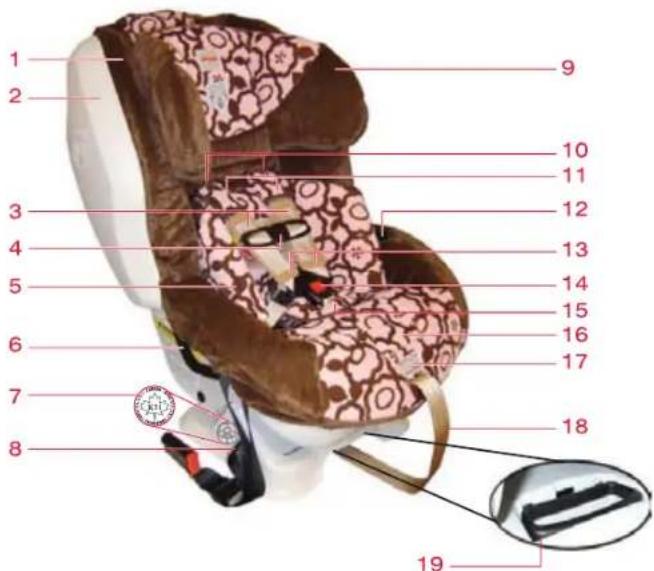
Cover1
Side Impact Cushion 2
Harness Straps3
Chest Clip4
Infant Body Pillow5
LCS Bar6
NSM (National Safety Mark) Label7
LCS Adjuster Strap8
Head Restraint9
Harness Slots10
Comfort Pads11
Harness Holder12
13 HUGS™ (Harness Ultra Guard System) Chest Pads
14 Harness Buckle
15 Belly Pad
16 Harness Adjuster Release Lever (under cover)
17 Click & Safe™ Snug Harness Indicator (under cover)
18 Harness Adjuster Strap
19 Recline Handle
20 Forward-Facing Lock-Off
21 Rear-Facing Lock-Off
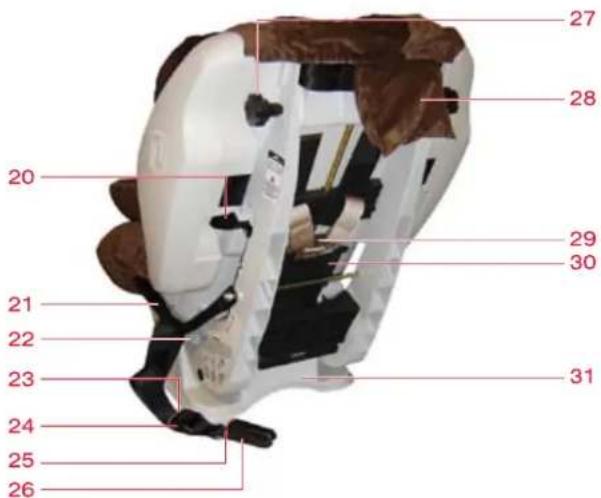
Serial Number and Manufactured 2228 Date Label
LCS Adjuster Release Button23
LCS Adjuster24
LCS Connector Release Button25
LCS Connector (stored under 26 cover)
27 Head Restraint Adjustment Knob
Versa-Tether (Top Anchorage Strap) -in pouch
29 Harness Yoke
30 Belt Guard
31 Base
IMPORTANT: When not in use, this user guide should be stored under the cover.
DO NOT discard the foam inserts found under the cover.
natural_image
Close-up of a car interior showing a hand holding a small object with red arrows and a white container, no visible text or symbols.Vehicle Seat Belt Information Vehicle Seat Belt
Compatible Vehicle Seat Belts
NOTE: The information in this section only applies to installation with vehicle safety belts.
Vehicle seats and safety belts differ from vehicle to vehicle. Refer to your vehicle owner's manual for specific information about your vehicle safety belts and their use with child seats.
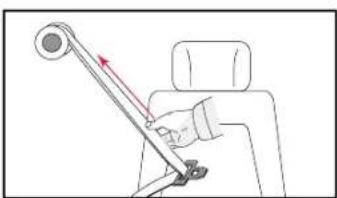
Lap-Shoulder (3-Point) Belt
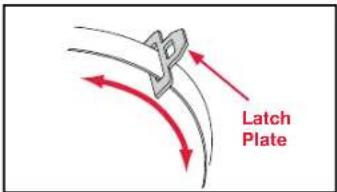
1. ALR (Automatic Locking Retractor) with Sliding Latch Plate
Has a latch plate that freely slides along the vehicle belt webbing.
Has a retractor that stops the belt from being pulled out again once the belt webbing has been pulled out at least 61 cm (24 inches).
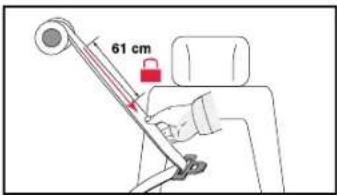
Tightens by feeding the belt c webbing back into the retractor.
natural_image
Line drawing of a car seatbelt with a red arrow indicating force direction (no text or symbols)2. ELR (Emergency Locking Retractor) with Locking Latch Plate
Has a latch plate that does a not allow the lap part of the belt to become loose after it is buckled.
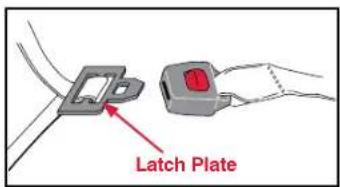
Has a retractor that locks only in an emergency situation such as sudden stop or crash.
natural_image
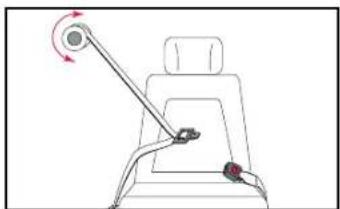
Diagram of a car seatbelt with a belt and wheel, showing motion direction (no text or symbols)Switchable Retractor in ALR with Sliding Latch Plate3.
Has a latch plate that freely slides along the vehicle belt webbing.
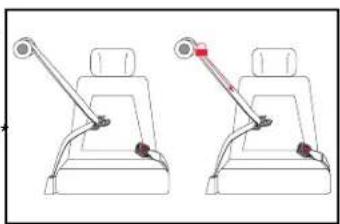
Has a retractor that can be b switched to function as an ELR or an ALR by pulling the vehicle belt fully out until a clicking sound can be heard when retracting.
natural_image
Diagram of two car seatbelt systems with adjustable arm joints (no text or labels)To use a child seat with this type of vehicle belt, you will need to switch to the ALR mode or use child seat lock-offs.
Vehicle Seat Belt Information Vehicle Seat Belt
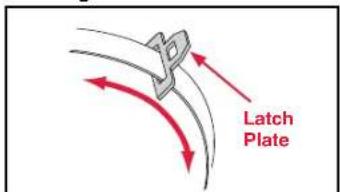
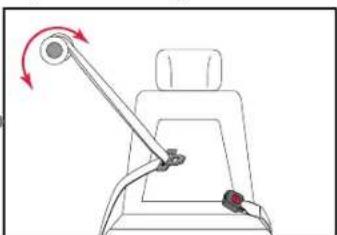
4. ELR (Emergency Locking Retractor) with a Sliding Latch Plate
Has a latch plate that freely slides along the vehicle belt webbing.
Has a retractor that locks only in an emergency situation such as sudden stop or crash.
IMPORTANT: This belt type requires the use of the lock-offs built into the seat.
natural_image
Diagram of a car seatbelt with a lever and belt, showing motion direction (no text or symbols)Lap Belt
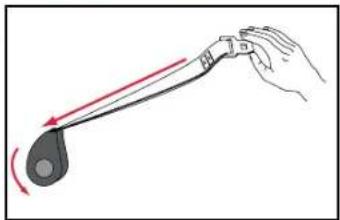
3. ALR (Automatic Locking Retractor)
Has a latch plate that is sewn a into the webbing.
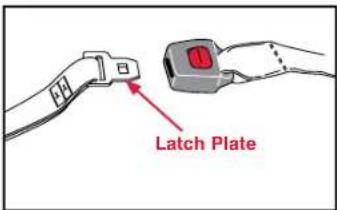
Has a retractor that stops the b belt from being pulled out again once the belt webbing has been pulled out at least 61 cm (24 inches).
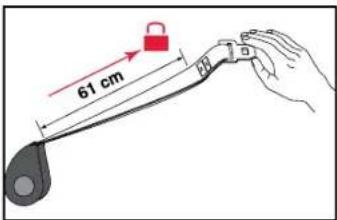
Tightens by feeding the belt c webbing back into the retractor.
natural_image
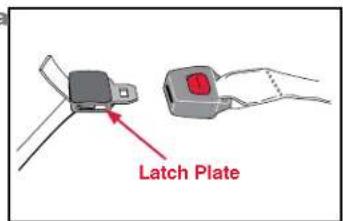
Illustration of a hand holding a tool with a red arrow indicating motion (no text or symbols)Locking Latch Plate6.
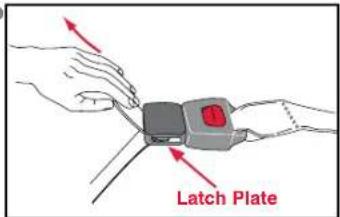
Has a latch plate that does not allow the belt to become loose after it is buckled.
Tightens by pulling on the belt webbing.
Vehicle Seat Belt Information Vehicle Compatibility
Incompatible Vehicle Belts

WARNING! The following types of vehicle belts are NOT patible with this child seat:
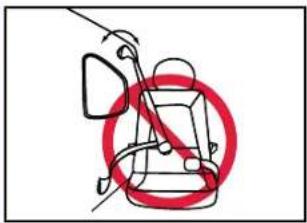
Vehicle belts with top or 1 bottom anchor points on the vehicle door.
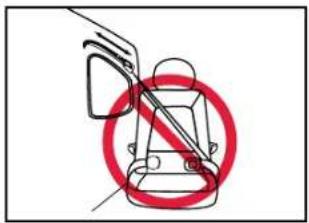
Motorized, automatic 2 vehicle belts
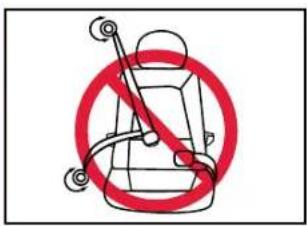
Lap-shoulder belts that 3 have a separate retractor each for the lap section and shoulder section
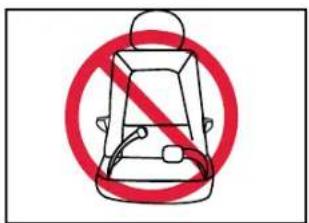
Lap belts forward of the 4 vehicle seat bight.
Lap belts that have a retractor that locks only 5 in case of a sudden stop (emergency locking retractor- or ELR).
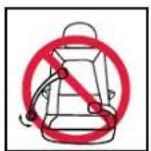
Vehicle Buckle Positions

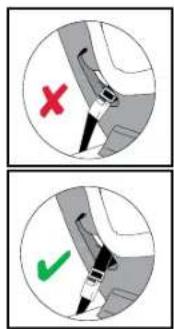
WARNING! The position of the vehicle buckle can adversely affect the stability of child seat.
If the buckle lies near the incorrect position (✗ when the vehicle belt is tightened, try fitting the child seat in another seating position in the vehicle OR consult your vehicle owner's manual to see if you can lower the vehicle buckle position by twisting the vehicle buckle stalk. If it is not possible to achieve the correct position (√) for the buckle, then another seating position MUST be used.
Vehicle Seating Positions

WARNING! Some vehicles have no seating positions which compatible with this child seat or any other child seat. If in doubt, act the vehicle manufacturer for assistance.
Forward-facing vehicle seats MUST be used with this child seat. Side-facing or rear-facing seats CANNOT be used. See diagram below.
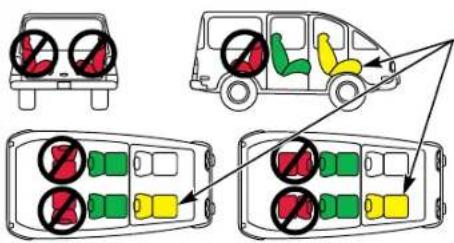
WARNING! -DO NOT place a child seat rear-facing in the front seat of a vehicle with a passenger air bag unless deactivated. DEATH or SERIOUS INJURY can occur. See your vehicle owner's manual for child seat installation instructions. The back seat is the safest place for children 12 and under.
Installation: Rear-Facing
Installation: Rear-Facing
Lower Universal Anchorage System (LUAS) Installation
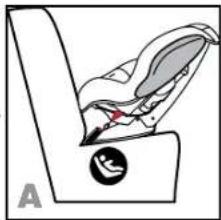
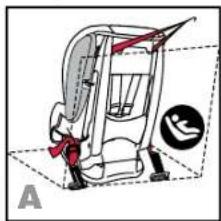
Figure A illustrates a rear-facing LUAS • installation.
Verify that your vehicle is equipped with LUAS anchors. If LUAS anchors are not available, you must use the vehicle belt installation methods.
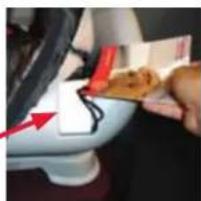
If stored, remove the LCS connectors from 1 the storage slots under the cover (see page 33), open the rear-facing lock-offs, and route through their adjacent rear-facing belt slots.
NOTE: Close lock-offs before continuing with installation.
Press and hold the first LCS adjuster release 2 button, then pull the LCS strap to full length.
Repeat for the remaining LCS connector. Recline the child seat and place rear-facing on 3 the vehicle seat. This child seat must be in the recline position when installed rear-facing. See Recline Adjustment on page 33.
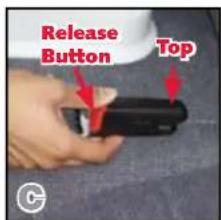
Attach one LCS connector to its adjacent 4 vehicle LUAS anchor (Fig. B) in the upright position (Fig. C).
- An audible click confirms attachment. - Ensure that the LCS strap is not twice
TIP: You may need to turn the front of the child seat toward you for easier access to the vehicle LCS anchor.
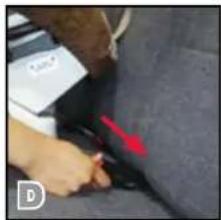
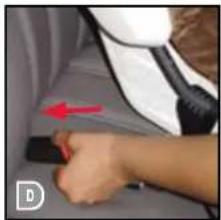
5 Attach the remaining LCS connector to its adjacent vehicle LUAS anchor (Fig. D) in the upright position (Fig. B).
• An audible click confirms attachment.
- Ensure that the LCS strap is not twisted.
NOTE: If an audible click is not heard when connecting either LCS connector, the LCS strap
natural_image
Line drawing of a car seatbelt with a red bookmark and circular button (no text or symbols)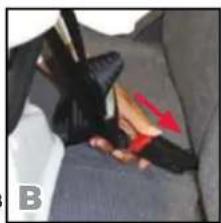
natural_image
Close-up of a black object resting on a gray surface with a red arrow pointing to a small object (no visible text or symbols)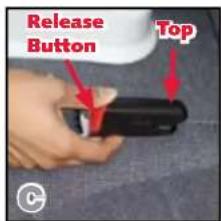
natural_image
Close-up of a person's hand holding a black cable with a red arrow pointing to a dark cable (no visible text or symbols)may be twisted, or there may be debris in the LCS connector. Correct either situation before continuing with the installation process.
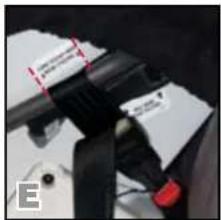
Align each LCS strap on the LCS bar with the 6 "LUAS Strap Here Rear-Facing" label on each side of the child seat. (Figs. E and F).
Push the child seat firmly into the vehicle seat 7 while pulling each LCS strap tight (Fig. G).
IMPORTANT: Ensure the LCS strap does not fold into the LCS adjuster while tightening.
Verify that all connections are secure, the LCS 8 strap is aligned to the "LUAS Strap Here Rear-Facing" label on each side of the child seat, and that the child seat is stable.
The child seat is secure when it cannot be moved more than 2.5 cm (1 in.) front-to-back or side-to-side at the belt path. If the child seat is not secure, repeat the installation process or use an alternate seating location.
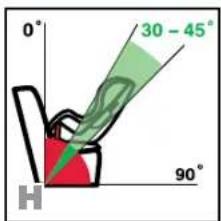
When properly installed in the rear-facing position, the back angle of the child seat should be 30^-45^ from vertical (not to exceed 45^ ) when the car is parked on a level surface (Fig. H).
If necessary, the proper recline angle can be achieved by placing a rolled towel or pool noodle in the vehicle seat bight to level the child seat's base.
natural_image
Close-up of a black mechanical component with red fasteners and a red label, no visible text or symbols.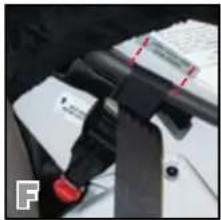
natural_image
Close-up of a mechanical device with a red-handled lever and black handle (no visible text or symbols)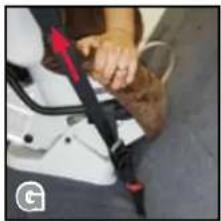
natural_image
Close-up of a person's seatbelt being adjusted for a dog, with a red arrow indicating the adjustment (no text or symbols visible)WARNING! Do not raise the child seat off the front edge of the vehicle seat. This could cause your child seat not to perform as intended.
- Rear-facing installation can be improved by the use of the Versa-Tether. See pages 29 – 32.
Installation: Rear-Facing
Installation: Rear-Facing
Lap-Shoulder Belt Installation
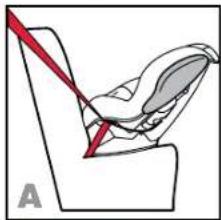
Figure A illustrates a rear-facing, lap-shoulder belt installation.
When not in use, always store the LCS • connectors in the storage slots. See page 33.
Recline the child seat then place it rear-facing 1 on the vehicle seat. This child seat must be in the recline position when installed rear-facing. See Recline Adjustment on page 33.
Lift the cover to open the rear-facing lock-off 2 farthest from where the vehicle belt will be buckled (Fig. B).
Pull the vehicle belt out, then pass it 3 under the LCS bar and through the rear-facing belt slot and (Fig. C).
The vehicle belt can be routed over or under the cover.
Route the vehicle belt across seat then through 4 the opposite rear-facing belt slot and under the LCS bar.
IMPORTANT: The vehicle belt must rest behind the child seat buckle strap.
Verify that the vehicle belt is not twisted, 5 position the lap belt portion through the open lock-off, then buckle (Fig. D).
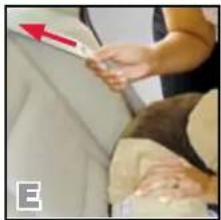
Push the child seat firmly into the vehicle seat 6 while removing slack first from the lap portion of the vehicle belt, then the shoulder portion (Fig. E).
Position the shoulder portion of the vehicle belt through the open lock-off, tighten belt, close the lock-off arm (Fig. F), and replace the cover.
The lock-off is properly closed when a click is • heard.
natural_image
Diagram of a car seat with a red diagonal line indicating force or direction (no text or symbols)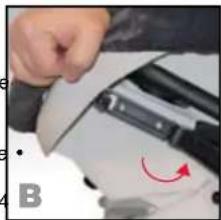
natural_image
Close-up of a hand pressing down on a mechanical component with a red curved arrow indicating rotation (no text or symbols visible)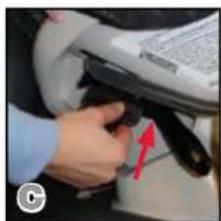
natural_image
Close-up of a person's hand holding a small object, with a red arrow pointing to the part (no visible text or symbols)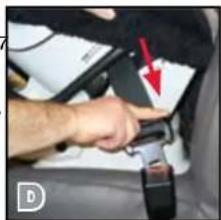
natural_image
Close-up of a person's seatbelt being adjusted, with a red arrow pointing to the belt (no text or symbols visible)To prevent damage, never extend the lock-off arm beyond its normal open position and always keep the lock-off closed when it is not in use.
If your vehicle is equipped with an automatic locking retractor (ALR), use of lock-offs is not required as long as the ALR is locked. Check your vehicle owner's manual to determine the type of retractor your vehicle has, and how to lock the retractor.
8 Verify that vehicle belt is tight and that the child seat is secure.
- The child seat is secure when it cannot be moved more than 2.5 cm (1 in.) front-to-back or side-to-side at the belt path. If the child seat is not secure, repeat the installation process or use an alternate seating location.
- When properly installed in the rear-facing position, the back angle of the child seat should be 30^ - 45^ from vertical (not to exceed 45^ ) when the car is parked on a level surface (Fig. G).
- If necessary, the proper recline angle can be achieved by placing a rolled towel or pool noodle in the vehicle seat bight to level the child seat's base.
WARNING! Do not raise the child seat off the front edge of the vehicle seat. This could cause your child seat not to perform as intended.
natural_image
Close-up of a person's neck and shoulder with a red arrow pointing to the shoulder area (no text or symbols visible)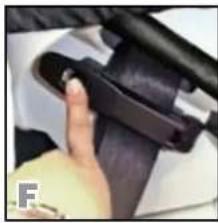
natural_image
Close-up of a hand holding a black mechanical component, possibly a switch or grip, in a car interior (no visible text or symbols)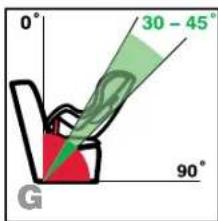
- Rear-facing installation can be improved by the use of the Versa-Tether. See pages 29 – 32.
Installation: Rear-Facing
Installation: Rear-Facing
Lap-Belt Installation
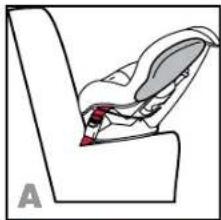
Figure A illustrates a rear-facing, lap-belt • installation.
When not in use, always store the LCS • connectors in the storage slots. See page 33.
Recline the child seat, then place it rear facing 1 on the vehicle seat. This child seat must be in the recline position when installed rear-facing. See Recline Adjustment on page 33.
Lift the cover and open the rear-facing lock-off 2 farthest from where the vehicle belt will be buckled (Fig. B).
Pull the vehicle belt out, then pass it 3 under the LCS bar, through the rear-facing belt slot and (Fig. C).
The vehicle belt can be routed over or under • cover.
Route the vehicle belt across the child seat 4 then through the opposite rear-facing belt slot and under the LCS bar.
IMPORTANT: The vehicle belt must rest behind the child seat buckle strap.
Verify that the vehicle belt is not twisted, 5 position the belt through the open lock-off, then buckle (Fig. D).
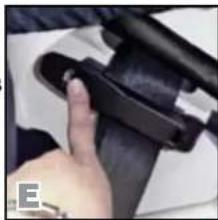
Push the child seat firmly into the vehicle seat 6 while removing slack from the vehicle belt. Tighten the belt, close the lock-off arm and 7 replace the cover (Fig. E).
The lock-off is properly closed when a click is heard.
To prevent damage, never extend the lock-off arm beyond its normal open position and always keep the lock-off closed when not in use.
If your vehicle is equipped with an automatic locking retractor (ALR), use of the lock-offs is not required as long as the ALR is locked.
natural_image
Line drawing of a car seat with highlighted seat area (no text or symbols)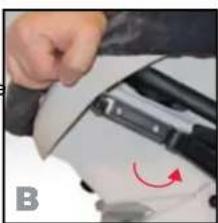
natural_image
Close-up of a hand adjusting a mechanical component with a red curved arrow indicating rotation (no text or symbols visible)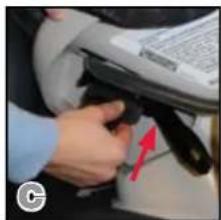
natural_image
Close-up of a hand holding a car seatbelt with a red arrow pointing to the seat (no visible text or symbols)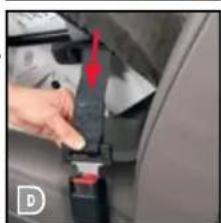
natural_image
Close-up of a hand pressing a red belt buckle into a car seat (no visible text or symbols)Check your vehicle owner's manual to determine the type of retractor your vehicle has, and how to lock the retractor.
Verify that vehicle belt is tight, locked, and that 8 the child seat is secure.
- The child seat is secure when it cannot be moved more than 2.5 cm (1 in.) front-to-back or side-to-side at the belt path. If the child seat is not secure, repeat the installation process or use an alternate seating location.
natural_image
Close-up of a finger pressing a black mechanical component (no visible text or symbols)WARNING! Do not use this seat with a non-locking, two-point Emergency Locking Retractor (ELR) vehicle belt.
- When properly installed in the rear-facing position, the back angle of the child seat should be 30^ - 45^ from vertical (not to exceed 45^ ) when the car is parked on a level surface (Fig. F).
- If necessary, the proper recline angle can be achieved by placing a rolled towel or pool noodle in the crease of the vehicle seat to level the child seat's base.
WARNING! Do not raise the child seat off the front edge of the vehicle seat. This could cause your child seat not to perform as intended.
- Rear-facing installation can be improved by the use of the Versa-Tether. See pages 29 – 32.
Installation: Forward-Facing
Installation: Forward-Facing
Lower Universal Anchorage System (LUAS) Installation
• Figure A illustrates a forward-facing LUAS installation.
- Verify that your vehicle is equipped with LUAS anchors. If LUAS anchors are not available, you must use vehicle belt installation methods.

WARNING!
- This child seat must not be used forward-facing for children less than one year of age OR who weigh less than 9.1 kg (20 lbs).
- This child seat must be in full upright position when installed forward-facing for children who weigh more than 15.1 kg (33 lbs). Always use the Versa-Tether when the child seat is installed forward-facing. Check your vehicle owner's manual for approved tether anchor locations.
natural_image
Illustration of a mechanical device with red components and a circular symbol, labeled 'A' (no text or symbols on the device itself)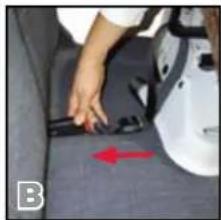
natural_image
Close-up of a person's seatbelt with a red arrow pointing to the left side (no text or symbols visible)If stored, remove the LCS connectors from 1 the storage slots under the cover (see page 33), open the rear-facing lock-offs, and route through their adjacent rear-facing belt slots.
NOTE: Close lock-offs before continuing with installation.
Press and hold the first LCS adjuster release 2 button, then pull the LCS strap to full length. Repeat for the remaining LCS connector.
Remove the Versa-Tether from the pouch and 3 place it up and over the child seat back.
Place the child seat forward-facing on the vehicle seat.4
TIP: You may need to raise or remove the vehicle head restraint to achieve best fit of the child seat.
5 Attach one LCS connector to its adjacent vehicle LUAS anchor (Fig. B) in the upright position (Fig. C).
An audible click confirms attachment.
Ensure that the LCS strap is not twisted.
TIP: You may need to turn the back of the child seat toward you for easier access to the vehicle LUAS anchor.
Attach the remaining LCS connector to its 6 adjacent vehicle LUAS anchor (Fig. D) in an upright position (Fig. C).
An audible click confirms attachment.
Ensure that the LCS strap is not twisted.
NOTE: If an audible click is not heard when connecting either LCS connector, the LCS strap may be twisted, or there may be debris in the LCS connector. Correct either situation before continuing with the installation process.
Align each LCS strap on the LCS bar with 7 the "LCS STRAP ON OR ABOVE LINE FORWARD-FACING" label on each side of the child seat (Fig. E).
TIP: Gradually tighten each LCS strap and keep the LCS strap webbing from sliding down on the LCS bar.
Push the child seat firmly into the vehicle seat 8 while pulling each LCS strap tight (Fig. F).
IMPORTANT: Ensure the LCS strap does not fold into the LCS adjuster while tightening.
Attach the Versa Tether9 hook to the vehicle's designated tether anchor for the chosen seating position. Remove all slack from the tether to secure. Store excess webbing in the tether pouch. See pages 29
Verify that all connections are secure and that the child seat is stable. 10 The child seat is secure when it cannot be moved front-to-back or side-to-side more than 2.5cm (1 in.) at the belt path. If the child seat is not secure, repeat the installation process or use an alternate seating location. Lap-Shoulder Belt Installation
natural_image
Close-up of a person's hand using a red arrow on a gray surface, no visible text or symbols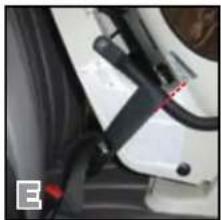
natural_image
Close-up of a white car seatbelt with black clasp and red screw, no visible text or symbols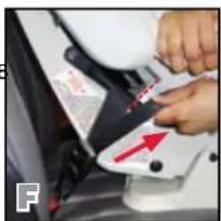
natural_image
Close-up of a hand using a tool to adjust or install a car component, with a red arrow indicating the motion (no visible text or symbols)Installation: Forward-Facing
Installation: Forward-Facing
Lap-Shoulder Belt Installation
Figure A illustrates a forward-facing lap-shoulder belt installation.
When not in use, always store the LCS • connectors in the storage slots. See page 33.

WARNING!
- This child seat must not be used forward-facing for children less than one year of age OR who weigh less than 9.1 kg (20 lbs).
- This child seat must be in full upright position when installed forward-facing for children who weigh more than 15.1 kg (33 lbs). Always use the Versa-Tether when the child seat is installed forward-facing. Check your vehicle owner's manual for approved tether anchor locations.
Place the child seat forward-facing on the vehicle 1 seat. Ensure the bottom of the child seat base is in full contact with the vehicle seat.
TIP: You may need to raise or remove the vehicle head restraint to achieve best fit of the child seat. Remove the Versa-Tether from the pouch and place it up and over the child seat back. Pull and hold the side impact cushion away from 3 the child seat belt path, then open the forward-facing lock-off opposite the vehicle belt buckle (Fig. B).
TIP: The side impact cushions can be rotated for better access to the belt path during installation (Fig C). Pull vehicle belt out, then pass it 4 bar, through the forward-facing belt path, then over the LCS bar on the opposite side (Fig. D).
TIP: Turning the back of the child seat toward you can make routing the vehicle belt easier (Fig. E).
5 Verify that the vehicle belt is not twisted and is routed over the LCS bars, then buckle (Fig. F).
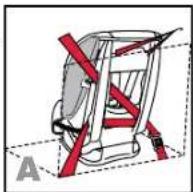
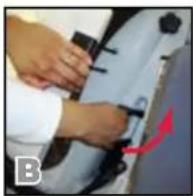
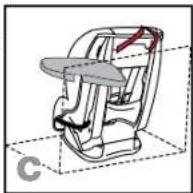
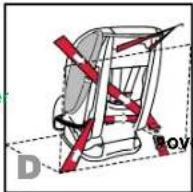
IMPORTANT: This child seat is equipped with a built-in lock-off for lap-shoulder belt systems that do not lock. Check your vehicle owner's manual to determine how to lock your vehicle's retractor type. See pages 10 – 13 for more information.
If your vehicle is equipped with a retractor that 6 can be locked, lock the retractor and proceed to step 7. If your vehicle belt system does not lock, follow the steps below to use the lock-off.
a Buckle the vehicle belt and push the child seat firmly into the vehicle seat while removing all slack first from the lap portion, and then the shoulder portion of the vehicle belt (Fig. G).
b Rotate the Side Impact Cushion away from the child seat shell to access the forward-facing lock-off.
C Brace the Side Impact Cushion with your forearm while pulling the shoulder belt tight and closing the lock-off (Fig. H).
d Continue installation instructions at step 9.
Push the child seat firmly into the vehicle seat 7 while removing slack first from the lap portion of the vehicle belt, then the shoulder portion (Fig. G). Attach the Versa-Tether hook to the designated tether anchor for the chosen seating position. Remove all slack from the tether to secure. Store excess webbing in the tether pouch. See pages 29 – 32.
Verify that the vehicle belt is tight and the child 9 seat is secure.
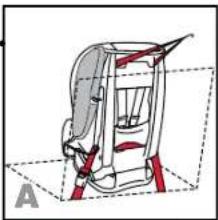
The child seat is secure when it cannot be moved front-to-back or side-to-side more than 2.5 cm (1 in.) at the belt path. If the child seat is not secure, repeat the installation process or use an alternate seating location.
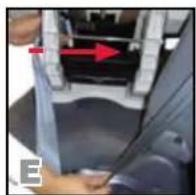
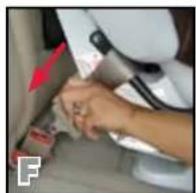
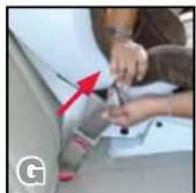
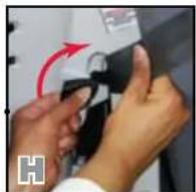
Installation: Forward-Facing Installation: Forward
Lap-Belt Installation
Figure A illustrates a forward-facing, lap-belt installation.
When not in use, always store the LCS • connectors in the storage slots. See page 33.

WARNING!
This child seat must not be used forward-• facing for children less than one year of age OR who weigh less than 9.1 kg (20 lbs).
This child seat must be in full upright position • when installed forward-facing for children who weigh more than 15.1 kg (33 lbs).
Always use the Versa-Tether when the child • seat is installed forward-facing. Check your vehicle owner's manual for approved tether anchor locations.
natural_image
3D diagram of a car seat assembly with red connectors and arrows indicating direction (no text or labels)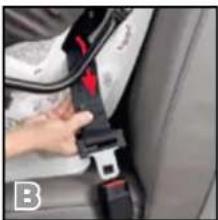
natural_image
Close-up of a car seatbelt buckle being locked, showing hand placement and red clasp (no text or symbols visible)Place the child seat forward-facing on the 1 vehicle seat. Ensure the bottom of the child seat base is in full contact with the vehicle seat.
TIP: You may need to raise or remove the vehicle head restraint to achieve best fit of the child seat.
Remove the Versa-Tether2om the pouch and place it up and over the child seat back.
3 Pull the vehicle belt out, then pass it under the LCS bar, through the forward-facing belt path, then under the LCS bar on the opposite side (Fig. B).
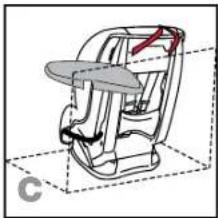
TIP: The side impact cushions can be rotated for better access to the belt path during installation (Fig C).
4 Verify that the vehicle belt is not twisted, is routed under the LCS bars, then buckle (Fig. B).
natural_image
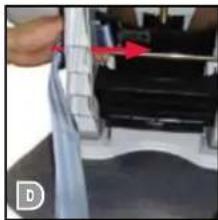
3D diagram of a baby car seat with no visible text or symbolsTIP: Turning the back of the child seat toward you can make routing the vehicle belt easier (Fig. D). Push the child seat firmly into the vehicle 5 seat while removing slack from the vehicle belt (Fig. E).
Attach the Versa-Tetherhook to the designated tether anchor for the chosen seating position. Remove all slack from the tether to secure. Store excess webbing in the tether pouch. See pages 29 – 32.
Verify that the vehicle belt is tight, locked 7 and the child seat is secure.
The child seat is secure when it cannot be moved front-to-back or side-to-side more than 2.5 cm (1 in.) at the belt path. If the child seat is not secure, repeat the installation process or use an alternate seating location.
natural_image
Close-up of a mechanical device with a blue plastic component and a red arrow pointing to a component (no visible text or symbols)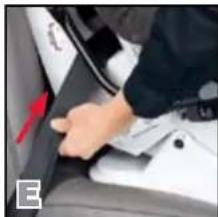
natural_image
Close-up of a person's seatbelt being adjusted for a red angle (no text or symbols visible)Aircraft Installation Installation: Versa-Tether

This child seat is certified for aircraft use. Most airlines in Canada and the U.S. will allow the use of a child seat as long as it is labeled as an approved child seat for airline use and fits properly on the aircraft seat. Contact the airline about their policy prior to traveling.
Install your child seat in a window seat to avoid blocking the aisle. If the aircraft lap belt is too short, ask the flight attendant for a belt extender.
Rear-Facing Installation
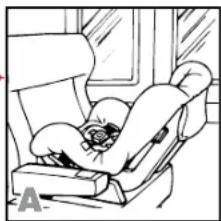
For rear-facing aircraft installation (Fig. A), follow Rear-Facing Lap-Belt Installation instructions on pages 20–21.
To aid installation on aircraft, open the rear-facing lock-offs to allow routing of large buckles.
Forward-Facing Installation
For forward-facing aircraft installation (Fig. B), follow Forward-Facing Lap-Belt Installation instructions on pages 26–27.
natural_image
Line drawing of a person seated in a seatbelt, viewed from the side (no text or symbols)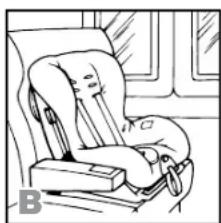
natural_image
Line drawing of a car seat with a pillow and seatbelt, no text or symbols presentSafety Information

WARNING!
When using the child seat in forward-facing mode, attach the Versa-Tether only to tether anchors designated by the vehicle manufacturer as tether anchorage points. Use of other locations is not approved or permitted.
DO NOT modify the vehicle without advice from the vehicle • manufacturer if a tether anchor is not available.
IMPORTANT:
If your vehicle does not currently have a tether anchor attachment, refer to your vehicle owner's manual or contact the vehicle manufacturer for assistance.
For vehicles manufactured January 1989 through August 2000 • equipped with vehicle manufacturer designated tether anchorage locations consisting of a hole or threaded hole, tether anchorage hardware is available upon request – at no cost – by contacting Britax Consumer Services at 1-888-427-4829.
Installation: Versa-Tether®
Installation: Versa-Tether®
Using the Versa-Tether
Consult your vehicle owner's manual for 1 designated tether anchorage locations.
Locate the tether on the rear of the child 2 seat and remove the tether from the pouch.
Place the tether up and over the child seat 3 back.
Install the child seat using the LUAS or the 4 vehicle belts according to the instructions in this manual.
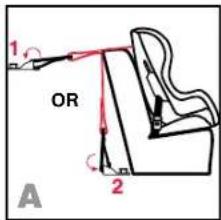
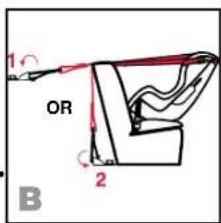
Tilt the tether release tab then pull to fully 5 extend the tether strap into a "V" shape.
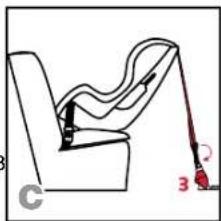
Locate the hook on the strap and attach 6 the tether hook to the vehicle's designated tether anchor.
See figure A for a forward-facing installation.
See figures B and C for a rear-facing • installation.
IMPORTANT: The tether should be hooked over, not under, the vehicle tether anchor.
Pull the tether adjuster strap to remove all 7 slack. Roll up excess webbing and store in tether pouch.
Verify there is tension in the tether strap and 8 that child seat is properly secured.
The child seat is secure when it cannot be moved front-to-back or
side-to-side more than 2.5 cm (1 in.) at the belt path.
natural_image
Line drawing of a car seatbelt with a red cable and number 3, no text or symbols presentTether Connector Strap

WARNING! Only use the tether connector strap for a rear- ing tether installation.
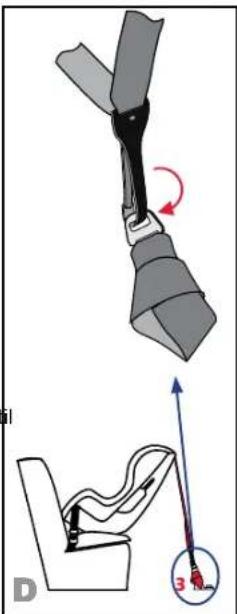
Because every vehicle model is different, sometimes you cannot find a location to properly anchor the tether. Use the tether connector strap to assist in creating an anchor point (Fig. D).
Find a fixed vehicle anchor point that is 1 bolted to the floor.
If you cannot find an acceptable location • to create an anchor point, contact the vehicle manufacturer to identify a suitable tether connection point.
Route the tether connector strap around 2 the fixed vehicle anchor point.
Take the metal D-ring and thread it 3 through the webbing loop on the other end of the strap (Fig. D).
4Pull the metal D-ring all the way through until the strap is tight.
5 Use the D-ring as an attachment point for the hook on the tether strap.
NOTE: Store the tether connector strap in the tether pouch when not in use.
Energy-Absorbing Tether Storing the LCS Connectors
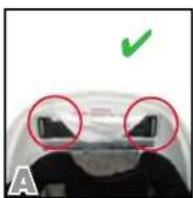
The energy-absorbing Versa-Tether was designed to enhance the performance of the child seat tether. By introducing a staged release of the tether webbing, the forward movement of the child seat is delayed while reducing the amount of energy transferred to the child seat during a crash. A secondary benefit of the energy-absorbing Versa-Tether is to help indicate when the child seat has been involved in a moderate or severe crash and replacement of the child seat is necessary.
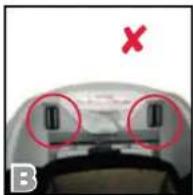
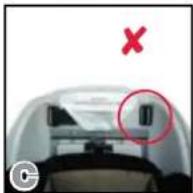
Figure A shows the tether when the child seat is acceptable for continued use (provided the child seat has not been involved in a crash). The colored stitching will be intact and the webbing will be looped inside the shell.
Figures B and C show the tether when the child seat is unacceptable for continued use. If any of the loops have pulled through the back side of the shell and/or any of the colored stitching has been released on either side, the child seat is no longer acceptable for use. Discontinue use of the child seat.
IMPORTANT: Regardless of whether loops have pulled through the back side of the shell and the colored stitching has been released, discontinue use of the child seat if it has been involved in a moderate or severe crash.
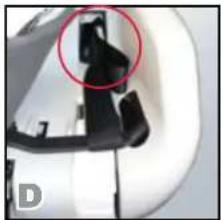
When the LCS connectors are not in use, lift the cover to access the LCS storage slots (Fig. D). Fold the LCS adjuster and the connector, then slide each set into the adjacent slot.
NOTE: Child seats are shipped from Britax with the LCS connectors in the storage slots. You will have to open the rear-facing lock-offs to remove the LCS connectors from storage.
Recline Adjustment
Pull the recline handle (Fig. E) then slide the child seat shell into the desired position. Release the recline handle, then verify the child seat has locked into position.
NOTE: It will be necessary to loosen the tether, vehicle seat belt, and/or LCS strap before adjusting the recline position. The tether, vehicle seat belt, and/or LCS strap must be properly re-tightened after adjusting the recline position.
Infant Body Pillow
The Infant Body Pillow is designed to provide better fit and comfort for infants using this child seat. For additional side support, fold the side flaps inward (Fig. F).
NOTE: Remove the Infant Body Pillow after the child can sit comfortably in the child seat without additional support.
natural_image
Close-up of a mechanical component with a red circle highlighting a specific part (no visible text or symbols)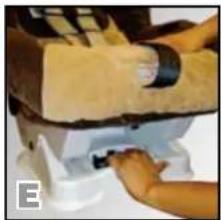
natural_image
Close-up of hands operating a sewing machine (no visible text or symbols)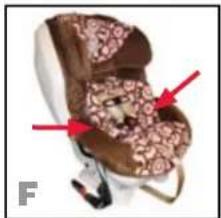
natural_image
Close-up of a brown and beige sneaker with decorative patterns and red arrows pointing to the side (no text or symbols)Child Seat FunctionsChil
Chest Clip
Fastening the Chest Clip
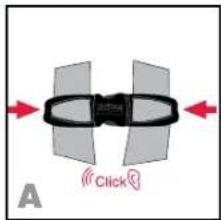
Fasten the chest clip by pushing the two halves together until a click is heard (Fig. A).
Releasing the Chest Clip
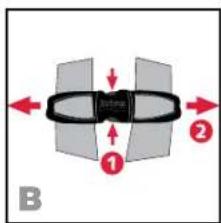
Squeeze the middle tabs together (Fig. B).1 Pull the two pieces apart.2
Adjusting the Chest Clip
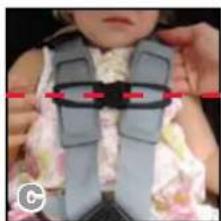
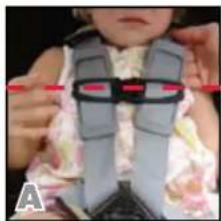
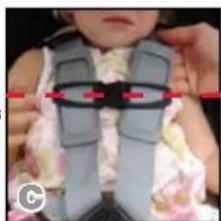
Slide the chest clip up or down on the 1 harness so it is positioned at the middle of the child's chest, level with the child's armpits (Fig. C). Slide the HUGS2 chest pads and comfort pads to a comfortable location for the child.
HUGS™ Chest Pads

WARNING! HUGS® chest pads must installed for forward-facing use. Removal of GS is optional only for rear-facing use.
natural_image
Close-up of a baby wearing a life vest with red measurement lines (no text or symbols visible)Harness Buckle
Fastening the Harness Buckle
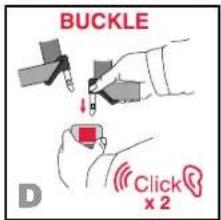
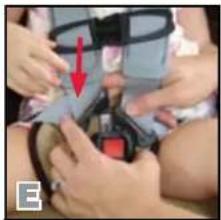
Hold the harness buckle with one hand.1 Use your other hand to insert one buckle 2 tongue at a time into the harness buckle (Fig. D).
A proper connection is confirmed with an audible click after inserting each buckle tongue.
Releasing the Harness Buckle
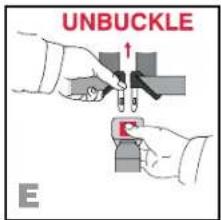
Brace the rear of the harness buckle with 1 one hand.
Use your thumb to press the release button 2 and slide both buckle tongues to remove from the buckle (Fig. E).
IMPORTANT: Periodically clean the harness buckle to ensure safe operation. See page 41.
Securing Your Child
Securing Your Child
Adjusting the Harness Height
IMPORTANT: See Important Harness Adjustments on pages 6–7 for instructions on proper harness fit based on your child's height and weight.
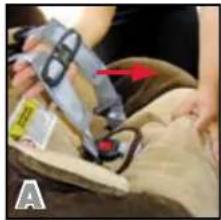
Loosen the harness by lifting the harness 1 adjuster lever while pulling both harness straps forward as far as possible (Fig A). Rotate the head restraint adjustment knob 2 on either side of child seat to raise or lower the head restraint and harness (Fig. B).
NOTE: DO NOT force the head restraint adjustment knob in either direction. If the knob is difficult to turn, the head restraint may be at maximum or minimum height, the harness may be tight, or the child's weight is pressing against the head restraint cover.
TIP: The side impact cushions can be moved for easier access to the head restraint adjustment knob.
Buckling and Tightening the Harness
Loosen the harness by lifting the harness 1 adjuster release lever located on the front of the child seat while pulling both shoulder straps forward (Fig. C).
Release the chest clip by squeezing the tabs 2 and sliding the pieces apart (Fig. D).
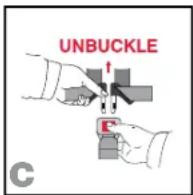
Unfasten the harness buckle by pressing the 3 release button and sliding the tongues out.
Move the harness straps to the side of the 4 child seat.
natural_image
Person using a handheld device to interact with a beige bag, no visible text or symbols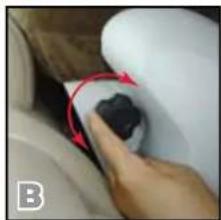
natural_image
Close-up of a hand pressing a small dark object on a white surface, with red arrows indicating motion (no text or symbols visible)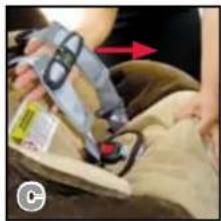
natural_image
Person applying a medical or cosmetic procedure to a beige object, with red arrows indicating direction (no visible text or symbols)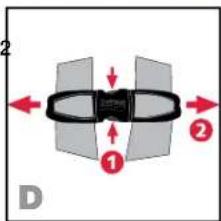
Use the harness holders located on the • straps and both sides of the cover to aid in holding the straps.
IMPORTANT: Remove bulky coats and/or jackets before putting the child in child seat. Adjust the harness to fit the clothes the child is wearing.
Place child in the child seat.5
Position harness straps around the child and fasten harness buckle (Fig. E) and chest clip (Fig. F).
Proper connection of the harness buckle is confirmed with a positive click after inserting each buckle tongue.
If the buckle will not fasten with an audible click after insertion of each buckle tongue, the harness buckle or adjuster area may be clogged with food, drink or other debris that needs to be removed. See page 41 for cleaning instructions.
natural_image
Close-up of hands assembling a small object with a red arrow indicating motion (no visible text or symbols)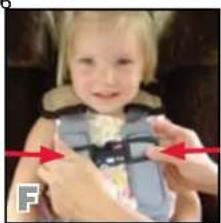
natural_image
Close-up of a smiling child wearing a blue and white safety vest, with red arrows pointing to the chest area (no text or symbols visible)Slide the HUGS7 ^™ chest pads down towards the buckle.
Important checklist before tightening the harness:
√ Check for proper harness height (see pages 6 – 7).
√ Remove slack from around the child's upper thighs.
√ Remove slack between the HUGS™ chest pads and the buckle.
Securing Your Child
Care and Maintenance
Slowly pull the adjuster strap 8 until the harness is snug around the child. The harness adjuster will click when the harness is snug.
NOTE: The Click & Safe™ Snug Harness Indicator is an audible aide to help determine when the harness is within range of appropriate snugness. When tightening the harness, this audible click provides extra assurance that the harness is
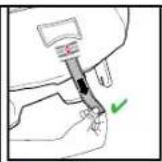
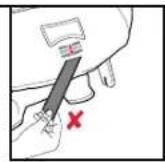
√ Pull the harness adjuster away from the child seat to tighten.
✗ Do not pull sideways.
A snug strap should not allow any slack. • It lies in a relatively straight line without sagging. It does not press on the child's flesh or push the child's body into an unnatural position.
You should not be able to pinch excess • webbing at the shoulder once the harness is properly secured.
natural_image
Close-up of a child wearing a full-body seatbelt, hands adjusting the seat (no visible text or symbols)If there is still slack in the harness, review 9 the checklist and then pull the harness adjuster strap again until another click indicates a snug harness.
Position the chest clip at the middle of the child's chest, level with 10 the child's armpits (Fig. A).
Verify that the harness is not twisted and the child is properly 11 secured.
IMPORTANT: Always pull on the harness after securing the child to ensure the buckle tongues are secure in the harness buckle.
Cover Removal
Remove the infant body pillow.1
Loosen the harness by lifting the harness 2 adjuster lever while pulling both shoulder straps forward as far as possible.
Release the chest clip and unbuckle the 3 harness.
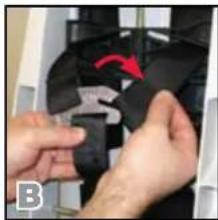
Unhook the shoulder straps from the 4 harness yoke on the rear of the child seat (Fig. B).
Pull the upper harness straps through the 5 head restraint and cover to the front of the child seat.
Recline the child seat.6
Locate the metal buckle strap retainer on the bottom of the child seat.
Pull the retainer away from the child seat to 8 loosen.
natural_image
Close-up of hands assembling a black mechanical component with a red arrow indicating rotation (no text or symbols visible)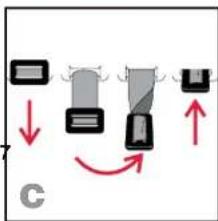
9 Turn the retainer so the short side will fit through the slot in the child seat shell (Fig. C).
10 Push the retainer through the slots in the shell and cover, to the top of the child seat.
11 Remove the head restraint portion of the cover. Remove the energy-absorbing foam from the head restraint and set aside.
* Be careful not to damage the energy-absorbing foam.
12 Gently remove the upper portion of the cover by pulling it from behind the side air cushions and then around the head restraint.
13 Pull the lower harness straps, buckle tongues, HUGS ^™ chest pads, and chest clip through the lower slots in cover.
14 Remove the entire cover from the child seat.
Care and Maintenance
Care and Maintenance
Cleaning the Cover
HAND WASH using cold water and mild soap.
LINE or LIE-FLAT DRY to prevent the cover from shrinking.
DO NOT• bleach, machine wash, machine dry or iron.
Refitting the Cover
To refit the cover, reverse the directions on page 39. Make sure that the shoulder straps are not twisted, and are properly threaded through the chest clip, HUGS ^™ chest pads, cover, foam, and shell.
Cleaning the Shell
SPONGE CLEAN using warm water and mild soap.
TOWEL DRY•
DO NOT• use solvents or abrasive cleaners.
Cleaning the Side Impact Cushions
SPONGE CLEAN using warm water and mild soap.
TOWEL DRY•
DO NOT• use solvents or abrasive cleaners.

WARNING! Prevent the Side Impact Cushions from being punctured. Puncture damage will cause the cushions not to perform as intended in a crash.
Cleaning the Harness
SPONGE CLEAN using warm water and mild soap.
TOWEL DRY•
- DO NOT bleach, machine wash, machine dry, iron, or disassemble the harness.
40
Cleaning the Harness Adjuster
Periodically check the adjuster area to be sure it is clean and free of food, drink or other debris. If debris is present, it must be removed to prevent interference with the adjuster mechanism.
BRUSH AWAY LOOSE DEBRIS using a soft-• bristled brush.
SPONGE CLEAN using warm water and a mild soap.
TOWEL DRY•
- DO NOT use solvents, abrasive cleaners or disassemble the harness.
Harness Buckle Removal
Recline the child seat.1
Locate the metal buckle strap retainer on the bottom of the child 2 seat.
Pull the retainer away from the child seat to loosen.3
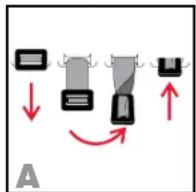
Turn the retainer so the short side will fit through the slot in the child 4 seat shell (Fig. A).
Push the retainer through the slots in the shell and cover, to the top 5 of the child seat.
Re-threading the Harness Buckle
1 Locate the slot in cover and shell for the harness buckle.
2 Turn the buckle retainer so the short side will fit through the slot in the cover and the child seat shell (Fig. A).
3 Push the retainer through the slots in the shell and cover, to the bottom of the child seat.
4 Pull the harness buckle away from the child seat until tight and verify the strap is not twisted and the release button is facing outward.
41
Care and Maintenance
Warranty
Cleaning the Harness Buckle
If a child eats and drinks while in the child seat, the harness buckle may need to be periodically checked and cleaned of any food, drink or other debris.
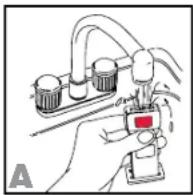
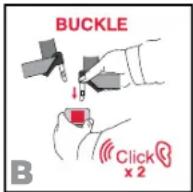
REMOVE BUCKLE as described on page 41. RINSE THOROUGHLY using warm water (Fig. A). TEST THE HARNESS BUCKLE by fastening • (Fig. B) and unfastening (Fig. C) until a click is heard after inserting each buckle tongue. If either click is not heard, repeat cleaning procedure.
TOWEL DRY•
DO NOT• lubricate, use solvents, abrasive cleaners, soap or other household detergents.
This child seat was manufactured by Britax Child Safety, Inc. Britax ^89 warrants this product to the original retail purchaser as follows:
LIMITED ONE-YEAR WARRANTY
This product is warranted against defective materials or workmanship for one year from the date of original purchase. Proof of purchase is required. The exclusive remedy for this warranty is that Britax will, at its option, provide repair or replacement components for this product. Britax reserves the right to discontinue or change fabrics, parts, models or products, or to make substitutions.
To make a claim under this warranty, contact Britax Consumer Services at
1-888-427-4829 or write to us using the address on the back cover of this booklet. Proof of purchase is required.
PLEASE COMPLETE AND MAIL THE OWNER REGISTRATION CARD WITHIN (30) DAYS OF PURCHASE OR VISIT WWW.BRITAXUSA.COM/REGISTRATION.
WARRANTY LIMITATIONS
This warranty does not include damages which arise from negligence, misuse or use not in accordance with the product instruction.
The use of non-Britax Child Safety, Inc., covers, inserts, toys, accessories, or tightening devices is not approved by Britax. Their use could cause this child seat to fail Federal Motor Vehicle Safety Standards or not perform as intended in a crash. Their use automatically voids the Britax warranty.
LIMITATION OF DAMAGES
The warranty and remedies as set forth above are exclusive and in lieu of all others, oral or written, express or implied. In no event will Britax, or the retailer selling this product, be liable for any damages, including incidental or consequential damages, arising out of the use or inability to use this product.
LIMITATIONS OF WARRANTIES AND OTHER WARRANTY TERMS AND STATE LAWS
Any implied warranties, including implied warranties of merchantability and fitness for a particular purpose, shall be limited to the duration and terms of the express written warranty. Some states do not allow limitations on how long an implied warranty lasts or the exclusion or limitation of incidental or consequential damages, so the above limitations may not apply. This warranty gives you specific legal rights, and you may have other rights, which vary from state to state. Neither Britax, nor the retailer selling this product, authorizes any person to create for it any other warranty, obligation, or liability in connection with this product.
Table des matières
natural_image
Close-up of a car interior showing a hand holding a small object with red arrows and a white container, no visible text or symbols.natural_image
Line drawing of a hand using a belt switch to lift a car seat (no text or symbols)the vehicle
natural_image
Diagram of a car seatbelt with a belt and arm, showing motion direction (no text or symbols)natural_image
Diagram of two car seatbelt configurations with lever arms and a red safety tag (no text or symbols)natural_image
Diagram of a car seatbelt with a lever mechanism and red motion arrows indicating rotation (no text or symbols)natural_image
Illustration of a hand holding a tool with a red arrow indicating motion (no text or symbols)Boucle6.
natural_image
Line drawing of a car seatbelt with a circular button labeled 'A' (no text or symbols on the diagram itself)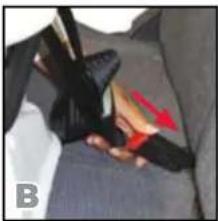
natural_image
Close-up of a person's lower torso and arm, showing a black object and red highlight on the chest area (no text or symbols visible)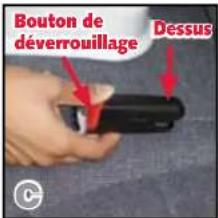
natural_image
Close-up of a person's hands adjusting a dark fabric or cable with a red arrow pointing to a detail (no visible text or symbols)natural_image
Close-up of a black mechanical component with red connectors and a white background (no visible text or symbols)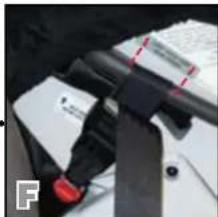
natural_image
Close-up of a black and red object with a red mark, possibly a device or component (no visible text or symbols)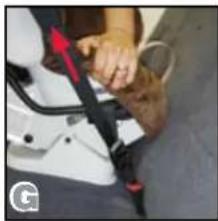
natural_image
Close-up of a person's seatbelt being adjusted for a car (no visible text or symbols)natural_image
Diagram of a car seat with a red diagonal line indicating force or direction (no text or symbols)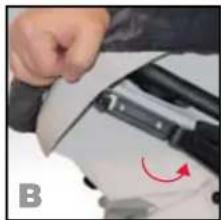
natural_image
Close-up of a hand adjusting a mechanical component with a red curved arrow indicating rotation (no text or symbols visible)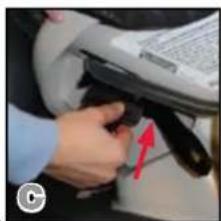
natural_image
Close-up of a person's hand holding a small object, with a red arrow pointing to the part (no visible text or symbols)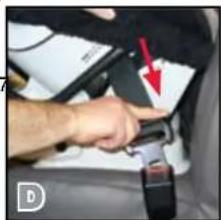
natural_image
Close-up of a person's hands using a car seatbelt switch, with a red arrow pointing to the handle (no visible text or symbols)natural_image
Close-up of a person's neck and shoulder with a red arrow pointing to the knee area (no text or symbols visible)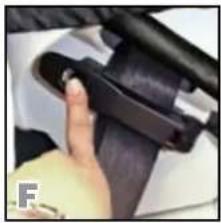
natural_image
Close-up of a hand adjusting a car seatbelt component (no visible text or symbols)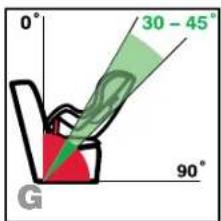
natural_image
Line drawing of a car seat with a red accent marking (no text or symbols)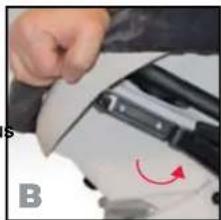
natural_image
Close-up of a hand adjusting a white mechanical component with a red curved arrow indicating rotation (no text or symbols visible)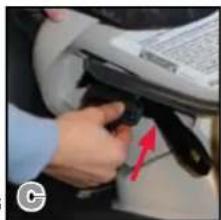
natural_image
Close-up of a person's hand holding a small black object with a red arrow pointing to it, next to a white document (no visible text or symbols)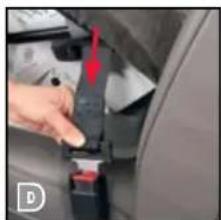
natural_image
Close-up of a hand adjusting a red belt buckle (no visible text or symbols)natural_image
Close-up of a hand pressing a black mechanical component (no visible text or symbols)natural_image
Illustration of a person lifting a large mechanical device with a red ribbon, labeled 'A' (no text or symbols on the diagram itself)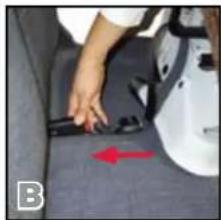
natural_image
Close-up of a person's seatbelt with a red arrow pointing to the seat area, no visible text or symbols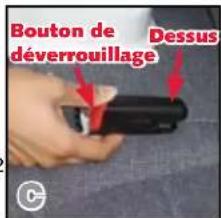
natural_image
Close-up of a person's hand pressing down on a car seatbelt, with a red arrow indicating the left side (no text or symbols visible)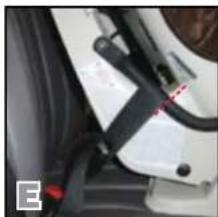
natural_image
Close-up of a car seatbelt with black straps and red buttons (no visible text or symbols)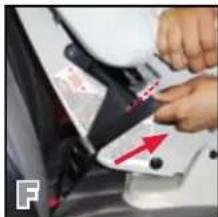
natural_image
Close-up of a hand pressing down on a car seatbelt with a red arrow indicating the angle (no text or symbols visible)natural_image
3D diagram of a vehicle seat assembly with red connectors and arrows indicating components (no text or labels)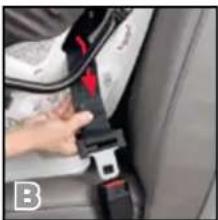
natural_image
Close-up of a person's seatbelt buckle being adjusted for a car (no text or symbols visible)natural_image
3D diagram of a baby seat with red straps and a gray seat, shown in perspective view (no text or symbols)natural_image
Close-up of a mechanical device with a metallic tool and a red arrow pointing to a component (no visible text or symbols)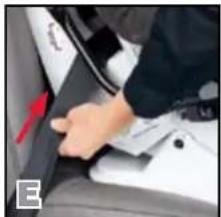
natural_image
Close-up of a person's hand pressing down on a car seatbelt (no visible text or symbols)natural_image
Line drawing of a baby seatbelt in a car seatbelt (no text or symbols)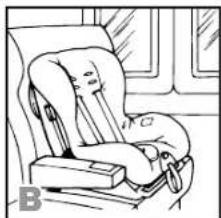
natural_image
Line drawing of a person sitting in a car seat, no text or symbols presentnatural_image
Diagram of a car seatbelt with a red belt and numbered label (no text or symbols on the diagram itself)natural_image
Close-up of a mechanical component with a red circle highlighting a specific part (no visible text or symbols)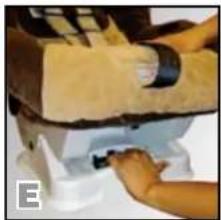
natural_image
Close-up of hands operating a sewing machine (no visible text or symbols)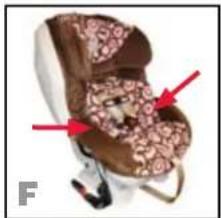
natural_image
Close-up of a brown sneaker with floral pattern and two red arrows pointing to its side (no text or symbols)Coussin pour bébé
natural_image
Diagram of a mechanical or electrical component with arrows indicating direction, no readable text or symbols present.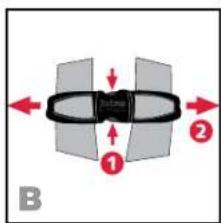
natural_image
Close-up of a baby wearing a gray life vest with black straps, held by hands (no visible text or symbols)Boucle du harnais
natural_image
Person using a medical device to interact with a beige object, no visible text or symbols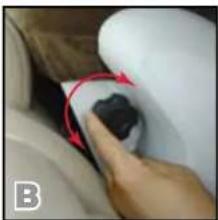
natural_image
Close-up of a hand pressing a small dark object on a white surface, with red arrows indicating motion (no text or symbols visible)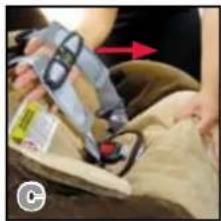
natural_image
Close-up of a person using a handheld device to secure a small object, with no visible text or symbols.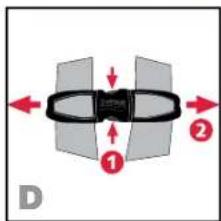
natural_image
Close-up of hands adjusting a medical device with a red arrow pointing to the component (no visible text or symbols)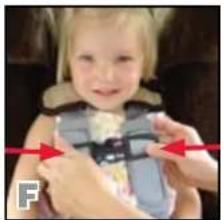
natural_image
Child wearing a seatbelt, smiling (no visible text or symbols)natural_image
Close-up of a child wearing a full-body seatbelt, hands adjusting the seat (no visible text or symbols)ralement.
natural_image
Close-up of hands adjusting a black object with a red arrow and letter B label (no readable text or symbols)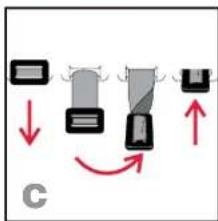
Soins et entretien
Soins et entretien
GARANTIE LIMITÉE D'UN AN
The Click & Safe™ Snug Harness Indicator is an audible aid to help determine when the harness is within range of appropriate snugness.
STEP 1: Checklist before tightening harness:
☑ Check for proper harness height, see pages 6 – 7.
Remove slack from around child's upper thighs.
Remove slack between HUGS™ chest pads and buckle.
STEP 2: Pull harness adjuster strap until an audible click confirms that the harness is snug.
STEP 3: Double check:
See pages 36 – 38 for more information.
☑ Harness is buckled and secure.
☑ Harness is snug and you can not pinch excess webbing at shoulder.
☑ If there is still slack in the harness, double check Step 1, then pull the adjuster strap again until another click indicates a snug harness.
Manufactured in Charlotte, NC, USA
Britax Child Safety, Ltd.
RD. Box 7289,
RPO Brunswick Square,
Saint John NB E2L 9Z9.
A Britax Childcare Group
Limited company
- Safety Information ....2
- Child Seat Features 8
- Vehicle Seat Belt Information ....10
- Vehicle Compatibility ....15
- Installation: Rear-Facing 16
- Installation: Forward-Facing 22
- Aircraft Installation 28
- Installation: Versa-Tether 29
- Child Seat Functions ....33
- Securing Your Child ....36
- Care and Maintenance ....39
- Warranty 43
- ! WARNING!
- Safety Information
- Important Notes
- Certification
- Registration
- Important Harness Adjustments
- Rear-Facing
- WARNING! DO NOT use the child seat rear-facing if any of
- Forward-Facing
- WARNING! DO NOT use the child seat forward-facing if any
- Child Seat Features
- Vehicle Seat Belt Information Vehicle Seat Belt
- Compatible Vehicle Seat Belts
- Lap-Shoulder (3-Point) Belt
- ALR (Automatic Locking Retractor) with Sliding Latch Plate
- ELR (Emergency Locking Retractor) with Locking Latch Plate
- Switchable Retractor in ALR with Sliding Latch Plate3.
- ELR (Emergency Locking Retractor) with a Sliding Latch Plate
- Lap Belt
- ALR (Automatic Locking Retractor)
- Locking Latch Plate6.
- Vehicle Seat Belt Information Vehicle Compatibility
- Incompatible Vehicle Belts
- Vehicle Buckle Positions
- Vehicle Seating Positions
- Installation: Rear-Facing
- Lower Universal Anchorage System (LUAS) Installation
- Lap-Shoulder Belt Installation
- Lap-Belt Installation
- Installation: Forward-Facing
- WARNING!
- Installation: Forward-Facing Installation: Forward
- Aircraft Installation Installation: Versa-Tether
- Rear-Facing Installation
- Forward-Facing Installation
- IMPORTANT:
- Installation: Versa-Tether®
- Using the Versa-Tether
- Tether Connector Strap
- Energy-Absorbing Tether Storing the LCS Connectors
- Recline Adjustment
- Infant Body Pillow
- Child Seat FunctionsChil
- Chest Clip
- Fastening the Chest Clip
- Releasing the Chest Clip
- Adjusting the Chest Clip
- HUGS™ Chest Pads
- Harness Buckle
- Fastening the Harness Buckle
- Releasing the Harness Buckle
- Securing Your Child
- Adjusting the Harness Height
- Buckling and Tightening the Harness
- Care and Maintenance
- Cover Removal
- Cleaning the Cover
- Refitting the Cover
- Cleaning the Shell
- Cleaning the Side Impact Cushions
- Cleaning the Harness
- Cleaning the Harness Adjuster
- Harness Buckle Removal
- Re-threading the Harness Buckle
- Warranty
- Cleaning the Harness Buckle
- LIMITED ONE-YEAR WARRANTY
- PLEASE COMPLETE AND MAIL THE OWNER REGISTRATION CARD WITHIN (30) DAYS OF PURCHASE OR VISIT WWW.BRITAXUSA.COM/REGISTRATION.
- WARRANTY LIMITATIONS
- LIMITATION OF DAMAGES
- LIMITATIONS OF WARRANTIES AND OTHER WARRANTY TERMS AND STATE LAWS
- Table des matières
- the vehicle
- Boucle6.
- Coussin pour bébé
- Boucle du harnais
- Soins et entretien
- GARANTIE LIMITÉE D'UN AN
- STEP 1: Checklist before tightening harness:
- STEP 2: Pull harness adjuster strap until an audible click confirms that the harness is snug.
- STEP 3: Double check:
Brand : BRITAX
Model : Advocate CS
Category : Car seat