DWS-220 - Weather Station EnviraStation - Free user manual and instructions
Find the device manual for free DWS-220 EnviraStation in PDF.


| Product Type | Wireless Weather Station |
| Model | DWS-220 |
| Brand | EnviraStation |
| Dimensions (Main Unit) | 150 x 100 x 200 mm (approx.) |
| Weight (Main Unit) | 500 g (approx.) |
| Power Supply | 2 x AAA batteries (not included) |
| Display Type | LCD with backlight |
| External Sensor | Wireless, 433 MHz, up to 100 m range |
| Measured Parameters | Indoor/outdoor temperature and humidity, barometric pressure, wind speed and direction, rainfall, UV index |
| Weather Forecast | 12-24 hour trend with icons |
| Moon Phase | Displayed |
| Alarm | Configurable high/low alerts |
| Data Logging | Min/max records, reset manually |
| Mounting | Desk stand or wall mount |
| Cleaning Instructions | Wipe with a soft, dry cloth; avoid liquids |
| Safety Precautions | Indoor use only; keep away from water and heat sources |
| Spare Parts | Replacement external sensors available |
| Repairability | Battery replacement by user; other repairs by authorized service |
Frequently Asked Questions - DWS-220 EnviraStation
User questions about DWS-220 EnviraStation
0 question about this device. Answer the ones you know or ask your own.
Ask a new question about this device
Download the instructions for your Weather Station in PDF format for free! Find your manual DWS-220 - EnviraStation and take your electronic device back in hand. On this page are published all the documents necessary for the use of your device. DWS-220 by EnviraStation.
USER MANUAL DWS-220 EnviraStation
DWS-220SP-ENG.qxd 10/12/04 11:34 AM Page 1
ENVIRASTATION.
Dirección postal:
Envirastation
Consumer Relations
Service Center Dept. 168
3000 Pontiac Trail
Commerce Township, MI
48390
Correo electrónico:
cservice@envirastation.com
Toll Free
1-800-466-3342
GARANTÍA LIMITADA POR DOS AÑOS
Instruction Manual and
Warranty Information
DWS-220
2year limited warranty
DWS-220SP-ENG.qxd 10/12/04 11:34 AM Page 3
GETTING STARTED
- IMPORTANT: Insert batteries into the home receiver unit first. Home Receiver:
- Remove the battery cover on the back of the unit. Install 2 alkaline AA batteries according to the polarity indicated. Close the battery cover. Remote Sensor:
• Install 2 alkaline AA batteries according to the polarity indicated. Close the battery cover.
-
Place the home receiver as close as possible to the remote sensor. This will help with synchronization between the two units.
-
REMEMBER: Once you are ready to position your remote sensor and home receiver, ensure that the distance is not outside the effective transmission range (100 feet). Some building materials and location of the home receiver or remote sensor can affect transmission quality and range. Try various locations for best results.
NOTE: There are no consumer serviceable parts. All questions or service requests should be directed to our consumer relations department. (See Warranty section for contact information.)
INPUT EXISTING WEATHER CONDITIONS
To ensure accurate weather forecast under different altitude situations, you should first enter the existing weather condition manually. The weather icon will be flashing.
-
Select the existing weather condition by toggling through the selections with the "MAX/MIN" button. These conditions will be displayed as; Sunny, Partial Sunny, Cloudy, Rainy, Stormy or Icy at the top of the LCD display.
-
Once the correct condition is selected, press the "CLEAR" button on back of unit to confirm and exit.
-
The unit is now calibrated to the existing pressure and weather conditions.
SETTING TIME
RADIO-CONTROLLED CLOCK
The home receiver will start synchronizing the clock after the 1st channel of the RF thermometer is registered.
-
At normal mode, hold the “-” button located on the back of the home receiver for 3 seconds to force synchronization.
-
The antenna icon will appear during the synchronization process (on the right side of the time display).
-
If the icon disappears afterwards, radio time signal is not available at that moment. Try setting the home receiver in other locations. Remember to place the unit away from sources of interference such as mobile phones, appliances, TV etc.
-
The antenna icon will appear on screen if the radio time reception is successful. The radio-controlled clock will have a daily synchronization at 1:00 am everyday. If previous attempts of reception were unsuccessful, the home receiver will attempt synchronization each hour until successful.
-
Each reception cycle is minimum 2 minutes and maximum 10 minutes.
TIME ZONE SELECTION
Press "SET" button on the front of home receiver to select from the following time zones in the U.S. (zone is displayed in the upper right hand corner of time display).
P - Pacific Standard Time M - Mountain Standard Time
C - Central Standard Time E - Eastern Standard Time
MANUAL SETTING FOR CLOCK & CALENDAR
If atomic time is unavailable in your area or to manually set/over ride this feature;
-
Hold "SET" button for 3 seconds to enter clock set.
-
First, select 12 hour or 24 hour setting using the "+,-" buttons located on the back of the home receiver. Press "SET" button to confirm.
DWS-220SP-ENG.qxd 10/12/04 11:34 AM Page 5
Now you will select the calendar settings-
3. Select Year - Use the " + , - " buttons located on the back of the home receiver to adjust year setting. Press " SET " button to confirm.
4. Select Month/Day - Use the " + , - " buttons located on the back of the home receiver to adjust month/day setting. Press " SET " button to confirm.
5. Select Hour/Minute - Use the " + , - " buttons located on the back of the home receiver to adjust hour/minute setting. Press " SET " button to confirm.
6. DST On/Off (Daylight Savings Time) - Use the " + , - " buttons to turn DST on or off. Press " SET " button to confirm.
FAHRENHEIT/CENTIGRADE SELECTION
You can now select either Fahrenheit or Centigrade temperature readings. Hold the max/min button for 3 seconds to toggle between Fahrenheit or Centigrade readings.
ALARM FUNCTIONS
TO SELECT BETWEEN ALARM 1, ALARM 2 OR ALARM OFF
Press "+/♀" button on the back of the unit to scroll through selections. For Daily Alarm - The appropriate "♀" icon will appear in the upper left corner of the time display. No Alarm - The "♀" icons will not be shown.
TO SET ALARM TIME
- Press "ALARM" button once to select Alarm 1 or twice for Alarm 2.
- Once you select the correct alarm, hold the "ALARM" button down for 3 seconds.
- Set alarm time - Press " + , - " on the back of the unit to enter the desired Hr/ Min values. Press "ALARM" to confirm.
- To view alarm time - Press "ALARM" button. Alarm time will display for 5 seconds and then resume to normal clock thereafter.
- The home receiver will provide either a daily alarm, which last for 2 minutes or a snooze mode where the alarm will repeat every 5 minutes until manually cleared (see SNOOZE/LIGHT section below.)
- To turn ringing alarm off - Simply press the button under the LCD display. The alarm is now off for one day.
SNOOZE/ LIGHT
- Press the SNOOZE/ LIGHT button for an extended backlight.
- In snooze alarm mode, press this button to trigger a repetitive snooze alarm.
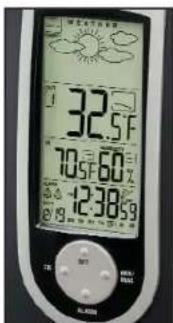
MIN/ MAX MEMORY SETTINGS
- Press "MIN/ MAX" button to view the maximum values for 5 seconds. Press again to view the minimum values.
- To clear the memory record, press "CLEAR" button on the back of the unit while the respective values are displayed on screen.
TEMPERATURE TREND INDICATOR:
Next to each weather reading on the home receiver LCD display, you will see one of 3 icons;
will indicate Rising Conditions if it changes more than
1 degree in an hour
— will indicate Steady Conditions
will indicate Falling Conditions if it is more than
1 degree in an hour.
WEATHER FORECAST WITH STORM ALERT
The built-in sensor will read the atmospheric pressure and calculate the weather conditions of the next 12 hours. These conditions will be displayed as; Sunny, Partial Sunny, Cloudy, Rainy, Stormy or icy at the top of the LCD display.
OFFSETING AIR PRESSURE FOR WEATHER FORECAST
After the initial step or in case the weather forecast deviates, you can still recalibrate the unit.
- Hold "CLEAR" button for 3 seconds to enter the pressure offset mode. The weather icon will flash.
- Select the existing weather condition by pressing "MAX/MIN" button.
- Press "CLEAR" to confirm and exit.
- The unit is now calibrated to the existing pressure and weather conditions.
DWS-220SP-ENG.qxd 10/12/04 11:34 AM Page 7

LOW BATTERY INDICATION
Low battery indication is available for the home receiver and the remote sensor. "LO" will be displayed on the remote sensor and a battery life "☐" icon will be shown on the home receiver. Replace the batteries as necessary and follow the setup procedure as mentioned earlier in the "GETTING STARTED" section.
MOUNTING INSTRUCTIONS
Table Top
For the home receiver, fold the base down and into the back of the unit. For the remote sensor, simply pull out the integrated stand from the bottom.
Wall Mount
For the remote sensor - Set a screw into the desired hanging location and mount.
For Home Receiver -
Pull base out and fold up onto mounting pegs. (Base will snap into place). Set a screw into the wall and mount.
MAINTENANCE AND CARE
INSTRUCTIONS
- Extreme temperatures, shock or areas of unusual vibration should be avoided to prevent damage to the units.
- Clean the units using only a soft, damp cloth to wipe. Do not use solvents, abrasives, detergents or other strong cleaning agents. After cleaning, wipe surfaces with a dry cloth.
- Do not submerge units in water or other liquids.
- Do not subject the units to extremely severe temperatures - DO NOT PLACE UNITS INTO OVENS, FREEZERS or MICROWAVE OVENS.
NOTES
- Opening the housing of either the remote sensor or the home receiver will invalidate your warranty. Do not attempt to repair this unit. There are no consumer serviceable parts.
- If you encounter any difficulties in setting up your wireless thermometer system, please contact Consumer Relations.
- Your new RF Thermometer is built with random security code technology. The home receiver will learn the random code of the first remote sensor and log it in as channel 1. Channel 2 and Channel 3 will be registered in the same way if additional sensors are used. The home receiver can monitor up to 3 separate sensors.
- Once a channel is registered, it will not accept any new sensors. However, registered channels can be erased by removing the batteries in the remote sensor or the home unit.
- When replacing batteries for the remote sensor - Remember to clear the corresponding channel of the home receiver by removing the batteries or select the respective channel of the sensor by pressing the CHANNEL button on the home receiver. Hold the CHANNEL button for 3 seconds to clear the registration.
- When replacing batteries for the home receiver - Please remove the batteries of all remote sensors. Once you have replaced the home receiver batteries, re-install the batteries to the sensors according to the desired channel sequence. This will ensure that the home receiver and the remote sensors are properly synchronized.
- Press the Tx button on the back of remote sensor to verify the RF reception.
- It is recommended to test the home receiver and the remote sensor next to each other to ensure that both are properly synchronized.
- Keep the remote sensor out of direct sunlight and rain. Do not mount on a metal surface.
About the Atomic Clock
The National Institute of Standard and Technology (NIST) in Fort Collins, Colorado broadcasts the time signal (WWVB at 60kHz AM radio signal) with an accuracy of 1 second per every 3,000 years. The signal will cover a distance up to 2,000 miles from the source. Like a typical AM radio, your Atomic Clock will not be able to receive the WWVB signal in places surrounded by heavy concrete or metal panels. The reception of the time
DWS-220SP-ENG.qxd 10/12/04 11:34 AM Page 9
signal can be affected by mobile phones, TV, electrical appliances or other electronic interference. To get the best performance of the Atomic clock, please install the home receiver near a window and away from large metallic objects. If the unit is not working properly, change the unit position. There may be some interference at this location.
TROUBLE SHOOTING
Indoor and Outdoor temperatures do not match when placed next to each other -
Each sensor is manufactured to be +/- 2 degrees in accuracy under normal conditions. So it is possible to have up to four degrees difference shown on the separate temperature sensors (one could be “+2 degree” and the other “-2 degrees”. Additionally, the calibration curve is different between the two units because of the greater temperature range of the outdoor sensor. Errors are usually noted on the extreme ends of the temperature ranges.
Base unit is not accepting remote transmissions -
The units may not be properly synchronized or the batteries may need to be replaced. See "GETTING STARTED" section beginning on page 2 of the instructions for detailed instructions. With the two units next to each other, attempt synchronization. Remember to always place the remote sensor within the effective transmission range and away from large metal surfaces.
What is the recommended battery type?
Your unit will come with 4 "AA" alkaline batteries (2 "AA" batteries required for each unit). We recommend using only alkaline batteries for replacements.
Where can I mount the remote sensor?
To get accurate readings and to prolong the life of your sensor, we recommend that you mount it out of direct sunlight and rain. Fog and mist will not affect the sensor, but large volumes of soaking rain may. To guard against this, we recommend that you mount it under the eve of your house, your garage or any other suitable place that will keep it out of direct sun and rain.
Outdoor Temperature Reading shows “- - ”
This is usually an indication that the channel selector (located in the top left corner of the home receiver) is set incorrectly to receive the signal from the remote sensor. If you have only one remote sensor, ensure that the channel selector is set to "1". To change the channel, press the "channel" button located on the front of the home receiver.
The home receiver may also be "scrolling" - looking for sensor readings from more than one remote sensor. This home receiver can support up to three remote sensors (only one is included). If it is looking for more than one remote sensor, a "○" icon will appear below the channel designator. Again, to select a reading from just one remote sensor, press the "channel" button to remove the scroll icon and ensure that the channel selected now reads "1".
The unit is "locked" - I can't perform unit functions -
When this occurs, the unit maybe in "forced synchronization" mode. If the radio antenna icon shows "waves" projecting from it, the unit is attempting to synchronize with the atomic clock frequency. To override, simply press the "-" button on the back of the unit. You will now be able to perform all other functions.
The weather forecast does not match current outdoor conditions -
The forecast projects weather conditions 8-12 hours into the future. It does not reflect current conditions.
To ensure accurate weather forecast, it may be necessary to manually enter existing conditions (see page 2 "Input Existing Weather Conditions").
DWS-220SP-ENG.qxd 10/12/04 11:34 AM Page 11
Name and Functions of Buttons:
Functions If button is held down
SET Select PST, MST, Enter clock & calendar CST, EST setting
+/8. 1 step forward Alarm, Fast advance Select Alarm(s) on/off
-/1 step backward Fast backward
Atomic time seek
ALARM Display alarm time for 5 sec at normal mode
MIN/MAX Read minimum/ maximum record 5 sec
CHANNEL Select Channel 1,2,3, Delete current channel auto scroll
SNOOZE/ Backlight on for 5 seconds, BACKLIGHT Trigger snooze alarm, stop alarm
CLEAR Clear memory at Min/ Max Select weather conditions
FCC DISCLAIMER
This device complies with part 15 of the FCC rules. Operation is subject to the following two conditions:
- This device may not cause harmful interference, and
- This device must accept any interference received, including interference that may cause undesired operation.
FCC ID: L5C0761TX-1 (Transmitter) Freq. 434 MHz
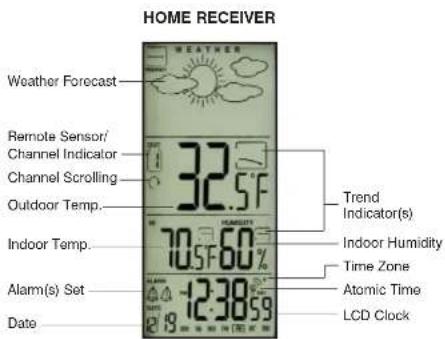
REMOTE SENSOR

SPECIFICATIONS
Range of temperature/humidity measurement: Indoor temp : +32 F to +122 F (0 C to +50 C)
Indoor humidity: 20% to 99% RH
Remote sensor: -4 F to +140 F (-20 C to +60 C)
Channel: max. 3 remote sensors
Temp. Alert: Indoor Temp/ Humidity and Ch 1
Transmission: max. 100 ft. (30 m) open area, RF434 MHz
Resolution: 0.1 degree for temperature
Clock: WWVB Radio-controlled
Power source: 2 Alkaline AA batteries - home receiver
2 Alkaline AA batteries - remote sensor
DWS-220SP-ENG.qxd 10/12/04 11:34 AM Page 13
ENVIRASTATION.
Mail To:
Envirastation
Consumer Relations
Service Center Dept. 168
3000 Pontiac Trail
Commerce Township, MI
4B390
e-mail:
cservice@envirastation.com
Toll Free
1-800-466-3342
TWO YEAR LIMITED WARRANTY
(Valid in USA only)
HoMedics guarantees this product free from defects in material and workmanship for a period of two years from the date of original purchase, except as noted below.
This HoMedics product warranty does not cover damage caused by misuse or abuse; accident; the attachment of any unauthorized accessory; alteration to the product; or any other conditions whatsoever that are beyond our control. This warranty is effective only if the product is purchased and operated in the USA. A product that requires modification or adaptation to enable it to operate in any country other than the country for which it was designed, manufactured, approved and/or authorized, or repair of products damaged by these modifications is not covered under warranty. HoMedics shall not be responsible for any type of incidental, consequential or special damages. All implied warranties, including but not limited to those implied warranties of fitness and merchantability, are limited in the total duration of two years from the original purchase date.
To obtain warranty service on your HoMedics product, either hand deliver or mail the unit and your dated sales receipt (as proof of purchase), postpaid, along with check or money order in the amount of \$5.00 payable to HoMedics to cover handling.
Upon receipt, we will repair or replace, as appropriate, your product and return it to you, postpaid. If it is appropriate to replace your product, we will replace the product with the same product or a comparable product at our option. Warranty is solely through our Service Center. Service of this product by anyone other than HoMedics Service Center voids warranty.
This warranty provides you with specific legal rights. You may have additional rights which may vary from state to state. Because of individual state regulations, some of the above limitations and exclusions may not apply to you.
©2004 HoMedics, Inc. and its affiliated companies, all rights reserved. Enviastation™ is a trademark of HoMedics, Inc. and its affiliated companies. All rights reserved.
B-DWS220
ENVIRASTATION™
CÓMO CONFIGURAR LA HORA
RELOJ CONTROLADO POR RADIO
DWS-220SP-ENG.qxd 10/12/04 11:34 AM Page 17
SNOOZE/ LIGHT (alarma de repetición/ luz)
DWS-220SP-ENG.qxd 10/12/04 11:34 AM Page 21
- GETTING STARTED
- INPUT EXISTING WEATHER CONDITIONS
- SETTING TIME
- RADIO-CONTROLLED CLOCK
- TIME ZONE SELECTION
- MANUAL SETTING FOR CLOCK & CALENDAR
- FAHRENHEIT/CENTIGRADE SELECTION
- ALARM FUNCTIONS
- TO SELECT BETWEEN ALARM 1, ALARM 2 OR ALARM OFF
- TO SET ALARM TIME
- SNOOZE/ LIGHT
- MIN/ MAX MEMORY SETTINGS
- TEMPERATURE TREND INDICATOR
- WEATHER FORECAST WITH STORM ALERT
- OFFSETING AIR PRESSURE FOR WEATHER FORECAST
- LOW BATTERY INDICATION
- MOUNTING INSTRUCTIONS
- TABLE TOP
- WALL MOUNT
- FOR HOME RECEIVER
- MAINTENANCE AND CARE
- INSTRUCTIONS
- NOTES
- ABOUT THE ATOMIC CLOCK
- TROUBLE SHOOTING
- INDOOR AND OUTDOOR TEMPERATURES DO NOT MATCH WHEN PLACED NEXT TO EACH OTHER
- BASE UNIT IS NOT ACCEPTING REMOTE TRANSMISSIONS
- WHAT IS THE RECOMMENDED BATTERY TYPE
- WHERE CAN I MOUNT THE REMOTE SENSOR
- OUTDOOR TEMPERATURE READING SHOWS
- THE UNIT IS "LOCKED" - I CAN'T PERFORM UNIT FUNCTIONS
- THE WEATHER FORECAST DOES NOT MATCH CURRENT OUTDOOR CONDITIONS
- NAME AND FUNCTIONS OF BUTTONS
- FUNCTIONS IF BUTTON IS HELD DOWN
- FCC DISCLAIMER
- SPECIFICATIONS
- MAIL TO
- ENVIRASTATION
- TWO YEAR LIMITED WARRANTY
- CÓMO CONFIGURAR LA HORA
- RELOJ CONTROLADO POR RADIO
- SNOOZE/ LIGHT (ALARMA DE REPETICIÓN/ LUZ)
Brand : EnviraStation
Model : DWS-220
Category : Weather Station