125.22614610 - Vacuum Cleaner KENMORE - Free user manual and instructions
Find the device manual for free 125.22614610 KENMORE in PDF.


| Product Type | Upright Vacuum Cleaner |
| Brand | Kenmore |
| Model | 125.22614610 |
| Dimensions (L x W x H) | 12 x 11 x 42 inches |
| Weight | 15 lbs |
| Power | 12 Amps, 120V |
| Dust Bag Capacity | 3.5 L |
| Cord Length | 30 ft |
| Filtration | HEPA Media Filter |
| Cleaning Path Width | 13 inches |
| Suction Power | 200 Air Watts |
| Brush Roll | Motorized with height adjustment |
| Attachments | Crevasse tool, dusting brush, upholstery tool, extension wand |
| Noise Level | 70 dB |
| Maintenance | Replace belt annually, clean filter monthly |
| Warranty | 5 years limited |
Frequently Asked Questions - 125.22614610 KENMORE
User questions about 125.22614610 KENMORE
0 question about this device. Answer the ones you know or ask your own.
Ask a new question about this device
Download the instructions for your Vacuum Cleaner in PDF format for free! Find your manual 125.22614610 - KENMORE and take your electronic device back in hand. On this page are published all the documents necessary for the use of your device. 125.22614610 by KENMORE.
USER MANUAL 125.22614610 KENMORE
Vacuum Cleaner Help Line:
1-877-531-7321
8:00am-5:00pm EST, M-F
Sears Brands Management Corporation
Hoffman Estates, IL 60179 USA
www.kenmore.com
www.sears.com
TABLE OF CONTENTS
Before Using Your New Vacuum Cleaner.... 2
Packing List 2
Kenmore Vacuum Cleaner Warranty 3
Important Safety Instructions....4
Parts and Features 5-7
Assembly Instructions 8-9
Operating Instructions 10
Canister Care 16
PowerMate® Care....21
Troubleshooting 24-25
Notes 26
Requesting Assistance Or Service ....Back Cover
BEFORE USING YOUR NEW VACUUM CLEANER
Please read this guide. It will help you assemble and operate your new Kenmore vacuum cleaner in the safest and most effective way.
For more information about vacuum cleaner care and operation, call the Vacuum Cleaner Help Line at 1-877-531-7321. You will need the complete model and serial numbers when requesting information. Your vacuum cleaner's model and serial numbers are located on the Model and Serial Number Plate.
Use the space below to record the model number and serial number of your new Kenmore vacuum cleaner.
Model No.
Serial No. ____
Date of Purchase ____
Keep this book and your sales check (receipt) in a safe place for future reference.
PACKING LIST
Your KENMORE VACUUM CLEANER is packaged with the following parts and components assembled separately in the carton:
- Canister Vacuum Cleaner
- PowerMate®
- Hose & Handle Assembly
- Pet PowerMate™
-
Telescoping Wand
-
Tool Caddy
- Crevice Tool
- Dusting Brush
- Use & Care Guide
KENMORE VACUUM CLEANER WARRANTY
KENMORE LIMITED WARRANTY
FOR ONE YEAR from the date of sale this appliance is warranted against defects in material or workmanship when it is correctly installed, operated and maintained according to all supplied instructions.
WITH PROOF OF SALE, a defective appliance will receive free repair or replacement at option of seller.
For warranty coverage details to obtain free replacement, visit the web page: www.kenmore.com/warranty.
This warranty applies for only 90 DAYS from the sale date if this appliance is ever used for other than private household purposes.
This warranty covers ONLY defects in material and workmanship, and will NOT pay for:
- Expendable items that can wear out from normal use, including but not limited to filters, belts, bags or screw-in base light bulbs.
- A service technician to clean or maintain this appliance, or to instruct the user in correct appliance installation, operation and maintenance.
- Service calls to correct appliance installation not performed by Sears authorized service agents, or to repair problems with house fuses, circuit breakers, house wiring, and plumbing or gas supply systems resulting from such installation.
- Damage to or failure of this appliance resulting from installation not performed by Sears authorized service agents, including installation that was not in accord with electrical, gas or plumbing codes.
- Damage to or failure of this appliance, including discoloration or surface rust, if it is not correctly operated and maintained according to all supplied instructions.
- Damage to or failure of this appliance, including discoloration or surface rust, resulting from accident, alteration, abuse, misuse or use for other than its intended purpose.
- Damage to or failure of this appliance, including discoloration or surface rust, caused by the use of detergents, cleaners, chemicals or utensils other than those recommended in all instructions supplied with the product.
- Damage to or failure of parts or systems resulting from unauthorized modifications made to this appliance.
- Service to an appliance if the model and serial plate is missing, altered, or cannot easily be determined to have the appropriate certification logo.
Disclaimer of implied warranties; limitation of remedies
Customer's sole and exclusive remedy under this limited warranty shall be product repair or replacement as provided herein. Implied warranties, including warranties of merchantability or fitness for a particular purpose, are limited to one year or the shortest period allowed by law. Seller shall not be liable for incidental or consequential damages. Some states and provinces do not allow the exclusion or limitation of incidental or consequential damages, or limitation on the duration of implied warranties of merchantability or fitness, so these exclusions or limitations may not apply to you.
This warranty applies only while this appliance is used in the United States.
This warranty gives you specific legal rights, and you may also have other rights which vary from state to state.
Sears Brands Management Corporation, Hoffman Estates, IL 60179
IMPORTANT SAFETY INSTRUCTIONS
Read all instructions in this guide before assembling or using your vacuum cleaner.
WARNING:
Your safety is important to us. To reduce the risk of fire, electrical shock, injury to persons or damage when using your vacuum cleaner, follow basic safety precautions including the following:
Use your vacuum cleaner only as described in this guide. Use only with Sears recommended attachments.
Disconnect electrical supply before servicing or cleaning out the brush area. Failure to do so could result in brush unexpectedly starting causing personal injury from moving parts.
Do not leave vacuum cleaner when plugged in. Unplug from outlet when not in use and before performing maintenance.
To reduce the risk of electrical shock - Do not use outdoors or on wet surfaces.
Do not allow to be used as a toy. Close attention is necessary when used by or near children.
Do not use with a damaged cord or plug. If vacuum cleaner is not working as it should, has been dropped, damaged, left outdoors, or dropped in water, take it to a qualified service dealer for inspection and possible repair.
Do not pull or carry by cord, use cord as a handle, close a door on cord, or pull cord around sharp edges or corners. Do not run vacuum cleaner over cord. Keep cord away from heated surfaces.
Do not unplug by pulling on cord. To unplug, grasp the plug, not the cord.
Do not handle plug or vacuum cleaner with wet hands.
Do not put any objects into openings.
Do not use with any opening blocked; keep free of dust, lint, hair, and anything that may reduce air flow.
Keep hair, loose clothing, fingers, and all parts of body away from openings and moving parts.
Turn off all controls before unplugging.
Use extra care when cleaning on stairs.
Do not put on chairs, tables, etc. Keep on floor.
Do not use vacuum cleaner to pick up flammable or combustible liquids (gasoline, cleaning fluid, perfumes, etc.), or use in areas where they may be present. The fumes from these substances can create a fire hazard or explosion.
Do not pick up anything that is burning or smoking, such as cigarettes, matches, or hot ashes.
Do not use vacuum cleaner without dust cup and/or filters in place.
Always empty the dust cup after vacuuming carpet cleaners or freshener, powders, and fine dust. These products clog the dust cup, reduce airflow and can cause the bag to burst. Failure to empty the dust cup could cause permanent damage to the vacuum cleaner.
Do not use the vacuum cleaner to pick up sharp hard objects, small toys, pins, paper clips, etc. They may damage the vacuum cleaner.
Do not operate the vacuum cleaner without the exhaust filter or filter door in place.
The hose contains electrical wires. Do not use when damaged, cut, or punctured. Replace if cut or worn. Do not pick up sharp objects.
Always turn off and unplug vacuum cleaner before connecting or disconnecting either hose, wand, Pet PowerMate ™ , or PowerMate ® .
Hold plug when rewinding onto cord reel. Do not allow plug to whip when rewinding.
You are responsible for making sure that your vacuum cleaner is not used by anyone unable to operate it properly.
WARNING:
This product contains a chemical known to the state of California to cause cancer and birth defects or other reproductive harm.
SAVE THESE INSTRUCTIONS
Proper assembly and safe use of your vacuum cleaner are your responsibilities. Your vacuum cleaner is intended for Household use. Read this Use & Care Guide carefully for important use and safety information. This guide contains safety statements under warning and caution symbols.
PARTS AND FEATURES
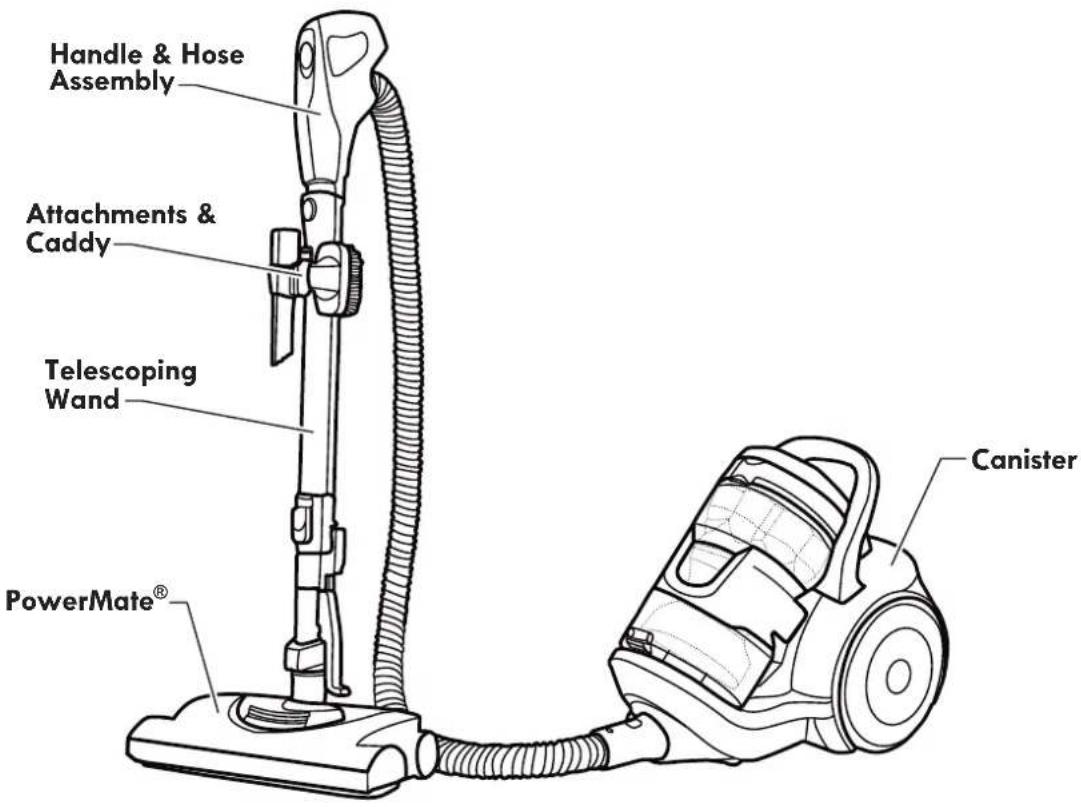
It is important to know your vacuum cleaner's parts and features to ensure its proper and safe use. Review these before using your vacuum cleaner.
REPLACEMENT PARTS
| Part | Part No. |
| Belt | 20-53013* |
| Headlight Bulb | 20-5248 |
| Exhaust Filter | 20-53296* |
| Primary Filter | KC44KDMTZ000 |
| To order a replacement part call 1-844-553-6667 or visit www.searspartsdirect.com* Available online at www.sears.com | |
NOTE: Detailed illustrations and listings of all vacuum cleaner parts are also available at searspartsdirect.com
TELESCOPING WAND & ATTACHMENTS

HANDLE & HOSE ASSEMBLY
3-Way On/Off Switch
Off/Floor/Carpet

CANISTER


Please pay special attention to these hazard alert boxes, and follow any instructions given. WARNING statements alert you to such dangers as fire, electric shock, burns and personal injury. CAUTION statements alert you to such dangers as personal injury and/or property damage.
ASSEMBLY INSTRUCTIONS

WARNING
Electrical Shock Hazard
DO NOT plug into electrical supply until assembly is complete. Failure to do so could result in electrical shock or injury.
Before assembling vacuum cleaner, check the PACKING LIST (page 2). Use this list to verify that you have received all the components of your new Kenmore vacuum cleaner.
POWERMATE®
Insert telescoping wand into PowerMate® until the wand button snaps into place. A noticeable "click" should be heard.
To remove: Press wand quick release pedal and pull telescoping wand out of PowerMate®.
HANDLE
Insert handle into telescoping wand until lock button snaps in place. Be sure hose is not twisted.
To remove: Press handle quick release button and pull up on handle.
To store: Disconnect hose from telescoping wand and canister to prevent stress on hose during storage. Store hose in a loosely coiled position so the hose covering is not stressed.

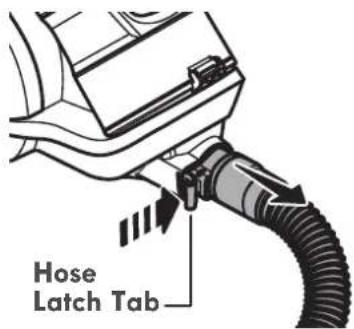
HOSE
Align the hose latch tab and notch in canister hood and insert hose into canister until it snaps in place.

To remove:
Press hose latch
tab inward and
pull out on hose.
CADDY
Align the tab on the telescoping wand with the slot in the caddy.
Press the caddy onto the telescoping wand and snap the caddy into place.

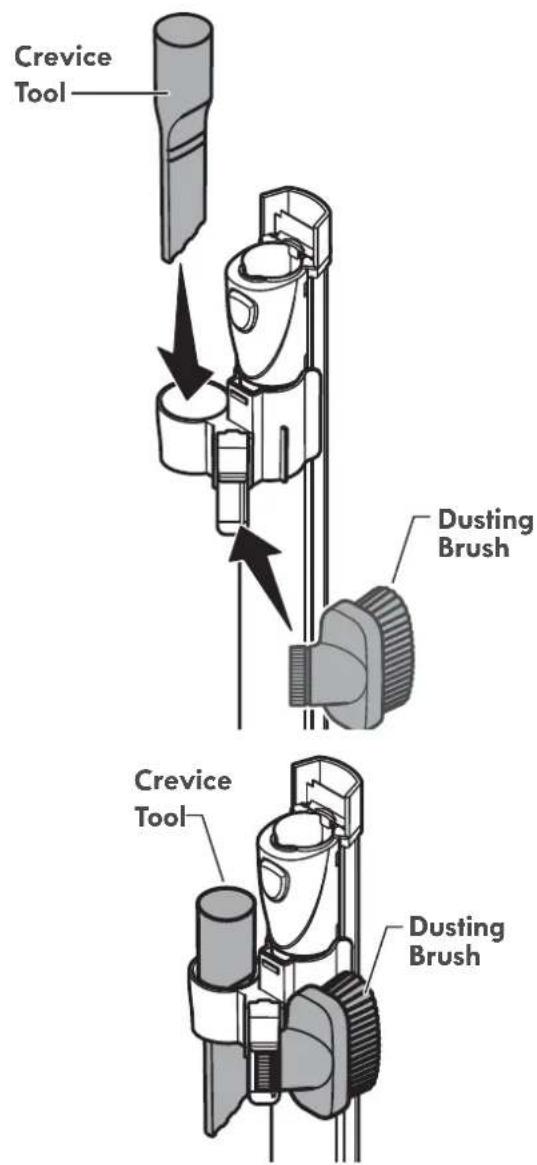
ATTACHMENTS
Install the crevice tool and dusting brush into the caddy as shown.
OPERATING INSTRUCTIONS

CAUTION
Moving parts! To reduce the risk of personal injury, DO NOT touch the agitator when vacuum cleaner is on. Contacting the agitator while it is rotating can cut, bruise or cause other injuries. Always turn off and unplug from electrical outlet before servicing.
Use caution when operating near children.

HOW TO START

WARNING
Personal Injury and Product Damage Hazard
• DO NOT place hands or feet under the vacuum cleaner at any time.
• DO NOT plug in if switch is in ON position. Personal injury or property damage could result.
- The cord moves rapidly when rewinding. Keep children away and provide a clear path when rewinding the cord to prevent personal injury.
• DO NOT use outlets above counters. Damage from cord to items in surrounding area could occur.
- When any abnormality/failure occurs, stop using the product immediately and disconnect the power plug.
- Pull cord out of canister to desired length. The cord will not rewind until the cord rewind button is pushed.

natural_image
Line drawing of a hand using a screwdriver to adjust or install a vacuum cleaner's air vent (no text or symbols present)- Plug the polarized power cord into a 120 Volt outlet located near the floor.

natural_image
Hand inserting a plug into an electrical outlet (no text or symbols visible)NOTE: To reduce the risk of electric shock, this vacuum cleaner has a polarized plug; one blade is wider than the other. This plug will fit in a polarized outlet only one way. If the plug does not fit fully in the outlet, reverse the plug. If it still does not fit, contact a qualified electrician to install the proper outlet. Do not change the plug in any way.
To rewind: Unplug the vacuum cleaner. Hold the plug while rewinding to prevent damage or injury from the moving cord. Push cord rewind button.
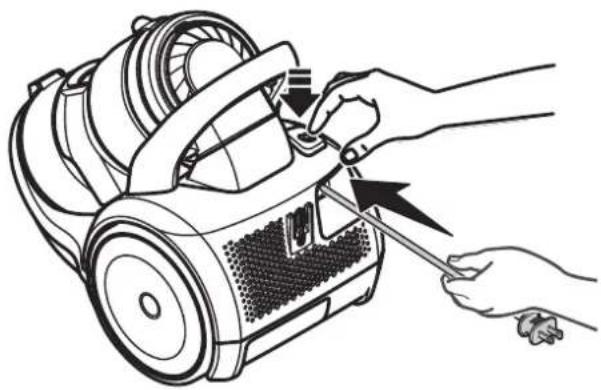
natural_image
Line drawing of a hand using a screwdriver to adjust or install a vacuum cleaner's air vent (no text or symbols present)- Lower handle from upright position by pressing on the handle release pedal.

- Select a pile height setting by pressing the small pedal on the rear of the PowerMate®. The pile height setting shows on the indicator.
SUGGESTED PILE HEIGHT SETTINGS:
For best deep down cleaning, use the XLO setting. However, you may need to raise the height to make some jobs easier, such as scatter rugs and some deep pile carpets, and to prevent the vacuum cleaner from shutting off. Suggested settings are:
HI – Shag, deep pile, super-soft or ultra-plush carpets, and scatter rugs.
MED – Medium to deep pile.
LO – Low to medium pile.
XLO – The preferred setting for many carpets and also for bare floors.
NOTE: To protect bare floors, place the 3-Way On/Off switch in the FLOOR position to turn off agitator rotation.
Attention: Refer to your carpet manufacturers cleaning recommendations. Some more delicate carpets may require that they be vacuumed with the PowerMate® agitator turned off to prevent carpet damage.

CAUTION
DO NOT leave the PowerMate ® running in one spot in the upright position for any length of time. Damage to carpet may occur.
- Select a switch position on the handle.
OFF - Slide the switch all the way back to turn off both the canister and the PowerMate motors.
FLOOR - turns on the canister motor only. The PowerMate® agitator will not spin.
CARPET - turns on both the canister and the PowerMate® motors.
The PowerMate® agitator will spin.
NOTE - When this switch is in the FLOOR position, the headlight DOES NOT function since no electricity flows to the PowerMate®.

TELESCOPING WAND
The telescoping wand length is adjustable and requires no assembly. To adjust, simply push down on the wand adjust button and slide the upper portion of the telescoping wand to the desired height.
NOTE: When adjusting the telescoping wand length you may have to hold the PowerMate ® with your hand or foot.

VACUUMING TIPS

WARNING
Personal Injury and Product Damage Hazard
- DO NOT run over power cord with PowerMate®. Personal injury or product damage could result.
- DO NOT pull plug from wall by the power cord. If there is damage to the cord or plug, personal injury or property damage could result.

CAUTION
Product Damage Hazard
Use care if the PowerMate ® and wand is left in the upright position as it may tip over easily. Property damage can occur if tipped.
Suggested sweeping pattern.
For best cleaning action, the PowerMate ® should be pushed straight away from you and pulled straight back. At the end of each pull stroke, the direction of the PowerMate ® should be changed to point into the next section to be cleaned. This pattern should be continued across the carpet with slow, gliding motions.
NOTE: Fast, jerky strokes do not provide complete cleaning.

natural_image
Illustration of a person using a vacuum cleaner with motion arrows indicating airflow (no text or symbols)
natural_image
Line drawing of a mechanical component with a coiled hose and connector (no text or symbols)The hose swivel allows the hose to turn without moving the canister. This is helpful for cleaning in small areas.
Check hose for twisting before pulling canister.

WARNING
Personal Injury Hazard
Use care if canister is placed on stairs. It may fall, causing personal injury or property damage.

CAUTION
Product Damage Hazard
Do not pull on the hose to move the canister from one stair to the next. When finished cleaning in one area use the handle grip on the canister to move the vacuum cleaner to a new location for further cleaning.
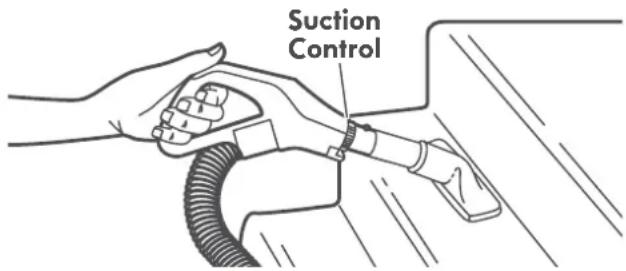
Carpeted stairs need to be vacuumed regularly. For best cleaning results, fully close the suction control.
For best cleaning results, keep the airflow passage open. Check each assembly area in REMOVING CLOGS (page 16) occasionally for clogs. Turn off and unplug vacuum cleaner from outlet before checking.
ATTACHMENTS

CAUTION
DO NOT attach or remove handle or telescoping wand while vacuum cleaner is ON. This could cause sparking and damage the electrical contacts.
ATTACHMENTS ON HANDLE
NOTE: If the
PowerMate ® is attached, turn off and unplug vacuum cleaner before removing handle from telescoping wand.
- Press handle quick release button and pull up on handle.
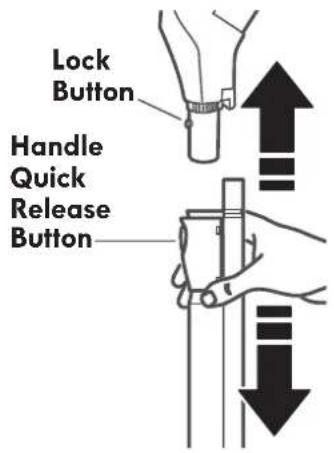
- Slide attachments firmly on handle as needed. See ATTACHMENT USE TABLE (page 14).
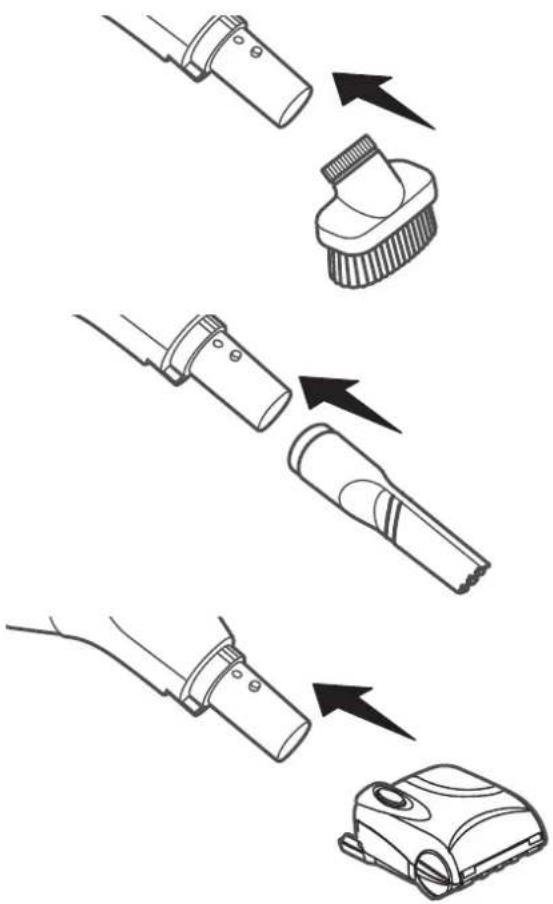
ATTACHMENTS ON TELESCOPING WAND
- To remove telescoping wand from PowerMate®, lock telescoping wand in straight-up position.

natural_image
Line drawing of a robotic vacuum cleaner emitting exhaust air, with no text or symbols present.- Press wand quick release pedal with foot and pull the telescoping wand straight up and out of PowerMate®.

- Put attachments on telescoping wand as needed. See ATTACHMENT USE TABLE (page 14).
ATTACHMENT USE TABLE
| CLEANING AREA | ||||||||
| ATTACHMENT | Furniture 1 | Between Cushions 1 | Drapes 1 | Stairs | Bare Floors | Carpeted Floors/Rugs | Walls | |
| Crevice tool |  | √ | √ | √ | ||||
| Dusting brush |  | √ | √ | √ | √ | |||
| PowerMate® |  | √2 | √ | |||||
| Pet PowerMateTM3 |  | √ | √ | |||||
- Always clean attachments before using on fabrics.
- 3-way switch should be in FLOOR position.
- Pet PowerMate™ attachment instructions are included with the product.
PERFORMANCE FEATURES

WARNING
Personal Injury Hazard
Always turn off and unp!ug the vacuum cleaner before cleaning the agitator area as agitator may suddenly restart. Failure to do so can result in personal injury.
THERMAL PROTECTOR
This vacuum cleaner has a thermal protector which automatically trips to protect the vacuum cleaner from overheating. If a clog prevents the normal flow of air to the motor, the thermal protector turns the motor off automatically. This allows the motor to cool in order to prevent possible damage to the vacuum cleaner.
To correct problem: Turn the vacuum cleaner off and unplug the power cord from the outlet to allow the vacuum cleaner to cool and the thermal protector to reset. Check for and remove clogs, if necessary. Also check and replace any clogged filters. Wait approximately fifty (50) minutes and plug the vacuum cleaner in and turn back on to see if the motor protector has reset.
MOTOR PROTECTOR
This vacuum cleaner also has a motor protector by-pass valve which prevents motor overheating and damage. The valve opens to provide cooling air when a clog prevents normal air flow to the

vacuum cleaner suction motor. You will notice a change of sound as air rushes through the valve opening.
To correct problem: Empty the dust cup and clean the primary filter and pre-filter. Check for and remove clogs, and empty dust cup if necessary. See REMOVING CLOGS (page 16).
NOTE: Do not block motor protector.
NOTE: The motor protector may open when using attachments or when cleaning new carpet due to reduced airflow caused by the attachments themselves or by new carpet.
BELT RESET
The PowerMate ® has built-in protection against motor and belt damage should the agitator jam. If the agitator slows down or stops, the belt reset shuts off the PowerMate ® . The canister motor will continue to run.
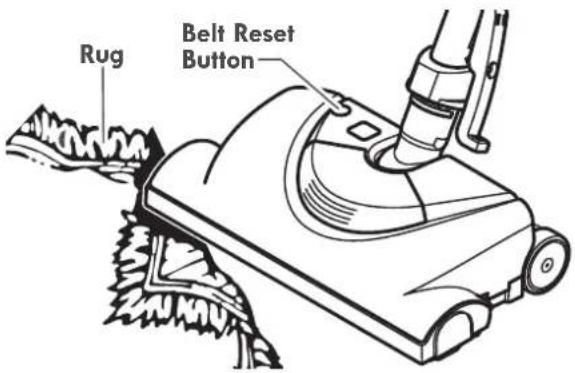
To correct problem: Turn off and unplug vacuum cleaner, remove obstruction, then press BELT RESET button.
If the problem persists, have the vacuum cleaner serviced by a Sears or other qualified service agent.
EDGE CLEANER
Active brush edge cleaners are on both sides of the PowerMate®. Guide either side of the PowerMate® along base-boards or next to furniture to help remove dirt trapped at carpet edges.

natural_image
Line drawing of a vacuum cleaner with a pipette, mounted on a base (no text or symbols)SUCTION CONTROL
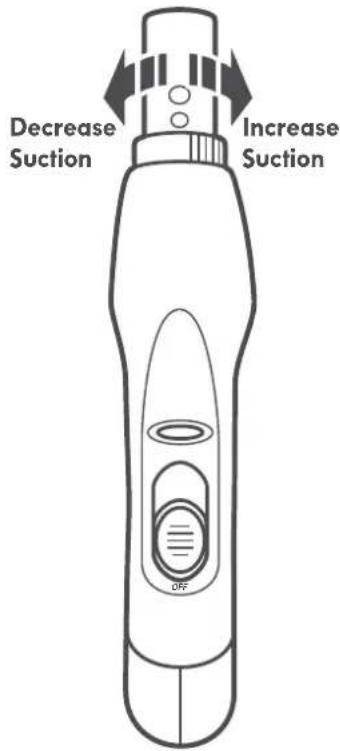
The suction control allows you to change the vacuum suction for different fabrics and carpet weights.
Opening the control decreases suction for draperies and lightweight rugs, while closing the control increases suction for upholsteries and carpets.
REMOVING CLOGS
The vacuum cleaner creates suction that picks up dirt. Rapidly moving air carries the dirt to the dust cup through the airflow passages. The dust Cup lets the air pass through, while it traps the dirt.
For best cleaning results, keep the airflow passage open. Check the starred areas occasionally for clogs. Turn off and unplug vacuum cleaner from outlet before checking.

TO CHECK FOR CLOGS:
- Check dust cup and empty if full. See EMPTYING DUST CUP (page 17).
- Check pre-filter, primary filter and exhaust filter and clean/replace if dirty. See PRE-FILTER CLEANING (page 18), PRIMARY FILTER CLEANING (page 19) and EXHAUST FILTER CHANGING (page 20).
- Check PowerMate® for any dirt or debris in the belt path area or in the agitator area. Carefully remove any string or debris located on the agitator or end caps. See "TO CLEAN AGITATOR" in BELT CHANGING AND AGITATOR CLEANING (pages 21-22).
If the vacuum cleaner still has poor suction, do the following:
- Connect the hose to the canister and turn vacuum cleaner on. Check the end of the hose for suction. If there is good suction on the hose handle, there is no clog in the hose. If the suction is bad, remove any dirt or debris in the hose and handle.
- Connect hose handle to wand. Check the end of the wand for suction. If there is good suction at the end of the wand, there is no clog in the wand. If the suction is bad, remove any dirt or debris in the wand.
- Check PowerMate ® swivel. Remove any dirt or debris.
CLEANING EXTERIOR AND ATTACHMENTS
- Turn off and unplug vacuum cleaner. DO NOT drip water on vacuum cleaner.
- To clean exterior, or to reduce static electricity and dust build-up, wipe outer surface with a clean, soft cloth that has been dipped in a solution of mild liquid detergent and water, then wrung dry. Wipe dry after cleaning.

CAUTION
Do not use attachments if they are wet. Attachments used in dirty areas, such as under a refrigerator, should not be used on other surfaces until they are washed. They could leave marks.
EMPTYING DUST CUP
TO REMOVE DUST CUP
-
Turn off and unplug vacuum cleaner.
-
Lift dust cup handle located at the top of the dust cup.

- Pull the handle up and lift dust cup up and out of the vacuum cleaner.

natural_image
Line drawing of a vacuum cleaner with handle and mounting bracket (no text or symbols)- Remove any clogs that might be located in the suction port or filter port area.

TO EMPTY DUST CUP
-
Rotate dust cup handle to the vertical position.
-
Hold dust cup over a trash container.


- Press the dust cup latch slightly outwards and downward to release the door.
The door will swing open and the debris will fall into the trash container.
-
Shake the dust cup to release any debris that might hang in the pre-filter.
-
After the dust cup is empty of debris, firmly close the door. Make sure you hear a "click" sound to indicate that the door is fully latched.

natural_image
Line drawing of a hand pressing down on a mechanical component with an arrow indicating motion (no text or symbols)TO REPLACE DUST CUP

-
Place dust cup back into vacuum cleaner by inserting the bottom first and tilting back with the dust cup handle raised.
-
Lower the dust cup handle to lock dust cup in place.
A noticeable "click" should be heard.

natural_image
Line drawing of a hand pressing down on a mechanical component (no text or symbols)PRE-FILTER CLEANING
The pre-filter is located inside the dust cup. Check the pre-filter frequently and clean when dirty.
- Remove the dust cup as outlined in the EMPTYING DUST CUP (page 17).
NOTE: Make sure dust cup is free of debris before opening.
- Rotate dust cup lid assembly counterclockwise as indicated on the lid and lift off.

-
Grasp pre-filter and rotate counterclockwise to remove.
-
Clean pre-filter by gently tapping over a trash container. Tap on several sides to ensure best cleaning.
If necessary, rinse with cold water only, DO NOT use detergent or soap. Allow parts to dry 24 hours before putting back into vacuum cleaner.
DO NOT wash in the dishwasher. DO NOT install damp.
To Reinstall:
-
Align the slots on the pre-filter with the alignment tabs inside dust cup lid assembly.
-
Rotate pre-filter clockwise to lock in place.

- Replace the lower portion of the dust cup by aligning marks as shown, UNLOCKED (For Cleaning).

-
Rotate while pressing downward until marks align as shown; LOCKED (For Use).
-
Reinstall the dust cup. See EMPTYING DUST CUP (page 17).
PRIMARY FILTER CLEANING
The primary filter is located inside the dust cup lid.

It is recommended to clean the primary filter with cold water at least every (1) month. Check the primary filter frequently and clean when dirty.
NOTE: When the cleaning of the filter no longer restores vacuum cleaner suction to full power, replace the filter.
-
Remove the dust cup as outlined in the EMPTYING DUST CUP (page 17).
-
Pull the dust cup lid latch and open the lid.
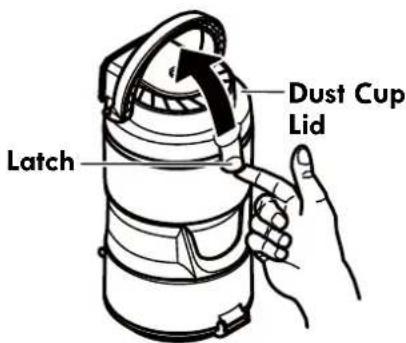
- Remove the primary filter.

- Wash with cold water only, DO NOT use detergent or soap. squeeze by hand and allow to air dry. Allow parts to dry 24 hours before putting back into vacuum cleaner.
DO NOT operate without primary filter installed. DO NOT wash in the dishwasher. DO NOT install primary filter if damp.
To Reinstall:
- Place the primary filter into the dust cup lid.

- Close the dust cup lid. Be sure the lid snaps in place. A noticeable "click" should be heard.

- Reinstall the dust cup. See EMPTYING DUST CUP (page 17).
EXHAUST FILTER CHANGING

WARNING
Fire and/or Electrical Shock Hazard Do not operate with a clogged exhaust filter or without the exhaust filter or exhaust filter tray installed.
HEPA MEDIA EXHAUST FILTER
The exhaust filter cartridge must be replaced when dirty. Replace the filter when the entire surface area is covered evenly. The filter CANNOT be washed as it will lose its dust trapping ability.
NOTE: See PARTS AND FEATURES (page 5) for Exhaust Filter number.
- Pull out and up on the exhaust filter tray to remove from the canister.
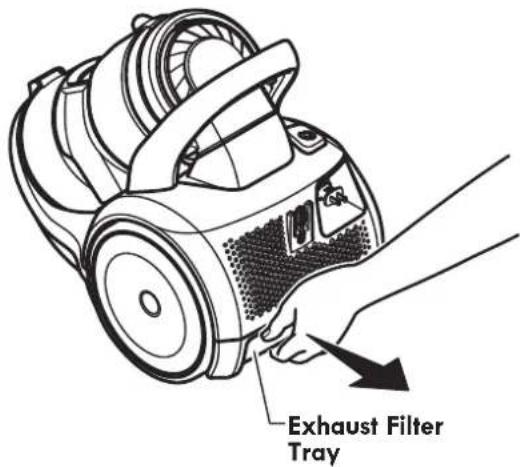
- Remove exhaust filter from filter tray and dispose.

- Replace exhaust filter cartridge. Place the new filter cartridge into the exhaust filter tray as shown.

- Reinstall the exhaust filter tray. Press into place until it snaps closed.

natural_image
Line drawing of a vacuum cleaner with an attached air vent (no text or symbols)POWERMATE® CARE
Always follow all safety precautions when performing maintenance on the PowerMate®.

WARNING
Electrical Shock Or Personal Injury Hazard.
Always turn off and unplug vacuum cleaner before performing maintenance to the vacuum cleaner. Failure to do so could result in electrical shock or personal injury from vacuum cleaner suddenly starting.
BELT CHANGING AND AGITATOR CLEANING
TO REMOVE BELT

natural_image
Line drawing of a hand using a tool to adjust or install a mechanical component (no text or symbols visible)- Turn PowerMate® upside down.
-
Unscrew two (2) PowerMate ® cover screws.
-
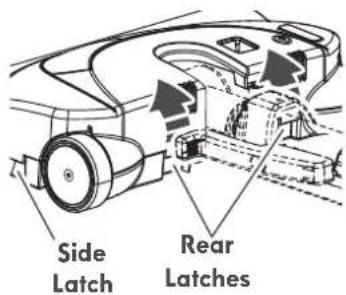
Turn PowerMate® right side up. Press handle release pedal and lower the swivel. Lift rear and side latches up.

natural_image
Illustration of hands operating a mechanical device with arrows indicating motion (no text or symbols)-
To remove cover, grasp the sides and pull out.
-
Lift agitator assembly out and remove worn belt.

- Check and clean end cap areas. See TO CLEAN AGITATOR (page 22) section and AGITATOR ASSEMBLY illustration (page 22) for picture of complete agitator assembly.
TO REPLACE BELT
- Install new belt over motor drive, then over belt path.


natural_image
Diagram of a hand operating a device with a downward arrow indicating a process (no text or symbols present)NOTE: See PARTS AND FEATURES (page 5). for Belt number.
-
Push agitator assembly back into PowerMate®.
-
Line up front of cover and base. Rest cover on front edge of base as shown.


- Rotate cover back. Press cover firmly until side and rear latches snap into place.
Make sure there is no gap between the cover and base.
- Turn PowerMate ® upside down and replace two (2) cover screws.
TO CLEAN AGITATOR:
NOTE: In order to keep cleaning efficiency high and to prevent damage to your vacuum cleaner, the agitator must be cleaned every time the belt is changed.
The agitator must also be cleaned according to the following schedule:
Vacuum Cleaner Use Clean Agitator
HEAVY - every week
(used daily)
MODERATE - every month
(used 2-3 times/week)
LIGHT - every 2 months
(used 1 time/week)
IMPORTANT
Turn off and unplug vacuum cleaner from electrical outlet. Check and remove hair, string and lint build-up frequently in the PowerMate® agitator and end cap areas.
Remove any dirt or debris in the belt path area or in the brush roller area.
Carefully remove any string or debris located on the agitator or end caps.
AGITATOR ASSEMBLY

LIGHT BULB CHANGING

WARNING
Electrical Shock Or Personal Injury Hazard
Turn off and unplug vacuum cleaner before performing maintenance to the vacuum cleaner. Failure to do so could result in electrical shock or personal injury from the vacuum cleaner suddenly starting.

CAUTION
Do not plug in or turn on until the vacuum cleaner is completely reassembled.
- Remove PowerMate® cover as shown in BELT CHANGING AND AGITATOR CLEANING (pages 21-22).
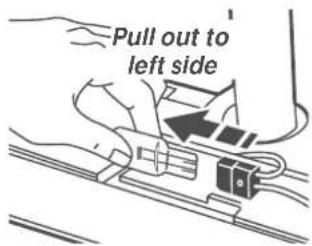
- Remove the light bulb by pulling straight out.

CAUTION
Do not use a bulb rated over 9W (13V). During extended use, heat from the bulb could overheat surrounding plastic parts.

-
To replace the light bulb, carefully insert fully into slot.
-
Reinstall PowerMate ® cover as shown in BELT CHANGING AND AGITATOR CLEANING (pages 21-22).
NOTE: See PARTS AND FEATURES (page 5) for Bulb number.
AGITATOR SERVICING

WARNING
Electrical Shock Or Personal Injury Hazard Turn off and unplug vacuum cleaner electrical supply before performing maintenance to the vacuum cleaner. Failure to do so could result in electrical shock or personal injury from vacuum cleaner suddenly starting.
TO CHECK THE BRUSHES
When brushes are worn to the level of the base support bars, replace the agitator assembly.

TO REPLACE AGITATOR ASSEMBLY
- Remove PowerMate® cover, belt and agitator assembly. See "To Remove Belt" in BELT CHANGING AND AGITATOR CLEANING (pages 21-22).
- Replace agitator assembly.
- Reinstall belt and PowerMate® cover. See "To replace belt" in BELT CHANGING AND AGITATOR CLEANING (pages 21-22).
TROUBLESHOOTING
Review this table to find do-it-yourself solutions for minor performance problems. Any other service needed should be performed by a Sears or other qualified service agent.

WARNING
Always turn off and unplug vacuum cleaner before performing maintenance to the vacuum cleaner. Failure to do so could result in electrical shock or personal injury.
| PROBLEM | POSSIBLE CAUSE | POSSIBLE SOLUTION |
| Vacuum cleaner won't start. | 1. Unplugged at wall outlet.2. Tripped circuit breaker/ blown fuse at household service panel.3. Loose hose electrical connections. | 1. Plug in firmly, move switch to FLOOR or CARPET position.2. Reset circuit breaker or replace fuse.3. Reconnect hose ends. |
| Poor job of dirt pick-up. | 1. Full or clogged dust cup.2. Clogged airflow passages.3. Dirty filters.4. Wrong pile height setting.5. Suction control is open.6. Hole in hose.7. Worn PowerMate® agitator.8. Worn or broken belt.9. Dirty agitator or end caps.10. Dust cup installed incorrectly.11. Dust cup lid and dust cup missassembly. | 1. Empty and clean dust cup.2. Clear airflow passages.3. Change/clean filters.4. Adjust setting.5. Adjust control.6. Replace hose.7. Change agitator.8 & 9. See BELT CHANGING AND AGITATOR CLEANING.10. See EMPTYING DUST CUP.11. See PRE-FILTER CLEANING. |
| Vacuum cleaner starts but shuts off. | 1. Hose electrical connection.2. Tripped overload protector in PowerMate®.3. Tripped thermal protector in canister. | 1. Check connections, reconnect hose ends.2. Remove any items that may be caught or jammed, then reset. If vacuum cleaner starts and stops again, clean agitator and end caps, then reset.3. Reset thermal protector. |
| PowerMate® will not run when attached. | 1. PowerMate® connections unplugged.2. Worn or broken belt.3. Dirty agitator or end caps.4. Tripped overload protector in PowerMate®.5. Switch not in CARPET position. | 1. Plug in firmly.2 & 3. See BELT CHANGING AND AGITATOR CLEANING.4. Remove any items that may be caught or jammed, then reset. If vacuum cleaner starts and stops again, clean agitator and end caps, then reset.5. Move switch to CARPET position. |
| PROBLEM POSSIBLE CAUSE POSSIBLE SOLUTION | ||
| Vacuum cleaner picks up moveable rugs-or- PowerMate® pushes too hard. | 1. Wrong pile height setting.2. Suction too strong. | 1. Adjust setting.2. Open suction control. |
| Light won't work. | 1. Burned out light bulb.2. Tripped overload protector in PowerMate®. | 1. Change light bulb.2. Remove any items that may be caught or jammed, then reset. If vacuum cleaner starts and stops again, clean agitator and end caps, then reset. |
| Cord won't rewind. | 1. Dirty power cord.2. Cord jammed. | 1. Clean the power cord.2. Pull out cord and rewind. |
| Vacuum cleaner leaves marks on carpet. | 1. Wrong vacuuming pattern. | 1. See VACUUMING TIPS. |
NOTES
TABLA DE CONTENIDO
Sears Brands Management Corporation, Hoffman Estates, IL 60179
natural_image
Prohibition sign over a vehicle, no text or symbols presentPARA COMENZAR

ADVERTENCIA
natural_image
Line drawing of a hand using a screwdriver to adjust the interior of a vacuum cleaner (no text or symbols present)natural_image
Hand inserting a plug into an electrical outlet (no text or symbols visible)natural_image
Line drawing of a hand using a screwdriver to adjust or install a vacuum cleaner's air vent (no text or symbols present)TUBO TELESCÓPICO
natural_image
Illustration of a person using a vacuum cleaner with motion arrows indicating airflow (no text or symbols)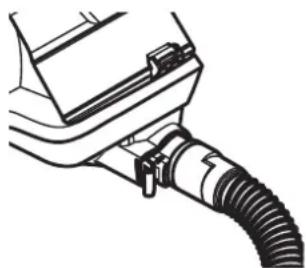
natural_image
Line drawing of a car's electrical plug with coiled cable (no text or symbols)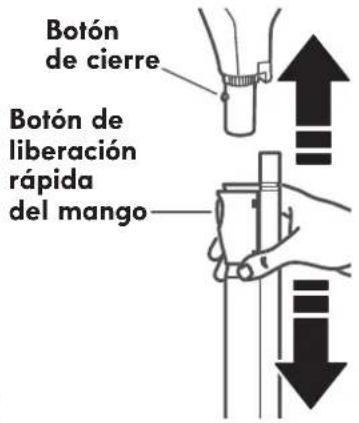
natural_image
Diagram of a mobile lawn mower with directional arrows indicating motion (no text or symbols)natural_image
Line drawing of a vacuum cleaner with a mounted device (no text or symbols)natural_image
Line drawing of a vacuum cleaner with an arrow indicating the component (no text or symbols present)natural_image
Technical line drawing of a mechanical device with no visible text or symbolsMango del contenedor de polvo
Contenedor de polvo

natural_image
Illustration of a hand pressing down on a mechanical component (no text or symbols visible)natural_image
Illustration of a hand pressing down on a mechanical component with a curved arrow indicating motion (no text or symbols)PARA REINSTALAR EL CONTENEDOR DE POLVO

natural_image
Line drawing of a hand pressing down on a mechanical component (no text or symbols)LIMPIEZA DEL PRE-FILTRO
natural_image
Line drawing of a vacuum cleaner with an attached filter device (no text or symbols)CUIDADO DE LA POWERMATE®
natural_image
Illustration of hands using a tool to adjust or install a mechanical component (no text or symbols visible)
natural_image
Illustration of hands operating a car tire with arrows indicating motion direction (no text or symbols)natural_image
Mechanical assembly diagram showing a hand pressing a component with a downward arrow indicating motion (no text or symbols present)natural_image
Illustration of hands connecting wires to a mechanical component with a black arrow indicating direction (no text or symbols)natural_image
Illustration of hands connecting wires to a small electronic component (no text or symbols visible)Vacuum Cleaner Help Line
1-877-531-7321
8:00 am - 5:00 pm ET M-F
Refer to the Troubleshooting section of the Use & Care Guide.
For additional assistance, call the Vacuum Cleaner Help Line.

- TABLE OF CONTENTS
- BEFORE USING YOUR NEW VACUUM CLEANER
- PACKING LIST
- KENMORE VACUUM CLEANER WARRANTY
- KENMORE LIMITED WARRANTY
- Disclaimer of implied warranties; limitation of remedies
- IMPORTANT SAFETY INSTRUCTIONS
- WARNING:
- SAVE THESE INSTRUCTIONS
- PARTS AND FEATURES
- TELESCOPING WAND & ATTACHMENTS
- HANDLE & HOSE ASSEMBLY
- CANISTER
- ASSEMBLY INSTRUCTIONS
- WARNING
- POWERMATE®
- HANDLE
- HOSE
- CADDY
- ATTACHMENTS
- OPERATING INSTRUCTIONS
- CAUTION
- HOW TO START
- SUGGESTED PILE HEIGHT SETTINGS:
- TELESCOPING WAND
- VACUUMING TIPS
- Suggested sweeping pattern.
- ATTACHMENTS ON HANDLE
- ATTACHMENTS ON TELESCOPING WAND
- ATTACHMENT USE TABLE
- PERFORMANCE FEATURES
- THERMAL PROTECTOR
- MOTOR PROTECTOR
- BELT RESET
- EDGE CLEANER
- SUCTION CONTROL
- REMOVING CLOGS
- TO CHECK FOR CLOGS:
- CLEANING EXTERIOR AND ATTACHMENTS
- EMPTYING DUST CUP
- TO REMOVE DUST CUP
- TO EMPTY DUST CUP
- TO REPLACE DUST CUP
- PRE-FILTER CLEANING
- To Reinstall:
- PRIMARY FILTER CLEANING
- EXHAUST FILTER CHANGING
- HEPA MEDIA EXHAUST FILTER
- POWERMATE® CARE
- BELT CHANGING AND AGITATOR CLEANING
- TO REMOVE BELT
- TO REPLACE BELT
- TO CLEAN AGITATOR:
- IMPORTANT
- LIGHT BULB CHANGING
- AGITATOR SERVICING
- TO CHECK THE BRUSHES
- TO REPLACE AGITATOR ASSEMBLY
- TROUBLESHOOTING
- NOTES
- TABLA DE CONTENIDO
- PARA COMENZAR
- ADVERTENCIA
- TUBO TELESCÓPICO
- PARA REINSTALAR EL CONTENEDOR DE POLVO
- LIMPIEZA DEL PRE-FILTRO
- CUIDADO DE LA POWERMATE®
- Vacuum Cleaner Help Line
- 1-877-531-7321
Brand : KENMORE
Model : 125.22614610
Category : Vacuum Cleaner