
HMBC58ST - Refrigerator Magic Chef - Free user manual and instructions
Find the device manual for free HMBC58ST Magic Chef in PDF.


| Product Type | Beverage Cooler |
| Brand | Magic Chef |
| Model | HMBC58ST |
| Total Capacity | 5.1 cu. ft. |
| Width | 23.4 inches |
| Height | 33.9 inches |
| Depth | 24.3 inches |
| Net Weight | 95.2 lbs |
| Power Supply | 115 V AC / 60 Hz |
| Temperature Range | 37°F to 54°F (3°C to 12°C) |
| Number of Shelves | 3 adjustable steel shelves |
| Door Type | Reversible glass door |
| Defrost | Automatic |
| Interior Light | LED (replaceable by technician) |
| Installation | Built-in or freestanding |
| Cooling System | Compressor with R600a refrigerant |
| Controls | Electronic thermostat with digital display |
| Warranty - Parts & Labor | 1 year |
| Warranty - Compressor | 5 years (parts only) |
| Service Type | In-home |
| Included Accessories | User manual |
Frequently Asked Questions - HMBC58ST Magic Chef
User questions about HMBC58ST Magic Chef
0 question about this device. Answer the ones you know or ask your own.
Ask a new question about this device
Download the instructions for your Refrigerator in PDF format for free! Find your manual HMBC58ST - Magic Chef and take your electronic device back in hand. On this page are published all the documents necessary for the use of your device. HMBC58ST by Magic Chef.
USER MANUAL HMBC58ST Magic Chef
Wine and Beverage Center
User's Manual
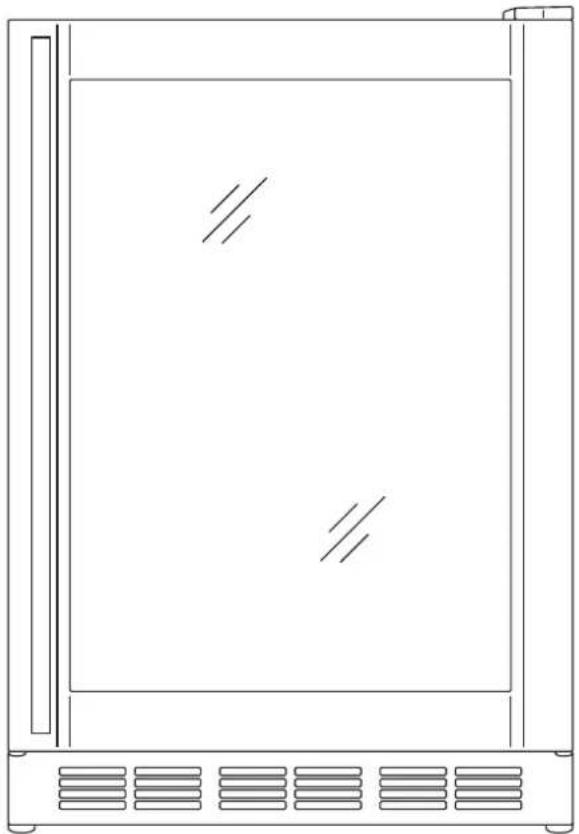
natural_image
Line drawing of a rectangular enclosure with ventilation grilles and internal doorways (no text or symbols)Model HMWC50ST / HMBC58ST
PLEASE READ THIS MANUAL CAREFULLY BEFORE USING YOUR WINE AND BEVERAGE CENTER AND KEEP IT FOR FUTURE REFERENCE.
PRODUCT REGISTRATION COPY
Thank you for purchasing a Magic Chef® product. The first step to protect your new product is to complete the product registration on our website:
www.mcappliance.com/register. The benefits of registering your product include the following:
- Registering your product will allow us to contact you regarding a safety notification or product update.
- Registering your product will allow for more efficient warranty service processing when warranty service is required.
- Registering your product could act as your proof of purchase in the event of insurance loss.
Once again, thank you for purchasing a Magic Chef® product.
TABLE OF CONTENTS
NAMES OF THE PARTS.... 3
SPECIFICATIONS....4
IMPORTANT SAFETY INSTRUCTIONS.... 5
INSTALLATION INSTRUCTIONS
BEFORE USING YOUR APPLIANCE.... 6
FREE STANDING INSTALLATION.... 6
BUILT-IN INSTALLATION.... 7
ELECTRICAL CONNECTION 7
APPLIANCE FEATURE
HMWC50ST: WINE COOLER 8
HMBC58ST: BEVERAGE COOLER 8
OPERATING YOUR APPLIANCE
HMWC50ST: WINE COOLER 9
HMBC58ST: BEVERAGE COOLER 9
CHANGING THE INNER LIGHT 10
AUTOMATIC DEFROST 10
CHANGING THE REVERSIBLE DOOR 10
CARE AND MAINTENANCE
CLEANING YOUR APPLIANCE.... 11
VACATION TIME.... 11
MOVING YOUR APPLIANCE.... 11
ENERGY SAVING TIPS.... 11
TROUBLESHOOTING GUIDE.... 12
APPLIANCE WARRANTY.... 13
MODEL NO.: HMWC50ST
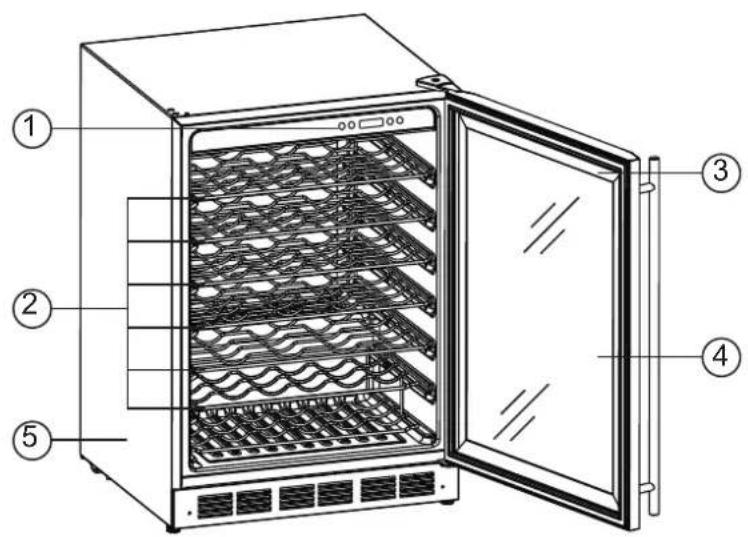
① Electronic thermostat
② Wine rack
③ Door gasket
④ Glass door ⑤
Cabinet
MODEL NO.: HMBC58ST
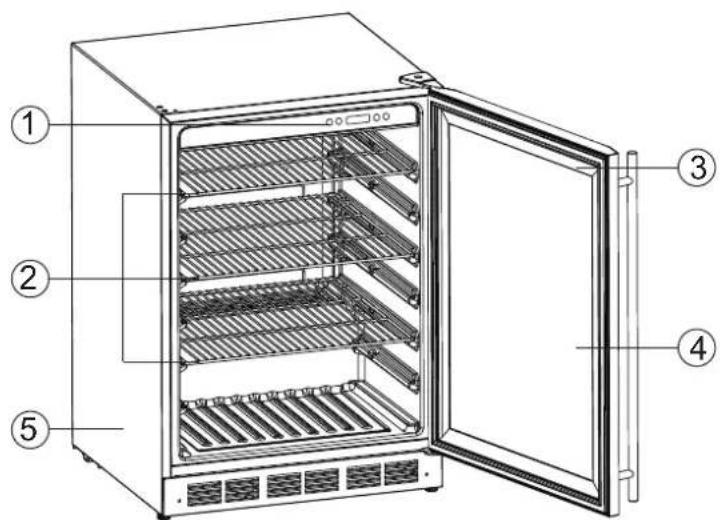
① Electronic thermostat
② Beverage shelf
③ Door gasket
④ Glass door ⑤
Cabinet
SPECIFICATIONS – Model # HMWC50ST
| Product Description | Magic Chef 50 Bottle Stainless Steel Built-In Wine Cooler | ||
| Model No. | HMWC50ST | ||
| Unit Dimensions (inches) | Width | Height | Depth |
| 23.4" | 33.9" 24.3" | ||
| Net Weight (lbs) | 99.1 lbs | ||
SPECIFICATIONS – Model # HMBC58ST
| Product Description | Magic Chef 5.1 cu.ft. Stainless Steel Built-In Beverage Cooler | ||
| Model No. | HMBC58ST | ||
| Unit Dimensions (inches) | Width | Height | Depth |
| 23.4" | 33.9" 24.3" | ||
| Net Weight (lbs) | 95.2 lbs | ||
IMPORTANT SAFETY INSTRUCTIONS
WARNING
To reduce the risk of fire, electrical shock, or injury follow these basic precautions when using your refrigerator.
1) WA RNING----Keep ventilation openings, in the appliance enclosure or in the built-in structure, clear of obstruction.
2) WARNING----Do not use mechanical devices or other means to accelerate the defrosting process, other than those recommended by the manufacturer.
3) WARNING----Do not damage the refrigerant tubing to increase the risk of a leak when handle, move and use of refrigerator.
4) WARNING----Do not use electrical appliances inside the food storage compartments of the appliances, unless they are of the type recommended by the manufacturer.
5) WARNING----DANGER: Never allow children to play with, operate, or crawl inside the refrigerator. Risk of child entrapment. Before you throw away your old refrigerator or freezer:
• Take off the doors
- Leave the shelves in place so that children may not easily climb inside.
6) The appliance has to be unplugged before carrying out user maintenance on the appliance.
7) This appliance can be used by children age 8 years and above and persons with reduced physical sensory or mental capabilities or lack of experience and knowledge if they have been given supervision or instruction concerning use of the appliance in a safe way and understand the hazards involved. Children should not play with the appliance. Cleaning and maintenance should not be made by children without supervision.
8) If the component part is damaged, it must be replaced by the manufacturer, its service agent or similar qualified persons in order to avoid a hazard.
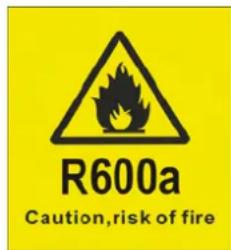
9) Please abandon the refrigerator according to local regulations as the unit contains flammable blowing gas and refrigerant.
10) Follow local regulations regarding disposal of the appliance due to flammable refrigerant and blowing gas. All refrigeration products contain refrigerants, which under the guidelines of federal law must be removed before disposal. It is the consumer's responsibility to comply with federal and local regulations when disposing of this product.
11) This appliance is intended to be used in household and similar environments; such as:
- staff kitchen areas in shops, offices and other working environments;
- farm houses and by clients in hotels, motels and other residential type environments;
• bed and breakfast type environments;
• catering and similar non-retail applications.
12) Do not store or use gasoline or any inflammable liquors and liquids inside or in the vicinity of refrigerator.
13) Do not use an extension cord with this appliance. If the power cord is too short, have a qualified electrician install an outlet near the appliance. Use of an extension can negatively affect the unit's performance.
IMPORTANT SAFETY INSTRUCTIONS
| WARNING | To reduce the risk of fire, electrical shock or injury when using your appliance, follow these basic precautions: |
| Read all instructions before using the wine or beverage cooler.DANGER or WARNING:Risk of child entrapment.To avoid the possibility of child entrapment, please take the following precaution before throwing out the appliance.Remove all doors from the unit.Leave the shelves in place so that children may not easily climb inside.Never allow children to operate, play with, or crawl inside the appliance.Refrigerants:All refrigeration products contain refrigerants, which under the guidelines of federal law must be removed before disposal of product. It is the consumer's responsibility to comply with federal and local regulations when disposing of this product.Never clean appliance parts with flammable fluids. The fumes can create a fire hazard or explosion.Do not store or use gasoline or any other flammable vapors and liquids in the of this or any other appliance. The fumes can create a fire hazard or an exp-Save these instructions- | |
INSTALLATION INSTRUCTIONS
Before Using Your Appliance
- Remove the exterior and interior packing.
- Before connecting the appliance to the power source, let it stand upright for approximately 4 hours. This will reduce the possibility of a malfunction in the cooling system from improper handling during transportation.
- Clean the interior surface with lukewarm water using a soft cloth. (Cleaning instruction on page 11)
Free-Standing Installation
• This appliance is designed to be installed built-in or free standing.
- Locate the appliance away from direct sunlight and sources of heat (stove, heater, radiator, etc.). Direct sunlight may affect the acrylic coating and heat sources may increase electrical consumption. Ambient temperature below 55°F (12.8°C) or above 77°F (25°C) will hinder the performance of this appliance. This unit is not designed for use in a garage or any other outside installation.
- Avoid locating the appliance in moist areas.
- Plug the appliance into dedicated, properly installed-grounded wall outlet. Do not under any circumstances cut or remove the third (ground) prong from the power cord. Any questions concerning power and/or grounding should be directed toward a certified electrician or an authorized service center. This unit is not designed to be installed in an RV or used with an inverter.
- After plugging the appliance into a wall outlet, turn the unit on and allow the unit to cool down for 3 \~ 4 hours under before placing wine bottles or beverages in the appliance.
Built-In Installation
The cutout dimension illustrated in figure (A) allows for d swing and access to the pull-out shelves when installed a built-in appliance. If installing between frameless cabine a 12 " wide filler strip or side panel may be needed on I side. The filler strip will act as a spacer between the appliance case and adjacent cabinet door swing. The width of the opening must include the filter panels.
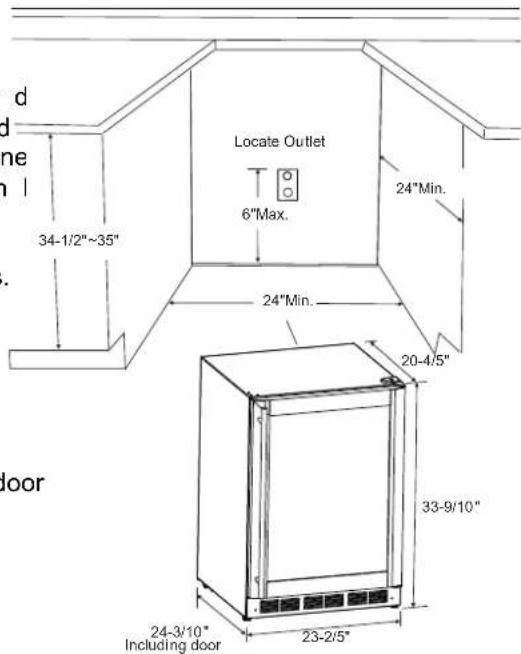
Figure A
Note:
- The door should protrude at least 1" beyond the surrounding cabinets.
- If door reversal is desired, please follow Reversible door instructions on page 9 of this manual prior to installation.
The cutout depth must be 24".
Electrical Connection
WARNING
Improper use of the grounded plug can result in the risk of electrical shock. If the power cord is damaged, have it replaced by an authorized service center.
This appliance should be properly grounded for your safety. The power cord of this appliance is equipped with a three-prong plug which mates with standard three prong wall outlets to minimize the possibility of electrical shock.
Do not, under any circumstances, cut or remove the third ground prong from the power cord supplied.
This appliance requires a standard 115 Volt A.C. /60Hz electrical outlet with three-prong ground.
This appliance is not designed to be used with an inverter.
The cord should be secured behind the appliance and not left exposed or dangling to prevent accidental injury.
Never unplug the appliance by pulling the power cord. Always grip the plug firmly and pull straight out from the receptacle.
Do not use an extension cord with this appliance. If the power cord is too short, have a qualified electrician or service technician install an outlet near the appliance. Use of an extension cord can negatively affect the performance of the unit.
If any problems with the appliance persist, please contact our Customer Service Dept. to consult with a representative at 888 775-0202 or visit our website to request warranty service at www.mcappliance.com.
APPLIANCE FEATURE
HMWC50ST: Wine Cooler
Engaged Wine Shelves
- There are five wine shelves of full depth in upper cabinet to store wine bottles.
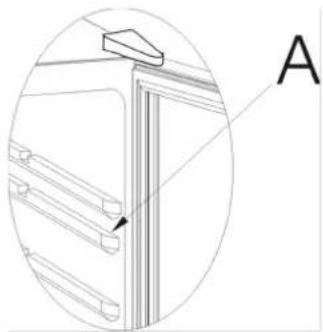
- The second supporting guide (Counted from top, see illustration "A") is not designed for wine shelves. It for beverage shelf.
- All the top five wine shelve have tabs to engage the cabinet on both sides.
- Any of the wine shelve can be removed to accomr larger bottles.
To Remove a Shelf:
- Remove all bottles from the shelves.
- Lift the shelve upwards and then gently pull out the shelves.
To Replace a Shelf:
- Place the sides of the shelves back onto the supporting guides of the cabinet and push back until the shelf tabs slide into place.
NOTE: Ensure that the tabs are firmly engaged in place before storing any bottles.
Bottle Arrangement
- The top five shelves each hold 8 bottles with the bott alternating front to back.
- The bottom rack, which consist of two stories, each hold bottles with bottle necks facing the front.
HMBC58ST: Beverage Cooler
Engaged Beverage Shelves
• There are three Steel shelves to store beverage cans or bottles.
• All three Steel shelves have tabs to engage the cabinet on both sides.
• The shelves may be arranged on any supporting guide as preferred.
• Any of the Steel shelves can be removed to accommodate larger cans or bottles.
To Remove a Shelf:
- Remove all cans or bottles from the shelves.
- Lift the shelve upwards and then gently pull out the shelves.
To Replace a Shelf:
- Place the sides of the shelves back onto the supporting guides of the cabinet and push back until the shelf tabs slide into place.
natural_image
Technical line drawing of a door frame with labeled component A (no text or symbols beyond label)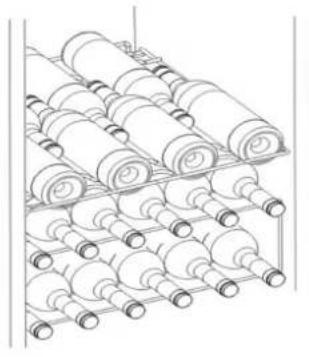
natural_image
Illustration of a multi-tiered rack with rolled bottles and circular ends (no text or symbols)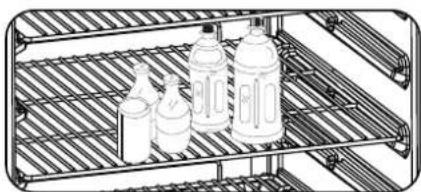
natural_image
Illustration of a multi-tiered storage rack with three bottles and two smaller cups (no text or symbols)NOTE: Ensure that the tabs are firmly engaged in place before storing any beverages. Warning:
- Do not press/jostle the circulation fan in the cabinet when you place in or remove the beverage cans or bottles.
- Properly store your beverages so that the cans or bottles do not hinder air circulation inside the cabinet.
OPERATING YOUR APPLIANCE
HMWC50ST: Wine Cooler
- The temperature range of the wine is for 41^ 64^ ( 5^ 18^ ) +
• Temperature Recommendations:
Red Wine: 54°F \~ 61°F (12°C \~ 16°C)
White Wine: 43°F \~ 50°F (6°C \~ 10°C)
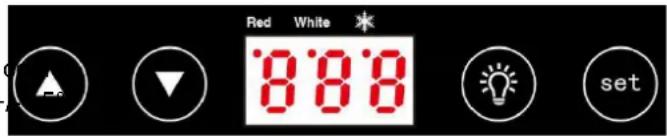
- The display indicates the average temperature of the appliance at the moment.
Pre-Set Wine Zones
- Press the ▲ or ▼ pads to choose preset storage conditions for either red or white wine. (The indicator light “Red” or “White” will illuminate accordingly.)
- The programmed temperature for red or white wine will be displayed for a few seconds.
Manual Temperature Setting
- The temperature of the wine cooler can be set anywhere between 41°F \~ 64°F (5°C \~ 18°C) by pressing temperature up▲ and temperature down ▼ pads as follows:
1) Press the [SET] pad until you hear a "Beep" sound (approximately 2 seconds).
2) Press the ▲▼ pads to increase or decrease the desired temperature in increments of one degree.
3) Press the [SET] pad to confirm your desired temperature setting. If no pad is pressed within 10 seconds, your select temperature setting will be automatically confirmed.
NOTE:
- To select temperature display between Celsius (°C) or Fahrenheit (°F), press the ▲ pad for approximately 2 seconds.
HMBC58ST: Beverage Cooler
- The temperature range of the beverage c is for 37°F \~ 54°F (3°C \~ 12°C). +/- 5°
- The display indicates the average temperatu of the appliance at the moment.
NORMAL Temperature Setting
- When the appliance is switched on, or the ▲pad is pressed, the appliance runs on the temperature setting of 45°F (7°C).
Manual Temperature Setting
- The temperature of the beverage cooler can be set anywhere between 37°F \~ 54°F (3°C \~ 12°C) by pressing temperature up ▲ and temperature down ▼ pads as follows:
1) Press the [SET] pad until you hear a "Beep" sound (approximately 2 seconds).
2) Press the ▲▼pads to increase or decrease the desired temperature in increments of one degree.
3) Press the [SET] pad to confirm your desired temperature setting. If no pad is pressed within 10 seconds, your select temperature setting will be automatically confirmed.
NOTE:
- To select temperature display between Celsius (°C) or Fahrenheit (°F), press the ▲ pad for approximately 2 seconds.*
The following is applicable to both HMWC50ST and HMBC58ST:
- The indicator will remain ON during refrigeration cycle and will be OFF during idle cycle.
- To switch the Interior light ON/OFF, press the pad.
Changing The Inner Light
Before removing the inner light, turn off the appliance first and then unplug the unit from the wall outlet. Failure to do so could result in electrical shock or personal injury.
- Remove two screws that fix the control box. While holding the control box, disconnect the LED connector to the main PCB.
- Remove the LED array by removing two screws.
- Replace a new LED array and connect it to the main PCB.
• Fix the LED array and reinstall the control box.
Important: The replacement of LED lamp can only be performed by an authorized technician.
Automatic Defrost
There is no need for manual defrosting of this appliance due to automatic defrosting function.
- The ice build-up on the inner back wall during compressor operation will be automatically defrosted once the compressor cycle is off.
- Defrost water will drain out passing through the drain outlet in the inner back wall into a drain pan located above the compressor, from where it evaporates.
CHANGING THE REVERSIBLE DOOR
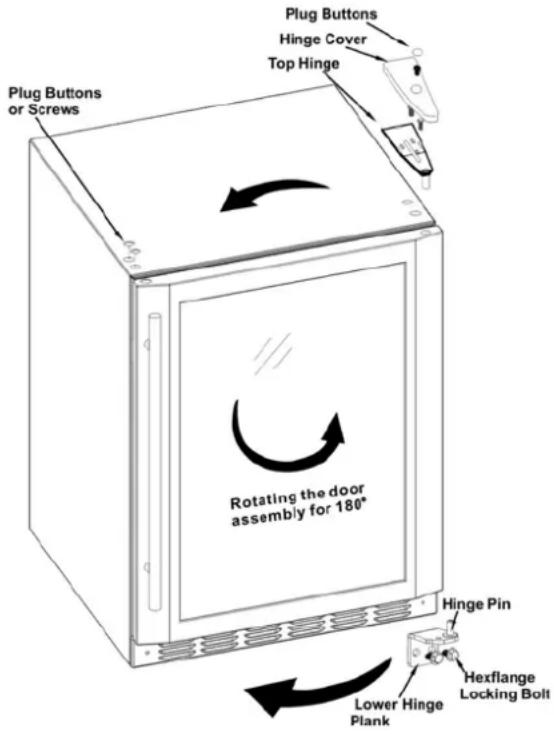
This appliance is built with a reversible door. You have the choice of either opening it from the left or the right side. In order to reverse the opening direction of your door, please follow these simple instructions. NOTE: If desired, please change the door swing prior to appliance installation.
Caution: To avoid personal injury to yourself and/or property, we highly recommend that someone assist you during the door reversal process.
1) Remove the top hinge assembly and keep them for later use.
2) Disassemble the lower hinge plank by removing 2 hex flange locking bolts. Screw out the hinge pin from the hinge plank and re-screw it into the other hole on the plank and keep it for later use.
3) Remove the plug buttons from the upper left holes and transfer them to the uncovered holes on the right side. Be sure to press the plug buttons firmly into the hole.
4) Re-install the top hinge assembly previously removed in step 1 on the opposite side.
5) Re-install the lower hinge plank (with the hinge pin on the opposite hole) previously removed in step 2 onto the opposite side.
6) Re-install the door assembly with the door handle on the opposite side. (Rotating the door assembly 180°).
7) Ensure that the door assembly is properly aligned with cabinet before tightening the screws.
CARE AND MAINTENANCE
Cleaning Your Appliance
- Upon installation of your new appliance, it is recommended that it be cleaned thoroughly.
- Turn off the appliance first and then unplug the unit from the wall outlet.
- Remove all contents.
- Wash the inside with a damp warm cloth soaked in lukewarm water and baking soda solution. The solution should be about 2 tablespoons of baking soda to a quart of water.
- Be sure to keep the door gasket (seal) clean to keep the unit running efficiently.
- The outside of the appliance should be cleaned with mild detergent and warm water.
• Dry the interior and exterior with a soft cloth. - Dust or anything else blocking the vent may hinder the cooling efficiency of the appliance. Vacuum the vent if necessary.
Vacation Time
- Turn off the appliance first and then unplug the unit from the wall outlet.
- Remove all the contents.
- Clean the appliance.
- Leave the lid open slightly to avoid possible formation of condensation, mold, or odors.
- Short vacations: Leave the appliance operating during vacations of less than three weeks.
- Long vacations: If the appliance will not be used for several months, remove all content and unplug the power cord. Clean and dry the interior thoroughly. To prevent odor and mold growth, leave the door open slightly: blocking it open if necessary.
Moving Your Appliance
- Turn off the appliance first and then unplug the unit from the wall outlet.
- Remove all the contents.
- Securely tape down all loose items inside your appliance.
- Tape the doors shut.
Energy Saving Tips
- The appliance should be located in the coolest area of the room, away from heat producing appliances or heating ducts, and out of the direct sunlight.
- Ensure that door is closed when the appliance is turned on.
TROUBLESHOOTING GUIDE
You can solve many common appliance problems easily, saving you the cost of a possible service call. Try the suggestions below to see if you can solve the problem before calling for service.
| PROBLEM | POSSIBLE CAUSE |
| Appliance does not operate. | Not plugged in.The circuit breaker tripped or a blown fuse. |
| Temperature inside the appliance is too warm. | Temperature control is set too warm. Turn the control to a cooler setting and allow several h for the temperature to stabilize.Door is kept open too long or is opened too frequently. Warm air enters the appliance every time the door is opened. Open the door less often.The door is not closed completely.The door gasket does not seal properly.The appliance has recently been disconnected for a period of time. 4 hours are required for appliance to cool down completely. |
| Temperature inside the appliance is too cold. | Temperature control is set too cold. Turn the control to a warmer setting and allow several hours for the temperature to stabilize. |
| Vibrations. | Check to assure that the appliance is on a le surface.The appliance is touching the wall. Re-level the appliance and move it from the wall.If continued vibration occurs, turn off the appliance and unplug the power plug. Contact Customer Service Dept. for further assistance. |
| Moisture forms on inside appliance walls. | Door is slightly open.Door is kept open too long, or is opened too frequently. Open the door less often.The door is not sealed properly. |
| Moisture forms on outside of appliance. | Door is slightly open, causing cold air from ins the appliance to meet warm moist air from outside. |
| The door will not close properly. | The appliance is not on a level surface.The gasket is dirty. |
WARRANTY
LIMITED WARRANTY
MC Appliance Corporation warrants each new “Wine & Beverage Center” to be free from defects in material and workmanship and agrees to remedy any such defect or to furnish a new part(s) (at the company’s option) for any part(s) of the unit that has failed during the warranty period. Parts and labor expenses are covered on this unit for a period of one year after the date of purchase. A copy of the dated sales receipt/invoice is required to receive warranty service, replacement or refund.
In addition, MC Appliance Corporation warrants the compressor (parts only) to be free from defects in material and workmanship for a period of five years. The consumer is responsible for all labor and transportation expenses related to the diagnosis and replacement of the compressor after the initial one-year warranty expires. In the event that the unit requires replacement or refund under the terms of this warranty, the consumer is responsible for all transportation expenses to return the unit to our factory prior to receiving a replacement unit or refund. A refund or replacement will be issued at the discretion of MC Appliance Corporation.
This warranty covers appliances in use within the contiguous United States, Alaska, Hawaii, Canada and Puerto Rico. The warranty does not cover the following:
- HDamages due to shipping damage or improper installation
•HDamages due to misuse or abuse - Punctures to the evaporator system due to improper defrosting of the unit
•HContent losses due to failure of the unit
• HRepairs performed by unauthorized service agents - Service calls that do not involve defects in material and workmanship, such as instruction on proper use of the product or improper installation
- HReplacement or resetting of house fuses or circuit breakers
- Failure of this product if used for purposes other than its intended purpose
- HDisposal costs of failed units not returned to our factory
- Any delivery or installation costs incurred as the result of a unit that fails to perform as specified
- Expenses for travel and transportation for product service if your appliance is located in a remote area where service by an authorized service technician is not available
- The removal and reinstallation of your appliance if it is installed in an inaccessible location or is not installed in accordance with published installation Hinstructions
• HRefunds for non-repairable products are limited to the price paid for the unit per the sales receipt - This warranty is non-transferable. This warranty applies only to the original purchaser and does not extend to any subsequent owner(s)
LIMITATIONS OF REMEDIES AND EXCLUSIONS
Product repair in accordance with the terms herein, is your sole and exclusive remedy under this limited warranty. Any and all implied warranties including merchantability and fitness for a particular purpose are hereby limited to one year or the shortest period allowed by law. MC Appliance Corporation is not liable for incidental or consequential damages and no representative or person is authorized to assume for us any other liability in connection with the sale of this product. Under no circumstances is the consumer permitted to return this unit to the factory without the prior written consent of MC Appliance Corporation.
Some states prohibit the exclusion or limitation of incidental or consequential damages, or limitations on implied warranties. This warranty gives you specific rights, and you may also have other rights which vary from state to state.
ModelOParts & LaborOCompressor (Parts Only)OType of Service
HMWC50ST
One YearHFive YearsHIn-Home
HMBC58ST
One YearHFive YearsHIn-Home
For Service or Assistance, please call 888-775-0202. Or visit us on the web at www.mcappliance.com to request warranty service or order parts.

CNA International, Inc. d/b/a MC Appliance Corporation. All rights reserved. Magic Chef® is a registered trademark of CNA International, Inc.
www.mcappliance.com Printed in China

Magic Chef®
natural_image
Line drawing of a rectangular appliance with internal compartments and ventilation grilles (no text or symbols)Modelo HMWC50ST / HMBC58ST
LEA ESTE MANUAL ANTES DE UTILIZAR SU CENTRO DE BEBIDAS Y VINOS Y GUÁRDELO PARA FUTURA REFERENCIA.
natural_image
Technical line drawing of a door frame with labeled component A (no text or symbols beyond label)natural_image
Line drawing of a multi-tiered storage rack with rolled bottles (no text or symbols)HMBC58ST: ENFRIADORA DE BEBIDAS
natural_image
Illustration of three bottles on a metal shelf (no text or symbols)Para substituir un estante:
Ajuste NORMAL De la Temperatura
- Wine and Beverage Center
- PRODUCT REGISTRATION COPY
- TABLE OF CONTENTS
- MODEL NO.: HMWC50ST
- MODEL NO.: HMBC58ST
- SPECIFICATIONS – Model # HMWC50ST
- SPECIFICATIONS – Model # HMBC58ST
- IMPORTANT SAFETY INSTRUCTIONS
- WARNING
- INSTALLATION INSTRUCTIONS
- Before Using Your Appliance
- Free-Standing Installation
- Built-In Installation
- Note:
- Electrical Connection
- APPLIANCE FEATURE
- HMWC50ST: Wine Cooler
- Engaged Wine Shelves
- To Remove a Shelf:
- To Replace a Shelf:
- Bottle Arrangement
- HMBC58ST: Beverage Cooler
- Engaged Beverage Shelves
- OPERATING YOUR APPLIANCE
- Pre-Set Wine Zones
- Manual Temperature Setting
- NORMAL Temperature Setting
- The following is applicable to both HMWC50ST and HMBC58ST:
- Changing The Inner Light
- Automatic Defrost
- CHANGING THE REVERSIBLE DOOR
- CARE AND MAINTENANCE
- Cleaning Your Appliance
- Vacation Time
- Moving Your Appliance
- Energy Saving Tips
- TROUBLESHOOTING GUIDE
- WARRANTY
- LIMITED WARRANTY
- LIMITATIONS OF REMEDIES AND EXCLUSIONS
- ModelOParts & LaborOCompressor (Parts Only)OType of Service
- Magic Chef®
- HMBC58ST: ENFRIADORA DE BEBIDAS
- Para substituir un estante:
- Ajuste NORMAL De la Temperatura
Brand : Magic Chef
Model : HMBC58ST
Category : Refrigerator