
MCSCWD27W5 - Washing machine Magic Chef - Free user manual and instructions
Find the device manual for free MCSCWD27W5 Magic Chef in PDF.


| Product Type | 24" Combo Washer and Dryer (Ventless) |
| Model | MCSCWD27W5 |
| Dimensions (H x W x D) | 33.5" x 23.5" x 23.5" (850 x 595 x 595 mm) |
| Depth with Door Open | 42.5" (1080 mm) |
| Weight | 160.9 lbs (73.0 kg) |
| Electrical Ratings | AC 120V-60Hz, 11.0A, 15/20 amp circuit |
| Max Washing Capacity | 26.4 lbs (12.0 kg) |
| Max Drying Capacity | 17.6 lbs (8.0 kg) |
| Drum Volume | 2.7 cu. ft. |
| Spin Speed | Up to 1300 RPM (adjustable: No Spin, Low, Med, High, Highest) |
| Wash Cycles | Normal/Cotton, Quick Wash, Perm Press, Delicates, Heavy Duty, Wool, Bulky/Large, Baby Wear, Sports Wear, Sanitary, Spin Only, Rinse & Spin, Tub Clean |
| Dry Cycles | Auto Dry, Timed Dry (multiple time options) |
| Additional Functions | Time Save, Delay Start (1-24h), Temperature (Cold/Eco/Warm/Hot/Hot+), Soil Level (Light/Med/Heavy), Dry Level (Extra/Normal/Gentle), Child Lock, Extra Rinse, My Cycle, Sound On/Off |
| Detergent Dispenser | 3-compartment drawer for pre-wash, main wash, and fabric softener |
| Drain System | Standpipe (min 2" diameter, height 24-39" from floor) or floor drain with siphon break |
| Water Supply | Hot and cold water faucets, pressure 20-100 psi |
| Safety Features | Door lock during operation, child lock, emergency door release cord, overheating protection |
| Maintenance | Clean detergent drawer, inlet filters, drain pump filter; run Tub Clean cycle monthly |
| Warranty | 1 year parts and labor (in-home service) |
| Included Accessories | Water hoses (2), cable tie, transport hole plugs (4) |
Frequently Asked Questions - MCSCWD27W5 Magic Chef
User questions about MCSCWD27W5 Magic Chef
0 question about this device. Answer the ones you know or ask your own.
Ask a new question about this device
Download the instructions for your Washing machine in PDF format for free! Find your manual MCSCWD27W5 - Magic Chef and take your electronic device back in hand. On this page are published all the documents necessary for the use of your device. MCSCWD27W5 by Magic Chef.
USER MANUAL MCSCWD27W5 Magic Chef
24" Combo Washer and Dryer 24" Front Load Washer
User's Manual
natural_image
Line drawing of a simple washing machine with no text or symbols
PRODUCT REGISTRATION
Thank you for purchasing a Magic Chef® product. The first step to protect your new product is to complete the product registration on our website: www.mcappliance.com/register. The benefits of registering your product include the following:
- Registering your product will allow us to contact you regarding a safety notification or product update.
- Registering your product will allow for more efficient warranty service processing when warranty service is required.
- Registering your product could act as your proof of purchase in the event of insurance loss.
Once again, thank you for purchasing a Magic Chef product.
CONTENTS
PRODUCT REGISTRATION....2
IMPORTANT SAFETY INSTRUCTIONS 4
SPECIFICATIONS 6
INSTALLATION INSTRUCTIONS....7
BEFORE USE 10
OPERATION INSTRUCTIONS....11
WASH CYCLE PARAMETERS....18
CARE AND MAINTENANCE 20
TROUBLESHOOTING 23
LIMITED WARRANTY 25
IMPORTANT SAFETY INSTRUCTIONS
This manual contains Safety Instructions, Installation and Operating Instructions, and Troubleshooting Tips. Please carefully read this manual before using your washing machine for instructions on how to use and maintain the product properly. Be sure to follow the safety instructions to avoid injury or damage to the product.
Keep this manual. When passing on/selling the device to a third party, the manual must be handed over along with the device.
Before calling for service, please make sure unit is installed and being used correctly, and read the troubleshooting section.
⚠ WARNING: When using your appliance, follow the precautions listed below.
NOTE: Specifications may change at any time without notice.
State of California Proposition 65 Warnings
⚠ WARNING: The California Safe Drinking Water and Toxic Enforcement Act requires the Governor of California to publish a list of substances known to the State of California to cause cancer, birth defects, or other reproductive harm, and requires business to warn of potential exposure to such substances. This product contains a chemical known to the State of California to cause cancer, birth defects, or other reproductive harm. This appliance can cause low-level exposure to some of the substances listed, including benzene, formaldehyde, and carbon monoxide.
- Read all instructions before using this product.
- This appliance is for household use only. It is not intended for commercial applications.
- The appliance is intended for indoor use only. DO NOT use outdoors.
- DO NOT use this appliance for other than its intended purpose.
- Use only detergents or softeners recommended for use in this manual and keep them out of the reach of children.
- This machine is not intended for use by persons (including children) with reduced physical, sensory or mental capabilities, or lack of experience and knowledge, unless they are given supervision or instruction concerning the use of the washer by a person responsible for their safety.
- This appliance must be properly installed in accordance with the installation instructions before it is to be used.
- DO NOT unplug your appliance by pulling on its power cord. Always grasp the plug firmly and pull it straight out from the outlet.
- Do not operate any appliance that has a damaged cord or plug, if it is damaged or malfunctions in any way, or if the outlet is not in proper working order. Contact customer service or a service technician.
- ALWAYS turn off and unplug from outlet before servicing, changing accessories or cleaning the unit. Allow unit to cool down completely before cleaning, moving or servicing. Turning the unit off does not disconnect it from the power source.
- DO NOT put anything flammable or explosive in, on, or near the appliance. DO NOT wash or dry articles of clothing or any items that have been soaked in flammable or explosive chemicals. To reduce the risk of fire, clothes, cleaning rags, mop heads and the like which have traces of any flammable substance, such as cooking oils, petroleum based oils or distillates, waxes, fats, etc., must not be placed in the washing machine. These items may contain flammable substances which, even after washing, may smoke or catch fire. DO NOT dry articles containing foam rubber or similarly textured rubber like materials.
- ALWAYS wait for the washer tub to completely stop moving before reaching in to add or remove any clothes
-
The loading door must be closed when the tub is spinning.
-
DO NOT operate this washer unless all enclosure panels are properly installed.
- DO NOT tamper with or modify the controls.
- ⚠ WARNING: Risk of child entrapment. DO NOT allow children to play on or in the appliance. Close supervision of children is necessary when the appliance is used around them.
- The appliance must be plugged into a properly installed and grounded outlet that meets the voltage requirements listed on the ratings label.
- ▲ CAUTION: The power cord is equipped with a 3-prong grounding plug to protect against shock hazards. ALWAYS plug the cord into a properly installed and grounded 3-prong wall receptacle, and DO NOT remove the grounding prong.
- Under certain conditions, hydrogen gas may be produced in a household hot water system that has not been used for two weeks or more. Hydrogen gas is highly explosive. If the hot water system has not been used for more than two weeks, turn on all hot water faucets and let the water flow for several minutes prior to using your compact washer.
- DO NOT modify or repair the unit by yourself. Contact customer service or a qualified service technician if service is required.
- To reduce the risk of electric shock or fire, do not use an extension cord or outlet adapters to connect the unit to an electrical power source. The appliance must be properly grounded using a three-prong electric receptacle wall outlet.
- DO NOT install the washing machine in a moist or wet area, or where it can get wet or exposed to outside weather conditions. DO NOT spray with water when cleaning.
- DO NOT put children on top of, or allow children or pets to climb in or on, the washer. ALWAYS check inside before using.
- Glass door may be very hot during the operation. Keep children and pets away from the washer while in use.
- Regularly clean the power plug to remove dust and dirt, in order to prevent electrical failure.
- It is recommended to unplug the unit when it is not in use.
- ALWAYS be sure to properly and securely connect the power cord to the outlet, and the water hoses to prevent leakage or electrical shock.
- DO NOT operate the unit or handle the plug with wet hands.
- The water temperature to the washing machine should not exceed 131 °F (55 °C).
- DO NOT wash raincoats, heavy jackets, or similar, heavy items.
- DO NOT machine wash fiberglass materials (such as curtains and window coverings that use fiberglass materials.) Small particles may remain in the washing machine and stick to fabrics in subsequent wash loads causing skin irritation.
- When removing from service and discarding, be sure to remove the door from the unit and cut the power cord.
- DO NOT reach into the wash tub when the agitator is moving.
- ⚠ CAUTION: Content may be HOT when washing and/or drying cycle is completed.
READ AND FOLLOW THIS SAFETY INFORMATION CAREFULLY SAVE THESE INSTRUCTIONS
SPECIFICATIONS
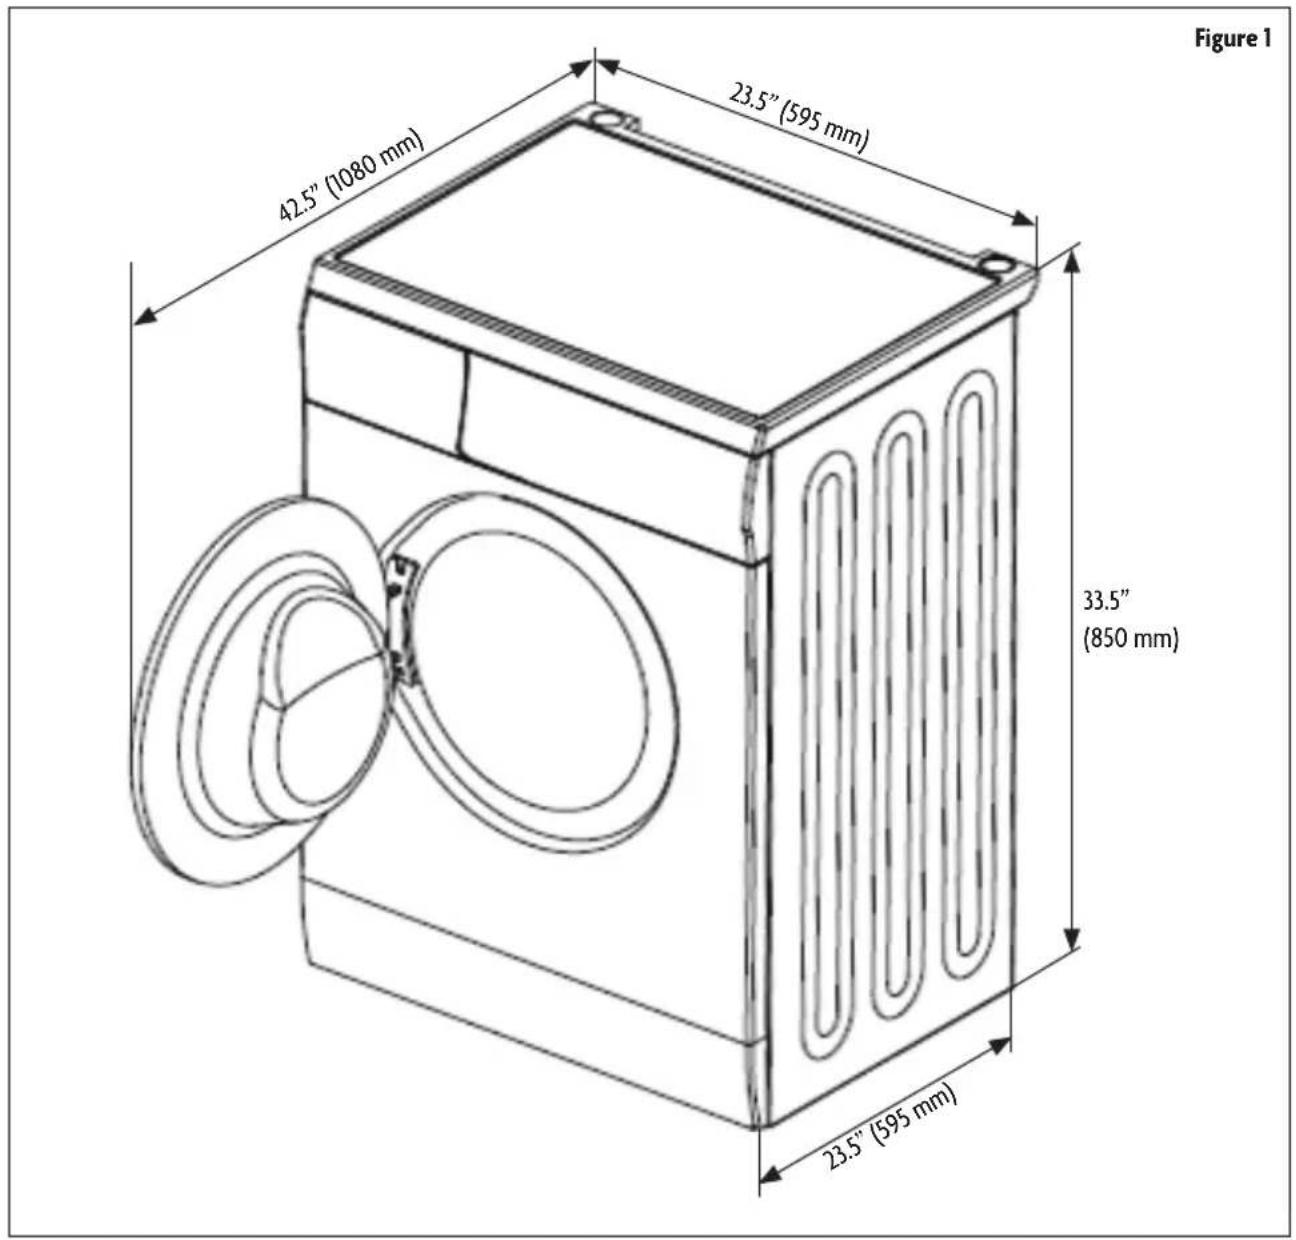
| Height 33.5” (850 mm) | |
| Width 23.5” (595 mm) | |
| Depth 23.5” (595 mm) | |
| Depth with Door Opened 42.5” (1080 mm) | |
| Weight 160.9 lbs. (73.0 kg) | |
| Voltage / Frequency AC 120V-60Hz | |
| Rated Current 11.0A | |
| Max. Washing Capacity 26.4 lbs. (12.0 kg) | |
| Max. Dry Capacity (For MCSCWD27W5/MCSCWD27S5/MCSCWD27G5 only) 17 | 6 lbs. (8.0 kg) |
| Drum Size 2.7 cu. ft. |
INSTALLATION INSTRUCTIONS
- The washing machine must be properly grounded. In the event of a short circuit, grounding can reduce the danger of electrical shock.
- Washing machine should be operated in a circuit separate from other electrical appliances.
INCLUDED PARTS
Before starting installation, make sure all included parts are in the package inside the drum.
INSTALLATION REQUIREMENTS
ELECTRICAL REQUIREMENTS
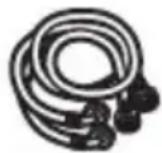
Water Hoses (2) Cable Tie
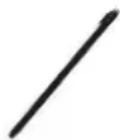
Figure 2
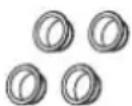
Transport
Hole Plugs (4)
- A 120v, 60Hz, AC 15-or 20amp, fused electrical supply is required. A time-delay fuse or circuit serving only this appliance should be used.
- This washer is equipped with a power supply cord having a 3 prong grounding plug.
- To minimize possible shock hazard, the cord must be plugged into a 3 prong outlet, properly grounded in accordance with local codes and ordinances. If a proper outlet is not available, it is the responsibility of the customer to have the properly grounded outlet installed by a qualified electrician
- If codes permit and a separate ground wire to be used, it is recommended that a qualified electrician determine the proper ground path.
- DO NOT ground to a gas pipe.
- Check with a qualified electrician if you are not sure the washer is properly grounded.
- DO NOT have a fuse in the neutral or ground circuit.
- Certain internal parts are intentionally not grounded and may present a risk of electric shock only during servicing. Service Personnel – Do not contact the following parts while the appliance is energized: Drain Pump, Door Lock, Drying Heater (Combo), Fan Motor (Combo).
LOCATION REQUIREMENTS
Selecting the proper location for your washer improves performance and minimizes noise and possible washer "walk." The washer can be installed under a custom counter or in a basement, laundry room, closet, or recessed area.
You will need:
• A water heater set for 120^ F ( 49^ C).
- A grounded electrical outlet located within 6 ft.(1.8 m) of where the power cord is attached to the back of the washer.
- Hot and cold water faucets located within 4 ft. (1.2 m) of the hot and cold water fill valves, and water pressure of 20 - 100 psi (137.9 - 689.6 kPa).
- A level floor with a maximum slope of 1" (25 mm) under entire washer. Installing the washer on soft floor surfaces, such as carpets or surfaces with foam backing is not recommended.
• A sturdy and solid floor to support the washer with a total weight (water and load) of 200lbs.
- Do not operate your washer in temperatures below 32^ F ( 0^ C). Some water can remain in the washer and can cause damage in low temperatures.
- The location must be large enough to allow the washer door to be fully opened. The door opens more than 90°, and is not reversible.
• Additional spacing should be considered for ease of installation and servicing.
• Minimum spacing of 1" (25 mm) on all sides of the washer is recommended to reduce noise transfer.
• Additional clearances might be required for wall, door, and floor moldings.
• Spacing for companion appliance should also be considered.
INSTALLATION
⚠️ CAUTION: Packing materials may be dangerous to children. Please dispose them properly and DO NOT let children play with any packing materials.
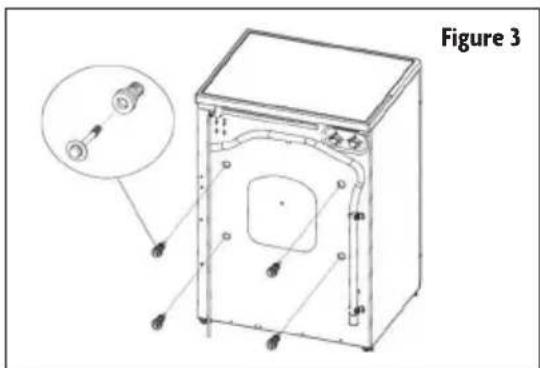
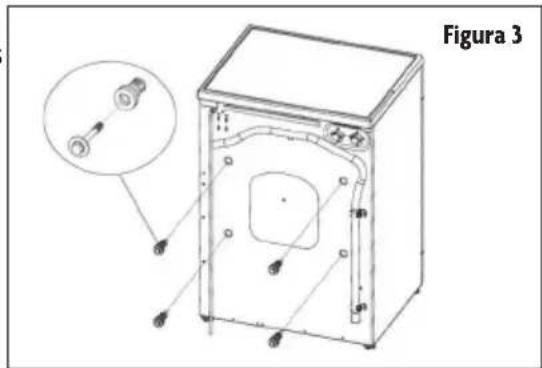
Before using this washing machine, transport bolts must be removed from the backside of this machine. Please take the following steps to remove the bolts:
- Loosen all bolts and then remove them.
- Insert the transport hole plugs into the holes.
- Keep the transport bolts for future use.
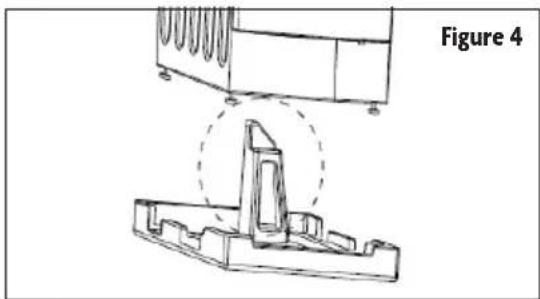
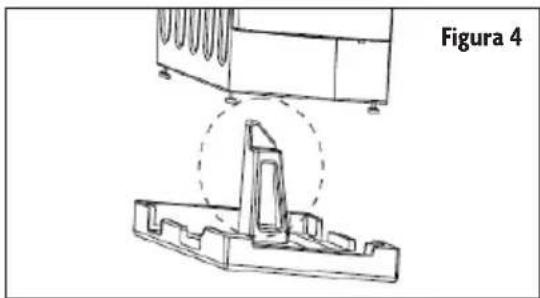
Make sure that the small foam triangle is removed with the bottom foam piece. If not, carefully lay the unit down and remove it.
When you unpack your washing machine, check if there is any damage or missing pieces. If any items missing, please contact customer service.
LEVELING THE WASHER
-
When positioning the washing machine, make sure the legs are screwed in close to the cabinet. If not, turn them to their original positions by hand or with a wrench and tighten the nuts with a wrench.
-
After positioning the washing machine, push on all four corners at the top of washing machine. If the washing machine has any wobble, or is not stable when being pressed, adjust the leg to level the machine.
-
To level the unit, loosen the lock nut with a wrench and turn the leg by hand until it tightly contacts with the floor. Press the leg with one hand and tighten the locking nut close to the cabinet with the other hand.
-
Repeat steps 2 and 3 as needed.
-
Use a bubble level to check front to back, side to side, and corner to opposite corner to ensure the washing machine is level. Repeat above steps if needed.
natural_image
Technical line drawing of a mechanical component with two views, one showing internal structure and the other a cross-section (no text or symbols)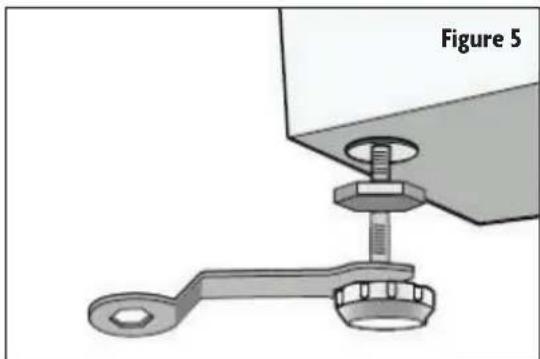
natural_image
Mechanical assembly diagram showing a wrench inserted into a bracket with a labeled section (Figure 5), no text or symbols present.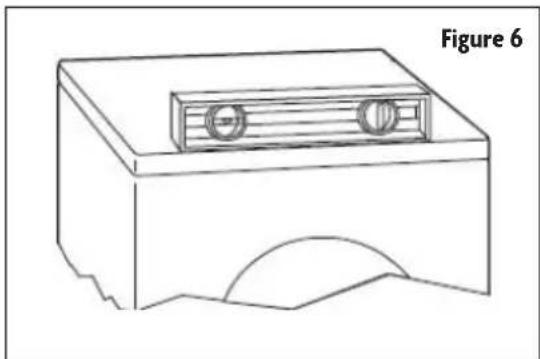
natural_image
Line drawing of a mechanical component with two circular features on top, shown without any text or symbolsDRAIN SYSTEM
STANDPIPE DRAIN SYSTEM - WALL OR FLOOR
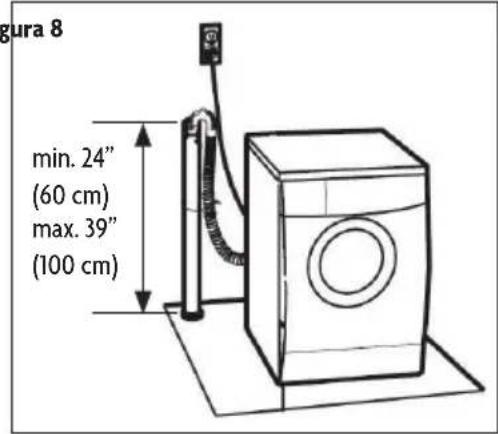
The standpipe drain requires a minimum diameter standpipe of 2" (5 cm). The minimum carry-away capacity can be no less than 17 gal. (64 L) per minute. The top of the standpipe must be at least 24" (60 cm) high and no higher than 39" (100 cm) from the bottom of the washer.
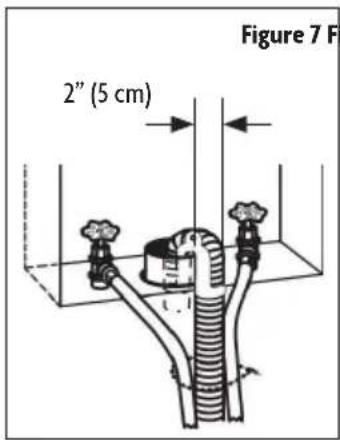
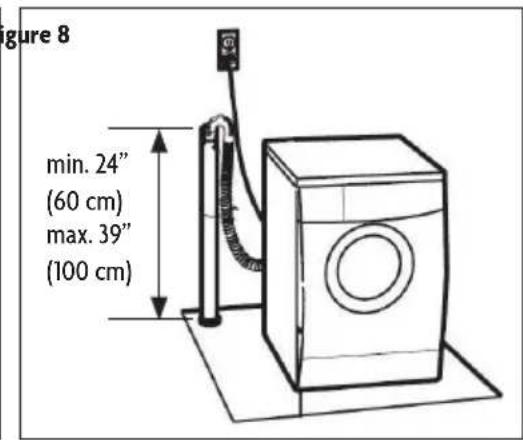
The laundry tub needs a minimum 20 gal. (76 L) capacity. The top of the laundry tub must be at least 60cm above the floor.
FLOOR DRAIN SYSTEM
The floor drain system requires a siphon break that may be purchased separately. The siphon break must be a minimum of 28" (71 cm) from the bottom of
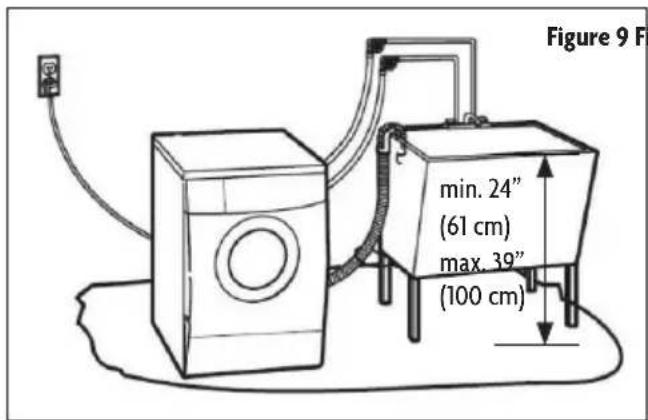
Figure 10 the washer. Additional hoses might be needed.
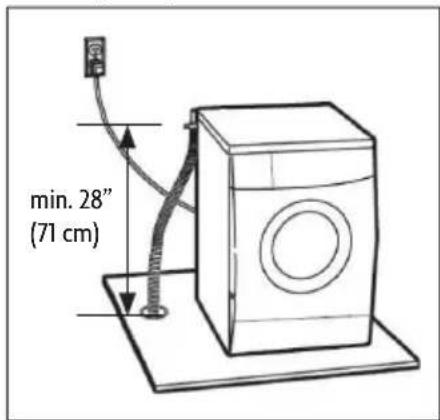
NOTE: Images are for reference only.
INSTALL INLET PIPE
Connect the end of the water inlet hose with the 90° elbow to the back of the washing machine and turn clockwise to tighten. Note the position of the Hot and Cold water inlets.
Connect the other end of the water inlet hose to the appropriate Hot and Cold water tap. Tighten by turning clockwise, and turn on the water valve to check for leaks If any leaks are found, verify all connections are tight and washers are present, and repeat the procedure.
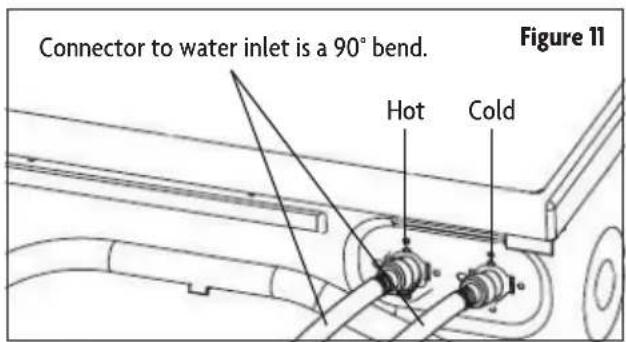
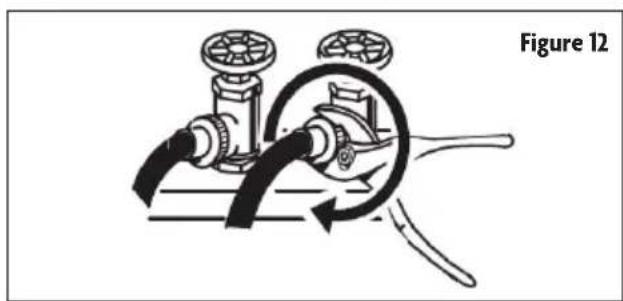
natural_image
Diagram of a mechanical valve assembly with rotating components and a handle, labeled Figure 12 (no text or symbols on the diagram itself)BEFORE USE
CHECK LIST AND PREPARATION BEFORE WASHING
Read all instructions carefully to avoid any damage or issues with the washing machine and to clothes. ALWAYS follow instructions on fabric care labels on clothing articles for proper care.
⚠ WARNING: DO NOT leave items to be washed in the washing machine for long periods of time. Items left in the machine may get moldy and get spots. Clothes may also become discolored if they are not washed according to the stated washing temperature and instructions.
SELECTING DETERGENT
• Low foaming powdered detergent is recommended for use with the washing machine.
- Some detergents may not completely dissolve if there is too much detergent or if the water temperature is too low.
- Bleach can damage clothes. Use bleach with caution and follow detergent and clothing article care instructions.
Washing method is based on weight of clothes, soil level, local water hardness as well as the recommendations from the detergent manufacturers.
▲ NOTE: DO NOT place or store laundry products, such as detergent, bleach, or liquid fabric softener, on top of your washer/dryer combo unit. Wipe up any spills immediately. These products can damage the finish and controls. Keep all laundry products in a safe, dry space out of reach of children.
SEPARATE CLOTHES TO BE WASHED
Classify clothes to be washed into cottons, blended fibers, synthetic fibers, silks, wools, etc. Light and dark clothes should also be separated.
▲ NOTE: New, colored fabrics should be washed separately.
- Accessories: Loose accessories on some clothes may become damaged and/or damage the washing machine. Clothes that contain buttons or embroideries should be turned inside-out before being washed
- Fasteners: Zippers must be closed and buttons or hooks must be firmly affixed. Any loose bands or ribbons should be tied together before being washed.
• Water-proof materials: It is not recommended to wash water-proof fabrics as they may become damaged and/or cause damage to the washing machine and other items being washed
REMOVE ALL LOOSE OBJECTS FROM CLOTHES
Check all pockets/compartments of clothes to be washed and remove any loose items such as coins. Loose items may damage the washing machine.
BALANCING THE LOAD
Washing large, heavy garments, such as towels, jeans, jackets etc., may cause an unbalanced load. It is suggested to add one or two more items to balance the load to allow smooth and complete draining
OPERATING INSTRUCTIONS
CONTROL PANEL (FOR MCSCWD27W5/MCSCWD27S5/MCSCWD27G5 ONLY)
Figure 13
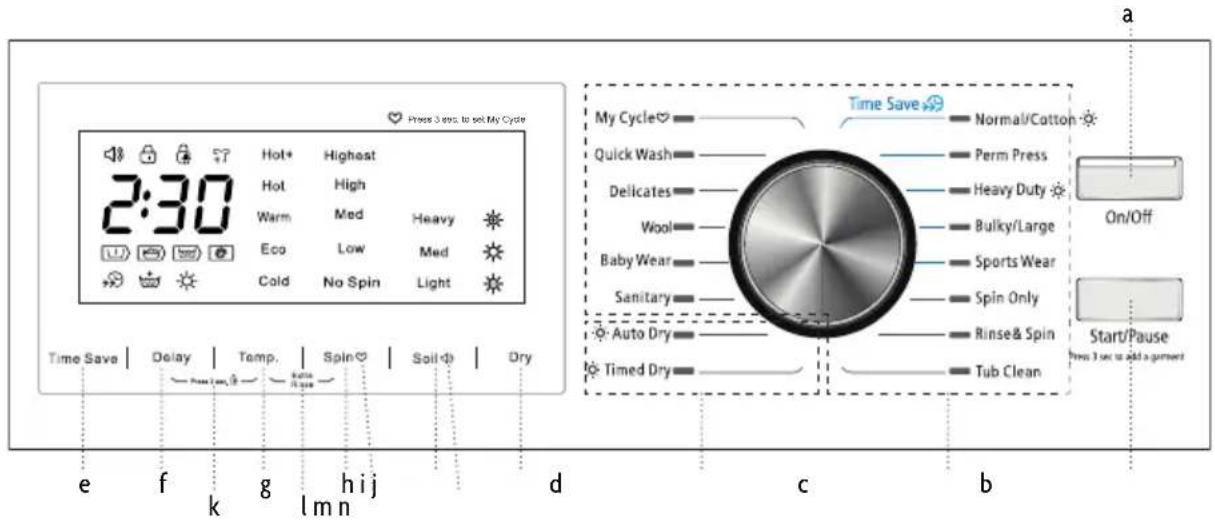
a. On/Off: Press [On/Off] to turn the unit ON. Press the button again to turn the unit OFF.
NOTE: If the washer is programmed for a wash cycle and is not started within 10 minutes, the cycle will be cancelled and the unit will automatically turn OFF.
b. Start/Pause: Press [Start/Pause] to start a wash cycle. Press [Start/Pause] again to pause the cycle when the washer is running. Press [Start/Pause] once more to resume. To add a garment after the wash cycle has started, push this button for 3 seconds before the drum has filled with water. This can only be done in the beginning of the cycle before the water reached the bottom of the door. Wait for the drum to stop and the door to unlock, then add item(s). Close door and press [Start/Pause] to continue washing.
c. Wash Cycles
- My Cycle: Select this option to save a commonly used washing program as a preset
• To program, select the settings you wish to use, and then press and hold [Spin] for 3 seconds to save.
-
Quick Wash: Select this option to wash small loads of clothing that are not very dirty quickly.
-
Delicates: Select this option for delicate fabrics such as dress shirts, nylons, etc.
• Wash cycle operates at a lower temperature.
- Wool: Only use this option to wash wool clothing articles labeled "Machine Washable".
• Proper detergent and water temperature must be selected for wool textiles.
• Lower spin speed and less agitation
-
Baby Wear: For washing infant clothing
-
Sanitary: Uses hot water to allow enzymes in detergent to work more efficiently for hard to clean or heavily soiled items.
-
Normal/Cotton: Select this option for regularly used cottons and fabrics.
• Extended wash cycle with stronger intensity
• Recommended fabrics: cotton, linens, bed sheets, t-shirts, towels, jeans, etc.
• Dry cycle can be added.
-
Perm Press: Moderate strength wash cycle. Used to reduce wrinkles in clothes from washing.
-
Heavy Duty: Select this option for washing heavy clothing.
- Dry cycle can be added.
- Bulky/Large: Select this option for bulky/large items.
• Extended wash cycle
- Sports Wear: Select this option for sportswear.
• Wash cycle cleans heavily soiled clothes.
- Spin Only: Select this option to spin a load separately from a regular wash cycle.
- Soap water or rinse water must be drained before spinning.
- Rinse & Spin: Select this option to rinse and spin a load separately from a regular wash cycle.
• This can be helpful in preventing fresh stains from setting in fabrics.
- Tub Clean: Select this option to clean the wash tub. This program uses high temperatures to sterilize the tub while removing built up detergent and residues. Add bleach for a better clean. This program should be used at least once a month with regular use. DO NOT add any clothes or wash items for this program.
d. Dry Cycles
NOTE: Maximum drying load size is smaller than wash load size. Be sure to note the drying load size when using.
- Auto Dry: Select this option to have dry cycle automatically set based on the load. Auto Dry program has a 12 minute spin cycle and 45 minute cool air cycle. It is recommended to dry in multiple, smaller loads to allow for better for performance.
- Timed Dry: Select this option to set dry cycle time manually. Timed Dry programs include a 12 minute spin and 25 minute cool period. It is recommended to dry in multiple, smaller loads to allow for better for performance.
| Time in Minutes Capacity | |
| 58 1.8 lbs. (0.8 kg) | |
| 88 2.2 lbs. (1.0 kg) | |
| 199 6.6 lbs. (3.0 kg) |
▲ NOTE: Important Notes for Dry Cycles
For Wash only, unit can be filled to the Max. Washing Capacity, however, load sizes less than the Max. Wash Capacity can improve performance and efficiency.
For Wash cycles plus Dry cycles or Dry only cycles, unit should not be filled over the Max. Dry Capacity to allow the dry function to work effectively. Load sizes less than the maximum capacity will improve the drying performance of the combo unit.
DO NOT cut off water supply or remove hose attachments during dry cycle. This is a ventless unit that releases moisture during dry cycles. The dryer is equipped with a door-locking safety feature to ensure safe temperatures and avoid burns and other safety hazards. The door will remain LOCKED during dry cycle until the unit reaches a safe temperature. After a safe temperature is reached, the door should open and function normally.
e. Time Save: Press [Time Save] to decrease the washing time.
• See Wash Cycle Parameters Table for programs that can use Time Save.
f. Delay: Press [Delay] to set a delay time for the wash to begin.
- The delay start light will flash to indicate the delay time. You can delay the start time of the cycle from 1 - 24 hours.
- Set Wash program, Press Delay to set the number of hours to delay wash cycle, then push Start/Pause.
• To cancel the delay time, press Delay button until time shows 0H.
g. Temp.: Press [Temp.] to set your desired washing temperature.
• Press button to set desired wash temp (Hot+, Hot, Warm, Eco, Cold)
h. Spin: Press [Spin] to increase spin speed.
- Washer drum spins at a speed up to 1300 RPM which reduces drying time and saves energy.
• Press the button until desired speed is lit (No Spin, Low, Med, High, Highest).
• Some fabrics (i.e. delicates) require a slower spin speed.
• High spin speeds are not available on all cycles.
i. Soil: Press [Soil] to increase time for heavier soiled items.
• There are three (3) soil levels options.
• Each bar increases the base wash time by 15 minutes.
j. Dry Level: Press the Dry button continuously to choose the dry level: Extra Dry/Normal Dry/Gentle Dry
k. Child Lock: Press [Delay] and [Temp] at the same time for 3 seconds to Unlock/Lock the control panel.
- On/Off Button will still function.
- Extra Rinse: Press the [Temp.] and [Spin] button at the same time to add an extra rinse to the selected cycle.
m. My Cycle: After a wash cycle is modified, hold down [Spin] to save your settings.
• You can quickly choose this cycle for your next wash by turning the dial to My Cycle.
- Override saved settings by holding the [Spin] button down again after a different cycle and options are selected.
n. Sound: Press the [Soil] button for 3 seconds to turn the sound on or off.
DISPLAY (FOR MCSCWD27W5/MCSCWD27S5/MCSCWD27G5 ONLY)
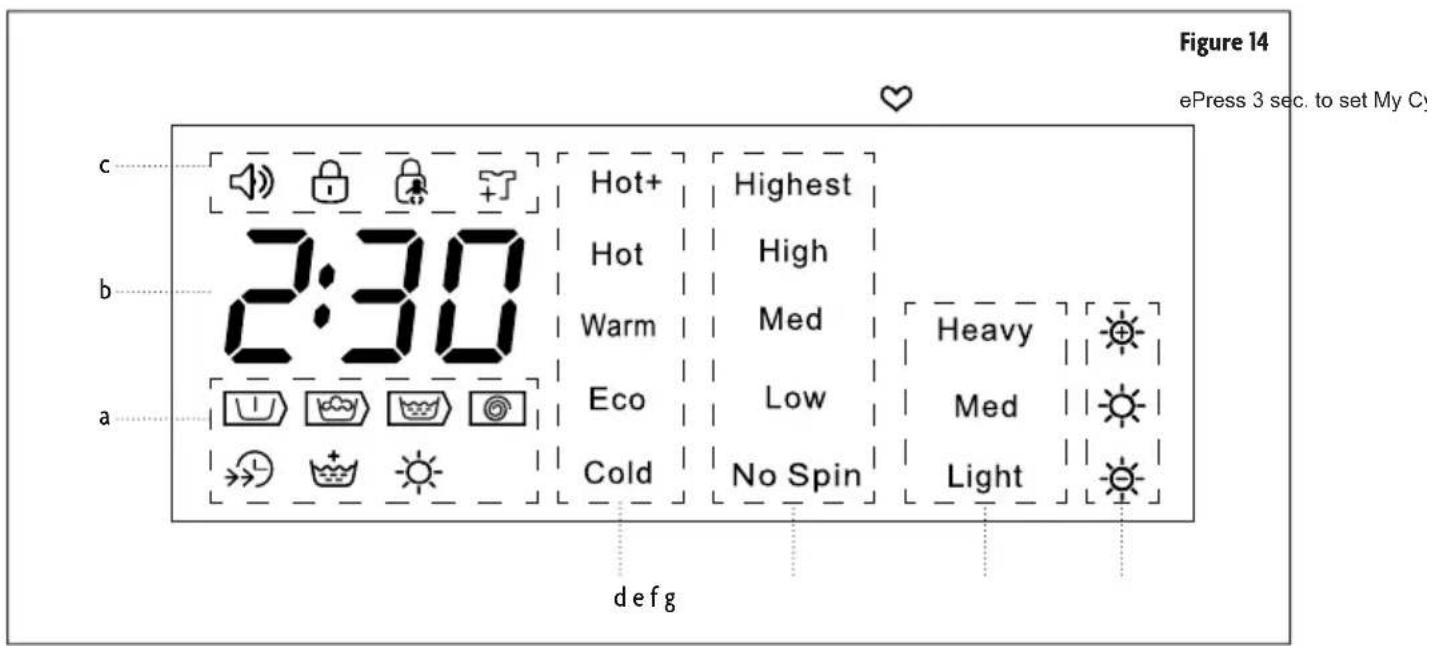
a. Cycle Indicator: Indicates stage of wash/dry cycle.

b. Clock: Indicates time left until the end of wash/dry cycle.
c. Feature Indicator: Indicates features that are active.
• Sound: Indicates that sounds are on. When unlit, unit is muted.
• Door Lock: Machine is locked for duration of cycle.
• Child Lock: Child lock is on.
- Add a Garment
d. Water Temperature: Indicates the selected temperature.
e. Spin Speed: Indicates the selected spin speed.
f. Soil Level Indicator: Indicates the selected soil level.
g. Dry Level: Indicated the selected dry level.

NOTE: Maximum drying load size is smaller than wash load size.
CONTROL PANEL (FOR MCSFLW27W/MCSFLW27S ONLY)
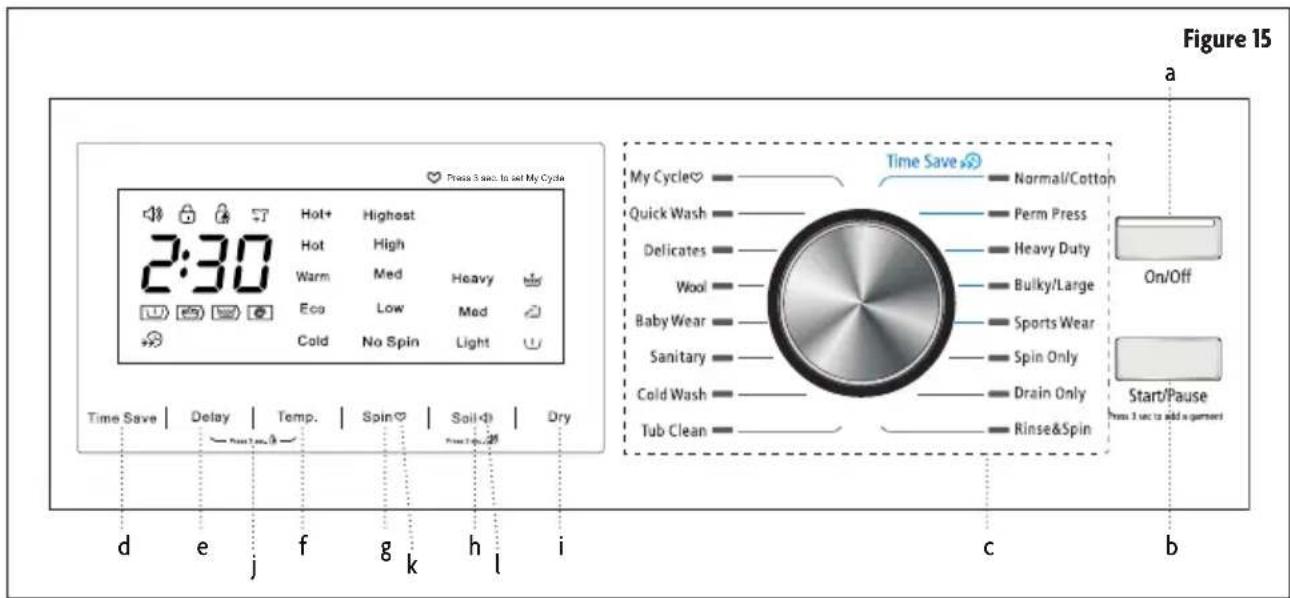
a. On/Off: Press [On/Off] to turn the unit ON. Press the button again to turn the unit OFF.
▲ NOTE: If the washer is programmed for a wash cycle and is not started within 10 minutes, the cycle will be cancelled and the unit will automatically turn OFF.
b. Start/Pause: Press [Start/Pause] to start a wash cycle. Press [Start/Pause] again to pause the cycle when the washer is running. Press [Start/Pause] once more to resume. To add a garment after the wash cycle has started, push this button for 3 seconds before the drum has filled with water. This can only be done in the beginning of the cycle before the water reached the bottom of the door. Wait for the drum to stop and the door to unlock, then add item(s). Close door and press [Start/Pause] to continue washing.
c. Wash Cycles
- My Cycle: Select this option to save a commonly used washing program as a preset.
• To program, select the settings you wish to use, and then press and hold [Spin] for 3 seconds to save.
- Quick Wash: Select this option to wash small loads of clothing that are not very dirty quickly.
- Delicates: Select this option for delicate fabrics such as dress shirts, nylons, etc.
- Wash cycle operates at a lower temperature.
- Wool: Only use this option to wash wool clothing articles labeled "Machine Washable".
• Proper detergent and water temperature must be selected for wool textiles.
• Lower spin speed and less agitation
-
Baby Wear: For washing infant clothing
-
Sanitary: Uses hot water to allow enzymes in detergent to work more efficiently for hard to clean or heavily soiled items.
- Cold Wash: Only uses cold water.
- Tub Clean: Select this option to clean the wash tub. This program uses high temperatures to sterilize the tub while removing built up detergent and residues. Add bleach for a better clean. This program should be used at least once a month with regular use. DO NOT add any clothes or wash items for this program.
- Normal/Cotton: Select this option for regularly used cottons and fabrics.
• Extended wash cycle with stronger intensity
• Recommended fabrics: cotton, linens, bed sheets, t-shirts, towels, jeans, etc.
- Perm Press: Moderate strength wash cycle. Used to reduce wrinkles in clothes from washing.
- Heavy Duty: Select this option for washing heavy clothing.
- Bulky/Large: Select this option for bulky/large items.
• Extended wash cycle
- Sports Wear: Select this option for sportswear.
• Wash cycle cleans heavily soiled clothes.
- Spin Only: Select this option to spin a load separately from a regular wash cycle.
- Soap water or rinse water must be drained before spinning.
- Drain Only: Used to drain any water in the unit.
- Rinse & Spin: Select this option to rinse and spin a load separately from a regular wash cycle.
• This can be helpful in preventing fresh stains from setting in fabrics.
d. Time Save: Press [Time Save] to decrease the washing time.
• See Wash Cycle Parameters Table for programs that can use Time Save.
e. Delay: Press [Delay] to set a delay time for the wash to begin.
- The delay start light will flash to indicate the delay time. You can delay the start time of the cycle from 1 - 24 hours.
- Set Wash program, Press Delay to set the number of hours to delay wash cycle, then push Start/Pause.
• To cancel the delay time, press Delay button until time shows 0H.
f. Temp.: Press [Temp.] to set your desired washing temperature.
- Press button to set desired wash temp (Hot+, Hot, Warm, Eco, Cold)
g. Spin: Press [Spin] to increase spin speed.
- Washer drum spins at a speed up to 1300 RPM which reduces drying time and saves energy.
- Press the button until desired speed is lit (No Spin, Low, Med, High, Highest).
• Some fabrics (i.e. delicates) require a slower spin speed.
• High spin speeds are not available on all cycles.
h. Soil: Press [Soil] to increase time for heavier soiled items.
• There are three (3) soil levels options.
• Each bar increases the base wash time by 15 minutes.
i. Function: Use to select functions during the wash cycle
j. Child Lock: Press [Delay] and [Temp] at the same time for 3 seconds to Unlock/Lock the control panel.
• On/Off Button will still function.
k. My Cycle: After a wash cycle is modified, hold down [Spin] to save your settings.
• You can quickly choose this cycle for your next wash by turning the dial to My Cycle.
- Override saved settings by holding the [Spin] button down again after a different cycle and options are selected.
- Sound: Press the [Soil] button for 3sec. to turn the sound on or off.
DISPLAY (FOR MCSFLW27W/MCSFLW27S ONLY)
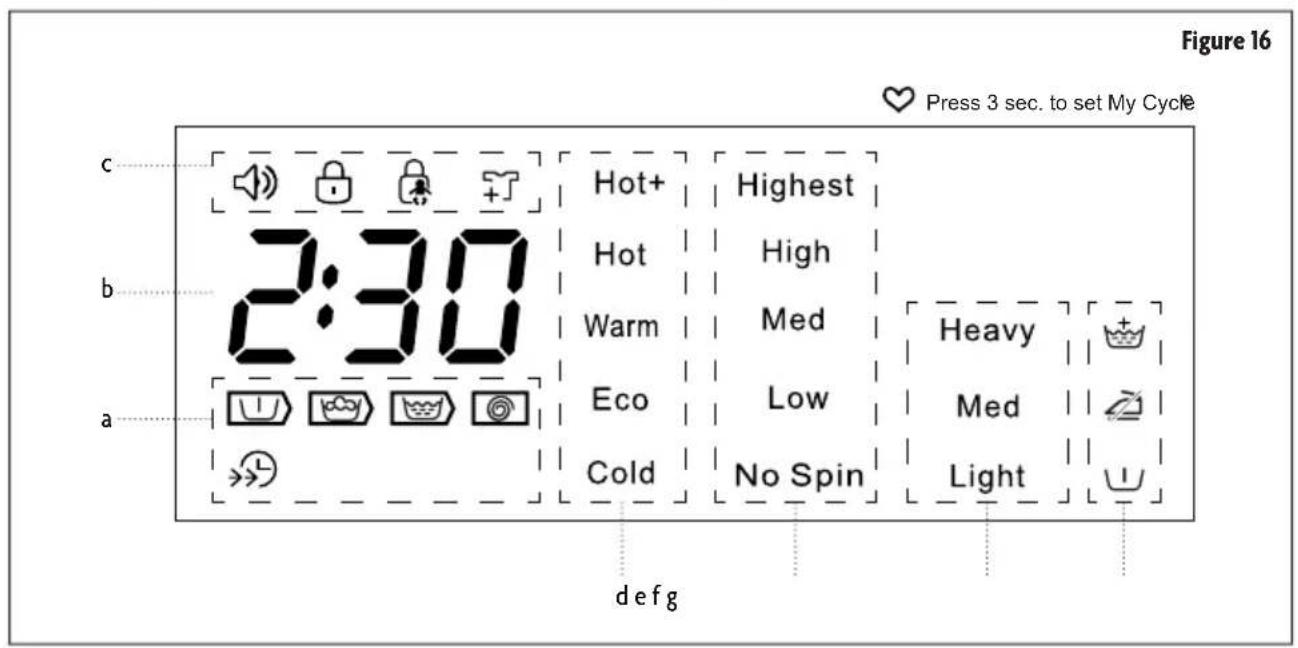
a. Cycle Indicator: Indicates stage of wash/dry cycle.
• : Prewash
- : Wash
• : Rinse
• : Spin
• ➡: Time Save
b. Clock: Indicates time left until the end of wash/dry cycle.
c. Feature Indicator: Indicates features that are active.
• Sound: Indicates that sounds are on. When unlit, unit is muted.
• Door Lock: Machine is locked for duration of cycle.
• Child Lock: Child lock is on.
- Add a Garment
d. Water Temperature: Indicates the selected temperature.
e. Spin Speed: Indicates the selected spin speed.
f. Soil Level Indicator: Indicates the selected soil level.
g. Additional Functions: Indicates additional functions selected.
• Extra Rinse •
Easy Iron
- Prewash
OPERATION INSTRUCTIONS
WASHING CLOTHES
Before washing clothes for the first time, the washing machine must be run with a small amount of detergent and without clothes. Follow below instructions.
- Connect power source and water.
- Place a small amount of detergent into the detergent dispenser and close.
- Press [On/Off] button.
- Turn the cycle to [Normal/Cotton] and press the [Temp.] button until the word Hot is displayed.
- Press [Start/Pause] button.
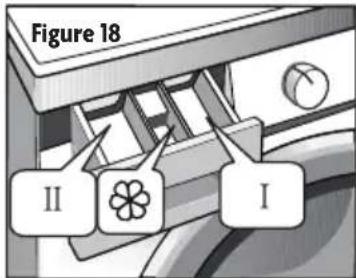
DETERGENT DISPENSER DRAWER
I. Pre-detergent or washing powder
II. Main Detergent
Softener
Once you have loaded the washer and added laundry products, you are ready to wash and dry.
START THE WASHING MACHINE
- Make sure the unit is properly connected to a power source and water lines.
• Tap should be turned on (in an open position).
• Place your wash load into the drum.
- Press the [On/Off] button. Control panel will illuminate.
- Turn the cycle selector knob to the desired cycle based on load. The LCD display panel will reflect the preset features for that cycle.
- If you would like to modify any of the preset settings for the desired cycle, press on the individual options until the display panel reflects the desired settings.
NOTE: If you have a favorite cycle, once you modify all settings, press and hold [Spin] to save as My Cycle.
Depending on the desired cycle, all options may not be available.
- Press the [Start/Pause] button to begin cycle. Once the cycle begins, the door will automatically lock and wash cycle will begin. Display panel will change to reflect estimated time and state of wash. At any time, you can pause the cycle by pressing on the [Start/Pause] button again.
CHOOSING A WASH PROGRAM
Select a wash cycle program according to the types, quantities, and dirtiness of the clothes to be washed in combination with the following washing temperature table.
| Extra Hot | Very dirty, white cotton or linens (examples: table cloths, towels, bed sheets) |
| Hot | Moderately dirty, colored linens, cotton and synthetic articles (examples: shirts, pajamas; Slightly dirty, white linens (for example: underwear) |
| Warm | Normally dirty articles (including synthetic and wool) |
WASH CYCLE PARAMETERS
WASH CYCLE PARAMETERS (FOR MCSCWD27W5/MCSCWD27S5/MCSCWD27G5 ONLY)
NOTE: Maximum drying load size is smaller than wash load size.
| Program | Max. Washing/Drying Load in lbs (kgs) | Temp | Default Time (H:M) | Time Save | Extra Rinse | Delay | Soil Level | Spin Speed |
 Normal/Cotton Normal/Cotton | 26.4/17.6(12.0/8.0) | Warm 1:04 | ○ | -- Med | ○ | |||
| Perm Press 13.2 (6.0) Warm 1:35 | ○ | ○ | ○ | Light Low | ||||
 Heavy Duty Heavy Duty | 26.4/17.6(12.0/8.0) | Hot 2:36 | ○ | ○ | ○ | - Med | ||
| Bulky/Large 13.2 (6.0) Warm 2:18 | ○ | ○ | ○ | Light Med | ||||
| Sports Wear 13.2 (6.0) Warm 2:08 | ○ | ○ | ○ | Light Med | ||||
| Spin Only | 26.4 (12.0) | - | 0:12 | - | - | ○ | - High | |
| Rinse & Spin | 26.4 (12.0) | - | 0:20 - | ○ | ○ | - High | ||
| Tub Clean | - | Hot + | 1:58 | - | - | ○ | - | - |
 Timed Dry Timed Dry | 1.1/2.2/5.5(0.5/1.0/2.5) | - | 1:28 | - | - | ○ | - | Highest |
 Auto Dry Auto Dry | 17.6 (8.0) | - | 4:18 | - | - | ○ | - | Highest |
| Sanitary | 13.2 (6.0) | Hot 3:09 | - | ○ | ○ | - Med | ||
| Baby Wear 26.4 (12.0) Eco | 1:39 | - | ○ | ○ | Light Med | |||
| Wool | 4.4 (2.0) | Warm 1:37 | - | ○ | ○ | - Low | ||
| Delicates | 5.5 (2.5) | Eco | 1:00 | - | ○ | ○ | - Low | |
| Quick Wash | 4.4 (2.0) | Cold | 0:20 | - | - | ○ | - Med | |
NOTE: ○ is Optional Function.
NOTE: is Dry function.
WASH CYCLE PARAMETERS (FOR MCSFLW27W/MCSFLW27S ONLY)
| Program | Max. Wash Load in lbs (kgs) | Temp | Default Time (H:M) | Spin Speed | Time Save | Extra Rinse | Easy Iron | Pre-wash | Delay |
| Normal/Cotton 26.5 (12.0) Warm 1:04 Med | - | - | ○ | - | ○ | ||||
| Perm Press 13.2 (6.0) Warm 1:35 Low - | ○ | ○ | ● | ○ | |||||
| Heavy Duty 26.5 (12.0) Hot 2:36 Med | ○ | ○ | ○ | ○ | ○ | ||||
| Bulky/Large 13.2 (6.0) Warm 2:18 Med | ○ | ○ | ○ | ○ | ○ | ||||
| Sport Wear | 13.2 (6.0) Warm 2:08 | Med | ○ | ○ | ○ | ○ | ○ | ||
| Spin Only | 26.5 (12.0) | - | 0:12 | High | - | - | ○ | - | ○ |
| Drain Only | 26.5 (12.0) | - | 0:01 | - | - | - | - | - | ○ |
| Rinse & Spin | 26.5 (12.0) | - | 0:20 | High | - | ○ | ○ | - | ○ |
| Tub Clean | - | Hot | 1:58 | - | - | - | - | - | ○ |
| Cold Wash | 26.5 (12.0) Cold 1:42 Med | ○ | ○ | ○ | ○ | ○ | |||
| Sanitary | 13.2 (6.0) | Hot | 3:09 | Med | - | ○ | ○ | ● | ○ |
| Baby Wear | 26.5 (12.0) Eco | 1:39 Med | ○ | ○ | ○ | ○ | ○ | ||
| Wool | 4.4 (2.0) | Warm | 1:37 | Low | - | ○ | ○ | - | ○ |
| Delicates | 5.5 (2.5) | Eco | 1:00 | Low | - | - | - | - | ○ |
| Quick Wash | 4.4 (2.0) | Cold | 0:20 | Med | - | - | - | - | ○ |
▲ NOTE: ○ is Optional Function.
NOTE: ● is Required Function.
NOTE: ENERGY TEST PROGRAM - NORMAL/COTTON
“Normal/Cotton” is the standard washing program to which the information in the label and energy guide relates, and is suitable to clean normally soiled cotton laundry and is the most efficient program in terms of combined energy and water consumptions for washing that type of laundry. The actual water temperature may differ from the declared cycle temperature.
NOTE: The parameters in this table are only for user's reference. The actual parameters may be vary from the parameters in above table.
In the event of the loss of power, the washer will automatically resume operation from previous settings when power is restored.
CARE AND MAINTENANCE
Before doing any maintenance, be sure to remove the power plug from the outlet and close the tap.
WARNING:
• DO NOT use solvents to clean the unit. The washing machine can be damaged, or toxic gasses may be produced.
• NEVER spray water on the washing machine to clean it.
• DO NOT use detergents that contain PCMX to clean the washing machine.
- Certain internal parts are intentionally not grounded and may present a risk of electric shock only during servicing. Service Personnel – DO NOT contact the following parts while the appliance is energized: Drain Pump, Door Lock, Drying Heater (Combo), Fan Motor (Combo).
CLEANING AND MAINTENANCE OF WASHING MACHINE CABINET
Proper maintenance on the washing machine can extend its working life. The surface can be cleaned with diluted non-abrasive neutral detergents when necessary. If there is any water overflow, use a cloth to wipe it off immediately. DO NOT allow sharp items to strike the cabinet.
▲ NOTE: DO NOT use formic acid and its diluted solvents or equivalent
CLEANING THE INTERNAL DRUM
Any rust left inside the drum by the metal articles should be cleaned out immediately with chlorine-freedetergents. DO NOT use steel wool.
CLEAN DETERGENT BOX
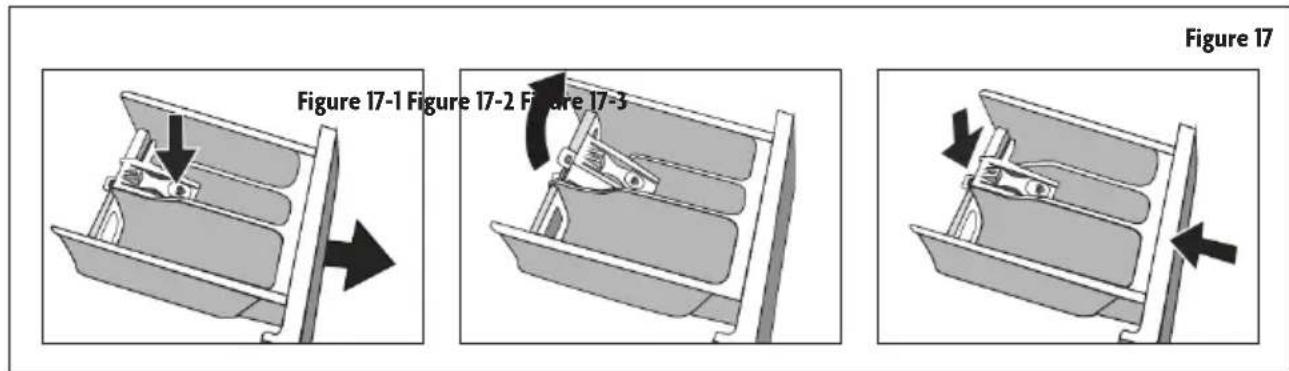
- Open Detergent box.
- Press down the arrow and slide out assembly. (Figure 17-1)
- Lift the clip and remove softener cover and wash all sections with water. (Figure 17-2)
- Replace the softener cover and push the drawer back into position. (Figure 17-3)
CLEAN INLET FILTER
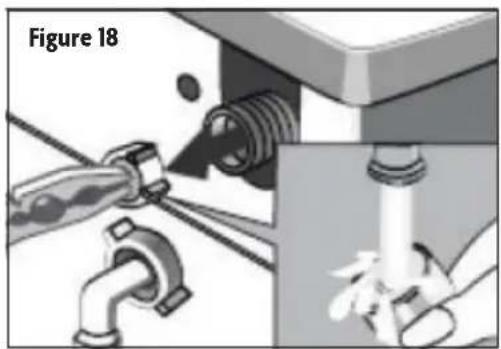
Inlet filter maybe need to be cleaned if there is insufficient or no water in when the tap is opened. To clean the filter:
- Close the tap.
- Select any procedure except "Wash" or "Drain" procedure.
- Press the button "Start/Pause" and keep the procedure running for about 40 seconds.
- Remove the inlet pipe from the tap.
- Wash the filter with water
- Reconnect the inlet pipe.
WASHING THE FILTER IN WASHING MACHINE
- Remove the inlet pipe from the rear of the machine.
- Pull out the filter with needle nose pliers rinse with water.
- Put the filter back into place.
- Reconnect the inlet pipe.
- Open the tap and make sure there is no water leakage.
- Close the tap.
natural_image
Illustration of a faucet installation with hands performing maintenance (no text or symbols)REMOVING FOREIGN ITEMS FROM DRAIN PUMP FILTER
The drain pump filter can filter small foreign matters from clothing being washed. Clean the filter periodically to ensure the normal operation of washing machine.
The pump should be inspected if the machine does not empty and/or spin, or if it makes unusual noises during draining due to objects (such as, coins etc.) blocking the pump.
To access and clean the filter:
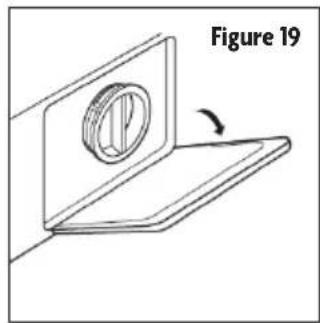
- Open the lower access cover. (Figure 19)
- Remove the emergency drain hose cap and let water drain out. It is recommended to have a vessel ready to catch remaining water. (Figure 20)
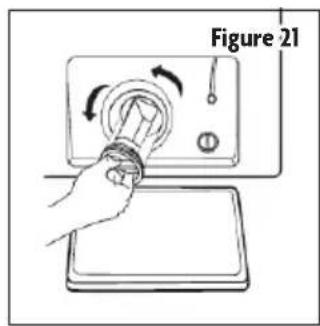
- Replace emergency drain hose, and open the filter by turning counter-clockwise. (Figure 21)
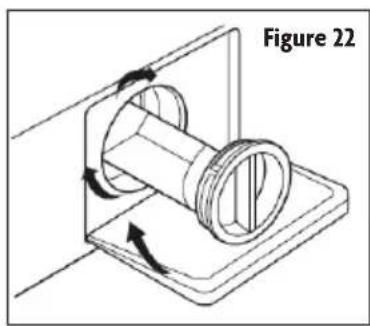
- Remove any objects in filter and replace, locking in by turning clockwise. (Figure 22)
natural_image
Diagram of a mechanical component with a circular feature and an arrow indicating rotation (no text or symbols)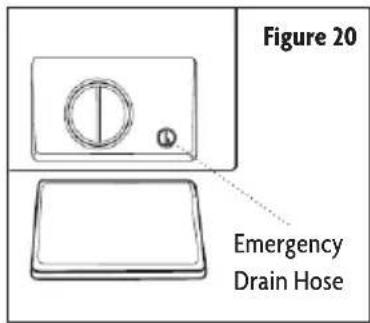
natural_image
Technical diagram of a mechanical assembly with rotating components and directional arrows (no text or symbols)⚠ WARNING: To avoid burning, it shall be done after the hot water inside the machine cools down.
⚠ WARNING: When the appliance is in use and depending on the program selected there may be hot water in the pump. Never remove the pump cover during a wash cycle, always wait until the appliance has finished the cycle, and is empty. When replacing the cover, ensure it is securely in place
THAW A FROZEN WASHING MACHINE
If the temperature drops below zero and your washing machine gets frozen, you may:
- Disconnect the power supply for the washing machine.
-
Wash the tap connection with warm water to loosen inlet pipe.
-
Remove the inlet pipe and immerse it in warm water.
- Pour warm water into washing drum and wait for 10 minutes.
- Reconnect inlet pipe to the tap and check whether inlet and outlet are working normally.
NOTE: when the washing machine is reused, make sure the ambient temperature is above 32^ F ( 0^ C).
TO PREVENT FREEZING
If your washing machine is located in the room where it can get frozen easily, please drain the remaining water inside drain pipe and inlet pipe thoroughly.
Remove the remaining water in inlet pipe:
- Close the tap.
- Screw off the inlet pipe from tap and put its end into the container.
- Start up any procedure except single Wash or Drain procedure. Water will be drained out of inlet pipe if any for about 40 seconds.
- Reconnect the inlet pipe to tap.
EMERGENCY DOOR RELEASE
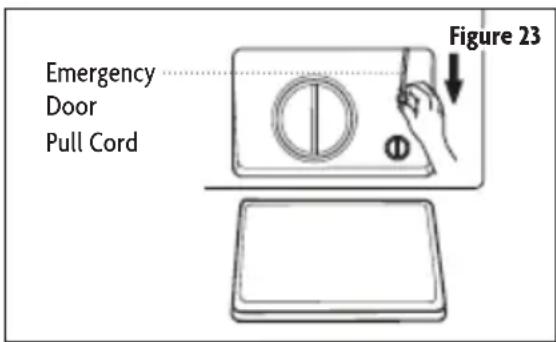
In the case of a power failure or other circumstances and door cannot be opened, if it is necessary to open the door, pull down on the cord inside the access panel. Be sure to restore the pull cord after opening the door.
⚠️ CAUTION: The emergency switch pull cord cannot be used during washing. If unit is in operation, wait for it to stop and for the interior to cool to a safe temperature before opening door.
TROUBLESHOOTING
ALARM CODE DETECTION
| Alarm Code Cause of Problem Solution | ||
| E30 Door is not properly closed. | Check if clothes are stuck in door.Close door and restart. | |
| E10 Problem with water flow. | Check if the water pressure is too low.Make sure inlet hose is not bent or blocked.Check if the inlet valve filter is blocked. | |
| E21 Water taking too long to drain. Check if the drain hose is blocked. | ||
| E12 Water overflow. Restart the washer. | ||
| EXX Other Restart machine to clear. Call customer service if code persists. | ||
▲NOTE: After trying the solution, restart the washing machine. If code persists, contact customer service.
When the washing machine needs servicing, please contact our customer service department, and a representative will try to diagnose the issue. Please do not dismantle the washing machine without prior permission. Doing so will void your warranty.
If the washing machine fails to operate properly, or it sounds an alarm, please check the following guidelines for possible solutions to common problems or alarm indicators.
LIST OF PROBLEMS AND POSSIBLE SOLUTIONS
| Problem Cause Solution | ||
| Washing machine will not start. | Check if the door is closed tightly. | |
| Check if power plug is properly inserted. | ||
| Check if water supply is open. | ||
| Check if “On/Off” button is pressed. | ||
| Check if “Start/Pause” button is pressed. | ||
| Door cannot be opened. | Safety lock is engaged. Disconnect the power. | |
| Heating fault | NTC thermistor is damaged and heating pipe is worn. | Contact customer service. |
| Water leakage | The connection between inlet pipe or outlet hose and tap or washing machine is not tight. | Check and fasten water pipes. |
| Drain pipe is blocked. | Clean up outlet hose and drain. | |
| Water overflowing from the bottom of the Machine | The inlet pipe is not connected firmly. | Fix the inlet pipe. |
| Outlet hose has water leakage. | Replace the drain hose. | |
| Indicator or display do not light. | Power is disconnected. Check if plug is connected correctly and power is on. | |
| PC board has problems. | Contact customer service. | |
| Harness has connection problem. | ||
| Detergent residue in the detergent box | Washing powder is damp and hardened. | Clean and wipe the box. |
| Use liquid detergents or the detergents special for hi efficiency front load washer. | ||
| Clothes not clean enough | The clothes are too dirty. Select a | proper washing program. |
| Insufficient detergent quantity | Make sure to follow instructions for adding detergent amount. | |
| Abnormal noises or vibration | Make sure the transport bolts are removed. | |
| Make sure cabinet is installed on solid, level surface. | ||
| Check for any foreign items in the unit. | ||
| Make sure leveling legs are level. | ||

LIMITED WARRANTY
MC Appliance Corporation warrants each new Washer and Combo Washer/Dryer to be free from defects in material and workmanship, and agrees to remedy any such defect or to furnish a new part(s), at the company's option, for any part(s) of the unit that has failed during the warranty period. Parts and labor expenses are covered on this unit for a period of one year from the date of purchase. A copy of the dated sales receipt/invoice is required to receive warranty service, replacement or refund.
This warranty covers appliances in use within the contiguous United States, Alaska, Hawaii and Puerto Rico. This warranty does not cover the following:
- Damages due to shipping damage or improper installation.
• Damages due to misuse or abuse.
- Content losses due to failure of the unit.
• Inside components such as filters, etc.
• Repairs performed by unauthorized service agents.
- Service calls that do not involve defects in material and workmanship such as instructions on proper use of the product or improper installation.
- Replacement or resetting of house fuses or circuit breakers.
- Failure of this product if used for other purposes than its intended purpose.
- Disposal costs for any failed unit not returned to our factory.
- Any delivery/installation costs incurred as the result of a unit that fails to perform as specified.
- Expenses for travel and transportation for product service if your appliance is located in a remote area where service by an authorized service technician is not available.
- The removal and reinstallation of your appliance if it is installed in an inaccessible location or is not installed in accordance with published installation instructions. Service may not be available on units installed in nontraditional housing locations (ie. boats, etc.)
• Refunds for non repairable products are limited to the price paid for the unit per the sales receipt.
- This warranty is non transferable. This warranty applies only to the original purchaser and does not extend to any subsequent owner(s).
Limitations of Remedies and Exclusions:
Product repair in accordance with the terms herein, is your sole and exclusive remedy under this limited warranty. Any and all implied warranties including merchantability and fitness for a particular purpose are hereby limited to one year or the shortest period allowed by law. MC Appliance Corporation is not liable for incidental or consequential damages and no representative or person is authorized to assume for us any other liability in connection with the sale of this product. Under no circumstances is the consumer permitted to return this unit to the factory without the prior written consent of MC Appliance Corporation.
Some states prohibit the exclusion or limitation of incidental or consequential damages, or limitations on implied warranties. This warranty gives you specific legal rights, and you may also have other rights which vary from state to state.
Model Parts Labor Type of Service
MCSCWD27W5/MCSCWD27S5
MCSFLW27W/MCSFLW27S/MCSCWD27G5
One Year One Year In Home
For Service or Assistance please call 888-775-0202 or visit us on the web at www.mcappliance.com to request warranty service or order parts.

CNA International, Inc. d/b/a MC Appliance Corporation. All rights reserved. Magic Chef® logo is a registered trademark of CNA International, Inc.
www.mcappliance.com Printed in China

natural_image
Line drawing of a simple washing machine with no text or symbols on the bodyModelo MCSCWD27W5 / MCSCWD27S5 / MCSFLW27W / MCSFLW27S / MCSCWD27G5 LEA ESTE MANUAL ANTES DE UTILIZAR SU LAVADORA Y SECADORA Y GUÁRDELO PARA FUTURA REFERENCIA.

- When positioning the washing machine, make sure the legs are screwed in close to the cabinet. If not, turn them to their original positions by hand or with a wrench and tighten the nuts with a wrench.
- After positioning the washing machine, push on all four corners at the top of washing machine. If the washing machine has any wobble, or is not stable when being pressed, adjust the leg to level the machine.
- To level the unit, loosen the lock nut with a wrench and turn the leg by hand until it tightly contacts with the floor. Press the leg with one hand and tighten the locking nut close to the cabinet with the other hand.
- Repeat steps 2 and 3 as needed.
- Use a bubble level to check front to back, side to side, and corner to opposite corner to ensure the washing machine is level. Repeat above steps if needed.
natural_image
Technical line drawing of a mechanical component with two views, one showing internal structure and the other a base mount (no text or symbols)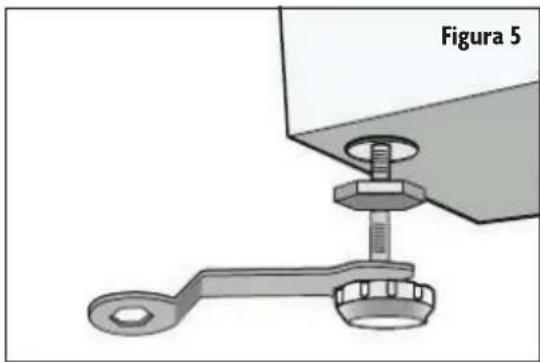
natural_image
Mechanical assembly diagram showing a wrench inserted into a bracket with a labeled section 'Figura 5' (no text or symbols on the diagram itself)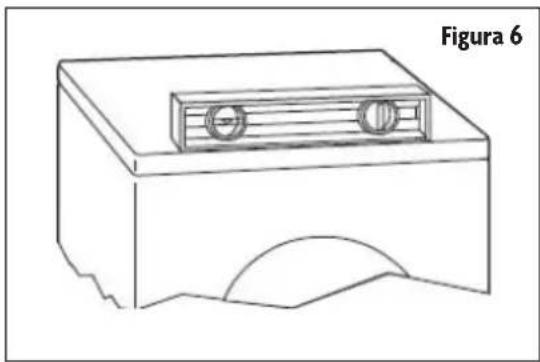
natural_image
Line drawing of a mechanical component with two circular cutouts and an arched base (no text or symbols)SISTEMA DE DESAGÜE
SISTEMA DE DESAGÜE VERTICAL - PARED O SUELO
SISTEMA DE DESAGÜE DEL TAMBOR DE LAVADO
natural_image
Diagram of a mechanical device with rotating arms and a handle, labeled Figura 12 (no text or symbols on the diagram itself)ANTES DE USAR
INICIAR LA LAVADORA
natural_image
Diagram showing plumbing fixtures being installed, with hands holding a pipe and a magnified view of the pipe (no text or symbols)QUITAR CUALQUIER SUSTANCIA EXTRAÑA DEL FILTRO DE LA BOMBA DE DESAGÜE
natural_image
Mechanical assembly diagram showing a rotating component mounted on a base plate (no text or symbols)
- 24" Combo Washer and Dryer 24" Front Load Washer
- PRODUCT REGISTRATION
- CONTENTS
- IMPORTANT SAFETY INSTRUCTIONS
- READ AND FOLLOW THIS SAFETY INFORMATION CAREFULLY SAVE THESE INSTRUCTIONS
- SPECIFICATIONS
- INSTALLATION INSTRUCTIONS
- INCLUDED PARTS
- INSTALLATION REQUIREMENTS
- ELECTRICAL REQUIREMENTS
- LOCATION REQUIREMENTS
- INSTALLATION
- LEVELING THE WASHER
- DRAIN SYSTEM
- STANDPIPE DRAIN SYSTEM - WALL OR FLOOR
- FLOOR DRAIN SYSTEM
- INSTALL INLET PIPE
- BEFORE USE
- CHECK LIST AND PREPARATION BEFORE WASHING
- SELECTING DETERGENT
- SEPARATE CLOTHES TO BE WASHED
- REMOVE ALL LOOSE OBJECTS FROM CLOTHES
- BALANCING THE LOAD
- OPERATING INSTRUCTIONS
- CONTROL PANEL (FOR MCSCWD27W5/MCSCWD27S5/MCSCWD27G5 ONLY)
- d. Dry Cycles
- ▲ NOTE: Important Notes for Dry Cycles
- OPERATION INSTRUCTIONS
- WASHING CLOTHES
- DETERGENT DISPENSER DRAWER
- START THE WASHING MACHINE
- CHOOSING A WASH PROGRAM
- WASH CYCLE PARAMETERS
- WASH CYCLE PARAMETERS (FOR MCSCWD27W5/MCSCWD27S5/MCSCWD27G5 ONLY)
- CARE AND MAINTENANCE
- WARNING:
- CLEANING AND MAINTENANCE OF WASHING MACHINE CABINET
- CLEANING THE INTERNAL DRUM
- CLEAN DETERGENT BOX
- CLEAN INLET FILTER
- WASHING THE FILTER IN WASHING MACHINE
- REMOVING FOREIGN ITEMS FROM DRAIN PUMP FILTER
- THAW A FROZEN WASHING MACHINE
- TO PREVENT FREEZING
- EMERGENCY DOOR RELEASE
- TROUBLESHOOTING
- LIMITED WARRANTY
- Limitations of Remedies and Exclusions:
- Model Parts Labor Type of Service
- SISTEMA DE DESAGÜE
- SISTEMA DE DESAGÜE VERTICAL - PARED O SUELO
- SISTEMA DE DESAGÜE DEL TAMBOR DE LAVADO
- ANTES DE USAR
- INICIAR LA LAVADORA
- QUITAR CUALQUIER SUSTANCIA EXTRAÑA DEL FILTRO DE LA BOMBA DE DESAGÜE
Brand : Magic Chef
Model : MCSCWD27W5
Category : Washing machine