
TSSTTVFDXLPP-033 - Oven OSTER - Free user manual and instructions
Find the device manual for free TSSTTVFDXLPP-033 OSTER in PDF.


| Product Type | Countertop oven with double French doors |
| Brand | Oster |
| Model | TSSTTVFDXLPP-033 |
| Power Supply | 120 V, AC |
| Power | Approximately 1500 W (estimated) |
| Capacity | 18 L (estimated) |
| Dimensions (W x D x H) | 45 x 35 x 30 cm (estimated) |
| Weight | 6.5 kg (estimated) |
| Material | Stainless steel, tempered glass |
| Functions | Broil, turbo convection baking, bake, reheat, variable broil |
| Temperature Setting | Temperature selector from 200°F to 450°F (93°C to 230°C) |
| Timer | 60 minutes with automatic shut-off and audible bell |
| Cooking Heights | 2 rack positions |
| Included Accessories | 2 racks, baking pan/cookie sheet, removable crumb tray |
| Doors | Tempered glass double French doors |
| Maintenance | Clean with damp cloth and mild soapy solution; racks and crumb tray are dishwasher safe |
| Safety | Automatic shut-off, hot surface indicator, polarized plug, short anti-tangle cord |
| Spare Parts | Standard accessories available; contact Jarden customer service |
| Repairability | 1-year limited warranty; repair by authorized center only |
| General Information | Made in China, distributed by Jarden Consumer Solutions |
Frequently Asked Questions - TSSTTVFDXLPP-033 OSTER
User questions about TSSTTVFDXLPP-033 OSTER
0 question about this device. Answer the ones you know or ask your own.
Ask a new question about this device
Download the instructions for your Oven in PDF format for free! Find your manual TSSTTVFDXLPP-033 - OSTER and take your electronic device back in hand. On this page are published all the documents necessary for the use of your device. TSSTTVFDXLPP-033 by OSTER.
USER MANUAL TSSTTVFDXLPP-033 OSTER
For product questions contact:
Jarden Consumer Service
USA: 1.800.334.0759
Canada: 1.800.667.8623
www.oster.ca
© 2016 Sunbeam Products, Inc. doing business as Jarden Consumer Solutions. All rights reserved. In Canada, imported and distributed by Sunbeam Corporation (Canada) Limited doing business as Jarden Consumer Solutions, 20 B Hereford Street, Brampton, Ontario L6Y 0M1.
User Manual
French Door Countertop Oven
Notice d'emploi
natural_image
Exterior view of a stainless steel electric oven with open doors and control knobs (no visible text or symbols)Visit us at www.oster.ca
P.N. 188284
IMPORTANT SAFEGUARDS
When using electrical appliances, basic safety precautions should always be followed, including the following:
- READ ALL INSTRUCTIONS, PRODUCT LABELS AND WARNINGS BEFORE USING THE COUNTERTOP OVEN.
- Do not touch hot surfaces. Use handles or knobs. Always use the oven handles when moving the unit.
- Unplug from outlet when not in use and before cleaning. Allow to cool before putting on or taking off parts.
- To protect against risk of electrical shock, do not immerse the appliance in water or any other liquids.
- Close supervision is always necessary when this or any appliance is used near children. This appliance is not for use by children.
- Do not operate this or any appliance with a frayed or damaged cord or plug or after the appliance malfunctions or is dropped or has been damaged in any manner. Return the countertop oven to the nearest Authorized Sunbeam Appliance Service Center for examination, repair or electrical or mechanical adjustment.
- Do not use attachments not recommended by the manufacturer; they may cause fire, electric shock or personal injury.
- Do not use outdoors or for commercial purposes.
- Do not use this appliance for other than its intended use.
- Do not let the cord dangle over the edge of a tabletop or countertop or touch hot surfaces.
- Do not place the appliance near a hot gas or electric burner or in a heated oven.
- Extreme caution should be used when using containers constructed of material other than metal or glass.
- A fire may occur if the countertop oven is covered or touching flammable materials, including curtains, draperies, walls, etc., when in operation. Do not store any items on top of the appliance when in operation.
- When using countertop oven, pull the unit out a minimum of 6 inches away from the wall or other cords.
- Do not store any materials, other than manufacturer's recommended accessories, in this unit when not in use.
English-42
- Do not place any flammable materials in oven, such as paper, cardboard, plastic or any materials that may catch fire or melt.
- Do not cover the oven tray with metal foil. This will cause overheating of the appliance.
- Oversized foods or metal utensils must not be inserted in the appliance as they may create a fire or risk of electrical shock.
- Do not clean with metal scouring pads. Pieces can break off the pad and touch electrical parts involving a risk of electrical shock.
- Use extreme caution when removing pan or disposing of hot grease or other hot liquids.
- To turn this appliance off, return all controls to the "OFF" position and remove cord from outlet.
SAVE THESE INSTRUCTIONS
This Unit Is for Household Use Only Short Power Supply Cord Instructions
A short power-supply cord is provided to reduce the risk resulting from becoming entangled in or tripping over a longer cord. An extension cord may be used if care is exercised in its use. If an extension cord is used, the electrical rating of the cord must be at least as great as the electrical rating of the appliance. The extension cord should be arranged so that it will not drape over the countertop or tabletop where it can be pulled on by children or tripped over unintentionally.
For Products Purchased in the United States and Canada Only To reduce the risk of electrical shock, this appliance has a polarized plug (one blade is wider than the other). This plug fits a polarized outlet only one way; if the plug does not fit fully into the outlet, reverse the plug. If it still does not fit, contact a qualified electrician. Do not attempt to defeat this safety feature.
English-43

LEARNING ABOUT YOUR COUNTERTOP OVEN
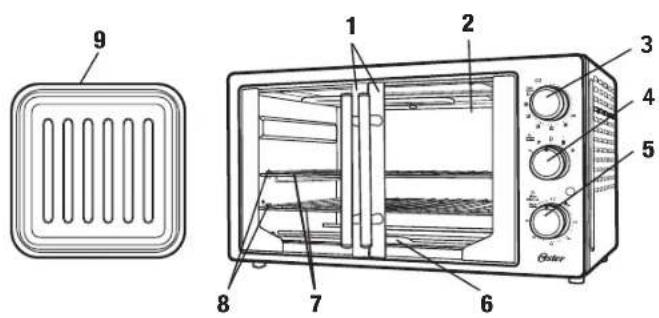
- Tempered Glass Doors – For front viewing of food.
- Easy Clean Interior Walls – Allows fast clean up.
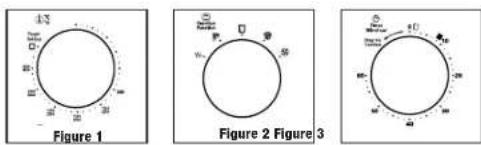
- Temperature Control Knob - Adjust the dial thermostat to the desired temperature. (See Figure 1)
- Function Selector Knob - Select cooking function by turning knob to desired setting. (See Figure 2)
- Timer Control Knob with Bell Signal - Set cooking time up to 60 minutes. Will automatically turn the oven OFF at the end of the cooking time. (See Figure 3)
- Removable Crumb Tray – For crumb or fallen food particles collection. Pulls out for easy cleaning.
- Two Removable Wire/Broil Racks – Use for all your broiling and grilling needs. See “Positioning Rack” and “Positioning Pan” sections.
- Two Rack Positions
- Baking Pan & Cookie sheet in one – Use for all your baking needs. See “Positioning Pan” section.
English-44
PREPARING TO USE YOUR COUNTERTOP OVEN FOR THE FIRST TIME
If you are using your Countertop oven for the first time, please be sure to:
- Remove any stickers from the surface of the oven.
- Open oven doors and remove all printed documents and paper from inside the Countertop Oven.
- Clean the rack and pan with hot water, a small amount of dishwashing liquid and a non-abrasive cleaning pad.
CAUTION: DO NOT IMMERSE THE BODY OF THE UNIT IN WATER.
• Dry the unit thoroughly before using.
- Select a location for the Countertop Oven. The location should be in an open area on a flat counter where the plug will reach an outlet.
- Plug the Countertop Oven into a 120 Volt AC electrical outlet.
NOTE: During initial start up you may detect a slight smell and/or smoke. Turn the temperature to max and let run for approximately 5 minutes.
WARNING: When Countertop Oven is in use or cooling down, please be sure there is a 6-inch clearance between the Countertop Oven and any other surface including cords. Be sure the cord is not resting against the back of the Countertop Oven.

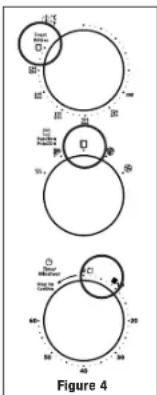
To Use the Toast Function (See Fig. 4)
Select desired rack position. (See "Positioning Rack" Section)
NOTE: Different types of bread require different settings. Lighter breads and waffles require lighter setting. Darker breads, muffins and English muffins require a darker setting.
Step 1. Place food on Wire Racks. For best toasting results, position the rack in the upper position. * *
Step 2. Close glass doors completely.
Step 3. Turn the Function dial to Toast. Both the top and bottom heater elements will operate.
Step 4. Turn the temperature control knob to the 450°/TOAST setting.
Step 5. To set the timer, turn the timer past the 20 minute mark to engage timer switch and set back to desired toast time.
Step 6. When toasting is complete, a bell will sound. Open doors completely and remove food.
To Use the Turbo Convection Heat Function (See Fig. 5)
The Turbo Convection Heat Function turns on a built in fan that circulates hot air in the oven chamber cooking your food faster and more evenly. Preheat oven 5-7 minutes at desired temperature with oven rack in place.
Step 1. Place baking pan with food inside on wire rack.
Step 2. Close glass doors completely.
Step 3. Turn the Function dial to Turbo.
Step 4. Turn the Temperature dial to desired setting.
Step 5. Turn the Timer to desired cook time.*
Step 6. When baking is complete, open doors completely and remove food.**
What is Turbo Convection Heat?
Answer: In your Countertop Oven there is a built-in fan that circulates the hot air in the oven chamber cooking your food faster and more evenly.
How do I adjust the time for Turbo Convection?
Answer: On average, the Turbo function will shorten the cooking time, but it varies by food. It is suggested to go with a shorter cooking time to start with and then add time if it is needed.
What are the best foods to use with Turbo?
Answer: While a shorter cook time is often desirable, baked goods in particular benefit from Turbo cooking as the circulating air keeps oven temperature consistent throughout.
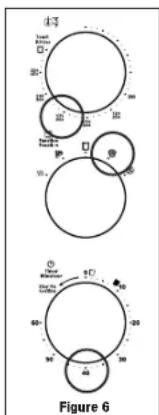
To Use the Bake Function (See Fig. 6)
Step 1. Place baking pan with food inside on wire rack.
Step 2. Close glass doors completely.
Step 3. Turn the Function dial to Bake.
Step 4. Turn the Temperature dial to desired setting.
Step 5. Turn the Timer to desired cook time.*
Step 6. When baking is complete, open doors completely and remove food.**
For Cooking Two Pizzas
Step 1. Place the 2 pizzas on the wire racks.
Step 2. Cook the pizzas for about one-half the recommended time, and then switch the rack positions to allow the pizzas to uniformly cook top and bottom.
English-47 English-46

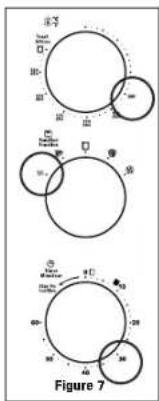
To Use the Warm Function (See Fig. 7)
Step 1. Place baking pan with food inside on wire rack.
Step 2. Close glass doors completely.
Step 3. Turn the Function dial to Warm.
Step 4. Turn the Temperature dial to "200°F".
Step 5. 'Turn the Timer to desired to "Warm" time."
Step 6. When Warming is complete, open doors completely and remove food. ^4
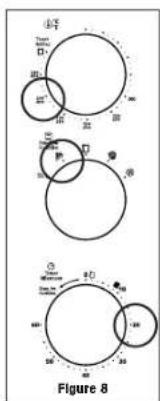
To Use the Broil Function (See Fig. 8)
Adjustable Broil allows the oven to broil at any temperature. Great for melting cheese at 150^ F or cooking fish at 400^ F. Adjust as needed.
Step 1. Place food on broil rack or on baking pan if needed. See "Positioning Rack" and "Positioning Pan" sections.
Step 2. Close glass doors.
Step 3. Turn the Function dial to Broil.
Step 4. Turn the Temperature dial to desired temperature.
Step 5. Turn the Timer to desired cook time.*
Step 6. When Broiling is complete, open doors completely and remove food.**
* Special note: If cook time is less than 20 minutes, you must turn 'Timer past the 20 minute mark to engage the timer then back to desired time.
** WARNING: Cooked food and metal rack can be very hot, handle with care. Do not leave Countertop Oven unattended.
English-48
POSITIONING RACK
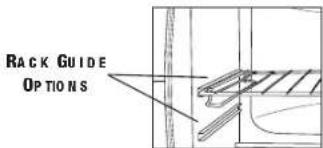
- To accommodate a wide variety of foods the oven has two rack positions. The rack can be inserted in the oven in the upper or lower rack guides. The rack will fit into either of the rack guides inside of the Countertop Oven. (See Figure Below)
- Before removing the rack allow the unit to cool.
- To remove the rack, open the oven doors and pull the rack towards the front of the oven. The rack will slide on the rack guides on the inside of the oven.
PLEASE NOTE: the oven rack may tilt downward causing food to shift when the rack is pulled out, proceed with caution.
- Positioning of the oven rack will depend on the size of the food and desired browning. Move the rack to the lower rack position to prevent top browning and move the rack to the upper rack position to prevent bottom burning.
- For best toasting results, position the rack in the upper rack guide.
English-49

POSITIONING PAN
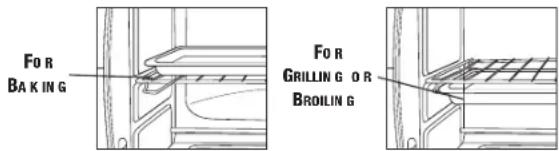
- To accommodate a wide variety of foods the oven has two pan positions. The pan can be placed on top of the rack or inserted into the guide rails below the rack. (See Figure Below)
- Before removing the pan allow the unit to cool.
- Positioning of the oven pan will depend on the desired cooking method. For baking, place the pan on top of the rack. For grilling or broiling, insert the pan into the guide rails below the rack and place the food on top of the rack.
PLEASE NOTE: Do not to use the broil pan under the rack in the lower position.
CLEANING YOUR COUNTERTOP OVEN
CAUTION: DO NOT IMMERSE IN LIQUIDS.
Step 1. Turn all knobs to "OFF" position and remove plug from electrical outlet. Allow to cool.
Step 2. Wipe unit down with damp cloth. DO NOT IMMERSE IN WATER. Make sure to only use mild, soapy water. Abrasive cleaners, scrubbing brushes and chemical cleaners will damage the coating on this unit.
Step 3. Remove crumb tray by pulling out of Countertop Oven.
Step 4. Shake off crumbs from crumb tray. Cleaning the crumb tray often will avoid any accumulations.
Step 5. Remove wire rack and clean with damp cloth or place in top rack of dishwasher.
STORING YOUR COUNTERTOP OVEN
Allow the appliance to cool completely before storing. If storing the Countertop Oven for long periods of time make certain that the Countertop Oven is clean and free of food particles. Store the Countertop Oven in a dry location such as on a table or countertop or cupboard shelf. Other than the recommended cleaning, no further user maintenance should be necessary.
English-50
RE CIPE S
BRIE AND ARTICHOKE BRUSCHETTA
6 (1/3-inch-thick) slices of round country loaf
6 tablespoons extra-virgin olive oil
2 (6 ½-oz.) jars marinated artichoke hearts, drained
1 (2 oz.) piece prosciutto or ham
1 small red onion, chopped
1 tablespoon chopped garlic
2 tablespoons balsamic vinegar
6 oz. brie
1 tablespoon chopped fresh mint
1 tablespoon chopped fresh basil
1/4 cup parmesan shavings
Set Oster ^® Countertop Oven to broil and pre-heat. Arrange bread in one layer on a baking pan, then brush tops with 2 tablespoons oil and season with salt and pepper. Broil until golden brown and transfer to a rack. Spread thin layer of Brie on toasted bread. Cut artichokes lengthwise into 1/4-inch-thick slices and cut prosciutto into matchsticks. Heat 1 tablespoon oil in a 10-inch heavy bottom skillet on moderately high heat. Add the onions and garlic. Stir frequently until they become transparent. Add the artichokes and prosciutto, cook the artichokes until golden (about 4 minutes) then add the balsamic vinegar. Add the basil and mint, salt and pepper to taste. Spoon the mixture over the toast. Top with Parmesan and serve immediately.
CINNAM ON TOAST
1 tablespoon brown sugar
2 teaspoons margarine, at room temperature
14 teaspoon ground cinnamon
2 slices whole wheat or multigrain bread
Combine the sugar, margarine and cinnamon in a small bowl with a fork until well blended. Spread each bread slice with equal portions of the mixture. In an Oster ^® Countertop Oven, toast until the sugar is melted and the bread is browned to your preference.
RE CIPES
HONEY MUSTARD CHICKEN WITH SPICY PECAN CORNFLAKE CRUST
1 cup Dijon mustard
12 cup chopped pecans
1 cup honey
Nonstick pan spray
3 pounds of skinless chicken thighs and/or breasts
Olive oil for drizzling
1 teaspoon cayenne pepper
1 18-ounce box cornflake cereal, pulsed in food processor until flakes are crumbs
Mix the mustard and honey together in a medium shallow bowl. Thoroughly coat the chicken on both sides. Combine cayenne pepper, cornflakes and pecans in another shallow bowl. Spray baking pan with nonstick spray and place chicken in pan. Drizzle top with olive oil. Bake at 375^ F for 40 minutes or until chicken reaches internal temperature of 170^ F and is no longer pink in center.
ROASTED TURKEY BREAST WITH AROMATIC VEGETABLES
1 small turkey breast
2 stalks celery, cut into ¼ inch dice
2 cloves garlic, peeled
1 lemon, halved
1 or 2 sprigs each of fresh rosemary and fresh thyme
Preheat Oster ^® Countertop Oven to 450°F. Sprinkle vegetables in bottom of an 11 inch baking pan with 1 ½ - 2 inches sides and top with turkey breast. Tuck garlic and herbs under breast. Squeeze lemon on top of turkey and season with chili powder, salt and pepper. Cook for 25 minutes. Reduce oven temperature to 325°F and pour broth into bottom of pan, about 1 inch up the sides of the pan. Continue cooking until turkey juices run clear and it reaches internal temperature of 180°F.
English-52
RE CIPES
MUSTARD AND HERB PORK TENDERLOIN WITH ROASTED POTATOES
1 package pork tenderloin, 1 ½ - 2 pounds
5 cloves garlic, peeled and minced
3 tablespoons Dijon mustard
6 small Yukon Gold potatoes, quartered
3 tablespoons fresh rosemary, stemmed and chopped
2 tablespoons olive oil
3 tablespoons fresh thyme, stemmed
1 tablespoon Kosher salt, plus additional for potatoes
1 teaspoon freshly cracked black pepper, plus additional for potatoes
Preheat Oster ^® Countertop Oven to 375°F. Coat pork with Dijon mustard. In a small bowl, combine 2 tablespoons of rosemary, 2 tablespoons of thyme, salt, pepper and garlic. Spread over pork tenderloins and place in a large baking dish that fits comfortably inside toaster oven. Spread potatoes around pork drizzle with olive oil. Sprinkle potatoes with salt and pepper and remaining 1 tablespoon of rosemary and thyme. Cook for 12 hour or until pork tenderloin is no longer pink in the center. Remove pork, cover with foil and set aside. Check potatoes by piercing with fork to see if tender and cook for an additional 15-20 minutes if necessary.
English-53

| HELPFUL TIPS / TROUBLESHOOTING | ||
| PROBLEM POTENTIAL CAUSE SOLUTION | ||
| Overcooked / Undercooked Foods. | Incorrect temperature or time setting.Rack placement. | You may have to adjust the time and temperature to desired taste.Because your Countertop Oven is smaller than your regular oven, it will heat up faster and generally cook in shorter periods of time.Refer to "Positioning Rack" Section, Page English-9. Rack may need to be adjusted to accommodate food. |
| Burnt Smell. • Food build-up inside oven, on heating elements or in crumb tray. | Refer to "Cleaning Your Countertop Oven" Section, Page English-10. | |
| Only one heating element is heating up. | Function setting selection determines which heating element will operate. | Check to see if the Broil or Warm setting is selected. |
| Heating elements do not stay ON. | Heating elements will cycle ON and OFF to maintain proper heat. | Confirm function setting is the correct one of choice. |
NOTE S
English-55English-54
1 Year Limited Warranty
Sunbeam Products, Inc. doing business as Jarden Consumer Solutions or if in Canada, Sunbeam Corporation (Canada) Limited doing business as Jarden Consumer Solutions (collectively "JCS") warrants that for a period of one year from the date of purchase, this product will be free from defects in material and workmanship. JCS, at its option, will repair or replace this product or any component of the product found to be defective during the warranty period. Replacement will be made with a new or remanufactured product or component. If the product is no longer available, replacement may be made with a similar product of equal or greater value. This is your exclusive warranty. Do NOT attempt to repair or adjust any electrical or mechanical functions on this product. Doing so will void this warranty.
This warranty is valid for the original retail purchaser from the date of initial retail purchase and is not transferable. Keep the original sales receipt. Proof of purchase is required to obtain warranty performance. JCS dealers, service centers, or retail stores selling JCS products do not have the right to alter, modify or any way change the terms and conditions of this warranty.
This warranty does not cover normal wear of parts or damage resulting from any of the following: negligent use or misuse of the product, use on improper voltage or current, use contrary to the operating instructions, disassembly, repair or alteration by anyone other than JCS or an authorized JCS service center. Further, the warranty does not cover: Acts of God, such as fire, flood, hurricanes and tornadoes.
What are the limits on JCS's Liability?
JCS shall not be liable for any incidental or consequential damages caused by the breach of any express, implied or statutory warranty or condition. Except to the extent prohibited by applicable law, any implied warranty or condition of merchantability or fitness for a particular purpose is limited in duration to the duration of the above warranty.
JCS disclaims all other warranties, conditions or representations, express, implied, statutory or otherwise.
JCS shall not be liable for any damages of any kind resulting from the purchase, use or misuse of, or inability to use the product including incidental, special, consequential or similar damages or loss of profits, or for any breach of contract, fundamental or otherwise, or for any claim brought against purchaser by any other party.
Some provinces, states or jurisdictions do not allow the exclusion or limitation of incidental or consequential damages or limitations on how long an implied warranty lasts, so the above limitations or exclusion may not apply to you.
English-56
This warranty gives you specific legal rights, and you may also have other rights that vary from province to province, state to state or jurisdiction to jurisdiction.
How To Obtain Warranty Service
In the U.S.A.
If you have any question regarding this warranty or would like to obtain warranty service, please call 1-800-334-0759 and a convenient service center address will be provided to you.
In Canada
If you have any question regarding this warranty or would like to obtain warranty service, please call 1-800-667-8623 and a convenient service center address will be provided to you.
In the U.S.A., this warranty is offered by Sunbeam Products, Inc. doing business as Jarden Consumer Solutions located in Boca Raton, Florida 33431. In Canada, this warranty is offered by Sunbeam Corporation (Canada) Limited doing business as Jarden Consumer Solutions, located at 20 B Hereford Street, Brampton, Ontario L6Y 0M1. If you have any other problem or claim in connection with this product, please write our Consumer Service Department.
PLEASE DO NOT RETURN THIS PRODUCT TO ANY OF THESE ADDRESSES OR TO THE PLACE OF PURCHASE.
CONSIGNES IMPORTANTES
Instructions relatives au cordon court
PRÉ PARATION POUR L'UTUSATION INITIALE DU FOUR POSABLE
RANGEMENT DU FOURPOSABLE
- IMPORTANT SAFEGUARDS
- When using electrical appliances, basic safety precautions should always be followed, including the following:
- SAVE THESE INSTRUCTIONS
- This Unit Is for Household Use Only Short Power Supply Cord Instructions
- LEARNING ABOUT YOUR COUNTERTOP OVEN
- PREPARING TO USE YOUR COUNTERTOP OVEN FOR THE FIRST TIME
- To Use the Toast Function (See Fig. 4)
- To Use the Turbo Convection Heat Function (See Fig. 5)
- To Use the Bake Function (See Fig. 6)
- For Cooking Two Pizzas
- To Use the Warm Function (See Fig. 7)
- To Use the Broil Function (See Fig. 8)
- POSITIONING RACK
- POSITIONING PAN
- CLEANING YOUR COUNTERTOP OVEN
- STORING YOUR COUNTERTOP OVEN
- RE CIPE S
- BRIE AND ARTICHOKE BRUSCHETTA
- CINNAM ON TOAST
- RE CIPES
- HONEY MUSTARD CHICKEN WITH SPICY PECAN CORNFLAKE CRUST
- ROASTED TURKEY BREAST WITH AROMATIC VEGETABLES
- MUSTARD AND HERB PORK TENDERLOIN WITH ROASTED POTATOES
- Year Limited Warranty
- What are the limits on JCS's Liability?
- How To Obtain Warranty Service
- In the U.S.A.
- In Canada
- PLEASE DO NOT RETURN THIS PRODUCT TO ANY OF THESE ADDRESSES OR TO THE PLACE OF PURCHASE.
- CONSIGNES IMPORTANTES
- Instructions relatives au cordon court
- PRÉ PARATION POUR L'UTUSATION INITIALE DU FOUR POSABLE
- RANGEMENT DU FOURPOSABLE
Brand : OSTER
Model : TSSTTVFDXLPP-033
Category : Oven