
Multi Processor LC5500 - Food processor SUNBEAM - Free user manual and instructions
Find the device manual for free Multi Processor LC5500 SUNBEAM in PDF.


| Product Type | Food Processor |
| Brand | Sunbeam |
| Model | Multi Processor LC5500 |
| Dimensions (H x W x D) | Approx. 12 x 8 x 10 inches (30 x 20 x 25 cm) |
| Weight | Approx. 8 lbs (3.6 kg) |
| Power Consumption | 550 Watts |
| Voltage / Frequency | 120 V / 60 Hz (US standard) |
| Bowl Capacity | 7 cups (1.6 liters) |
| Feed Chute Diameter | 4 inches (10 cm) |
| Main Functions | Chopping, slicing, shredding, mixing, blending, dough kneading |
| Attachments Included | Stainless steel chopping blade, slicing disc, shredding disc, dough hook, emulsifier disc |
| Controls | Rotary dial with Off, Low, High, and Pulse settings |
| Safety Features | Interlock system; lid must be locked before operation, overload protection |
| Material | Plastic housing with stainless steel blades, BPA-free bowl |
| Dishwasher Safe Parts | Bowl, lid, pusher, and all discs (top rack recommended) |
| Cleaning Instructions | Wipe motor base with damp cloth; do not immerse in water |
| Storage | Compact design with cord wrap underneath |
| Repairability | Spare parts available; contact Sunbeam customer service |
| Warranty | 1 year limited warranty |
Frequently Asked Questions - Multi Processor LC5500 SUNBEAM
User questions about Multi Processor LC5500 SUNBEAM
0 question about this device. Answer the ones you know or ask your own.
Ask a new question about this device
Download the instructions for your Food processor in PDF format for free! Find your manual Multi Processor LC5500 - SUNBEAM and take your electronic device back in hand. On this page are published all the documents necessary for the use of your device. Multi Processor LC5500 by SUNBEAM.
USER MANUAL Multi Processor LC5500 SUNBEAM
Multi Processor & Multi Processor Plus
User Guide
LC5500 / LC6500
natural_image
Close-up of a kitchen blender with a black handle and control panel (no visible text or symbols)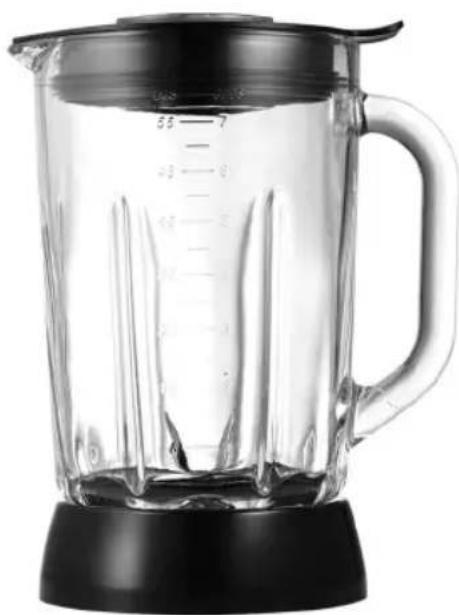
natural_image
Close-up of a clear glass blender with black handle and water spout (no text or symbols visible)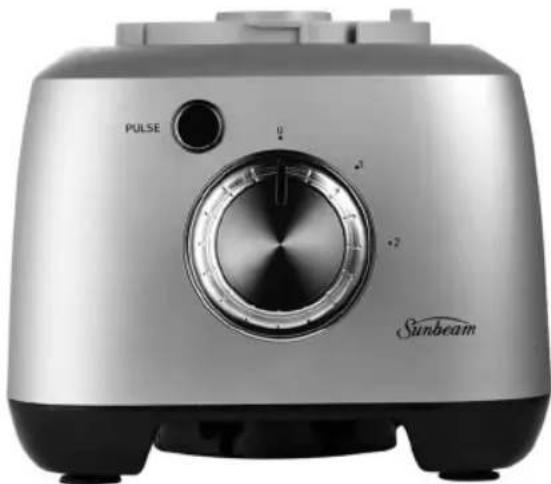
natural_image
Silver Sunbeam brand microwave oven with visible brand logo and control knob (no text or symbols on body)Contents
Sunbeam's Safety Precautions 1
Features of your Multi Processor 2 - 3
Attachments for your Food Processor 4 - 5
Before First Use of the Multi Processor 6
Care & Cleaning 6
Storing your Food Processor 7
Using your Food Processor 8
Tips for the best Food Processing Results 9
Using your Blender (LC6500 Only) 10
Tips for the best Blending Results (LC6500 Only) 11
Recipes 12 - 23
Warranty
24
Important Instructions - retain for future use
Sunbeam's Safety Precautions
SAFETY PRECAUTIONS FOR YOUR SUNBEAM FOOD PROCESSOR.
• Always use extreme care when handling processing blades and cutting discs. These are extremely sharp and may cause injury if handled incorrectly. Always store processing blades and cutting discs in their respective covers or processing containers.
- Unplug from power outlet before cleaning.
- Switch off the appliance and disconnect from supply before changing accessories or approaching parts that move in use.
• Always fit the safety cover before using the food processor.
Sunbeam is very safety conscious when designing and manufacturing consumer products, but it is essential that the product user also exercise care when using an electrical appliance. Listed below are precautions which are essential for the safe use of an electrical appliance:
- Read carefully and save all the instructions provided with an appliance.
- Always turn the power off at the power cutlet before you insert or remove a plug. Remove by grasping the plug - do not pull on the cord.
- Turn the power off and remove the plug when the appliance is not in use and before cleaning.
- Do not use your appliance with an extension cord unless this cord has been checked and tested by a qualified technician or service person.
• Always use your appliance from a power outlet of the voltage (A.C. only) marked on the appliance. - This appliance is not intended for use by persons (including children) with reduced physical, sensory or mental capabilities, or lack of experience and knowledge, unless they have been given supervision or instruction concerning use of the appliance by a person responsible for their safety.
- Children should be supervised to ensure that they do not play with the appliance.
- The temperature of accessible surfaces may be high when the appliance is operating.
- Never leave an appliance unattended while in use.
- Do not use an appliance for any purpose other than its intended use.
If you have any concerns regarding the performance and use of your appliance, please visit the Sunbeam Website or contact Sunbeam Consumer Care - details are on the back page. Ensure the above safety precautions are understood.
- Do not put hot liquids into the food processor bowl or blender jug. Cool to room temperature before processing.
- Avoid contacting moving parts at all times.
- Place the processor bowl onto the base of the processor before fitting any attachments.
- All blades and attachments should be removed with care before cleaning.
- Do not over fill the processor.
• Always remove the blade before emptying the processor bowl of its contents. -
When mixing a heavy load, ie, a '0.5kg dough' do not operate food processor for more than 38 seconds at a time. This does not apply for any of the recipes detailed in this booklet.
-
Do not place an appliance on or near a hot gas flame, electric element or on a heated oven.
- Do not place on top of any other appliance.
- Do not let the power cord of an appliance hang over the edge of a table or bench top or touch any hot surface.
- Do not operate any electrical appliance with a damaged cord or after the appliance has been damaged in any manner. If damage is suspected, return the appliance to the nearest Sunbeam Appointed Service Centre for examination, repair or adjustment.
- For additional protection, Sunbeam recommend the use of a residual current device (RCD) with a tripping current not exceeding 30mA in the electrical circuit supplying power to your appliances.
- Do not immerse the appliance in water or any other liquid unless recommended.
- Appliances are not intended to be operated by means of an external timer or separate remote control system.
- This appliance is intended to be used in household and similar applications such as: staff kitchen areas in shops, offices and other working environments; farm houses; by clients in hotels, motels and other residential type environments; bed and breakfast type environments.
- If the supply cord is damaged, it must be replaced by the manufacturer, its service agent or similarly qualified persons in order to avoid a hazard.


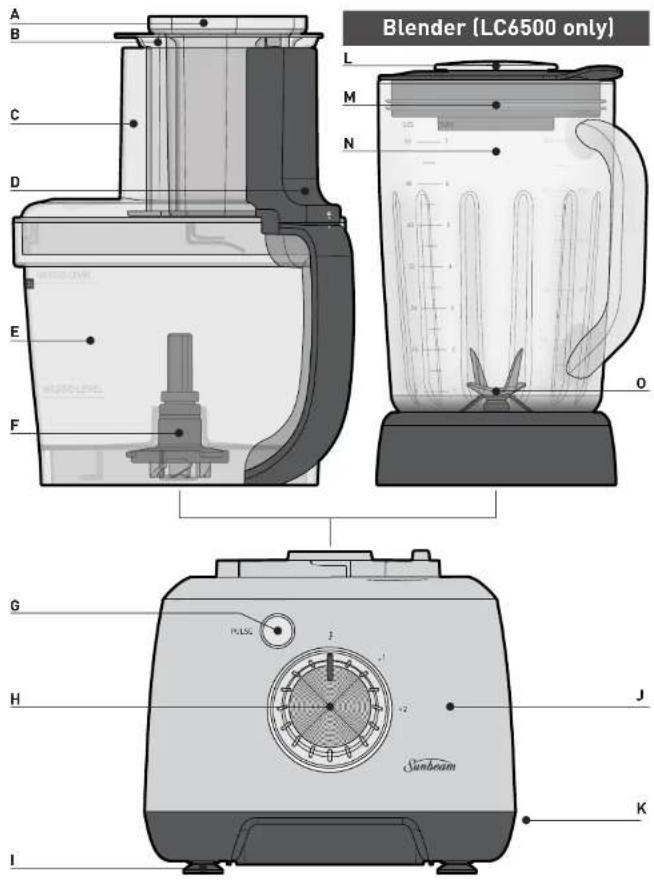
Features of your Multi Processor (LC5500/LC6500) Feature

LC5500__LC3680_LC6500_LC3266_20EM1 (ANZ).ind 2-3
Multi Processor (LC5500/LC6500)
A. Small Food Pusher
The small food pusher is ideal for thin or narrow foods.
B. Two Food Pushers
The two food pushers guide food down evenly into the feed tube and can also be used to close the chute while processing
C. Extra Wide Chute
The wide feed chute makes processing ingredients easy. Use the chute to guide ingredients down into the selected blades. With a wider chute, vegetables do not need to be cut into small pieces to fit in the chute.
D. Processing Bowl Lid
The processing bowl lid activates the automatic safety system. The Multi Processor will not operate unless the lid is correctly positioned on the processing bowl and locked into place.
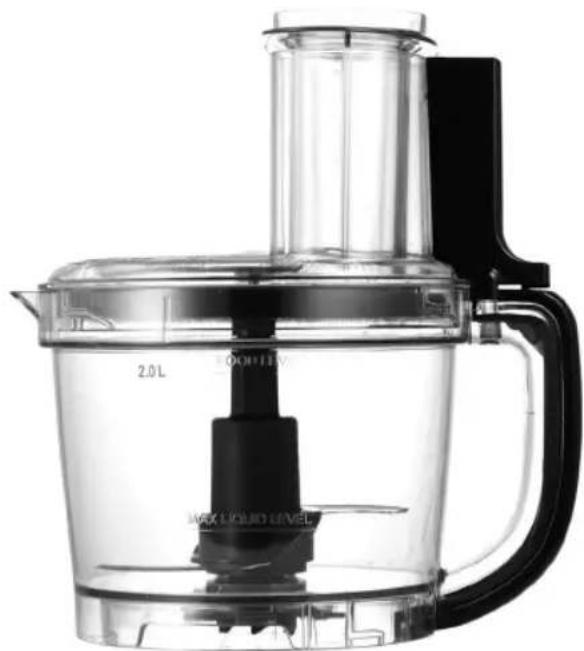
E. Processing Bowl
The processing bowl is designed to encourage even, efficient processing. It has a capacity of 2 litres for food & 500mL for liquids. The bowl locks into place on the motor base.
F. Removable Processor Coupling
Can be removed for easy cleaning of the processing bowl.
G. Pulse Button
The pulse provides short bursts of power and allows ingredients to be chopped whilst maintaining the integrity of the food.
H. Two Speed Control Dial
The large speed dial with two speeds, makes it easy to select your desired selling.
I. Non-slip Feet
Non-slip feet keep the food processor secure on the bench top during use.
J. 600W Motor
The base houses a powerful 600W motor, to provide great processing results every time.
K. Cord Storage
Convenient storage of the cord is located at the back of the motor base.
Features of your Multi Processor Pro (LC6500 only)
L. Ingredient Cup
Handy 60ml ingredient cup, lacks into place on the lid.
M. Flexible lid with pouring hole
The glass jug features a pouring hole in the centre, that allows you to add ingredients during the blending process.
N. 1.5 Litre Glass Jug
The sizeable 1.5 litre glass jug features specially designed internal ribs to cycle ingredients back into the blade system for superior results.
The jug features an easy to pour up and is marked in both cups and litres [1] for ease of use.
0. Fixed Blade Assembly
Specially designed for extra durability, the heavy-duty, stainless steel blade with a six-blade construction, crushes ice cubes, produces a smooth consistency when purezing and combines ingredients perfectly for a smooth.

Attachments of your Food Processor Attachments of your
essor
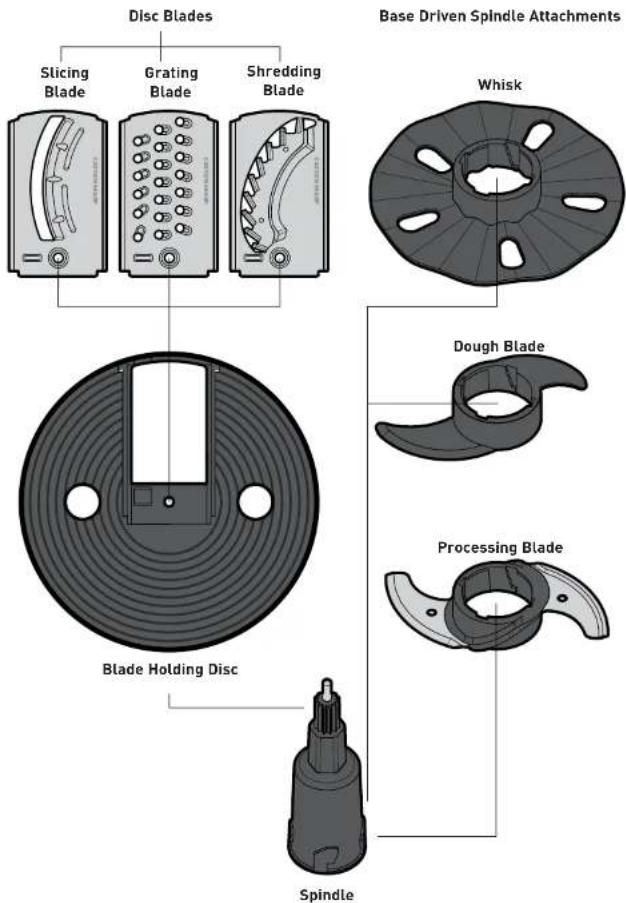
Disc Blades
The stainless steel disc blades are inserted into the blade holding disc for use. The round hole at the end of the disc blades should align with the round hole in the middle of the blade holding disc.
CAUTION: Care must be taken when handling the metal blades as these items are extremely sharp.
- Slicing Blade
Ideal for fruit, vegetables, hard cheeses and deli meats.
- Grating Blade
Ideal for fruit, vegetables, hard cheeses and chocolate.
- Shredding Blade
Ideal for fruit, vegetables.
Blade Holding Disc
The blade holding disc houses the various processing blade attachments – slicing, grating and shredding. The blade holding disc is driven by the top of the spindle.
Base Driven Spindle Attachments
The below attachments are driven by the base of the spindle and can only work one at a time.
Whisk
The whisk attachment is ideal for whisking egg whites and creams.
Dough Blade
The dough blade is contoured for fast, efficient processing. It is ideal for mixing doughs, heavy cake mixes and batters.
Processing Blade
The stainless steel processing blade is contoured to fit the shape of the processing bowl to provide the most efficient chopping and/or mixing action. The processing blade can be used to chop raw meats to mince, chocolate to crumbs and nuts to paste. Please ensure that the processing blade protective cover is removed before using.
CAUTION: Use extreme caution, as blades are sharp. Always handle the processing blade by the plastic central section.
Spindle
The spindle drives all the food processing attachments. Place attachments on the spindle prior to placing in the processing bowl.

5
Before First Use of the Multi Processor Storing your Food
Step 1. Remove Packaging
Ensure all packaging has been removed.
Step 2. Position Machine
Place the motor base facing you on a dry, level surface.
Step 3. Wash Parts
Wash the processing bowl, lid and all attachments in warm water using a mild detergent. Dry each part thoroughly before use.
CAUTION: Care must be taken when handling the metal blades as these items are extremely sharp.
Step 4. Power
Before you assemble the food processor for blender for LC6500 only), ensure that the power cord is unplugged.
Care & Cleaning
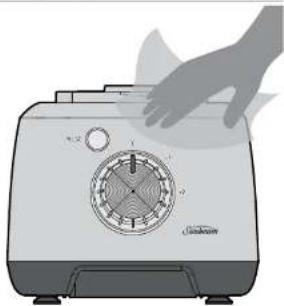
Motor Base
Clean the motor body by wiping with a damp, soft sponge with mild detergent.
Note: Always unplug the Multi Processor before cleaning.
natural_image
Illustration of a hand touching a microwave oven with a circular dial (no text or symbols)CAUTION: To prevent damage to the appliance do not use alkaline cleaning agents when cleaning the exterior.
Note: Never immerse the motor base in water or any other liquid.
Food Processor
When you have finished processing, unplug your Multi Processor from the power outlet. Wash all accessories, attachments and all surfaces that have come into contact with food in warm soapy water.
- Dishwasher use
All plastic components deteriorate through the prolonged use of a dishwasher for cleaning.
CAUTION: Care must be taken when handling the metal blades as these items are extremely sharp.
Blender (LC6500 Only)
- Quick cleaning method
Half fill the blender with warm water and a small amount of detergent. Press the PULSE button for 10-20 seconds. Then remove the jug and rinse it under running water.
• For thorough cleaning
Wash the lid, ingredient cup, rubber seat, glass jug with fixed blade assembly in warm soapy water.
Note: Do not clean any part of the blender in the dishwasher.
Attachments
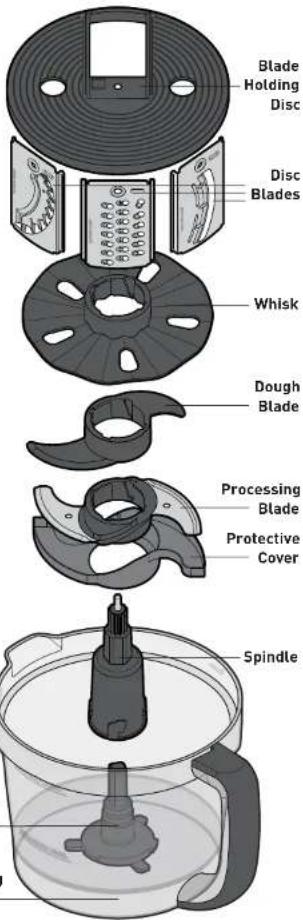
All of the food processor attachments can be conveniently stored within the processing bowl for easy storage.
Note: Wash & dry each attachment thoroughly before storing.
Make sure the removable processor coupling is locked into the processing bowl.
Firstly place the processing blade (with protective cover) over the spindle, making sure the blade is at the lowest position on spindle. Then place in the processing bowl over the processor coupling.
Then place the dough blade on top of the processing blade, it will not lock in, just rest on top.
Then place the whisk over the spindle so it rests on top of the dough blade.
Then the disc blades can now be placed vertically down the sides of the processing bowl.
Lastly place the blade holding disc on top of the spindle.
The processing lid with the two food pushers can be positioned & locked into the processing bowl as usual.
The power cord can be stored within the cord storage area at the back of the motor base.
Using your Food Processor
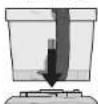
- Position the processing bowl on the motor base, with the processing lid off. The handle of the bowl needs to be facing you. Rotate the processing bowl counterclockwise to lock into position.
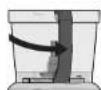
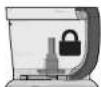
- Select the desired processing attachment and place onto the spindle
- Insert the spindle into the processor bowl by placing it on top of the processor coupling in the centre of the bowl. If needed rotate the spindle a little until it falls down into place.
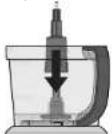
- Place the processing bowl lid onto the processing bowl. Rotate the processing lid towards the handle (counter-clockwise) to lock the lid into position.
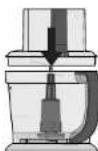
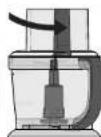
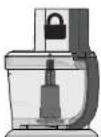
Important: If the processing bowl and lid are not correctly assembled, the Multi Processor will not operate.
- Plug the power cord into a 230-240V AC power outlet and turn power 'ON'.
- Using the control dial, select the desired processing speed. The two speeds on the speed dial, will provide continuous processing until the control dial is returned to the 'OFF' position.
- The food processor will only start processing when the large pusher is inserted into the extra wide chute.
Note: The small pusher cannot be used by itself. It must be used with the larger pusher to activate the interlock.

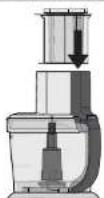
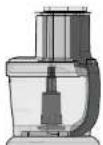
Note: For maximum control when using your food processor, load the feed tube before turning on your food processor. Always use the food pusher for more evenly processed foods and never use your fingers.
- The pulse function remains on long as the pulse bullon is pressed down.
• Further ingredients can also be added whilst processing by pouring through the feed tube once the food pusher has been removed. - After you have completed processing, turn the control dial to the "OFF" position.
Important: When mixing a heavy load i.e 0.5kg cough, do not operate the food processor for more than 38 seconds at a time
Tips for the best Food Processing Results
Chopping
For the best, most consistent results, you should try to process pieces of food that are approximately equal in size. When you break, cut or tear food into uniform pieces before processing, the finished results will be more uniform.
More consistent processing results are achieved if the processing bowl is not overloaded.
Mincing
Pre-cut meat into cubes approximately 2cm square.
Vegetables
When processing vegetables such as onions, peel and quarter or cut large vegetables into eighths.
Mixing
The quantities that can be processed within the processing bowl will vary with the density of the mixture.
Adding ingredients
When various recipes require dry ingredients such as flour, add them directly into the processing bowl before processing. There is no need to sift ingredients when using your Multi Processor. Liquid ingredients may be added while the processor is operating by pouring through the feed tube in the processor lid.
Note: When processing sauces or semi-liquid ingredients, stop the food processor and scrape down the bowl sides with a spatula.
Using the Feed Tube
The most important factor for successful slicing and shredding is the way in which the food is packed into the feed lube.
Slicing, shredding and grating
Cut all ingredients to a size that fits comfortably into the feed tube. Pack the feed tube and, while holding food steady
and upright with the food pusher, press down evenly until all ingredients are sliced or shredded. The more firmly you push, the thicker the slices or shreds. Do not use excessive force or you may damage the food processor.
For best results when slicing
The feed tube should always be packed firmly to allow each piece of food to support the others. There will always be a small portion of food left unprocessed between the food pusher and the blade.
Note: Never use fingers to push food down the feed tube. Always use the food pusher.
For best results when shredding and grating
Remember that softer foods such as cheese [cheddar, mozzarella or swiss] should be well chilled before processing. Harder foods such as parmesen or Romano cheese should be at room temperature before processing.
Note: When graling parmesan cheese do not apply a lot of pressure to the food pusher.
Disassembly
When processing is completed, remove the lid from the processing bowl first and then remove the processing bowl with the processing blade still in place. To remove the processing bowl firstly unlock the processing bowl lid by rotating it in a clockwise direction until the lid is unlocked.
Note: Always wait for the processing blade to stop moving completely before removing the bowl lid.
CAUTION: Use extreme caution, as blades are sharp. Always handle the processing blade by the plastic central section.
8
9
Using your Blender (LC6500 only)
- Position the blender jug on the motor base, with the blender lid off. The handle of the jug needs to be facing you. Rotate the processing bowl counter-clockwise to lock into position.
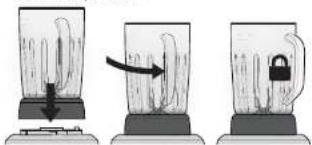
- Place ingredients into the glass jug.
Note: Do not exceed the maximum indicated level - 1.5 litres.
Note: Do not switch on the Blender without the lid in position.
- Position the ingredient cup into the blender lid and rotate clockwise to lock into place.
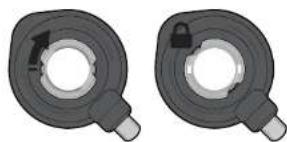
natural_image
Two identical mechanical components with circular features and a central knob, shown side by side (no text or symbols)- Position the lid [with ingredient cup] onto the blender jug by pressing down firmly. Ensure the lid is all the way down and correctly in place.
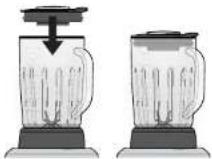
10
LC5500__LC3680_LC6500_LC3266_20EM1 (ANZ).ind 10-11
- Plug the power cord into a 230-240V AC power outlet and turn power 'ON'.
- Using the control dial, select the desired blending speed 1, 2 or PULSE.
Note: Although the lid fits firmly to the glass jug, we advise when blending liquid ingredients, to place your hand on the lid as you initially select the blending speed/function. As the powerful 600 watt motor could cause the liquid to surge up causing leakage. Once you have started blending you can remove your hand.
• Further ingredients can also be added whilst blending by removing the ingredient cup and pouring ingredients through the hole in the lid.
Note: Do not blend hot ingredients.
- After you have completed blending, turn the control dial to the 'off' position.
Note: Do not operate for more than 2 minutes at a time.
Tips for the best Blending Results (LC6500 only)
- Nothing can beat a blender for making smooth purees and sauces or for whipping up frothy drinks - from healthy breakfast shakes to frozen daiquiris.
- Use your blender for chopping small amounts of food like nuts and bread crumbs.
- Turn any oil-based salad dressing into a creamy style dressing by blending it until slightly thickened.
- A short pulse in the blender will rescue a lumpy gravy, or an egg-based sauce that has separated.
- Food items for blending should be cut into cubes (approximately 2-3cm), this will assist in achieving an even result.
- Ensure the lid is firmly and securely placed on the jug. Do not operate the blender without the lid on, if you wish to add any additional ingredients remove the ingredient cup and add as necessary.
- Never fill above the maximum level indicator 1.5 litres.
Important: DO NOT process hot/warm liquids in your blender. Allow to cool to room temperature before blending.
• To ensure efficient mixing when blending dry mixtures, it may be necessary to stop the blender and push ingredients down the sides of the jug with a spatula.
- When pureeing fruit or vegetables, cooked or raw, cut into small pieces to facilitate blending.
- When blending a variety of ingredients together, blend the liquids first, then add dry ingredients
• Always ensure stones are removed from fruit and bones from meat as these can damage the blades.
• To aid with cleaning fill jug with warm water and set aside. This will prevent food from drying to the blades.
- When making bread crumbs, use 2 to 3 day old bread, leaving crusts on, to minimise the possibility of clumping. If only fresh bread is available, dry it out for a few minutes in a low heated oven.
- Don't allow a used blender to sit for too long as the food will dry onto the blades, making it very difficult to clean. If you can't clean the blender straight away, pour some warm water in it and allow to soak.
11
2/18/20 10.50
Food Processor Recipes Food Processor Dip & Dressings R
Pizza Dough
½ cup warm milk
7 teaspoons yeast
1 teaspoon castler sugar
2 cups plain flour
1 teaspoons salt
½ cup hot water
2 tablespoons olive oil
-
In a small bowl combine milk, yeast and sugar. Allow to stand in a warm place until mixture begins to foam.
-
Using the processing bowl filled with dough blade pulse flour and salt.
-
Add yeast, hot water and olive oil to the bowl and continue to pulse until the dough has formed a ball.
-
Place dough onto a floured surface and kneed gently until smooth.
-
Place dough into a greased bowl and lid. Place in a warm area until doubled in size, about 30-40 minutes.
-
Turn dough out of bowl and cut in half. Roll into two 26cm circles.
Sweet Short Crust Pastry
175g butter, room temperature
2 cups plain flour
½ cup icing sugar
1 tablespoon iced water
7 egg yolks
-
Using the processing bowl fitted with the dough blade pulse butter, flour, icing sugar, water and egg yolks until a ball has formed.
-
Knead pastry until smooth then shape into a disk. Wrap pastry in plastic wrap and refrigerate for 30 minutes before use.
Tip: Depending on temperature, flour and humidity you may need to add a bit more water to the mixture.
Hummus
Makes: 3 cups
2 400g cans chickpeas, drained, rinsed
1 clove garlic
1/3 cup olive oil
1 tablespoon lemon juice
1 tablespoon tahini
½ cup water
Salt and freshly ground black pepper, to taste
-
Using the processing blade process all ingredients on speed 2, except water, until a smooth paste. Continue to process while slowly adding water through chute. Season to taste with salt and pepper.
-
Store in a clean, covered container in the refrigerator for up to one week.
Tip: Add a teaspoon of your favourite ground spice for a twist.
Spicy Capsicum and Cashew Nut Dip
Makes: 2 cups
450g jar roasted capsicums, drained, rinsed
100g parmesan cheese
2 long red chilies
1 clove garlic
2 cups roasted cashew nuts
12 cup olive oil
1 tablespoon lemon juice
Salt and freshly ground black pepper, to taste
-
Using the processing blade process all ingredients on speed 2 until smooth. Season to taste with salt and pepper.
-
Store in a clean, covered container in the refrigerator for up to one week.
12
13
Food Processor Mains Recipes Food Processor Mains Reci
Chorizo and Basil Pizza with Basil Pesto
Makes: 2 pizzas
1 basic pizza dough, rolled into 2x 26cm circles
1 cup pizza sauce
2 chorizo sausages, sliced
1 ½ cups pizza cheese
1 bunch fresh basil
1 clove garlic
14 cup olive oil
14 cup roasted pine nuts
Salt and pepper, to taste
Fresh basil leaves, to serve
-
Preheat oven to 200°C. Line two baking trays with baking paper. Place pizza bases on prepared trays.
-
Spread tomato sauce over pizza bases. Top with chorizo and pizza cheese.
-
Bake for 15-20 minutes or until the bases are cooked and cheese has melted.
-
Meanwhile place all remaining ingredients in the bowl with the processing blade and pulse until a chunky paste. Season to taste with salt and pepper.
-
Dollop pesto over the cocked pizzas and top with fresh basil leaves.
Turkish Lamb Burgers
Makes: approximately 8 patties
4 long green onions
2 slices white bread
2 cloves garlic
200g feta cheese
½ cup fresh flat-leaf parsley
12 cup fresh mint
2 teaspoons ground coriander
2 teaspoons ground cumin
1kg lamb mince
Salt and pepper, to taste
Vegetable oil, for cooking
-
Using the processing blade, pulse the green onions, bread and garlic until chunky. Add feta, parsley, mint, coriander and cumin. Continue to pulse until incorporated.
-
Add bread mixture to lamb in a bowl and mix until combined. Form lamb mixture into 12 cup patties and refrigerate for 15 minutes before use.
-
Preheat a large frypan or barbeque to medium. Brush cooking surface with oil and cook lamb patties for 3-4 minutes on each side or until cooked. Serve in pita pockets with lettuce, yoghurt and red onion.
Winter Coleslaw
Makes: 4-6
2 carrots, peeled
1 fennel bulb, trimmed
1 red onion
½ small red cabbage, quartered
12 cup greek yoghurt
12 cup olive oil
1/4 cup fresh flat-leaf parsley
2 tablespoons fresh dill
2 tablespoons lemon juice
1 tablespoon seeded mustard
1 teaspoon casler sugar
Salt and pepper, to taste
-
Using the processing bowl fitted with the grating blade shred carrots. Set aside.
-
Using the slicing blade slice fennel, onion and cabbage. Set aside.
-
Using the processing blade add all remaining ingredients and process on speed 2 until well combined.
-
Pour dressing over vegetables and stir to combine. Season to taste with salt and pepper. Serve.
Chicken Nuggets
These nuggets can be also be used as chicken patties for burgers.
Makes: approximately 20 nuggets
75g parmesan cheese
750 kg chicken thigh fillets
73 cup buttermilk
4 eggs
1 tablespoons lemon juice
Salt and pepper, to lasle
Vegetable oil, for cooking
-
Using the processing bowl fitted with the grating blade shred parmesan cheese.
-
Using the processing blade process chicken, buttermilk, one egg, lemon juice and soy sauce until a smooth paste. Stir through parmesan. Season to taste with salt and pepper.
-
Form chicken mixture into 14 cup sized balls. Flatten slightly with palm of hand. Refrigerate for 30 minutes.
-
Dip chicken in flour, remaining eggs (lightly beaten) and panko breadcrumbs.
-
Heat oil in a fry pan over medium heat. Cook chicken in batches for 4-5 minutes on each side or until done. Serve hot.
Food Processor Soup Recipes Food Processor Dessert Rec
Tuscan Meatballs
Serves: approximately 25
2 slices white bread
2 cloves garlic
1 onion
½ cup fresh basil
2 tablespoons lemon rind
500g lean beef mince
14 cup tomato paste
1 egg
Salt and pepper, to taste
Vegetable oil, for frying
-
Using the processing blade on speed 1 process bread, garlic, onion, basil and lemon rind until a fine crumb
-
In a large bowl combine remaining ingredients with breadcrumb mixture. Season to taste with salt and pepper.
-
Form beef mixture into tablespoon sized balls.
-
Heat oil in a large frypan over medium heat. Cook meatballs for 5-6 minutes or until golden brown and cooked. Serve hot.
Mexican Style Tomato Soup
Makes: 10 cups
1 tablespoon olive oil
2 onions
2 cloves garlic
2 teaspoons ground cumin
1 teaspoon ground chilli
3 400g cans chopped tomatoes
2 cups vegetable stock
2 400g cans red kidney beans, drained, rinsed
1 tablespoon balsamic vinegar
1 teaspoon brown sugar
Salt and pepper, to taste
Sour cream and tortillas, to serve
- Using the processing blade on speed 1
process oil, onion and garlic.
-
Place onion mixture in a large saucepan over medium heat. Cook onion mixture until tender. Add spices and cook until fragrant. Add tomatoes and stock. Bring to a simmer and cook, stirring for 20 minutes. Allow to cool.
-
Add kidney beans to cooled soup. Using the processing blade process soup. Add remaining ingredients. Season to taste with salt and pepper.
-
Reheat. Serve with sour cream and tortillas.
Creamy Pumpkin Soup
Serves: 6 cups
50g butter
2 onions
2 cloves garlic
1 kg butternut squash, peeled, cubed
4 cups vegetable stock
12 cup parmesan cheese
13 cup double cream
Salt and pepper, to taste
-
Using the processing blade process onions and garlic on speed 2.
-
Mell butter in a medium pot over medium heat. Add onions and garlic, cooking until tender.
-
Add pumpkin and slock; bring to a simmer and cook for 25-30 minutes or until tender. Set aside and allow to cool to room temperature.
-
Once cooled, place soup into blender jug and in batches, blend on speed 2 until smooth.
-
Return blended soup to the pot and bring to a simmer.
-
Add remaining ingredients and serve.
Carrot Cake
Makes: 8-10
6 medium carrots, peeled
1 ½ cups caster sugar
3 14 cup plain yoghurt
^3/_4 cup vegetable oil
34 cup walnuts
14 cup brown sugar
3 eggs
2 ½ cups plain flour
1 teaspoon baking powder
1 teaspoon baking soda
12 teaspoon ground allspice
12 teaspoon ground cinnamon
½ teaspoon ground nutmeg
12 teaspoon salt
-
Preheat oven to 180°C. Grease and line a 23cm spring form pan with baking paper.
-
Using the processing bowl fitted with the grating blade shred carrots. Set aside.
-
Using the processing blade process sugars, yoghurt, oil, walnuts and eggs on speed 2 until combined.
-
Add remaining ingredients and pulse until just combined.
-
Pour baller into prepared pan. Bake for 1 hour or until cooked when tested with a skewer.
-
Allow to cool on wire rack. Serve.
Food Processor Dessert Recipes Food Processor Dessert
Ultimate Chocolate Chunk Cookies
Makes: approximately 25 cookies
150g butter, room temperature
12 cup brown sugar
14 cup caster sugar
1 teaspoon vanilla extract
1 egg
150g dark chocolate, melted
1 cup plain flour
½ cup cocoa powder
1 teaspoon baking soda
12 cup dark chocolate chips
12 cup while chocolate chips
-
Preheat oven to 180°C. Grease and line two baking trays with baking paper.
-
Using the processing blade process butter, sugars and vanilla on speed 2 until light and fluffy. Scrape down the sides of the bowl if necessary. Add egg and process until smooth.
-
Add chocolate, flour, cocoa and baking soda. Process on speed 1 until just combined. Add chocolate chips and pulse to combine.
-
Roll mixture into tablespoon sized balls. Place on prepared trays and gently press down. Bake for 8-10 minutes or until cooked.
-
Allow to cool on wire rack. Serve.
Banana Cake
Serves: 8-10
180g butter, room temperature
1 ½ cups brown sugar
2 eggs
2 ½ cups self raising flour
1 ½ cups mashed banana
½ cup buttermilk
1 teaspoon ground cinnamon
1 teaspoon vanilla extract
1 teaspoon white vinegar
½ teaspoon ground nutmeg
12 teaspoon salt
-
Preheat oven to 180°C. Grease and line a 23cm cake pan with baking paper.
-
Using the processing blade process butter and sugar on speed 1 until combined. Add eggs and process on speed 1 until combined.
-
Add remaining ingredients and pulse until just combined.
-
Pour batter into prepared pan. Bake for 40 minutes or until cooked when tested with a skewer.
-
Allow to cool on wire rack. Serve.
Sour Cream Apple Pancakes
Makes: approximately 8 pancakes
3 granny smith apples, peeled, core removed
1 tablespoon lemon juice
1 cup self-raising flour
12 cup caster sugar
1 teaspoon baking powder
½ teaspoon salt
34 cup milk
12 cup sour cream
1 egg, lightly beaten
Butter, for cooking
-
Using the processing bowl fitted with the grating blade shred apples. Toss in lemon juice. Set aside.
-
Using the processing blade process flour, sugar, baking powder and salt on speed 1 until combined.
-
Add milk, sour cream and egg. Pulse until just combined. Gently stir through apple.
-
Heat butter in a large pan over medium heat. Add ¼ cup of baller to pan and cook for 2 minutes on each side or until golden. Serve hot.
Super Moist Chocolate Cake
Serves: 8-10
200g dark chocolate
175g butter, room temperature
23 cup brown sugar
100g blanched almonds
12 cup cocoa powder
4 eggs
1 cup self raising flour
100g milk chocolate chips
-
Preheat oven to 160^ C. Grease and line a 22cm cake pan with baking paper.
-
Using the processing bowl filled with the processing blade, process dark chocolate, butter, sugar, almonds and cocoa until smooth.
-
Add eggs one at a lime, making sure to mix well after each addition. Add remaining ingredients and process until smooth.
-
Pour mixture into the prepared pan and bake for 40-45 minutes or until cooked. Allow to cool in pan for 10 minutes before turning out onto a wire rack.
Blender Recipes (LC6500 only) Blender Recipes (LC6500 or
Roasted Garlic Aioll
Makes: 1½ cups
3 cloves garlic
2 egg yolks
2 tablespoons water
7 tablespoons white wine vinegar
1 teaspoon Dijon mustard
1 cup olive oil
Salt and pepper, to taste
-
Preheat oven to 200°C. Wrap garlic in foil and place in oven for 20 minutes or until garlic is soft. Discard the skins.
-
Place egg yolks, garlic, water, vinegar and muslard in blender. Place the lid securely onto the jug.
-
With motor operating on speed 2, remove measuring cup and gradually add the oil in a thin slow stream. Season to taste.
-
Store in a clean, covered container in the refrigerator for up to one week.
Thai Red Curry Paste Paste
Makes: 2 cups
24 small dried red chillies
10 long red chillies, chopped
B cloves garlic
6 kaffir lime leaves
2 lemon grass stalks, chopped
½ cup roasted peanuts, roasted
4 tablespoons fresh coriander, chopped
2 tablespoons grated galangeal
2 tablespoons ground coriander
1 tablespoon caster sugar
1 teaspoon ground black pepper
2 leaspoons ground cumin
2 teaspoons lemon juice
1 teaspoon salt
1 teaspoon shrimp paste
Salt and pepper, to taste
-
Place dried chillies in a bowl and cover with boiling water. Set aside for 10 minutes. Drain, remove seeds.
-
Place all ingredients in the blender. Place the lid securely onto the jug.
-
Blend on speed 2 for 1 minute or until ingredients form a chunky paste. Season to taste.
-
Store in a clean, covered container in the refrigerator for up to one week.
Serving suggestion: Toss with fresh pasta for a quick and easy meal.
Caesar Salad Dressing
Makes: 1 cup
3 anchovy fillets
½ clove garlic
½ cup grated parmesan cheese
2 tablespoons crème friache
2 teaspoons Dijon mustard
2 tablespoons lemon juice
1 teaspoon casten sugar
3½ cup olive oil
Salt and pepper, to taste
-
Place all ingredients in blender, omitting the oil. Place the lid securely onto the jug.
-
Pulse for 20 seconds, or until ingredients are well combined.
-
With motor operating, on speed 1 remove measuring cup and gradually add the oil in a thin slow stream. As mixture thickens, increase speed gradually to 2, until all the oil has been added.
-
Store in a clean, covered container in the refrigerator for up to one week.
Serving suggestion: Great alternative to mayonnaise in sandwiches.
Indian Lentil Soup with Minted Yoghurt
Serves: 8 cups
2 carrots, peeled
2 celery stalks
2 onions
3 cloves garlic
2 tablespoons olive oil
500g dried red lentils, rinsed
1 tablespoon curry powder
I teaspoon ground coriander
1 teaspoon ground cumin
10 cups salt reduced chicken stock
1 ½ cups plain Greek yoghuri
1/4 cup (freshly chopped mint)
1 teaspoon lemon juice
½ teaspoon ground cumin
Salt and pepper, to taste
-
Using the processing blade, add the carrots, celery, onion and garlic to the bowl and pulse until roughly chopped. Heat oil in a large pot over medium heat. Add carrots, celery, onion and garlic, cooking until tender.
-
Add lentils, curry powder, coriander and cumin, cooking until fragrant. Add stock and bring to a simmer, lower heat and cook for 1 hour or until lentils are softened. Set aside and allow lentils to cool to room temperature.
-
Once cooled, in batches blend on speed 2 until smooth. Season to taste.
-
Place yoghurt, mint, lemon and cumin in blender. Place the lid securely onto the jug.
-
Blend on speed 1 until smooth. Season to laste.
-
Bring to a simmer before serving. Serve with a dollop of minted yoghurt.
20
21
Blender Drink Recipes (LC6500 only) Blender Drink Recipe
Caramel Thick Shake
Makes: 2
2 scoops caramel ice cream
1 cup milk
Grated chocolate to serve
- Place all ingredients in blender. Place the lid securely onto the jug.
- Blend on speed 2 for 30 seconds, or until all ingredients are well mixed.
- Serve in tall glass with grated chocolate.
Banana Smoothie
Makes: 2
2 large, ripe bananas, peeled
1 cup milk
½ cup plain Greek yoghurt
1 teaspoon honey
1. Place all ingredients in blender. Place the lid securely onto the jug.
2. Blend on speed 2 for 30 seconds, or until all ingredients are well mixed.
3. Pour into glasses.
only)
Pineapple Mint Frappe
Makes: 2
500mL pineapple juice
13 cup mint leaves
10 ice cubes
1. Place all ingredients in blender. Place the lid securely onto the jug.
2. Blend on setting 2 for 30 seconds or until all ingredients are well mixed.
3. Pour into glasses.
Affogato Cocktail
Makes: 2
40mL vodka
20mL maple syrup
15mL espresso coffee
15mL Kahlua
2 scoops vanilla ice cream
Ice to serve
1. Place all ingredients in blender. Place the lid securely onto the jug.
2. Blend on speed 2 for 30 seconds, or until over ice.
Ultimate Chocolate Thick Shake
Makes: 2
3 scoops chocolate ice cream
1 cup vanilla custard
½ cup milk
Ice to serve
- Place all ingredients in blender. Place the lid securely onto the jug.
- Blend on speed 2 for 30 seconds, or until all ingredients are well mixed.
- Pour into glasses, over ice
Breakfast Smoothie
Makes: 2
1 ripe banana, peeled
1 cup milk
12 cup rolled oats
½ cup frozen strawberries
1 tablespoon honey
1. Place all ingredients in blender. Place the lid securely onto the jug.
2. Blend on speed 2 for 30 seconds, or until all ingredients are incorporated.
3. Pour into glasses
Pina Colada
Makes: 2
100mL pineapple juice
40mL coconut cream
30mL white rum
15mL Malibu liqueur
15mL sugar syrup
Ice to serve
1. Place all ingredients in blender. Place the lid securely onto the jug.
2. Blend on speed 2 for 1 minute, or until all ingredients are well mixed.
3. Serve over ice.
Pine-Lime Splice
Makes: 2
100ml pineapple juice
60mL lime juice
60mL thickened cream
- Place all ingredients in blender. Place the lid securely onto the jug.
- Blend on speed 2 for 1 minute, or until all ingredients are well mixed.
- Serve over ice.
Warranty

This Sunbeam product is covered by a 12 month replacement or repair warranty, which is in addition to your rights under the Australian Consumer Law (if your product was purchased in Australia) or New Zealand Consumer Guarantees Act (if your product was purchased in New Zealand).
Should you experience any difficulties with your product during the warranty period, please contact our customer service line for advice on 1300 881 861 in Australia, or 0800 786 232 in New Zealand.
Australia
www.sunbeam.com.au 1300 881 861 Suite 1, Level 1, 13 Lord Street, Botany NSW 2019 Australia
New Zealand www.sunbeam.com.nz 0800 786 232 Unit 3, Building D, 26 Vestey Drive, Mt Wellington Auckland New Zealand
Upon receipt of your claim, Sunbeam will seek to resolve your difficulties or, if the product is defective, advise you on how to obtain a replacement or refund.
To assist us in managing warranty claims, we recommend you register your product as soon as practicable after purchase by creating a MySunbeam account on our website and uploading a copy of your original receipt.
In order to make a claim under our warranty, you must have the original proof of purchase documentation for the product and present it when requested (if not already uploaded to our website).
Should your product develop any defect within 12 months of purchase because of faulty materials or workmanship, we will replace or repair it, at our discretion, free of charge. A product presented for repair may be replaced by a refurbished product of the same type rather than being repaired. Refurbished parts may be used to repair the product.
Our replacement or repair warranty only applies where a defect arises as a result of faulty material or workmanship during the warranty period. Your warranty does not cover misuse or negligent handling (including damage caused by failing to use the product in accordance with this instruction booklet), accidental damage, or normal wear and tear.
Your warranty does not:
• cover freight or any other costs incurred in making a claim, consumable items, accessories that by their nature and limited lifespan require periodic renewal (such as filters and seals) or any consequential loss or damage: or
• cover damage caused by: - power surges, power dips, voltage supply problems, or use of the product on incorrect voltage;
- servicing or modification of the product other than by Sunbeam or an authorised Sunbeam service centre; use of the product with other accessories, attachments, product supplies, parts or devices that do not conform to Sunbeam specifications; or exposure of the product to abnormally corrosive conditions; or
- extend beyond 3 months if the product is used in commercial, industrial, educational or rental applications.
The benefits given to you by our warranty are in addition to other rights and remedies under law in relation to the product.
In Australia our goods come with guarantees that cannot be excluded under the Australian Consumer Law. You are entitled to a replacement or refund for a major failure and for compensation for any other foreseeable loss or damage. You are also entitled to have the goods repaired or replaced if the goods fail to be of acceptable quality and the failure does not amount to a major failure.
Our goods also come with guarantees that cannot be excluded under the New Zealand Consumer Guarantees Act.
If your warranty claim is not accepted, we will inform you and if requested to do so by you, repair the product provided you pay the usual charges for such repair. You will also be responsible for all freight and other costs.
Should your product require repair or service after the warranty period, contact your nearest Sunbeam service centre. For a complete list of Sunbeam's service centres, visit our website or call our customer service line for advice on 1300 881 861 in Australia, or 0800 786 232 in New Zealand.

Sunbeam
Need help with your appliance?
Contact our Customer Care Team or visit our website for information and tips on getting the most from your appliance.
AUSTRALIA
Visit: www.sunbeam.com.au
Phone: 1300 881 861
Mail: Suite 1, Level 1, 13 Lord Street, Botany NSW 2019
NEW ZEALAND
Visit: www.sunbeam.co.nz
Phone: 0800 786 232
Mail: Level 6, Building 5, Central Park, 660–670 Great South Road, Greenlane, Auckland

NEWELL AUSTRALIA PTY LTD ABN 68 075 071 233
Sunbeam is a registered trade mark.
Due to continued product improvements, product illustrations and photographs in this User Guide may differ slightly from the actual product.
LC5500_LC3680_LC6500_LC3266_20EM1 (ANZ)
3680A
GCDS-SUN-JC
- Multi Processor & Multi Processor Plus
- Contents
- Important Instructions - retain for future use
- Sunbeam's Safety Precautions
- Multi Processor (LC5500/LC6500)
- Small Food Pusher
- Two Food Pushers
- Extra Wide Chute
- Processing Bowl Lid
- Processing Bowl
- Removable Processor Coupling
- Pulse Button
- Two Speed Control Dial
- Non-slip Feet
- 600W Motor
- Cord Storage
- Features of your Multi Processor Pro (LC6500 only)
- Ingredient Cup
- Flexible lid with pouring hole
- 1.5 Litre Glass Jug
- Fixed Blade Assembly
- essor
- Disc Blades
- Blade Holding Disc
- Base Driven Spindle Attachments
- Whisk
- Dough Blade
- Processing Blade
- Spindle
- Before First Use of the Multi Processor Storing your Food
- Step 1. Remove Packaging
- Step 2. Position Machine
- Step 3. Wash Parts
- Step 4. Power
- Care & Cleaning
- Motor Base
- Food Processor
- - Dishwasher use
- Blender (LC6500 Only)
- - Quick cleaning method
- • For thorough cleaning
- Attachments
- Using your Food Processor
- Tips for the best Food Processing Results
- Chopping
- Mincing
- Vegetables
- Mixing
- Adding ingredients
- Using the Feed Tube
- Slicing, shredding and grating
- For best results when slicing
- For best results when shredding and grating
- Disassembly
- Using your Blender (LC6500 only)
- Tips for the best Blending Results (LC6500 only)
- Food Processor Recipes Food Processor Dip & Dressings R
- Pizza Dough
- Sweet Short Crust Pastry
- Hummus
- Makes: 3 cups
- Spicy Capsicum and Cashew Nut Dip
- Makes: 2 cups
- Food Processor Mains Recipes Food Processor Mains Reci
- Chorizo and Basil Pizza with Basil Pesto
- Makes: 2 pizzas
- Turkish Lamb Burgers
- Makes: approximately 8 patties
- Winter Coleslaw
- Makes: 4-6
- Chicken Nuggets
- Makes: approximately 20 nuggets
- Food Processor Soup Recipes Food Processor Dessert Rec
- Tuscan Meatballs
- Serves: approximately 25
- Mexican Style Tomato Soup
- Makes: 10 cups
- Creamy Pumpkin Soup
- Serves: 6 cups
- Carrot Cake
- Makes: 8-10
- Food Processor Dessert Recipes Food Processor Dessert
- Ultimate Chocolate Chunk Cookies
- Makes: approximately 25 cookies
- Banana Cake
- Serves: 8-10
- Sour Cream Apple Pancakes
- Makes: approximately 8 pancakes
- Super Moist Chocolate Cake
- Blender Recipes (LC6500 only) Blender Recipes (LC6500 or
- Roasted Garlic Aioll
- Makes: 1½ cups
- Thai Red Curry Paste Paste
- Caesar Salad Dressing
- Makes: 1 cup
- Indian Lentil Soup with Minted Yoghurt
- Serves: 8 cups
- Blender Drink Recipes (LC6500 only) Blender Drink Recipe
- Caramel Thick Shake
- Makes: 2
- Banana Smoothie
- only)
- Pineapple Mint Frappe
- Affogato Cocktail
- Ultimate Chocolate Thick Shake
- Breakfast Smoothie
- Pina Colada
- Pine-Lime Splice
- Warranty
- Australia
- Sunbeam
- Need help with your appliance?
- NEW ZEALAND
Brand : SUNBEAM
Model : Multi Processor LC5500
Category : Food processor