
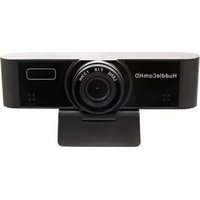
PT-WEBCAM-80 - Webcam PTZ Optics - Free user manual and instructions
Find the device manual for free PT-WEBCAM-80 PTZ Optics in PDF.


| Product Type | Webcam |
| Brand | PTZ Optics |
| Model | PT-WEBCAM-80 |
| Dimensions (W x H x D) | 4.5 x 2.8 x 2.1 inches (114 x 71 x 53 mm) |
| Weight | 1.2 lbs (544 g) |
| Power Supply | USB 2.0 (5V, 500mA) |
| Image Sensor | 1/2.7-inch CMOS |
| Resolution | 1920 x 1080 (Full HD) at 30fps |
| Field of View | 80° (diagonal) |
| Focus Type | Fixed focus |
| Microphone | Built-in dual omnidirectional |
| Connectivity | USB 2.0 Type-A |
| Mounting | Clip and tripod socket (1/4-20) |
| Cable Length | 5 ft (1.5 m) |
| Operating System Compatibility | Windows, macOS, Chrome OS, Linux |
| Key Features | Auto light correction, privacy shutter, plug-and-play |
| Maintenance | Clean lens with soft cloth; avoid liquids |
| Safety Warnings | Do not expose to moisture or extreme temperatures |
| Spare Parts Availability | USB cable, mounting clip (contact support) |
| Repairability | Non-user-serviceable; contact PTZ Optics for repairs |
| Warranty | 1 year limited |
Frequently Asked Questions - PT-WEBCAM-80 PTZ Optics
User questions about PT-WEBCAM-80 PTZ Optics
0 question about this device. Answer the ones you know or ask your own.
Ask a new question about this device
Download the instructions for your Webcam in PDF format for free! Find your manual PT-WEBCAM-80 - PTZ Optics and take your electronic device back in hand. On this page are published all the documents necessary for the use of your device. PT-WEBCAM-80 by PTZ Optics.
USER MANUAL PT-WEBCAM-80 PTZ Optics
User Manual
Model Nos: PT-WEBCAM-80
V1.0
(English)
Please check PTZOPTICS.com for the most up to date version of this document
Rev 1.1 8/19
Preface
Thank you for using the PTZOptics Webcam. This manual introduces the function, installation and operation of the camera. Prior to installation and usage, please read the manual thoroughly.
Precautions
This product can only be used in the specified conditions in order to avoid any damage to the camera:
- Don't subject the camera to rain or moisture.
- Don't remove the cover. Removal of the cover may result in an electric shock, in addition to voiding the warranty. In case of abnormal operation, contact the manufacturer.
- Never operate outside of the specified operating temperature range, humidity, or with any other power supply than the one originally provided with the camera.
- Please use a soft dry cloth to clean the camera. If the camera is very dirty, clean it with diluted neutral detergent; do not use any type of solvents, which may damage the surface.
Note
This is an FCC Class A Digital device. As such, unintentional electromagnetic radiation may affect the image quality of TV in a home environment.
Table of Contents
1 Supplied Accessories 3
2 Notes 3
3 Quick Start 4
4 Features 4
5 Product Specifications 5
6 Main Unit 6
7 Menu Settings 8
8 Maintenance and Troubleshooting 11
Supplied Accessories
When you unpack your camera, check that all the supplied accessories are included:
Installation and operation must be in accordance with national and local electric safety standards.
● Polarity of power supply
The power supply output for this product is 12VDC with a maximum current supply of 2A. Polarity of the power supply plug is critical and is as follows.
- Handling
■ Avoid any stress, vibration, or moisture during transportation, storage, installation and operation.
■ Do not expose camera to any corrosive solid, liquid, or gas to avoid damage to the cover which is made of a plastic material.
■ DO NOT DISMANTLE THE CAMERA – The manufacturer is not responsible for any unauthorized modification or dismantling.
Quick Start
Please check that all connections are correct before powering on the camera.

Features
- Supports up to 1080p-30/25 fps with an wide 80° field of view.
- Plug and play USB 2.0 video & audio connectivity.
- Built in microphone array with unique noise reduction algorithm to accurately present your voice up to 15 feet away.
- Wide Dynamic Range to deliver high quality video during various lighting environments.
- Features star-level CMOS sensor and 2D/3D noise reduction algorithm, delivering ultra-high SNR for optimized noise reduction. 55dB SNR for clear video in low light environments.
- EPTZ - Electronic Pan/Tilt/Zoom up to 8x
Product Specifications
| Model | PT-WEBCAM-80 |
| Type | PTZOptics Webcam |
| Camera | |
| Video System | 1080p-30/25, 720p-30/25, 960x540p-30/25, 640x360p-30/2550Hz: 1fps ~ 25fps, 60Hz: 1fps ~ 30fps |
| Sensor | 1/2.7", CMOS, Effective Pixel: 2.07M |
| Scanning Mode | Progressive |
| Lens | F=3.5mm, F1.8 ~ F2.8 |
| Minimal Illumination | 0.05 Lux @ (F1.8, AGC ON) |
| Camera Bracket | Bracket with damper |
| Shutter | 1/30s ~ 1/10000s |
| White Balance | Auto, Indoor, Outdoor, One Push, Manual |
| Backlight Compensation | Support |
| Digital Noise Reduction | 2D & 3D Digital Noise Reduction |
| Video S/N | ≥55dB |
| Horizontal Angle of View | 80° |
| H & V flip | Support |
| Input/Output Interface | |
| HD Output | 1 x USB: Version 2.0 |
| Audio Output | 1 x Internal Microphone Array |
| Generic Specification | |
| Input Voltage | 5V (USB Power Supply) |
| Operating Temperature | -10°C ~ 40°C (14°F ~ 104°F) |
| Storage Temperature | -40°C ~ 60°C (-40°F ~ 140°F) |
| Current Consumption | 270mA |
| Power Consumption | 1.4W (Max) |
| MTBF | >30000h |
| Size | 118mm x 37.2mm x 30.8mm (not including bracket) |
| Net Weight | 93g (not including bracket) |
Main Unit


- Wide Angle Camera lens
- Microphone Array
- Bracket with damper
- Attached USB 2.0 cable
- 1/4-20 mount (underneath)
Dimensional Drawings (mm)

Menu Settings
1. MENU
To access the OSD Menu of the Webcam, you will first need to download the PTZOptics Webcam OSD application from ptzoptics.com/downloads. From there, select your device, and use the arrows to traverse the menu.
MENU
▶ Exposure
Color
Image
Noise Reduction
Setting
Information
Restore Default
[Home] Enter
[Menu] Exit
2. EXPOSURE
Move the main menu cursor to [EXPOSURE], and press [OK] button enter the exposure page, as shown in the following figure.
EXPOSURE
▶ Mode Full Auto
ExpCompMode On
ExpComp 1
Gain Limit 3
Backlight Off
DRC Strength 5
Anti-Flicker 60Hz
▲▼ Select Item
Change Value
[Menu] Back
Rev 1.1 8/19
Mode: Exposure mode, optional items: Full Auto, WDR, Shutter Priority, Bright, Manual
ExpCompMode: Exposure compensation mode, optional items: On, Off (Effective only in Auto mode).
ExpComp: Exposure compensation value, optional items: -7 \~ 7 (Effective only in ExpCompMode item to On).
Gain Limit: Maximum gain limit, optional items: 0 \~ 15 (Effective in Full Auto, WDR, Shutter Priority, Bright, & Manual).
Backlight: Set the backlight compensation, optional items: On, Off (Effective only in Auto mode).
DRC Strength: optional items: 0 \~ 8 (Effective in Full Auto, Shutter Priority, Bright, & Manual mode).
Anti-Flicker: Anti-flicker, optional items: Off, 50Hz, 60Hz (Effective only in Auto & Bright mode).
Shutter: Shutter value, optional items: 1/30, 1/60, 1/90, 1/100, 1/125, 1/200, 1/250, 1/350, 1/500, 1/725, 1/1000, 1/1500, 1/2000, 1/3000, 1/4000, 1/6000, 1/10000
(Effective only in Shutter Priority & Manual)
Gain: Sets gain limit, optional items: 0 \~ 7 (Effective only in Manual)
3. COLOR
Move the main menu cursor to [COLOR], and press [OK] button enter the color page, as shown in the following figure.
![COLOR ► WB Mode Auto AWB Sens High RG Tuning 1 BG Tuning 1 Saturation 100% ▲▼ Select Item ◄► Change Value [Menu] Back](/content/2026/05/946825/images/8ca29de5dcfb513e4817711865fb372a10955a51c857defbcda8bd50271a5ab7.jpg)
WB-Mode: White balance mode. optional items: Auto, 3000K/Indoor, 5000K/Outdoor, OnePush, Manual, VAR.
Color Temp: Optional items: 2500K \~ 8000K (Effective only in VAR mode).
RG Tuning: Red gain fine-tuning, optional items: -10 \~ +10
BG Tuning: Blue gain fine-tuning, optional items: -10 \~ +10
Saturation: optional items: 60% \~ 200%.
AWB Sens: The white balance sensitivity, optional items: Low, Normal, High. Only effective in Auto, 5000K/Outdoor, & 3000K/Indoor
R Gain: Red gain fine tuning, optional items: 0 \~ 255. (Effective only in Manual)
R Gain: Red gain fine tuning, optional items: 0 \~ 255. (Effective only in Manual)
4. IMAGE
Move the cursor to the Image item in the main menu and press [OK] button, [IMAGE] menu appears, as shown in the following figure.
![IMAGE ►Luminance 7 Contrast 7 Sharpness 3 Flip-H Off Flip-V Off Gamma EXT Style Clarity LDC 3 ▲▼ Select Item ◄► Change Value [Menu] Back](/content/2026/05/946825/images/f7cb31f46b7ce4039f36e5fdc992126736ecf478dd1de426a53d78769f2d7540.jpg)
Luminance: Brightness adjustment, optional items: 0 \~ 14.
Contrast: Contrast adjustment, optional items: 0 \~ 14.
Sharpness: Sharpness adjustment, optional items: Auto, 0 \~ 14.
Flip-H: Image flipped horizontally, optional items: On, Off.
Flip-V: Image Flip Vertical, optional items: On, Off.
Gamma: Optional items: EXT, Default, 0.45, 0.5, 0.56, 0.63.
Style: Optional items: Norm, Clarity, Soft, 5S, Bright.
LDC: Optional items: Off, 1 \~ 6
5. NOISE REDUCTION
Move the main menu cursor to [NOISE REDUCTION], and press [OK] button enter the noise reduction page, as shown in the following figure.
NOISE REDUCTION
▶ NR2D-Level 3
NR3D-Level 4
Dynamic Filter 3
▲▼ Select Item
Change Value
[Menu] Back
NR2D Level: 2D noise reduction, optional items: Close, Auto, 1 \~ 5.
NR3D Level: 3D noise reduction, optional items: Close, 1 \~ 8.
Dynamic Filter: Noise reduction filter, optional items: Close, 1 \~ 6
6. SETTING
Move the main menu cursor to [SETUP], and press [OK] button enter the setup page, as shown in the following figure.
SETUP
▶Language English
▶ EPTZ On
▶ Zoom Limit 4x
▲▼ Select Item
Change Value
[Menu] Back
Language: Optional items: English, Chinese
EPTZ: Electronic Pan/Tilt/Zoom. Optional items: On, Off
Zoom Limit: Optional items: 1.5x, 2x, 3x, 4x, 8x
7. RESTORE DEFAULT
Move the main menu cursor to [RESTORE DEFAULT], and press [HOME] key enter the restore default page, as shown in the following figure.
RESTORE DEFAULT
▶Restore? No
Change Value
[Home] OK
[Menu] Back
Restore: Confirm restore factory settings, optional items: Yes, No.
Note: Press [HOME] button to confirm, all parameter restore default, include IR Remote address and VISICA address.
Maintenance and Troubleshooting
Camera Maintenance
- If the camera will not be used for a long time, please disconnect from PC.
● Use a soft cloth or lotion-free tissue to clean the camera body.
- Use a soft dry lint-free cloth to clean the lens. If the camera is very dirty, clean it with a diluted neutral detergent. Do not use any type of solvent or harsh detergent, which may damage the surface.
Unqualified Applications
- Do not shoot extremely bright objects for a long period of time, such as sunlight, ultra-bright light sources, etc...
- Do not operate in unstable lighting conditions, otherwise the image may flicker.
- Do not operate close to powerful electromagnetic radiation, such as TV or radio transmitters, etc...
Troubleshooting
- No image
- Check whether the USB cable is connected properly to the PC.
- Check whether the LED glows when USB is connected to the PC.
● Abnormal display of image
- Check OSD of camera through the OSD Menu app.
- Check settings of software you're viewing the video feed in.
● Image is shaky or vibrating.
- Check whether camera is mounted solidly or sitting on a steady horizontal and level surface.
- Check the building and any supporting furniture for vibration.
- Any external vibration that is affecting the camera will be more apparent when in tele zoom (zoomed in) settings
Copyright Notice
The entire contents of this manual, whose copyright belongs to PTZOptics, may not be cloned, copied or translated in any way without the explicit permission of the company. Product specifications and information referred to in this document are for reference only and as such are subject to updating at any time without prior notice.
- PREFACE
- PRECAUTIONS
- NOTE
- TABLE OF CONTENTS
- SUPPLIED ACCESSORIES
- QUICK START
- FEATURES
- MAIN UNIT
- DIMENSIONAL DRAWINGS (MM)
- MENU SETTINGS
- MENU
- EXPOSURE
- COLOR
- IMAGE
- NOISE REDUCTION
- SETTING
- SETUP
- RESTORE DEFAULT
- MAINTENANCE AND TROUBLESHOOTING
- CAMERA MAINTENANCE
- UNQUALIFIED APPLICATIONS
- TROUBLESHOOTING
- COPYRIGHT NOTICE
Brand : PTZ Optics
Model : PT-WEBCAM-80
Category : Webcam