
TC381 - Weather Station UPM - Free user manual and instructions
Find the device manual for free TC381 UPM in PDF.


User questions about TC381 UPM
0 question about this device. Answer the ones you know or ask your own.
Ask a new question about this device
Download the instructions for your Weather Station in PDF format for free! Find your manual TC381 - UPM and take your electronic device back in hand. On this page are published all the documents necessary for the use of your device. TC381 by UPM.
USER MANUAL TC381 UPM
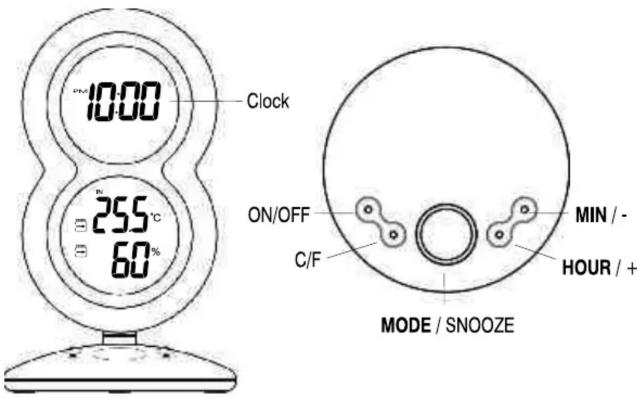
FULL LCD DISPLAY AND BUTTONS

PAGE 2
TEMPERATURE DISPLAY
Min. and Max. Daily Temperature and Humidity
A Press MIN/- or HOUR/+ in clock mode, to display the minimum or maximum daily temperature and humidity. (The MIN or MAX symbol will appear.)
B Press MIN/- or HOUR/+ again to return to the normal display.
NOTE: Min/Max readings are automatically cleared daily at midnight.
Temperature trend
The trend indicator shows the trend of the temperature in the past 30 minute interval. The temperature trend is located beside the current temperature.
For example:
The following trend
indicates that the
temperature
is rising

| Arrow Indicator | |||
| Trend | Rising | Steady | Falling |
PAGE 6
TEMPERATURE ALERT

The temperature alert is a feature to be used in a room in which you need to maintain a controlled temperature. Once activated, the temperature alarm will sound if the room gets too warm or too cold.
- You can set both an upper and lower temperature alert for the local temperature.
- HIGH TEMPERATURE LIMIT: If the temperature gets too warm and reaches the high temperature limit, the alarm will sound.
- LOW TEMPERATURE LIMIT: If the temperature gets too cold and reaches the low temperature limit, the alarm will sound.
Setting the upper and lower temperature alert
① Press MODE until the ≧ temperature alarm symbol appears.
② Press ON/OFF to select the high temperature limit.
(→ The rising temperature symbol indicates the high limit mode.)
③ Press the (+ or -) button to set the high alarm.
4 Press ON/OFF again to select the low temperature
(→ The falling temperature symbol indicates the lower limit mode.)
⑤ Press ON/OFF to select the lower temperature limit.
6 Press the (+ or -) button to set the low temperature.
Press MODE to return to the normal display. (OR)
Press ON/OFF again to turn off the temperature alert. (The arrow will disappear to indicate the temperature alarm is de-activated)
Note: The temperature alarm sound is different to that of the alarm clock. When activated, the temperature alarm t (siren) symbol will also flash.
PAGE 7
GETTING STARTED
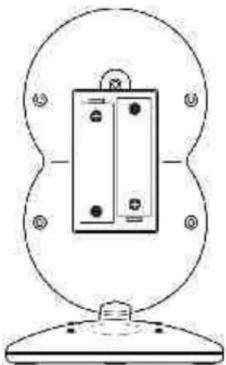
Battery Installation
Press the tab to remove the battery cover. Insert 2 AA batteries (observing correct polarity) Replace the battery cover.
12 or 24 Hour Clock
Immediately after inserting the batteries press ON/OFF to toggle between 12 or 24 hour display. (Note: 12 or 24 hour display, can be changed anytime by pressing the ON/OFF button during the normal clock mode.
Local (Indoor) Temperature
The local (indoor) temperature will display instantly after batteries are inserted into the receiver.
Selecting Celsius or Fahrenheit Temperature Display
Press the C/F button anytime to toggle between °C and °F display.
Mode button - Display Sequence
The MODE button will sequence between: Clock, Alarm 1, Alarm 2, Temperature Alarm -->
PAGE 3
HUMIDITY DISPLAY
Relative humidity is expressed as a percentage ranging from 15% to 90% . The local humidity in a room is detected by sensors inside the thermo-clock. If the humidity level falls below 15% the clock will display LO% , which means the humidity level is too low to be measured. If the humidity level goes above 90% the reading will display HI% , meaning the humidity level is too high to be measured.
Temperature and humidity trend
The trend indicator shows the humidity trend in the past half-hour interval. The humidity trend is located beside the current humidity reading.
For example: The following trend indicates that the humidity is rising.


LOW BATTERY INDICATION
Receiver
Replace the batteries when the Low Battery Indication (☐) is displayed on the LCD screen.
NOTE: After replacing the batteries, you will need to set the clock display and wake up alarm(s) again.
PAGE 8
CLOCK SETTING
① Press and hold MODE for 3 seconds to enter the setting mode. (You will hear a beep.) (The time will flash).
② Press HOUR to set the hour.
③ Press MINUTE to set the minute
④ Press MODE again to return to normal clock mode.
(NOTE: Press and hold the HOUR or MINUTE button to accelerate the time setting.)
PAGE 4
TROUBLESHOOTING
| PROBLEM | SOLUTION |
| The temperature reading on the thermo-clock does not match the actual temperature in your home. | This may occur when the unit is placed near a source of heat or a cool draft. Be sure to place the clock in a central location in your home; unaffected by direct sunlight, heat vents, fireplaces, or drafty doorways. |
PAGE 9
ALARM SETTING
Alarm 1 and Alarm 2 Setting:
① Scroll to Alarm using MODE. The (AL 1) ALARM 1 symbol will appear.
② Press HOUR to set the hour.
③ Press MINUTE to set the minute.
4 Press ON/OFF to turn the alarm on or off.
⑤ The bell symbol ⚪ 1 AL 1 (ALARM 1) will appear and the unit will beep when the alarm in turned on. In the normal clock display, if the alarm is set ON, the ⚪ 1 symbol will also appear on the display.
To set Alarm 2, scroll to Alarm 2 using MODE. The ALARM 2 symbol (AL 2) will appear. Follow the same steps as above to set. In the normal clock display, if the alarm is set ON, the ⚪2 symbol will also appear on the display.
When the Alarm Sounds:
① 1 or 2 symbol will flash and the unit will beep.
② Press the SNOOZE button to delay the alarm for 5 minutes. After that the alarm will sound again.
③ Press ANY other key to stop the alarm. Or without interruption, the alarm will automatically stop after one minute.
SPECIFICATIONS
TC381 - THERMO-CLOCK
- Battery Type: 2 X 1.5V AA batteries
- Temperature Range: -9.9°C to 55°C
- Resolution: 1°C
- Measurement Accuracy: Max. +/- 1°C within measuring range of 0°C to 40°C
- Humidity Range: 15% to 90% RH (resolution 0.5%)
LIMITED ONE-YEAR WARRANTY
This product is warranted to be free from defects in the materials or workmanship, under normal use and service, for a period of one (1) year from the date of purchase by the consumer.
If the product is defective, return it with a dated proof of purchase, to the retailer from which you purchased it.
This warranty shall not apply, if the defect, malfunction or damage occurred while the product was in the possession of the consumer, including dropping and/or abuse.
THIS WARRANTY IS THE ONLY EXPRESS WARRANTY ON THIS PRODUCT. THE DURATION OF ANY IMPLIED WARRANTIES, INCLUDING THE WARRANTIES OF MERCHANTABILITY AND FITNESS FOR A PARTICULAR PURPOSE, IS HEREBY LIMITED TO THE ONE YEAR DURATION OF THIS WARRANTY.
CUSTOMER SERVICE (1-888-468-6876)
- TEMPERATURE DISPLAY
- TEMPERATURE TREND
- FOR EXAMPLE
- TEMPERATURE ALERT
- SETTING THE UPPER AND LOWER TEMPERATURE ALERT
- GETTING STARTED
- BATTERY INSTALLATION
- 12 OR 24 HOUR CLOCK
- LOCAL (INDOOR) TEMPERATURE
- SELECTING CELSIUS OR FAHRENHEIT TEMPERATURE DISPLAY
- MODE BUTTON - DISPLAY SEQUENCE
- HUMIDITY DISPLAY
- TEMPERATURE AND HUMIDITY TREND
- LOW BATTERY INDICATION
- RECEIVER
- CLOCK SETTING
- ALARM SETTING
- ALARM 1 AND ALARM 2 SETTING
- WHEN THE ALARM SOUNDS
- SPECIFICATIONS
- TC381 - THERMO-CLOCK
- LIMITED ONE-YEAR WARRANTY
Brand : UPM
Model : TC381
Category : Weather Station