
W2S100 - Weather Station UPM - Free user manual and instructions
Find the device manual for free W2S100 UPM in PDF.


| Product Type | Wireless Weather Station |
| Brand | UPM |
| Model | W2S100 |
| Receiver Model | WS1200 |
| Transmitter Model | WT440 |
| Display Type | LCD screen |
| Display Size | 4 x 6 inches (approx.) |
| Temperature Range (Receiver) | -5°C to +55°C (-23°F to +131°F) |
| Temperature Range (Transmitter) | -30°C to +60°C (-22°F to +140°F) |
| Number of Remote Channels | Up to 4 |
| Transmission Frequency | 433.92 MHz |
| Transmission Range | Up to 40 meters (open area) |
| Power Supply (Receiver) | 2 x 1.5V AA batteries |
| Power Supply (Transmitter) | 2 x 1.5V AA batteries |
| Clock Format | 12 or 24 hour selectable |
| Calendar Display | Year, month, date, weekday (auto-set) |
| Temperature Trend Indicator | Rising / steady / falling arrows |
| Low Battery Indication | Symbol on LCD |
| Warranty | 1 year against defects |
| Compliance | FCC Part 15, Industry Canada RSS-210 |
Frequently Asked Questions - W2S100 UPM
User questions about W2S100 UPM
0 question about this device. Answer the ones you know or ask your own.
Ask a new question about this device
Download the instructions for your Weather Station in PDF format for free! Find your manual W2S100 - UPM and take your electronic device back in hand. On this page are published all the documents necessary for the use of your device. W2S100 by UPM.
USER MANUAL W2S100 UPM
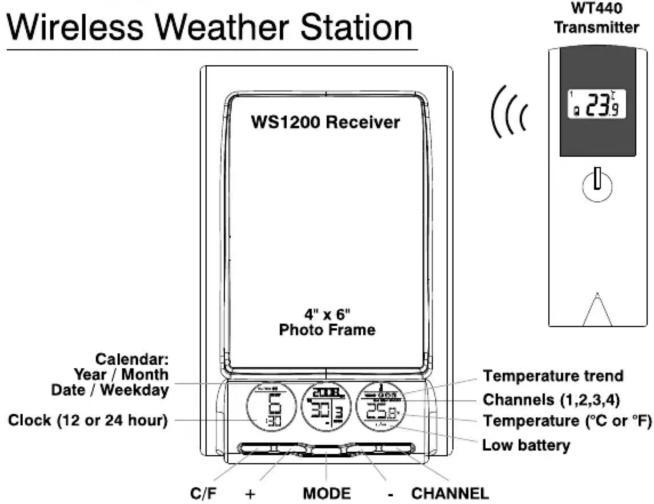
Wireless Weather Station
P.1
TEMPERATURE DISPLAY
Check Inside Temperature
After inserting the batteries, the inside temperature readings will display on the receiver.
Check Remote Temperature
Although this weather station comes with only 1 transmitter it is compatible with up to 4. If you have multiple transmitters; Press Channel to scroll through the channels (1-4) Temperature readings for each channel will display on the receiver.
°C or °F Temperature Display
Press C/F to toggle between °C and °F by pressing C/F in normal clock mode.
If the outside temperature falls below -30^ , the symbol "LO" will appear on the screen; If the temperature rises above +55C , the symbol "HI" will appear on the screen. Both displays are normal and do not mean that your weather station is defective.
Temperature trend
The trend indicator shows the trend of inside/outside temperature determined by the sensor(s) in the past half hour interval.
| Arrow Indicator |  | [€7XK] | [€4X2] |
| Trend | Rising | Steady | Falling |
RECEIVER BUTTONS
• C/F: toggles between °C or °F format
• + (Plus): adjusts clock and calendar values
- MODE: scrolls through the setting modes: clock time / year / date / month or 12/24 hour. (*Note the weekday sets itself, according to the date and year.)
- (Minus): adjusts the clock and calendar values
- Channel: scrolls through the inside temperature and the 4 remote temperature channels, Channel 1,2,3,4 report temperature data from the remote transmitter(s).
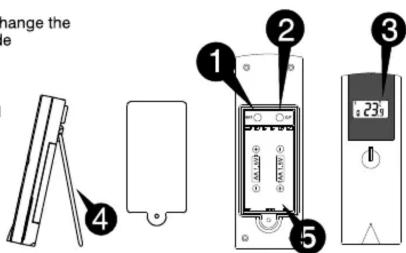
TRANSMITTER BUTTONS
① SET: enters the House code and Channel setting mode
② C/F: toggles between °C or °F, change the frequency channel or house code
③ LCD display
4 Wall mount holder & table stand
5 Battery compartment
P.2
LOW BATTERY INDICATION

RECEIVER / TRANSMITTER:
If the low battery symbol "☐" displays on the LCD screen then the receiver batteries are low. A low battery may affect the units performance, for example:
- the LCD display appears faint;
- the transmission range is reduced;
- the data may not display from remote transmitter(s)
The transmitter and receiver each require 2 x AA batteries.
* Note: Changing the batteries will cause all settings to be erased
If a transmitter is exposed to very low or high temperatures for an extended period of time, the batteries may lose power, which may cause reduced transmission range.
SPECIFICATIONS
Weather Station Receiver WS1200
Battery Type: 2 X 1.5V AA batteries
Temp. Range: -5°C to +55°C
Temp. Range: -23°F to +131°F
Weather Station Transmitter WT440
Battery Type: 2 X 1.5V AA batteries
Temp. Range: -30°C to +60°C
Temp. Range: -22°F to +140°F
Transmission Frequency: 433.92 MHz
Transmission Range: up to 40 meters
in open area
FOR BEST OPERATION
- Insert batteries into the remote transmitter(s) first, and then the receiver.
- Place the receiver and remote transmitter(s) close together. This will ensure that the receiver synchronizes with remote transmitter(s).
- Place the remote transmitter(s) outdoors within an effective transmission range.
- Although remote transmitters are weather resistant, it is not recommended to place it directly in sunlight, rain or snow.
● The transmission range can be affected by the dense walls or electronic interference in between the receiver and transmitter. Try various set-ups for best results.
SETTING THE TRANSMITTER

1 Remove battery cover and insert 2 AA size batteries to start setup.
② The HOUSE CODE will flash for 8 seconds
③ Select the HOUSE CODE by pressing C/F
4 The range of House Codes are from "01" to "15". Make sure all transmitters in your system are set to the same House Code.
5 Select CHANNEL(1-4) by pressing C/F. This number will be confirmed upon pressing the SET button, or if no key is pressed for 10 seconds. If only one transmitter is available, it is recommended to leave the CHANNEL be "01"
⑥ Temperature will display
⑦ Select °C or °F of Temperature by pressing C/F and pressing SET. Once setup of remote transmitter is completed, it will start transmitting at one minute intervals
* Use a different house code if your weather station detects other signals from neighbouring sources
* Factory default: house code = 01 and channel = 01
P.3
FCC / Industry Canada COMPLIANCE
This device complies with Part 15 of the FCC Rules and with RSS-210 of Industry Canada. Operation is subject to the following two conditions:
(1) this device my not cause harmful interference, and
(2) this device must accept any interference received, including interference that may cause undesired operation.
This equipment has been tested and found to comply with the limits for a Class B digital device, pursuant to Part 15 of the FCC Rules. These limits are designed to provide reasonable protection against harmful interference in a residential installation. This equipment generates, uses and can radiate radio frequency energy and, if not installed and used in accordance with the instructions, may cause harmful interference to radio communications. However, there is no guarantee that interference will not occur in a particular installation. If this equipment does cause harmful interference to radio or television reception, which can be determined by turning the equipment off and on, the user is encouraged to try to correct the interference by one or more of the following measures: Reorient or relocate the receiving antenna. Increase the separation between the equipment and receiver. Connect the equipment into an outlet on a circuit different from that to which the receiver is connected. Consult the dealer or an experienced radio/TV technician for help.

P.8
SYNCHRONIZATION
Automatic Learn Function:
1 The Learn function begins automatically and runs for 3 minutes when receiver batteries are first installed.
2 Within these 3 minutes, the receiver will display the temperature signals from transmitter(s).
If the signals are not received within this 3 minutes, the outside temperature will show "---". If this is the case, bring the units closer together or try a different location. Then restart the auto learning function by temporarily removing the batteries from receiver.
Manual-Learn Function (Searching for Remote Signals):
If extra transmitters are added, or if signal is lost and the outdoor display is blinking, the learn function must be executed again.
1 Press and hold Channel for 3 seconds in clock display mode.
2 The Outdoor symbol will flash indicating that the learn function has begun.
3 Press Channel to scroll through each channel (1-4).
4 The Channel number (1-4) will display, and the temperature reading from each remote transmitter will also display.


Remote
Transmitter
LCD

P.4
TROUBLESHOOTING
Problem
Receiver is no longer receiving remote data or the display is incorrect.
Solution
- Wait for 1-2 minutes to ensure the units are not in a phase change.
- Ensure the remote sensor is out of direct
sunlight, and away from other sources of heat. - Repeat the learn procedures. (see synchronization section)
- Temperature may be below -30°C
- Batteries in transmitter may need changing
- Move the transmitter closer to the receiver.
- Make sure transmitter is away from sources
of electrical disturbance.
Operation is not normal or certain functions do not perform
Reset the unit (to default mode) by removing the batteries in both the receiver and transmitter(s). Then re-insert the batteries and re-enter your settings.
1 YEAR WARRANTY
This product carries a one (1) year warranty against defects in workmanship and materials. At their discretion, retailers may replace the unit within the stated warranty period, when returned with proof of purchase. This product is not guaranteed against wear or breakage due to misuse and/or abuse.
If the product is defective,
(i) return it, with a dated proof of purchase, to the retailer from which you purchased it.
Note: shipping and handling for returns is not included under this warranty.
Customer Service Centre
1-888-468-6876 / www.upm-marketing.com
P.9
CLOCK SETTING
1 Press and hold MODE for 3 seconds to enter the clock setting mode (the HOUR and MINUTE will flash)
2 Press + to set the hour / Press - to set the minute.
3 To end setting the clock: Press MODE repeatedly until the LCD display stops flashing or do not press any key for 1 minute (normal display will return automatically)
4 Press MODE again after LCD stops flashing, to toggle between 12 and 24 hour display

DAY / MONTH / YEAR SETTING
1 Press and hold MODE for 3 seconds to enter the clock setting mode
2 Press MODE again to enter the Date/Month setting mode (once activated DAY/MONTH will flash)
3 Press + to set the month
4 Press - to set the date
5 Press MODE again to enter Year setting (YEAR will flash)
6 Press + or - to adjust the year
7 Press MODE again to end setting the date Note: The weekday is automatically determined from the year/month/day setting.

- Wireless Weather Station
- TEMPERATURE DISPLAY
- Temperature trend
- RECEIVER BUTTONS
- TRANSMITTER BUTTONS
- LOW BATTERY INDICATION
- SPECIFICATIONS
- FOR BEST OPERATION
- SETTING THE TRANSMITTER
- FCC / Industry Canada COMPLIANCE
- SYNCHRONIZATION
- Automatic Learn Function:
- Manual-Learn Function (Searching for Remote Signals):
- TROUBLESHOOTING
- Problem
- Solution
- YEAR WARRANTY
- CLOCK SETTING
- DAY / MONTH / YEAR SETTING
Brand : UPM
Model : W2S100
Category : Weather Station