CPRB07XC7-B - Air conditioner Commercial Cool - Free user manual and instructions
Find the device manual for free CPRB07XC7-B Commercial Cool in PDF.


User questions about CPRB07XC7-B Commercial Cool
0 question about this device. Answer the ones you know or ask your own.
Ask a new question about this device
Download the instructions for your Air conditioner in PDF format for free! Find your manual CPRB07XC7-B - Commercial Cool and take your electronic device back in hand. On this page are published all the documents necessary for the use of your device. CPRB07XC7-B by Commercial Cool.
USER MANUAL CPRB07XC7-B Commercial Cool
natural_image
Line drawing of a modern refrigerant appliance with lid and front panel (no text or symbols)User Manual
Model # CPRB07XC7, CPRB07XC7-B, CPRB07XC7-W
Before operating this air conditioner, please read these instructions completely.
A Word From Haier America
Thank you for buying a dependable, energy-saving and easy-to-operate Commercial Cool air conditioner. This manual contains useful information for you to maintain, operate, install and safely use your air conditioner. Your air conditioner cleans, cools and dehumidifies the air in your room to provide you with the ultimate level of comfort. Please read instructions carefully before using the product. Also, do not forget to fill out and mail the Product Registration Card.
Product Registration
Record Your Model and Serial Number.
Attach the sales receipt to this guide and keep for future reference. Model and serial number can be obtained from the serial label, which is on your air conditioner. For all your service calls during the warranty period the following information will be needed:
Model Number:
Serial Number:
Date of Purchase:
Dealer's Name: ....
Dealer's Address:
Dealer's Phone Number:....
| TABLE | |||||
| RECEPTACLE AND FUSE TYPES | |||||
| RATED VOLIS | 125/60 | 250/60 | |||
| AMPS | 15 | 20 | 15 | 30 | |
| WALL OUTLET |  |  |  |  |  |
| FUSE SIZE | 15 | 20 | 15 | 30 | 30 |
| TIME DELAY FUSE(or circuit breaker) | Plug | Plug | Plug | Plug | Plug |
SAFETY PRECAUTIONS
WARNING: Following these basic precautions will reduce the risk of fire, electrical shock, injury or death when using your air conditioner.
1) Air conditioner must be connected to proper electrical outlet with the correct electrical supply. (see table previous page)
2) Proper grounding must be ensured to reduce the risk of shock and fire. DO NOT CUT OR REMOVE THE GROUNDING PRONG. If you do not have a three-prong electric receptacle outlet in the wall, have a certified electrician install the proper receptacle. The wall receptacle MUST be properly grounded.
3) Do not operate air conditioner if power cord is frayed or otherwise damaged. Also avoid using it if there are cracks or abrasion damage along the length or plug connector or if the unit malfunctions or is damaged in any manner. Contact an authorized service for examination, repairs or adjustments.
4) DO NOT USE AN ADAPTER OR AN EXTENSION CORD.
5) Do not block airflow around the air conditioner. Also, the exhaust hose should be free of any obstructions.
6) Always unplug the air conditioner before servicing it or moving it.
7) Do not install or use the air conditioner in any area where the atmosphere contains combustible gases or where the atmosphere is oily or sulphurous. Avoid any chemicals coming in contact with your air conditioner.
8) Do not place any object on the top of the unit.
9) Never operate the air conditioner without the filters in place.
10) Do not use the air conditioner near a bathtub, shower or wash basin.
SAVE THESE INSTRUCTIONS
Important Instructions
- Please keep this manual in a safe place.
- Do not use liquid or a spray to clean this product. Use a damp cloth.
- Do not place the product on an unstable surface or elevated place as it may fall and cause damage or injury.
- Never spill liquid on the control panel; it may cause electrical shock to the electronic parts inside and disable them or cause them to function improperly.
- Never try to dismantle the product by yourself. Unsupervised dismantling and incorrect reassembly of the inside of the back cover may damage the electrical circuit and affect its performance. When maintenance is required, please contact the local service center or local distributor.
Thank you for purchasing our Commerical Cool product. Please read this manual carefully before operating and store for future reference Staple your receipt to your manual. You will need it to obtain warranty service.
Model number
Serial number
Date of purchase
Table Of Contents
PAGE
A Word From Haier America....1
Product Registration....1
Safety Precautions....2
Advantages....4
Parts and Features....5
Assembly and Installation....6
Operation 7
Product Specification....9
Care and Cleaning 9
Storage....9
Troubleshooting 10
Warranty Information 11
Advantages of this Model
- This model is easy to operate. The electronic control panel has a timer, thermostat, three speed cooling speeds, three fan speeds and one speed dehumidification function (dry).
- This portable air conditioner does not require water to be added.
- The unit has a unique design which evaporates water. Therefore no condensation tank is necessary, thus avoiding the need to empty the bucket and turn on the unit in the middle of the night.
- Easy-to-install window kit is included, which consists of the exhaust hose, 2 hose adaptors, the window panel kit and window panel adaptor.
- Full-directional casters are included to help move the unit to be conveniently used in almost any area.
- The filter screen is designed for easy accessibility of the filter.
- Portable air conditioners are easy to store when not in use.
Parts and Features
- Control Panel
- Air Outlet (To be opened manually)
- Handle Hole
- Caster
- Air Filter
- Air Outlet (Heat Exhaust)
- Air Intake (Condenser)
- Remote Control Storage Facility
- Water Outlet Drain
- Power Supply Cord
Front


■ TEST. WHEN THIS BUTTON IS PRESSED OR WHEN THERE IS A CURRENT LEAK, THE INDICATOR LIGHT WILL TURN OFF AND THE UNIT WILL NOT RUN.
■ RESET: AFTER SOLVING THE PROBLEM, PLEASE PRESS THE BUTTON AND THE UNIT WILL START OPERATING.
Rear
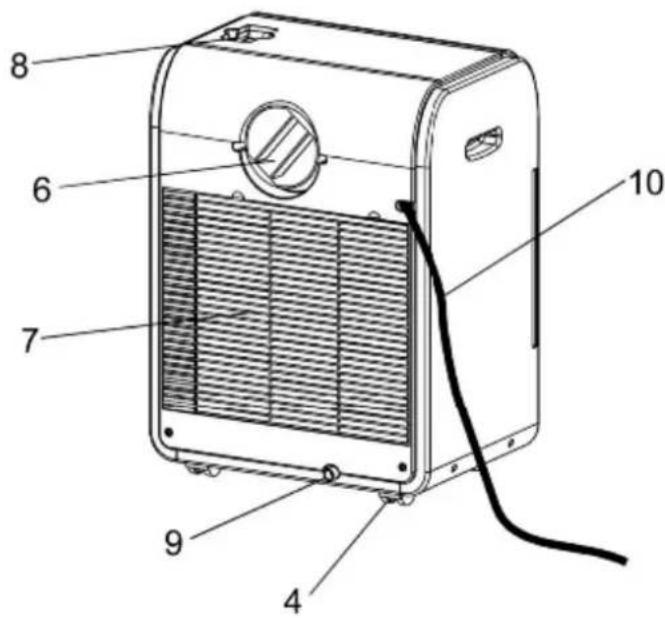
Note: Please manually open the air outlet (Item 2) to desired position.
Assembly and Installation
Accessories Include
- Plastic panel - 3 pieces From 20" (50.5cm) up to 46" (116.8cm)
- Window Panel adapter - 1 piece
- Screws - 4 pieces
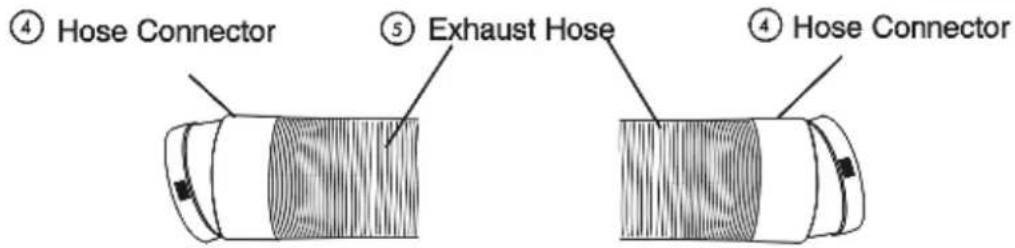
- Heat Exhaust hose connector - 2 pieces
- Heat Exhaust hose - 1 piece
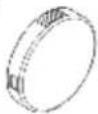
- Cover - 1 pieces

natural_image
Pure electrical circuit lines without any symbols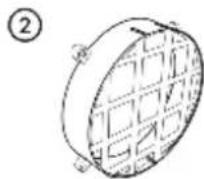

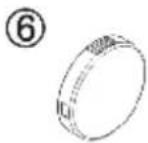
- Push the round Window Panel Adapter through the rear of the Plastic Panel. Line up the holes and tighten the Adapter with 4 screws that are included in the kit. (Tighten screws from the front.)
- Adjust the Plastic Panel to the width or height of your window and tighten the 2 screws that are attached to the panel.
- Install the Window Plastic Panel into the window. If necessary use duct tape to better secure the panel.
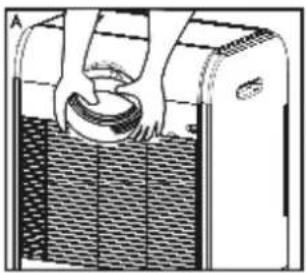
- Connect exhaust hose to the unit by inserting the hose connector that is attached to the hose into the exhaust. (See Illustration A)
- Move the unit to the window, extend the hose and attach the other end of the hose to the window. Align the tabs on the hose and window panel adapters and fasten them together.
- Plug into wall outlet to get ready for operation.
natural_image
Diagram of a mechanical device with a curved component inserted into a liquid container (no text or symbols visible)
natural_image
Technical line drawing of a mechanical component with no visible text or symbols\* NOTE: Use on Single Outlet Circuit Only.

natural_image
Line drawing of a window with a door and a refrigerator, no text or symbols present
natural_image
Line drawing of a hand inserting a device into a window (no text or symbols)Operation
Control Panel

Power Control
The power control turns the unit on and off. When you press power control, the unit begins to operate.
Warning Light
Condensed water may accumulate in the unit. If the internal tank becomes full, the Warning Light will shine and the unit will not operate until the unit has been drained.
Operating mode indicator
Indicator color of operating mode and LED: When cooling mode is selected, the indicator light will be blue.
When dehumidify mode is selected, indicator light will be Orange.
When fan mode is selected, indicator light will be green.
Temp. and Time Setting Indicator
- During operation, the unit displays "present room temperature."
- When setting temperature, the unit will display set temperature.
- When setting the time it displays "set time" and indicator flashes.
- 5 seconds after "set temperature" and "set time", it goes back to "present room temperature".
• Temperature display ranges from 61°F to 89°F. - When environmental temperature is higher than the temperature display range, the display shows "HI".
- When environmental temperature is lower than the temperature display range, the display shows "LO".
- When the unit stops operating, indicator light goes off.
After switching the air conditioner off, you must wait 3 minutes before switching it back on again.
Operation
Remote Control

Power Control
The power control turns the unit on and off.
Mode Control
There are 3 models of Operations: "Cool" (When unit is cooling), "Dehumidify", and "Fan" (only Fan running). A mode Indicator light on the unit control panel shows the following colors: Blue for "Cool" mode; Orange for "Dehumidify", and Green for "Fan".
The unit will start in "Cool" mode with a Blue Indicator light. Once you press the "Mode" button on the remote, it will change to "Dehumidify" mode. Press the "Mode" button again to get "Fan" mode. It goes back to the "Cool" mode once the "Mode" button is pressed again.
Note: When you press "Up" and "Down" buttons and there is no response, please press the "Mode" button until the unit indicator light is Blue ("Cool"), you can then adjust the temperature accordingly.
- Cooling Mode
During the cooling mode the air is cooled and hot air is exhausted to the outside air through the air exhaust hose. Adjust fan speed and temperature to suit your desired comfort level.
Note: The air exchange hoses must vent outside the room when using Cool Mode.
- Dehumidify Mode
Air is dehumidified as it passes through air conditioner, without being in full cooling mode. If room temperature is greater than 77°F, fan speed can be adjusted; otherwise fan speed is fixed to "low."
- Fan Mode
Air is circulating throughout the room with no cooling.
Note: Unit does not need to be vented in Fan Mode.
Fan Speed Control
The Fan Speed Control has 3 settings:
High, Medium and Low.
Temp Set Controls
Press "Up" or "Down" to set temperature. The setting range is from 61°F to 89°F.
Note: When using Dehumidify or Fan Mode, temperature setting button is invalid.
Press the °C / °F switch button, to switch between °F and °C.
Note: Initial setting is °F.
Timer Setting Control
- When you use the timer setting button while the unit is operating, you can preset a time for the unit to turn off.
- When you use the timer setting button while the unit is on standby, you can present a time for the unit to turn on.
- If you press the "ON/OFF" button, the preset timer function will be cancelled.
- Timer setting range is 1\~24 hours.
Timer Cancel Control
- You can cancel the timer setting at any time by pressing the "Cancel" button.
Product Specification
| Voltage and Frequency | 115V / 60Hz |
| Input Power | 800 W |
| Cooling Capacity | 7000 BTU |
| Moisture Removal (pints/day) | 70 |
| Refrigerant | R-22/12.7 Oz. |
| Timer | 24 Hours |
| Operating Temperature Range | 61°F - 100°F |
| Unit Dimensions (WxDxH) | 17-15/16" x 13-1/8" x 24-3/8" |
| Net Weight (approximate) | 55.1 lbs. |
| Exhaust Hose | 5 Feet |
Care and Cleaning Guide
• Always unplug your air conditioner before cleaning.
- Air filter needs to be cleaned at least once a week for your unit to operate at optimum efficiency. Slide out the filter from the back by pulling on the tab. The filter may be washed or vacuumed. Remove the excess water from the filter by gently shaking the filter. This will remove dust and particles trapped in the filter. After cleaning, reinstall the filter. DO NOT use your air conditioner without the air filter in place.
- To clean the cabinet, DO NOT use harsh chemicals, abrasives, ammonia, chlorine, bleach, concentrated detergents, solvents or metal scouring pads. Some of these chemicals may dissolve, damage and/or discolor your air conditioner.
- Always use a soft cloth dampened with water or a mild soap and water solution to wipe the front of the cabinet. Wipe dry with a soft cloth.
Storage
- To store your air conditioner when not in use for a long period of time, drain condensed water using the drain pipe. Remove exhaust hose, clean the filters, cover with plastic bag and store.
Troubleshooting
If air conditioner does not operate:
- Check if unit is plugged in. The plug may have come loose.
- Press "Reset" button on the plug to resume operation.
- Check if the electrical wall receptacle is of proper voltage.
- Check if the circuit breaker needs to be reset or if the fuse needs to be replaced.
- Check if the unit is in "Off" mode.
- If the warning light is on, drain the water drain pipe by removing the plug.
Air conditioner is working but room is not cooling:
• Room may have appliances that produce heat. Use an exhaust fan to remove excess heat.
- Check exhaust hose for proper installation.
- Redirect the airflow. Remove any obstacles.
- All doors and windows need to be closed so that cool air does not escape the room.
• Air filter may be blocked or may need cleaning.
- Unit BTU may be too low for the required cooling area.
- On extremely hot & humid days, air conditioners may take a little longer to cool.
- Drain the water drain pipe by removing the plug.
- Unit may be in fan or dry mode. Put air conditioner in cool mode.
Limited Warranty
This warranty covers all defects in workmanship or materials for:
- The mechanical and electrical parts (including labor costs) contained in this product for a period of 12 months, from the date of purchase (commercial or rental application, the warranty is 90 days).
- The sealed system and compressor contained in this product is for a period of 5 years, from the date of purchase (excluding labor costs after the initial 12 month period). In commercial or rental use, the additional limited compressor warranty is for 1 year and 9 months (excluding labor costs after the initial 90 days period).
You must keep and be able to provide your original sales receipt as proof of the date of purchase.
Who is covered?
The original retail purchaser of this product.
What will be done?
Haier America will repair or replace in your home, any mechanical, electrical part or the compressor, which proves defective in normal household use for a period of 12 months. Haier America will repair or replace (excluding labor costs) the sealed system and compressor (parts only) for an additional 4 year period.
How can you get service?
- Contact your nearest Haier America Authorized Service Depot. For the name of the Service Depot nearest you, contact Haier America at (877) 337-3639.
- All service must be performed by an authorized Haier America Service Depot.
THIS WARRANTY COVERS UNITS WITHIN THE CONTINENTAL UNITED STATES, CANADA AND PUERTO RICO AND DOES NOT COVER:
• Damages from improper installation.
- Damages in shipping.
- Damages from misuse, abuse, accident, alteration, lack of proper care and maintenance.
- Damages from service, by other than an authorized dealer or service center.
• Labor, service, transportation and shipping charges for the removal of defective parts and installation of a replacement part, beyond the initial 12 month period.
THIS LIMITED WARRANTY IS GIVEN IN LIEU OF ALL OTHER WARRANTIES, EXPRESS OR IMPLIED, INCLUDING THE WARRANTIES OF MERCHANTABILITY AND FITNESS FOR A PARTICULAR PURPOSE.
The remedy provided in this warranty is exclusive and is granted in lieu of all other remedies. This warranty does not cover incidental or consequential damages. Some states do not allow the exclusion of incidental or consequential damages, so this limitation may not apply to you. Some states do not allow limitations on how long an implied warranty lasts, so this limitation may not apply to you. This warranty gives you specific legal rights, and you may also have other rights, which vary from state to state.
Un mot de Haier America
Addressed u negotiant:
Numeros de telephone du negociant:
ÉCONOMISER CES INSTRUCTIONS
Table de matieres
PAGE
Un mot de Haier America....1
natural_image
Diagram of a hand pouring liquid into a container with a mesh layer (no text or symbols)B

natural_image
Diagram of a mechanical component with layered structure and circular cutout (no text or symbols)natural_image
Simple line drawing of a cylindrical object with a textured cross-section and two diagonal lines above it (no text or symbols)natural_image
Cross-sectional diagram of a cylindrical object with internal layered structure (no text or symbols)natural_image
Simple line drawing of a door with a handle and adjacent equipment (no text or symbols)
natural_image
Simple line drawing of a printer emitting a fan or lens (no text or symbols)Fonctionnement
Panneau de Commande

natural_image
Pure electrical circuit lines without any symbols②

③

⑥
natural_image
Diagram of a mechanical device with a curved component inserted into a liquid-filled chamber (no text or symbols visible)B

natural_image
Diagram of a mechanical component with a circular feature and textured surface, no visible text or symbolsnatural_image
Simple line drawing of a car with a textured body and two arrows pointing to the side (no text or symbols)⑤ Manguera de salida

natural_image
Cross-sectional diagram of a cylindrical object with internal striations and two protruding lines (no text or symbols)natural_image
Simple line drawing of a window with a door and a printer, no text or symbols present
natural_image
Line drawing of a printer emitting a device from a screen (no text or symbols)Operación
Panel De Control

If you have a problem with this product, please contact the
"Haier America Customer Satisfaction Center" at 1-877-337-3639.
DATED PROOF OF PURCHASE, MODEL # AND SERIAL # REQUIRED FOR WARRANTY SERVICE
IMPORTANT


- A Word From Haier America
- Product Registration
- SAFETY PRECAUTIONS
- WARNING: Following these basic precautions will reduce the risk of fire, electrical shock, injury or death when using your air conditioner.
- SAVE THESE INSTRUCTIONS
- Important Instructions
- Table Of Contents
- PAGE
- Advantages of this Model
- Parts and Features
- Assembly and Installation
- Accessories Include
- \* NOTE: Use on Single Outlet Circuit Only.
- Operation
- Control Panel
- Power Control
- Warning Light
- Operating mode indicator
- Temp. and Time Setting Indicator
- Remote Control
- Mode Control
- - Cooling Mode
- - Dehumidify Mode
- - Fan Mode
- Fan Speed Control
- Temp Set Controls
- Timer Setting Control
- Timer Cancel Control
- Product Specification
- Care and Cleaning Guide
- Storage
- Troubleshooting
- If air conditioner does not operate:
- Air conditioner is working but room is not cooling:
- Limited Warranty
- This warranty covers all defects in workmanship or materials for:
- You must keep and be able to provide your original sales receipt as proof of the date of purchase.
- Who is covered?
- What will be done?
- How can you get service?
- THIS WARRANTY COVERS UNITS WITHIN THE CONTINENTAL UNITED STATES, CANADA AND PUERTO RICO AND DOES NOT COVER:
- Un mot de Haier America
- ÉCONOMISER CES INSTRUCTIONS
- Table de matieres
- Fonctionnement
- Panneau de Commande
- Operación
- Panel De Control
- IMPORTANT
Brand : Commercial Cool
Model : CPRB07XC7-B
Category : Air conditioner