Rocketboost RF-RBWHP01 - Headphones Rocketfish - Free user manual and instructions
Find the device manual for free Rocketboost RF-RBWHP01 Rocketfish in PDF.


| Product Type | Wireless Stereo Headphones |
| Brand | Rocketfish |
| Model | Rocketboost RF-RBWHP01 |
| Dimensions | 9.7 x 8.3 x 4.5 inches (245 x 210 x 114 mm) |
| Weight | 1.3 lbs (0.6 kg) |
| Frequency Response | 20 Hz - 20 kHz |
| Signal-to-Noise Ratio | 86 dB |
| Total Harmonic Distortion | 0.2% @ 1 mW |
| Impedance | 32 ohms |
| Speaker Input Power | 20 mW nominal / 30 mW maximum |
| Wireless Type | 2.4 GHz band |
| Wireless Range | Up to 115 feet (35 m) line-of-sight |
| Battery Type | 2 x AA rechargeable (included) |
| Battery Life | Up to 10 hours continuous use |
| Charging Time | Approximately 8-9 hours |
| Power Supply | AC adapter (included), 5V DC |
| Audio Input | RCA (L/R) via AUX INPUT; also 3.5 mm adapter cable included |
| Audio Output | AUX OUTPUT (RCA) for passthrough to amplifier |
| Hub Capability | Yes, can act as hub in Rocketboost network |
| Compatibility | All Rocketboost products |
| Headband | Self-adjusting |
| Earcup Adjustment | Swiveling hinges for angle adjustment |
| Controls | Power ON/OFF, SOURCE selection, Volume +/-, CONNECT button |
| Indicators | Power (blue/red), STANDBY (red), CHARGING (red/green), TX (blue) |
| Maintenance | Clean with soft cloth dampened with mild detergent; dry immediately |
| Safety Warnings | Do not expose to rain/moisture; avoid high volume for prolonged periods |
| Warranty | One-year limited warranty |
Frequently Asked Questions - Rocketboost RF-RBWHP01 Rocketfish
User questions about Rocketboost RF-RBWHP01 Rocketfish
0 question about this device. Answer the ones you know or ask your own.
Ask a new question about this device
Download the instructions for your Headphones in PDF format for free! Find your manual Rocketboost RF-RBWHP01 - Rocketfish and take your electronic device back in hand. On this page are published all the documents necessary for the use of your device. Rocketboost RF-RBWHP01 by Rocketfish.
USER MANUAL Rocketboost RF-RBWHP01 Rocketfish
Rocketboost™ Wireless Stereo Headphones
Rocketfish RF-RBWHP01 Rocketboost™ Wireless Stereo Headphones
Contents
Introduction .... 3
Safety information 4
Features 7
What is Rocketboost™?......5
How does Rocketboost™ work? 6
Setting up your system ....13
Using your system....17
Maintaining your system....23
Troubleshooting 23
Specifications....25
Legal notices ....25
One-year limited warranty....29
Introduction
Congratulations on your purchase of high-quality Rocketfish Rocketboost™ Wireless Stereo Headphones. This system represents the state of the art in 2.4 GHz wireless headphone design, and gives you complete freedom while enjoying your music or movie without the limitations of cables.
The system has a maximum transmission range of up to 115 feet (35 m), as well as a strong immunity to external interference and static. You can use the docking station to recharge the headphones when they are not in use.
The system can be used with your television or other audio components, like your CD/DVD player, home theater system, or even audio output from a computer or mp3 player. By using other Rocketboost™ wireless audio products, you can also configure multiple audio streams and listen in multiple rooms.
This User Guide explains how to correctly install, operate, and get the best performance from your Rocketboost Wireless Stereo Headphones. Read this guide carefully before installing your system, and then keep it handy for quick reference.
Safety information

The lightning flash with arrowhead symbol, within an equilateral triangle is intended to alert the user to the presence of uninsulated dangerous voltage within the product's enclosure that may be of sufficient magnitude to constitute a risk of electric shock.

The exclamation point within an equilateral triangle is intended to alert the user to the presence of important operating and maintenance (servicing) instructions in the literature accompanying the appliance.
Warning: To reduce the risk of fire or electric shock, do not expose this apparatus to rain or moisture.
Caution: To reduce the risk of electric shock, do not remove screws, covers, or the cabinet. There are no user-serviceable parts inside. Refer servicing to qualified service personnel.
- Read these instructions.
- Keep these instructions.
- He e e d a l l w a r n i n g s.
- Follow all instructions.
- Do not use this apparatus near water.
- Clean only with a dry cloth.
- Do not install near any heat sources such as radiators, heat registers, stoves, or other apparatus (including amplifiers) that produce heat.
- Do not defeat the safety purpose of the polarized or grounding-type plug. A polarized plug has two blades with one wider than the other. A grounding type plug has two blades and a third grounding prong. The wide blade or the third is provided for your safety. If the provided plug does not fit into your outlet, consult an electrician for replacement of the obsolete outlet.
- Protect the power cord from being walked on or pinched particularly at plugs, convenience receptacles, and the point where they exit from the apparatus.
- Only use attachments or accessories specified by the manufacturer.
- Unplug this apparatus during lightning storms or when unused for long periods of time.
- Refer all servicing to qualified service personnel. Servicing is required when the apparatus has been damaged in any way, such as power-supply cord or plug is damaged, liquid has been spilled or objects have fallen into the apparatus, the apparatus has been exposed to rain or moisture, does not operate normally, or has been dropped.
- To reduce the risk of fire or electric shock, do not expose this apparatus to rain or moisture.
- The shock hazard marking and associated graphical symbol are provided on the supplied AC adapter.
- The apparatus shall not be exposed to dripping or splashing and objects filled with liquids should not be placed on the apparatus.
- The AC plug or an appliance coupler is used as the disconnect device. The disconnect device shall remain readily operable.
- Excessive sound pressure from headphones can cause hearing loss.
- Batteries (battery pack and batteries installed) should not be exposed to excessive heat such as sunshine or fire.
- Do not place any conductive material in the cradle to avoid short circuits involving the charging pins.
What is Rocketboost™?
Rocketboost™ is expandable wireless digital audio.
- Products with Rocketboost™ technology let you easily expand your listening experience throughout your home.
- Rocketboost™ does not interfere with other wireless products in your home.
- Rocketboost™ is uncompressed digital audio compatible with all audio formats such as Dolby TrueHD, and DTS-HD Master Audio used with Blu-ray.
When you see the Rocketboost™ logo on any product, it has been designed to work with other Rocketboost™ products, no matter who manufactures them.
How does Rocketboost™ work?
Rocketboost technology can connect all audio devices throughout your home to form a home audio network.
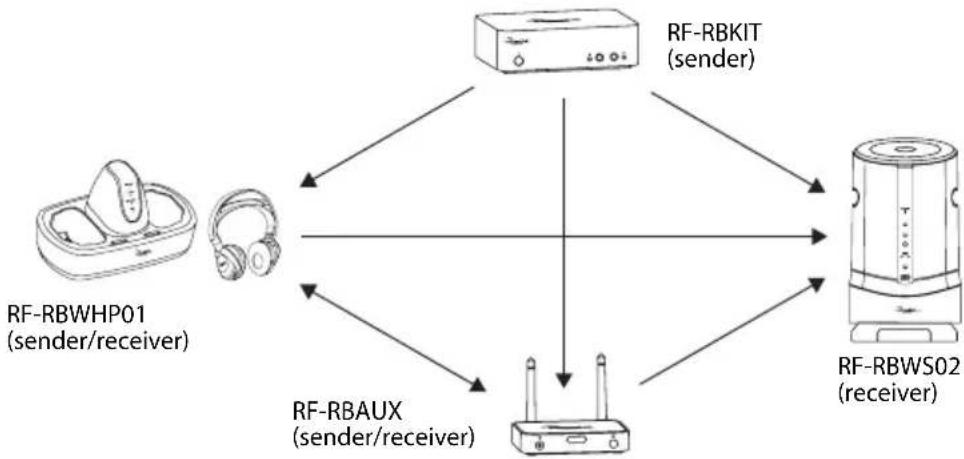
Rocketboost products include "Senders," which send or transmit audio streams, and "Receivers," which receive the audio. This lets you listen to music from your Sender in other rooms using your Receiver.
For this product, the Sender is built into the Docking station, and the Receiver is the Headphone.
Rocketboost is expandable. Each Rocketboost Receiver can select the audio from any Sender in your Rocketboost audio network. The following shows an example Rocketboost network. You can set up your network to meet your specific needs.
flowchart
graph TD
    A["RF-RBWP01 (sender/receiver)"] --> B["RF-RBKIT (sender)"]
    A --> C["RF-RBWAUX (sender/receiver)"]
    B --> D["RF-RBWS02 (receiver)"]
    C --> D
We hope you enjoy your new Rocketboost system. Remember that it's designed to grow with your home entertainment needs, and that it's easy to add a new device to the network as you expand your system.
Features
• High-Performance Audio - Uncompressed digital CD-quality sound, adjustable volume control
- Strong Wireless Signal - 115 ft. wireless range (maximum, line of sight), great sound, no static, won't interfere with your other wireless products, compatible with all Rocketboost products
- Easy to Use - Easy setup, rechargeable batteries with convenient base docking station
Package contents
Examine the contents of the box for your digital wireless stereo headphones. The box should contain:

natural_image
Line drawing of a pair of Gaia headphones (no text or symbols)Headphones
natural_image
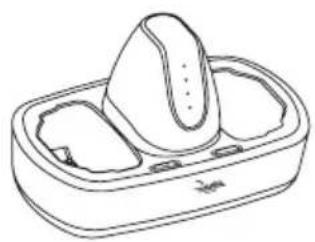
Line drawing of a rectangular electronic device with three ports and a central handle (no text or symbols)Docking station

AC Adapter
Rechargeable batteries (2)

RCA audio cable (1)

3.5 mm-to-RCA adapter cable

User Guide

Quick Start Guide
Headphones back

Item Description
1 Self-adjustable headband
2 Swiveling hinge for angle adjustment (on the left and right ear pieces)
3 Power ON/OFF switch (on left earpiece)
4 Source indicator (on the SOURCE button). Flashes several times when a different audio stream is selected on your Rocketboost network.
5 SOURCE button (on the right earpiece). Press to select different audio streams on your Rocketboost network. Each press moves to the next source.
Headphones front and side

Left earpiece

Right earpiece
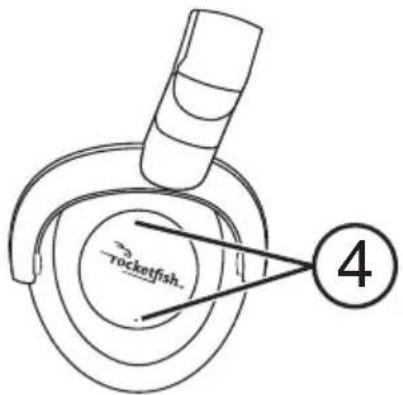
Item Description
1 Manual CONNECT button (on the left earpiece)
2 Charging contacts (on the left earpiece)
3 Power indicator (on the left earpiece). It lights blue steadily when successfully paired to a Rocketboost network.
It blinks rapidly in pairing mode and slowly when the device is not connected to a network.
This indicator will also light red when the headphone batteries are low.
4 Volume +/- button (the cover on the right earpiece)
Docking station front

Item Description
1 STANDBY indicator. When the unit is turned off this LED lights steady red when the docking station is plugged in and hub status is set to Disable. Blinks red when the docking station is plugged in and the hub status is set to Enable.
2 POWER indicator. Lights green when the hub switch on the docking station is set to enable and lights blue when the hub switch on the docking station is set to disable. It lights steadily when successfully paired to a Rocketboost network. It blinks rapidly in pairing mode and slowly when the device is not connected to a network.
3 CHARGING indicator. Lights red when headphone batteries are charging and lights green when headphone batteries are fully charged.
4 TX (sending) indicator. Lights blue when the docking station is powered on.
Docking station back
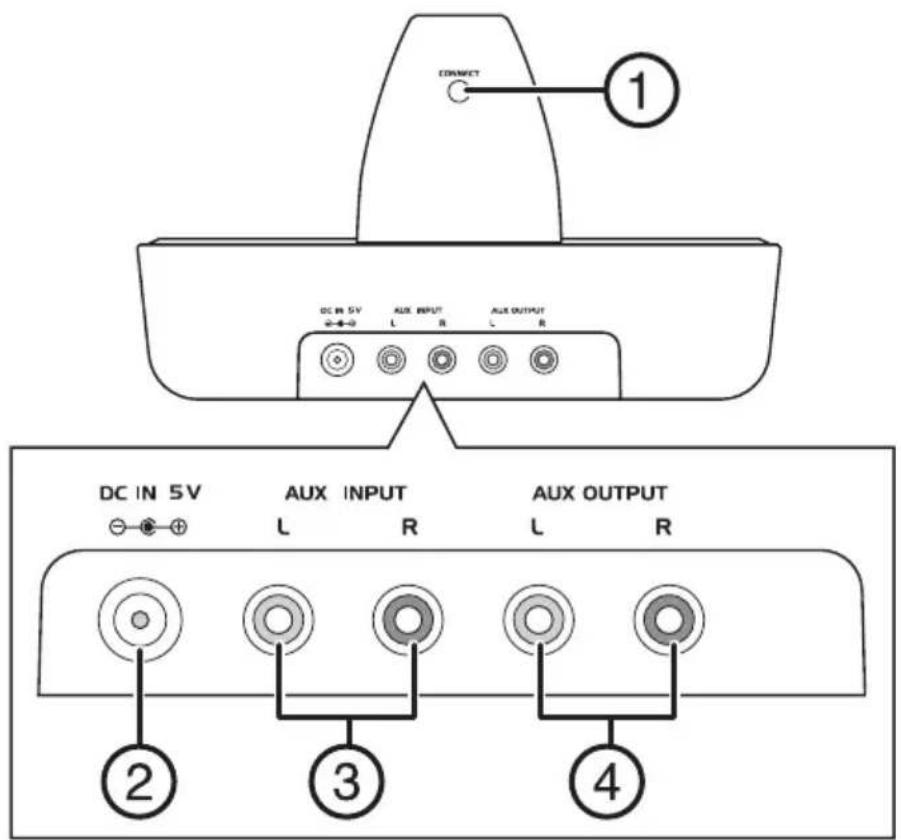
Item Description
1 Manual CONNECT button
2 DC IN jack
3 A U X I N P U T j a c k :
4 AUX OUTPUT jacks
Docking station top

Item Description
1 Charging pins
2 Headphone cradles
3 Hub Enable/Disable switch
4 Power on/standby switch
Setting up your system
Installing or replacing headphone batteries
The headphones are powered by two AA rechargeable batteries. One battery is housed in the left earpiece and one battery is housed in the right earpiece.
Notes:
- Do not install non-rechargeable batteries.
- Make sure that all batteries are installed correctly.
To install batteries in the headphones:
1 With the earpiece cushion facing you, unlock and remove the cushions from the left earpiece by slightly rotating it clockwise, and from the right earpiece by rotating it counterclockwise, then pulling them away from the headphones.

2 Insert one AA rechargeable battery into each battery compartment. Make sure to align the + and - symbols on the batteries with the symbols in the battery compartments.

natural_image
Technical line drawing of a mechanical device with a central shaft and housing (no text or symbols)3 Put the left and right cushions back into place.
Caution: To prevent damage to your system, make sure all components are turned off before making the connections.
Connecting the system to an audio source
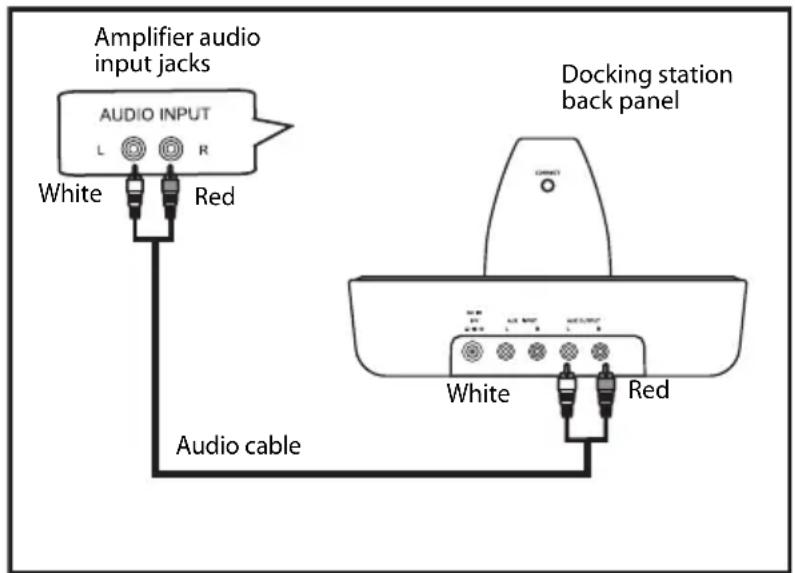
The following diagram shows a typical user installation. In this case the docking station is connected to the audio output of a TV. Other devices with audio outputs could be used as well.

To connect the docking station to your audio source:
- Using the supplied RCA audio cable, connect the audio output jacks of your audio source to the AUX INPUT jacks of the docking station. Make sure that you connect the same color jacks together (the white to the white and the red to the red).

Note: If your audio source has only a 3.5 mm "phones" or "line out" jack, use the supplied 3.5 mm-to-RCA adapter cable.
To connect the docking station to your amplifier (optional):
- The audio input signal from the AUX INPUT jacks is connected to the AUX OUTPUT jacks. This is helpful if your audio source component only has one audio output and you want to connect it to both the docking station and another component, like an audio amplifier. To do this, follow the steps above in “To connect the docking station to your audio source;,” then connect a second RCA audio cable (not supplied) from the aux output jacks of the docking station to the audio input jacks of your audio amplifier or other audio component. Make sure that you connect the same color jacks together (the white to the white and the red to the red).
Connecting the AC adapter to the docking station
Caution: To avoid risk of fire and to prevent damage, only use the AC adapter supplied with your wireless headphones. Make sure that the power supply outlet matches the AC adapter's 120V before making the connection.
To connect the AC adapter to your docking station:
1 Connect the AC adapter connector to the docking station's DC IN jack.
2 Connect the AC adapter plug to an AC power outlet. The STANDBY indicator lights red steadily when the docking station is plugged in and the unit is in the Off state.
Caution: Plug the AC adapter into the power outlet only after all other connections are completed.
Expanding the headphones with other Rocketboost devices
Your headphones can receive audio from other Rocketboost sender devices. Additionally your other Rocketboost receivers can receive audio connected to your docking station.
To expand your listening area throughout your house, install additional receivers and senders where ever you want sound. Learn more at Rocketboost.com.
Using your system
Charging the headphones
Important: Before using the wireless headphones for the first time, make sure the batteries are fully charged for at least 16 hours. This will provide a longer operating lifetime for the batteries.
To charge the headphones:
- Place the headphones onto the docking station. Make sure that the headphone charging contacts and the docking station charging pins make contact.

- The docking station charging indicator turns red to indicate the headphones are charging.
- When the headphones are fully charged (which takes about eight to nine hours), the docking station charging indicator turns green.
Note: It can take about eight to nine hours to charge the batteries. The batteries will last up to ten hours with continuous use (depending on the headphone volume level and distance from the docking station or other Rocketboost sender).
Note: The headphones can be charged even if the docking station or headphones are turned off.
Establishing communication
Rocketboost products form an audio network and each Rocketboost receiver can select the audio from any Rocketboost sender in the network.
Every Rocketboost network must contain one hub device, which helps devices join the network. The network can have only one hub, which you can enable using the hub switch on the back of all Rocketboost senders and sender/receivers. If this is your first Rocketboost product, you should make the docking station sender device the hub, if you already have Rocketboost products, you should disable hub mode on this device.
Important: Hub devices must always have power for your network to operate. The hub device can be in standby (power saving) mode, but must stay plugged in.
Turning on the system
To turn on the system:
Note: The headphones and docking station were previously paired at the factory. When an active link is established between them, the power indicators on the headphones and docking station all light steadily.
1 Set the POWER switch on the left earpiece of headphones to ON. The power indicator:
- Lights steadily Blue if the headphones and docking station are paired.
- Blinks slowly if the headphones and docking station are not paired.
2 Press the POWER button on the docking station. The Standby indicator turns off and the power indicator turns:
- Green when the HUB switch on the docking station is set to ENABLE.
- Blue when the HUB switch on the docking station is set to DISABLE.

Notes:
If the headphone's charge is low, the indicator turns red. When this happens, you should charge the headphones. For instructions, see "Charging the headphones" on page 17.
Tip: If the power indicators on the headphones and docking station continue to blink after 30 seconds, they are no longer paired to each other. Follow the instructions in the next section to pair the docking station to the headphones.
Pairing the headphones to the docking station
The headphones and docking station must be "paired" or wirelessly connected to each other, so that audio can be sent from the docking station to the headphones.
Note: If this is your first Rocketboost enabled product, you can skip this section because your docking station and headphone were previously paired or connected at the factory. To learn how to use your headphones go to Listening to the digital wireless stereo headphones on page 22.
Use this procedure only if you need to re-pair the docking station and headphones.
To pair the headphones to the docking station:

flowchart
graph TD
    A["Headphones"] --> B["Docking station (HUB: ENABLE)"]
    C["Rocketfish sender/receiver RF-RBUSB (HUB: DISABLE)"] --> B
    B --> D["+ other Rocketfish devices."]
1 Set the HUB switch on the docking station to ENABLE if this is your first Rocketboost™ product set.
2 Press and hold the CONNECT button on the docking station for more than three seconds to put it into pairing mode. The power indicator starts blinking rapidly and the unit will stay in pairing mode for 30 seconds.
3 Press and hold the CONNECT button on the headphone for more than three seconds so the docking station and headphone enter pairing mode.
• The power indicators light steadily if the pairing was successful.
• The power indicators blink slowly if the pairing was not successful.
Pairing the headphones and docking station to an existing Rocketboost network
Use this procedure only if you are adding this product to an existing Rocketboost network.
You need to pair both the docking station and the headphone to your existing hub device, using the following steps.
To pair an existing Rocketboost network:

flowchart
graph TD
    A["Rocketfish sender/receiver RF-RBAUX or other Rocketboost device. (HUB: ENABLE)"] --> B["Docking station (HUB: DISABLE)"]
    A --> C["Headphones"]
    A --> D["RF-RBUSB (HUB: DISABLE)"]
    B --> E["..."]
    C --> F["..."]
    D --> G["..."]
    E <--> F
    G <--> D
1 Set the HUB switch on the docking station to DISABLE.
2 Press and hold the POWER button on the your Rocketboost Hub device for more than three seconds to put it into pairing mode. The power indicator starts blinking rapidly and the unit will stay in pairing mode for 30 seconds.
3 Press and hold the CONNECT button on the docking station for more than three seconds so the Hub device and docking station enter pairing mode.
- The power indicators light steadily if the pairing was successful.
• The power indicators blink slowly if the pairing was not successful.
4 Press and hold the POWER button on the your Rocketboost Hub device for more than three seconds to put it into pairing mode. The power indicator starts blinking rapidly and the unit will stay in pairing mode for 30 seconds.
5 Press and hold the CONNECT button on the headphone for more than three seconds so the Hub device and headphone enter pairing mode.
- The power indicators light steadily if the pairing was successful.
- The power indicators blink slowly if the pairing was not successful.
Listening to the digital wireless stereo headphones
To listen through the headphones:
1 Set the headphone volume level to the minimum.
2 Turn on the headphones and docking station. Make sure that your docking station and headphones are wirelessly "paired."
The power indicators light steadily if the docking station and headphones are paired and blink slowly if they are not. If they are not paired, see “Establishing communication” on page 18.
3 Put your headphones on your head. Adjust the angles of the left and right ear pieces until you feel comfortable.
4 Turn on your audio source and begin playback.
If there are multiple sources in the Rocketboost network, press the SOURCE button on the headphones to find the source you want to listen to. The TX indicator on the docking station (if it is a hub) blinks several times, indicating that the current audio source is changing.
5 Adjust the headphone volume to your normal listening level.
Caution: Continuous use at high volume may permanently damage your hearing.
Notes:
- If the system is connected to an A/V receiver with an external amplifier, turn off the amplifier to prevent hearing sound from the amplifier speakers.
- If the system is connected to a TV, turn off the TV sound to prevent hearing sound from the TV speakers.
Turning off the system
To turn off the system:
1 Set the POWER ON/OFF switch located on the headphones' left earpiece to OFF.
2 Press the POWER button on the docking station. The power indicator on the docking station goes off.
Maintaining your system
Use a soft cloth dampened with a weak solution of mild detergent and water. Dry the device immediately afterwards with a clean cloth. Do not use abrasive cloth, thinners, alcohol, or other chemical solvents, because they may damage the finish or remove the panel lettering.
Cautions:
- Do not block the ventilation openings.
- If the power cord is damaged, it must be repaired by a qualified technician.
Troubleshooting
Check this list for a possible solution before calling for service.
| Problem Solution | |
| My Rocketboost devices will not pair or join. | Make sure there is only one hub device in the Rocketboost network. The existing hub device is the one with the green power indicator. Make sure all other sender and sender/receiver devices are set to DISABLE HUB or DISABLE STATUS if necessary.Make sure the devices are in range of the hub. The unobstructed operating range of most Rocketboost networks is 150 feet (45 meters). The unobstructed operating range for the Rocketboost Wireless Headphones is 115 feet (35 meters).Make sure that the AC adapter is connected to the docking station.Make sure that the headphone batteries are installed correctly.Make sure the headphone batteries are charged. |
| My Rocketboost Wireless Headphones are not working at all (i.e., will not turn on using power button, no indicator lights lighting). | Make sure that the headphone charging contacts and the docking station charging pins make contact. You might have to rock them back and forth to make a good connection. The docking station charging indicator turns red to indicate the headphones are charging.Try power cycling the device by unplugging it and plugging it back in.Try plugging the device into a different outlet. |
Problem Solution
No sound • Check the volume level of the headphones or audio sources connected to the docking station.
- Make sure that all of the cables are connected correctly. Make sure that the power indicators of the headphones and docking station are lit solidly. If the indicators are blinking green, see "Establishing communication" on page 18.
- Make sure the sender or receiver devices are not set to Mute.
- Check if the audio source has internal/external speaker settings that allow the internal speakers to be turned off and for the sound to be heard from the external source (your headphones). If this is the case be sure your audio source is not set to Mute.
- To maximize your volume level through the system, make sure your audio source (for example, an A/V receiver, MP3 player, etc.) has its volume turned up to at least 50% of their volume level.
| Sound interference | ·Move the docking station slowly to find the best reception position for your headphones.·Shorten the distance between your headphones and the docking station. The maximum distance is 115 feet (35 m).·Make sure all of the cables are connected correctly to the Rocketboost devices.·It is possible other devices like cordless phones, microwaves, wireless routers, etc. may be causing interference. Try turning one device off at a time to determine which device is causing interference.·If your cordless phone or wireless router is causing interference try changing the channel it is using. Please refer to your device's owner manual. |
| No communication between the headphones and docking station | ·Make sure that the AC adapter is connected to the docking station.·Make sure that the headphone batteries are installed correctly.·Make sure the headphone batteries are charged.The headphones and docking station power indicators turn on after the headphone switch is set to ON and the POWER button on the docking station is pressed.·If they are lit solidly, a communication link has been successfully established between the system.·If they are blinking on one or both devices, see “Establishing communication” on page 18. |
| There is sound coming from the audio source | ·Turn off the internal speakers of your audio sound source. Contact the manufacturer of the audio sound source, such as your TV, for support. |
Specifications
Dimensions 9.7 x 8.3 x 4.5 inches (245 x 210 x 114 mm)
Weight 1.3 lbs (0.6 kg)
Frequency response 20 Hz - 20 kHz
THD@1mW 0.2%
Signal to noise ratio 86 dB
Battery life 10 hours
Impedance 32 ohm
Headband Auto-adjusting
Wireless type 2.4 GHz band
Distance 115 feet (35 m) line-of-sight
Speaker input power 20 mW nominal/ 30 mW maximum
Legal notices
FCC and IC Information:
This device complies with Part 15 of the FCC Rules and RSS-210 of the IC Rules. Operation is subject to the following two conditions: (1) This device may not cause harmful interference, and (2) this device must accept any interference received, including interference that may cause undesired operation.
Warning: Changes or modifications to this unit not expressly approved by the party responsible for compliance could void the user's authority to operate the equipment.
Note: This equipment has been tested and found to comply with the limits for a Class B digital device, pursuant to Part 15 of the FCC Rules. These limits are designed to provide reasonable protection against harmful interference in a residential installation. This equipment generates, uses and can radiate radio frequency energy and , if not installed and used in accordance with the instructions, may cause harmful interference to radio communications. However, there is no guarantee that interference will not occur in a particular installation. If this equipment does cause harmful interference to radio or
television reception, which can be determined by turning the equipment off and on, the user is encouraged to try to correct the interference by one or more of the following measures:
- Reorient or relocate the receiving antenna.
- Increase the separation between the equipment and receiver.
- Connect the equipment into an outlet on a circuit different from that to which the receiver is connected.
- Consult the dealer or an experienced radio/TV technician for help.
FCC & IC Radiation Exposure Statement
This equipment complies with FCC radiation exposure limits set forth for an uncontrolled environment and meets the exemption from the routine evaluation limits in section 2.5 of RSS 102.
- This Transmitter must not be co-located or operating in conjunction with any other antenna or transmitter.
- This equipment complies with FCC RF radiation exposure limits set forth for an uncontrolled environment. This equipment should be installed and operated with a minimum distance of 20 centimeters from user and bystanders.
The device meets the exemption from the routine evaluation limits in section 2.5 of RSS 102 and users can obtain Canadian information on RF exposure and compliance from the Canadian Representative Richardson Technical Services Inc., Suite 304, 131 Wurtemburg St., Ottawa, Ontario, Canada. Tel: 613 562 3827
Rocketboost is a trademark of BBY Solutions, Inc.
Information for Users on Disposal of Old Equipment
European Union
Note: This symbol is only valid in the European Union.
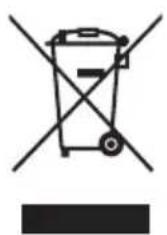
This symbol indicates that the electrical and electronic equipment should not be disposed as general household waste at its end-of-life. Instead, the product should be handed over to the applicable collection point for the recycling in accordance with your national legislation.
By disposing of this product correctly, you will help to conserve natural resources and will help prevent potential negative effects on the environment and human health that could otherwise be caused by inappropriate waste handling of this product. For more information about collection point and recycling of this product, please contact your local municipal office, your household waste disposal service or the shop where you purchased the product.
Penalties may be applicable for incorrect disposal of this waste, in accordance with national legislation.
Other Countries Outside the European Union
If you wish to dispose of this product, please do so in accordance with applicable national legislation or other rules in your country for the treatment of old electrical and electronic equipment.
One-year limited warranty
Rocketfish Products ("Rocketfish") warrants to you, the original purchaser of this new RF-RBWHP01 ("Product"), that the Product shall be free of defects in the original manufacture of the material or workmanship for one (1) year from the purchase of the Product ("Warranty Period"). This Product must be purchased from an authorized dealer of Rocketfish brand products and packaged with this warranty statement. This warranty does not cover refurbished Product. If you notify Rocketfish during the Warranty Period of a defect covered by this warranty that requires service, terms of this warranty apply.
How long does the coverage last?
The Warranty Period lasts for one year (365 days), beginning on the date you purchased the Product. The purchase date is printed on the receipt you received with the product.
What does this warranty cover?
During the Warranty Period, if the original manufacture of the material or workmanship of the Product is determined to be defective by an authorized Rocketfish repair center or store personnel, Rocketfish will (at its sole option): (1) repair the Product with new or rebuilt parts; or (2) replace the Product at no charge with new or rebuilt comparable products or parts. Products and parts replaced under this warranty become the property of Rocketfish and are not returned to you. If service of Products and parts are required after the Warranty Period expires, you must pay all labor and parts charges. This warranty lasts as long as you own your Rocketfish Product during the Warranty Period. Warranty coverage terminates if you sell or otherwise transfer the Product.
How to obtain warranty service?
If you purchased the Product at a retail store location, take your original receipt and the Product to the store you purchased it from. Make sure that you place the Product in its original packaging or packaging that provides the same amount of protection as the original packaging. If you purchased the Product from an online web site, mail your original receipt and the Product to the address listed on the web site. Make sure that you put the Product in its original packaging or packaging that provides the same amount of protection as the original packaging.
Where is the warranty valid?
This warranty is valid only to the original purchaser of the Product in the United States, Canada, and Mexico.
What does the warranty not cover?
This warranty does not cover:
- Customer instruction
- Installation
-
Setup adjustments
• Cosmetic damage -
Damage due to acts of God, such as lightning strikes
- Accident
- Misuse
- A b u s e
- Negligence
- Commercial use
- Modification of any part of the Product, including the antenna
This warranty also does not cover:
- Damage due to incorrect operation or maintenance
- Connection to an incorrect voltage supply
- Attempted repair by anyone other than a facility authorized by Rocketfish to service the Product
- Products sold as is or with all faults
- Consumables, such as fuses or batteries
- Products where the factory applied serial number has been altered or removed
REPAIR REPLACEMENT AS PROVIDED UNDER THIS WARRANTY IS YOUR EXCLUSIVE REMEDY. ROCKETFISH SHALL NOT BE LIABLE FOR ANY INCIDENTAL OR CONSEQUENTIAL DAMAGES FOR THE BREACH OF ANY EXPRESS OR IMPLIED WARRANTY ON THIS PRODUCT, INCLUDING, BUT NOT LIMITED TO, LOST DATA, LOSS OF USE OF YOUR PRODUCT, LOST BUSINESS OR LOST PROFITS. ROCKETFISH PRODUCTS MAKES NO OTHER EXPRESS WARRANTIES WITH RESPECT TO THE PRODUCT, ALL EXPRESS AND IMPLIED WARRANTIES FOR THE PRODUCT, INCLUDING, BUT NOT LIMITED TO, ANY IMPLIED WARRANTIES OF AND CONDITIONS OF MERCHANTABILITY AND FITNESS FOR A PARTICULAR PURPOSE, ARE LIMITED IN DURATION TO THE WARRANTY PERIOD SET FORTH ABOVE AND NO WARRANTIES, WHETHER EXPRESS OR IMPLIED, WILL APPLY AFTER THE WARRANTY PERIOD. SOME STATES, PROVINCES AND JURISDICTIONS DO NOT ALLOW LIMITATIONS ON HOW LONG AN IMPLIED WARRANTY LASTS, SO THE ABOVE LIMITATION MAY NOT APPLY TO YOU. THIS WARRANTY GIVES YOU SPECIFIC LEGAL RIGHTS, AND YOU MAY ALSO HAVE OTHER RIGHTS, WHICH VARY FROM STATE TO STATE OR PROVINCE TO PROVINCE.
Contact Rocketfish:
For customer service please call 1-800-620-2790
www.rocketfishproducts.com
Distributed by Best Buy Purchasing, LLC
7601 Penn Avenue South, Richfield, Minnesota, U.S.A. 55423-3645
© 2011 BBY Solutions, Inc.
All rights reserved. ROCKETFISH is a trademark of BBY Solutions, Inc. Registered in some countries. All other products and brand names are trademarks of their respective owners.
www.rocketfishproducts.com (800) 620-2790
Distributed by Best Buy Purchasing, LLC
7601 Penn Avenue South, Richfield, MN 55423-3645 USA
© 2011 BBY Solutions, Inc.
All rights reserved. ROCKETFISH is a trademark of BBY Solutions, Inc.
All other products and brand names are trademarks of their respective owners.

11-0883
ENGLISH


- Rocketboost™ Wireless Stereo Headphones
- Rocketfish RF-RBWHP01 Rocketboost™ Wireless Stereo Headphones
- Contents
- Introduction
- Safety information
- What is Rocketboost™?
- How does Rocketboost™ work?
- Features
- Package contents
- Headphones back
- Item Description
- Headphones front and side
- Docking station front
- Setting up your system
- Installing or replacing headphone batteries
- Notes:
- To install batteries in the headphones:
- Connecting the system to an audio source
- To connect the docking station to your audio source:
- To connect the docking station to your amplifier (optional):
- Connecting the AC adapter to the docking station
- To connect the AC adapter to your docking station:
- Expanding the headphones with other Rocketboost devices
- Using your system
- Charging the headphones
- To charge the headphones:
- Establishing communication
- Turning on the system
- To turn on the system:
- Pairing the headphones to the docking station
- To pair the headphones to the docking station:
- Pairing the headphones and docking station to an existing Rocketboost network
- To pair an existing Rocketboost network:
- Listening to the digital wireless stereo headphones
- To listen through the headphones:
- Turning off the system
- To turn off the system:
- Maintaining your system
- Cautions:
- Troubleshooting
- Problem Solution
- Specifications
- Legal notices
- FCC and IC Information:
- FCC & IC Radiation Exposure Statement
- Information for Users on Disposal of Old Equipment
- European Union
- Other Countries Outside the European Union
- One-year limited warranty
- How long does the coverage last?
- What does this warranty cover?
- How to obtain warranty service?
- Where is the warranty valid?
- What does the warranty not cover?
Brand : Rocketfish
Model : Rocketboost RF-RBWHP01
Category : Headphones