RF-GUV1201 - Headphones Rocketfish - Free user manual and instructions
Find the device manual for free RF-GUV1201 Rocketfish in PDF.


| Product Type | Wireless Bluetooth Headphones |
| Model | RF-GUV1201 |
| Brand | Rocketfish |
| Driver Size | 40 mm |
| Frequency Response | 20 Hz - 20 kHz |
| Impedance | 32 Ω |
| Sensitivity | 105 dB |
| Bluetooth Version | 5.0 |
| Wireless Range | 10 m (33 ft) |
| Battery Type | Lithium-ion, 300 mAh |
| Battery Life | Up to 20 hours |
| Charging Time | 2 hours |
| Charging Port | USB-C |
| Microphone | Built-in, with noise reduction |
| Controls | On-ear buttons for volume, playback, calls |
| Noise Cancellation | Passive noise isolation (closed-back) |
| Foldable | Yes |
| Weight | 200 g |
| Cable Length (when wired) | 1.2 m (with 3.5 mm audio cable) |
| Compatibility | Bluetooth-enabled devices, also wired |
| Color Options | Black |
| Warranty | 1 year limited |
Frequently Asked Questions - RF-GUV1201 Rocketfish
User questions about RF-GUV1201 Rocketfish
0 question about this device. Answer the ones you know or ask your own.
Ask a new question about this device
Download the instructions for your Headphones in PDF format for free! Find your manual RF-GUV1201 - Rocketfish and take your electronic device back in hand. On this page are published all the documents necessary for the use of your device. RF-GUV1201 by Rocketfish.
USER MANUAL RF-GUV1201 Rocketfish
Gaming Headset with 3D Sound
RF-GUV1201
rocketfish™
Gaming Headset with 3D Sound
Contents
Important safety instructions .... 3
Features......4
Package contents.... 5
Headset jacks and controls.... 6
In-line control unit 7
Connecting to a PlayStation 3 (PS3)....8
Using a headphone jack or AV cable....8
Using an HDMI connection ....12
Connecting to an Xbox 360 ....16
Using a headphone jack or AV cable....16
Using an HDMI connection with a headphone jack or audio adapter19
Connecting to a computer....22
Windows 7, Windows Vista, or Windows XP....22
Mac OS X v10.2.8 and above....25
Connecting to a portable audio device 27
Troubleshooting 28
Specifications....29
Legal notices....29
One-year limited warranty....30
Important safety instructions
1 Read these instructions.
2 Keep these instructions.
3 Heed all warnings.
4 Follow all instructions.
5 Do not use this apparatus near water.
6 Clean only with dry cloth.
7 Do not store near any heat sources such as radiators, heat registers, stoves, or other apparatus (including amplifiers) that produce heat.
8 Unplug this apparatus during lightning storms or when unused for long periods of time.
9 To reduce the risk of fire or electric shock, do not expose this device to rain, moisture, dripping, or splashing.
Features
- Compatible with:
- PlayStation®3 (PS3™)
- Xbox 360® and Xbox LIVE®
- PC running Windows® 7, Windows Vista®, or Windows® XP
- Mac® computer running OS X v10.2.8 and above
-
Stereo audio devices
-
Incorporates SRS WOW® with SRS® TruBass®, and FOCUS® technologies to create 3D sound for the exciting, lifelike sound that gamers crave
• Light-weight and comfortable - Unique rotating earcups provide a comfortable fit and flip up inside the headband for compact storage
- Versatile, noise-canceling, boom microphone that is flexible, and removable and fits in either earcup
- Thick, soft, breathable padding for hours of comfort
- Convenient in-line controls
- Separate volume controls for game and chat
- "All-mute" button on the headset instantly mutes all audio and chat
Package contents

natural_image
Line drawing of a pair of headphones (no text or symbols)Gaming Headset with 3D sound

Microphone
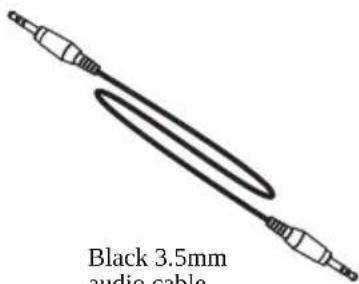
Black 3.5mm audio cable
natural_image
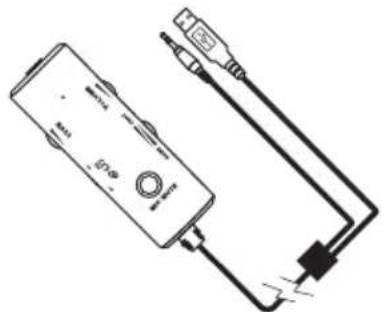
Line drawing of a handheld electronic device connected to a cable with a connector (no text or symbols visible)In-line headset control unit with green 3.5mm audio cable and USB cable connectors

natural_image
Line drawing of a medical or laboratory instrument with a bulbous body and connector (no text or symbols)2.5mm Xbox chat cable

natural_image
Pure electrical circuit lines without any symbols10 ft. (3 m) RCA piggyback to 3.5mm audio cable
Note: If your Xbox 360 is connected to a TV, monitor, or receiver using an HDMI cable, you may need the Microsoft HDMI audio adapter (sold separately). Some models of the Xbox 360 include this adapter.
Headset jacks and controls
Right side Left side

| # Component Description | ||
| 1 | Right microphone jack (MIC) | Plug the microphone into this jack. |
| 2 | Left microphone jack (MIC) | Plug the microphone into this jack. |
| 3 | Line In jack Plug the black 3.5mm cable into this jack and into the 3.5mm jack on the in-line control unit, TV headphone jack, or other audio device. | |
| 4 | MUTE ALL button Press to mute all audio and chat. Press again to un-mute the audio and chat. | |
In-line control unit

| # Component Description | ||
| 1 | 3.5mm cable jack Plug the black 3.5mm cable into this jack and into the LINE IN jack on your headset. | |
| 2 | Mute indicator Lights red when all audio and chat is muted. (The ALL MUTE button is on the headset.) Lights yellow when the microphone is muted. | |
| 3 | BASS Rotate to adjust the bass. | |
| 4 | VOLUME Rotate to adjust the overall volume. | |
| 5 | SRS switch Slide this switch to turn the SRS sound feature on or off. | |
| 6 | CHAT/GAME VOLUME balance | Rotate to adjust the balance between the chat and game volume. |
| 7 | MIC MUTE Press to mute the microphone. Press again to un-mute the microphone. | |
| 8 | Xbox 360 chat cable jack | Plug the 2.5mm Xbox 360 chat cable into this jack and into the jack on the Xbox 360 controller. |
Connecting to a PlayStation 3 (PS3)
You can connect your headset to your PS3 in a variety of ways to receive PS3 audio:
• TV headphone jack or AV cable (see "Using a headphone jack or AV cable" on page 8)
- HDMI connection (see "Using an HDMI connection" on page 12)
Using a headphone jack or AV cable
To connect to a PS3 using a headphone jack or AV cable:
1 Plug the microphone into the left or right MIC jack on your headset. Twist the tip of the microphone so the sound holes face your mouth.

2 Choose your connection method.
If you want to connect the audio using a headphone jack on a TV, monitor, or receiver, complete the instructions in "Option A: Headphone jack connection method."
If you want to connect the audio using the PS3 AV cable, complete the instructions in "Option B: AV cable connection method" on the next page.
Option A: Headphone jack connection method
3 Make the connections shown in the following illustration. Go to "Setting up the Chat function" on page 11.

flowchart
graph TD
    A["Black 3.5mm cable"] --> B["In-line control unit green 3.5mm cable connector"]
    B --> C["PS3 AV cable"]
    C --> D["Yellow (video)"]
    C --> E["Red (right audio)"]
    C --> F["White (left audio)"]
Option B: AV cable connection method
Step 3 (continued)
Make the connections shown in the following illustration.

flowchart
graph TD
    A["Headphones"] -->|Black 3.5mm cable| B["In-line control unit"]
    B --> C["In-line control unit green 3.5mm cable connector"]
    C --> D["RCA piggyback cable"]
    D --> E["PS3 AV cable"]
    E --> F["White (audio left)"]
    E --> G["Red (audio right)"]
    E --> H["Yellow (video)"]
4 Turn on your PS3, then open the PS3 Settings menu.
5 Select Sound Settings, then select Audio Output Settings. The Audio Output Settings menu opens.

6 Select Audio Input Connector / SCART / AV Multi to send the audio to your headset.
7 Press X to save the setting.
8 Complete the Steps in the following section "Setting up the Chat function."
Setting up the Chat function
To set up the Chat function:
1 Turn on your PS3, then open the PS3 Settings menu.
2 Select Accessory Settings. The Accessory Settings menu opens.
3 Select Audio Device Settings. The Audio Device Settings menu opens.
4 Set the Input Device and Output Device settings to Rocketfish Headset.
5 Select OK to save your settings.
Your headset is ready to use.
Using an HDMI connection
Note: Connecting to a headphone jack is the easiest connection method.
When your PS3 is connected to a TV, monitor, or receiver using HDMI, you can connect the audio using the TV's headphone jack (if available) or using the AV cable that came with your PS3.
To connect to a PS3 using an HDMI connection:
1 Plug the microphone into the left or right MIC jack on your headset. Twist the tip of the microphone so the sound holes face your mouth.
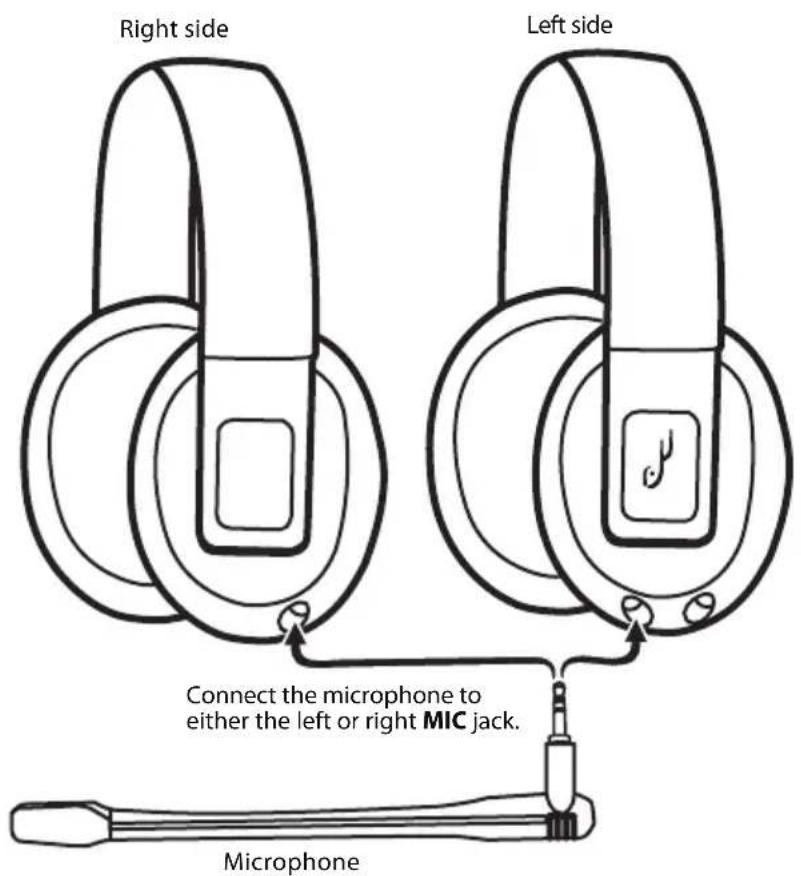
2 Choose your connection method.
If you want to connect the audio using a headphone jack on a TV, monitor, or receiver, complete the instructions in "Option A: Headphone jack connection method."
If you want to connect the audio using the PS3 AV cable, complete the instructions in "Option B: AV cable connection method" on the next page.
Option A: Headphone jack connection method
3 Make the connections shown in the following illustration. Go to "Setting up the Chat function" on page 15.

flowchart
graph TD
    A["Black 3.5mm cable"] --> B["In-line control unit"]
    B --> C["In-line control unit green 3.5mm cable connector"]
    C --> D["In-line control unit USB cable connector"]
    D --> E["HDMI cable"]
    E --> F["Computer monitor"]
Option B: AV cable connection method
Step 3 (continued)
Make the connections shown in the following illustration.

flowchart
graph TD
    A["Headphones"] -->|Black 3.5mm cable| B["In-line control unit"]
    B --> C["In-line control unit green 3.5mm cable connector"]
    C --> D["In-line control unit USB cable connector"]
    D --> E["PS3 AV cable"]
    E --> F["HDMI cable"]
    F --> G["White (audio left)"]
    G --> H["Red (audio right)"]
    H --> I["Yellow (not used)"]
4 Plug the USB connector on the in-line control unit into any open USB port on the PS3.
5 Turn on your PS3, then open the PS3 Settings menu.
6 Select Settings, Sound Settings, Audio Multi Output. This setting lets you use the standard PS3 AV cable that came with your PS3 simultaneously with an HDMI or digital (optical) audio output.
![Audio Multi-Output On Sets to output audio through multiple connectors simultaneously. Audio output to connectors that are not selected in [Audio Output Settings] is downscaled to 2 Ch.](/content/2026/05/1071868/images/882298c24c8ace8ad568da260ace85f49beb6f63e1cf11a74b859a301fd202b9.jpg)
7 Complete the Steps in the following section "Setting up the Chat function."
Setting up the Chat function
To set up the Chat function:
1 Turn on your PS3, then open the PS3 Settings menu.
2 Select Accessory Settings. The Accessory Settings menu opens.
3 Select Audio Device Settings. The Audio Device Settings menu opens.
4 Set the Input Device and Output Device settings to Rocketfish Headset.
5 Select OK to save your settings. Your headset is ready to use.
Connecting to an Xbox 360
You can connect to an Xbox 360 using:
• TV headphone jack or AV cable (see "Using a headphone jack or AV cable" on page 16)
- HDMI connection (see "Using an HDMI connection with a headphone jack or audio adapter" on page 19)
Using a headphone jack or AV cable
To connect an Xbox 360 using a headphone jack or AV cable:
1 Plug the microphone into the left or right MIC jack on your headset. Twist the tip of the microphone so the sound holes face your mouth.

2 Choose your connection method.
If you want to connect the audio using a headphone jack on a TV, monitor, or receiver, complete the instructions in "Option A: Headphone jack connection method."
If you want to connect the audio using the PS3 AV cable, complete the instructions in "Option B: AV cable connection method" on the next page.
Option A: Headphone jack connection method
3 Make the connections shown in the following illustration. Your headset is ready to use.

flowchart
graph TD
    A["In-line control unit"] --> B["2.5mm Xbox chat cable"]
    B --> C["In-line control unit green 3.5mm cable connector"]
    C --> D["Computer monitor"]
    D --> E["Yellow (video)"]
    D --> F["Red (right audio)"]
    D --> G["White (left audio)"]
    C --> H["These connectors are not used for your headset."]
    A --> I["Black 3.5mm cable"]
    I --> J["In-line control unit"]
    J --> K["USB cable connector"]
Option B: AV cable connection method
Step 3 (continued)
Make the connections shown in the following illustration.
Your headset is ready to use.
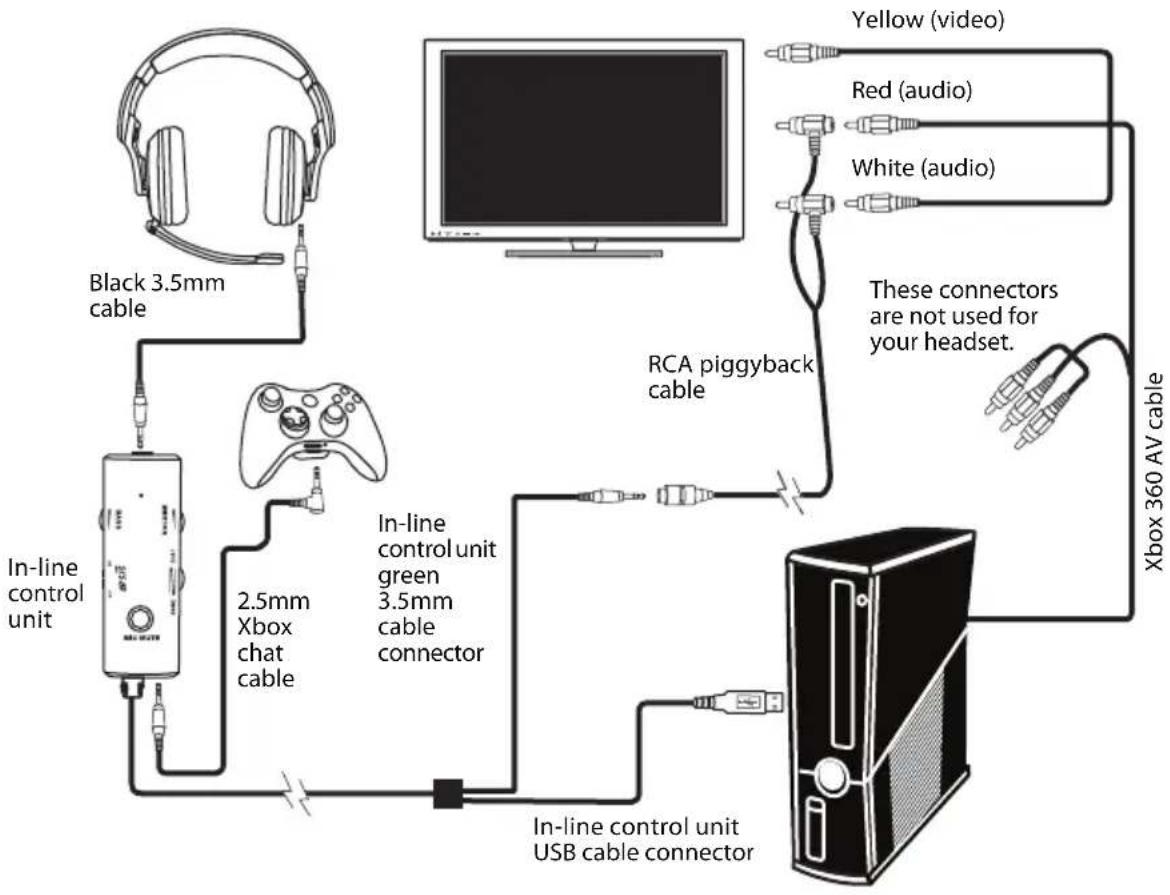
flowchart
graph TD
    A["In-line control unit"] --> B["2.5mm Xbox chat cable"]
    A --> C["Black 3.5mm cable"]
    A --> D["In-line control unit green 3.5mm cable connector"]
    A --> E["In-line control unit USB cable connector"]
    F["RCA piggyback cable"] --> G["Computer"]
    H["Yellow (video)"] --> I["Red (audio)"]
    H --> J["White (audio)"]
    K["Xbox 360 AV cable"] --> L["These connectors are not used for your headset."]
Using an HDMI connection with a headphone jack or audio adapter
Note: Connecting to a headphone jack is the easiest connection method.
When your Xbox 360 is connected to a TV, monitor, or receiver using HDMI, you can connect the audio using the TV's headphone jack (if available) or using the AV cable jack on your Xbox 360 to connect the sound.
Note: If you use the Xbox 360 AV cable, you need the Microsoft HDMI audio adapter (sold separately). Some models of the Xbox 360 include this adapter.
To connect an Xbox 360 using an HDMI connection with a headphone jack or AV cable:
1 Plug the microphone into the left or right MIC jack on your headset. Twist the tip of the microphone so the sound holes face your mouth.

2 Choose your connection method.
If you want to connect the audio using a headphone jack on a TV, monitor, or receiver, complete the instructions in "Option A: Headphone jack connection method."
If you want to connect the audio using an HDMI audio adapter (sold separately), complete the instructions in "Option B: HDMI audio adapter connection method" on the next page.
Option A: Headphone jack connection method
3 Make the connections shown in the following illustration. Your headset is ready to use.

flowchart
graph TD
    A["In-line control unit"] --> B["2.5mm Xbox chat cable"]
    B --> C["Black 3.5mm cable"]
    C --> D["In-line control unit green 3.5mm cable connector"]
    D --> E["Xbox 360 HDMI cable"]
    E --> F["Computer"]
Option B: HDMI audio adapter connection method
Make the connections shown in the following illustration.
Your headset is ready to use.

flowchart
graph TD
    A["In-line control unit"] --> B["2.5mm Xbox chat cable"]
    B --> C["In-line control unit green 3.5mm cable connector"]
    C --> D["In-line control unit USB cable connector"]
    D --> E["In-line control unit"]
    E --> F["Xbox 360 HDMI audio adapter (sold separately)"]
    F --> G["RCA piggyback cable"]
    G --> H["Black 3.5mm cable"]
    H --> I["Computer"]
Connecting to a computer
If your computer has a Windows operating system, go to "Windows 7, Windows Vista, or Windows XP" on page 22.
If your computer has a Mac operating system, go to "Mac OS X v10.2.8 and above" on page 25.
Windows 7, Windows Vista, or Windows XP
To connect to a Windows-based computer:
1 Plug the microphone into the left or right MIC jack on your headset. Twist the tip of the microphone so the sound holes face your mouth.

2 Make the connections shown in the following illustration.

3 Click Start, Control Panel, then click the icon that controls sound and audio devices. The Sounds and Audio Devices Properties dialog box opens.
Note: Options may vary depending on the version of Windows you are using.
4 Click the Playback tab.
5 Make a note of the default devices selected in the Sound Playback and Sound Recording lists. If you do not want the headset to be the default sound device for Windows sounds, you can reset the default devices to their original settings.
6 In the Sound Playback list, select Rocketfish Headset, then click the Volume button. The Master Volume dialog box opens.
7 Click Options, then click Properties. The Properties dialog box opens.
8 Click to check Speaker, Wave, and Microphone, then click OK.
9 Slide the Speaker and Wave sliders to the maximum settings. These settings determine the volume of the chat you hear. You can use the CHAT VOLUME control on the in-line control unit to adjust the chat volume.
10 Slide the Microphone slider to adjust the microphone volume. This setting determines the volume of your voice that you hear in the headphone when you speak into the microphone. If the microphone volume is too low or too high, readjust the slider.
11 Click the X in the upper right corner of the dialog box to close the box.
12 Open the Sounds and Audio Devices Properties box again.
13 In the Sound Recording list, select Rocketfish Headset, then click the Volume button. The Master Volume dialog box opens.
14 Slide the Mic Volume slider to the middle setting. This setting determines the volume of your voice that others hear when you speak into the microphone.
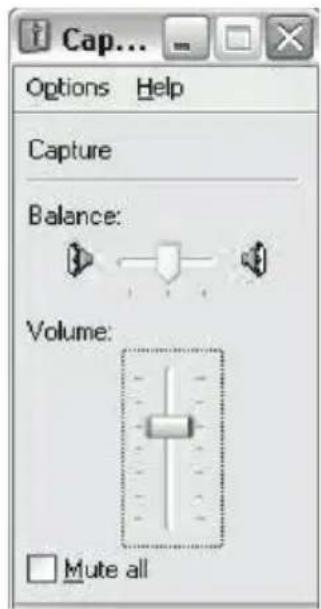
15 Click the X in the upper right corner of the dialog box to close the box.
16 Position the microphone several inches away from your mouth so it does not overload when you speak. Try to balance the microphone position and the volume setting for optimum voice level.
17 If you do not want the headset to be the default device for Window sounds, go back to the Sounds and Audio Devices dialog box and set the default audio devices for playback and recording back to their original settings
18 Close the open dialog boxes.
Your headset is ready to use.
Mac OS X v10.2.8 and above
To connect to a Mac-based computer:
1 Plug the microphone into the left or right MIC jack on your headset. Twist the tip of the microphone so the sound holes face your mouth.
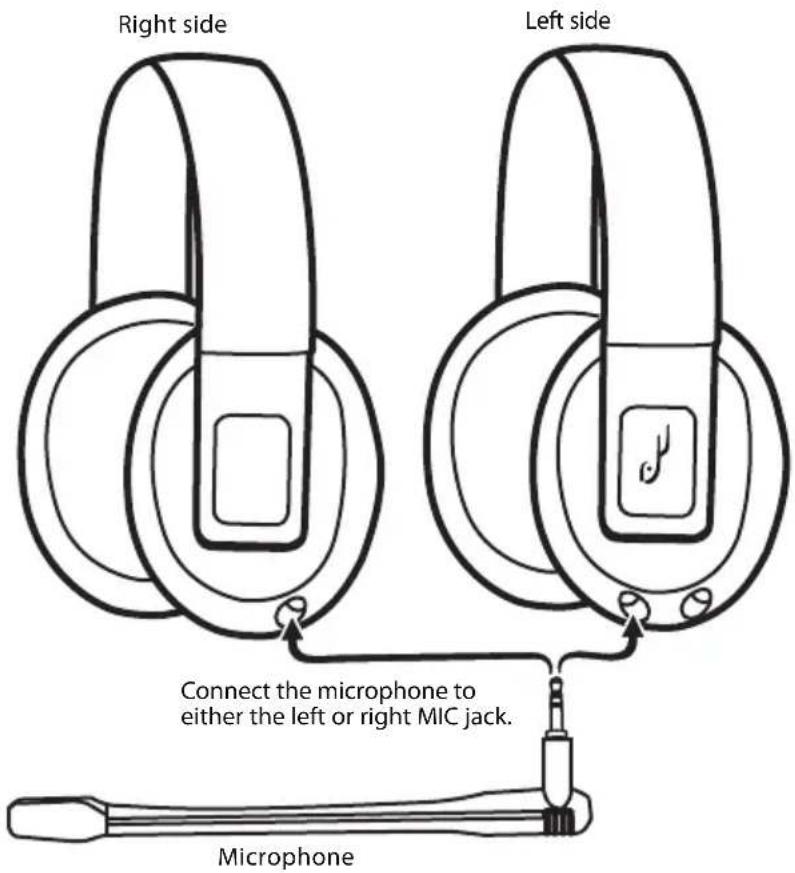
2 Make the connections shown in the following illustration.

flowchart
graph TD
    A["Black 3.5mm cable"] --> B["In-line control unit"]
    B --> C["In-line control unit green 3.5mm cable connector"]
    B --> D["In-line control unit USB cable connector"]
3 Click the Apple® menu icon and go to System Preferences/Sound.
4 Select the Output tab and make sure that the default audio device is set to Rocketfish Headset. If not, select Rocketfish Headset.
5 Set the Output volume slider on the bottom of the screen to the maximum. This setting determines the chat volume level. You can use the CHAT VOLUME control in-line control unit to adjust the volume.
6 Select the Input tab and make sure that the default microphone is set to Rocketfish Headset. If not, select Rocketfish Headset.
7 Set the Input volume slider to 75%. This setting determines the volume of your voice that others hear when you speak into the microphone.
8 Close the open dialog boxes.
Your headset is ready for use.
Connecting to a portable audio device
To connect to a portable audio device:
1 Plug the black 3.5mm cable into the Line In jack on the left side of your headset and into the 3.5mm jack on any portable audio device.
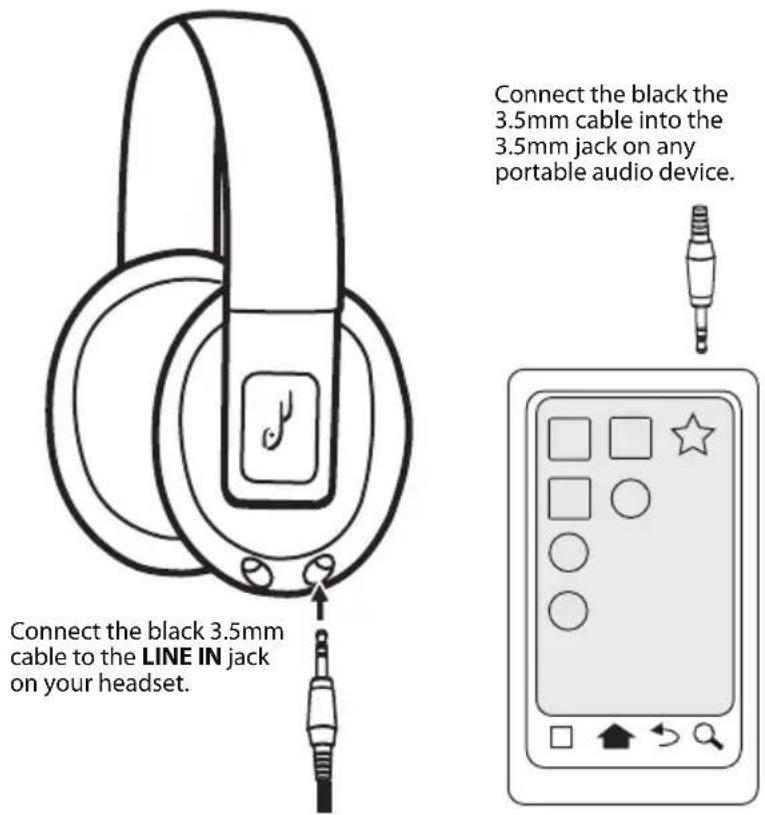
2 Turn on the audio device. Sound plays through your headset.
3 Adjust the volume using the volume controls on your portable audio device.
Note: When you connect your headset to a portable audio device, the microphone does not work.
Troubleshooting
Problem Solution
No audio • Make sure that the volume is not turned down or muted.
- Make sure that the All-Mute feature is not turned on. When All-Mute is turned on, the mute indicator on the in-line control unit lights red. Press the ALL MUTE button on the left earcup to turn off All-Mute. The chat and game audio turn back on and the LED turns off.
- Make sure that the sound on the connected device (such as a gaming console, computer, or audio device) is not muted or turned down too low.
- Rotate the CHAT/GAME VOLUME control on the in-line control unit to adjust the balance towards the chat volume.
- Make sure that all connections are connected correctly and securely.
| Chat is not working on a PS3 • Make sure mute indicator on the in-line control unit is not yellow. If the mute indicator is yellow, press the MIC MUTE button to restore sound and turn off the mute indicator.• R ot a t e t h e CHAT/GAME VOLUME dial on the in-line control unit to adjust the balance between the game volume and the chat volume.• Make sure the USB connector on the in-line control unit cable is connected to PS3.• Refer to PS3 Section regarding the system setting for Chat. |
| Chat is not working on an Xbox 360• Make sure mute indicator on the in-line control unit is not yellow. If the mute indicator is yellow, press the MIC MUTE button to restore sound and turn off the mute indicator.• R ot a t e t h e CHAT/GAME VOLUME dial on the in-line control unit to adjust the balance between the game volume and the chat volume.• Make sure the USB connector on the in-line control unit cable is connected to Xbox 360. |
Specifications
Speakers 40mm neodymium
Frequency response Headphones: 20 Hz to 20,000 Hz
Microphone: 100 Hz to 8,000 Hz
Impedance 32 ohms
Legal notices
FCC Part 15
This device complies with Part 15 of the FCC Rules. Operation of this product is subject to the following two conditions: (1) this device may not cause harmful interference, and (2) this device must accept any interference received, including interference that may cause undesired operation.
This equipment has been tested and found to comply within the limits for a class B digital device, pursuant to Part 15 of the FCC Rules. These limits are designed to provide reasonable protection against harmful interference in a residential installation. This equipment generates, uses, and can radiate radio frequency energy and, if not installed and used in accordance with the instructions, may cause harmful interference to radio communications. However, there is no guarantee that interference will not occur in a particular installation. If this equipment does cause harmful interference to radio or television reception, which can be determined by turning the equipment off and on, the user is encouraged to try to correct the interference by one or more of the following measures:
- Reorient or relocate the receiving antenna.
- Increase the separation between the equipment and receiver.
- Connect the equipment into an outlet on a circuit different from that to which the receiver is connected.
- Consult the dealer or an experienced radio/TV technician for help.
FCC warning
Changes or modifications not expressly approved by the party responsible for compliance with the FCC Rules could void the user's authority to operate this equipment.
Canada ICES-003 statement
This Class B digital apparatus complies with Canadian ICES-003.
SRS Labs, Inc.

WOW

is a trademark of SRS Labs, Inc. WOW technology is incorporated under license from SRS Labs, Inc. WOW® significantly improves the playback quality of audio, delivering a dynamic 3D entertainment experience with deep, rich bass.
One-year limited warranty
Rocketfish Products ("Rocketfish") warrants to you, the original purchaser of this new product ("Product"), that the Product shall be free of defects in the original manufacture of the material or workmanship for one (1) year from the purchase of the Product ("Warranty Period"). This Product must be purchased from an authorized dealer of Rocketfish brand products and packaged with this warranty statement. This warranty does not cover refurbished Product. If you notify Rocketfish during the Warranty Period of a defect covered by this warranty that requires service, terms of this warranty apply.
How long does the coverage last?
The Warranty Period lasts for one year (365 days), beginning on the date you purchased the Product. The purchase date is printed on the receipt you received with the product.
What does this warranty cover?
During the Warranty Period, if the original manufacture of the material or workmanship of the Product is determined to be defective by an authorized Rocketfish repair center or store personnel, Rocketfish will (at its sole option): (1) repair the Product with new or rebuilt parts; or (2) replace the Product at no charge with new or rebuilt comparable products or parts. Products and parts replaced under this warranty become the property of Rocketfish and are not returned to you. If service of Products and parts are required after the Warranty Period expires, you must pay all labor and parts charges. This warranty lasts as long as you own your Rocketfish Product during the Warranty Period. Warranty coverage terminates if you sell or otherwise transfer the Product.
How to obtain warranty service?
If you purchased the Product at a retail store location, take your original receipt and the Product to the store you purchased it from. Make sure that you place the Product in its original packaging or packaging that provides the same amount of protection as the original packaging. If you purchased the Product from an online web site, mail your original receipt and the Product to the address listed on the web site. Make sure that you put the Product in its original packaging or packaging that provides the same amount of protection as the original packaging.
Where is the warranty valid?
This warranty is valid only to the original purchaser of the Product in the United States, Canada, and Mexico.
What does the warranty not cover?
This warranty does not cover:
- Customer instruction
- Installation
- Setup adjustments
• Cosmetic damage - Damage due to acts of God, such as lightning strikes
- Accident
- Misuse
- A b u s e
- Negligence
• Commercial use
- Modification of any part of the Product, including the antenna
This warranty also does not cover:
- Damage due to incorrect operation or maintenance
- Connection to an incorrect voltage supply
- Attempted repair by anyone other than a facility authorized by Rocketfish to service the Product
- Products sold as is or with all faults
- Consumables, such as fuses or batteries
- Products where the factory applied serial number has been altered or removed REPAIR REPLACEMENT AS PROVIDED UNDER THIS WARRANTY IS YOUR EXCLUSIVE REMEDY. ROCKETFISH SHALL NOT BE LIABLE FOR ANY INCIDENTAL OR CONSEQUENTIAL DAMAGES FOR THE BREACH OF ANY EXPRESS OR IMPLIED WARRANTY ON THIS PRODUCT, INCLUDING, BUT NOT LIMITED TO, LOST DATA, LOSS OF USE OF YOUR PRODUCT, LOST BUSINESS OR LOST PROFITS. ROCKETFISH PRODUCTS MAKES NO OTHER EXPRESS WARRANTIES WITH RESPECT TO THE PRODUCT, ALL EXPRESS AND IMPLIED WARRANTIES FOR THE PRODUCT, INCLUDING, BUT NOT LIMITED TO, ANY IMPLIED WARRANTIES OF AND CONDITIONS OF MERCHANTABILITY AND FITNESS FOR A PARTICULAR PURPOSE, ARE LIMITED IN DURATION TO THE WARRANTY PERIOD SET FORTH ABOVE AND NO WARRANTIES, WHETHER EXPRESS OR IMPLIED, WILL APPLY AFTER THE WARRANTY PERIOD. SOME STATES, PROVINCES AND JURISDICTIONS DO NOT ALLOW LIMITATIONS ON HOW LONG AN IMPLIED WARRANTY LASTS, SO THE ABOVE LIMITATION MAY NOT APPLY TO YOU. THIS WARRANTY GIVES YOU SPECIFIC LEGAL RIGHTS, AND YOU MAY ALSO HAVE OTHER RIGHTS, WHICH VARY FROM STATE TO STATE OR PROVINCE TO PROVINCE.
Contact Rocketfish:
For customer service please call 1-800-620-2790
www.rocketfishproducts.com
Distributed by Best Buy Purchasing, LLC
7601 Penn Avenue South, Richfield, Minnesota, U.S.A. 55423-3645
© 2011 BBY Solutions, Inc.
All rights reserved. ROCKETFISH is a trademark of BBY Solutions, Inc. Registered in some countries. All other products and brand names are trademarks of their respective owners.

natural_image
Abstract white line drawing of a stylized animal head or creature on black background (no text or symbols)www.rocketfishproducts.com (800) 620-2790
Distributed by Best Buy Purchasing, LLC
7601 Penn Avenue South, Richfield, MN 55423-3645 USA
© 2011 BBY Solutions, Inc.
All rights reserved. ROCKETFISH is a trademark of BBY Solutions, Inc.
All other products and brand names are trademarks of their respective owners.


- Gaming Headset with 3D Sound
- rocketfish™
- Contents
- Important safety instructions
- Features
- Package contents
- Headset jacks and controls
- In-line control unit
- Connecting to a PlayStation 3 (PS3)
- Using a headphone jack or AV cable
- To connect to a PS3 using a headphone jack or AV cable:
- Option A: Headphone jack connection method
- Option B: AV cable connection method
- Setting up the Chat function
- To set up the Chat function:
- Using an HDMI connection
- To connect to a PS3 using an HDMI connection:
- Connecting to an Xbox 360
- To connect an Xbox 360 using a headphone jack or AV cable:
- Using an HDMI connection with a headphone jack or audio adapter
- To connect an Xbox 360 using an HDMI connection with a headphone jack or AV cable:
- Option B: HDMI audio adapter connection method
- Connecting to a computer
- Windows 7, Windows Vista, or Windows XP
- To connect to a Windows-based computer:
- Mac OS X v10.2.8 and above
- To connect to a Mac-based computer:
- Connecting to a portable audio device
- To connect to a portable audio device:
- Troubleshooting
- Problem Solution
- Specifications
- Legal notices
- FCC Part 15
- FCC warning
- Canada ICES-003 statement
- SRS Labs, Inc.
- One-year limited warranty
- How long does the coverage last?
- What does this warranty cover?
- How to obtain warranty service?
- Where is the warranty valid?
- What does the warranty not cover?
Brand : Rocketfish
Model : RF-GUV1201
Category : Headphones