
DVX-2075 USB - DVD player MAJESTIC - Free user manual and instructions
Find the device manual for free DVX-2075 USB MAJESTIC in PDF.


User questions about DVX-2075 USB MAJESTIC
0 question about this device. Answer the ones you know or ask your own.
Ask a new question about this device
Download the instructions for your DVD player in PDF format for free! Find your manual DVX-2075 USB - MAJESTIC and take your electronic device back in hand. On this page are published all the documents necessary for the use of your device. DVX-2075 USB by MAJESTIC.
USER MANUAL DVX-2075 USB MAJESTIC
natural_image
Black AudiOLA DVD studio electronic device with USB port and power button (no visible text or symbols beyond branding)MANUALE ISTRUZIONI


natural_image
Black triangular warning symbol with white lightning bolt and downward arrow (no text)natural_image
Black triangular warning symbol with an exclamation mark (no text or numbers)CLASS 1 LASER PRODUCT
KLASSE 1 LASER PRODUKT
LUOKAN 1 LASER LAITE
KLASS 1 LASER APPARAT

natural_image
Warning symbol with sun inside a triangle (no text or numbers)PERICOLO
natural_image
Simple line drawing of a mechanical component or tool with no visible text, numbers, or symbols.
natural_image
Simple line drawing of a rectangular object with a curved line extending from its top (no text or symbols)

natural_image
Simple line drawing of a mechanical component or tool with an arrow indicating rotation (no text or symbols)natural_image
Black AudiOLA DVD studio electronic device with USB port and power button (no visible text or symbols beyond branding)INSTRUCTION MANUAL


We take the opportunity to thank you for purchasing this DVD player. We strongly recommend that you study carefully the operation instructions before attempting to operate the unit and that you have noted the listed precautions.
Note
This unit can be used only where the powersupply is 100V-240V\~ 50/60Hz.
Caution
* DVD PLAYER ISA CLASS1 LASER PRODUCT. HOWEVER THEPLAYER EMITSAVISIBLE LASER BEAM WHICH COULD CAUSE HAZARDOUS RADIATION EXPOSURE IF DIRECTED. BE SURE TO OPERATE THEDVD PLAYER CORRECTLY AS INSTRUCTED WITHOUT OPENING CABINET AND LOADER COVER.
* WHEN THE PLAYER IS POWERED ON, DO NOT PLACE YOUREYES CLOSE TO THE OPENING OF THE DISC TRAYOR OTHER OPENINGS TO LOOK INTO INSIDE OF THE PLAYER.
* WHEN THEPLAYER IS POWERED ON, DONOT REMOVE THE PROTECTIVE CAP ON THE OPTICAL SCART. RED BEAM EMITTED WILL HARM YOUR EYES ESPECIALLY TO CHILDREN WHEN YOU LOOK AT OPTICAL SCART. PUTTING ON THE PROTECTIVE CAP WHEN THE SCART IS IDLE.
* RADIOACTIVE DANGERMAY BECAUSED IF YOU DO NOT FOLLOW THE METHOD STIPULATED HERE FOR THE OPERATION, ADJUSTMENT OR CONTROL.
* PLEASE CONSIGN THE MAINTENANCE TO PROFESSIONAL TECHNICIAN.
Copy Protection:
This DVD players supports Macrovison copy protection. On DVD disc that include a copy protection code, if the contents of the DVD disc are copied using a VCR, the copy protection code prevents the videotape copy from playing normally.
Apparatus Claims of U.S. Patent Nos.4,631,603.4,577,216.4,819,098 and 4,907,093 licensed for limited viewing uses only.
This product incorporates copyright protection technology that is protected by method claims of certain U.S. Patents and other intellectual property rights owned by Macrovision Corporation and other right owners. Use of this copyright protection technology must be authorized by Macrovision Corporation, and is intended for home and other limited viewing uses only unless otherwise authorized by Macrovision Corporation. Reverse engineering or disassembly is prohibited.
CONTENT
-
Brief Instruction of Controls
-
Preparations
2.1 Accessories
2.2 Battery installation of remote controller
2.3 System connection
2.4 Play mode setting
- Basic operation
3.1 Play disc
- Description of function
4.1 OSD
4.2 Play Mode
4.3 Subtitle
4.4 Angle
4.5 Audio
4.6 Title
4.7 Menu/PBC
4.8 Direction key
4.9 Number key
4.10 RepeatA-B
4.11 Repeat
4.12 Zoom
4.13 Volume and mute
4.14 L/R
4.15 Prog
4.16 Slow
-
Setting Of The System
-
Operation OfMP3 function
-
JPEG
-
Troubleshooting guide
-
Care of discs
-
Technical Specification
1. Brief Instruction of Controls
Front panel identification
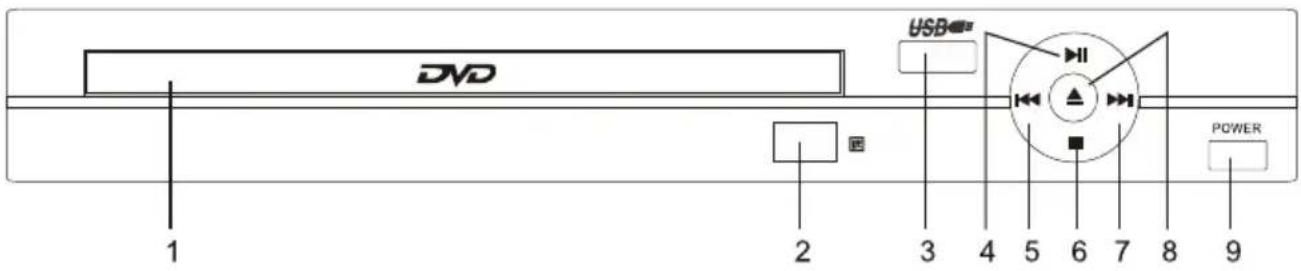
- DVD Disc door
- USB slot
4.Play/pause button - Preview button
- Stop button
-
Next button
8.Open/close button
9.Power button -
Remote control signal sensor
Rear panel identification

- Scart output
2.R/L stereo audio output - Video output
- Digital Coaxial output
Remote control panel identification

① Power on/off ③1 V-mode button
2 Number keys 32 L/R button
③ Setup button ③3 N/P button
4 Direction button 34 Remain button
5 Enter button 35 Resume button
6 Menu button
7 Stop button
8 REV button
9 Search button
10 FWD button
11 Volume - button
12 Title button
13 Return button
14 A-B button
15 RAN DOM button
16 Angle button
17 Zoom button
18 Open/close button
19 Subtitle button
20 Language button
21 OSD button
22 PROG button
23 DVD/USB button
24 Mute button
25 Play/pause button
26 PREV button
27 Repeat button
28 Next button
29 Volume + button
30 Slow button
Note:
The same buttons on remote control and front panel have the same function.
2. Preparations
2.1 Accessories
- Remote controller 2. Audio/Videocable 3. User's manual
- Batteries 5. Guarantee letter
(Check whether it is fully equipped after opening the box).
2.2 Battery installation of remote controller
Place two AAA batteries in the battery compartment. Be sure the polarities are correct. There should be no large obstacles between the remote controller and the main unit.
2.3 System connection
(1) When making connection between this unit and other components, be sure all connection are power-off.
(2) Audio/Video cables are connected according to the different colour identification and they should be fitted firmly.
Yellow to video terminal
White to audio terminal(L)
Red to audio terminal(R)
(3) Scheme of connection

flowchart
graph TD
    A["USCITA SCART"] --> B["AC IN 110-240V~50/60Hz MADE IN CHINA"]
    A --> C["Video OUT/DIGITAL AUDIO OUT"]
    A --> D["Video IN"]
    D --> E["Start In"]
    A --> F["Audio IN"]
    F --> G["L (WHITE)"]
    F --> H["R (RED)"]
    F --> I["Audio IN"]
    I --> J["L"]
    I --> K["R"]
    A --> L["DCARAL"]
    L --> M["Amplifier"]
2.4 Play mode setting
If you found the picture could not spread all screen or no color, please select PAL, NTSC or auto by pressing (P/N) key.
3. Basic operation
Please use remote control to operate the function as described below:
Once all the connection of the system have been done, this machine will be ready for service. Prior to play, make sure to complete the following preparatory operations.
- Switch on TV and select AV mode. If it's S-Video connect select S-Video mode.
- Switch on amplifier if it is connected, select AC-3 or DVD mode.
- Plug-in of DVD player
Step 1: Press STANDBY button, Disc Loading shown on screen.
Step 2: Press (OPEN/CLOSE) key on the front panel, the tray comes out automatically.
Step 3: Place disc on the tray, press (OPEN/CLOSE) key to close the tray, the disc type will be shown on the upper left corner of the screen.
Note: Press (STANDBY) key on the remote controller to bring the unit into standby status.
3.1 Play disc
Please use remote control to operate the function as described below:
- Once it has read the disc, this machine will start playing automatically.
- In order to see the folder menu inside a disc, press (STOP) button first and then prog.
- If it is a DVD, the machine will show the DVD menu or title menu.
- If it is a VCD2.0 disc, the machine will activate PBC playback control status.
- If it is a CD, this machine will start playing in the sequence.
Press (PLAY) key to return play back while disc stop, pause or step.
PAUSE key:
Press (PAUSE) key to put the playback in temporary halt.
PREV key:
Press (PREV) key to skip backward to the title before current.
NEXT key:
Press (NEXT) key to skip forward to the title after current.
REV key:
Press (REV) key to get 2X, 4X, 8X, 16X, 32X or normal play circular fast reverse function on disc playing.
FWD key: ▶▶
Press (FWD) key to get 2X, 4X, 8X, 16X, 32X or normal play circular fastreverse function on disc playing.
STOP key:
Press (STOP) key first time to follow by a (PLAY) key will an auto resume to the last played location. Press (Stop) key twice will halt the playback completely.
VIDEO key:
Press (V-MODE) key to select the signal source: CVBS, RGB
4. Description of function
Please use remote control to operate the function as described below:
4.1 OSD
In the condition of DVD disc playing, press (OSD) key on the remote controller to display the elapsed time of the current title, remain time of the current title, remain time of the current chapter. total title, current title, total chapter, current chapter and other information of the disc. In the condition of VCD disc playing, press (OSD) key on the remote controller to display single elapsed time, single remain time, display off and other information of the disc circular.
4.2 Play mode
Press (N/P) key repeatedly to get PAL, AUTO, NTSC display on the screen.
4.3 Subtitle
This function may enable you to select multi subtitle languages (as many as 32 kinds and only for the disc with multi subtitle encode). Press (SUBTITLE) key to get desired display. For example, to select language 2 from 8 options.
4.4 Angle
During athletic match, concert or theatrical program, press (ANGLE) key continually on remote controller to select various angle to view the same image (This operation works only for the disc with multi angle encoded).
4.5 Audio
There are 8 kinds of language for selection. Press (AUDIO) key to select language (this operation works only for the disc with multi language encoded). For example, to select language 1 from 2 language options, soundfield effect AC-3, 2 channels, English.
4.6 Title
For DVD discplaying, press (TITLE) key to get title menu.
4.7 Menu/PBC
Press (MENU) key to return to main menu for DVD disc playing.
For VCD 2.0 disc playing, in the condition of PBC ON, song selection can only be done when the playing returned to the main menu. In the condition of PBCOFF, press relevant number key to get favorite song during playing.
4.8 Direction key
There are four direction keys to assist in navigation. They are normally use while in title, navigation, and setup menu.
4.9 Number key
Press relevant number key to play the favorite chapter or title according to the number on the menu.
4.10 Repeat A - B
First time pressing (A-B) key to set initial point (A): Second time pressing (A-B) key to set end Point (B) After setting, the program repeats playing from Ato B. Third time pressing (A-B) key to cancel repeat.
4.11 Repeat
For DVD disc playing, press (REPEAT) key to repeat title, chapter, all or close repeat. For VCD disc playing, press (REPEAT) key to repeat track, all or close repeat.
4.12 ZOOM
The picture may be enlarged by up to 4 times to facilitate you to enjoy a particular action or still picture. Press (ZOOM) key 3 times, the ZOOM scales will be 2x, 3x 4x respectively. Pressing direction key to move the screen while zoom in. Pressing the button once again will return to normal play status.
4.13 Volume and Mute
Press (VOL+) key to increase volume, press (VOL-) key to reduce volume till to no volume output. Press (MUTE) key to get mute, press it again to recover it from mute.
4.14 L/R
When play SVCD, VCD or CD disc, press (L/R) key to select mono left, Monoright, mix mono, stereo.
4.15 PROG
In the condition of disc playing, press (PROG) key on remote controller to come into program status; Enter the track Numbers desired, 2, 4, 6 and 8, for example, if you enter wrong number, you can press direction key move the cursor to wrong point, again input the numbers, when finished, then using direction key move the cursor to start button, then press (ENTER) to start playing. Select (exit) and press ENTER to exit the program function.
4.16 SLOW
Press (SLOW) key repeatedly, you will enjoy the slow motion at a 1/2, 1/4, 1/8 and 1/16 slower forward speed.
4.17 RESUME
During DVD playback, press (STOP) button and then resume to start playback from the point it was stopped before.
5. SETTING OF THE SYSTEM
1. DVD menu setting
Press the SETUP button on the remote controller, the SETUP MENU (main) will be displayed.
- After accessing the SETUPMenu, press the direct ion buttons for up and down movement to select and item desired, then press the (ENTER) button to confirm your entry and move to the sub-menu. Use the left and right direction buttons to move the pointer, and the up and down direction buttons to select the option desired. Also, press the (ENTER) button to confirm your selection, press left direction button to return the last menu. Now, setup of the current function is completed.
- To end the setup, press the SETUP button again. In the SETUPMENU, you may choose any of the following options as you like.
LAST MEMORY
DVD Playback is resumed from the point it was stopped last time.
GENERAL SETUP
This option is used to setup TV screen format, video functions and DVD functions, with options of "TV DISPLAY", "ANGLE MARK", "OSD LANG", "CAPTIONS", "SCREEN SAVER", "HDCD", "LAST MEMORY".

TV DISPLAY
Regardless of what screen format is chosen, if the screen displays in 4:3 format, the picture can only be shown in that format. With DVDs, the screen format is convertible. If the screen displays only in 4:3 format, when a DVD with 16:9 display format is used, the picture will be flattened.
| Film format\TV screen | 4:3 | 16:9 | ||
| Normal | Full view | Mailbox | Wide screen | |
4:3 |  |  |  | |
| 16:9 | ||||
ANGLE MARK
When a DVD providing multiple angles is used, the user may select a particular shooting angle. the operating instructions stated in "Angle Mark".
OSD LANG
The user may use this item to set the language of the setup menu and screen display to English, French, German, Italian.
The operating instructions stated in "OSDLanguage".
CAPTIONS
Set captions is "on", "off".
Note: This function is working with NTSC discs only.
SCREEN SAVER
If the screen saver is on, when your DVD player is in Stop, Open, or No Disc state, or there is a frame frozen for more than 180sec, the screen saver will be displayed. This featrue can protect the screen from damage.
ON: Choose this setting to activate the screen saver.
OFF: Choose this setting to cancel the screen saver.
HDCD
Set HDCD is "off", "1X", "2X".
AUDIO SETUP
Includes DOWNMIX, SPDIF OUTPUT setup.

Speaker Setup
Downmix
This setting is suitable for films.set angle audio out is Lt/Rt or Stereo.
Lt / Rt: Choose this setting, it will be sound like in a movie theatre if the original movie the disc was recorded from was encoded in the Pro Logic Dolby Digital format.
STEREO: Choose this setting, when 5.1-channelsound playing, two channels of signals will be output from the left and right soundtrack; when 2-channel sound playing, stereo signal will be output.
Spdif Setup
Spdif Output
Audio digital signals can be output through COAXIAL in rear panel. There are 3 optimal audio output modes: spdif off, spdif/raw and spdif/pcm.
a) SPDIF OFF: From the Coaxial Output jack, no signal is output.
b) RAW: Choose this setting if your DVD player is connected to a power amplifier with coaxial cable. When playing a disc recorded with Dolby Digital, and MPEG audio formats, the corresponding digital signals will be output from the Coaxial Output jack. This players digital output jacks are designed for a connection to a Dolby Digital, or MPEG receiver or decoder.
c) PCM: Choose this setting if your DVD player is connected to a 2-channel digital stereo amplifier; When playing a disc recorded whit Dolby Digital and MPEG audio formats, audio signals will be modulated into a 2-channel PCM signal, and it will be output from the Coaxial Output jack
DOLBY SETUP
Dolby digital setup includes DUAL MONO and DYNAMIC range compress.
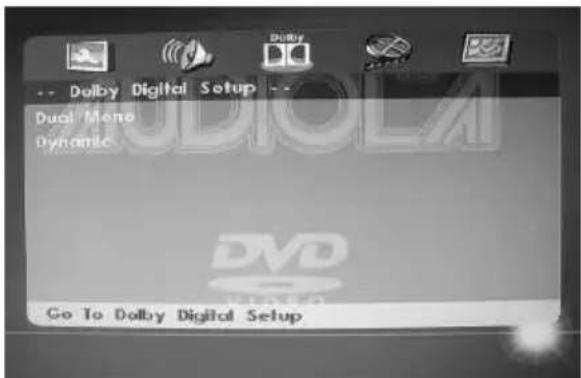
DUAL MONO
If you have Dolby digital output in your amplifier/decoder, you may select stereo, L.Mono R.Mono and Mix.Mono sound accordingly.
DYNAMIC
Choose this setting to adjust the dynamic ratio and get different effect. If adjusting to FULL, the audio signal peak value will be the minimum; while adjusting to OFF, maximum.
VIDEO SETUP
Includes Component, Quality.

COMPONENT
CVBS: Choose this setting if your DVD player is connected through CVBS output. RGB: Choose this setting if your DVD player is connected through scarct cable.
SHARPNESS
Set SHARPNESS mode, there are 3 optional modes: High, Medium and Low.
BRIGHTNESS
Press right arrow button to enter adjustment BRIGHTNESS mode; press up and down buttons to make adjustment.
Press left arrow button to return to setup menu.
CONTRAST
Press right arrow button to enter adjustment CONTRAST mode; press right and left buttons to make adjustment.
Press enter button to return to setup menu.
PREFERENCE SETUP
During stop mode, press the SETUP button to access the PREFERENCE setup menu, which includes items of TV TYPE, AUDIO Language, SUBTITLE, DISC MENU language, PARENTAL, DEFAULT and PASSWORD.
Preset values are essential to a DVD player. The user may change these items as desired.

TV TYPE
According to the Color System of the TV, you can choose the TV System.
a. NTSC: Choose this settings if your DVD player is connected to a NTSC TV.
The United States uses NTSC, while Europe uses the PAL broadcast system.
If your picture is colorless and rolling, you have chosen the incorrect broadcast system.
Press the N/P button to change the system back.
b. PAL: Choose this settings if your DVD player is connected to a PAL TV
c. AUTO: Choose this settings if your DVD player is connected to a multi-system TV.
AUDIO LANGUAGE
Choose the audio language your prefer. if the disc you are playing has that language available, it will output that language, this machine provides English, French, Spanish, Italian, German.
SUBTITLE LANGUAGE
Choose the subtitle language your prefer. if the disc you are playing has that language available, it will display subtitle in that language, this machine provides English, French, Spanish, Italian, German, OFF.
DISC MENU LANGUAGE
Choose the disc menu language your prefer. if the disc you are playing has that language available, it will display the menu in that language, this machine provides English, French, German, Italian and others as the built-in disc dubbing language options.
PARENTAL
For a film to be restricted for children, the film class may be set according to label marking on the disc. High light "PARENTAL" in the preference setup menu need confirm the pass-word mode is off.
PASSWORD
The default is "136900" The user may change it using this option.
The password option is initialized locked, and you cannot set the ratings limit or change the password. In order for the Ratings feature to work, the password mode must be turned on. If you want to set the ratings limit, you will need to enter the default password which is 0000 then press Enter to confirm. To change the password, you will be prompted for the old password, then be prompted for a new.
Enter a 4-digit number (this is you password). Please remember your PASSWORD, as the DEFAULT setting will not revert the PASSWORD to the factory defaults.
DEFAULT
This option will resume the original settings of this machine except the PASSWORD.
MP3 is an audio compression mode using Level 3 of the international standard MPEG, whereby sound signal is compressed in a rate of 12:1. AMP3 disc can record music for play of over 600 minutes or record over 170 songs, rivaling CDs in sound quality.
To play a MP3 disc
Select the track using direction buttons
- Follow the basic operating instructions to insert a MP3 disc, this machine will start to search the information on the disc and show it in the display.
- Press direction key to select MP3 file and press ENTER key to play.
Repeat play
Using this function, the user will be able to enjoy a particular song or all the songs on the disc over and over again.
- Choose a particular song to be repeated.
- Press the REPEAT button you can choose folder repeat or cancel the repeat function.
Other functions:
When a MP3 disc is played, the features of mute, volume control, pause and forward and backward search will also be available. The operations are the same with those of CDs.
7. JPEG
JPEG adopting the most efficient compression is widely used as picture storage type flattened and stored format.
Even if pictures are compressed 15-20 times. They still have good effect. Supported by most picture processing software, fit for picture storage, it has small date and easy use. This machine can read. JPEG-format picture CD disc.
Select to play by menu
- Put in disc, the machine searches disc information and main menu displays on screen. Press number key from 1 to select picture, press play key to make sure.
- Press direction key to select picture, then press ENTER key to make sure.
- In condition of stop, select direction key to select other pictures.
- In condition of stop, select the first line file item on the right, then press play key to return to uppermenu
Other functions:
When playing picture CD. The machine allows pause, repeat and browsing. Use the Next or Previous key to browse. Press ZOOM key to enlarge picture. While in zoom mode press fast forward of backward key to control the zoom scale. To move the view area of the enlarged picture, use the direction keys.
In view mode, pictures can be rotated with direction keys. The type of slide show transition can be selected from the navigation menu or simply by pressing PROGRAM key.
NOTE:
If the disc contains more than one folder with different file formats, playback will start from the first file; to enter folder menu press STOP button first and then prog.
USB:
The unit can be connected to a flash memory USB to play the files inside. It is not guaranteed this compatibility for players using owner software.
Insert an USB device in the port, when DVD is playing press DVD/USB button on remote control to switch to USB mode, after few seconds playback will start.
Press STOP and Prog to enter in the device foLders, choose desired f older and press Enter or Play to Enter and start playback.
8. Trouble shooting guide
For your convenience, we have enlisted some points to help solve problems you might encounter while using DVD player.
No sound
* Make sure the good connection between player and other appliances such sapower amplifier or TV.
* Make sure the right operation on TV and power amplifier.
No picture
* Make sure the good connection between player and other appliances such as TV.
* Make sure TV works well.
* Make sure the DVD player is in correct mode, otherwise,
press VIDEO button several times to solve it.
Disc does not play
* Make sure the disc is loaded correctly (label side is facing up on the disc tray)
* Make sure the disc is clear.
Remote controller does not work
* Move the obstacle between player and remote controller away.
* Point the remote controller at the remote control sensor.
* Check the battery.
Picture dividing
* Make sure the disc is clear and no any scratch on it.
* For the player is controlled by micro-computer, if encountering problem, switch off the powerfirst, and switch on again in a fewsecond, by then if no mistake is displayed, the player could work well.
SAFE MODE
The main unit will be in safe mode of it does not respond to any operation due to interference by accident or strong noise signals. To resolve this problem, you must pull out the power cord and plug it in again later 10 seconds.
NOTES ON CONDENSATION
Occasionally, condensation may occur within the device, resulting in drops of water forming on the optical pick-up inside the unit. This is much like the condensation that takes place on a glass of cold water. This condensation may affect the overall performance of the machine.
Condensation occurs when:
1) It is moved from a cold area to a warm area.
2) Its surrounding area is exposed to a sudden change in temperature, for example, when located near an air conditioner.
3) In summer, the unit is moved from a hot and humid environment immediately into an air-conditioned room.
4) The device is in a humid environment.
9. CARE OF DISCS
Protection
a. When loading or removing the discs, always hold them by the center and edge.
B. Do not stick or write anything on the surface. Protect discs against any fingerprint.
Cleaning
Wipe the discs from time to time using a soft cloth.
Always wipe from the center toward the edge.
Storage
a. Never warp the discs. During no-use periods, store them in their cases, while should be kept vertically. Do not expose discs to high temperature, dampness or extremely low temperature, or else to may cause damage to the discs.
b. Do not expose discs to direct sunlight.
The DVD player contains laser devices. The top cover of the DVD module acts as a protective housing. Laser radiation is dangerous when the top cover is removed or opened. Avoid direct exposure to beam during service or repair.
Manufactured under license from Dolby Laboratories." Dolby", and the double-D Symbol are trade marks of Dolby Laboratories.
This product incorporates copyright protection technology, that is protected by method claims of certain U.S. patents and other intellectual property rights owned by Macrovision Corporation and other rights owners. Use of this copyright protection technology must be authorized by Macrovision Corporation, and is intended for home and other limited viewing uses only unless otherwise authorized by Macrovision Corporation. Reverse engineering or disassembly is prohibited.
- Technical Specification
| Type | DVX 2075USB |
| TV mode | PAL/AUTO/NTSC |
| Disc mode | MPEG4,DVD, VCD,CD, MP3, CD-R, JPEG Picture CD |
| Resolution | ≥500 lines |
| Video S/N ratio | ≥56dB |
| Frequency response | 20Hz-20KHz+/-1 dB |
| Audio S/N ratio | ≥90dB |
| Dynamic range | ≥90dB |
| Distortion | <1% |
| D/A converter | 96KHz/24bit |
| Video output | 1Vp-p(75 O) |
| Audio output | 2.0V |
| Digital audio output | Coaxial |
| Channel | 2 |
| Power voltage | 110-240V~50Hz/60Hz |
| Consumption | 10w MAX-1W STANDBY |
Specifications are subject to change without notice.
If at any time in the future you should need to dispose of this product please note that waste electrical products should not be disposed of with household waste. Please recycle where facilities exist. Check with your Local Authority or retailer for recycling advice.(Waste Electrical and Electronic equipment Directive)
Owing to continuous improvement, no prior notice will be given regarding changes on above feature and spec.
Caution: Danger of explosion if battery is incorrectly replaced. Replace only with the same or equivalent type.
CE
"CE" marking states that the product is compliant to European Directives:
2006/95/EC Low Voltage Directive
2004/108/EC EMC Directive
2011/65/UE RoHS Directive
- MANUALE ISTRUZIONI
- PERICOLO
- Note
- Caution
- Copy Protection:
- CONTENT
- Brief Instruction of Controls
- Remote control panel identification
- Preparations
- Accessories
- Battery installation of remote controller
- System connection
- Play mode setting
- Basic operation
- Play disc
- Description of function
- OSD
- Play mode
- Subtitle
- Angle
- Audio
- Title
- Menu/PBC
- Direction key
- Number key
- Repeat A - B
- Repeat
- ZOOM
- Volume and Mute
- L/R
- PROG
- SLOW
- RESUME
- SETTING OF THE SYSTEM
- DVD menu setting
- LAST MEMORY
- GENERAL SETUP
- TV DISPLAY
- ANGLE MARK
- OSD LANG
- CAPTIONS
- SCREEN SAVER
- HDCD
- AUDIO SETUP
- Speaker Setup
- Downmix
- Spdif Setup
- Spdif Output
- DOLBY SETUP
- DUAL MONO
- DYNAMIC
- VIDEO SETUP
- COMPONENT
- SHARPNESS
- BRIGHTNESS
- CONTRAST
- PREFERENCE SETUP
- TV TYPE
- AUDIO LANGUAGE
- SUBTITLE LANGUAGE
- DISC MENU LANGUAGE
- PARENTAL
- PASSWORD
- DEFAULT
- JPEG
- Trouble shooting guide
- No sound
- No picture
- Disc does not play
- Remote controller does not work
- Picture dividing
- SAFE MODE
- NOTES ON CONDENSATION
- CARE OF DISCS
- Protection
- Cleaning
- Storage
- CE
Brand : MAJESTIC
Model : DVX-2075 USB
Category : DVD player