
SLED3228 - Television SANSUI - Free user manual and instructions
Find the device manual for free SLED3228 SANSUI in PDF.


| Product Type | LED TV |
| Brand | Sansui |
| Model | SLED3228 |
| Screen Size | 32 inches (81 cm diagonal) |
| Display Resolution | 1366 x 768 (HD Ready) |
| Dimensions (without stand) | 28.9 x 17.1 x 3.1 inches (73.5 x 43.5 x 7.9 cm) |
| Dimensions (with stand) | 28.9 x 18.5 x 7.1 inches (73.5 x 47.0 x 18.0 cm) |
| Weight (without stand) | 8.8 lbs (4.0 kg) |
| Weight (with stand) | 9.7 lbs (4.4 kg) |
| Power Supply | AC 120V, 60Hz |
| Power Consumption (typical) | 50W |
| Standby Power | < 0.5W |
| Inputs | HDMI x2, USB x1, VGA x1, Composite x1, Antenna x1 |
| Outputs | Headphone jack x1, Audio out (RCA) x1 |
| Tuner | ATSC (Digital) / NTSC (Analog) |
| Remote Control | Included (IR) |
| Stand | Included, table-top |
| Wall Mount | VESA 200 x 100 mm (not included) |
| Care Instructions | Wipe with a soft dry cloth. Do not use liquid or abrasive cleaners. |
| Safety Warning | Do not open the back cover. Avoid exposure to rain or moisture. Place on a stable surface. |
| Spare Parts Available | Remote control, stand, power cord (may vary by region) |
| Repairability | Refer to a qualified technician. No user-serviceable parts inside. |
Frequently Asked Questions - SLED3228 SANSUI
User questions about SLED3228 SANSUI
0 question about this device. Answer the ones you know or ask your own.
Ask a new question about this device
Download the instructions for your Television in PDF format for free! Find your manual SLED3228 - SANSUI and take your electronic device back in hand. On this page are published all the documents necessary for the use of your device. SLED3228 by SANSUI.
USER MANUAL SLED3228 SANSUI
TELEVISOR DEL PANORÁMICO DE 32" 32" CLASS WIDE LED TV
SLED3228

HIGH-DEFINITION TELEVISION

DIGITAL

HIGH-DEFINITION MULTIMEDIA INTERFACE


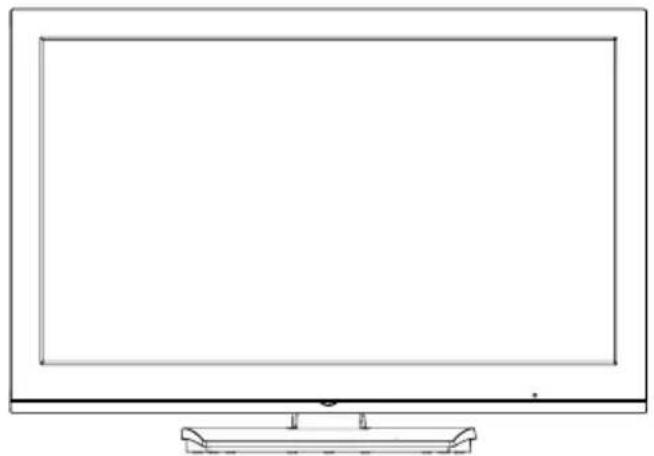
natural_image
Line drawing of a flat-screen monitor with a blank screen and stand (no text or symbols)ATENCION ATTENTION
Si usted ha comprado un control remoto universal, por favor comunicarse con el fabricante para el código de programación requerido. If you purchase a universal remote control from your local retailer, please contact the remote manufacturer for the required programming code.
SELECCION DE MODO DE ANTENA/CABLE AIR/CABLE MODE SELECTION
Al salir la unidad de fábrica, la opción Tipo de Señal se ajusta al modo de "Cable" (Televisión por cable). Si no utiliza CATV, ajuste esta opción de menú al modo de "Antena". When shipped from the factory, the Signal Type option is set to the "Cable" (Cable Television) mode. If not using Cable TV, set this menu option to the "Air" position.
SI REQUIERE CONTACTAR SERVICIO AL CLIENTE POR FAVOR TENGA EL NÚMERO DE
MODELO LISTO ANTES LLAMAR
IF CONTACT WITH CUSTOMER SERVICE IS REQUIRED
PLEASE HAVE THE MODEL NUMBER READY PRIOR TO THE CALL
SERVICIO AL CLIENTE - 01-800-832-4065
CUSTOMER SERVICE - 1-800-289-0980
SITIO WEB DE ORION ORION WEBSITE
natural_image
Technical line drawing of an electrical control panel with visible circuit breakers and components (no text or labels)natural_image
Technical line drawing of a rectangular electronic device with internal components and an inset view showing internal structure (no text or symbols)Figura 1


Figura 2
CÓMO INSTALAR LAS PILAS
natural_image
Simple line drawing of a mechanical component with a paper clip and arrows indicating direction (no text or symbols)- Instale dos pilas "AAA" (suministrado).

natural_image
Simple line drawing of a battery mounted on a base with two positive charges, no text or symbols present.| Antena Cable | |||
| VHF | VHF | ||
| 2-13 | 2-13 | ||
| UHF | STD/HRC/IRC | ||
| 14-69 | 14-36 | (A) | (W) |
| 37-59 | (AA) | (WW) | |
| 60-85 | (AAA) | (ZZZ) | |
| 86-94 | (86) | (94) | |
| 95-99 | (A-5) | (A-1) | |
| 100-135 | (100) | (135) | |
| 01 | (4A) | ||
NOTA:
- / VCR / DVD / STB / Cable / Satellite / Receiver /
Game / Camcorder / PC / DVI PC / Blu-ray
Ajuste del V-Chip
natural_image
Simple geometric diagram with a circle centered within a square, flanked by four smaller circles (no text or symbols)natural_image
Two diagrams showing a square with a circle and an oval shape, both rotated to form a rectangle (no text or symbols)natural_image
Diagram showing a square with a circle and five surrounding circles, transforming into a rectangular frame (no text or symbols)natural_image
Two diagrams showing a circular component before and after transformation, with no text or symbols present.FANTASMAS
natural_image
Black-and-white portrait of a woman with curly hair (no visible text or symbols)NIEVE
natural_image
Black-and-white photo of a person with curly hair, no visible text or symbolsnatural_image
Abstract black ink blot on a striped background (no text or symbols)natural_image
Portrait of a smiling woman with curly hair and a ponytail (no text or symbols visible)Audio: -8 dBm/50k ohmios
Componente: (Y) 1,0 V (p-p), 75 ohmios
(Pb)/(Pr) 0,7 V (p-p), 75 ohmios
Audio: -8 dBm/50k ohmios
Altavoces: 40,6 mm × 121,9 mm (1-5/8 pulgadas × 4-13/16 pulgadas), 8 ohmios × 2
Potencia de salida de audio: 5,0 Vatios + 5,0 Vatios
ACCESORIOS Control remoto
Pilas (AAA) × 2
Cable de CA
Soporte
Tornillos x 3
The lightning flash with arrowhead symbol, within an equilateral triangle is intended to alert the user to the presence of uninsulated dangerous voltage within the product's enclosure that may be of sufficient magnitude to constitute a risk of electric shock.

The exclamation point within an equilateral triangle is intended to alert the user to the presence of important operating and maintenance (servicing) instructions in the literature accompanying the appliance.
WARNING: TO PREVENT FIRE OR SHOCK HAZARD, DO NOT EXPOSE THIS APPLIANCE TO RAIN OR MOISTURE. TO PREVENT THE SPREAD OF FIRE, KEEP CANDLES OR OPEN FLAMES AWAY FROM THIS PRODUCT AT TIMES.
CAUTION: TO PREVENT ELECTRIC SHOCK. DO NOT USE THIS POLARIZED PLUG WITH AN EXTENSION CORD, RECEPTACLE OR OTHER OUTLET UNLESS THE BLADES CAN BE FULLY INSERTED TO PREVENT BLADE EXPOSURE.
WARNING: This equipment has been tested and found to comply with the limits for a Class B digital device, pursuant to Part 15 of the FCC Rules. These limits are designed to provide reasonable protection against harmful interference in a residential installation. This equipment generates, uses and can radiate radio frequency energy and, if not installed and used in accordance with the instructions, may cause harmful interference to radio communications.
However, there is no guarantee that interference will not occur in a particular installation. If this equipment does cause harmful interference to radio or television reception, which can be determined by turning the equipment off and on, the user is encouraged to try to correct the interference by one or more of the following measures:
- Reorient or relocate the receiving antenna.
- Increase the separation between the equipment and receiver.
- Connect the equipment into an outlet on a circuit different from that to which the receiver is connected.
- Consult the dealer or an experienced radio/TV technician for help.
CAUTION: Changes or modifications not expressly approved by the party responsible for compliance with the FCC Rules could void the user's authority to operate this equipment.
Location of the required Marking
The rating sheet and the safety caution are on the rear of the unit.

natural_image
Technical line drawing of an electrical control panel with no visible text or symbolsRecord the model number and serial number.
Model number ____ Serial number ____
1) Read these instructions.
2) Keep these instructions.
3) Heed all warnings.
4) Follow all instructions.
5) Do not use this apparatus near water.
6) Clean only with dry cloth.
7) Do not block any ventilation openings. Install in accordance with the manufacturer's instructions.
8) Do not install near any heat sources such as radiators, heat registers, stoves, or other apparatus (including amplifiers) that produce heat.
9) Do not defeat the safety purpose of the polarized or grounding-type plug. A polarized plug has two blades with one wider than the other. A grounding type plug has two blades and a third grounding prong. The wide blade or the third prong are provided for your safety. If the provided plug does not fit into your outlet, consult an electrician for replacement of the obsolete outlet.
10) Protect the power cord from being walked on or pinched particularly at plugs, convenience receptacles, and the point where they exit from the apparatus.
11) Only use attachments/accessories specified by the manufacturer.
12) Use only with cart, stand, tripod, bracket, or table specified by the manufacturer, or sold with the apparatus. When a cart is used, use caution when moving the cart/apparatus combination to avoid injury from tip-over.
13) Unplug this apparatus during lightning storms or when unused for long periods of time.
14) Refer all servicing to qualified service personnel. Servicing is required when the apparatus has been damaged in any way, such as power-supply cord or plug is damaged, liquid has been spilled or objects have fallen into the apparatus, the apparatus has been exposed to rain or moisture, does not operate normally, or has been dropped.
15) Apparatus should not be exposed to dripping or splashing, and objects filled with liquids, such as vases, should not be placed on the apparatus.
16) An outside antenna system should not be located in the vicinity of overhead power lines or other electric light or power circuits, or where it can fall into such power lines or circuits. When installing an outside antenna system, extreme care should be taken to keep from touching such power lines or circuits, as contact with them might be fatal.
17) Do not overload wall outlets and extension cords, as this can result in a risk of fire or electric shock.
18) Do not push objects through any openings in this unit, as they may touch dangerous voltage points or short out parts that could result in fire or electric shock. Never spill or spray any type of liquid into the unit.
19) If an outside antenna or cable system is connected to the unit, be sure the antenna or cable system is grounded to provide some protection against voltage surges and built-up static charges, Section 810 of the National Electrical Code, ANSI/NFPA 70, provides information with respect to proper grounding of the mast and supporting structure, grounding of the lead-in wire to an antenna discharge unit, size of grounding conductors, location of antenna discharge unit, connection to grounding electrodes, and requirements for
EXAMPLE OF ANTENNA GROUNDING AS PER THE NATIONAL ELECTRICAL CODE

20) When replacement parts are required, be sure the service technician uses replacement parts specified by the manufacturer or those that have the same characteristics as the original part. Unauthorized substitutions may result in fire, electric shock or other hazards.
21) Upon completion of any service or repairs to this unit, ask the service technician to perform safety checks to determine that the unit is in proper operating condition.
22) When you connect the product to other equipment, turn off the power and unplug all of the equipment from the wall outlet. Failure to do so may cause an electric shock and serious personal injury. Read the owner's manual of the other equipment carefully and follow the instructions when making any connections.
23) Sudden high volume sound may cause hearing or speaker damage. When you use headphones, (if the unit is equipped with a headphone jack) keep the volume at a moderate level. If you use headphones continuously with high volume sound, it may cause hearing damage.
24) Do not allow the product to output distorted sound for an extended period of time. It may cause speaker overheating and fire.
25) This reminder is provided to call the cable TV system installer's attention to Article 820-40 of the NEC that provides guidelines for proper grounding and, in particular, specifies that the cable ground shall be connected to the grounding system of the building, as close to the point of cable entry as practical.
26) The socket-outlet must be installed near the unit and easily accessible.
CHILD SAFETY:
It Makes A Difference How and Where You Use Your Flat Panel Display
Congratulations on your purchase! As you enjoy your new product, please keep these safety tips in mind:
THE ISSUE
The home theater entertainment experience is a growing trend and larger flat panel displays are popular purchases. However, flat panel displays are not always supported on the proper stands or installed according to the manufacturer's recommendations.
Flat panel displays that are inappropriately situated on dressers, bookcases, shelves, desks, speakers, chests or carts may fall over and cause injury.
THIS MANUFACTURER CARES!
The consumer electronics industry is committed to making home entertainment enjoyable and safe.
TUNE INTO SAFETY
One size does NOT fit all. Follow the manufacturer's recommendations for the safe installation and use of your flat panel display.
Carefully read and understand all enclosed instructions for proper use of this product.
Don't allow children to climb on or play with furniture and television sets.
Don't place flat panel displays on furniture that can easily be used as steps, such as a chest of drawers.
Remember that children can become excited while watching a program, especially on a “larger than life” flat panel display. Care should be taken to place or install the display where it cannot be pushed, pulled over, or knocked down.
Care should be taken to route all cords and cables connected to the flat panel display so that they cannot be pulled or grabbed by curious children.
WALL MOUNTING: IF YOU DECIDE TO WALL MOUNT YOUR FLAT PANEL DISPLAY, ALWAYS:
Use a mount that has been recommended by the display manufacturer and/or listed by an independent laboratory (such as UL, CSA, ETL).
Follow all instructions supplied by the display and wall mount manufacturers.
If you have any doubts about your ability to safely install your flat panel display, contact your retailer about professional installation.
Make sure that the wall where you are mounting the display is appropriate to support the weight of the unit/product and wall mount. If you are unsure, contact a professional installer.
A minimum of two people are required for installation. Flat panel displays can be heavy.
CONDENSATION
Moisture will form in the operating section of the unit if the unit is brought from cool surroundings into a warm room or if the temperature of the room rises suddenly. When this happens, unit's performance will be impaired. To prevent this, let the unit stand in its new surroundings for about an hour before switching it on, or make sure that the room temperature rises gradually.
Condensation may also form during the summer if the unit is exposed to the breeze from an air conditioner. In such cases, change the location of the unit.
HOW TO HANDLE THE LCD PANEL
- Do not press hard or jolt the LCD panel. It may cause the LCD panel glass to break and injury may occur.
- If the LCD panel is broken, make absolutely sure that you do not touch the liquid in the panel. This may cause skin inflammation.
If the liquid gets in your mouth, immediately gargle and consult with your doctor. Also, if the liquid gets in your eyes or touches your skin, consult with your doctor after rinsing for at least 15 minutes or longer in clean water.
Possible Adverse Effects on LCD Panel: If a fixed (non-moving) pattern remains on the LCD Panel for long periods of time, the image can become permanently engrained in the LCD Panel and cause subtle but permanent ghost images. This type of damage is NOT COVERED BY YOUR WARRANTY. Never leave your LCD Panel on for long periods of time while it is displaying the following formats or images:
- Fixed Images, such as stock tickers, video game patterns, TV station logos, and websites.
- Special Formats that do not use the entire screen. For example, viewing letterbox style (16:9) media on a normal (4:3) display (black bars at top and bottom of screen); or viewing normal style (4:3) media on a widescreen (16:9) display (black bars on left and right sides of screen).
The following symptoms are not signs of malfunction but technical limitation. Therefore we disclaim any responsibility for these symptoms.
- LCD Panels are manufactured using an extremely high level of precision technology, however sometimes parts of the screen may be missing picture elements or have luminous spots.
This is not a sign of a malfunction. - Do not install the LCD Panel near electronic equipment that produces electromagnetic waves. Some equipment placed too near this unit may cause interference.
- Effect on infrared devices – There may be interference while using infrared devices such as infrared cordless headphones.
SAFETY PRECAUTIONS
The unit emits heat when in operation. Do not place any covers or blankets on the unit, this may cause overheating.
Do not block ventilation holes, or set up near radiators. Do not place in direct sunshine. When placing on a shelf leave 10 cm (4 inches) free space around the entire unit.

Notes when mounting the unit on a wall
- If the unit is to be mounted on the wall, contact the retailer where you purchased the unit for advice, and have the equipment professionally installed. Incomplete or improper installation may cause injury to you, and/or damage to the unit.
- Bracket holes: To attach a wall mounting bracket (not supplied) attach where indicated in the drawing right.
• This manufacturer recommends professional installation. - Utilize an appropriate bracket and fasteners, sufficient to accommodate the size and weight of the unit.
- Assure the wall to which the unit is to be mounted will safely support the size and weight of the unit, using the bracket and fasteners you have selected.
- Keep cords and cables connected to this flat panel display out of reach of children.
- To hang the television on a wall, remove these screws and then remove a stand. Before performing work spread cushioning over the base area to lay the TV on.
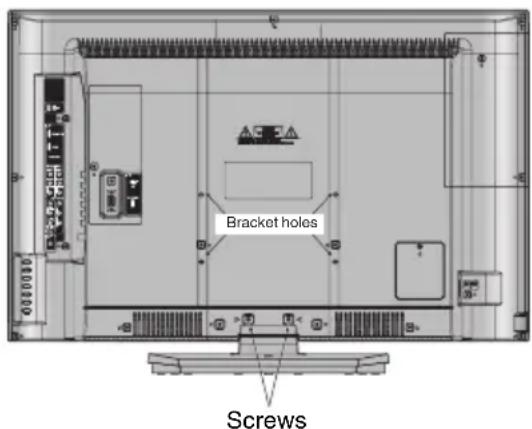
How to attach the stand
NOTE:
- Unplug the AC cord from the AC INPUT terminal.
- Before beginning this process, assure that the TV is laid on a clean, safe, and cushioned surface to avoid any damage to the unit.
- Do not touch or press the TV-screen, glass might break under pressure.
Place the TV on its front onto a table.
Align the stand's bottom-plate (supplied) as seen here.
It will fit in only one direction.
Hold the unit and attach the stand slowly, as shown in Figure 1.

Figure 1
Figure 2
Finally secure the bottom-plate with 3 screws (supplied) as indicated by the arrows in Figure 2.
- Be sure to follow the instructions. Insufficient tightening or incorrect installation of the stand will not support your unit correctly, and could result in damage or injury from tip-over.
How to remove the stand
When you transport this product, remove the stand and pack flat against the back of the unit in the carton. To remove the stand, perform these steps in reverse order.
For wall mounting, the base must be removed. To disconnect the base/stand remove the 2 screws from the back (see page 5).
- Integrated Digital Tuner - You can view digital broadcasts without using a Digital TV Set-Top Box.
- Closed Caption Decoder With Full Text Mode - Displays text captions or full screen text on the screen for hearing impaired viewers.
- Picture Adjustments Using The Remote Control - The On-Screen display allows precise remote control adjustment of BRIGHTNESS, CONTRAST, COLOR, TINT and SHARPNESS.
- Programmable TV Sleep Timer - Operable from the remote control, the unit can be programmed for up to 120 minutes to turn off automatically.
- V-Chip - The V-Chip function can read the rating of a broadcast program or movie content if the program is encoded with this information. V-Chip will allow you to set a restriction level.
- Digital Audio Jack (Coaxial) - When a component with a built-in Dolby Digital decoder is connected, Dolby Digital sound can produce the effect of being in a movie theater or a concert hall.
- HDMI/Component Video Jacks - A VCR, DVD player, satellite receiver or other audio/video component can be connected to this unit.
- On-Screen 3 Language Display - You can select one of 3 languages, English, French or Spanish for on-screen programming.
* Manufactured under license from Dolby Laboratories. Dolby and the double-D symbol are trademarks of Dolby Laboratories.
* HDMI, the HDMI Logo, and High-Definition Multimedia Interface are trademarks or registered trademarks of HDMI Licensing LLC in the United States and other countries.
Power source
TO USE AC POWER
- Connect the AC cord plug into this unit's AC INPUT jack.
- Connect the AC cord into an AC outlet.

NOTE:
- Please make sure to insert the cord securely at both the unit and the wall outlet.
- The AC cord has a polarized type AC line plug. If the supplied AC cord does not match your AC outlet, contact a qualified electrician.
WARNING:
- DO NOT CONNECT THIS UNIT TO THE POWER USING ANY DEVICE OTHER THAN THE SUPPLIED AC CORD. THIS COULD CAUSE FIRE, ELECTRICAL SHOCK, OR DAMAGE.
- DO NOT USE WITH A VOLTAGE OTHER THAN THE POWER VOLTAGE SPECIFIED. THIS COULD CAUSE FIRE, ELECTRICAL SHOCK, OR DAMAGE.
CAUTION:
- WHEN THIS UNIT IS NOT USED FOR A LONG TIME, (E.G., AWAY ON A TRIP) IN THE INTEREST OF SAFETY, BE SURE TO UNPLUG IT FROM THE AC OUTLET.
- DO NOT PLUG/UNPLUG THE AC CORD WHEN YOUR HANDS ARE WET. THIS MAY CAUSE ELECTRICAL SHOCK.
- IF YOU NEED TO REPLACE THE SUPPLIED AC ADAPTER OR AC CORD, THE SPECIFIED ONE IS RECOMMENDED. CONTACT CUSTOMER SERVICE AT 1-800-289-0980.
Before using your unit
IMPORTANT SAFETY INSTRUCTIONS .....3
SAFETY PRECAUTIONS ....5
How to attach the stand 6
How to remove the stand 6
Features....7
Power source 7
Contents 8
Parts and functions 9
Remote control 10
Antenna connections ....11
Cable TV connections ....11
Connections to other equipment 12
TV operation
Starting setup 15
TV operation 15
Quick guide for menu operation 16
Convenience functions ......17
Memorizing channels 18
Checking the digital signal strength .....19
Labeling channels 19
Labeling video inputs 19
Setting the V-Chip 20
Closed Caption 21
CC advanced 21
Setting the picture size 22
Additional information
Reception disturbances 23
Troubleshooting 24
Specifications 25
limited WARRANTY 26
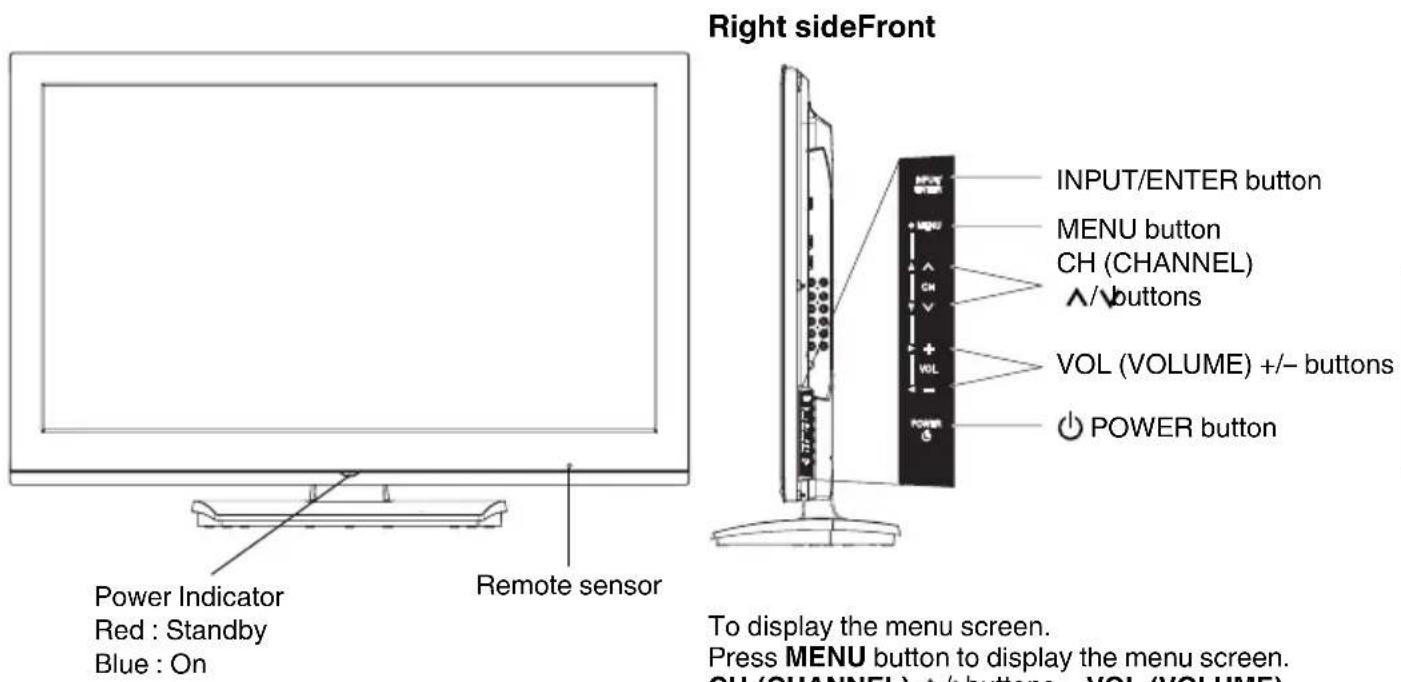
To display the menu screen.
Press MENU button to display the menu screen.
CH (CHANNEL) ^/buttons, VOL (VOLUME)
+/- buttons and INPUT/ENTER button can be used to select the desired setting during the menu screen operations.


- ⏻ (POWER) Button - Used to turn the power on/off to the unit.
2.DISPLAY Button - When you press this button, the current information will be displayed on a screen. To remove the display from the screen, press this button again. - Direct Channel Selection Buttons (0-9) - Allows direct access to any channel of the unit.
4.- Button -This button is used when selecting digital channels. -
MENU Button - Use to display the On-Screen menu function.
-
CURSOR ▲/▼/◄/► Buttons - Used to operate the menu functions of the unit.
- ENTER Button - Use to enter or select information for On-Screen operations.
8.MUTE Button - To turn off the sound, press this button once. The unit will be silenced and the symbol "Mute" will appear on the screen. The muting feature can be released by pressing the MUTE button again or one of the VOL (VOLUME) + or - buttons. - VOL (VOLUME) + / - Buttons - Press the + button to increase, or the - button to decrease the sound level.
- INPUT SELECT Button - Use to change the external input.
11.CCD Button - Used to display the Closed Caption menu screen.
12.SLEEP Button - To set the unit to turn off after a preset amount of time, use the SLEEP button on the remote control.
13.PICTURE SIZE Button - Used to change the picture size.
14.RECALL Button - This button allows you to go back to the previous channel selected by just pressing the RECALL button. Press this button again to return to the channel you were watching. - EXIT Button - Press to remove setup menu.
- AUDIO Button - Change sound track language.
17.CH (CHANNEL) ∧/ Buttons - To change the channels of the unit.
Before using the remote control, batteries must first be installed.
HOW TO INSTALL BATTERIES
- Open the battery compartment cover.
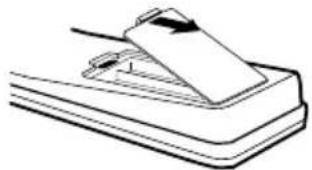
natural_image
Illustration of a mechanical device with a paper clip and base, no text or symbols present- Install two "AAA" batteries (supplied).

natural_image
Simple line drawing of a battery with two positive charges and a negative charge, placed on a base (no text or symbols)- Replace the battery compartment cover.
Use two "AAA" size batteries. The batteries may last approximately one year depending on how much the remote control is used. For best performance, it is recommended that batteries should be replaced on a yearly basis, or when the remote operation becomes erratic. Do not mix old and new batteries or different types.
BATTERY PRECAUTIONS
These precautions should be followed when using batteries in this device:
- Use only the size and type of batteries specified.
- Be sure to follow the correct polarity when installing the batteries as indicated in the battery compartment. Reversed batteries may cause damage to the device.
- Do not mix different types of batteries together (e.g. Alkaline and Carbon-zinc) or old batteries with fresh ones.
- If the device is not to be used for a long period of time, remove the batteries to prevent damage or injury from possible battery leakage.
- Do not try to recharge batteries not intended to be recharged; they can overheat and rupture. (Follow battery manufacturer's directions.)
If you are using an indoor or outdoor antenna, follow the instructions below that correspond to your antenna system. If you are using a Cable TV service, see "Cable TV connections".
Combination VHF/UHF Antenna (Single 75 ohm cable)

Connect the 75 ohm cable from the combination VHF/UHF antenna to the Antenna Jack.
Cable TV connections
This TV has an extended tuning range and can tune most cable channels without using a Cable TV Converter box. Some cable companies offer “premium pay channels” where the signal is scrambled. Descrambling these signals for normal viewing requires the use of a descrambler device which is generally provided by the Cable TV company.
For subscribers to basic Cable TV service

For basic Cable TV service not requiring a Converter/Descrambler box, connect the 75 ohm Coaxial Cable directly to the Antenna Jack on the back of the TV.
For subscribers to scrambled Cable TV service
If you subscribe to a Cable TV service which requires the use of a Converter/Descrambler box, connect the incoming 75 ohm Coaxial Cable to the Converter/Descrambler box. Using another 75 ohm Coaxial Cable, connect the output jack of the Converter/Descrambler box to the Antenna Jack on the TV. Follow the connections shown below. Set the TV to the output channel of the Converter/Descrambler box (usually channel 3 or 4) and use the Converter/Descrambler box to select channels.

flowchart
graph LR
    A["Incoming 75 ohm Cable TV Cable"] --> B["Converter/ Descrambler"]
    B --> C["75 ohm Cable to TV"]
    C --> D["Antenna Jack"]
    D --> E["ANT."]
For subscribers to unscrambled Cable TV service with scrambled premium channels
If you subscribe to a Cable TV service in which basic channels are unscrambled and premium channels require the use of a Converter/Descrambler box, you may wish to use a signal Splitter and an A/B Switch box (available from the Cable TV company or an electronics supply store). Follow the connections shown below. With the switch in the "B" position, you can directly tune any nonscrambled channels on your TV. With the switch in the "A" position, tune your TV to the output of the Converter/Descrambler box (usually channel 3 or 4) and use the Converter/Descrambler box to tune scrambled channels.

flowchart
graph LR
    A["Incoming 75 ohm Cable TV Cable"] --> B["Splitter"]
    B --> C["Converter/Descrambler"]
    B --> D["A/B Switch"]
    C --> E["Antenna Jack"]
    D --> F["75 ohm Cable to TV"]
    F --> G["Ant."]
Connections to other equipment
The exact arrangement you use to interconnect various video and audio components to this unit is dependent on the model and features of each component. Check the Owner's Manual provided with each component for the location of video and audio inputs and outputs.
To connect the unit to a VCR
Right of the unit

flowchart
graph LR
    A["VIDEO 1"] -->|To VIDEO/AUDIO IN| B["VIDEO"]
    C["VIDEO 2"] -->|To Video/AUDIO OUT| D["VIDEO"]
    E["AUDIO"] --> F["L (VCR)"]
    G["AUDIO"] --> H["L (VCR)"]
    I["L (VCR)"] --> J["R"]
    K["VCR"] --> L["Output"]
    M["Video/Audio cord (not supplied)"] --> N["Video"]
    O["Video/Audio cord (not supplied)"] --> P["Video"]
To connect the unit to a DVD player with Component Video Input
You can enjoy a high quality picture by connecting the unit's COMPONENT VIDEO OUT jacks of your DVD player with the COMPONENT video cables (not supplied).
Right of the unit

flowchart
graph LR
    A["VIDEO 1"] -->|To AUDIO IN| B["Component"]
    C["VIDEO 2"] -->|To AUDIO IN| B
    D["VIDEO"] -->|To AUDIO IN| B
    E["VIDEO"] -->|To AUDIO IN| B
    F["L MONO"] -->|To Audio OUT| G["DVD"]
    H["L MONO"] -->|To Audio OUT| G
    I["R"] -->|To Audio OUT| G
    J["R"] -->|To Audio OUT| G
    K["R"] -->|To Audio OUT| G
    L["L MONO"] -->|To Audio OUT| M["Component"]
    N["L MONO"] -->|To Audio OUT| M
    O["R"] -->|To Audio OUT| M
    P["R"] -->|To Audio OUT| M
    Q["Pb"] -->|To Audio OUT| M
    R["Pr"] -->|To Audio OUT| M
    S["Y"] -->|To Audio OUT| M
    T["Pb"] -->|To Audio OUT| M
    U["Pr"] -->|To Audio OUT| M
    V["PY"] -->|To Audio OUT| M
    W["PY"] -->|To Audio OUT| M
    X["PY"] -->|To Audio OUT| M
    Y["PY"] -->|To Audio OUT| M
    Z["PY"] -->|To Audio OUT| M
    AA["PY"] -->|To Audio OUT| M
    AB["PY"] -->|To Audio OUT| M
    AC["PY"] -->|To Audio OUT| M
    AD["PY"] -->|To Audio OUT| M
    AE["PY"] -->|To Audio OUT| M
    AF["PY"] -->|To Audio OUT| M
    AG["PY"] -->|To Audio OUT| M
    AH["PY"] -->|To Audio OUT| M
    AI["PY"] -->|To Audio OUT| M
    AJ["PY"] -->|To Audio OUT| M
    AK["PY"] -->|To Audio OUT| M
    AL["PY"] -->|To Audio OUT| M
    AM["PY"] -->|To Audio OUT| M
    AN["PY"] -->|To Audio OUT| M
    AO["PY"] -->|To Audio OUT| M
    AP["PY"] -->|To Audio OUT| M
    AQ["PY"] -->|To Audio OUT| M
    AR["PY"] -->|To Audio OUT| M
    AS["PY"] -->|To Audio OUT| M
    AT["PY"] -->|To Audio OUT| M
    AU["PY"] -->|To Audio OUT| M
    AV["PY"] -->|To Audio OUT| M
    AW["PY"] -->|To Audio OUT| M
    AX["PY"] -->|To Audio OUT| M
    AY["VIDEO 1"] --> BY["COMPONENT"]
    AZ["VIDEO 2"] --> BA["COMPONENT"]
    BB["L MONO"] --> BC["COMPONENT"]
    BD["L MONO"] --> BE["COMPONENT"]
    BF["R"] --> BG["COMPONENT"]
    BH["L MONO"] --> BI["COMPONENT"]
    BJ["L MONO"] --> BK["COMPONENT"]
    BL["R"] --> BD
    BM["L MONO"] --> BN["COMPONENT"]
    BO["L MONO"] --> BP["COMPONENT"]
    BZ["L MONO"] --> CA["COMPONENT"]
    CB["L MONO"] --> CC["COMPONENT"]
    CD["L MONO"] --> CE["COMPONENT"]
    CF["L MONO"] --> CG["COMPONENT"]
    CH["L MONO"] --> CI["COMPONENT"]
    CJ["L MONO"] --> CK["COMPONENT"]
    CL["L MONO"] --> CM["COMPONENT"]
    CN["L MONO"] --> CO["COMPONENT"]
    CP["L MONO"] --> CS["COMPONENT"]
    CK["L MONO"] --> CT["COMPONENT"]
    CU["L MONO"] --> CV["COMPONENT"]
    CW["L MONO"] --> CX["COMPONENT"]
    CY["L MONO"] --> CZ["COMPONENT"]
    DA["L MONO"] --> DB["COMPONENT"]
    DC["L MONO"] --> DD["COMPONENT"]
    DJ["L MONO"] --> DE["COMPONENT"]
    DF["L MONO"] --> DG["COMPONENT"]
    DH["L MONO"] --> DI["COMPONENT"]
    DJ["L MONO"] --> DJ["COMPONENT"]
    DK["L MONO"] --> DL["COMPONENT"]
    DV["L MONO"] --> DW["COMPONENT"]
NOTE:
- Component Video input of the unit are for use with a device which output 480i/1080i interlaced signals and 480p/720p progressive signals.
To connect the unit to a camcorder, or a game console
To playback from a camcorder, connect the camcorder to the unit as shown.
This unit can also be used as a display device for many video games. However, due to the wide variety of signals generated by these devices and subsequent hook-up variations required, they have not all been included in the suggested connection diagrams. You'll need to consult each component's Owner's Manual for additional information.
Right of the unit

flowchart
graph LR
    A["VIDEO 1"] -->|To VIDEO/AUDIO IN| B["Video"]
    C["VIDEO 2"] -->|To Video/AUDIO IN| D["Video"]
    E["AUDIO"] --> F["Audio"]
    G["L Audio"] --> H["L Audio"]
    I["R"] --> J["R"]
    B --> K["Video/Audio cord (not supplied)"]
    D --> K
    H --> K
    L["Game Console"] --> M["or"]
    N["Video/Audio OUT"] --> M
Connections to other equipment (continued)
To connect the unit to an audio system
This connection allows you to use an audio amplifier and external speakers, and adjust the audio level using the TV's remote control. To control the audio, turn on the TV and the stereo amplifier, and turn off the TV's built-in speakers (see page 17).
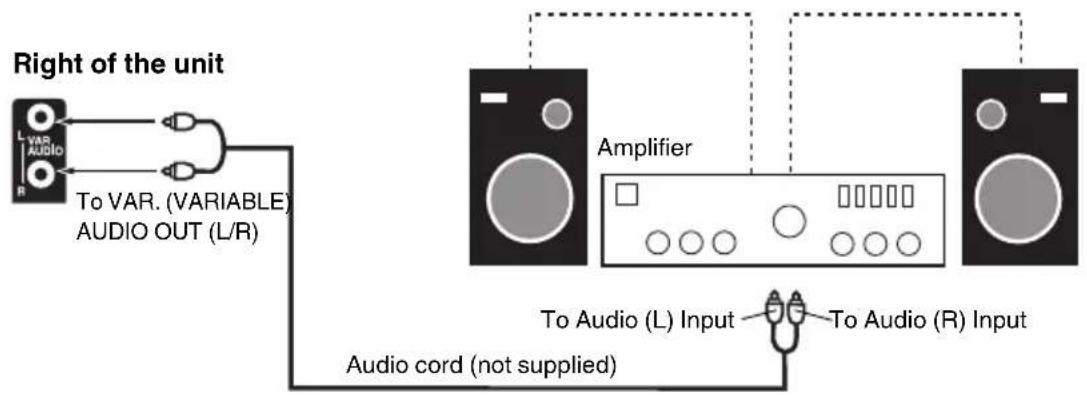
flowchart
graph TD
    A["Right of the unit"] --> B["L VAR. (VARIABLE) AUDIO OUT (L/R)"]
    B --> C["To VAR. (VARIABLE) AUDIO OUT (L/R)"]
    C --> D["Amplifier"]
    D --> E["To Audio (L) Input"]
    D --> F["To Audio (R) Input"]
    D --> G["Audio cord (not supplied)"]
NOTE:
- To hear sound when using an external audio amplifier, the volume of both the TV and the amplifier must be set above 0 (zero).
- For example, if the volume of the TV is set to 0, you will not be able to hear any sound, even if the volume of the amplifier is at its highest level.
Using an AV Amplifier with built-in digital surround
If you are using an AV Amplifier with built-in digital surround sound, you can enjoy various audio systems including Dolby Digital Surround audio that sounds just like the movie.
Connect an AV amplifier with built-in Dolby Digital decoder, etc. as shown below.

flowchart
graph TD
    A["Right of the unit"] --> B["Coaxial digital audio output"]
    B --> C["To Digital Audio COAXIAL OUT"]
    B --> D["To Coaxial Digital Audio Input"]
    D --> E["AV Amplifier with built-in digital surround decoder as listed above"]
    F["TV"] --> G["Front Speaker (Left)"]
    F --> H["Subwoofer"]
    F --> I["Front Speaker (Right)"]
    F --> J["Center Speaker"]
    F --> K["Surround Speaker (Left)"]
    F --> L["Surround Speaker (Right)"]
NOTE:
- When you are viewing digital broadcast, this unit will not work in conjunction with DTS audio or MPEG audio.
There will be no sound output if connected to an AV amplifier with a built-in DTS decoder or MPEG decoder. - Digital Audio Output terminal does not output the sounds from devices connected by HDMI.
To connect a HDMI or a DVI device to the unit
The HDMI1/DVI input receives digital audio and uncompressed video from a HDMI device or uncompressed digital video from a DVI device.
When you connect to a DVI device with a HDMI-to-DVI adapter cable, it transfers only video signal. Separate analog audio cords required.
Rear and Right of the unit

flowchart
graph LR
    A["PC MONITOR"] --> B["To PC/DVI AUDIO IN"]
    B --> C["Audio cord (not supplied)"]
    C --> D["To DVI output"]
    E["To HDMI IN"] --> F["HDMI - to - DVI adapter cable (HDMI type A connector)"]
    F --> G["or"]
    G --> H["HDMI cable (type A connector) (not supplied)"]
    H --> I["To HDMI output"]
    J["DVI device"] --> K["HDMI device"]
    L["←"] --> M["PC Monitor"]
NOTE:
- When using HDMI1/DVI IN to connect your HDMI or DVI devices, you must select the corresponding audio input source (HDMI or DVI) on the menu screen (see page 17). Otherwise you will only see the image with no sound.
To connect the unit to a PC (Personal Computer)
BEFORE YOU CONNECT THIS TV TO YOUR PC, CHANGE THE ADJUSTMENT OF YOUR PC'S RESOLUTION AND REFRESH RATE (60 Hz).
Connect one end of a (male to male) VGA cable to the video cord of the computer and the other end to the VGA connector PC MONITOR IN on the rear of the TV. Attach the connectors firmly with the screws on the plug. In case of a Multimedia computer, connect the audio cord to the audio output of your Multimedia computer and to the AUDIO IN connector of the PC/DVI AUDIO IN jack of the TV. You can also connect the PC with HDMI cable. If you use HDMI cable, you don't have to connect the audio cord. If you use DVI-to-HDMI cable, please connect audio cord as same way as VGA cable.
Press INPUT SELECT on the remote control to select PC mode.
Switch on the computer. The TV can operate as the computer monitor.
Rear and Right of the unit

flowchart
graph TD
    A["PC"] -->|To HDMI IN| B["To HDMI"]
    A -->|To PC MONITOR IN| C["To PC MONITOR"]
    A -->|To PC/DVI AUDIO IN| D["To PC/DVI AUDIO"]
    B --> E["HDMI cable (not supplied)"]
    C --> F["VGA cable (not supplied)"]
    D --> G["Audio cord (not supplied)"]
    E --> H["PC"]
    F --> H
    G --> H
Monitor Display modes
MODE Resolution Refresh rate
VGA 640x480 60/72/75 Hz
VGA 720x400 70Hz
SVGA 800x600 56/60/72/75 Hz
XGA 1024x768 60/70/75 Hz
WXGA 1280x768 60Hz
WXGA 1280x720 60Hz
WXGA 1360x768 60Hz
To return to normal mode
Press INPUT SELECT again.
NOTE:
- The on-screen displays will have a different appearance in PC mode than in TV mode.
- If there is no video signal from the PC when the unit is in PC mode, "No signal" will appear on the TV-screen.
Starting setup
The Auto Setup menu appears the first time you turn on the TV, and assists you to specify the Air/Cable setting, and program your channels automatically.
IMPORTANT: Make sure that the antenna or cable TV system connection is made!
1 To turn on the TV, press(POWER) (POWER indicator on the front of the unit changes blue. It may take approx. 10 seconds for a picture to appear on screen.). The Auto Setup function begins.

2 Press ▲ or ▼ to select "TV Location", then press ◀ or ▶ to select "Store" or "Home". This product qualifies for ENERGY STAR In Home mode default setting.
NOTE:
- This unit has been preset to STORE brightness. This setting does not qualify under ENERGY STAR. To reduce brightness and energy consumption, change setting to 'HOME'. This setting does qualify under ENERGY STAR.
- The device may not conform to the ENERGY STAR standard after Reset is performed or the Backlight is adjusted.
3 Press ▲ or ▼ to select "Signal Type", then press ◀ or ▶ to select "Cable" or "Air".
4 Press ▲ or ▼ to select "Automatic Search", then press ▶ or ENTER.
5 "Auto Setup" will begin. After the Auto Setup is completed, the TV channel appears on the screen.
- Depending on the reception condition, it may take up to 30 minutes to complete memorizing digital cable channels. Please allow the process to complete without interruption.
NOTE:
- If you press EXIT in the process of "Auto Setup", the Auto Setup stops and changes to the normal screen.
- When you make a menu selection, your changes occur immediately. You do not have to press EXIT to see your changes.
TV operation
1 To turn on the TV, press (POWER). (POWER indicator on the front of the unit changes blue. It may take approx. 10 seconds for a picture to appear on screen.)
2 Adjust the volume level by pressing VOL + or -. The volume level will be indicated on the screen by green bars. As the volume level increases, so do the number of bars. If the volume decreases, the number of green bars also decreases.
3 Set the Signal Type option to the appropriate position (see "Air/Cable selection" on page 18).
4 Press the Direct Channel Selection (0-9, -) buttons to select the channel.
(If you press only channel number, channel selection will be delayed for a few seconds.)
TO SELECT ANALOG CHANNELS
1-9: Press 1-9 as needed. Example, to select channel 2, press 2, then press ENTER.
10-99: Press the 2 digits in order. Example, to select channel 12, press 1, 2, then press ENTER.
100-135: Press the 3 digits in order. Example, to select channel 120, press 1, 2, 0, then press ENTER.
TO SELECT DIGITAL CHANNELS
Press the first 1-3 digits, then press the – button, followed by the remaining number.
Example, to select channel 15-1, press 1, 5, -, 1, then press ENTER.
- If a channel is selected with only audio content, "Audio only" will be displayed on the screen.
- If a channel is selected with a weak digital signal, “Digital channel signal strength is low” will be displayed on the screen. The same program may be available on either an analog channel or a digital channel. You may choose to watch either format.
- If a channel is selected to which you have not subscribed, "Digital channel is encrypted" will be displayed on the screen.
VHF/UHF/CABLE CHANNELS
| Air Cable | ||
| VHF2-13 | VHF2-13 | |
| UHF14-69 | STD/HRC/IRC | |
| 14-36 (A) | (W) | |
| 37-59 (AA) | (WW) | |
| 60-85 (AAA) | (ZZZ) | |
| 86-94 (86) | (94) | |
| 95-99 (A-5) | (A-1) | |
| 100-135 (100) | (135) | |
| 01 (4A) | ||
NOTE:
- If a channel with no broadcast is selected, the sound will automatically be muted.
- It may take a few seconds for a digital channel picture to appear on screen after being selected.
To select the video input source
To view a signal from another device connected to your unit, such as a VCR player, press INPUT SELECT, then press ▲ or ▼ or corresponding Number buttons (0-6), then press ENTER. You can select TV, Video1, Video2, Component, HDMI1, HDMI2 or PC depending on which input jacks you used to connect your devices.
![Input Select 0.TV 1.Video1 2.Video2 3.Component 4.HDMI1 5.HDMI2 6.PC [0-6]:Select](/content/2026/05/945445/images/3849860fce3fe5b8fb54c8d6639b6f55d109485b0057030714cdda69a94fedc2.jpg)
CH ∧ ∨
Press and release CH ∧ / ∨. The channel automatically stops at the next channel set into memory. For proper operation, before selecting channels, they should be set into the memory. See “Memorizing channels” on page 18.
DISPLAY
Press DISPLAY to display the current information on the screen.
When the TV receives a digital signal, the digital information will appear.
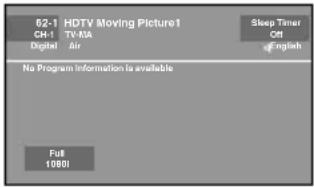
Channel number• Station name•
Channel label (if preset)•• Broadcast program name
V-Chip rating• Signal type•
Sleep timer• Audio language•
Program guide• Picture size•
Resolution•
When the TV receives an analog signal, the analog information will appear.
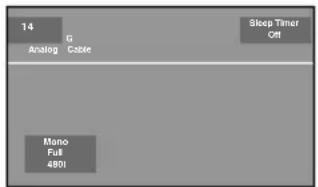
Channel number• Channel label (if preset)•
V-Chip rating• Signal type•
Sleep timer• Picture size•
- Resibutformation (Stereo, SAP or Mono)
Press DISPLAY again to clear the call display.
NOTE:
- After a few seconds, DISPLAY screen will return to normal TV operation automatically.
RECALL
This button allows you to go back to the last channel selected by pressing RECALL. Press RECALL again to return to the last channel you were watching.
MUTE
Press MUTE to switch off the sound. The TV's sound will be silenced and "Mute" will appear on the screen. The sound can be switched back on by pressing this button again or the VOL + or -.
SLEEP
To set the TV to turn off after a preset amount of time, press SLEEP on the remote control. The clock will count up 10 minutes for each press of the SLEEP button (Off, 0h 10m, 0h 20m, ..., 2h 0m). After the sleep time is programmed, the display will appear briefly every ten minutes to remind you that the sleep timer is operating. To confirm the sleep timer setting, press SLEEP and the remaining time will be displayed for a few seconds. To cancel the sleep timer, press SLEEP repeatedly until the display turns to Off.
Quick guide for menu operation
Call menu and for example: Select Language.
1 Press INPUT SELECT to select TV mode.
2 Press MENU. The TV menu screen will appear.

3 Press ▲ or ▼ to select "Setup", then press ▶ or ENTER.
4 Press ▲ or ▼ to select "Language", then press ◀ or ▶ to select the desired language.
...on the following pages the menu can be called in the same way as here.
5 Press EXIT to return to the normal screen.
NOTE:
- If no buttons are pressed for more than about 60 seconds, the menu screen will return to normal operation automatically.
You can change the default settings by pressing the MENU button on your remote, then select the one of the icons at the left of the menu - follow the On-Screen prompts to set your preferences.
| Icon Selected Items Setup hint | ||||
| Picture Picture Preference | Sports Bright and dynamic picture (factory-set) | |||
| Standard Standard picture quality (factory-set) | ||||
| Movie Movie-like picture setting (factory-set) | ||||
| Memory Your personal preferences (set by you; see "Picture Setting") | ||||
| Picture Setting Brightness /Contrast /Sharpness / Color / Tint | You can adjust the picture quality to your preference. | |||
| Color Temperature Bluish (Cool) / Neutral (Standard) / Reddish (Warm) | ||||
| Backlight*2 | The Backlight feature adjusts the screen brightness for improved picture clarity. | |||
| DBC On / Off | Use this feature to change the Black level automatically according to the brightness of an image. The Black level will become dark in a dark scene. | |||
| Picture Size See page 22. | ||||
| Film Mode On/Off A smoother motion may be obtained by setting the Film Mode to "On" (480i only). | ||||
| PC Setting Hor Position /Ver Position | To adjust the horizontal / vertical position of the image on the PC Monitor screen. Each video standard will require a different value for this setting. | |||
| Clock | To minimize any vertical bars or stripes visible on the screen background. | |||
| Phase | This must be adjusted after the frequency has been set optimize picture quality. | |||
| Auto Adjust | To adjust the all PC settings automatically. | |||
| DNR | On/Off | DNR (Digital Noise Reduction) can reduce the roughness of the picture. | ||
| Audio | Equalizer Mode | Standard/Music/Movie/News/Memory/Flat | You can adjust the Equalizer Mode to your preference. | |
| Audio Setting | Bass/Treble | You can adjust the sound quality to your preference. (Flat mode only) | ||
| Equalizer Setting | 100Hz/250Hz/500Hz/1kHz/2kHz/4kHz/10kHz (Not available in Flat mode) | |||
| Balance You can adjust the sound quality to your preference. | ||||
| MTS Stereo / SAP | Mon The multi-channel TV sound (MTS) feature provides high-fidelity stereo sound. MTS also can transmit a second audio program (SAP) containing a second language or other audio information.When the TV receives a stereo or SAP broadcast, the word "Stereo" or "SAP" displays on-screen every time you press DISPLAY. | |||
| Surround | On/Off The dynamic presence and sound created offers a thoroughly enjoyable listening experience. | |||
| Auto Volume | On/Off Volume level can be adjusted automatically by the sound level. | |||
| Audio Language | When two or more audio languages are included in a digital signal, you can select one of the audio languages. (This function is available only for digital broadcast.) | |||
| HDMI1 Audio | HDMI | When you connect the HDMI device to the TV, select this setting. | ||
| DVI | When you connect the DVI device to the TV with analog audio cords, select this setting. | |||
| Speakers | On/Off | Use this feature to turn the TV speakers off when you connect an audio system. | ||
| Channel | Add / Delete | See page 18. | ||
| DTV Signal | See page 19. | |||
| Auto Ch Memory | See page 18. | |||
| Ch Label | See page 19. | |||
| Lock | See page 20. | |||
| Setup | Closed Caption | See page 21. | ||
| Language | You can choose from three different languages (English, Français (French) and Español (Spanish)) for the on-screen displays.Select the language you prefer first, then proceed with the other menu options. | |||
| Video Label See page 19. | ||||
| On Timer | Off / 0h30m / 1h00m / 1h30m / 2h00m / 3h00m · · · 12h00m | You can set the On Timer to automatically turn on the TV. To cancel the On Timer select "Off". | ||
| Auto Shut Off*1 | On/Off If the Auto Shut Off | feature is On, a station being viewed stops broadcasting and the TV is not operated, the TV will automatically shut itself off after 15 minutes. | ||
| Auto Setup | See page 15. | |||
| Power On LED | On/Off | When you turn on the TV, Power indicator on the front of the TV will light. | ||
| PC Standby On/Off | In PC mode, if no signal is received or no operation performed for 1 minute, the TV will turn to standby mode automatically (LED light will flash red). When an input signal is received or an operation performed on the PC, the TV will return to the On mode. | |||
| Reset*2 | The Reset function returns your Picture/Audio settings to the factory settings. "Picture Size", "MTS", "Audio Language" and "HDMI1 Audio" cannot be reset by this function. | |||
NOTE:
*1 If there is no input signal in the PC mode, after 1 minute Auto Shut Off will be activated. In PC mode the "PC Standby" setting takes precedence.
*2 The device may not conform to the Energy Star standard after Reset is performed or the Backlight is adjusted.
Memorizing channels
This TV is equipped with a channel memory feature which allows channels to skip up or down to the next channel set into memory, skipping over unwanted channels. Before selecting channels, they must be programmed into the TV's memory. To use this TV with an antenna, set the Signal Type option to the Air mode. When shipped from the factory, this menu option is in the Cable mode.
Air/Cable selection
1 Select "Channel", then press ▶ or ENTER.
2 Press ▲ or ▼ to select "Auto Ch Memory", then press ▶ or ENTER.
3 Press ▲ or ▼ to select "Signal Type".
4 Press ◀ or ▶ to select "Air" or "Cable".


CABLE CHART
The chart below is typical of many cable system channel allocations.
| Number on this TVCorresponding GABLE channel | 14A | 15B | 16C | 17D | 18E | 19F | 20G | 21H | 22I | ||||||||
| 23J | 24K | 25L | 26M | 27N | 28O | 29P | 30Q | 31R | 32S | 33T | 34U | 35V | 36W | 37AA | 38BB | 39CC | 40DD |
| 41EE | 42FF | 43GG | 44HH | 45II | 46JJ | 47KK | 48LL | 49MM | 50NN | 51OO | 52PP | 53QQ | 54RR | 55SS | 56TT | 57UU | 58VV |
| 59WW | 60AAA | 61BBB | 62CCC | 63DDD | 64EEE | 65FFF | 66GGG | 67HH | 68III | 69JJ | 70KKK | 71LLL | 72MMM | 73NNN | 74OOO | 75PPP | 76QQQ |
| 77RRR | 78SSS | 79TTT | 80UUU | 81VVV | 82WWW | 83XXX | 84YYY | 85ZZZ | 86 | 87 | 88 | 89 | 90 | 91 | 92 | 93 | 94 |
| 95A-5 | 96A-4 | 97A-3 | 98A-2 | 99A-1 | 100100 | 101101 | 102102 | 103103 | 104104 | 105105 | 106106 | 107107 | 108108 | 109109 | 110110 | 111111 | 112112 |
| 113113 | 114114 | 115115 | 116116 | 117117 | 118118 | 119119 | 120120 | 121121 | 122122 | 123123 | 124124 | 125125 | 126126 | 127127 | 128128 | 129130 | 130130 |
| 131131 | 132132 | 133133 | 134134 | 135135 | |||||||||||||
NOTE:
- It may take a few seconds for a digital channel picture to appear on screen after being selected.
Automatic Search
1 Select "Channel", then press ▶ or ENTER.
2 Press ▲ or ▼ to select "Auto Ch Memory", then press ▶ or ENTER.
3 Press ▲ or ▼ to select "Automatic Search", then press ▶ or ENTER.

4 The TV will begin memorizing all the channels available in your area.
- It may take from 15 minutes to 30 minutes to complete memorizing digital cable channels. Depending on the reception condition, a bar display may not advance for several minutes, please be patient.
NOTE:
- Memorizing channels is best accomplished during evening "PRIMETIME" hours, as more stations are broadcasting digital signals. Memorizing channels can only be accomplished while a station is broadcasting a digital signal to set that channel into memory.
- If you are unsure of the digital channels available in your area, you may visit www.antennaweb.org to receive a list based on your address or zip code. Should you require further assistance you may call our toll-free customer service line at 1-800-289-0980.
- New digital channels may be added to your area periodically, it is recommended to perform the "Automatic Search" procedure regularly.
Adding Channel
If you find a new digital channel unregistered, you can add the new channel into the channel memory.
1 Tune in the new channel.
2 Select "Channel", then press ▶ or ENTER.
3 Press ▲ or ▼ to select "Add/Delete", then press ▶ or ENTER.

4 Press ▲ or ▼ to select "Adding Channel", then press ▶ or ENTER. The new channel will be added into the channel memory.
Add/Delete channel
You can select the channel that you want to skip.
1 Select "Channel", then press ▶ or ENTER.
2 Press ▲ or ▼ to select "Add/Delete", then press ▶ or ENTER.
3 Press ▲ or ▼ to select "Add/Delete", then press ▶ or ENTER.
4 Press ▲ or ▼ to select the channel that you want to skip.

5 Press ◀ or ▶ to select "Add" or "Delete", whichever function you want to perform.
6 Repeat steps 4 - 5 for other channels you want to add or delete.
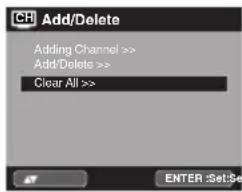
Clear All
All channels are deleted from the channel memory.
1 Select "Channel", then press ▶ or ENTER.
2 Press ▲ or ▼ to select "Add/Delete", then press ▶ or ENTER.
3 Press ▲ or ▼ to select "Clear All", then press ▶ or ENTER.
Checking the digital signal strength
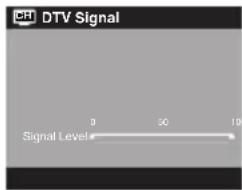
This TV will allow you to view the digital signal meter for digital channels.
1 Select "Channel", then press ▶ or ENTER.
2 Press ▲ or ▼ to select "DTV Signal".
3 Press ▶ or ENTER to check the digital signal strength.
The digital signal strength screen will appear. If necessary, adjust the direction of the antenna to obtain the maximum signal strength.
NOTE:
- Signal meter feature is not available for analog channels.
- After 240 seconds, DTV Signal screen will return to normal TV operation automatically.
Labeling channels
Channel label appear with the channel number display each time you turn on the TV, select a channel, or press DISPLAY.
You can choose any four characters to identify a channel.
To create channel labels
1 Select "Channel", then press ▶ or ENTER.
2 Press ▲ or ▼ to select "Ch Label", then press ▶ or ENTER.
The Ch Label menu will appear.
3 Press ◀ or ▶ to select a channel you want to label, then press ▼.

4 Press ◀ or ▶ repeatedly until the character you want appears in the first space.
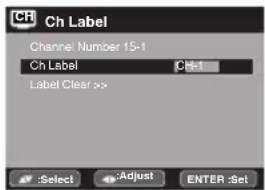
The characters rotation as follows:

If the character which you desire appears, press ENTER.
Repeat this step to enter the rest of the characters. If you would like a blank space in the label name, you must choose the empty space from the list of characters.
5 Repeat steps 3-4 for other channel. You can assign a label to each channel.
6 When you finish inputting the label name, press EXIT to return to the normal screen.
To clear a Ch Label
After step 3 above, press ▲ or ▼ to select "Label Clear", then press ▶ or ENTER.
NOTE:
- The channel labels will be reset after "Automatic Search" on page 18.
Labeling video inputs
The Video Label feature allows you to label each input source for your TV.
1 Select "Setup", then press ▶ or ENTER.
2 Press ▲ or ▼ to select "Video Label", then press ▶ or ENTER.
3 Press ▲ or ▼ to select an input which you want to label.
4 Press ◀ or ▶ to select the desired label for that input source.

- / VCR / DVD / STB / Cable / Satellite / Receiver / Game / Camcorder / PC / DVI PC / Blu-ray
Setting the V-Chip
An age limitation can be set to restrict children from viewing or hearing violent scenes or pictures that you may choose to exclude. The restriction applies to "TV Rating" and "Movie Rating" if this data is transmitted. You may set this restriction separately. To use the V-Chip function, you must register a password.
To register a password
1 Select "Lock", then press ▶ or ENTER.
2 Select and enter your password (4 digits) using Number buttons (0-9), then press ENTER.
![Lock New Password *** [0-9] :Enter Code ENTER :Set](/content/2026/05/945445/images/57463f024acad8afad2f0d961781ef125ae19831a483d2e27c0610c9badba34b.jpg)
“*appears instead of the number.
3 Enter the same password again to confirm, then press ENTER.
The password is now registered.
NOTE:
- If you forget the password, contact Customer Service at 1-800-289-0980 for assistance.
Your original remote control will be required. - To avoid forgetting the password, write it down and keep in a safe place.
To set the V-Chip
1 Select "Lock" menu, then press ▶ or ENTER.
2 Use Number buttons (0-9) to enter your password, then press ENTER. The Lock menu will appear.
3 Press ◀ or ▶ to set "V-Chip" to "On".
4 Press ▲ or ▼ to select "V-Chip Set", then press ▶ or ENTER.
The V-Chip Set menu will appear.
5 Press ▲ or ▼ to select which rating will be used, then press ▶ or ENTER. Each rating below will appear.
TV Rating

You can set the rating using age level and genre.
Age:
TV-Y : All children
TV-Y7 : 7 years old and above
TV-G : General audience
TV-PG : Parental guidance
TV-14 : 14 years old and above
TV-MA : 17 years old and above
When you select TV-Y7, TV-PG, TV-14 or TV-MA, press DISPLAY to explain the rating.
Genre:
G : All ages
PG : Parental guidance
PG-13 : Parental guidance less than 13 years old
R : Under 17 years old parental guidance suggested
NC-17 : 17 years old and above
X : Adult only
6 Press ▲ or ▼ to select the desired rating, then press ENTER.
7 Press EXIT to return to the normal screen. V-Chip function is activated now.
To use the TV after the TV is protected.
When a program is received that is blocked by the V-Chip, press MUTE, then enter your password. The protection will be temporarily overridden. If the TV is turned off or the channel is changed, the V-Chip restriction will be reactivated.
NOTE:
- The V-Chip function is activated only on programs and input sources that include a rating signal.
To change the password
1 Select "Lock", then press ▶ or ENTER.
2 Use Number buttons (0-9) to enter your password, then press ENTER. The Lock menu will appear.
3 Press ▲ or ▼ to select "Change Password", then press ▶ or ENTER.
The Change Password screen will appear.
4 Enter a new password using Number buttons (0-9), then press ENTER.
5 Enter the same password again to confirm, then press ENTER. The password is now registered.
Downloading the additional V-Chip rating system
As a supplement to the standard V-Chip rating system, your television will be able to download an additional rating system, if such a system becomes available in the future.
To download the additional V-Chip rating system (when available)
1 Select "Lock", then press ▶ or ENTER.
2 Use Number buttons (0-9) to enter your password, then press ENTER. The Lock menu will appear.
3 Press ◀ or ▶ to set "V-Chip" to "On".
4 Press ▲ or ▼ to select "V-Chip Set (DTV)", then press ▶ or ENTER.
5 If the TV is not storing the additional rating system, the TV will begin downloading it, which may take some time to be completed.
6 Set your preferred content rating limits for the additional rating system.
7 You also need "Update" procedure to update rating information.
NOTE:
- You can only download the additional V-Chip rating system when your TV is receiving a digital signal.
- When you download the additional rating system, it may take some time for the download to occur.
- The V-Chip rating information and system are not determined or controlled by the TV.
- The standard V-Chip rating system is available whether your TV is receiving a digital signal or not, and will block both analog and digital programs. To set the restriction level using the standard V-Chip rating system, select V-Chip Set in step 4.
- The downloadable V-Chip rating system is an evolving technology, and availability, content, and format may vary.
- You cannot select this feature if the TV is not receiving a digital signal for the current station.
To clear the all V-Chip settings
1 Select "Lock", then press ▶ or ENTER.
2 Use Number buttons (0-9) to enter your password, then press ENTER. The Lock menu will appear.
3 Press ▲ or ▼ to select "V-Chip Clear", then press ▶ or ENTER.
The V-Chip Clear screen will appear.
4 Use Number buttons (0-9) to enter your password, then press ENTER.
Closed Caption
WHAT IS CLOSED CAPTIONING?
This television has the capability to decode and display Closed Captioned television programs. Closed Captioning will display text on the screen for hearing impaired viewers or it will translate and display text in another language.
Captions: This Closed Caption mode will display text on the screen in English or another language. Generally, Closed Captions in English are transmitted on C1 and Closed Captions in other languages are transmitted on C2.
Text: The Text Closed Caption mode will usually fill 1/2 of the screen with a programming schedule or other information.
1 Select "Setup", then press ▶ or ENTER.
2 Press ▲ or ▼ to select "Closed Caption", then press ▶ or ENTER.
The Closed Caption menu will appear.
3 Press ◀ or ▶ to set "CC Setting" to "On". On: Captions will be displayed on the screen. Off: Captions will not be displayed on the screen.
4 Press ▲ or ▼ to select "Analog Caption" or "Digital Caption".
When you select "Analog Caption", you can choose from C1, C2, C3, C4, T1, T2, T3 and T4.
When you select "Digital Caption", you can choose from CS1, CS2, CS3, CS4, CS5 and CS6.
5 Press ◀ or ▶ to select the desired Closed Caption mode for both Digital and Analog Caption.
6 Press ▲ or ▼ to select "CC Priority", then press ◀ or ▶ to select "Digital CC" or "Analog CC".
NOTE:
- Depending on the broadcast signal, some Analog Captions will function with a Digital broadcast signal. This step prevent that two kind of captions are overlapping.
NOTE:
- If the program or video you selected is not Closed Captioned, no captions will display on-screen.
- If text is not available in your viewing area, a black rectangle may appear on-screen. If this happens, set the CC Setting to "Off".
- When selecting Closed Captions, the captioning will be delayed approx. 10 seconds.
- If no caption signal is received, no captions will appear, but the television will remain in the Caption mode.
- Misspellings or unusual characters may occasionally appear during Closed Captioning. This is normal with Closed Captioning, especially with live programs. This is because during live programs, captions are also entered live. These transmissions do not allow time for editing.
- When Captions are being displayed, on-screen displays, such as volume and mute may be seen but may interfere with Closed Captions.
- Some cable systems and copy protection systems may interfere with the Closed Captioned signal.
- If using an indoor antenna or if TV reception is very poor, the closed caption decoder may not appear or may appear with strange characters or misspelled words. In this case, adjust the antenna for better reception or use an outdoor antenna.
- Closed Caption menu also can be displayed by pressing CCD on the remote control.
CC advanced
When you have selected Custom as the display method, you can adjust the various setting listed below as follows:
This feature is designed to customize Digital Captions only.
1 Select "Setup", then press ▶ or ENTER.
2 Press ▲ or ▼ to select "Closed Caption", then press ▶ or ENTER.
The Closed Caption menu will appear.
3 Press ◀ or ▶ to set "CC Setting" to "On".
4 Press ▲ or ▼ to select "Digital CC Preset", then press ◀ or ▶ to select "Custom".
5 Press ▲ or ▼ to select "CC Advanced", then press ▶ or ENTER.
The CC Advanced menu will appear.
6 Press ▲ or ▼ to select the desired item, then press ◀ or ▶ to change the setting.
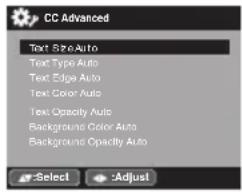
You can select from among the following items and parameters.
Text Size: Auto, Small, Standard, Large
Text Type: Auto, Style1, Style2, Style3, Style4, Style5, Style6, Style7
Text Edge: Auto, None, Raised, Depressed, Uniform, Left Shadow, Right Shadow
Text Color: Auto, Black, White, Red, Green, Blue, Yellow, Magenta, Cyan
Text Opacity: Auto, Solid, Transparent, Translucent, Flashing
Background Auto, Black, White, Red, Green, Color: Blue, Yellow, Magenta, Cyan
Background Auto, Solid, Transparent, Opacity: Translucent, Flashing
NOTE:
- You cannot set both "Text Color" and "Background Color" as a same color.
- You cannot set both "Text Opacity" and "Background Opacity" to "Transparent".
Setting the picture size
You can change to a variety of picture sizes—Natural, Cinema Wide1, Cinema Wide2, Cinema Wide3, Full and Native.
Selecting the picture size
1 Select "Picture", then press ▶ or ENTER.
2 Press ▲ or ▼ to select "Picture Size", then press ▶ or ENTER to display Picture Size menu. Press ▲ or ▼ or corresponding Number buttons (0-4) to select the desired picture size, as described below.
![Picture Size 0.Natural 1.Cinema Wide1 2.Cinema Wide2 3.Cinema Wide3 4.Full [0-4] :Select](/content/2026/05/945445/images/fbb1d81841090df8ebd88d699487bc21d2f09332ca0d778765830977344f23c0.jpg)
NOTE:
- Selectable picture sizes may vary depending on the input source or broadcast signal.
- Picture Size menu also can be displayed by pressing PICTURE SIZE on the remote control.
Natural
In some cases, this image will display the size of standard 4:3 with a black side bar.

natural_image
Simple geometric diagram with a circle centered within a square, surrounded by four corner circles (no text or symbols)Cinema Wide1 (for 4:3 format programs)
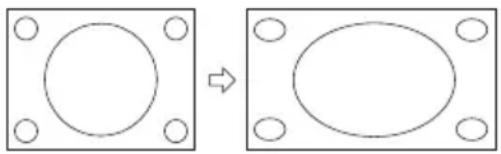
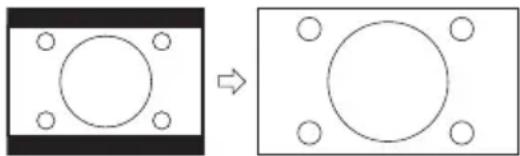
To fill the screen, the right and left edges are extended, however; the center of the picture remains near its former ratio.
The top and bottom edges of the picture may be hidden.
natural_image
Two identical diagrams showing a square with a circle and an oval, both with circular holes, connected by an arrow (no text or symbols)Cinema Wide2 (for letter box programs)
The entire picture is uniformly enlarged—it is stretched the same amount both wider and taller (retains its original proportion).
The top and bottom edges of the picture may be hidden.
natural_image
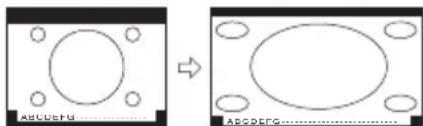
Diagram showing a square with a circle inside and a rectangle with a circle inside, both rotated to form a larger square (no text or symbols)Cinema Wide3 (for letter box programs with subtitles)
To fill the width of the screen, it is extended horizontally. However; it is only slightly extended at the top and the bottom.
The top and bottom edges of the picture may be hidden.
natural_image
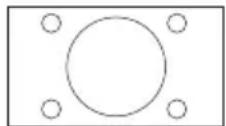
Two schematic diagrams showing a circular component before and after transformation, with no text or symbols present.Full (for 16:9 source programs)
Full will display the picture at the maximum size.
Native (for PC mode only)
Detects the resolution of the signal of the image and it will be shown on the screen with same amount of pixels.

NOTE:
- Some High Definition and/or Digital broadcasts may not allow you to change the picture size.
- In HDMI or COMPONENT mode with a scanning rate of 720p, 1080i or 1080p (HDMI only) only the Cinema Wide2 and Full picture size feature are available.
- In PC mode, only the Natural, Full and Native picture size features are available. In PC mode (WXGA), only the Full and Native picture size features are available.
Most types of television interference can be remedied by adjusting the height and position of the VHF/UHF antenna. Outdoor antennas are recommended for best results. The most common types of television interference are shown below. If one of these symptoms appear when the TV is connected to a Cable TV system, the disturbance may be caused by the local Cable TV company broadcast.
IGNITION
Black spots or horizontal streaks may appear, the picture may flutter or drift. Usually caused by interference from automobile ignition systems, neon lamps or AC powered tools and appliances such as drills or hair dryers.

natural_image
Black-and-white photo of a person wearing a headlamp, no visible text or symbolsGHOSTS
Ghosts are caused by the television signal following two paths. One is the direct path and the other is reflected by tall buildings, hills or other large objects. Changing the direction or position of the antenna may improve the reception.

natural_image
Portrait of a woman with curly hair and a smile (no visible text or symbols)SNOW
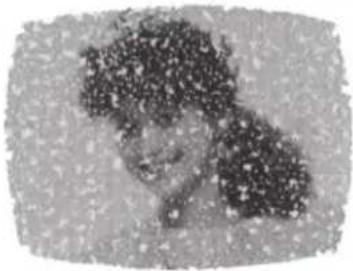
If the TV is located far from the TV station, in a fringe reception area where the signal is weak, small dots may appear in the picture. If the signal is extremely weak, the installation of a larger external antenna may be necessary.
natural_image
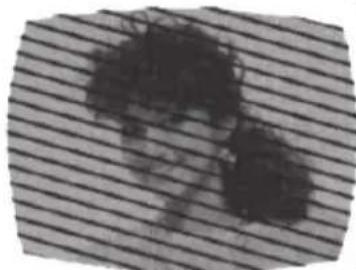
Grayscale image of a person with dark hair and light clothing, no visible text or symbolsRADIO FREQUENCY INTERFERENCE (RFI)
Caused by two-way radios, this type of interference produces moving ripples or diagonal streaks in the picture. Some cases may cause a loss of contrast in the picture. Changing the direction and position of the antenna or installing an RFI filter may improve the picture.
natural_image
Abstract pattern of dark smudges on a striped background (no text or symbols)PICTURE SIZE VARIATION
A slight picture size variation is normal when you adjust the CONTRAST or BRIGHTNESS settings.

natural_image
Portrait of a smiling woman with curly hair and a ponytail (no text or symbols visible)CARE AND MAINTENANCE
To prevent fire or shock hazard, disconnect the TV from the power source before cleaning. The finish on the cabinet may be cleaned with mild soap and a soft, damp cloth and cared for as other furniture. Use caution when cleaning or wiping the plastic parts.
Use the following checklist for troubleshooting if you have problems with your unit. Consult your local dealer or service outlet if problems persist. Be sure all connections are properly made when using with other units.
| SYMPTOMS POSSIBLE SOLUTIONS | |
| TV does not operate. | Make sure the power cord is plugged in.Try another AC outlet.Power is off, check fuse or circuit breaker.Unplug unit for an hour, then plug it back in. |
| Poor sound or no sound. | Station or Cable TV experiencing problems, tune to another station.Check sound adjustments (Volume or Mute).Check for sources of possible interference. |
| Poor picture or no picture. | Station or Cable TV experiencing problems, tune to another station.Make sure channels are set into memory.Check antenna or Cable TV connections, adjust antenna.Check for sources of possible interference.Check picture control adjustments. |
| Poor reception on some channels. | Station or Cable TV experiencing problems, tune to another station.Make sure channels are set into memory.Station is weak, adjust antenna to receive desired station.Check for sources of possible interference. |
| Poor color or no color. | Station or Cable TV experiencing problems, tune to another station.Make sure channels are set into memory.Check picture control adjustments.Check antenna or Cable TV connections, adjust antenna.Check for sources of possible interference. |
| Picture wobbles or drifts. | Station or Cable TV experiencing problems, tune to another station.Make sure channels are set into memory.Cable TV company is scrambling signal.Adjust antenna. |
| SYMPTOMS | POSSIBLE SOLUTIONS |
| Digital broadcasting screen problem. | Check digital signal strength.• |
| No CATV reception. | • Check all Cable TV connections.• Set Air/Cable menu option to the Cable mode.• Station or Cable TV system problems, try another station. |
| Horizontal or diagonal bars on screen. | • Check antenna connections, adjust or re-direct antenna.• Check for sources of possible interference. |
| No reception above channel 13. | • Make sure Signal Type option is in the appropriate mode.• If using antenna, check UHF antenna connections. |
| No Remote operation. | • Batteries are weak, dead or inserted incorrectly.• Remote is out of range, move closer to TV (within 15 feet).• Make sure Remote is aimed at sensor.• Confirm there are no obstructions between the Remote and the TV.• Make sure the power cord is plugged in. |
| TV shuts off. | • Sleep Timer is set.• Power interrupted. |
| Closed Caption is not activated. | • TV station experiencing problems or program tuned is not closed captioned. Try another channel.• Check Cable TV connection or VHF/UHF antenna, reposition or rotate antenna.• Set closed caption decoder in the menu. |
| TV is not shown in your language. | • Select proper language in the menu options. |
BLOCK NOISE / PICTURE FREEZE
Block noise or picture freeze may appear on the screen caused by weak signals, interference from automobile ignition systems, neon lamps or AC powered tools and appliances such as drills or hair dryers.
SANSUI®
FOR CUSTOMER SERVICE, ADDITIONAL SET-UP AND OPERATING ASSISTANCE, OR TO ORDER ACCESSORIES PLEASE CALL:
1-800-289-0980
WHEN CALLING CUSTOMER SERVICE – PLEASE HAVE YOUR MODEL NUMBER READY
OR WRITE TO:
ORION SALES, INC.
3471 N. UNION DR.
OLNEY, ILLINOIS 62450
FOR INFORMATION ON OUR OTHER PRODUCTS, OR TO ORDER ACCESSORIES ONLINE, PLEASE VISIT OUR WEBSITE AT
www.orionsalesinc.com
GENERAL
Power supply: AC 120V, 60Hz
Power consumption: Operation: 59W
Stand by: 0.3W
Weight: 8.1 kg (17.9 lbs)
Dimensions: Width: 778 mm (30-5/8 inches)
Height: 543.6 mm (21-3/8 inches)
Depth: 214 mm (8-7/16 inches)
Operating temperature: 5°C - 40°C
Operating humidity: Less than 80% RH
Type: 801.3mmV (32" class/31.55" diagonal)
Display method: Transmission TFT color LCD panel
Number of Pixels: 1366 (H) × 768 (V)
Broadcasting system: US system M
ATSC standard (8VSB), QAM
Receiving channels: VHF 2-13
UHF 14-69
CATV 14-36 (A)-(W)
37-59 (AA)-(WW)
60-85 (AAA)-(ZZZ)
86-94 (86)-(94)
95-99 (A-5)-(A-1)
100-135 (100)-(135)
01 (4A)
Tuner type: Frequency synthesized
Inputs: Video: 1.0 V (p-p), 75 ohms
Audio: -8 dBm/50k ohms
Component video: (Y) 1.0 V (p-p), 75 ohms
HDMI: HDMI compliant (type A connector)
HDCP compliant
E-EDID compliant
Suggested scan rates: 480p, 480i, 720p,1080i,1080p
HDMI Audio: 2-channel PCM
32/44.1/48 kHz sampling frequency
16/20/24 bits per sample
PC Monitor: Mini-Dsub 15pin
Antenna: VHF/UHF In 75 ohms coaxial
Outputs: Digital audio out: 0.5 V (p-p), 75 ohms terminated
Audio: -8 dBm/50k ohms
Speakers: 40.6 mm × 121.9 mm (1-5/8 inches × 4-13/16 inches), 8 ohms × 2
Audio output power: 5.0W + 5.0W
ACCESSORIES Remote control
Batteries (AAA) × 2
AC Cord
Stand
Screws × 3
Designs and specifications are subject to change without notice.
SANSUI®
limited WARRANTY
32" WIDE LED TELEVISION
ORION warrants this product to be free from manufacturing defects in material and workmanship under normal use and conditions for a period of 1 year from date of original purchase in the United States.
Should service be necessary under this warranty for any reason due to a manufacturing defect or malfunction during the first 12 months from date of original purchase, ORION will provide carry-in service only by an ORION authorized Independent Service Center at no charge. Also, if an original part fails due to manufacturing defect in material and workmanship within one year from date of original purchase we will replace the defective part, provided the defect or malfunction is verified along with dated proof of purchase.
There are ORION authorized Independent Service Centers located throughout the country. For the one nearest you, DIAL TOLL FREE: 1-800-289-0980 or visit our website at www.orionsalesinc.com. ORION will not be liable for damages incurred in shipment of the unit. If there are no ORION authorized Independent Service Centers in your area please call - 1-888-296-7466 for assistance.
Note: This warranty is void if the product is:
(a) Damaged through negligence, misuse, abuse, or accident.
(b) Used in a commercial application or rentals.
(c) Modified or repaired by anyone other than an Independent Service Center authorized by ORION to effect warranty repairs to the class of product or by the ORION Factory Service Center.
(d) Damaged because it is improperly connected to the equipment of other manufacturers.
This warranty does not cover:
(a) Damage to equipment not properly connected to the product.
(b) Costs incurred in the shipping of the product to an ORION authorized Independent Service Center or ORION Factory Service Center.
(c) Damage or improper operation of unit caused by customer abuse, misuse, negligence, or failure to follow operating instructions provided with the product.
(d) Ordinary adjustments to the product which can be performed by customer as outlined in the owner's manual.
(e) Signal reception problems caused by external antenna or cable systems.
THIS WARRANTY IS NON TRANSFERABLE AND APPLIES ONLY TO THE ORIGINAL PURCHASER AND DOES NOT EXTEND TO SUBSEQUENT OWNERS OF THE PRODUCT. ANY APPLICABLE IMPLIED WARRANTIES, INCLUDING THE WARRANTY OF MERCHANTABILITY, ARE LIMITED IN DURATION TO A PERIOD OF THE EXPRESS WARRANTY AS PROVIDED HEREIN BEGINNING WITH THE DATE OF ORIGINAL PURCHASE AT RETAIL AND NO WARRANTIES, WHETHER EXPRESS OR IMPLIED SHALL APPLY TO THIS PRODUCT THEREAFTER. ORION MAKES NO WARRANTY AS TO THE FITNESS OF THE PRODUCT FOR ANY PARTICULAR PURPOSE AND USE.
UNDER NO CIRCUMSTANCES SHALL ORION BE LIABLE FOR ANY LOSS, DIRECT, INDIRECT, INCIDENTAL, SPECIAL, OR CONSEQUENTIAL DAMAGE ARISING OUT OF OR IN CONNECTION WITH THE USE OF THIS PRODUCT.
THIS WARRANTY IS VALID ONLY IN THE UNITED STATES OF AMERICA. THIS WARRANTY GIVES YOU SPECIFIC LEGAL RIGHTS, HOWEVER, YOU MAY HAVE OTHER RIGHTS WHICH MAY VARY FROM STATE TO STATE. SOME STATES DO NOT ALLOW LIMITATION ON IMPLIED WARRANTIES OR EXCLUSION OF CONSEQUENTIAL DAMAGE, THEREFORE THESE RESTRICTIONS MAY NOT APPLY TO YOU.
ORION SALES, INC.
3471 N. UNION DR.
OLNEY, ILLINOIS 62450
- TELEVISOR DEL PANORÁMICO DE 32" 32" CLASS WIDE LED TV
- SLED3228
- ATENCION ATTENTION
- SELECCION DE MODO DE ANTENA/CABLE AIR/CABLE MODE SELECTION
- SITIO WEB DE ORION ORION WEBSITE
- CÓMO INSTALAR LAS PILAS
- NOTA:
- Ajuste del V-Chip
- FANTASMAS
- NIEVE
- Location of the required Marking
- CHILD SAFETY:
- It Makes A Difference How and Where You Use Your Flat Panel Display
- THE ISSUE
- THIS MANUFACTURER CARES!
- TUNE INTO SAFETY
- WALL MOUNTING: IF YOU DECIDE TO WALL MOUNT YOUR FLAT PANEL DISPLAY, ALWAYS:
- CONDENSATION
- HOW TO HANDLE THE LCD PANEL
- SAFETY PRECAUTIONS
- Notes when mounting the unit on a wall
- How to attach the stand
- NOTE:
- How to remove the stand
- Power source
- TO USE AC POWER
- WARNING:
- CAUTION:
- Before using your unit
- TV operation
- Additional information
- HOW TO INSTALL BATTERIES
- BATTERY PRECAUTIONS
- Cable TV connections
- For subscribers to scrambled Cable TV service
- For subscribers to unscrambled Cable TV service with scrambled premium channels
- Connections to other equipment
- To connect the unit to a VCR
- To connect the unit to a DVD player with Component Video Input
- To connect the unit to a camcorder, or a game console
- Connections to other equipment (continued)
- To connect the unit to an audio system
- Using an AV Amplifier with built-in digital surround
- To connect a HDMI or a DVI device to the unit
- To connect the unit to a PC (Personal Computer)
- BEFORE YOU CONNECT THIS TV TO YOUR PC, CHANGE THE ADJUSTMENT OF YOUR PC'S RESOLUTION AND REFRESH RATE (60 Hz).
- Monitor Display modes
- To return to normal mode
- Starting setup
- TO SELECT ANALOG CHANNELS
- TO SELECT DIGITAL CHANNELS
- To select the video input source
- CH ∧ ∨
- DISPLAY
- RECALL
- MUTE
- SLEEP
- Quick guide for menu operation
- Memorizing channels
- Air/Cable selection
- CABLE CHART
- Automatic Search
- Adding Channel
- Add/Delete channel
- Clear All
- Checking the digital signal strength
- Labeling channels
- To create channel labels
- To clear a Ch Label
- Labeling video inputs
- Setting the V-Chip
- To register a password
- To set the V-Chip
- Age:
- Genre:
- To use the TV after the TV is protected.
- To change the password
- Downloading the additional V-Chip rating system
- To download the additional V-Chip rating system (when available)
- To clear the all V-Chip settings
- Closed Caption
- WHAT IS CLOSED CAPTIONING?
- CC advanced
- When you have selected Custom as the display method, you can adjust the various setting listed below as follows:
- Setting the picture size
- Selecting the picture size
- Natural
- Cinema Wide1 (for 4:3 format programs)
- Cinema Wide2 (for letter box programs)
- Cinema Wide3 (for letter box programs with subtitles)
- Full (for 16:9 source programs)
- Native (for PC mode only)
- IGNITION
- GHOSTS
- SNOW
- RADIO FREQUENCY INTERFERENCE (RFI)
- PICTURE SIZE VARIATION
- CARE AND MAINTENANCE
- BLOCK NOISE / PICTURE FREEZE
- SANSUI®
- GENERAL
- limited WARRANTY
Brand : SANSUI
Model : SLED3228
Category : Television