
2998 100 - Coffee maker Foster - Free user manual and instructions
Find the device manual for free 2998 100 Foster in PDF.


| Product type | Built-in espresso coffee machine |
| Dimensions (LxHxD) | 595 x 452 x 312 mm |
| Weight | 20 kg |
| Power supply | 230V AC, 50Hz |
| Power consumption | 850 W |
| Water tank capacity | 2.5 L |
| Pump pressure | 20 bar |
| Water heating system | Heat exchanger |
| Steam production system | Independent heat exchanger |
| Pod compatibility | ESE (Easy Serving Espresso) standard pods, 44 mm diameter |
| User interface | Touch buttons on glass, backlit |
| Temperature control | Electronic with NTC probe |
| Safety devices | Pod presence valve, manual reset thermostat for overheating |
| Automatic system | Emptying system to prevent limescale, Energy Saving System (steam off after 5 min, standby after 15 min) |
| Descaling program | Yes, with citric acid solution |
| Water filter | 500 micron mesh filter at tank inlet |
| Power cord length | 1.5 m |
| Frame material | Metal |
| Installation type | Built-in, requires cabinet with heat-resistant panels, ventilation opening (min 45x540 mm) |
| Included accessories | Mounting kit, drip tray, grid, disc for first start |
Frequently Asked Questions - 2998 100 Foster
User questions about 2998 100 Foster
0 question about this device. Answer the ones you know or ask your own.
Ask a new question about this device
Download the instructions for your Coffee maker in PDF format for free! Find your manual 2998 100 - Foster and take your electronic device back in hand. On this page are published all the documents necessary for the use of your device. 2998 100 by Foster.
USER MANUAL 2998 100 Foster
natural_image
Interior view of a modern kitchen appliance with a stand and door, no visible text or symbolsnatural_image
Isometric line drawing of a rectangular electronic device with ventilation slots and mounting brackets (no text or symbols)natural_image
Two circular objects with a white base, resembling a button or sensor device (no text or symbols visible)natural_image
Line drawing of an open refrigerator with a door and ventilation slots (no text or symbols)natural_image
Technical line drawing of a double-door industrial cabinet with handle and door (no text or symbols)natural_image
Line drawing of a laboratory apparatus with no visible text or symbolsnatural_image
Two-panel diagram showing a kitchen sink with a plate and a cup, and a side view of a mug on a surface (no text or symbols)natural_image
Technical line drawing of a laboratory apparatus with no visible text or symbolsnatural_image
Technical line drawing of a laboratory apparatus with no visible text or symbolsnatural_image
Line drawing of a laboratory apparatus with an open door and side panel (no text or symbols)natural_image
Simple line drawing of a cabinet or enclosure with no text, numbers, or symbolsnatural_image
Line drawing of a bathroom sink with faucet and toilet (no text or symbols)natural_image
Line drawing of a modern office or storage unit with shelves, tables, and a central display (no text or symbols)natural_image
Line drawing of a laboratory or industrial setup with a bench and control panel (no visible text or symbols)natural_image
Line drawing of a kitchen appliance with a drain and stove (no text or symbols)natural_image
Line drawing of a refrigerator with open door and side table (no text or symbols)natural_image
Line drawing of a laboratory apparatus with an open door and side panel (no text or symbols)natural_image
Line drawing of a refrigerator with open door and side panel (no text or symbols)natural_image
Line drawing of a bathroom sink with faucet and toilet (no text or symbols)natural_image
Line drawing of a simple kitchen sink with a mug, pipe, and storage tray (no text or symbols)Dear customer, thank you for choosing a Foster household appliance.
This document provides recommendaons and instrucons that will allow you to make the best use of the purchased coee machine and its best preservaon over me.
EN
Summary
- Posioning
- Built-in
- Venlaon
- Centering and xing
• Electrical conncon - Aaching the power cord
- Data plate
- ESE standard pods
• Automac emptying system - Lubricaton system
• Energy Saving System
- Assembly view
- User Interface
Start and use (pag.21-23)
- First lighng
- Loading of the circuit
- Water Iter
- Coee brewing
- Hot water brewing
- Steam brewing
Care and maintenance (pag.24-25)
- General cleaning
- User interface cleaning
- Cleaning of the drip tray
- Cleaning of the pod Iter
• Water Iter maintenance - Descalin program
Problems – Causes- Remedies (pag.26)
! It is important to keep this manual for easy reference at all mes. If sold, transferred or moved, make sure that the instrucon manual accompanies the appliance to inform the new owner on the operaon and its warnings.
! Read the instrucons carefully: they contain vital informaon on installaon, use and safety.
Posioning
! The packaging are dangerous and should be kept away from children and disposed of according to the regulaons for recycling (see "Precauons and ps").
! The appliance must be installed according to these instrucons and by qualified personnel. Incorrect installaon may cause harm to people, animals and / or property.
Built-in
To ensure the proper functioning of the device it is necessary that the cabinet has suitable characteristics:
- The panels adjacent to the coee machine must be of heat resistant material;
- In the case of veneer wooden furniture, the glue must be resistant to a temperature of 100^ C and must be resistant to the acon of steam;
- For embedding of the coee machine in any type of installaon, the cabinet must have the following dimensions:

! Once installed the appliance must not be any contact with electrical parts. The consumpon indicaons on the data plate have been calculated for this type of installaon.
Venlaon
To ensure good venlaon is necessary to remove the rear wall of the compartment. It 'beer to install the coee machine so that it rests on a at surface with an opening on the basis of at least 45 X 540 mm.
Centring and fastening
To center the coee machine, place the shims to align the external structure of the machine to the cabinet.
- Also make sure that the cabinet of installaon for the appliance, has openings towards the floor and towards the wall, allowing the free circulaon of an air ow, necessary for the heat dissipaaon of the appliance.
! Fix the appliance so as to ensure its perfect stability.

To x the appliance to the cabinet, proceed as follows:
- open the side doors to access the mounng holes;
- open the envelope provided with the mounng kit;
ghten the 2 screws in the 2 holes in the side panels (le and right).
Aer xing the machine to the cabinet, top up the water tank and place the drip tray closing the drawer.
Electrical conncon
! The coee machines equipped with prong power cable are designed to operate with alternang current at the voltage and frequency indicated on the data plate located on the appliance.
! The installer is responsible for the correct electrical conncon and compliance with safety standards.
Before making the conncon to the mains, make sure that:
- the socket is earthed and complies with safety standard;
- The socket can withstand the maximum power of the appliance, which is indicated on the data plate;
- the supply voltage must been within the values indicated on the data plate;
- the socket must be compatible with the plug of the appliance. Otherwise, replace the socket or the plug; do not use extension cords or mulple sockets.
! The power cord must not be bent or compressed.
! The power cable must be checked regularly and if necessary replaced by authorized technicians only.
! The manufacturer declines any liability should these safety measures not be observed.

natural_image
Isometric line drawing of a rectangular electronic device with ventilation slots and mounting brackets (no text or symbols)- the power cord must rest be xed on the appropriate place in the back of the unit.
- Insert the plug into the socket.
The power supply cable must be posioned so that at no point is aected by operang temperatures that exceed of 50 °C the ambient temperature.
EN
Data plate
| • Supply voltage | 230VAC – 50Hz |
| • Nominal absorpon | 850W |
| • Frame material | Metal |
| • Dimensions (LxHxD) mm, packaging excluded | 595 x 452 x 312 |
| • Weight (kg), with empty tank | 20 kg |
| • Lenght of the power cord | 1,5 mt |
| • User interface | Touch buons on glass, backlit |
| • Water tank | Removed from the front |
| • Water capacity | 2,5 lt |
| • Temperature control | Electronic with NTC probe |
| • Pump pressure | 20 bar |
| • Water heang system | With heat exchanger |
| • Steam producon system | With independt heat exchanger |
| • Safety device for dispensing | Valve operated in the presence of the pod |
| • Safety device temperature | Thermostat with manual reset |
Appliance complies with standards EC 2006/95 and EC 2004/108.
CE
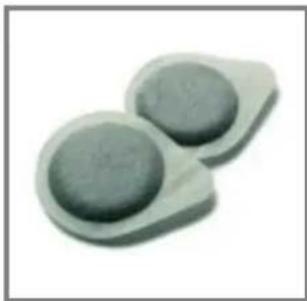
Pods in Iter paper standard E.S.E.

The dispensing unit of this machine is suitable to dispense: espresso, tea, barley, etc., in standard pods ESE (Easy Serving Espresso).
natural_image
Two circular objects with rounded surfaces, possibly buttons or sensors, displayed against a plain background (no text or symbols visible)The group allows you to use pods of 44mm with 7 gr. of coee powder standard E.S.E. (single dose quantity).
Use dierent sizes of pods, does not guarantee a good supply.
System about emptying of exchangers
The appliance has been designed with a hydraulic system that allows emptying the exchangers coee about the water vapor remaining at the end of each disbursement.
The advantage of this system, it is to not have the hydraulic circuit in pressure and in temperature when the machine is in stand-by, that to prevent the calcicaon of the water in the ducts.
Lubricaoon system of the heat exchanger coee
The hydraulic conncons of the appliance, were made so as to discharge the internal pressure of the exchanger coee, recovering the fay residues of disbursements, this allows a connuous lubrication of internal ducts, by protecng them against limescale.
Automac switch-o system ESS (Energy Saving System)
An electronic control mer, turns o the heat exchanger steam if not occur disbursements of these for 5 minutes. To dispense steam, we will have to select the steam buon and wait unl the temperature reaches the opmal level of provision.
Also, if you are not using the unit for 15 minutes, the unit automacally goes into stand-by mode (funcons and lights off, remains acve illuminaon at low intensity of the control panel).
Assembly view

Control panel

flowchart
graph TD
    A["COFFEE selecon"] --> B["Empty tank indicator"]
    C["Hot Water selecon"] --> D["STEAM selecon"]
    E["Power on/o stand-by"] --> F["Open of Pods drawer"]
EN
Before starng the appliance, check the tools supplied with the same and described in this manual.

natural_image
Line drawing of an open refrigerator with a side panel and lid (no text or symbols)-
Take the tank, rinse and ll with fresh water.
-
Relled the tank, and aer having closed with the stopper containing the charging hoses, place it inside its compartment.
! Fill the tank always and only with water at ambient temperature and not carbonated. Hot water or other liquids may damage the tank and the machine.
! When you rst start the appliance, delivering at least two cups of hot water (from the compartment using the special pods disc supplied with the machine) to allow complete lling of the hydraulic circuit.
First start

natural_image
Line drawing of a refrigerator with doors, shelves, and a door handle (no text or symbols)Open the le side panel to access the main switch to posion ON (1).

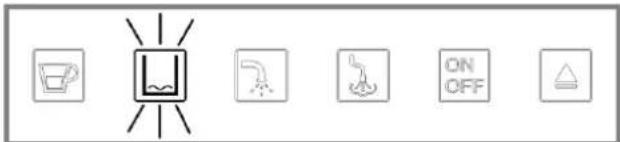
The machine is in the heang phase, the LEDs light up and the coee buon ashes.
! The appliance can be brought in stand-by, in this condion the machine is o, it works just the push-buon controls, while groups coee and steam and the led lighng does not feed.

We can stop the appliance from the control with on-o buon, the leds turn o and the keypad is illuminated at low intensity.
Loading of the hydraulic circuit
! Before rst use, or aer long periods of inacvity, if the water tank has been completely emped it is necessary to prime the circuit of the appliance.
In addition, the circuit must be loaded if ashes the indicator of the empty tank, so as to eliminate any air bubbles.

To load the circuit, make a dispensing without pods, closing the drawer and press the brew buon. Wait unl the group enters under pressure (about 8 seconds) and stop the dispensing.
To verify that the charging circuit has been carried out correctly, press the hot water buon and wait for the water drainage from the spout (direcng the spear out of a cup or on the drip tray).
When are nish the operaons described above, the machine is ready for use.
To brew coee, hot water or steam, and properly use the appliance, carefully follow the instrucons below in the following pages.
Dispensing espresso or long coee
The appliance is designed to dispense espresso. You cannot change the output parameters.
To brew espresso coee at the desired dose, just select the buon and wait for the dispensing reaches the desired quantity; a new press on the buon will stop the dispensing.
Temperature control
The brewing group is managed by an electronic control that ensures dispensing of coee and hot water at opmum temperature.
If the dispensing temperature undergoes significant changes, the led will ash until the restoraon of the pre-set working conditions.
Coee group
The coffee group compresses the coffee pod in an infusion chamber, ensuring a perfect seal and pressure needed to brew coee.
Aer dispensing the coee, an electronic control, prevents the opening of the group before the pressure in the infusion chamber is reset, therefore, the drawer opening occurs only in conditions of safety.
Safety valve of the pod presence
A safety valve located on the dispensing unit, prevents the brewing if the pod is not placed on the liter.
Coee brewing
! Before dispensing the coee, make sure that the water tank is full and the coee dispensing buon is not ashing.

natural_image
Line drawing of a laboratory apparatus with a control panel and storage unit (no text or symbols)Place the cup on the central reference of metal grid.

natural_image
Two-panel diagram showing a kitchen sink with a rectangular tank and a cup, and a mug on a surface (no text or symbols)The shape and size of the coee dispensing nozzle, allows to adapt to dierent sizes of cups or glasses.
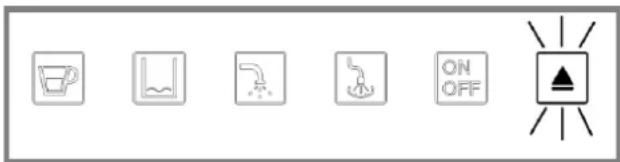
To open the pods drawer press the open buon drawer and place the single-serving pod on the liter drawer. An electronic controller checks the posion of the drawer and open or close the drive with the same buon.
Hot Water dispensing
! At the beginning of dispensing, they can short spurts of hot water. The lance wand may reach high temperatures: do not touch it directly with your hands.
Before dispensing hot water, check that the led does not blink, in case wait until the temperature has stabilized.
For the dispensing of hot water, proceed as follows:

natural_image
Technical line drawing of a laboratory apparatus with no visible text or symbols-
Place a cup, or any other container under the spout dispensing.
-
Press the buon to start the hot water supply.
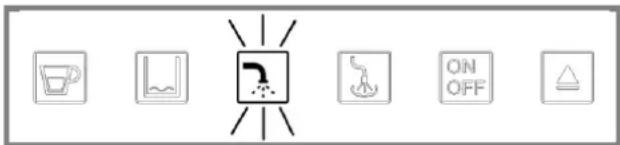
- Push the buon again to stop the hot water dispensing.
EN
! The hydraulic circuit of the appliance allows to dispense water at a controlled temperature, using the same lance also for dispensing the steam.
Steam dispensing / Preparaon of cappuccino
When we turn on the coee machine, the steam group remains o. To produce steam, we will necessarily press the "steam indicator" to turn it on and warm it up.

If the steam is not used for 5 minutes, its operaon is automatically disabled (Energy Saving System), until the user press a new selecon.
The steam can be used to "mount" the milk for cappuccino, but also for the heang of beverages.
! Risk of scalding! Dispensing may be preceded by short sprays of hot water. The lance wand may reach high temperatures: do not touch it directly with your hands, and force the water direcon into a container, or the drip tray.

natural_image
Technical line drawing of a laboratory apparatus with labeled components (no readable text or symbols)-
Place a cup or a jug under the spout of hot water / steam.
-
Push the steam buon, which will start ashing to indicate that the resistance is started for the heang, and will stop ashing when the temperature suitable for the dispensing.

-
Push the steam buon again to end the steam.
-
Fill with cold milk 1/3 of the container you want to use for the preparaon of cappuccino.
! For best results when preparing a cappuccino, use cold milk.
- Immerse the steam wand into the milk to heat and press the steam buon, turn the container with slow movements from the boom up to make uniform foaming.
- To stop the steam press the buon again.
! The same system can be used for heang other beverages.
! Aer use, clean the steam wand to remove residual milk or other, using a damp cloth.




General cleaning
! The maintenance and cleaning should be carried out preferably typed cold and disconnected from the mains.
- Do not immerse the appliance in water and do not place parts in the dishwasher.
- Do not use sharp objects or harsh chemical products (solvents) for cleaning and maintenance.
- Do not dry the appliance and / or its components using a microwave and / or convenonal oven.

natural_image
Line drawing of a refrigerator interior showing the door, front panel, and side shelves (no text or symbols)- It is advisable to frequently clean the water tank, providing to change the water from the inside.

natural_image
Simple line drawing of a room layout with no text, numbers, or symbols• To clean the unit, use a so cloth dampened with water.
- Clean the service area and the dispenser drawer.
Cleaning of the pods Iter
Periodically clean the pods Iter and it housing on the drawer. The Iter is held on the drawer by a magnec zone, just a slight pull to free it from its seat.

natural_image
Line drawing of a kitchen sink with a drain pump and a side sink (no text or symbols)The pods drawer can NOT be removed for cleaning. And 'possible to clean the coee lter by liing it from his housing with a slight magnec pull. Terminate the cleaning operaons re-insert the lter on the pods drawer.
Cleaning of the drip tray and grid
! Periodically clean the service area with a damp cloth periodically by removing residues of ground coee or other foreign maer from the guides of the drain pan.
! It is recommended that you empty and clean the drip tray periodically.

natural_image
Line drawing of a modern kitchen appliance with a person standing inside (no text or symbols)- Pull out the tray and slide it onto the rails all the way.

natural_image
Line drawing of a laboratory apparatus with a control panel and tubing (no text or symbols)- You can remove the single grid for cups by liing it from its housing, or pull out the drip tray with the grid.

natural_image
Line drawing of a laboratory apparatus with a control panel and glassware (no text or symbols)- Li the drip tray as shown in the gure, empty and clean. Once you have nished cleaning, re-insert the drip tray and grill correctly.
Control panel cleaning
Periodically clean with a damp cloth the glass control panel, so as to keep the area clean touch-sensitive. The touch-sensitive area is illuminated.
EN
Water Iter in the terminal.
The water lter is of the type with a network terminal 500 micron. This lter has not a funcon of puricaon, but avoids that residues or foreign bodies enter the hydraulic circuit.
The water lter should be replaced if it shows calcicaon outside or if it is damaged.
Replace the water Iter.

natural_image
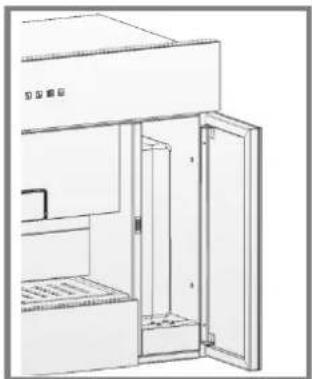
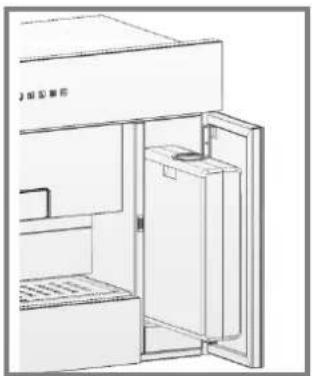
Line drawing of a refrigerator with open door and side table (no text or symbols)- Open the right door and remove the water tank. Extract the tank cap with the two pipes for loading and unloading.
- The Iter must be plugged into the inlet hose (longer).
natural_image
Line drawing of a cabinet or storage unit with an open door and side panel (no text or symbols visible)- Insert the tube with the new liter, close the cap and insert the tank into its compartment.
Descaling program
Although the appliance is equipped with automac emptying of the circuits, and lubrication of the same, used to avoid the formation of limestone on the inside, the same is however equipped with a specific program for a possible need for descaling of its circuit. This program allows the actuation of the pump for the circulation of the descaling solution in the absence of heang of the heang resistances of both groups coee and steam.
natural_image
Line drawing of a refrigerator with open door and side table (no text or symbols)-
Insert into the tank a soluon of water and citric acid (salable in any health shop) or any other commercial product intended for use.
-
Hold the pressure for 10 seconds on the indicator buon "empty tank".
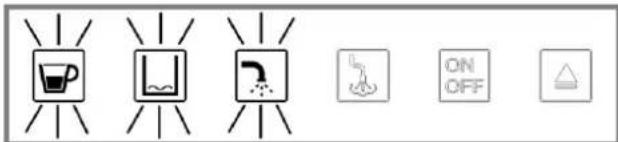
- At the end of the 10 seconds it will be the simultaneous ashing of the keys of "coee", "empty tank" and "hot water".

natural_image
Line drawing of a bathroom sink with faucet and sink (no text or symbols)- At this point it is possible to start the ow of descaling soluon from the coee group, aer inserng the "plasc pod" in the pods drawer.
natural_image
Technical line drawing of a laboratory apparatus with no visible text or symbols- Or select the hot water dispensing to descale the steam wand.
Aer dispensing the descaling soluon (at least 1.5 liters), make a dispensing of the same amount of clean water to eliminate residues of descaling soluon from the circuit.
EN
| Problems | Possible causes | Remedies |
| The appliance does not turn on | The appliance is not connected to the mains. | Check the conncon to the mains. |
| It is not put the switch to "ON" (1). | Acvate the switch. | |
| It has blown fuse in the plug of the power cord. | Call technical support. | |
| Dispensing absent aer the key selecon. | The appliance has entered stand-by mode. | Press the On/O buon on the control panel. |
| It is indicated the "empty tank" | Fill the water tank. | |
| No dispense hot water or steam from the "spear". | The heang element of the brew group has not yet reached its operang temperature | Wait unl the service light interested (hot water or steam) to stop blinking. |
| Steam pipe clogged. | First make a cleaning with hot water and detergent only the steam tube. | |
| Perform a descaling cycle. | ||
| Dispensing scarce or absent. | Erroneous posion of the sucon tube inside the tank water. | Check the correct posion of the pipe into the boom of the tank. |
| Formaon of calcareous concreon in the circuit. | Perform a descaling cycle with suitable products. | |
| The coee runs out of the pods drawer. | Coee pods osite. | Correctly posion the pod. |
| Metal lter clogged. | Remove the lter from the drawer and wash it. | |
| Water comes out from the drip tray. | Drip tray is too full. | Remove drip tray and empty it. |
EN
Intended Use
- The coee machine has been designed for domesc use.
- It's prohibited make technical modicaons and any illegal use, because of the risks they pose!
- The coee machine must only be used by adults with mental and physical capacities.
Power supply
- Connect the coee machine only to a suitable outlet.
- The voltage must correspond to that shown on the rang plate.
Power cord
- Do not use the coee machine if the power cord is defective.
- Do not route the power cord over sharp edges or over hot objects or surfaces and to protect it from the presence of liquids.
- Do not remove the plug by pulling on the cable.
- Do not touch the power cord or plug with wet hands or feet.
Protecon of persons
- Make sure that no child has the opportunity to play with the coee machine. Children are not aware of the risks associated with household appliances.
- Do not leave the materials used to pack the appliance within reach of children.
Risk of burns
- Do not point to themselves or others, the jet of hot steam or the hot water: and scalding.
- Do not insert objects through openings of the appliance.
Space for installaon, use and maintenance
- Do not block the vents and heat dissipaton.
- Choose for the built-in an housing adequately lit, clean and with a socket that is easily accessible.
- Do not place the machine on very hot surfaces or near open ames to prevent damage.
- Install the appliance at least 10 cm away from walls and cooking surfaces.
- Do not keep the machine at temperatures below 0 °C, frost can damage the appliance.
- The power outlet must be accessible in case of need.
Cleaning
- Before cleaning the appliance, it is mandatory to place the main switch to "0" (o) and then unplug it from the electrical outlet.
- Wait for the machine to cool down.
- Do not immerse the machine in water! Prevent it from being wet with water jets.
- Do not try to open the machine to gain access to internal parts.
Repairs / Maintenance
- In case of failure, problems or a suspected defect, immediately remove the plug from the socket. Never aempt to operate a faulty machine.
- Only authorized service centers can perform repairs.
- In the case of repairs or other work not performed by non-authorized service centers, the producer not assume no responsibility for any damage to persons or property.
Fireghng
In case of re, use carbon dioxide exnguishers (CO2).
Do not use water or powder exnguishers.
Disposal


Pursuant to art. 13 of Legislave Decree 25 July 2005, nr. 151 "Implementaon of Direcves 2002/95/EC, 2002/96/EC and 2003/108/EC on the reducon of use of hazardous substances in electrical and electronic equipment and the disposal of waste", the symbol of the bin wheelie strikethrough on the product or on its packaging indicates that this product at the end of its life must be collected separately from other waste. The user must therefore dispose of the equipment at the end of its useful life of separate collecon of electronic and electrical waste or returned to the dealer when purchasing a new equivalent equipment. The separate collecon for the start of your old appliance for recycling, treatment and disposal comparable environment, helps to avoid possible harmful eects on the environment and on health and promotes the reuse and/or recycling of materials it is made of. Improper disposal of the product by the user, involves the applicaon of administrave sancons provided by law.
EN
Foster
Live the Quality
Foster S.p.A.
Via M.S. Oone, 18-20
42041 Brescello (RE) – Italy
www.fosterspa.com
tel.: +39 0522 687425
e-mail: service@fosterspa.com
- Summary
- Start and use (pag.21-23)
- Care and maintenance (pag.24-25)
- Problems – Causes- Remedies (pag.26)
- Posioning
- Built-in
- Venlaon
- Centring and fastening
- Electrical conncon
- EN
- Pods in Iter paper standard E.S.E.
- System about emptying of exchangers
- Lubricaoon system of the heat exchanger coee
- Automac switch-o system ESS (Energy Saving System)
- Assembly view
- Control panel
- Loading of the hydraulic circuit
- Dispensing espresso or long coee
- Temperature control
- Coee group
- Safety valve of the pod presence
- Coee brewing
- Hot Water dispensing
- Steam dispensing / Preparaon of cappuccino
- General cleaning
- Cleaning of the pods Iter
- Cleaning of the drip tray and grid
- Control panel cleaning
- Water Iter in the terminal.
- Replace the water Iter.
- Descaling program
- Intended Use
- Power supply
- Power cord
- Protecon of persons
- Risk of burns
- Space for installaon, use and maintenance
- Cleaning
- Repairs / Maintenance
- Fireghng
- Disposal
- Foster
- Live the Quality
Brand : Foster
Model : 2998 100
Category : Coffee maker