ARP-2412 - Air Conditioning Royal Sovereign - Free user manual and instructions
Find the device manual for free ARP-2412 Royal Sovereign in PDF.


User questions about ARP-2412 Royal Sovereign
0 question about this device. Answer the ones you know or ask your own.
Ask a new question about this device
Download the instructions for your Air Conditioning in PDF format for free! Find your manual ARP-2412 - Royal Sovereign and take your electronic device back in hand. On this page are published all the documents necessary for the use of your device. ARP-2412 by Royal Sovereign.
USER MANUAL ARP-2412 Royal Sovereign
Read and retain these instructions for future reference
For any Customer Support needs, please choose the Support tab on www.royalsovereign.com
Royal Centurian Inc.
natural_image
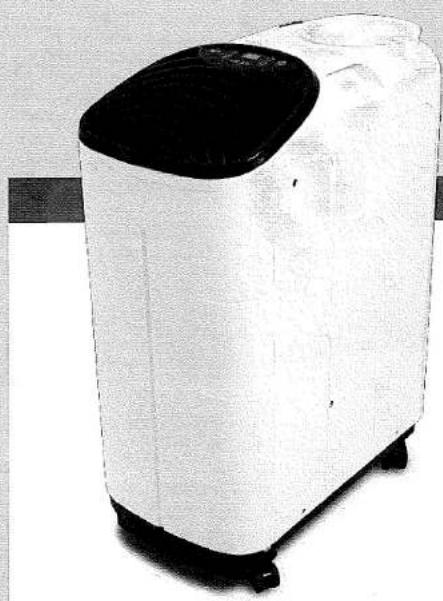
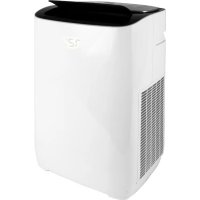
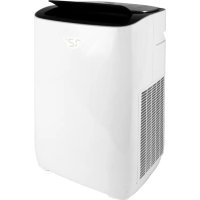
Exterior view of a white portable air conditioner unit with black lid and wheels (no visible text or symbols)PORTABLE AIR CONDITIONER
Model ARP-2412
INTRODUCTION
Thank you for choosing Royal Sovereign to provide you and your family with all of the "Home Comfort" requirements for your home, apartment, or office. This Portable Air Conditioner can be set-up in just minutes and can be easily moved from room to room. It is a multi-functional room air comfort system that offers you Air Conditioning, Dehumidification and Air Circulation modes. This manual will provide you with valuable information necessary for the proper care and maintenance for your new appliance. Please take a few moments and read the instructions thoroughly. If properly maintained, your appliance will give you many years of troublefree operation.
CONTENTS
Page
Precautions for use 4
Notes on operation and identification of parts 5
Installation instructions....6\~7
Operation 8\~10
Remote control 11
Maintenance 12
Specifications 13
Warranty 14
Contact information 15
Page en Français 17
PRECAUTIONS FOR USE
IMPORTANT SAFETY INSTRUCTIONS
This equipment must not be used in an area where combustible material are stored. Never operate or store gasoline or other flammable vapors and liquids in the vicinity of this or any other appliance.
PRECAUTIONS
To reduce the risk of fire, electrical shock, or injury to persons when using your air conditioner, follow basic precaution, including the following:
- Be sure the electrical power source is adequate for the model. This information can be found on the rating label which is located on the back of the unit.
- Be sure the air conditioner has been securely and correctly installed according to the installation instructions provided with this manual. Save this manual for possible future use in removing, storing or reinstalling this unit.
- When handling the air conditioner, be careful to avoid cuts from sharp metal fins on front and rear coils.
- Avoid air inlet and outlet grills from being covered or closed off.
- Never insert your fingers or any foreign objects into the air outlet. Take special care to warn children of these dangers.
- Use the unit in rooms of a suitable size and always remember that areas of high heat gain such as conservatories and sun lounges require up to four times the cooling power of conventional rooms.
- Close the fireplace damper floor and wall registers to avoid cool air escape up the chimney and into the duct work.
- Clean the air filter as recommended in the section "Care and Cleaning".
ELECTRICAL INFORMATION
The complete electrical rating of your new room air conditioner is stated on the nameplate. Refer to the rating when checking the electrical requirements.
- Be sure the air conditioner is properly grounded. To minimize shock and fire hazard, proper grounding is important.
- LCDI (Leakage Current Detection Interrupters) are built into the power cord cap of our room air conditioners.
- If the power cord is damaged and the power conductors touch the shield, the LCDI will interrupt power if even a small amount of current leaks to the shield. In such case, it must be replaced by the manufacturer, service agent or a similarly qualified electrician to avoid hazard.
- Your air conditioner must be plugged into proper power outlet. If the power outlet you intend to use is not adequately grounded or protected by a time delay fuse or circuit breaker, please contact qualified electrician to install the proper power outlet.
- Do not use an extension cord or an adapter plug.
- Be sure the maximum amps of all devices on that fuse or circuit breaker can not exceed the amps of the fuse or circuit breaker.
ARP-2412
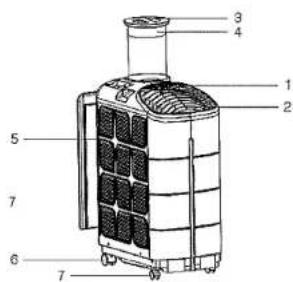
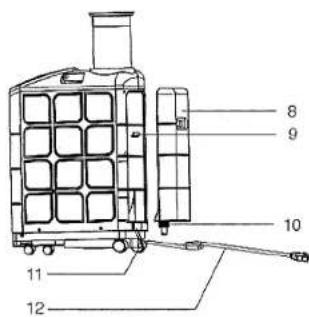
IDENTIFICATION OF PARTS
- Display Panel
- Air Outlet
- Exhaust Hose Cover
- Exhaust Hose
- Air Filters
- Rear Casters
- Front Casters
- Water Tank
- Water Tank Hanger
- Nozzle
- Drain
- Power Cord
ARP-2412
INSTALLATION
Unpack your new Portable Air conditioner and let the machine stand upright for at least 2 hours before starting.
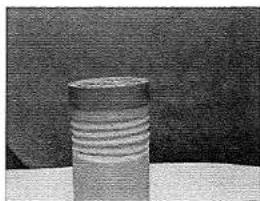
1) Extend Hose from Unit
2) Position Window plate with the unfinished edge facing away from the hose
3) Insert Screws (included) from the unfinished edge into the hose adapter
natural_image
Close-up of a cylindrical object with horizontal grooves, possibly a container or tube, against a dark background (no visible text or symbols)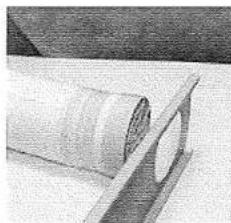
natural_image
Close-up of a rolled paper sheet on a surface with a flat surface and a circular object nearby (no visible text or symbols)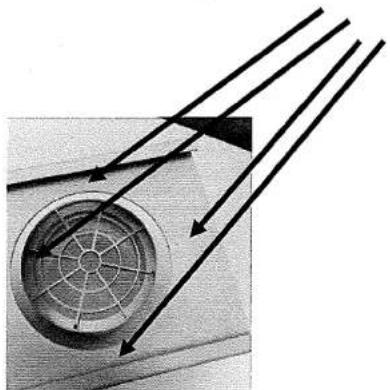
natural_image
Diagram showing airflow lines around a circular fan or vent, with no visible text or symbols.ARP-2412
C. Install the Window Slider Kit : Fig 3.
- Open the window and place the Window Slider Kit on the inside edge of the window.
- Adjust the Window Slider by adjusting it to the width of the window.
- Close the window to secure.
- Tighten the two screws to lock the window slider in place.
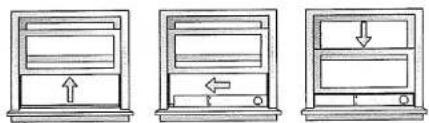
Fig 3.
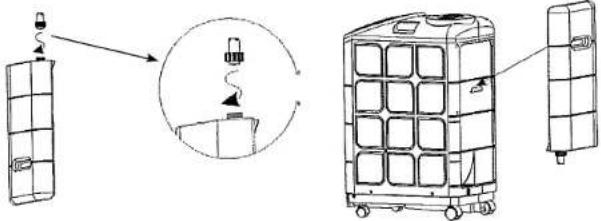
FUNCTION OF THE WATER TANK
This Portable Air Conditioner can run with or without water tank.
The water tank is an auxiliary function to the unit and can run with or without it. Its purpose is to use fresh water to cool the condenser so the machine will have maximum performance. In normal conditions, it will recycle the humidity that is collected to cool the condenser and evaporate the water out the exhaust. In areas where humidity levels are low, this tank will assist the unit in cooling effectively.
When used, you can achieve maximum BTU performance and the air conditioner will run more efficiently.
NOTE: This feature will not add humidity back into the room.
Step 1: Lift up and pull to remove the tank
Step 2: Remove the nozzle by turning counter clockwise
Step 3: Fill the tank with water to approximately the half way level and replace the nozzle snug.
Step 4: Place the tank back into place by lining up the tank with the tab on the back of the air conditioner
⑦
OPERATING INSTRUCTIONS
Read the Important safety instructions before operating this appliance.
(To prevent electrical hazards, do not use an extension cord or an adapter plug.)
- Plug in the air conditioner.
- Install the exhaust duct as illustrated in page 7.
3.Plug the unit into a 115\~120v\~60Hz grounded electrical outlet. - Press the "ON/OFF" button to turn on the unit.
NOTE: If the air conditioners is turned off, wait 3 minutes before restarting. This allows pressure inside the compressor to equalize.
Failure to follow these instructions may cause inefficient operation.
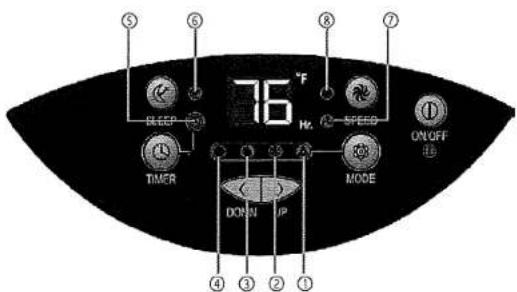
CONTROL PANEL
- Auto
- Air Conditioning
- Dehumidifier
- Fan
- Timer Indicator
- Sleep
- Low Fan
- High Fan
8
ARP-2412
ON/OFF
The power control button turns the unit on and off. When you press the button, the unit begins to operate.
MODE
Select the functions of the unit for: AUTO control, COOL, DRY, and FAN.
The appliance will start on AUTO function the first time it is turned on and remains in this mode until other type of programming is chosen.
AUTO (Automatic functioning key)
Press MODE key to select AUTO, your portable air conditioner will select an ideal temperature for the room while running at an optimal level. ② is shown on the display and the indicator light will come on. The fan speed will be determined by the machine.
COOL
Press the Mode Control button to select Cool mode. The light will show on the display.
The unit displays "present room temperature." The temperature range settings are between 64\~88 °F
In Cool mode, use the < or > button to adjust and set the desired temperature for the room. After 3 seconds the display will return back to the present room temperature.
NOTE: The air exchange hoses must be vented through the window kit when it is in this mode. The compressor will start after 3 minutes (during which only the fan function is active). If the room temperature is lower than selected, the appliance activates the fan function until the temperature rises above the the temperature that was set.
DRY
Press the Mode Control button to select Dry (dehumidify) mode. The ● light will show on the display.
When the Dehumidify mode is on, the temperature buttons do not function. The fan speed can be adjusted only if the temperature in the room is higher then 77 °E. If it is below this temperature, the fan speed is automatically fixed to "low" and cannot be adjusted. The compressor will be on for 10 minutes and then turn off for 4 minutes in this mode. This prevents the coils from freezing and protects the air conditioner. When the humidity in the room is 50% or lower, the compressor will not run and the unit will not dehumidify.
NOTE : The exhaust hose must be connected to remove the humidity.
FAN
Press the Mode Control button to select Fan mode. The light will show on the display. The air is circulated throughout the room with no cooling.
NOTE: The exhaust hose is not needed in fan mode as it is circulating the air that is in the room.
SPEED
Press "SPEED" key to adjust fan speed (High/ Low).
⑨
TIMER
There are 2 different timer programs. You can set the number of hours before the air conditioner automatically turns OFF so that you can set the number of hours that will elapse before the unit turns ON.
When the air conditioner is turned off, you can choose to turn it on in one hour intervals.
-
Press the Timer button on the Control Panel (the timer indicator light will be lit).
-
Continue to press the Timer button until you reach the number of hours you want to elapse before the unit turns on. Example: If you want the air conditioner to turn on in eight hours, press the button until you see 8 on the display.
-
The unit will turn on when the set time elapses.
When the air conditioner is turned on, you can choose to turn it off in one hour intervals.
-
Press the Timer button on the Control Panel (the timer indicator light will be lit).
-
Continue to press the Timer button until you reach the number of hours you want to elapse before the unit turns off. Example: If you want the air conditioner to turn off in eight hours, press the button until you see 8 on the display.
-
The unit will turn off when the set time elapses.
SLEEP
Sleep Mode is used to keep the room comfortable while saving energy. When the Sleep Mode button is pressed, the set temperature will increase by 2 °F in the first hour and increase another 2° the second hour. It will then remain at that temperature for the remainder of the night.
TANK FULL
The appliance has built-in evaporating system. The water is turned into humid air and evaporated through the exhaust hose. If the humidity level is high, it is possible to have to empty the internal water tank manually. If this happens, an alarm will beep for 15 times and the unit will stop running. The appliance can be restarted after draining the condensate water through drain port located at the bottom of the back of the PAC.
AUTOMATIC RESTART
In the event of a power failure: The settings will return to the previously set operating modes once the power is restored.
ARP-2412
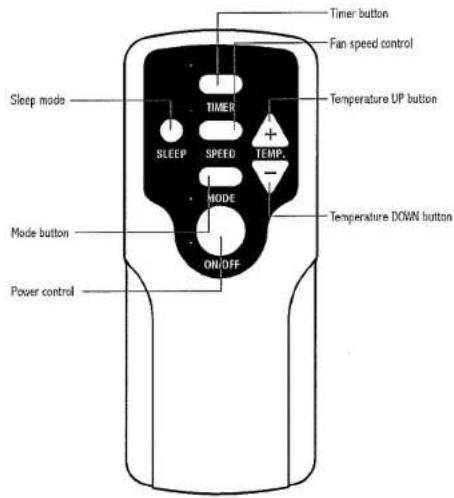
REMOTE CONTROL FUNCTION
All functions can be accessed from the remote control.
11
CARE AND CLEANING
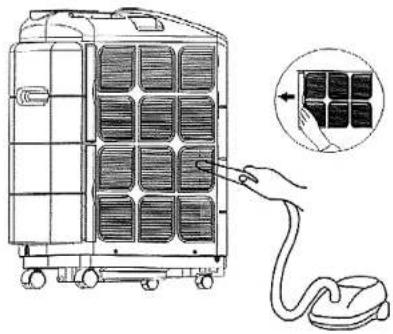
Every two weeks: Clean the filter
- Turn the unit OFF and remove the plug from the outlet.
- Grasp the formed handle of filter and pull it up, removing it from the evaporator.
- Use a brush attachment with a vacuum cleaner.
NOTE : Failure to keep air filter clean will result in poor air circulation. DO NOT operate without filter. This can render the unit inoperative.
natural_image
Diagram of a mobile device with grid panels and a hand inserting a cable (no text or symbols)Storage:
- Remove water from drain port
- Cover it with plastic or return it to the original carton.
12
ARP-2412
SPECIFICATIONS
- Figures noted in the contents are for reference only; variation may result due to the application in different countries or regions, and shall be based on practical operation.
| Description of product | ARP-2412 |
| POWER SOURCE | 115V/60Hz |
| RATED POWER INPUT | 1150W |
| Current (AMPS) | 10A |
| EER | 10.43 |
| AIR VOLUME (CFM) | 185 |
| NOISE LEVEL | 53db(A) |
| MOISTURE REMOVEL | 2.462L/h |
| TEMPSETTING | 64~88°F |
| REFRIGERANT | R410 |
| MAXIMUM PRESSURE | 2.8MPA |
| GROSS WEIGHT | 79lbs |
"Electrical waste products should not be disposed of with household waste. Please recycle where facilities exist. Check with your local authority or retailer for recycling advice."

ARP-2412
REFURBISHED PORTABLE AIR CONDITIONER – 90 DAY WARRANTY
Royal Sovereign warrants each Portable Air Conditioner to be free from defects in material and workmanship. Our obligation under this warranty is limited to the repair or replacement, free of charge, when delivered to an authorized Royal Sovereign service center, of any defective part(s) thereof, other than parts damaged in transit. This warranty is in effect to the original purchaser, for a period of 90 days from the date of purchase and is not transferable. This warranty shall apply only if the air conditioner is used on Alternating Current (AC) circuit, in accordance with the factory provided instructions which accompany it.
To request services, please go to www.royalsovereign.com - Customer Support to submit a request or call 1-800-397-1025
EXCLUSIONS
This warranty excludes and does not cover defects, malfunctions or failures of your Royal Sovereign Portable Air Conditioner, caused by repairs by unauthorized persons or service centers, mishandling, improper installation, modification or unreasonable use including incorrect voltage, acts of God, or failure to provide reasonable and necessary maintenance. This warranty is in lieu of any and all expressed warranties. In no event shall Royal Sovereign be liable for consequential or incidental damages. This limitation would not apply if you live in a location that does not permit the exclusion of limitation of incidental or consequential damages. This warranty gives you specific legal rights and you may also have other rights which vary from state to state.
Please visit www.royalsovereign.com - USA - Customer Support for out of warranty service or to view frequently asked questions.
natural_image
White portable air purifier with black lid and wheels (no visible text or symbols)
ROYAL SOVEREIGN INTERNATIONAL, INC.
2 Volvo Drive Rockleigh, NJ 07647 USA
TEL: +1) 800-397-1025 FAX: +1) 201-750-1022
ROYAL SOVEREIGN INC.
1001, World Meridian II, 426-5, Gasan-dong, Geumcheon-gu, Seoul, 153-759, KOPEA
TEL: +82)2-2025 8800 FAX: +82)2-2025 8830
RS INTERNATIONAL AUSTRALIA PTY. LTD.
30 Prime Drive, Seven Hills, NSW 2147, AUSTRALIA
TEL:+61)2-9674-2127 FAX:+61)2-9674-2027
RS CANADA INC.
1025 Wiesport Cresc. Mississauga ON LST 1EB
TEL:+1)905-461-1095 Fax:+1)905-461-1096
RS Holland B.V.
Industrieweg 6K, 4104AR, Culemborg, The Netherlands
Tel: +31 (0)345 473 097 Fax: 31 (0)345 519 811
Royal Sovereign Mexico, S.A. de C.V.
24 de Abril de 1860 No. 8 Col. Leyes de Reforma Mexico D.F.C.P. 09310
- PORTABLE AIR CONDITIONER
- INTRODUCTION
- CONTENTS
- PRECAUTIONS FOR USE
- IMPORTANT SAFETY INSTRUCTIONS
- PRECAUTIONS
- ELECTRICAL INFORMATION
- IDENTIFICATION OF PARTS
- INSTALLATION
- Install the Window Slider Kit : Fig 3.
- FUNCTION OF THE WATER TANK
- OPERATING INSTRUCTIONS
- CONTROL PANEL
- ON/OFF
- MODE
- AUTO (Automatic functioning key)
- COOL
- DRY
- FAN
- SPEED
- TIMER
- SLEEP
- TANK FULL
- AUTOMATIC RESTART
- REMOTE CONTROL FUNCTION
- CARE AND CLEANING
- Storage:
- SPECIFICATIONS
- REFURBISHED PORTABLE AIR CONDITIONER – 90 DAY WARRANTY
- EXCLUSIONS
Brand : Royal Sovereign
Model : ARP-2412
Category : Air Conditioning