
V-CD600BT - Car radio VARTA - Free user manual and instructions
Find the device manual for free V-CD600BT VARTA in PDF.


| Product Type | Car Stereo with CD/MP3/USB |
| Brand | Varta |
| Model | V-CD600BT |
| Dimensions (W x H x D) | 178 x 50 x 100 mm (Single DIN) |
| Weight | Approximately 1.0 kg |
| Power Supply | 12 V DC (negative ground) |
| Maximum Power Output | 4 x 50 Watts |
| Radio Bands | FM, AM (MW/SW) |
| RDS Functions | AF, TP, PTY, CT |
| Playback Media | CD, CD-R, CD-RW, MP3, WMA |
| Audio Inputs | USB (front), AUX (3.5 mm) |
| Bluetooth Version | Bluetooth 3.0 with A2DP, HFP, PBAP |
| Display | LCD with white illumination |
| Remote Control | Included (IR) |
| Mounting | Standard DIN chassis, screw mount |
| Maintenance | Clean with soft, dry cloth. Do not use solvents. |
| Safety | Use only the specified fuse (10A). Avoid moisture exposure. |
| Spare Parts / Repairability | Standard parts available; consult manufacturer for service. |
| Certifications | CE, RoHS compliant |
Frequently Asked Questions - V-CD600BT VARTA
User questions about V-CD600BT VARTA
0 question about this device. Answer the ones you know or ask your own.
Ask a new question about this device
Download the instructions for your Car radio in PDF format for free! Find your manual V-CD600BT - VARTA and take your electronic device back in hand. On this page are published all the documents necessary for the use of your device. V-CD600BT by VARTA.
USER MANUAL V-CD600BT VARTA
CD/MP3 receiver with Bluetooth Instruction manual
Thank you for purchasing our product. For safety, it is strongly recommended to read this manual carefully before connecting, operating and/or adjusting the product and keep the manual for reference in the future.
Table of contents
| Table of contents | 2 |
| Important safeguards | 3 |
| Accessories | 4 |
| Installation/connection | 5 |
| Panel controls | 10 |
| Basic operations | 16 |
| System menu operation | 19 |
| Tuner operation | 26 |
| RDS operations | 28 |
| CD operation | 30 |
| MP3/WMA operation | 31 |
| USB operations | 35 |
| SD/MMC operations | 36 |
| Recording operations | 37 |
| Music files transferring | 41 |
| Music files erasing | 43 |
| I-POD | 45 |
| Bluetooth operation | 49 |
| Handling discs | 64 |
| Cleaning | 64 |
| Troubleshooting guide | 65 |
| Specification | 66 |
Important safeguards
- Using the device at temperature below -10°C may cause the breakage of the device. Before using please heat up the passenger compartment to the recommended temperature!
- Read carefully through this manual to familiarize yourself with this high-quality sound system.
- Disconnect the vehicle's negative battery terminal while mounting and connecting the unit.
- When replacing the fuse, be sure to use one with an identical amperage rating. Using a fuse with a higher amperage rating may cause serious damage to the unit.
- Do not attempt to disassemble the unit. Laser beams from the optical pickup are dangerous to the eyes.
- Do not use the unit in places where it can be exposed to water, moisture and dust.
- Make sure that pins or other foreign objects do not get inside the unit; they may cause malfunctions, or create safety hazards such as electrical shock or laser beam exposure.
- If you have parked the car for a long time in hot or cold weather, wait until the temperature in the car becomes normal before operating the unit.
• Do not open covers and do not repair yourself. Consult the dealer or an experienced technician for help. - Make sure you disconnect the power supply and aerial if you will not be using the system for a long period or during a thunderstorm.
- Make sure you disconnect the power supply if the system appears to be working incorrectly, is making an unusual sound, has a strange smell, has smoke emitting from it or liquids have got inside it. Have a qualified technician check the system.
- Do not allow the speaker wires to be shorted together when the unit is switched on. Otherwise it may overload or burn out the power amplifier.
- Do not install the detachable panel before connecting the wire.
V-CD600BT
VARTA
Accessories
- Receiver
- Remote control
• Steering remote control
• ISO connector
• Instruction manual
• Consumer information - Warranty card
• 2 x Removal/Release keys
1 x 5 mm Nut
• 1 x Spring washer
• 1 x 12mm Screw
• 1 x Mounting/Support strap
• 1 x Plain washer
• USB extension cable
Installation/connection
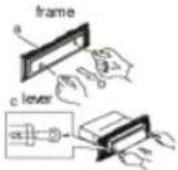
Din front-mount (method 1)
- After inserting the holder into the dashboard, select the appropriate tab and bend them inwards to secure the holder in place.
- Insert fingers into the groove in the front of frame and remove it.
-
Insert the levers supplied with the unit to the grooves at both sides. The unit can be installed or removed from the dashboard.
-
Dashboard
- Spring washer
- Screw (4 x 12 mm)
- Screw
- Strap
- Plain washer


Removing the unit
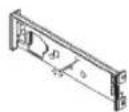
- Insert fingers into the groove in the front of frame and pull out to remove the frame.
- When re-attaching the frame, point the side with a groove down wards and attach it.
- Insert the levers supplied with the unit into the grooves at both sides of the unit as shown in figure until they click. Pulling the levers makes it possible to remove the unit from the dashboard.
V-CD600BT
VARTA
Din rear-mount (method 2)
Installation using the screw holes at both sides of the unit.
- Select a position where the screw holes of the main unit are fitted for aligned, and tighten the screws at 2 positions at each side.
Use either truss screws (5 x 5 mm), depending on the shape of the screw holes in the bracke
- Screw.
- Factory radio mounting bracket.
- Dashboard or Console.
- Hook (Remove this parts).


Note: The mounting box, outer trim ring and the half-sleeve are not used for this method of installation

Detach the unit
Removing the panel Attaching the panel

- Turn the power off
- Press the D.C.P. release button
- Remove the D.C.P.

- Attach the panel at the right side first, with point B on the main unit touching point A on the D.C.P. (As shown on the diagram).
- Then press the left side of D.C.P. onto the main unit until a "click" sound is heard.
Note: DO NOT insert the D.C.P from the left side. Doing so may damage it. The D.C.P can easily be damaged by shocks. After removing it, place it in a protective case and be careful not to drop it or subject it to strong shocks. When the release button is pressed and the D.C.P is unlocked, the car's vibrations may cause it to fall. To prevent damage to the D.C.P, always store it in a protective case after detaching it. Be careful not to damage it by pressing on it with fingernails, pens, screwdrivers, etc.
Cleaning
If the D.C.P is dirty, wipe off the dirt with soft, dry cloth only. And use a cotton swab soaked in isopropyl alcohol to clean the socket on the back of the D.C.P.

Resetting the unit:
After releasing the front panel, use a pencil or any non-metallic object to press & hold the RESET button for five seconds to reset the unit.
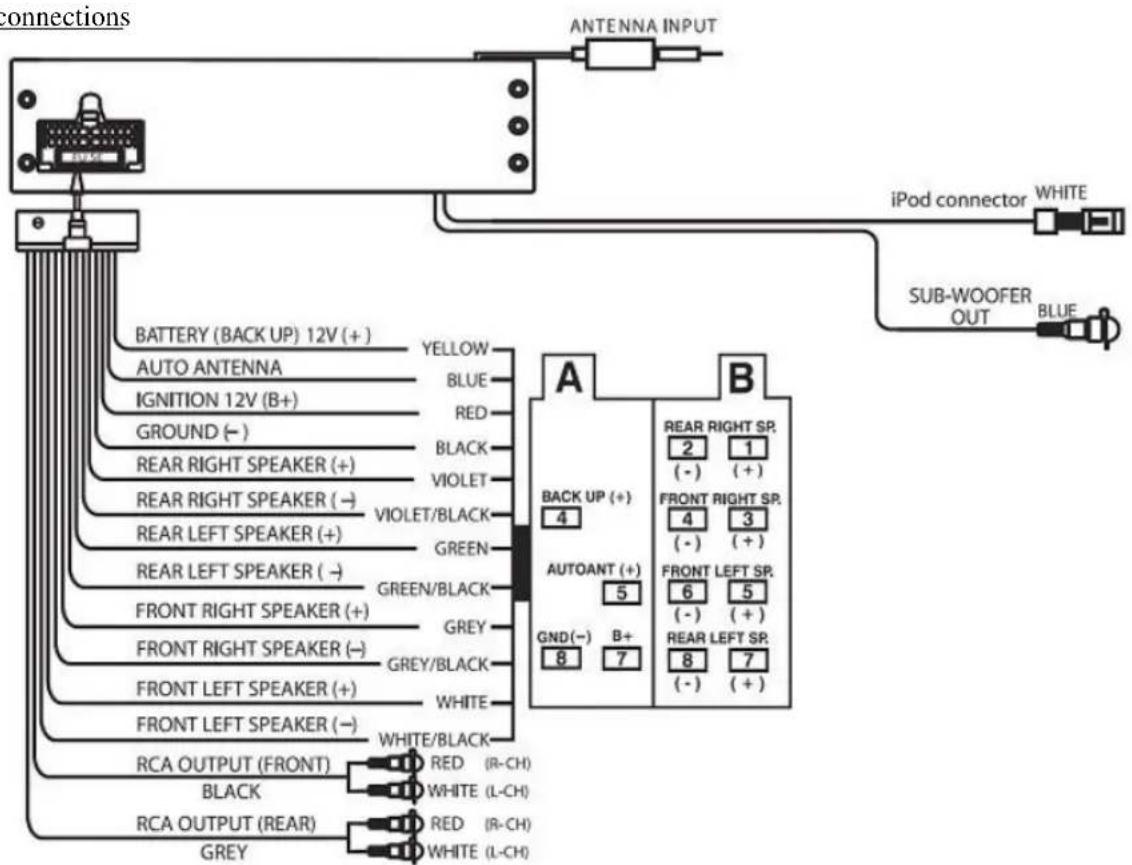
Electrical connections
Using the ISO Connector
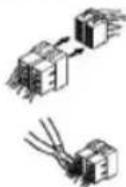
- If your car is equipped with the ISO connector, then connect the ISO connectors as illustrated.
- For connections without the ISO connectors, check the wiring in the vehicle carefully before connecting, incorrect connection may cause serious damage to this unit.
Cut the connector, connect the colored leads of the power cord to the car battery as shown in the color code table below for speaker and power cable connections.
| Pin | Wire color | Function/Label |
| A4 | Yellow | Battery (+) |
| A5 | Blue | Power antenna |
| A7 | Red | Ignition (ACC) |
| A8 | Black | Ground |
| B1 | Violet | Right rear speaker (+) |
| B2 | Violet/Black | Right rear speaker (-) |
| B3 | Grey | Right front speaker (+) |
| B4 | Grey/Black | Right front speaker (-) |
| B5 | White | Left front speaker (+) |
| B6 | White/Black | Left front speaker (-) |
| B7 | Green | Left rear speaker (+) |
| B8 | Green/Black | Left rear speaker (-) |
Panel controls
Front panel
- OPEN button
- NAVI button
- BAND/ERASE/CLEAR button
- AS/PS/ESC/ID3 button
- TA/RECORD/COPY button
- EJECT button
- USB slot
- ANIMATION button
- AF/SUB-W button
- PTY/X-BAS button
- FOLDER UP/6 number button
- FOLDER DOWN/5 number button
- RDM/4 number button
- RPT/3 number button
- INT/2 number button
- PAU/1 number button
- NEXT button
- PREVIOUS button
- MODE/TRANSFER button
- VOLUME knob/MENU/ENTER button
- POWER/MUTE button

V-CD600BT
VARTA
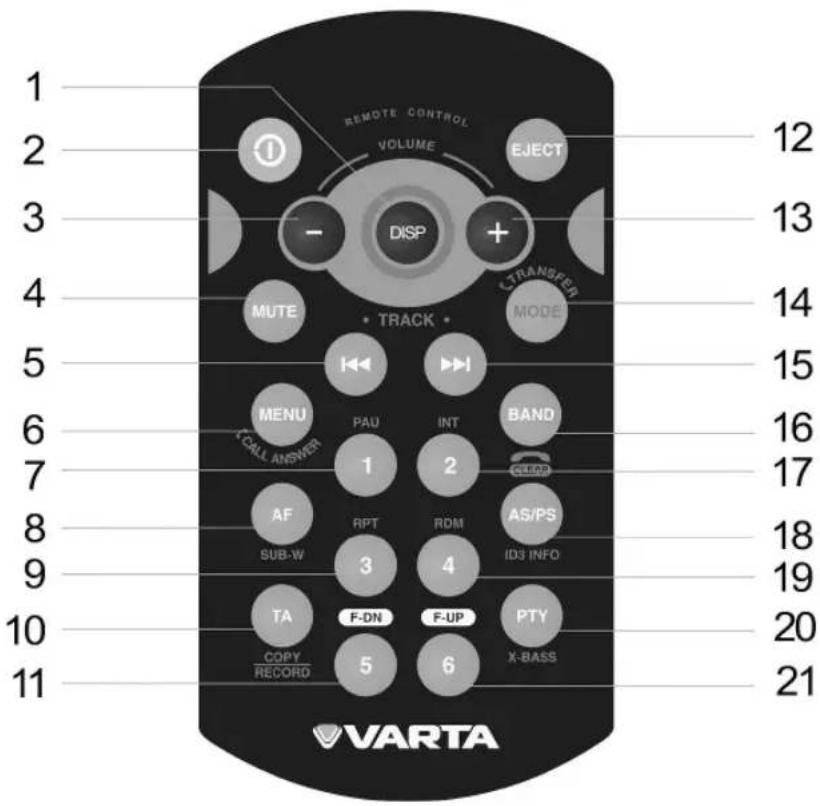
Remote controller (RC)
- DISP button
- POWER button
- VOL- button
- MUTE button
- PREVIOUS button
- MENU/CALL ANSWER button
- PAU/1 number button
- AF/SUB-W button
- RPT/3 number button
- TA/RECORD/COPY button
- FOLDER DOWN/5 number button
- EJECT button
- VOL+ button
- MODE/TRANSFER button
- NEXT button
- BAND/CLEAR button
- INT/2 number button
- AS/PS/ID3 button
- RDM/4 number button
- PTY/X-BASS button
- FOLDER UP/6 number button
Battery information of RC

- Press the catch and at the same time pull out the battery tray.

- Insert the 1 x lithium battery, type CR 2025 3V battery with the stamped (+) mark facing upward. Insert the battery tray into the RC.
Warning: Store the battery where children cannot reach. If a child accidentally swallows the battery, consult a doctor immediately.
Do not recharge, short, disassemble or heat the battery or dispose it in a fire.
Do not expose or bring into contact the battery with other metallic materials. Doing this may cause the battery to give off heat, crack or start a fire. When throwing away or saving the battery, wrap it in tape and insulate; otherwise, the battery may give off heat, crack or start a fire.
V-CD600BT
VARTA
Steering wheel remote control (SRC)
Important safeguards
• Install this SRC as required by this manual. Failure to do so may cause an accident.
- Do not install this SRC near the doors where rainwater is likely to be spilled on the unit. Incursion of water into the SRC may cause smoke or fire.
- Do not install this SRC in such a place as may obstruct the drive's view.
- Since interior layout differs depending on the type of vehicle, the ideal installation location for the SRC also differs. When installation the SRC, select the location that assures optimum transmission of signals from the SRC to the car stereo.
Mounting

V-CD600BT
VARTA
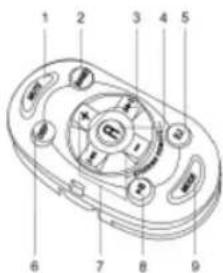
Operation buttons
- MUTE button
- BAND button
- NEXT/PREVIOUS buttons
- A (AUDIO) button
- EJ (EJECT) button
- DISP button
- VOLUME+/VOLUME-buttons
- PLAY/PAUSE button
- MODE button
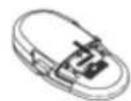
Battery changing
In order to ensure proper functioning of the steering wheel remote control, please make sure only use Lithium CR2025 Battery.
If the receiver being controlled no longer responds to any key press even under favorable circumstances please replace the battery of the remote control.
- Remove the remote control from the steering wheel.
- Push the battery compartment lid on the back of the remote control in direction of the gap and open the battery compartment.
- Remove the old battery, and replace with 1 new lithium battery.

V-CD600BT
VARTA
WARNING:
- Avoid installing this SRC in such a location where the operation of safety devices such as airbags is prevented by this SRC.
- Avoid installing this SRC in such a location where the operation of the steering wheel and the gearshift lever may be prevented. Otherwise, it may result in a traffic accident.
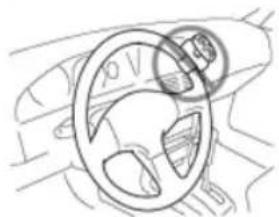
- Fix this SRC securely to the steering wheel with the belt attached to the SRC. If this SRC is loose, it disturbs driving stability, which may result in a traffic accident.
- Do not attach this SRC to the outer circumference of the steering wheel. Otherwise, it disturbs driving stability, causing a traffic accident. Always attach this SRC to the inner circumference of the steering wheel as shown.
natural_image
Line drawing of a car interior showing steering wheel and dashboard (no text or symbols)
natural_image
Line drawing of a car interior showing steering wheel and dashboard (no text or symbols)Basic operations
Open/Close the panel
Press EJECT button to slide down (open) a closed panel or to slide up (close) an opened panel.
Loading a CD
When the panel is in the slide down position, the disc slot becomes accessible. Insert a CD into the disc slot, the CD will be automatically loaded and the panel will also close automatically & playback will begin. If no CD is inserted, press EJECT button again to slide up (close) the panel.
Ejecting a CD
Press EJECT button to slide down the panel, if a CD is loaded, it will be ejected automatically. If the ejected CD is not being removed, after 10 seconds it will be reloaded automatically. And the panel will automatically slide up after disc has been reloaded.
Note: Please always use the EJECT button to slide up/down the front panel. Please never try to slide up or down the front panel manually, this will cause serious and permanent damage to the slide down mechanism, and this will void the warranty.
Please do not try to detach/remove the front panel (by pressing the detach button) or attach the front panel when the panel is in the slide down position. This may cause serious and permanent damage to the unit and panel. Only attach or detach the front panel when the panel is in the slide up position.
Animatrix mode
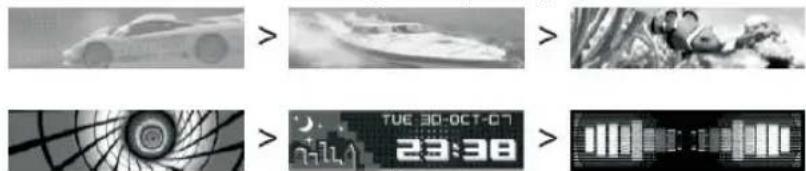
During playback mode press ANIMATION button on the panel repeatedly to choose the animation display mode:
V-CD600BT

Power ON/OFF
Press POWER button or any other button on the front panel (except OPEN/EJECT) to turn the unit on. Press and hold POWER button to turn the unit off.
Mute
Press POWER button on the unit or MUTE button to mute the audio volume, and "Mute ON" will be on the display. Press these buttons again to restore volume to the previous setting.
Sub-woofer (SUB-W)
Press and hold AF/SUB-W button to activate the sub-woofer function, and "Sub-w ON" will appear on the display for 3 seconds. Press and hold SUB-W button again to turn off the sub-woofer function.
Note: Please refer to the related description in "Audio Menu of Sub-woofer" for details operation of the Sub-woofer control.
The Subwoofer Level and Low Pass Filter control will only appear in the Audio Menu only if the Subwoofer function is currently activated.
X-bass
Press and hold PTY/X-BASS button to turn on the X-Bass function, and "ix-Bass ON" will appear on the display for 3 seconds. Press and hold X-Bass button again to turn this function off.
Please refer to the related description in "Audio Menu of X-Bass" for details operation of X-Bass control. The X-Bass Boost Level control will only appear in the Audio Menu only if the X-Bass function is currently activated.
Mode
Press MODE button to select a different mode of operation as indicated on the display panel. The modes are: TUNER, CDP, AUX, BT AUDIO, iPod.
AUX input
Connect the external device to AUX in jack located on the front panel (under the rubber cover), then press MODE button to select AUX mode. Press MODE button again to exit AUX Mode and select other mode.

Volume
To increase the volume, rotate the volume knob clockwise. To decrease the volume, rotate the volume knob counter clockwise. When volume is adjusted, the volume level will be shown on the display panel as a number ranging from 0 (lowest) to 46 (highest).
System menu operation
You can adjust the system setting in this unit by entering into the system menu, please read the below details operation for each system menu items:
Access into System Menu Function List
Press and hold MENU button for more than 3 seconds to enter the system menu items. Navigate through the menu items by rotating the VOLUME knob clockwise or anti-clockwise to move to the next or previous option. Once the needed option appears on the display, press MENU button to confirm and select the menu item.
Note: after entering the MENU mode you have 10 seconds to choose particular item, if no selection or adjustment made within the 10 seconds the unit will resume to the previous mode. You can also press AS/PS button to return quick to the previous mode without waiting the 10 seconds time out.
Audio Menu
Navigate through the audio menu items by pressing MENU button repeatedly. Once the needed menu item appears on the display, select the option by pressing NEXT or PREVIOUS buttons and then rotate the VOLUME knob or pressing VOL+/VOL- buttons to adjust the needed setting value.
Note: The unit will automatically exit the audio menu after 10 seconds of time out.
The following audio menu items can be adjusted as described above.
X-Bass
-
LEVEL: adjust the XBASS level from Low, Middle (MID) or High.
-
P.FREQ: adjust the XBASS peak frequency as 400Hz, 800Hz or 2.4KHz.
-
BOOST: adjust the XBASS booster to FLAT mode or ON mode.
Note: The XBASS option will only appear in the audio menu if the X-BASS feature is currently activated.
V-CD600BT
VARTA
Subwoofer
-
LEVEL: select the Sub-woofer level from "0" to "12".
-
LPF: adjust the Low pass filter (LPF) as Flat, 80Hz, 120Hz or 160Hz.
Notes:
- The SUBWOOFER control is only available for those units that are equipped with the optional sub-woofer line out, and only if connected to an optional sub-woofer speaker.
• The SUBWOOFER option will only appear in the audio menu if the SUBWOOFER feature is currently activated.
Bass
-
LEVEL: adjust the bass level from -6 to +6.
-
CFREQ: adjust the bass center frequency as 60Hz, 80Hz, 100Hz, or 200Hz.
-
BASS-Q: adjust the Bass Quality Factor as 2N, 1N, 1Wor2W.
Middle
-
LEVEL: adjust the Middle Range level from -6 to +6.
-
C.FREQ: adjust the Middle Range center frequency as 500Hz, 1 KHz, 1.5KHz, or 2.5KHz.
-
MID-Q: adjust the Middle Quality Factor as 2N, 1N, 1W or 2W.
Trable
-
LEVEL: adjust the Treble level from 6 to +6.
-
C.FREQ: adjust the Treble center frequency (C.FREQ) as 10KHz, 12.5KHz, 15KHz, or 17.5KHz.
Balance & Fader (Bal/Fad)
-
Rotate the VOLUME knob or press VOL+/VOL- buttons to adjust the Balance range from Balance left 06 to Balance Right 06 Press NEXT or PREVIOUS to choose fade.
-
Rotate the VOLUME knob or press VOL+/VOL- buttons to adjust the Fader range from Fader front 06 to Fader Rear 06.
Preset Audio EQ Menu
There are 8 different types of preset equalizer available. After entering the iEQ menu, rotate the VOLUME knob or press VOL+/VOL- buttons to select "FLAT", "ROCK", "R&B", "JAZZ", "DANCE", "COUNTRY", "REGGAE" and "CLASSIC".
V-CD600BT

Choose the needed one by pressing MENU button.
• The factory default iEQ setting is "FLAT"
- Once the iEQ function is activated, if you adjust the audio setting like BASS/MIDDLE/TREBLE/SUBWOOFR, the iEQ setting will automatically resume to FLAT mode.
System Function Menu
Rotate the VOLUME knob or press VOL+/VOL- buttons to adjust the setting. Press MENU to confirm and go to the next entry and press NEXT button to choose the next setting.
Date set
(1) mm (month) from 01(Jan) to 12 (Dec)
(2) dd (Date) from 01 (1st) to 31 (31st)
(3) www (week day) from Mon(Monday) to Sun (Sunday)
(4) yy (year)
Clock Set
The time of the clock will be set to 12:00 as the default.
Time Format
This option allows the selection of 12 hour or 24 hour time display format. "12 Hour" is the default setting.
Battery Level
This is a level indicator of your current car battery voltage condition. (Cannot be adjusted).
Note: If the battery level indicates 10 Volt or below, it is highly recommended that the user should consult with the nearest installer or dealer to check the battery condition.
Key Beep Tone
The beep tone feature allows the selection of an audible beep tone to be heard each time any button is being pressed on the panel of this unit. Default setting is ON. Rotate the VOLUME knob or press VOL+/VOL- buttons to select the "Off" option.
Program Volume
V-CD600BT
VARTA
This option allows the setting of the volume level of this unit automatically to be assumed when first turned on. Volume level "12" is the default setting. To program a specific volume level after turning on, rotate the VOLUME knob or press VOL+/VOL- buttons to select the desired volume level.
Tuner setting menu
Tuner Set - Local or Distance Select
This feature is used to designate the strength of the signals at which the radio will stop during automatic tuning. "Distance" is the default, allowing the radio to stop at a broader range of signals. To set the unit to select only strong local stations during automatic tuning, rotate the VOLUME knob or press VOL+/VOL- buttons to select "Local" mode.
AREA- Tuner frequency spacing
This option allows the selection of the frequency spacing appropriate for your area. Rotate the VOLUME knob or press VOL+/VOL- buttons to select the U.S.A., Latin America, Europe or OIRT options.
Auto Seek
Auto Seek "RDS" will be displayed by default. If "ALL" is selected, during the Auto Seek tuning mode, the unit will stop at all radio station including Non RDS station regardless AF and TA is switched on. If "RDS" was selected and the AF is on, during the Auto Seek tuning mode, the unit will stop at only RDS station.
TA Seek
TA Seek “On” will be displayed by default. If selected “On” mode, when a received station does not have TP information for 60 seconds, the unit automatic search to next station, which does not have the same station (PI), but has TP information. When a TP information gets lost at the current station over the default retune time (60 seconds), the unit starts to search to next same PI station. When the same PI station does not catch in 1 cyclic search, the unit retunes to next station with TP information. If “Off” is selected, when a received station dose not have TP information for 60 seconds, a Double Beep Sound (Alarm) is output and the LCD will be displayed “Lost TP TA” but the retune mode is not activated.
Note: This function is only activated when "TA" is turned on.
TA Volume
TA Volume “18” will be displayed by default. Rotate the VOLUME knob or press VOL+/VOL- buttons to adjust from “0-40”. When TA function is activated, if a TA program is tuned on, the volume level will automatically set to this set up volume, regardless of the current volume of the current mode.
V-CD600BT

Region
REGIONAL “OFF” will be displayed by default. If “On” is selected, then during an AF search or PI seek, it will implement to station, which have all the PI codes, which are the same as the current station. If “Off” is selected, then during AF search or PI seek the regional code in the format PI code will be ignored. A regional station is possible to be received.
The Regional function On/Off Setting is valid only when the "AF" function is on.
Display setting menu
The following display items can be adjusted after entering the display menu:
Stand by Disp
Under "ACC On But Power Off" condition, this unit has the following different types of display for selection:
- Demo: The default display mode is DEMO, and the unit will automatically demo this unit's major features cyclic on the display.

- OFF: The display will be black
V-CD600BT

Animatrix
When the unit is turned on, there are different types of animation display mode that you can select:
-
Movie 1
-
Movie 2
-
Graphic 1
-
Graphic 2
-
Clock Time
-
Spectrum 1

natural_image
Collage of grayscale images showing a car, abstract graphics, a person on a spinning wheel, and a digital display with time and date (no readable text or symbols)-
All: Display all above and wallpapers in cycle.
-
Off: Display the current playback mode only.
Wall Paper
“OFF” is the default setting. There are two animation wallpapers for user selection. The selected wallpaper will be displayed during playback mode, like Tuner, CD/MP3 playback, etc.
Screen Saver
"OFF" is the default setting. If selected "ON", in every 15 min the display will show the Clock Time for 15 seconds regardless what the current mode is.
Media Setting Menu
The following items can be adjusted once entered the media menu:
Record Mode – Record Quality selection
V-CD600BT
VARTA
This feature allows the selection of the Recording quality for FM, or AUX Line in. The default mode is “Standard”(Standard mode). Rotate the VOLUME knob or press VOL+/VOL- buttons to select “High” (High Quality Mode) option.
Note: While Recording is progressing, the “RECORD MODE” will not appear in the Menu list.
Bluetooth Setting Menu
The following Bluetooth setting can be chosen once entered the Bluetooth:
Download - Bluetooth Wireless Music File download
This feature can be used for wireless transfer of music file and store into this unit via Bluetooth wireless technology.
Paring - with Bluetooth device
This feature is used for pairing of this unit's Bluetooth system to mobile phone or other Bluetooth device. During the "Pairing" mode press MENU button to activate the Pairing.
Paired Device
This feature allows choosing the paired device.
Visibility - Show or Hide selection
This option allows other Bluetooth device to search for this unit. The default setting is “SHOW”, which allows other Bluetooth device to search this unit. Rotate VOLUME knob or press VOL+/VOL- buttons to select: “HIDE”, which does not allow the other device to search this unit.
Note: Please make sure to select "SHOW" during the searching of this unit from the other Bluetooth device.
Auto Answer - On/Off selection
This unit is default in “Off” mode. If “On” is selected, the unit will automatically answer any incoming call without need of pressing PHONE button.
Phone Vol - Incoming call ringing level
This unit can preset the ringing volume level for any incoming call. The default Ringing Volume Level is “20”. Rotate VOLUME knob or press VOL+/VOL- buttons to adjust from min. “00” to max. “38”.
Tuner operation
Navi list search (NAVI)
Using the advanced NAVI list search method on this unit, you can press NAVI button to access into the NAVI SEARCH mode, then rotate VOLUME knob or press VOL+/VOL- button to select the needed preset memory station. Once selected the needed preset memory on the list, press MENU/CALL ANSWER button on the RC or ENTER button on the unit to confirm and begin the playback.
Band selection
Press BAND/ERASE/CLEAR button on the unit or BAND/CLEAR button on the RC to switch between FM bands and AM (MW) bands.
Station search
- Manual tuning: press NEXT or PREVIOUS buttons to move the radio frequency one step up or down.
- Auto seek tuning: press and hold NEXT or PREVIOUS buttons for 3 seconds to search for the next station automatically.
Preset stations
There are six number buttons for storing and recalling stations in each band.
- Store a station: select a band, and then select a station. Press and hold a number button for 3 seconds. The preset number will appear in the display.
- Recall a station: select a band. Press a number button to select the corresponding stored station.
Automatic store/preset scan
- Automatically Store: the unit can automatically select 6 strong stations and store them in the current band. Select a band. Press and hold AS/PS/ESC*ID3 button on the unit or AS/PS/ID3 button on the RC for more than 3 seconds. The new stations will replace stations already stored in that band.
V-CD600BT
VARTA
- Preset Scan: the unit can scan stations stored in the current band. Select a band, press and hold AS/PS/ESC*ID3 button on the unit or press AS/PS/ID3 button on the RC. The unit will pause for ten seconds at each preset station. Press the button on the RC again to stop scanning when the needed station is reached.
Stereo
The unit will automatically pick up a stereo signal, when available. When in stereo mode, the ST icon appears in the display. When no stereo signal is available, the unit will automatically change to mono operation, and no icon will be displayed.
RDS operations
Note: RDS (Radio Data System) service availability varies with areas. Please understand if RDS service is not available in you area, the following service is not available, either.
AF (Alternative Frequencies) function
Press and hold for 3 seconds AF/SUB-W button to turn on or turn off the AF function. "AF ON" or "AF OFF" will shown on the display for 5 seconds. When AF is on, the RDS program will be automatically searched and received. If the RDS signal is week or even no signal, the unit will search another frequency with this RDS program.
Note: Factory default setting is AF ON.
TA (Traffic Announcement) function
By pressing and holding TA/RECORD/COPY button for 3 seconds, you can turn on TA standby mode. "TA ON" will be shown on the display for 5 seconds and the TA icon will light up on the display. In the standby mode, when a traffic announcement broadcast starts, the traffic announcement will be received regardless of the function mode. When a traffic announcement starts, "TRAFFIC INFO" will be shown on the display, press TA/RECORD/COPY button to cancel the broadcast reception while a traffic announcement is being received. The unit will go back to the previous mode and TA goes into standby mode again. When the TP icon does not light up for 60 seconds, a beep alarm sound is heard and the display shows "Lost TP, TA". TA seek will activate automatically and searches for another TA station.
PTY function
Press PTY/X-BAS button to go to PTY list search mode. The following PTY list is available to searching on this unit. Rotate VOLUME knob on the unit or press VOL+/VOL- buttons on the RC to search for a needed PTY and press MENU/CALL ANSWER button on the RC or ENTER button on the unit to confirm.
| Music Group Speech | Group |
| Pop, Rock News, Affairs, Info | |
| Easy, Light Sport, Educate, Drama | |
| Classics, Other Culture, Finance, Varied | |
| Jazz, Country Weather, Finance, Children | |
| Nation, Oldies Social, Religion, Phone In | |
| Folk Travel, Leisure, Document | |
CD operation
Loading a disc
Press EJECT button to slide down the panel. Insert the disc with the printed side facing upward into the slot. The playback will start automatically. If you want to eject the disc, press EJECT button to slide down the panel and eject the disc.
Pause
Press PAU/1 button to suspend disc playback. Press the button again to resume playback.
Track select
Press and hold PREVIOUS/NEXT buttons for 1 second to go to the next track on the CD. The selected track number will appear on the display. Press and hold PREVIOUS/NEXT buttons for more than 1 second to fast forward or fast reverse the disc. CD playback starts when the button is released.
Repeat playback
Press RPT/3 button during playback to continuously repeat the current track. Press the button again to resume normal playback.
Random mode
Press RDM/4 button during playback to play all tracks on a CD in a random order. Press the button again to resume normal playback.
Intro function
During playback, press INT/2 button to play the first 10 seconds of each track on the disc. When the desired track is reached, press the button again to end the scan and play the selected track.
MP3/WMA operation
This unit can play MP3/WMA directly from files contained on a CD-R/RW, USB Memory Stick, SD or MMC Memory Card.
Acceptable Medium Formats
The following formats are available for the media used in this unit. The maximum number of characters used for file name including the delimiter (".") and three-character extension are indicated in parentheses.
• ISO 9660 Level 1 (11 characters)
• ISO 9660 Level 2 (31 characters)
Joliet (31 characters)
• Romeo (31 characters)
The media reproducible on this unit has the following limitations:
• Maximum number of nested folders: \$
• Maximum number of files per disc: 999
• Maximum number of files per media device: 2000
• Maximum number of folders per disc: 255
MP3/WMA written in the formats other than the above may not be successfully played and their file names or folder names may not be properly displayed.
MP3/WMA Encoder and CD Writer Settings
Use the following settings when compressing audio data in MP3 data with the MP3 encoder.
Transfer bit rate: 32-320 kbps.
Sampling frequency: 32, 44.1, 48 KHz (WMA) 16, 22.05, 24, 32, 44.1, 48 KHz (MP3).
V-CD600BT

When using a CD writer to record MP3/WMA up to the maximum disc capacity, disable additional writing. For recording on an empty disc up to the maximum capacity at once, check disc at once.
ID3 Tag information
This unit supports ID3 tag versions 1.0 and 1.1.
Writing Files into a Media
When a media containing MP3/WMA data is loaded, the unit checks all data. If the media contains many folders or non-MP3/WMA files, MP3/WMA play will be delayed, it may take time for the unit to move to the next file, and searches may not be performed smoothly. Loading such a media may produce loud noise and cause damage to the speakers.
Note: Do not attempt to play a media containing a non-MP3/WMA file with the MP3/WMA extension or a media containing non-MP3/WMA files.
Bit Rates
The unit supports bit rates from 32 to 320 kbps.
Files Playing Order
When selected for play, Folder Search, File Search or Folder Select, files and folders are accessed in the order in which they were written by the PC writer. Because of this, the order in which they are expected to be played may not match the order in which they are actually played.
File/Folder Play
There are three different play methods as following:
File/Folder Intro Play
- Press and hold INT/2 button more than 3 seconds during playback for "intro" play all files of the current folder. Intro play should restart from the first song of the current folder, after all files in the current files have been intro-played. To disable current folder "intro" play, press and hold INT/2 button more than 3 seconds.
V-CD600BT

- Press INT/2 button to “intro” play all files on the disc. Intro play should restart at the very first file of the disc after all files in the disc has been intro played. To disable all files “intro” play, press INT/2 button.
File/folder Repeat Play
- Press and hold RPT/3 button more than 3 seconds during playing MP3/WMA disc to repeatedly play all files of the current folder. And keep on repeat playing the current folder until the repeat play is disabled. To disable current folder repeat play, press and hold RPT/3 button more than 3 seconds
- Press RPT/3 button to repeatedly play the current file. And keep on repeat playing the current file until the repeat play is disabled. To disable current file repeat play, press RPT/3 button.
File/Folder Random play
- Press and hold RDM/4 button more than 3 seconds during playing MP3/WMA disc to random play all files of the current folder. To disable current folder random play, press and hold RDM/4 button more than 3 seconds.
- Press RDM/4 button to randomly play all files on the disc. To disable all files random play, press RDM/4 button.
Folder Up/Down
Press FOLDER DOWN/5 button to go to 1 folder down. Press FOLDER UP/6 button to go to 1 folder up.
ID3 Information Display
If any MP3/WMA file recorded with ID3 Tag information, the ID3 information such like Album title, Track title, Artist Title will be displayed and automatic scrolling through the display while the file is playing. User also allows pressing repeatedly AS/PS/ESC*ID3 button on the unit or AS/PS/ID3 button on the RC to view the ID3 tag information manually.
Note Of ID3 Icons On Display
| Icon Description | |
| Album icon | |
| Track icon |
V-CD600BT

| Artist icon | |
| File icon | |
| Folder icon |
NAVI List Search The Desired CD Track or MP3/WMA Files
Using the advance NAVI List Search method on this unit, user can press NAVI button to access into the NAVI search mode, then rotate VOLUME knob to select the desired CD track or music files for playback. Once selected the desired track or files, press MENU/CALL ANSWER button on the RC or ENTER button on the unit to confirm and begin the playback.
Note: During the NAVI list searching, press AS/PS/ESC*ID3 button on the unit or AS/PS/ID3 button on the RC or rotate VOLUME knob counterclockwise to move to the last upper level of folder.
USB operations
Loading and ejecting USB drive
Insert the USB drive into the corresponding slot with the help of a USB extension cable included. Never detach the front panel when a USB stick is plugged in the slot. Always remove USB stick before detaching the panel.
USB Mode Selection
In any other mode while inserting a USB stick into the slot, the unit will automatically switch from current mode to USB Host mode. The unit will display "USB Host" for a while, and then start reading the files contained on the USB stick. Once the unit read the USB stick successfully, playback of the first audio music file on the USB stick wall start automatically. Press MODE/TRANSFER button repeatedly to change to other modes or switch back to USB Host mode.
Notes:
- Before removing the USB stick from the slot. Always remember to switch off the unit's power or switch to other mode. Never try to remove the USB stick while playing music file on the USB stick. It may damage the USB stick and sometimes will cause the unit system lock up.
- The unit can support a music player, which has a USB interface. However, due to the fast changing decoder technology and different kinds of hardware interface. This unit may or may not be compatible to all the music players and USB sticks, especially those USB sticks/players, which require installing a program driver.
- About music flash player with USB interface: usually the unit takes a longer time to read this kind of player than normal USB stick. For the flash player with a built-in power battery sometimes takes 20-30 seconds to start up the playback.
• The unit is not compatible with any portable hard disk.
• The unit supports USB sticks up to 2 Gb.
Music File Playback Operation
All the USB memory card playback operations are the same as the operations of CD/MP3/WMA.
SD/MMC operations
Loading and ejecting SD/MMC
Press EJECT button to slide down the panel. Insert the SD/MMC card with the label side up into the corresponding slot. Attach the front panel. To remove the memory card, detach the front panel, push the card till you hear a click sound, then pull out the card from the slot.
Memory Card Mode Selection
After a SD or MMC card was inserted into the main unit card slot, press MODE/TRANSFER button to select Memory Card mode. The unit will display "Memory Card" for a while then start reading the files contained on the memory card. Once the unit reads the memory card successfully, the first audio music file on the memory card will automatically played. Press MODE/TRANSFER button repeatedly to switch to other modes or switch back to Memory Card mode.
Note:
- If no memory card is inserted into the slot, press MODE/TRANSFER button to automatically skip Memory Card mode.
• The unit supports SD/MMC memory cards up to 2 Gh.
Music File Playback Operation
All the SD/MMC memory card playback operations are same as the operations on CD/MP3/WMA.
Recording operations
This unit allows user to record his favorite music. You can store your favorite music to the USB stick as well as SD/MMC memory card.
Recordable media
The following audio sources are available for recording on this unit:
• FM Radio: Recording FM program;
• CDP: Recording CD music;
• iPod Mode: Recording iPod audio;
• AUX in Mode: Recording AUX line in audio.
Storage devices for record
The following media can be used for storage of the music or audio files on this unit:
• USB stick:
• SD/MMC memory card.
To start recording
- Press and hold TA/RECORDCOPY button on the front panel to activate the Record mode.
- The display will show "RECORD" symbol as default. Rotate VOLUME knob or press VOL+/VOL- button to navigate through MMC/SD card or USB stick to select the storage media.
Note: Only the inserted media device can be shown for selection when rotating the knob. Any media device not inserted in this unit will not be shown.
- Once selected the storage media, press MENU/CALL ANSWER button on the RC or ENTER button on the unit to confirm starting the record to this selected media. If no further button is press within a 2 second period, the unit will automatically resume to the previous mode.
V-CD600BT
VARTA
-
After pressing MENU button to start the record, if the unit detects the selected device memory capacity is used up, "Memory Full" will be shown on the display for a while then automatically resume to the previous mode.
-
Under record processing, the display will show "REC PLAY with the elapsed time.
Notes:
• In recording mode, all the FM/iPod/AUX operations are not functional.
• The audio will remain in recording mode even if Mute function is activated.
• The recording will automatically stop if the storage device memory is full.
- Record Quality: the unit has 2 record quality modes: Standard and High, to be selected in the Menu. The below table indicates the difference of the 2 record quality modes.
| Record mode | Bit rate | Sample rate |
| High (High) | 128 Kbps | 44.1 KHz |
| Standard (Std) | 96 Kbps | 44.1 KHz |
To STOP Recording
Press and hold TA/RECORD/COPY button again to stop recording. The display will show "REC STOP <=:" and the recorded FM program or music is automatically saved as a file into the folder, "MY_TUNER" by the advanced "File Management" system of the unit.
The unit will stop recording automatically after the following operations (but recorded FM program or music will be saved as a file into the folder "MY_TUNER"):
• Switch the power to OFF mode;
• Mode change:
- Inserting a CD;
• Inserting a USB stick;
• Detach the front panel from the main unit.
V-CD600BT
VARTA
To pause recording
This unit allows user to pause the recording. This is a useful function for the user to cut commercial or advertises program, which he may not want to record into file. During recording, press PAU/1 button to pause the recording. The display will show "REC PAUSE <=>" until PAU/1 button is pressed again to resume the recording.
Recording CD music
This operation can be performed only when the unit is in CD playback mode.
1. Play a track to be recorded, then press and hold TA/RECORD/COPY button on the front panel to activate the Record mode.
2. The display will show "RECORD" symbol as default. Rotate VOLUME knob or press VOL+/VOL- button to navigate through MMC/SD card or USB stick to select the storage media.
Note: Only the inserted media device can be shown for selection when rotating the knob. Any media device not inserted in this unit will not be shown.
3. Once selected the storage media, press ENTER button to confirm starting the record to this selected media. If no further button is pressed within a 10 second period, the unit will automatically resume to the previous mode.
4. After pressing ENTER button to start recording, the unit will restart playback from the beginning of the track and the recording will start at the same time. If unit detects the selected media memory capacity is used up, "Memory full" will be shown on the display for a while, then automatically resume to previous mode.
5. Under record processing, the display will show "RECORD" following with the elapsed time.
6. When the recording is completed, the display will show "RECORD OK!" for a while and the unit will automatically playback the next music track on the CD. The recorded music is automatically saved as a file into the folder, "MY_CD" by the advanced "File Management" system of the unit.
Notes:
• In recording mode, all the FM/iPod/AUX operations are not functional.
• The audio will remain in recording mode even if Mute function is activated.
• The recording will automatically stop if the storage device memory is full.
V-CD600BT
VARTA
To Cancel Recording
Long press button COPY/RECORD again to cancel the recording. The track that has been recorded incompletely will be deleted. The unit will cancel the Recording automatically under the following operation.
• Switch the power to off mode
• Mode change
- Inserting a CD Disc
• Inserting a USB Stick
• Detach the Front Panel from the main unit
WARNING:
- Never remove the USB Stick while recording to USB Stick. It may damage the USB Stick and sometimes will cause the unit system lock up.
- It is not recommended to insert USB stick while recording is under progress to other storage device. Always remember to stop the record or after the record is completed, then insert the USB stick.
Music files transferring
Thanks for the most useful and convenient files transferring function of this unit, you can easily transfer music files between, USB Stick, SD or MMC Memory card and on the CD Disc.
Transferable media
Files are transferable within the following media:
• Removable USB Stick
• SD/MMC Memory Card
Supported file formats: MP3andWMA
Transferring MP3 or WMA music files from CD disc
This operation only can be performed during disc playing a MP3 or WMA music file.
-
Playback a music file to be transferred and then press and hold the TA/RECORD/COPY button to activate the Transfer mode.
-
Rotate VOLUME knob or press VOL+/VOL- button to choose the storage media.
Note: if storage media is not inserted, it cannot be chosen.
- Once selected the storage media, Press MENU button as confirmation to transfer the playing file.
Note: If button is not pressed within a 5 second, the unit will automatically resume to the previous mode.
-
The playing music: file will stop and the transferring will start at the same time. If the unit detected the selected media memory capacity is used up, "MEMORY FULL" will be displayed on the display for a while then automatically resume to the previous mode.
-
When the transfer is processing, the display will show "COPY"
-
When the file transfer is completed, the display will show "COPY OK" for a while and automatically playback the next music file on disc. The transferred music file is automatically saved as a file into folder "MY_MP3" or "MY_WMA" by the advanced "File Management" system of this unit.
V-CD600BT
VARTA
Notes:
- In transferring mode, All the MP3/WMA operation is not functional, like file up/down, Repeat, Random, and Intro etc.
• The audio will remain recording by the unit system even MUTE function is activated.
• The Transferring will automatically stop if the storage device memory is less than 2MB
To Cancel Transferring.
Press and hold TA/RECORD/COPY button again to cancel the recording, the unit will stop the file transfer. The display will show "COPY CANCEL". The music file that has been transferred incompletely will be deleted.
Note: The unit will stop the file transfer automatically under the following operation, the music file that has been transferred incompletely will be deleted:
• Switching the power to off mode
- Mode change
- Inserting a CD Disc
- Inserting a USB Stick
• Detaching the Front Panel from the main unit
Transferring MP3 or WMA music files between media devices
- Select a device (Memory card or USB stick) by MODE button and playback the music file that needs to be transferred.
- Rotate the VOLUME knob or press VOL+/VOL- button to choose the storage media (Memory card or USB stick).
Further operation is the same as in "Transferring MP3 or WMA music files from CD disc" item.
Notes:
- Never remove the USB Stick while recording or file transferring to USB Stick. It may damage the USB Stick and sometimes will cause the unit system lock up.
- It is not recommended to insert USB stick while recording is under progress to other storage device.
Music files erasing
You can erase files from the USB Stick or Memory Card.
Erasing music files in the media
There are TWO different methods for erasing files.
Erase while the Music File is playing
Press and hold BAND button to activate the ERASE mode.
• The display will show: ERASE. YES/NO?
- Under the erase mode. Rotate the VOLUME knob or press VOL+/VOL- button to select "Yes" to erase or "No" to cancel.
Note: If the operation is not confirmed within 5 seconds, the unit automatically resumes to the previous mode.
- After pressing MENU button to start the ERASE, the current music file will stop playing and the erasing will start at the same time.
- "ERASE OK" will be displayed on the LCD after the music file erased successful, and the unit will automatically start playback the next music file.
Erase under NAVI List Search Mode
You can select the Music file Number to erase by NAVI Search mode
- After selecting music file you want to erase by NAVI list search method, press and hold BAND button to activate the ERASE mode.
• The display will show: ERASE. YES/NO?
- Under the erase mode. Rotate the VOLUME knob or press VOL+/VOL- buttons to select "Yes" to erase or "No" to cancel.
Note: If the operation is not confirmed within 5 seconds, the unit automatically resumes to the previous mode.
- After pressing MENU button to start the ERASE, the current music file will stop playing and the erasing will start at the same time.
V-CD600BT
VARTA
- "ERASE OK" will be displayed on the LCD after the music file erased successful, and the unit will automatically start playback the next music file.
Notes:
- Do not switch mode of the unit during the erasing
- Do not turn off the Power of the unit during the erasing
- Do not switch the ignition key off during the erasing
- Do not detach the front panel during the erasing
Files manager
The advance "File Management" system of this unit can help you organize all the music files just like in PC. Please read below for details:
Folders management
This unit will automatically self-create the below default folders in any USB/SD/MMC media device, once this device is inserted into the unit.
MY_MP3: Folder for saving all the MP3 music files transferred from other device.
MY_WMA: Folder for saving all the WMA music files transferred from other device.
MY_CD : Folder for saving all the music files from CD Disc
MY iPod: Folder for saving all the music files from iPod Player.
MY_FM : Fokler for saving all the music files from FM Program.
MY_AUX : Folder for saving all the music files from AUX Line In.
MY_BT : Folder for saving all the music files wireless downloaded from other Bluetooth device.
Files management
This unit will automatically self-create the file name following with the Folder Name.
For example: Music file, which recorded from CD disc, the file name "CD0001 .MP3", will be automatically created and saved in the respective folder.
I-POD
This unit is equipped with iPod Ready function, which allows end user to have direct control of the iPod on the unit and display iPod song information on the unit LCD display. Please read below for more details operation.
iPod Compatibility Chart
This unit supports the following i Pod software versions:
iPod1G Not Supported
iPod2G Not Supported
iPod3G Firmware Version 2.2
iPod Mini All versions
iPod4G All versions
iPod Photo All versions
iPod Nano All versions
iPod5G (Video) All versions
iPod Classic All versions
iTouch All versions
V-CD600BT

Connect the iPod to this unit

flowchart
graph TD
    A["HEAD UNIT"] --> B["iPod photo"]
    A --> C["iPod"]
    A --> D["iPod mini"]
    A --> E["iPod nano"]
    B --> F["iPod Cable"]
    C --> F
    D --> F
    E --> F
    G["8 Din iPod Ready Cable"] --> A
About Video File
This unit is NOT ABLE to select any VIDEO FILE OR VIDEO ALBUM, which contained in the iPod Video. This unit will only automatically select Music Album or File regardless the connected Video iPod last playing is a Video File or Album.
Turning iPod Power On and Off
The iPod power turns on automatically as soon as it is connected to the 30 Pin Connector and as long as the vehicle's ignition is turned ON. The iPod power can be turned off by removing the iPod from the 30 Pin Connector or if the vehicle's ignition is turned OFF. Under this condition the iPod will go into pause mode and goes into sleep mode about 2 minutes later.
Note: While the iPod is connected, the power cannot be turned on or off from the iPod itself.
iPod Battery Charging
While connected to the unit, the iPod will automatically start recharging as long as the vehicle's ignition key is turned to ACC or ON.
Switch to iPod Mode
When the head unit is powered on and iPod is connected to the 30 pin connector, press MODE button to switch to iPod mode and unit then starts reading the music files contained in the iPod and the playback will automatically start. Press MODE button repeatedly to change to other modes or switch back to iPod mode.
iPod Information Display On The Unit Display
This unit can display the Song, Artist, Album name and Elapsed time on the display, this information can be displayed by pressing AS/PS button repeatedly while a iPod Song file is playing.
Searching a needed song
During iPod playback mode, press NAVI to enter into the iPod Searching Mode. There are different searching methods:
- Playlists
- Artists
- Albums
- Songs
- Genres
Once selected the needed searching method, within 10 second press MENU button to confirm and enter the searching mode, then rotate VOLUME knob or press VOL+/VOL- buttons to navigate in the Album or Artist or Song contained in the iPod. Press MENU button to confirm or play the selected song. During the searching mode, press AS/PS button as quick move back to the last upper level of Album, Playlist, Genre, etc.
Song Select
Press NEXT or PREVIOUS button to skip to the next or previous song. Press and hold NEXT or PREVIOUS button for more than 3 seconds to fast forward or fast reverse the current song.
Song Repeat/Repeat All play
Press and hold RPT/3 number button for more than 3 seconds during iPod playback mode to “REPEAT ALL”. The icon will be shown on display. All songs of the current album will be kept on repeat playing until the “Repeat All” function is disabled. To disable current Album “REPEAT ALL” function press and hold RPT/3 number button for more
than 3 seconds. Press RPT/3 number button to “REPEAT PLAY” the current song. The Icon will be shown on display. Repeat playing the current song will be active until the “REPEAT PLAY” function is disabled. To disable current song “REPEAT PLAY”, press RPT/3 number button.
Shuffle play/Shuffle Album
Press and hold RDM/4 number button for more than 3 seconds during iPod playback mode to activate the “SHUFFLE ALBUM” function. The icon ✕ 回 will be shown on display. This function allows RANDOM playback of all the albums contained on the iPod. To disable “SHUFFLE ALBUM” function, press and hold RDM/4 number button for more than 3 seconds.
Press RDM/4 number button during iPod playback mode to activate “SHUFFLE PLAY”. The icon ✕ will be shown on display. This function allows the playback of all the songs in the iPod in random sequence. To disable “SHUFFLE PLAY”, press RDM/4 number button again.
Bluetooth operation
This unit is equipped with the most advanced Bluetooth Wireless Technology. Please read the below instruction before you start enjoy the Bluetooth functions available in this unit:
Unit's Bluetooth Device Name
“BT70” is the default device name of this unit. “BT70” should be displayed on the connected/paired device.
The Bluetooth Profiles Supported By This Unit
- HSP(Head Set Profile)
- HFP (Hands Free Profile)
- OPP (Object Push Profile)
- A2DP (Advanced Audio Distribution Profile)
- AVRCP (Audio/Video Remote Control Profile)
The Bluetooth Functions Supported By This Unit
- Bluetooth Hands-Free with Mobile Phone featuring HSP & HFP profile.
- Phone Book download/calling from the Mobile Phone via Bluetooth wireless technology.
- Listen music via Bluetooth wireless technology with Audio device or Mobile Phone featuring A2DP & AVRCP profile.
- Music File download via Bluetooth wireless technology to USB Stick or Memory Card in this unit with any Devices or Mobile Phone featuring OPP profile.
User Guide For Bluetooth Operation
- Before using Bluetooth, please make sure the mobile phone you use supports Bluetooth functions (Headset or Handsfree profiles or both).
V-CD600BT
VARTA
- Before using Bluetooth, please make sure you completed pairing with your mobile phone first. Please refer to the user manual, section "Pairing". To ensure the best reception for pairing or reconnection, please make sure the phone battery is fully charged.
- "BT70" is unit model number, which is displayed on the mobile phone.
- To achieve the best performance, please always keep the mobile phone within 3 meters of the head unit.
- Please always keep a clear path between the mobile phone and the head unit, especially metal objects.
- Some brands of mobile phone like Sony Ericsson may have "Power Saving Mode" selection when Bluetooth mode is switched on. Please do not switch ON Power Saving Mode when operating with this head unit, as some abnormal communal behavior will happen occasionally.
- Before you make Outgoing call or Incoming call, make sure the mobile phone's "Bluetooth function" is switched "ON".
- To ensure the best conversation quality/performance, please always keep talking within 1 meter of the head unit.
- If you want to disconnect the head unit with the mobile phone, please switch off Bluetooth connection on the mobile phone or go to the system menu "disconnect" to disconnect the Bluetooth connection manually (please refer to the user manual, section "disconnection of the Bluetooth system" for details instruction).
- Some mobile phones can support "IN BAND RING TONE", such as Nokia. In such case, the Incoming Ringing Tone will be the same as the original Ring-tone of the mobile phone. But some mobile phones like Sony Ericsson do not support this feature. The Ring-tone will be using the standard Ring-tone of the Head unit.
- When in telephone mode, during talking, it is highly recommended to set the volume below "30" in order to achieve the best sound quality. As if the volume is too high, it may create unwanted echo inside the car, and this unwanted echo may feedback into the microphone.
- If the Bluetooth related operation is not performing normally, like cannot make pairing, cannot make an outgoing call, you can try to make a SOFT-RESET of the Bluetooth module by removing/detaching the panel from the main unit and waiting for about 1 min. Then reattach the panel to the unit and retry the Bluetooth operation again. Or you can RESET the whole unit by pressing RESET button behind the panel. By pressing RESET button all the stored memory will resume to factory default.
Bluetooth mobile phone compatibility list
This unit can support Bluetooth specification v1.2 or higher, and compatible with Bluetooth profiles such as handsfree or headset profiles. However the functionality may be limited due to some phones' own dedicated interfacing specification. This list is only updated to the time this list is being printed. This list gives an example of Bluetooth mobile phone available on the market, if your Bluetooth mobile phone is not on the list, please try it out in practice or try your phone at the local dealer or consult with the local dealer in case it is not mentioned in the list.
These mobile phones support Bluetooth functions supported by the unit:
Pairing, Pairing cancel, In-Band Ring Tone, Talk, Reject, AudioTransfer, Volume up/down, Hang up, AudioTransfer, Volume up/down, Redial last call.
But some models DO NOT support some functions. Not supported by all models of brand functions (listed below) will be mentioned in brackets near brand name.
Not supported by model functions will be mentioned in brackets near model name.
Sony Ericsson (In-Band Ring Tone): Z600 Advance, Z600 Save mode (Redial last call), T630 Advance, T630 Save mode (Redial last call), K700i, S700i, Z800i, W800i, W550i Advance, W550i Save mode, W810i.
Nokia: 8910, 6600, 6230, N90, 7600, N91, 6111, 6230i, 7380.
Motorola: V600, E398, V501, V3, V80, V3X.
Panasonic (In-Band Ring Tone): X88.
Sharp (In-Band Ring Tone) : GX-T15, GX-T71.
Siemens & BenQ: S55, S88.
Dopod (In-Band Ring Tone): 818, 565.
MIO (In-Band Ring Tone): A700.
Blackberry: 8700.
Samsung (Redial last call), (In-Band Ring Tone): D508, D528.
LG: KG320.
V-CD600BT
VARTA
Pairing, Connecting And Deleting With A Bluetooth Device
When connecting Bluetooth devices at the first time with this unit, a mutual registration is required, this is called "Pairing". This registration (Pairing) is required only at the first time, as this unit and after devices will recognize each other automatically from the next time.
After the devices are registered (Paired) with this unit. You can select the registered device and connect it; this is called "Connecting".
This unit can be paired up to 8 devices with Hands free and/or Audio devices.
If the pairing Bluetooth device has both HFP (Hands Free Profile) and A2DP (Advance Audio Distribution Profile) this unit will automatically pair these two profiles at the same time.
Pairing
There are two different methods to search for a Bluetooth device for pairing:
Method 1 - Searching available Bluetooth devices for Pairing "from this unit".
-
Enter the MENU of BT-PAIRING mode to activate the Pairing procedure. Press and hold MENU button for more than 3 seconds to enter the system menu items. Navigate through the menu items by rotating the VOLUME knob clockwise or anti-clockwise or pressing VOL+/VOL- buttons on the RC to move to the next or previous option.
-
Once the BT item appears on the display, press MENU button to confirm and select the menu item.
Press NEXT or PREVIOUS buttons until "PAIRING" appears on the display, then press ENTER (MENU) button to activate the searching pairing device mode.
Notes
- Please make sure to check the paring Bluetooth device, make sure the Bluetooth mode is turned ON and the "VISIBILITY" is set to "SHOW".
- Please make sure to keep the other Bluetooth device within 2 meters from this unit when making the pairing.
• To cancel the pairing, press BAND/CLEAR button at any time.
-
When searching is completed, the detected device name(s) will be displayed in a list.
-
Rotate VOLUME knob or press VOL+/VOL- buttons to select the device name which want to be connected/paired.
V-CD600BT
VARTA
-
Press ENTER (MENU) button to start the pairing with the selected device in the list.
-
Password Input: input minimum 1 and up to maximum 4 of any numeric number between 0 to 9, as the password for this unit.
To do this, rotate the VOLUME knob or press VOL+/VOL- buttons to choose between 0 to 9, then press MENU button to confirm the first digit. And soon with other digits.
-
Press MODE button to confirm the password input, and the Pairing process should start.
-
"BT70" should appear on the pairing device, select and accept pair with "BT70" and then input the same password which was input on this unit previously.
Note: Please refer to the instruction manual of the Bluetooth device on how to enter into the Bluetooth setup, Bluetooth on/off, and Bluetooth pairing.
- If the pairing is successful, the display will display "PAIRING OK!" and the Bluetooth device's name. If the pairing failed, "PAIRING FAILED!" will be displayed for 3 seconds, and the unit will automatically switch back to the previous mode.
Note: During the Pairing, only the CLEAR, Volume +/- and MUTE buttons are functional, all the other function keys are disabled and non-operational during the pairing mode.
Method 2 - Searching this unit for Pairing "from other Bluetooth Device".
- Set the other Bluetooth device, which needs to be paired with this unit into "Searching" mode.
Notes:
- To allow this unit searching by the other device, the "VISIBILITY" in the MENU of BT must be set to "SHOW". Please refer to MENU of BT for more details of how to set the "VISIBILITY" mode.
- Please refer to the instruction manual of your Bluetooth device on how to enter the Bluetooth device searching mode.
-
When searching is completed, "BT70" should appear in the Bluetooth device, select "BT70" and confirm to start the pairing process.
-
Once the "PAIR WITH?" and the device name is displayed on this unit, press ENTER button to confirm and start the pairing.
Notes:
V-CD600BT
VARTA
- Please make sure to keep the pairing Bluetooth device within 2 meters from this unit when making the pairing.
• To cancel the pairing, user can press BAND/CLEAR button at anytime. -
Password Input: on the Bluetooth device input minimum 1 and up to maximum 4 of any numeric number between 0 to 9, as the password for this unit.
-
Enter the same password on the receiver. To do this, rotate the VOLUME knob or press VOL+/VOL- buttons to choose between 0 to 9, then press MENU button to confirm the first digit. And so on with other digits.
-
Press MODE button to confirm the password input, and the pairing process should start.
-
If the pairing is successful, the display will display "PAIRING OK" and the Bluetooth device's name. If the pairing failed, "PAIRING FAILED" will be displayed for 3 seconds, and the unit will automatically switch back to the previous mode.
Notes:
- If this unit is connected to a Bluetooth device, this unit cannot be detected (searched) by another Bluetooth device. User should first disconnect the current connected device, in order to allow this unit to be detectable/searchable by another Bluetooth device.
- During the Pairing, only the CLEAR, VOLUME +/- and MUTE buttons are functional, all the other function keys are disabled and non-operational during the pairing mode.
Connecting
You can disconnect or reconnect with the paired Bluetooth device by following operation:
Note: Once any Bluetooth device is paired with this unit, user can select this paired device to be connected or disconnected, this is called "Connecting".
Reconnection
This unit will automatically reconnect with the paired device in the following conditions:
-
Every time the ignition key is turned from off to on, this unit will automatically reconnect with the last connected Bluetooth Device.
-
Every time when MODE button is pressed to confirm the dialing of an outgoing call, this unit will automatically reconnect with the mobile phone once (only if this mobile phone has been paired with the unit previously).
V-CD600BT
VARTA
However in some conditions, it needs to reconnect manually.
For example:
- This unit lost the connection with the mobile phone or the Bluetooth device.
Note: If the Bluetooth icon 📄 disappears from the display, it means the connection of the Bluetooth device with this unit is lost.
-
With some models of mobile phones after the call transfer mode is activated, and call is transferred to the Mobile Phone, the connection will be lost with this unit.
-
You paired with more than one Bluetooth devices in the list, and want to reconnect with one of them again.
Note: This unit can be paired up to 8 devices each for hands free and/or audio devices.
You can reconnect the paired device by the following method:
-
Access into the MENU of BT- PAIRED DEVICE
-
Rotate the VOLUME knob or press VOL+/VOL- button to select between "HANDFREE" and "AUDIO"
If the reconnected device is a hands free device, for example: Mobile Phone, once the "HANDFREE" appears on the display then press MENU button, the list of paired devices should appear on the display.
Note: On the paired list, if a device is with the 📄 icon beside it, it means this device is connecting with this unit now.
- Rotate the VOLUME knob or press VOL+/VOL- button to select the device to be reconnected, and then press MENU button. If the reconnection is successful, the display will show "CONNECTED OK!" along with Bluetooth device name.
• Please see the MENU Operation for more details on how to access into MENU of BT-PAIRED DEVICE.
- Please make sure to keep the mobile phone within 2 Meter from the unit when making the connection.
- The manual reconnection is only available for those Bluetooth devices, which have already been paired with this unit before.
Disconnection
You can disconnect the connected Bluetooth device as follows:
Enter the MENU of BT- PAIRED DEVICE
V-CD600BT
VARTA
- Rotate the VOLUME knob or press VOL+/VOL- button to select between "HANDFREE" and "AUDIO". If the device is a hands free (Mobile Phone) device, once the "HANDFREE" appears on the display press MENU button, the list of paired devices should appear.
- On the list if the device is with the 📋 ↓ icon beside it, it means this device is connected with this unit now.
- Press MENU button to confirm the disconnection of this device. If the disconnection is successful, the display will show "DISCONNECTOK!" along with the Bluetooth device name.
Deleting
You can delete a paired device if it is no longer needed as follows:
- Enter the MENU of BT-PAIRED DEVICE
- Rotate VOLUME knob or press VOL+/VOL- button to select between "HANDFREE" and "AUDIO". If the deleting device is a hands free (Mobile Phone) device, once the "HANDFREE" appears on the display then press MENU button, the list of paired devices appears.
- Press BAND/CLEAR button to enter the delete mode Rotate the VOLUME knob or press VOL+/VOL- button to select the below TWO "Delete modes".
- Delete the selected paired device.
• Delete all the paired devices in the list. - Press MENU button to confirm the selection to delete. If the delete is successful, the display will show "Delete Ok!"
Hands-Free Phoning
Answering an incoming call
Press MENU button or MODE button to answer/accept the incoming call.
-
When there is an incoming call, the ring tone is output from the car speaker, and the caller number will be shown on the display. If the incoming call has no caller number, the display will show "UNKNOWN".
-
Always press MENU button or MODE button to answer/accept the call after the display showing the "Caller Number" or "UNKNOWN".
V-CD600BT
VARTA
-
The audio output of the current mode will be muted and the ringing tone will be heard. If an incoming call does not want to be answered, you can rotate VOLUME knob or press VOL+/VOL-button to adjust the ring tone level.
-
If there is an incoming call during the stand by mode (Ignition on & Power Off), this unit will automatically switch on.
- While there is an Incoming call or during talking mode, the panel OPEN button will be disabled.
Ending a Call
To end a call, press CLEAR button, and the unit will automatically switch back to the previous mode and release the "Mute" at the same time.
Rejecting an incoming call
Press BAND/CLEAR button to reject an incoming call.
Making an outing call
You can dial the phone number either on the Mobile Phone or simply directly entering phone numbers on the front panel of this unit.
- Press MENU button to start making an outgoing call and "CALL MENU" will be shown on the display.
- Rotate VOLUME knob or press VOL.+VOL- button to choose the number 0-9 * , #, +.
- Press MENU button to confirm the input of the selected number.
- Use the NEXT/PREVIOUS buttons to move the cursor back or forward and use the BAND/CLEAR to clear the wrong input number.
- Once the phone number has been entered completely, press MODE button to start dialing the call, and the display will show "CALLING" along with the dialed number.
Note: During the Calling mode, if you need to input any number, for example: the Pin code input or service number dial input, you can press MENU button to enter the numeric input interface, and then rotate VOLUME knob or press VOL+/VOL- button to navigate in the needed input numbers and press MENU button again to confirm the input of the selected number.
- While there is an outgoing call or during talking mode, the panel OPEN button cannot be pressed.
- Rotate VOLUME knob or press VOL+/VOL- button to adjust the talking volume level.
- To end the conversation, press BAND/CLEAR button. The unit will switch back to the previous mode automatically. The mute of the previous mode will be released at the same time.
V-CD600BT
VARTA
- During the talking mode, if the ignition is being turned off, the unit will keep the conversation. After the conversation is finished, you can press BAND/CLEAR button to switch off the unit.
To Activate the privacy talking mode (Incoming call transfer mode)
During the talking mode, you can press and hold MODE/TRANSFER button to transfer the phone call from the unit back to the mobile phone for privacy reason. The display will show "CALL TRANSFER" for 3 seconds after the transfer mode is being activated.
Note:
• After the MODE/TRANSFER button is pressed, the mute of the present mode will be released at the same time.
- When making an outgoing call, it's not possible to make the call transfer if the call is not being answered yet. It's only possible to transfer the call to mobile phone after the call is being answered.
• Depending on different type of mobile phone, the time needed for activating the call transfer mode is different. To Call A Number From The Phone Book
You can find and direct dialing the number, which stored in the Phone Book on the mobile phone; enter the phone book by following operation:
-
Press MENU button to enter the call menu mode.
-
After the CALL MENU appeared on the display, press NAVI button to enter the phone book list.
-
Rotate VOLUME knob or press VOL+/VOL- button to find the phone number on the phone book list one by one.
Note: Rotate the VOLUME knob clockwise to search number stored in the mobile phone, if rotate the VOLUME knob anti-clockwise the searching number stored in the SIM card will be activated.
- Once the phone number is found, press MODE button to start dialing the number.
Auto answer mode
You can set this unit to automatically answer all the incoming calls, once this function is set to on, you do not need to press MENU or MODE button to answer/accept any incoming call.
To set the incoming ring tone level
You can preset the needed incoming call ringing volume level from the car speakers. Default setting is "20". You can adjust the volume level in the menu of BT-phone volume.
V-CD600BT
VARTA
Bluetooth Audio Streaming A2DP (Advanced Audio Distribution Profile)
You can listen to music files on an audio device on this unit if the audio device supports A2DP (Advanced Audio Distribution Profile) of Bluetooth Technology.
Connecting a Bluetooth audio device with this unit
Before using an audio device to play music on this unit, the audio device must be paired with this unit first.
• For the details operation of Pairing with this unit, Please refer to the PAIRING operation for more details.
- To know how to use the Bluetooth audio device to pair with this unit, please refer to the instruction manual of the Bluetooth device.
If the audio device has both HFP (Hands Free Profile) and A2DP (Advance Audio Distribution Profile), this unit will automatically pair these two profiles at the same time.
Listening to music from an audio device in this unit
- Connect this unit with the audio device.
Note: Please refer to the Connecting operation for more details.
- Press MODE/TRANSFER button repeatedly until "BT AUDIO" appears on the display.
Note: To listen to Bluetooth audio streaming from an audio device, user must change the mode to BT AUDIO first. In any other mode of this unit it is not possible to activate the Bluetooth audio streaming (A2DP) function.
If the audio device is connected or no audio device is connecting with this unit, after the mode changed to BT AUDIO mode, the display will show 📄, and if after a 20 seconds time out still cannot find any audio device for connecting, the unit will display "NO DEVIDE".
- Once in the BT AUDIO mode, user can use the audio device to start playback the song via Bluetooth wireless with this unit.
When mode is changed to BT AUDIO, some audio devices may automatically playback the music without operating the music playback, and some devices, like mobile phones, may need to first change into the "Media Player" mode on the mobile phone, otherwise the song cannot be direct playback via Bluetooth wireless. If the auto playback is supported by the audio device, then please refer to the instruction manual of the audio device on how to operate music playback via Bluetooth wireless technology.
Operating an audio device with this unit AVRCP (Audio Video Remote Control Profile)
V-CD600BT
VARTA
This unit can perform following operations with the connecting audio device which supports AVRCP (Audio Video Remote Control Profile) and only if the audio device does support AVRCP:
-
Start playing - Every time when user changes mode to BT AUDIO mode, the unit will automatically send a play command via AVRCP to the audio device to command the auto start playing song in the audio device. The play command may differ depending on the Audio device. If the audio device is not able to auto start playing songs after changing mode into BT AUDIO mode, user may need to operate the Play mode on the audio device to start the song playback.
-
Track up/down - by pressing PREVIOUS/NEXT buttons on this unit.
-
Pause/Play - by pressing Pause/Play button on this unit.
-
Volume up/down - by rotating VOLUME knob on this unit.
-
Audio Mute - by pressing POWER/MUTE button on this unit.
-
Stop playback - by changing mode of this unit to any other mode.
The AVRCP operation may vary depending on the audio device; all the other operations other than those listed above should be performed on the audio device.
Hands-free phoning while Bluetooth audio streaming
If the connected audio device is a mobile phone, the hands free function is still available under the Bluetooth audio streaming, like answering incoming calls, making an outgoing call, etc.
Disconnecting an audio device with this unit
User can close the Bluetooth audio connection by disconnecting with the audio device. Please refer to the disconnection operation for more details.
Bluetooth wireless music file download
Thanks to the most advanced and convenient Bluetooth Wireless Technology, user can now wirelessly transfer music files and download onto this unit's USB stick or memory card.
Music format supported by download
This unit can only accept downloading MP3 format music files. If any other file formats are transferred to this unit, the display will show “INVALID FILE”.
Transferable Media
MP3 files can be downloaded and stored into the following media:
V-CD600BT

• Removable USB stick
• SD/MMC memory card
Setting ready download MP3 music file mode on this unit
Before starting to transfer an MP3 music file to this unit, user must switch this unit to "Ready for Download" mode as per the below instruction:
- Access into the MENU of BT - DOWNLOAD mode to activate the READY DOWNLOAD procedure and then press ENTER button to confirm.
Please see Menu operation for more details of how to access into the MENU of BT -DOWNLOAD mode.
This unit will automatically disconnect the connection with the current Bluetooth device under the download mode. This unit will automatically reconnect with the last connected Bluetooth device after the file downloaded is completed.
- Once "READY for RECEIVE" appears on the display, user can start sending MP3 music files from the other Bluetooth device to this unit.
Start download MP3 music file from Bluetooth device to this unit
-
When this unit displays "READY for RECEIVE", user has 2 minutes time to operate the file download operation on the Bluetooth device.
-
Select an MP3 music file on the Bluetooth device that needs to be downloaded to this unit, and choose "send via Bluetooth". Now the Bluetooth device will enter into searching mode. After searching is completed and "BT70" should appear on the list.
-
Select "BT70" to confirm starting the download.
-
When this unit displays "RECEIVE FILE", user can press ENTER button on this unit to confirm accepting the download from the Bluetooth device.
Select a media device to store the MP3 music file download from Bluetooth device
After confirmation of accepting the download, user can select the desired storage media to store the MP3 music file on this unit:
- When the display shows 📄 rotate VOLUME knob or press VOL+/VOL- button to navigate through USB/Card for selection of the storage media.
- Please make sure to keep the Bluetooth device within 2 meters from the unit during the music file download.
V-CD600BT
VARTA
- If any storage media is not available on the unit, like USB Stick or Memory Card, Rotating the encoder volume knob will not display this media.
- If this unit detected the selected media memory capacity is used up or the file size being download is bigger than the media memory capacity left, "Memory Full" will be displayed.
-
Once selected the storage media. Press ENTER button to confirm the selection and the file download will begin.
-
During the MP3 music file download is processing, the display will show the percentage done. After the MP3 file download is completed, the display will shown "OK" to indicate the Music file download is completed successfully.
This unit will automatically reconnect with the last connected Bluetooth device after the file download is completed. Notes: The downloaded MP3 music file will be automatically saved as a file inside the folder "MY_BT" by the advance "File Management" System in this unit.
WARNING:
-
Never remove the USB stick while file downloading to USB stick, it may damage the USB stick and sometimes will cause the unit system lock up.
-
Never try to insert a USB stick while the download is under progress to other storage device. Only after the download is completed, then insert the USB stick.
-
Do not try to switch mode of the unit during the file download is under progress.
-
Do not try to turn off the power of the unit during the file download is under progress.
-
Do not switch off the ignition key during the file download is under progress.
-
Do not detach the front panel during the file download is under progress.
To cancel/terminate the file download to this unit
If you want to cancel the file download, press BAND/CLEAR button to terminate the file download instantly.
To Playback The File Download Into This Unit
User can listen to the downloaded music files by first switching the mode to the storage device, and search inside the music folder "MY_BT". This unit will automatically create a music folder named "MY_BT" on the storage device to store all the music files download from the Bluetooth device. All the music file playback operation is same as CD/MP3/WMA operation.
Hands free phoning is not supported while music file download
V-CD600BT
VARTA
If the download Bluetooth device is a hand phone with HFP (Hands free profile) and connected to this unit, during the file download, all the hands free function are not supported at this moment, the Bluetooth hands free will automatically resume only after the file download is completed.
Note: The Bluetooth system in this unit supports only Latin letters.
V-CD600BT
VARTA
Handling discs
• Dirty, scratched or warped discs may cause skip ping or noise.
- Handle the disc only by the edges. To keep clean do not touch its surface.
• Discs should be stored in their cases after use to avoid scratches.
- Do not expose discs to direct sunlight, high humidity, high temperature or dust.
- Prolonged exposure to extreme temperature can wrap the disc (such as leaving the discs in your car during summertime).
- Do not stick or write anything on either side of disc. Sharp writing instruments, or the inks used in some felt-tip pens, may damage its surface.
- Do not touch the unlabeled side. Do not attach any seal, label or data protection sheet to either side of a disc.
Cleaning
Cleaning the cabinet
Wipe with a soft cloth. If the cabinet is very dampen (not dropping wet) the cloth with a weak solution of soapy water, and then wipe clean.
Cleaning discs
Fingerprints should be carefully wiped from the surface of disc with a soft cloth. Unlike conventional records, compact discs have no grooves to collect dust and macroscopic dirt, so gently wiping them with a soft cloth should remove must panicles. Wipe in a straight motion from the center to the edge.
Never use thinner benzine, record cleaner or anti static spray on a compact disc. Such chemicals can damage its plastic surface.

Troubleshooting guide
| Symptom Cause Solution | ||
| No power The car ignition is not on. | The fuse is blown. | If the power supply is properly connected to the car accessory switch the ignition key to “ACC”.Replace the fuse. |
| Disc cannot be loaded. | Presence of disc inside the player. | Remove the disc in the player then put a new upward. |
| Disc cannot be read. Inserting | the disc in upside down.Compact disc is extremely dirty or defective.Temperature inside the car is too high. | Insert the compact disc with the label facing upward.Clean the disc or try to play a new one.Cool off until the ambient temperature returns to normal. |
| No sound Volume is in minimum. | Wiring is not properly connected. | Adjust volume to a desired level.Check wiring connection. |
| The operation keys do not work. | The built-in microcomputer is not operating properly due to noise.Front panel is not properly fix into its place. | Press RESET button.Reinstall the front panel. |
| Sound skips. The installation | angle is more than 30 degrees.The disc is extremely dirty or defective. | Adjust the installation angle to less than 30 degrees.Clean the compact disc/try to play a new one. |
| The radio does not work, the radio station automatic selection does not work. | The antenna cable is not connected the signals are too weak. | Insert the antenna cable firmly select a station manually. |
Specification
| General | |
| Power supply 12 V DC | |
| Maximum power output 50 W x 4 channels | |
| Dimensions (W x H x D) 188 x 57 x 187 mm | |
| FM Stereo Radio | |
| Frequency range 87.5 - 108.0 MHz | |
| Usable sensitivity 25 dB/1KHz | |
| Preset memory 18 | |
| MW Section | |
| Frequency range 522 kHz-1620 kHz | |
| Preset memory 6 | |
| Player | |
| Disc types CD/CD-R/CD-RW/USB/SD/MMC | |
| Supported formats CDDA/MP3/WMA | |
| Audio Specification | |
| Frequency Response 20 Hz to 16 KHz | |
| S/N Ratio/Separation 70 dB | |
| Line out | |
| Output: 4 channel RCA line-out (3V) | |
| Bluetooth | |
| Bluetooth version 1.2 | |
| Working distance Up to 3 m | |
| Supported profiles Headset/Handsfree/A2DP/AVRCP | |
Specifications are subject to change without notice. Dimensions are approximate.
V-CD600BT
VARTA

V-CD600BT
VARTA
Кнопки управления
- Кнопка MUTE
- Княнка BAND
- Кнопки NEXT/PREVIOUS
- Кнопка А (AUDIO)
- Кнопка ЕJ (ЕВЕСТ)
- Кнопка DISP
- Кнопки VOLUME+/VOLUME-
- Кнопка PLAY/PAUSE
- Кношка MODE
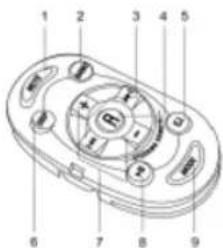
Замена батарен
natural_image
Line drawing of a car interior showing steering wheel and dashboard (no text or symbols)
natural_image
Line drawing of a car steering wheel with a sensor on the steering wheel (no text or symbols)Основные операции
V-CD600BT
VARTA
Has Bluetooth wcpolicer na
Panasonic (In-B and Ring Tone): X88.
Sharp (In-Band Ring Tone): GX-T15, GX-T71.
Siemens & BenQ: \55, \88
Dopod (In-Band Ring Tone): 818, 565.
MIO (In-Band Ring Tone): A700.
Blackberry: 8700.
Samsung (Redial last call), (In-Band Ring Tone): D508, D528.
LG: KG320.


- Important safeguards
- V-CD600BT
- VARTA
- Accessories
- Installation/connection
- Din front-mount (method 1)
- Removing the unit
- Din rear-mount (method 2)
- Detach the unit
- Cleaning
- Resetting the unit:
- Panel controls
- Front panel
- Remote controller (RC)
- Battery information of RC
- Mounting
- Operation buttons
- Battery changing
- WARNING:
- Basic operations
- Open/Close the panel
- Loading a CD
- Ejecting a CD
- Animatrix mode
- Power ON/OFF
- Mute
- Sub-woofer (SUB-W)
- X-bass
- Mode
- AUX input
- Volume
- System menu operation
- Access into System Menu Function List
- Audio Menu
- Subwoofer
- Notes:
- Bass
- Middle
- Trable
- Balance & Fader (Bal/Fad)
- Preset Audio EQ Menu
- System Function Menu
- Date set
- Clock Set
- Battery Level
- Key Beep Tone
- Tuner setting menu
- Auto Seek
- TA Seek
- TA Volume
- Region
- Display setting menu
- Stand by Disp
- Animatrix
- Wall Paper
- Screen Saver
- Media Setting Menu
- Bluetooth Setting Menu
- Tuner operation
- Navi list search (NAVI)
- Band selection
- Station search
- Preset stations
- Automatic store/preset scan
- Stereo
- RDS operations
- AF (Alternative Frequencies) function
- TA (Traffic Announcement) function
- PTY function
- CD operation
- Loading a disc
- Pause
- Track select
- Repeat playback
- Random mode
- Intro function
- MP3/WMA operation
- Acceptable Medium Formats
- MP3/WMA Encoder and CD Writer Settings
- ID3 Tag information
- Writing Files into a Media
- Bit Rates
- Files Playing Order
- File/Folder Play
- File/Folder Intro Play
- File/folder Repeat Play
- File/Folder Random play
- Folder Up/Down
- ID3 Information Display
- Note Of ID3 Icons On Display
- NAVI List Search The Desired CD Track or MP3/WMA Files
- USB operations
- Loading and ejecting USB drive
- USB Mode Selection
- Music File Playback Operation
- SD/MMC operations
- Loading and ejecting SD/MMC
- Memory Card Mode Selection
- Note:
- Recording operations
- Recordable media
- Storage devices for record
- To start recording
- To STOP Recording
- To pause recording
- Recording CD music
- To Cancel Recording
- Music files transferring
- Transferable media
- Supported file formats: MP3andWMA
- Transferring MP3 or WMA music files from CD disc
- To Cancel Transferring.
- Transferring MP3 or WMA music files between media devices
- Music files erasing
- Erasing music files in the media
- Erase under NAVI List Search Mode
- Files manager
- Folders management
- Files management
- I-POD
- iPod Compatibility Chart
- Connect the iPod to this unit
- About Video File
- Turning iPod Power On and Off
- iPod Battery Charging
- Switch to iPod Mode
- iPod Information Display On The Unit Display
- Searching a needed song
- Song Select
- Song Repeat/Repeat All play
- Shuffle play/Shuffle Album
- Bluetooth operation
- Unit's Bluetooth Device Name
- The Bluetooth Profiles Supported By This Unit
- The Bluetooth Functions Supported By This Unit
- User Guide For Bluetooth Operation
- Bluetooth mobile phone compatibility list
- Pairing, Connecting And Deleting With A Bluetooth Device
- Pairing
- Notes
- Connecting
- Disconnection
- Deleting
- Hands-Free Phoning
- Ending a Call
- Rejecting an incoming call
- Making an outing call
- Bluetooth Audio Streaming A2DP (Advanced Audio Distribution Profile)
- To cancel/terminate the file download to this unit
- To Playback The File Download Into This Unit
- Handling discs
- Cleaning the cabinet
- Cleaning discs
- Кнопки управления
- Замена батарен
- Основные операции
- Has Bluetooth wcpolicer na
Brand : VARTA
Model : V-CD600BT
Category : Car radio