
DCC-1150 - Coffee maker CUISINART - Free user manual and instructions
Find the device manual for free DCC-1150 CUISINART in PDF.


| Product Type | Programmable Drip Coffee Maker |
| Model | DCC-1150 |
| Brand | Cuisinart |
| Capacity | 12 cups (60 oz) |
| Dimensions (W x D x H) | 10.4 x 7.8 x 14.2 inches |
| Weight | 6.5 lbs |
| Power Supply | 120V ~ 60Hz, 1100W |
| Programmable Timer | Yes, 24-hour programmable |
| Auto Shutoff | Yes, 0-4 hours adjustable |
| Brew Pause Feature | Yes, pause and serve |
| Carafe Type | Glass carafe with ergonomic handle |
| Water Filtration | Charcoal water filter included |
| Filter Type | #4 cone paper filter or permanent gold-tone filter |
| Cleaning | Descale regularly using vinegar or descaling solution |
| Safety Features | Automatic shutoff, cool-touch handle |
| Spare Parts | Carafe, filter basket, water filter available |
| Repairability | Moderate; common parts replaceable by user |
| Warranty | Limited 3-year warranty |
Frequently Asked Questions - DCC-1150 CUISINART
User questions about DCC-1150 CUISINART
0 question about this device. Answer the ones you know or ask your own.
Ask a new question about this device
Download the instructions for your Coffee maker in PDF format for free! Find your manual DCC-1150 - CUISINART and take your electronic device back in hand. On this page are published all the documents necessary for the use of your device. DCC-1150 by CUISINART.
USER MANUAL DCC-1150 CUISINART
natural_image
Cuisinart coffee maker with digital display and two red mugs beside it (no visible text or symbols on main device)Cuisinart Thermal 10-Cup Programmable Coffeemaker
DCC-1150 Series
For your safety and continued enjoyment of this product, always read the instruction book carefully before using.
IMPORTANT SAFEGUARDS
When using electrical appliances, basic safety precautions should always be followed to reduce the risk of fire, electric shock and/or injury to persons, including the following:
- READ ALL INSTRUCTIONS.
- Do not touch hot surfaces. Use handles and knobs.
- To protect against electric shock, do not place cord, plug, or base in water or other liquids.
- Always unplug from outlet when not in use and before cleaning. Allow to cool before putting on or taking off parts and before cleaning the appliance.
- Do not operate any appliance with a damaged cord or plug or after the appliance malfunctions or has been dropped or damaged in any manner. Return appliance to the nearest Cuisinart Repair Center for examination, repair, or electrical or mechanical adjustment.
- The use of accessory attachments not recommended by Cuisinart may cause injuries.
- Do not use outdoors.
- Do not let cord hang over edge of table or counter, or touch any hot surface.
- Do not place on or near a hot gas or electric burner, or in a heated oven.
- Always fill water reservoir first, then plug cord into the wall outlet. To disconnect, turn controls to off, then remove plug from wall outlet.
-
Do not use appliance for other than intended use.
-
Snap lid securely onto carafe before serving any beverages.
- Scalding may occur if the lid is removed during the brewing cycle.
- The thermal carafe is designed for use with appliance base only. It must never be used on the range top.
- Do not set a hot carafe on a wet or cold surface.
- Do not use a cracked carafe or a carafe having a loose or weakened handle.
- Do not clean carafe or resting plate with cleansers, steel wool pads, or other abrasive materials.
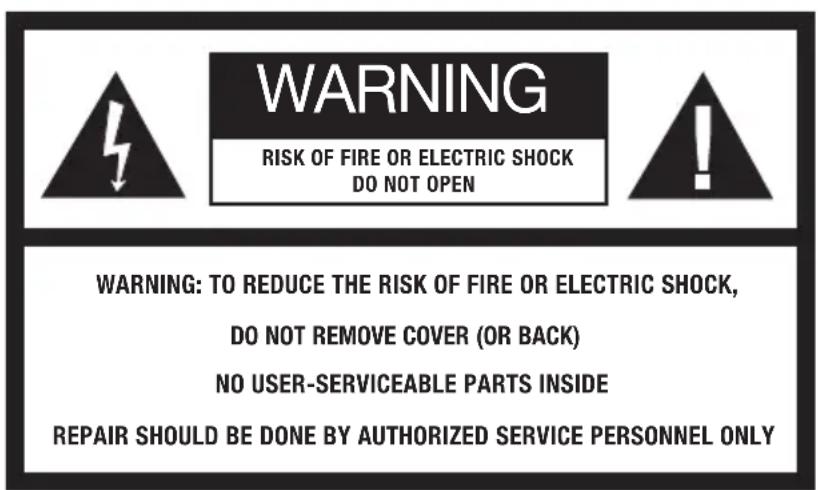
- WARNING: TO REDUCE THE RISK OF FIRE OR ELECTRIC SHOCK, DO NOT REMOVE THE BASE PANEL. NO USER SERVICEABLE PARTS ARE INSIDE. REPAIR SHOULD BE DONE ONLY BY AUTHORIZED PERSONNEL.
- Avoid contact with moving parts.
- Do not operate your appliance in an appliance garage or under a wall cabinet. When storing in an appliance garage, always unplug the unit from the electrical outlet. Not doing so could create a risk of fire, especially if the appliance touches the walls of the garage or the door touches the unit as it closes.
SAVE THESE INSTRUCTIONS
The lightning flash with arrowhead symbol within an equilateral triangle is intended to alert the user to the presence of uninsulated dangerous voltage within the product's enclosure that may be of sufficient magnitude to constitute a risk of fire or electric shock to persons.
The exclamation point within an equilateral triangle is intended to alert the user to the presence of important operating and maintenance (servicing) instructions in the literature accompanying the appliance.
SPECIAL CORD SET INSTRUCTIONS
A short power-supply cord is provided to reduce the risks resulting from becoming entangled in or tripping over a longer cord.
Longer extension cords are available and may be used if care is exercised in their use.
If a long extension cord is used, the marked electrical rating of the extension cord must be at least as great as the electrical rating of the appliance, and the longer cord should be arranged so that it will not drape over the countertop or tabletop where it can be pulled on by children or tripped over.
NOTICE
This appliance has a polarized plug (one blade is wider than the other). To reduce the risk of electric shock, this plug will fit in a polarized outlet only one way. If the plug does not fit fully in the outlet, reverse the plug. If it still does not fit, contact a qualified electrician. Do not modify the plug in any way.
OPERATING NOTICE
Clogging and backing up of water and/or coffee in the filter basket can occur under any or a combination of any of the following conditions: The use of too finely ground coffee, using two or more paper filters, using the gold tone filter in conjunction with a paper filter or not properly cleaning coffee grounds from the gold tone filter, or allowing coffee grounds to spill over the filter.
Caution: Never open the reservoir cover during the brewing cycle, even if no water is draining from the filter basket, since extremely hot water/coffee can spill out from the basket and cause injury. If water/coffee is not draining from the filter basket during the brewing cycle, unplug the unit and wait 10 minutes before opening the reservoir cover and checking the basket.
IMPORTANT UNPACKING INSTRUCTIONS
- Place the box on a large, sturdy, flat surface.
- Remove the instruction book and any other literature.
- Turn the box so that the back side of the coffeemaker is down and slide the coffeemaker from the box.
- After the coffeemaker has been removed, place the box out of the way and remove the top and bottom two polyfoam inserts.
- Grasp the carafe by its handle, remove it from the heater plate and remove the polybag.
- Remove the polybag covering from the coffeemaker and lift the coffeemaker off the remaining two inserts.
We suggest you save all packing materials in the event that future shipping of the machine is needed. Keep all plastic bags away from children.
CONTENTS
Important Safeguards....2
Special Cord Set Instructions ..... 3
Notices 3
Important Unpacking Instructions ..... 3
The Quest for the
Perfect Cup of Coffee 4
Features and Benefits .... 5
Control Panel 6
Programming Your Coffeemaker .....7
Making Coffee 7
Cleaning and Maintenance ..... 9
Warranty 10
INTRODUCTION
Congratulations on the purchase of your new Cuisinart® Classic Thermal 10-Cup
Programmable Coffeemaker! Please take a few moments to discover the features of your new coffeemaker, including the double-wall thermal carafe, and the programmable brew functions. Classic Cuisinart style means you'll enjoy every cup for years to come.
THE QUEST FOR THE PERFECT CUP OF COFFEE
ELEMENT 1: WATER
Coffee is 98% water. The quality of that water is as important as the quality of your coffee. If water doesn't taste good from the tap, it won't taste good in your coffee. Cuisinart includes a charcoal water filter to remove chlorine, bad tastes and odors, for the purest coffee flavor, every time you brew.
ELEMENT 2: COFFEE
While coffee is 98% water, all of the flavor comes from the beans. To achieve the same great taste you enjoy at a coffee bar, you need to use the same quality of coffee. If you choose to grind your own beans, buy them fresh and whole. Buy only about a two-week supply at a time, because once the bean is broken, its flavor degrades quickly.
ELEMENT 3: GRIND
The grind is critical for proper flavor extraction. If the grind is too fine, over-extraction and bitterness will result. Too fine a grind may also clog the filter. If grind is too coarse, the water will pass through too quickly and the maximum flavor will not be extracted. When grinding your own beans, we recommend a medium-fine grind.
ELEMENT 4: PROPORTION
Coffee that is too strong or too weak is always a disappointment. Follow the recommended portions of ground coffee in the instructions under Brewing Coffee, and later adjust the amount to suit your taste.
FEATURES AND BENEFITS
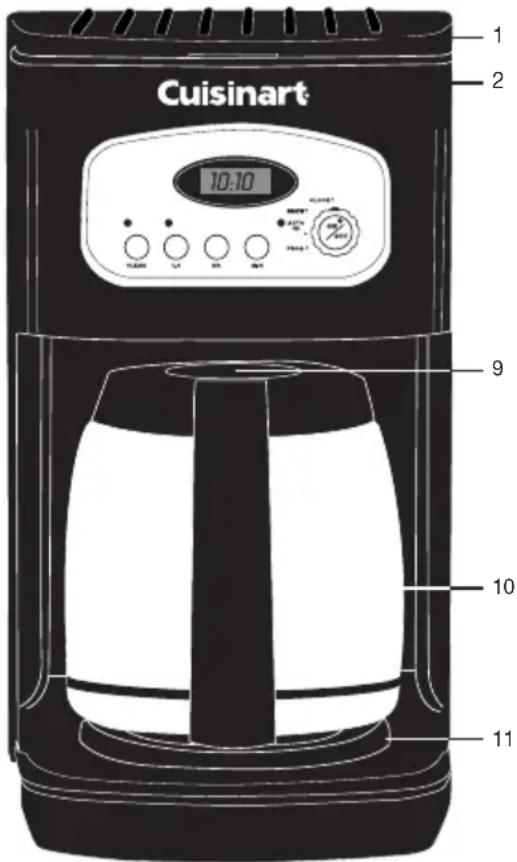
1. Reservoir Cover
Flips back for easy filling.
2. Coffeemaker Water Reservoir (not shown)
With water level indicator window.
3. Showerhead (not shown)
Distributes water evenly over coffee, reducing temperature loss as water passes through grounds.
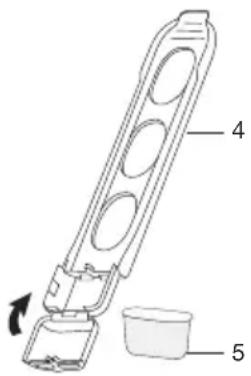
4. Charcoal Water Filter Holder
Holds filter firmly in place.
5. Charcoal Water Filter
Charcoal water filter eliminates chlorine, calcium and bad tastes and odors from tap water.
6. Filter Basket (not shown)
Holds a #4 paper filter OR a permanent filter.
7. Filter Basket Holder (not shown)
8. Permanent Gold-Tone
Commercial-Style Filter (not shown)
Eliminates the need for paper filters.
NOTE: Some fine grounds may flow through the filter and appear as sediment in the carafe.
9. Brew Pause ™
Stops flow of coffee from basket when carafe is removed (30 seconds max) from the heater plate, so a cup can be poured in mid-brew.
10. Thermal Carafe with Hands-Free Lid
The double-wall insulated 10-cup stainless steel carafe has an ergonomic handle and hands-free lid. A ball built into the lid floats to let coffee flow in and out without opening or turning the lid. Unique design seals out air to protect coffee flavor.
11. Resting Plate
Scratch resistant with black, nonstick coating.
12. Ready Tone
Signals the end of the brew cycle with five beeps.
13. Cord Storage (not shown)
Convenient storage area keeps counters clear.
14. Power Loss Back-up System (not shown)
One-minute protection if a breaker trips, unit is unplugged, or power fails. Holds all programmed information, including time of day, Auto On time and Auto Off time.
15. Measuring Scoop (not shown)
GETTING TO KNOW YOUR CONTROL PANEL
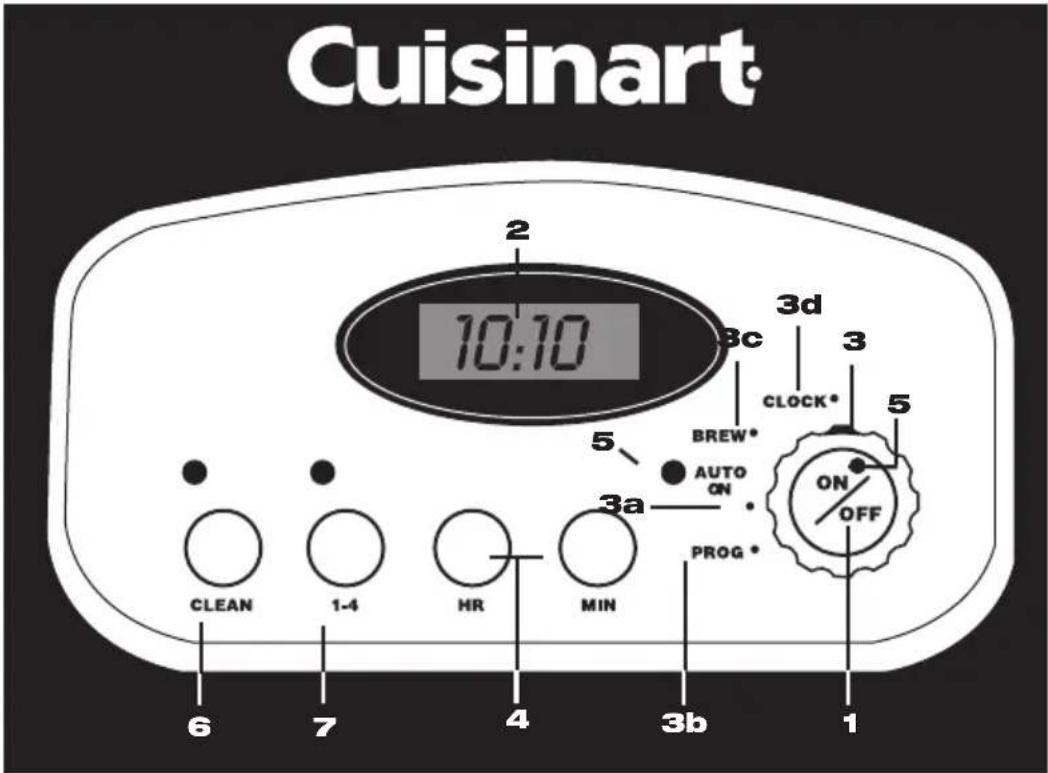
1. On/Off Button
Used to turn your coffeemaker on and off; also works in tandem with the function knob.
2. Clock Display
Displays time of day and auto on time.
3. Function Knob
For setting time of day, and auto on time.
a. Auto On
The Auto On feature is used to program the start time of the brew cycle. The auto on time can be set for any time, day or night. The PM indicator is displayed on the LCD for nighttime program times.
b. Program Set
The Program Set function is used to set the time for the Auto On function.
c. Brew
The Brew function is used to start the brew cycle directly.
d. Clock Set
Used to program the time of day.
4. Hour and Minute Buttons
For use in setting hour and minute for time of day, and auto on time.
5. On/Off and Auto On Indicator Lights
6. Clean Setting
Used to indicate time to clean your coffeemaker to remove calcium buildup.
7. 1-4 Cup Setting
For brewing smaller pots of coffee – it provides double heating of the water, so coffee is piping hot.
8. Audible Tone
The Cuisinart® Thermal 10-Cup Programmable Coffeemaker is equipped with an audible tone which will sound 5 times when the coffee has completed brewing (coffee will continue to stream from the filter for a few seconds after tone).
PROGRAMMING YOUR COFFEEMAKER
TO BREW COFFEE
- Turn the function knob to "Brew."
- Press the On/Off button and release. The red On indicator light will illuminate and brew cycle will begin.
Press the On/Off button and release.
Note: This coffeemaker shuts off automatically after brewing is complete.
PROGRAMMING YOUR COFFEEMAKER FOR DELAYED BREW TIME
To set the time:
- Turn the function knob to "Clock."
a. Set Hour: Press and hold the Hour button to scroll through numbers quickly. When number displayed approaches the desired setting, press and release (pulse) the button to advance one digit at a time. After setting the correct hour, the default will be the last time set unless power is shut off.
NOTE: When the number count passes 12, the PM light will be displayed on the LCD.
b. Set Minutes: Press and hold the Minute button to scroll through numbers quickly. When number displayed approaches the desired setting, press and release (pulse) the button to advance one digit at a time. After setting the correct minute, the default will be the last time set unless power is shut off. To finish setting time, turn the Function Knob to any other setting or simply wait until the numbers stop blinking.
To program the Auto On (brew start time)
- Turn the function knob to "Prog."
- Set the time you want coffee to begin brewing by using the minute and hour push-buttons. Follow the same instructions you used to set the time of day, in the To set the time section above.
- Turn the function knob to "Auto On." LCD will display the current time.
- Press the On/Off button and release. The green indicator light will come on to remind you that the programming function is in use. At the programmed time, the red indicator will come on as well, indicating that the brew cycle is starting. Both lights will go off when keep warm cycle ends.
NOTE: To reactivate the auto-on feature to start brew cycle at the same time another day, simply press the On/Off button and release. The green Auto-On light will illuminate.
1 - 4 Cup Setting
The 1-4 cup setting button is used when you make small amounts of coffee. The 1-4 cup setting basically double heats the water, making your smaller amount piping hot.
To use: When making a smaller amount, press the 1-4 button on the control panel after turning on the unit.
Power Loss Back-up
One-minute protection in case a breaker trips, the unit is unplugged, or the power fails. It holds all programmed information, including time of day, auto on time and auto off time.
CHARCOAL WATER FILTER
Your Coffeemaker comes with a charcoal water filter that eliminates chlorine, bad tastes and odors from tap water.
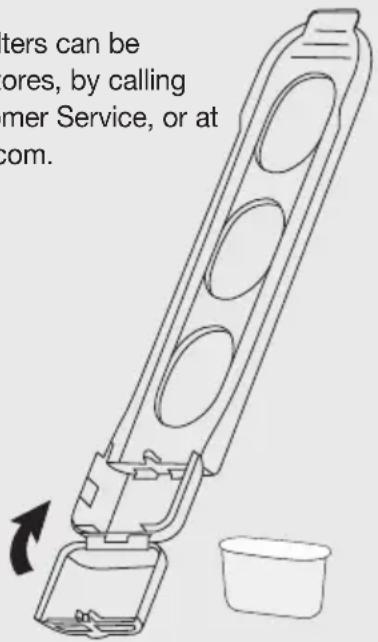
Inserting the Water Filter
- Remove the filter from the polybag and soak it, fully immersed, in cold tap water for 15 minutes.
- Lift the water filter holder out of the water reservoir (see diagram, page 5).
- Press down on the filter compartment and pull toward you to open.
- Place filter into the holder and snap it closed. Be careful – improper placement can tear the filter skin.
- Flush filter by running cold tap water through holes in bottom of compartment for 10 seconds.
- Allow the filter to drain completely.
- Slide the water filter holder back into the channel in the water reservoir, pushing it down to the base of the unit.
NOTE: We recommend changing the water filter every 60 days or after 60 uses, and more often if you have hard water.
Replacement filters can be purchased in stores, by calling Cuisinart Customer Service, or at www.cuisinart.com.
BREWING COFFEE
Follow instructions in Before First Use on previous page.
- Insert charcoal water filter
Follow directions for the preparation and insertion of the filter on page 7.
- Fill the water reservoir
Open the Coffeemaker reservoir cover by lifting it up. Pour in the desired amount of water using the water level indicator located at the side of the coffeemaker.
- Cup preference
Push the 1–4 cup button if you are brewing fewer than 5 cups.
- Add the ground coffee
Remove the filter basket by grasping the handle and lifting straight up. Insert a #4 paper filter OR permanent filter. Be sure that a paper filter is completely open and fully inserted in the basket. It may help to fold and flatten the seams of a paper filter beforehand. Add 1 level scoop of ground coffee per cup. Adjust the amount according to taste.
NOTE: The maximum capacity for ground coffee is 15 tablespoons for this coffeemaker. Exceeding this amount may cause overflow if the coffee is too finely ground.
Replace the filter basket in the filter basket holder and press firmly on cover to be sure it closes securely.
- Before brewing coffee
Make sure the glass carafe is in position on the heater plate and the top cover is closed. Plug the cord into an electrical outlet.
- Power unit
Turn the Function knob to BREW, press the On/Off button, and the blue indicator light will turn on. Or, set the AUTO ON function (see page 7) and the Auto On indicator will light.
- After brewing is complete
When the brewing cycle has been completed, five beeps will sound. Coffee will continue to stream from the filter for several seconds.
NOTE: Reservoir cover may be hot during and directly after brewing. Wait at least 10 minutes before opening.
CLEANING AND MAINTENANCE
Always turn coffeemaker OFF and remove the plug from the electrical outlet before cleaning.
Lift up the reservoir cover. Remove and discard the paper filter and ground coffee. The filter basket and permanent filter can be washed in warm, soapy water and rinsed thoroughly, or cleaned in the upper rack of the dishwasher.
Dry all parts after use.
Do not put any water in the unit once the filter basket has been removed. Wipe the area under the filter basket with a damp cloth.
Remove the carafe from the resting plate.
Discard any remaining coffee. The carafe and lid can be washed in warm, soapy water and rinsed thoroughly, or placed in a dishwasher.
The carafe and carafe lid should be placed on the upper rack only.
Do not use any scouring agents or harsh cleansers on any part of the coffeemaker.
Never immerse base unit in water or other liquid. To clean base, simply wipe with a clean, damp cloth and dry before storing.
Fingerprints and other blemishes on the stainless steel housing can be washed off with soap and water or a nonabrasive cleaning solution. Wipe resting plate with a clean, damp cloth. Never use rough, abrasive materials or cleansers to clean the resting plate. Do not dry the inside of the water reservoir with a cloth, as lint may remain.
MAINTENANCE
Any other servicing should be performed by an authorized service representative.
DECALCIFICATION
Decalcification refers to the removal of calcium deposits that form over time on the metal parts of the coffeemaker.
To Decalcify Your Coffeemaker
For best performance from your Coffeemaker, decalcify the unit from time to time. The frequency depends upon the hardness of your tap water and how often you use the Coffeemaker. The flashing Clean light will indicate when unit should be cleaned. If the Clean light begins to flash when the Coffeemaker is turned on, it is telling you that the calcium buildup is interfering with the functioning of your Coffeemaker and the flavor of your coffee. To clean, fill the water reservoir to capacity with a mixture of 13 white vinegar and 23 water. Press the Clean button. When the Clean light glows, turn the Coffeemaker on by pressing the On/Off button. The Clean light will shine steadily. The Coffeemaker is now in CLEAN mode. One cycle should be sufficient to adequately clean the Coffeemaker. When the cycle is completed and the five beeps sound, the Coffeemaker will shut off. Turn the Coffeemaker on to see if the Clean light continues to flash. If it does, turn it off and then repeat the cleaning procedure with a fresh solution of vinegar and water.
If the Clean light no longer flashes, turn the Coffeemaker off and then run one cycle of fresh cold water through the unit before using the unit again to brew coffee.
Notes on the CLEAN Function
Pressing the Clean button cancels all other settings. If it is pressed accidentally, press it again to return the Coffeemaker to all its previous settings. Pressing On/Off will also exit the CLEAN mode and turn the Coffeemaker off.
WARRANTY
LIMITED THREE-YEAR WARRANTY
This warranty is available to consumers only. You are a consumer if you own a Cuisinart® Classic Thermal 10-Cup Programmable Coffeemaker that was purchased at retail for personal, family or household use. Except as otherwise required under applicable law, this warranty is not available to retailers or other commercial purchasers or owners.
We warrant that your Cuisinart® Classic Thermal 10-Cup Programmable Coffeemaker will be free of defects in materials and workmanship under normal home use for 3 years from the date of original purchase.
We recommend that you visit our website, www.cuisinart.com for a fast, efficient way to complete your product registration. However, product registration does not eliminate the need for the consumer to maintain the original proof of purchase in order to obtain the warranty benefits. In the event that you do not have proof of purchase date, the purchase date for purposes of this warranty will be the date of manufacture.
If your Cuisinart® Classic Thermal 10-Cup Programmable Coffeemaker should prove to be defective within the warranty period, we will repair it, or if we think necessary, replace it. To obtain warranty service, simply call our toll-free number 1-800-726-0190 for additional information from our Customer Service Representatives, or send the defective product to Customer Service at Cuisinart, 7811 North Glen Harbor Blvd., Glendale, AZ 85307.
To facilitate the speed and accuracy of your return, please enclose \$10.00 for shipping and handling of the product.
Please pay by check or money order (California residents need only supply proof of purchase and should call 1-800-726-0190 for shipping instructions).
NOTE: For added protection and secure handling of any Cuisinart® product that is being returned, we recommend you use a traceable, insured delivery service. Cuisinart cannot be held responsible for in-transit damage or for packages that are not delivered to us. Lost and/or damaged products are not covered under warranty. Please be sure to include your return address, daytime phone number, description
of the product defect, product model number (located on bottom of product), original date of purchase, and any other information pertinent to the product's return.
CALIFORNIA RESIDENTS ONLY:
California law provides that for In-Warranty Service, California residents have the option of returning a nonconforming product (A) to the store where it was purchased or (B) to another retail store which sells Cuisinart products of the same type.
The retail store shall then, at its discretion, either repair the product, refer the consumer to an independent repair facility, replace the product, or refund the purchase price less the amount directly attributable to the consumer's prior usage of the product. If the above two options do not result in the appropriate relief to the consumer, the consumer may then take the product to an independent repair facility if service or repair can be economically accomplished. Cuisinart and not the consumer will be responsible for the reasonable cost of such service, repair, replacement, or refund for nonconforming products under warranty.
California residents may also, according to their preference, return nonconforming products directly to Cuisinart for repair, or if necessary, replacement, by calling our Consumer Service Center toll-free at 1-800-726-0190.
Cuisinart will be responsible for the cost of the repair, replacement, and shipping and handling for such products under warranty.
BEFORE RETURNING YOUR CUISINART® PRODUCT
If you are experiencing problems with your Cuisinart® product, we suggest that you call our Cuisinart® Service Center at 1-800-726-0190 before returning the product for service. If servicing is needed, a Representative can confirm whether the product is under warranty and direct you to the nearest service location.
Your Cuisinart® Classic Thermal 10-Cup Programmable Coffeemaker has been manufactured to the strictest specifications and has been designed for use only in 120-volt outlets and only with authorized accessories and replacement parts. This warranty expressly excludes any defects or damages caused by attempted use of this unit with a converter, as well as by use with accessories, replacement parts or repair service other than those authorized by Cuisinart. This warranty does not cover any damage caused by accident, misuse, shipment or other than ordinary household use. This warranty excludes all incidental or consequential damages. Some states do not allow the exclusion or limitation of these damages,
so these exclusions may not apply to you. You may also have other rights, which vary from state to state.
Important: If the nonconforming product is to be serviced by someone other than Cuisinart's Authorized Service Center, please remind the servicer to call our Consumer Service Center at 1-800-726-0190 to ensure that the problem is properly diagnosed, the product is serviced with the correct parts, and the product is still under warranty.
©2014 Cuisinart
150 Milford Road
East Windsor, NJ 08520
Printed in China
13CE144329
F IB-7294-ESP
13CE144329
East Windsor, NJ 08520
150 Million Road
©2014 Cuisinart
c. Preparation (BREW)
c. Programmation (PROG)
de noche.
PROBOCTIONS ELEMENTO 4: LAS
natural_image
BlackQUISHAR milkshake blender with red mug beside it (no visible text or symbols on main device)Quisinst® MANUAL DE INSTRUCIONES
| Version no.: DCC1150 Series IB-7294-ESP |
| IB Size: 148mm(W) x 210mm(H) |
| Die Cut: new |
| Material: 105gsm both side artpaper for whole book |
| Coating: gloss varnishing in cover |
| Colors(Cover): 4C+1C(BLACK) |
| (Inside): 1C+1C(BLACK) |
| Date: JAN/04/2014 Co-ordinator: Astor You / Janson Wang |
F DCC1150 Series IB-7294-ESP(0.0) Operator: ReverseVer
宝发柯式印刷有限公司
Tel: 0769-87720314 87886328 Fax: 0769-87720324 E-MAIL: pofatprepress@pofal.com
BCMY



- Cuisinart Thermal 10-Cup Programmable Coffeemaker
- IMPORTANT SAFEGUARDS
- SAVE THESE INSTRUCTIONS
- SPECIAL CORD SET INSTRUCTIONS
- NOTICE
- OPERATING NOTICE
- IMPORTANT UNPACKING INSTRUCTIONS
- CONTENTS
- INTRODUCTION
- THE QUEST FOR THE PERFECT CUP OF COFFEE
- ELEMENT 1: WATER
- ELEMENT 2: COFFEE
- ELEMENT 3: GRIND
- ELEMENT 4: PROPORTION
- FEATURES AND BENEFITS
- Reservoir Cover
- Coffeemaker Water Reservoir (not shown)
- Showerhead (not shown)
- Charcoal Water Filter Holder
- Charcoal Water Filter
- Filter Basket (not shown)
- Filter Basket Holder (not shown)
- Permanent Gold-Tone
- Brew Pause ™
- Thermal Carafe with Hands-Free Lid
- Resting Plate
- Ready Tone
- Cord Storage (not shown)
- Power Loss Back-up System (not shown)
- Measuring Scoop (not shown)
- GETTING TO KNOW YOUR CONTROL PANEL
- On/Off Button
- Clock Display
- Function Knob
- a. Auto On
- b. Program Set
- c. Brew
- d. Clock Set
- Hour and Minute Buttons
- On/Off and Auto On Indicator Lights
- Clean Setting
- 1-4 Cup Setting
- Audible Tone
- PROGRAMMING YOUR COFFEEMAKER
- TO BREW COFFEE
- PROGRAMMING YOUR COFFEEMAKER FOR DELAYED BREW TIME
- To set the time:
- To program the Auto On (brew start time)
- - 4 Cup Setting
- Power Loss Back-up
- CHARCOAL WATER FILTER
- Inserting the Water Filter
- BREWING COFFEE
- CLEANING AND MAINTENANCE
- Do not put any water in the unit once the filter basket has been removed. Wipe the area under the filter basket with a damp cloth.
- MAINTENANCE
- DECALCIFICATION
- To Decalcify Your Coffeemaker
- Notes on the CLEAN Function
- WARRANTY
- LIMITED THREE-YEAR WARRANTY
- CALIFORNIA RESIDENTS ONLY:
- BEFORE RETURNING YOUR CUISINART® PRODUCT
- PROBOCTIONS ELEMENTO 4: LAS
- 宝发柯式印刷有限公司
Brand : CUISINART
Model : DCC-1150
Category : Coffee maker