
Cingular Flip 2 - Mobile Phone AT&T - Free user manual and instructions
Find the device manual for free Cingular Flip 2 AT&T in PDF.


| Product Type | Flip Mobile Phone |
| Brand | AT&T |
| Model | Cingular Flip 2 |
| Network | 4G LTE (AT&T) |
| Dimensions | Approx. 4.3 x 2.1 x 0.7 inches (109 x 53 x 18 mm) |
| Weight | Approx. 4.2 oz (119 g) |
| Display | Internal: 2.8-inch QVGA; External: 1.44-inch |
| Battery | Removable Li-Ion 1500 mAh |
| Talk Time | Up to 7 hours |
| Standby Time | Up to 15 days |
| Main Functions | Voice calls, text messaging, camera, FM radio, Bluetooth, speakerphone |
| Camera | 2 MP rear camera with LED flash |
| Storage | microSD slot up to 32 GB |
| Connectivity | Bluetooth 4.2, microUSB 2.0, 3.5mm headphone jack |
| Power Supply | 5V 1A via microUSB charger (not included) |
| Maintenance & Cleaning | Wipe with dry cloth; avoid liquids and harsh chemicals |
| Safety | SAR value: 1.45 W/kg (head), 1.12 W/kg (body); use approved accessories only |
| Spare Parts & Repairability | Battery accessible; other parts serviceable only by authorized technicians |
| General Info | Designed for seniors; dedicated 911 button; hearing aid compatible (M4/T4) |
Frequently Asked Questions - Cingular Flip 2 AT&T
User questions about Cingular Flip 2 AT&T
0 question about this device. Answer the ones you know or ask your own.
Ask a new question about this device
Download the instructions for your Mobile Phone in PDF format for free! Find your manual Cingular Flip 2 - AT&T and take your electronic device back in hand. On this page are published all the documents necessary for the use of your device. Cingular Flip 2 by AT&T.
USER MANUAL Cingular Flip 2 AT&T
Table of Contents
1 Your mobile....5
1.1 Keys and connectors .... 5
1.2 Getting started 8
1.3 Home screen....13
2 Phone....15
2.1 Making a call....15
2.2 Answer or decline a call ....16
2.3 Calling your voicemail 17
3 Contacts....17
3.1 Consult your Contacts....17
3.2 Adding a contact....18
3.3 Editing your contacts....18
3.4 Deleting a contact .....19
3.5 Sharing your contacts....20
3.6 Additional options ......20
4 Messages ......21
4.1 Write message 21
4.2 Send a multimedia message 22
4.3 How to type a message.... 22
4.4 Settings....23
5 Email 24
6 Camera....25
6.1 Camera.... 25
6.2 Video....26
7 Gallery 27
8 Video....29
9 Music....30
10 Browser 30
11 Calendar.... 31
11.1 Multimode view 31
11.2 To create new events 31
11.3 Event reminder 32
12 Alarm ....33
12.1 Alarm 33
12.2 Timer....34
12.3 Stopwatch....34
13 Calculator .... 35
14 FM Radio....36
15 Settings....37
15.1 Network & connectivity 37
15.2 Personalization 41
15.3 Privacy & security......44
15.4 Storage 45
15.5 Device 45
15.6 Account manager 48
16 Making the most out of your phone......49
16.1 Upgrade 49
17 Safety information....50
18 General information ....57
19 Warranty 60
20 Trouble shooting....62
 www.sar-tick.com www.sar-tick.com | This product meets applicable national SAR limits of 2.0 W/kg. The specific maximum SAR values can be found on Radio waves section.When carrying the product or using it while worn on your body, either use an approved accessory such as a holster or otherwise maintain a distance of 15 mm from the body to ensure compliance with RF exposure requirements. Note that the product may be transmitting even if you are not making a phone call. |
 | PROTECT YOUR HEARINGTo prevent possible hearing damage, do not listen at high volume levels for long periods. Exercise caution when holding your phone near your ear while the loudspeaker is in use. |
1 Your mobile......
1.1 Keys and connectors
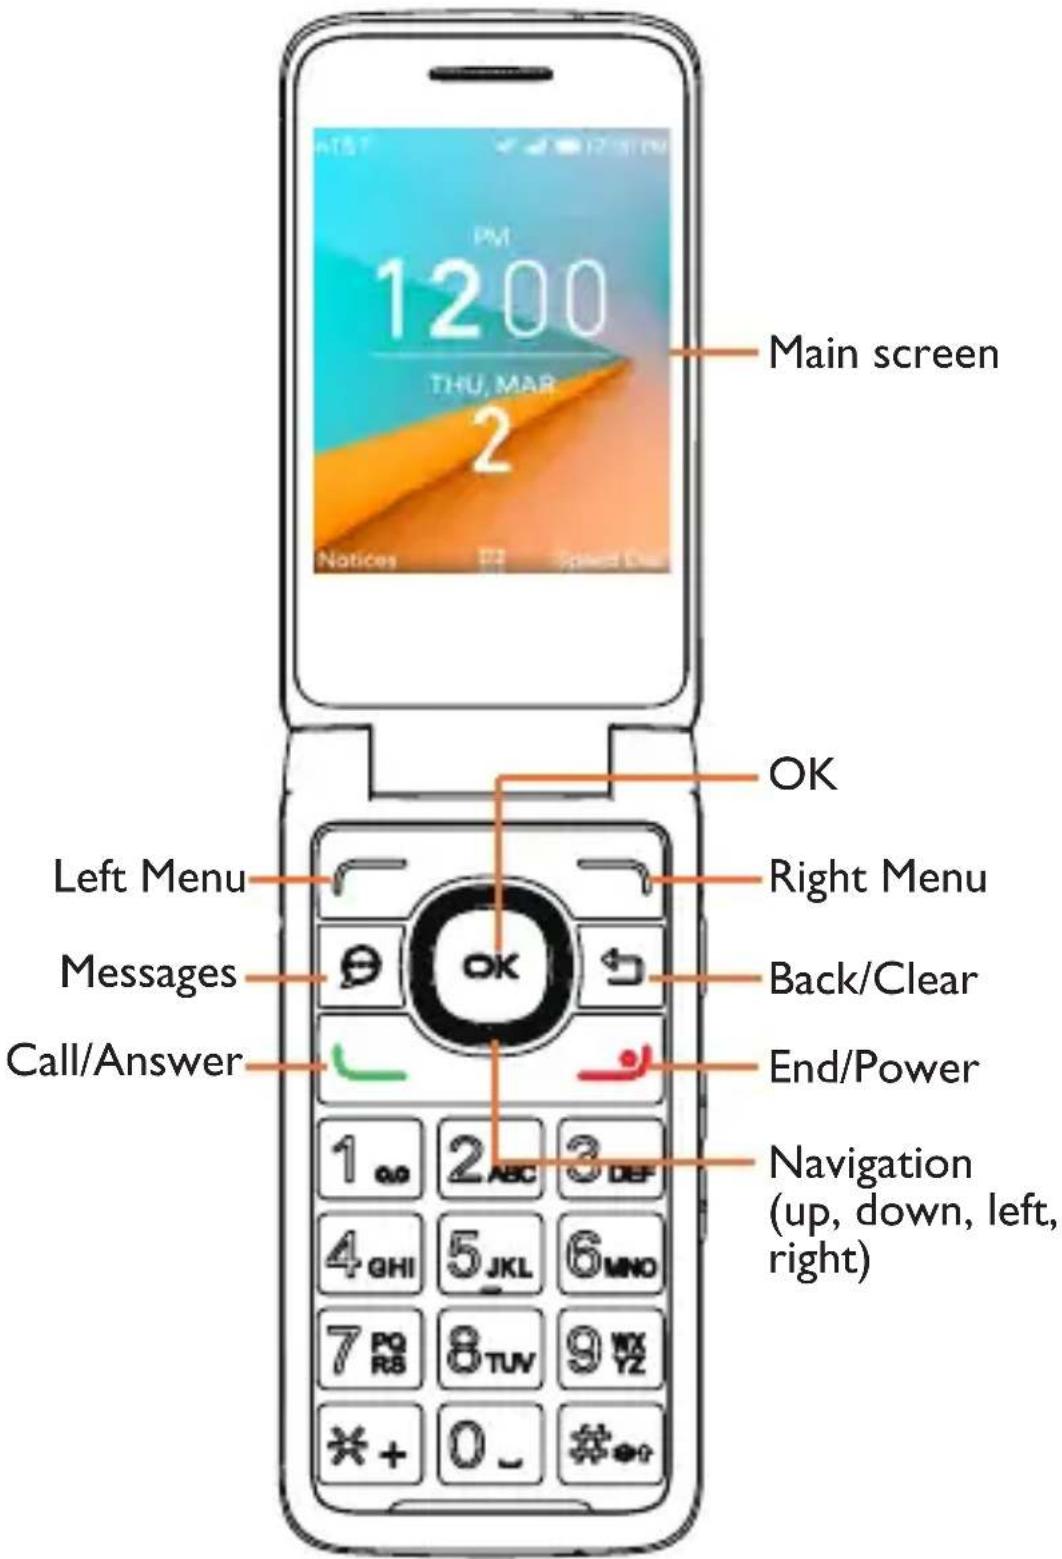
 | OKConfirm an option (press the middle of the keyPress: Access app list (Home screen) |
 | NavigationPress up, down, left or right to navigate |
 | MessagesPress: Access Messages app |
 | Back/ClearLet you return to the previous screen, close a dialog box, or exit options menuDelete character (In Edit mode) |
 | Call/AnswerPress to dial call or to answer incoming call.Press: Enter call log (From Idle screen) |
 | End/PowerPress: End a callReturn to the Idle screenLong press: Power on/off |
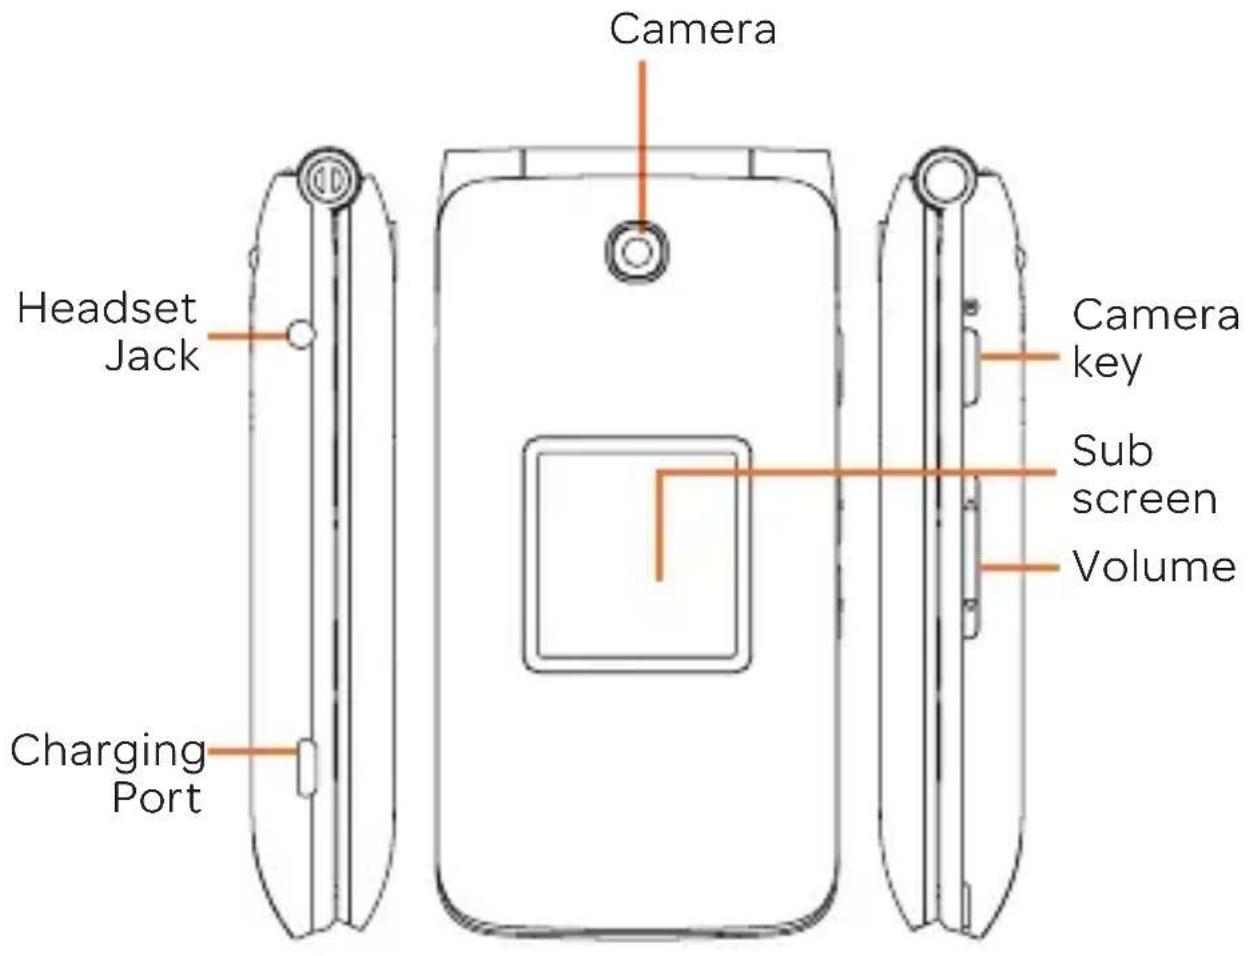
| [5A4C] | Camera keyPress: Access Camera appIn camera screen, press to capture picture or shoot videoPress and hold the Camera key and Volume down key to capture a screenshot |
| [XAB0] | VolumeIn call mode, adjusts the earpiece or headset volumeIn Music/Video/Streaming mode, adjusts the media volumeIn general mode, adjusts the ringtone volumeMutes the ringtone of an incoming call |
1.2 Getting started
1.2.1 Set-up
Removing or attaching back cover
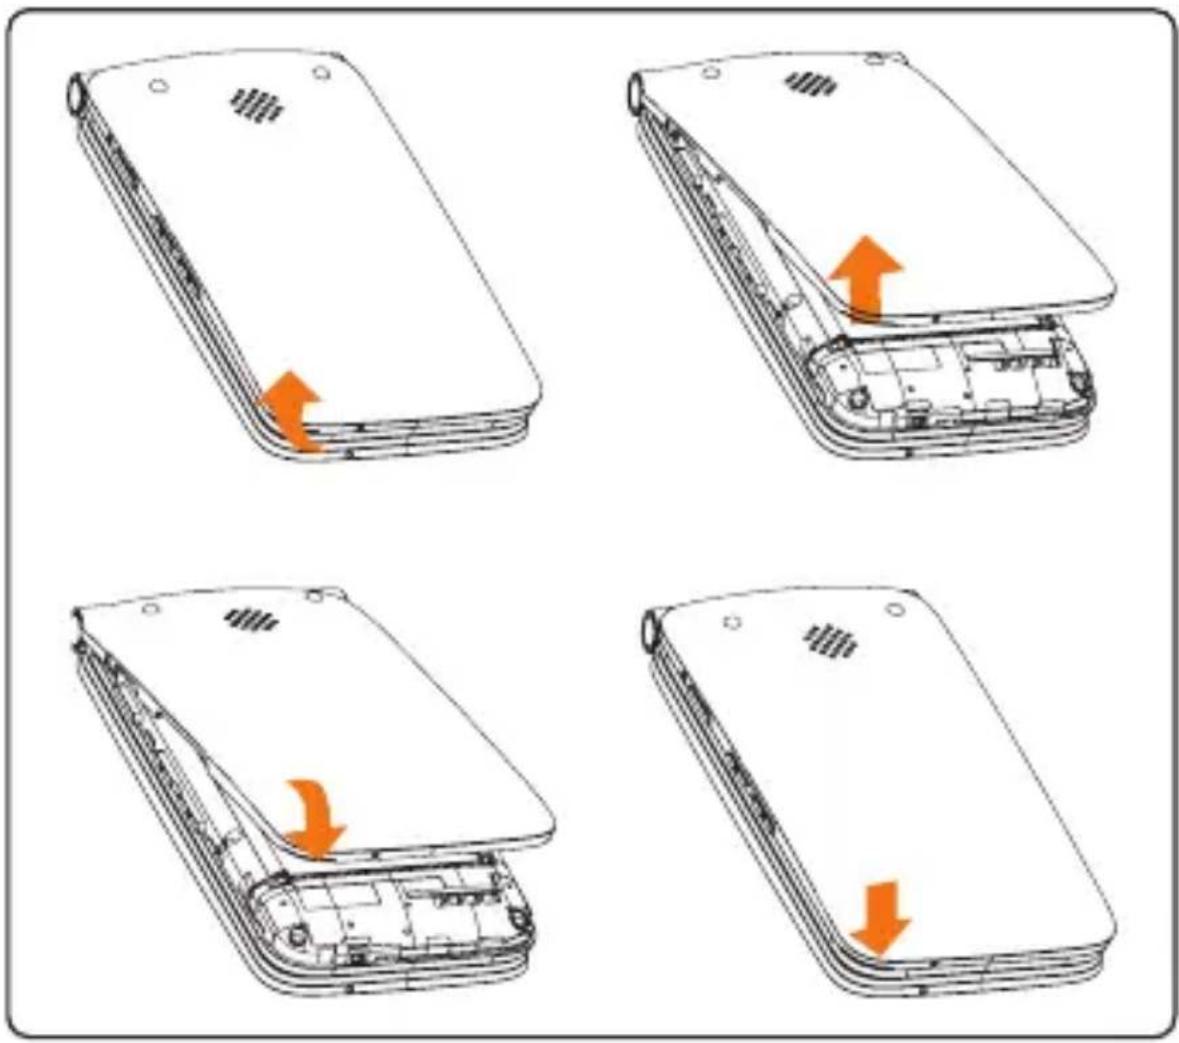
Removing or installing battery
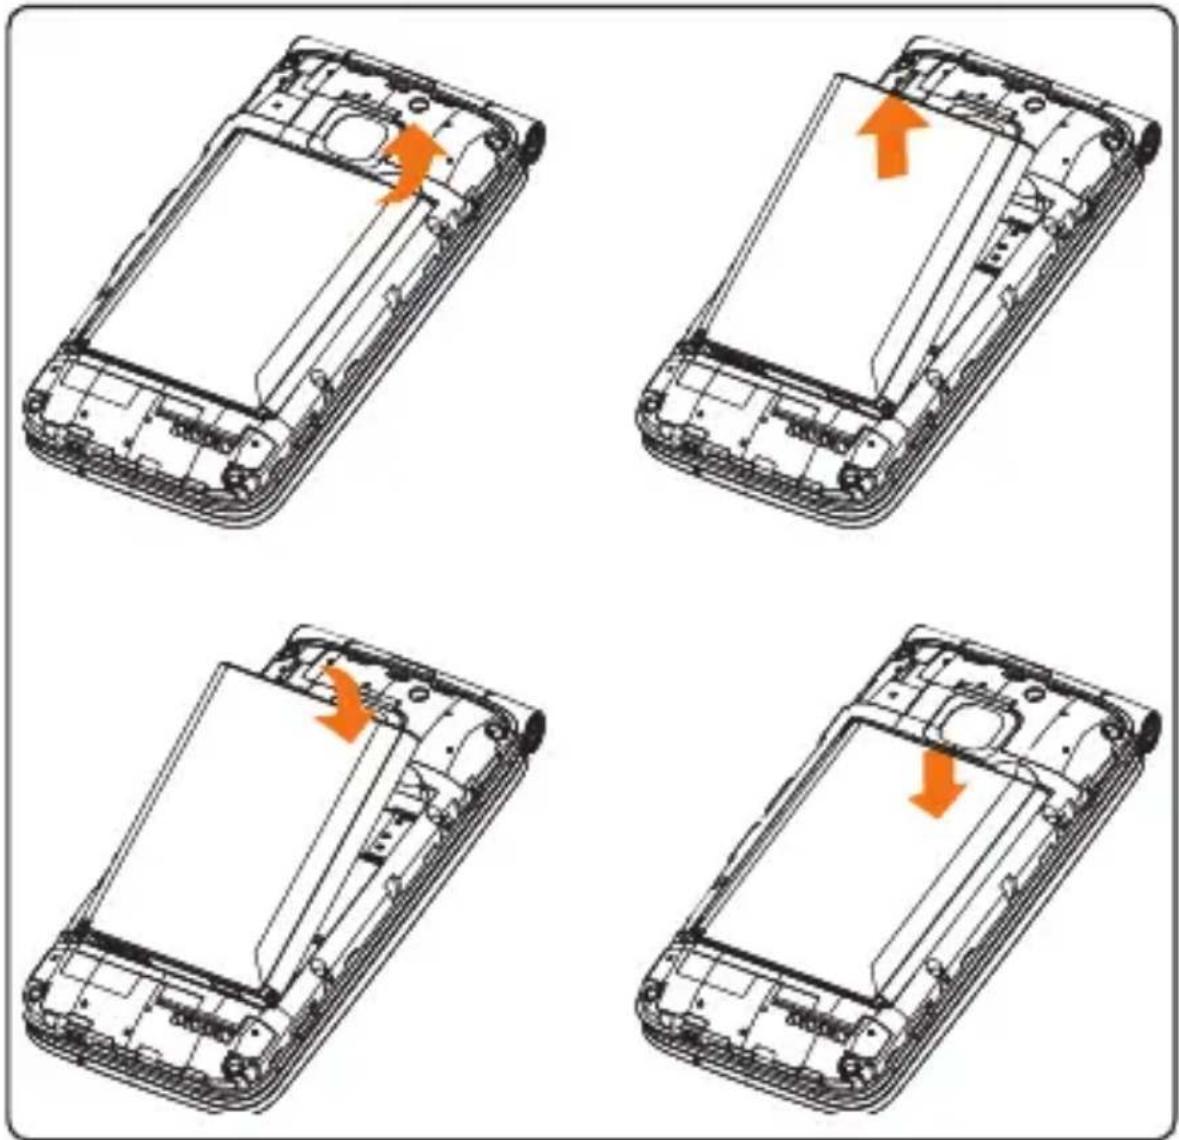
natural_image
Four-panel diagram of a smartphone showing internal components and orange arrows indicating movement or force (no text or symbols present)Inserting or removing the Nano SIM card and microSD
You must insert your Nano SIM card to make phone calls using your network.
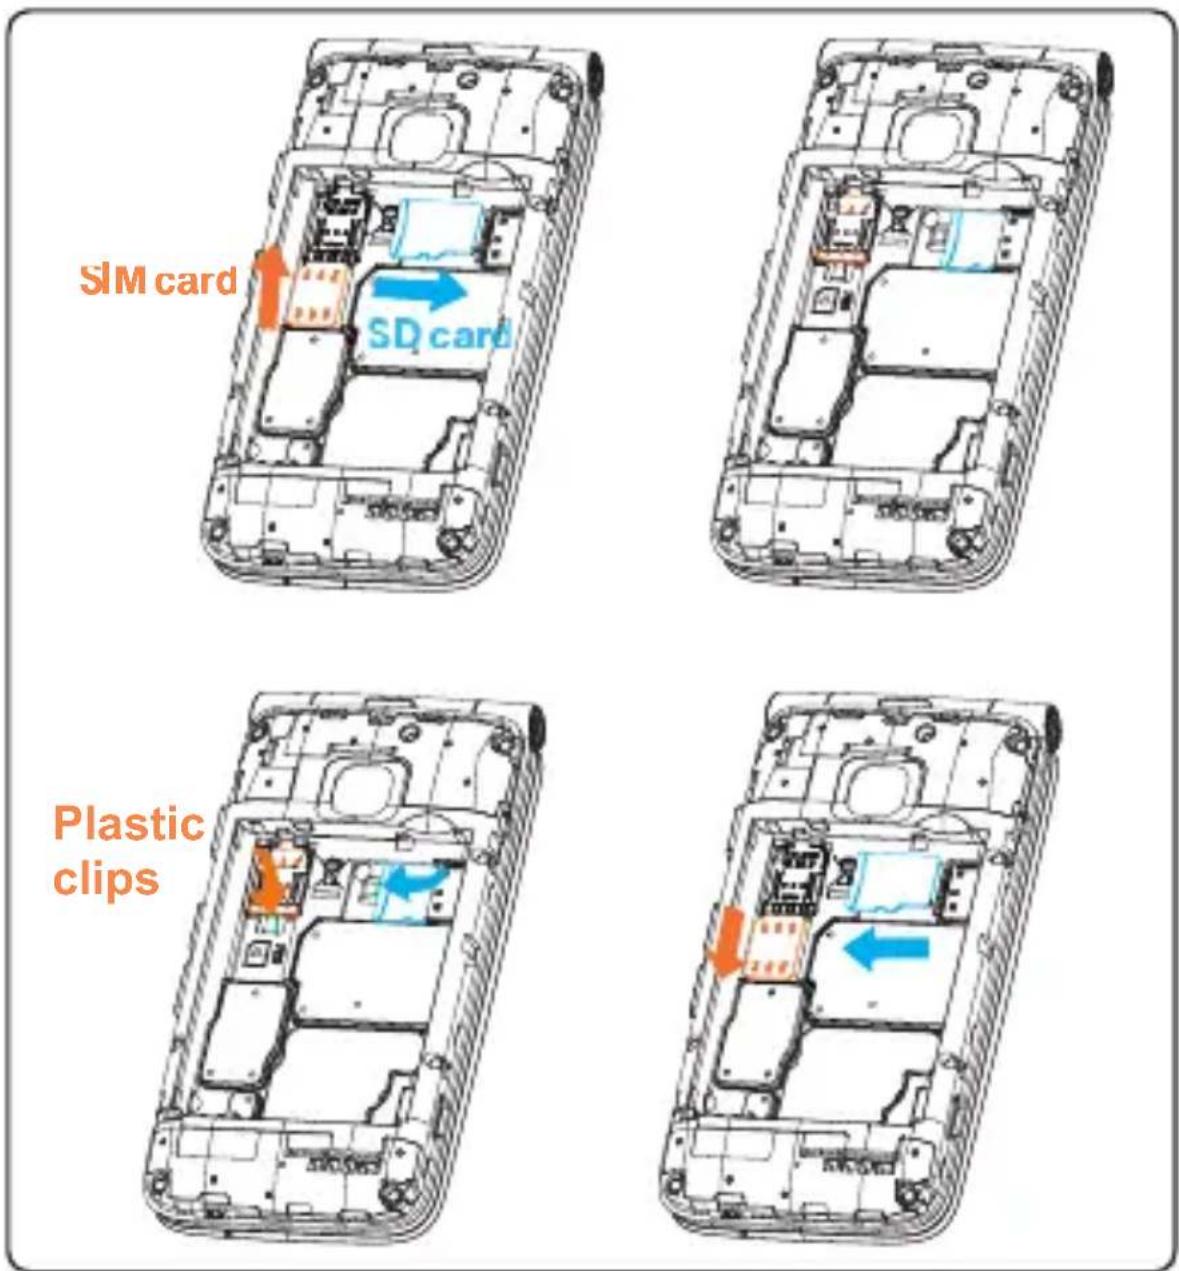
To insert Nano SIM or microSD card, push the Nano SIM or microSD card into the corresponding card slot with the gold-connectors facing down. To remove the SIM or microSD card, push down on the plastic clip located under card and push the SIM or pull microSD card out.
Your phone only supports Nano SIM card. Do not attempt to insert Mini or Micro SIM card sizes or you may damage your phone.
Charging battery
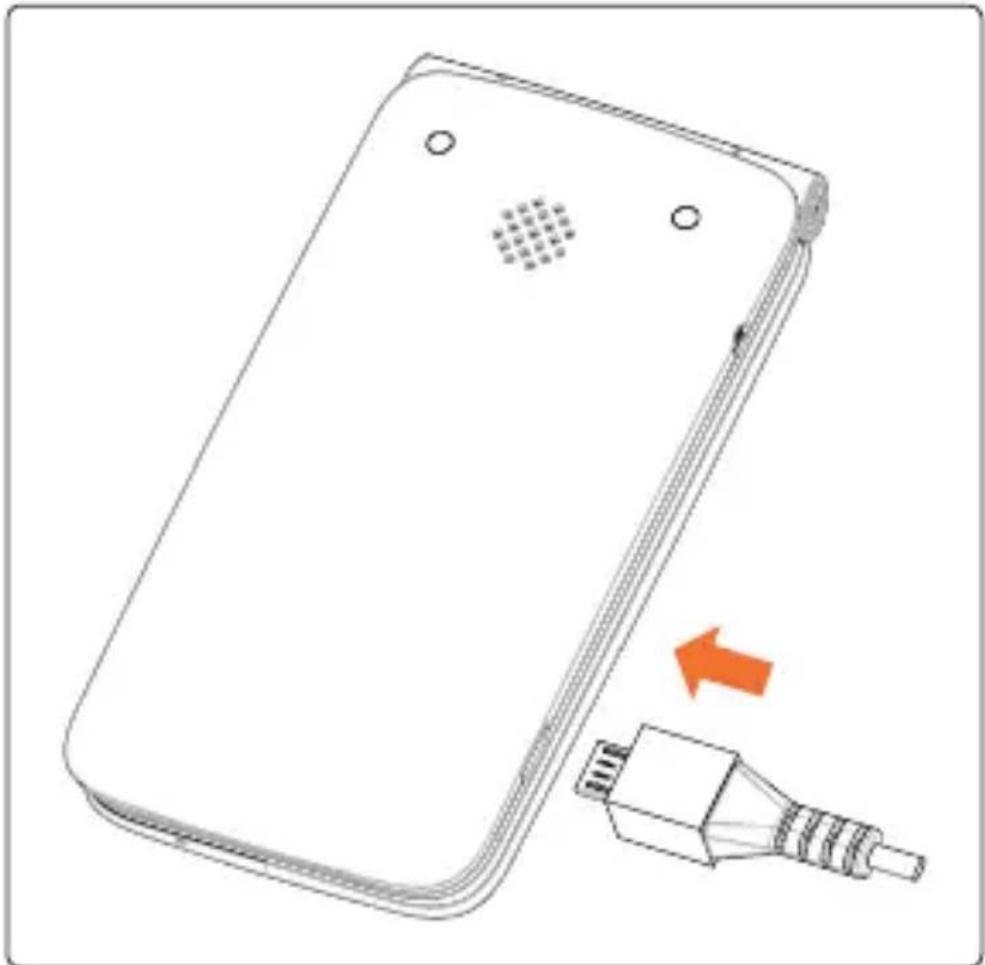
natural_image
Line drawing of a smartphone showing the cable, connector, and cable connector (no text or symbols)Insert the smaller end of the charger into the device charging port, and plug the charger into an electrical outlet.
1.2.2 Power on your phone
Long press the End/Power key until the phone powers on, Home screen will be displayed. If screen lock is set up, enter pass code to access Home screen.
If you don't know your pass code or if you have forgotten it, contact your service provider. Do not store pass code within your phone, instead store pass code in a location that is accessible without using phone.
Set up your phone for the first time
- Use the Navigation key to select a language and press the OK key OK.
- Welcome page will be displayed, press the Right Menu key to select Next.
- KeypadIntroduction, Softkeys and Change Text Input Method tip pages will be displayed, press the Right Menu key → to select Next and continue to next screen.
- Use the Navigation key to select Wi-Fi, if applicable. You can skip selecting a Wi-Fi by pressing the Right Menu key to select Next.
- Press the OK key OK to select network and enter password, if needed.
- Setup KaiOS Account to remotely lock the device or wipe all personal information in event of loss or theft. Select Create Account and press the OK key OK to continue, follow prompts to finish account set up. Press the Right Menu key → to Skip.
- Press the Right Menu key → to Accept KaiOS License Terms.
- You will next be taken to the Home screen, your phone is then ready for use.
Note: If SIM card is not installed, your phone will still power On and you will be able to connect to a Wi-Fi network and use some of the phone's features.
1.2.3 Power off your phone
Long press the End/Power key.
1.3 Home screen
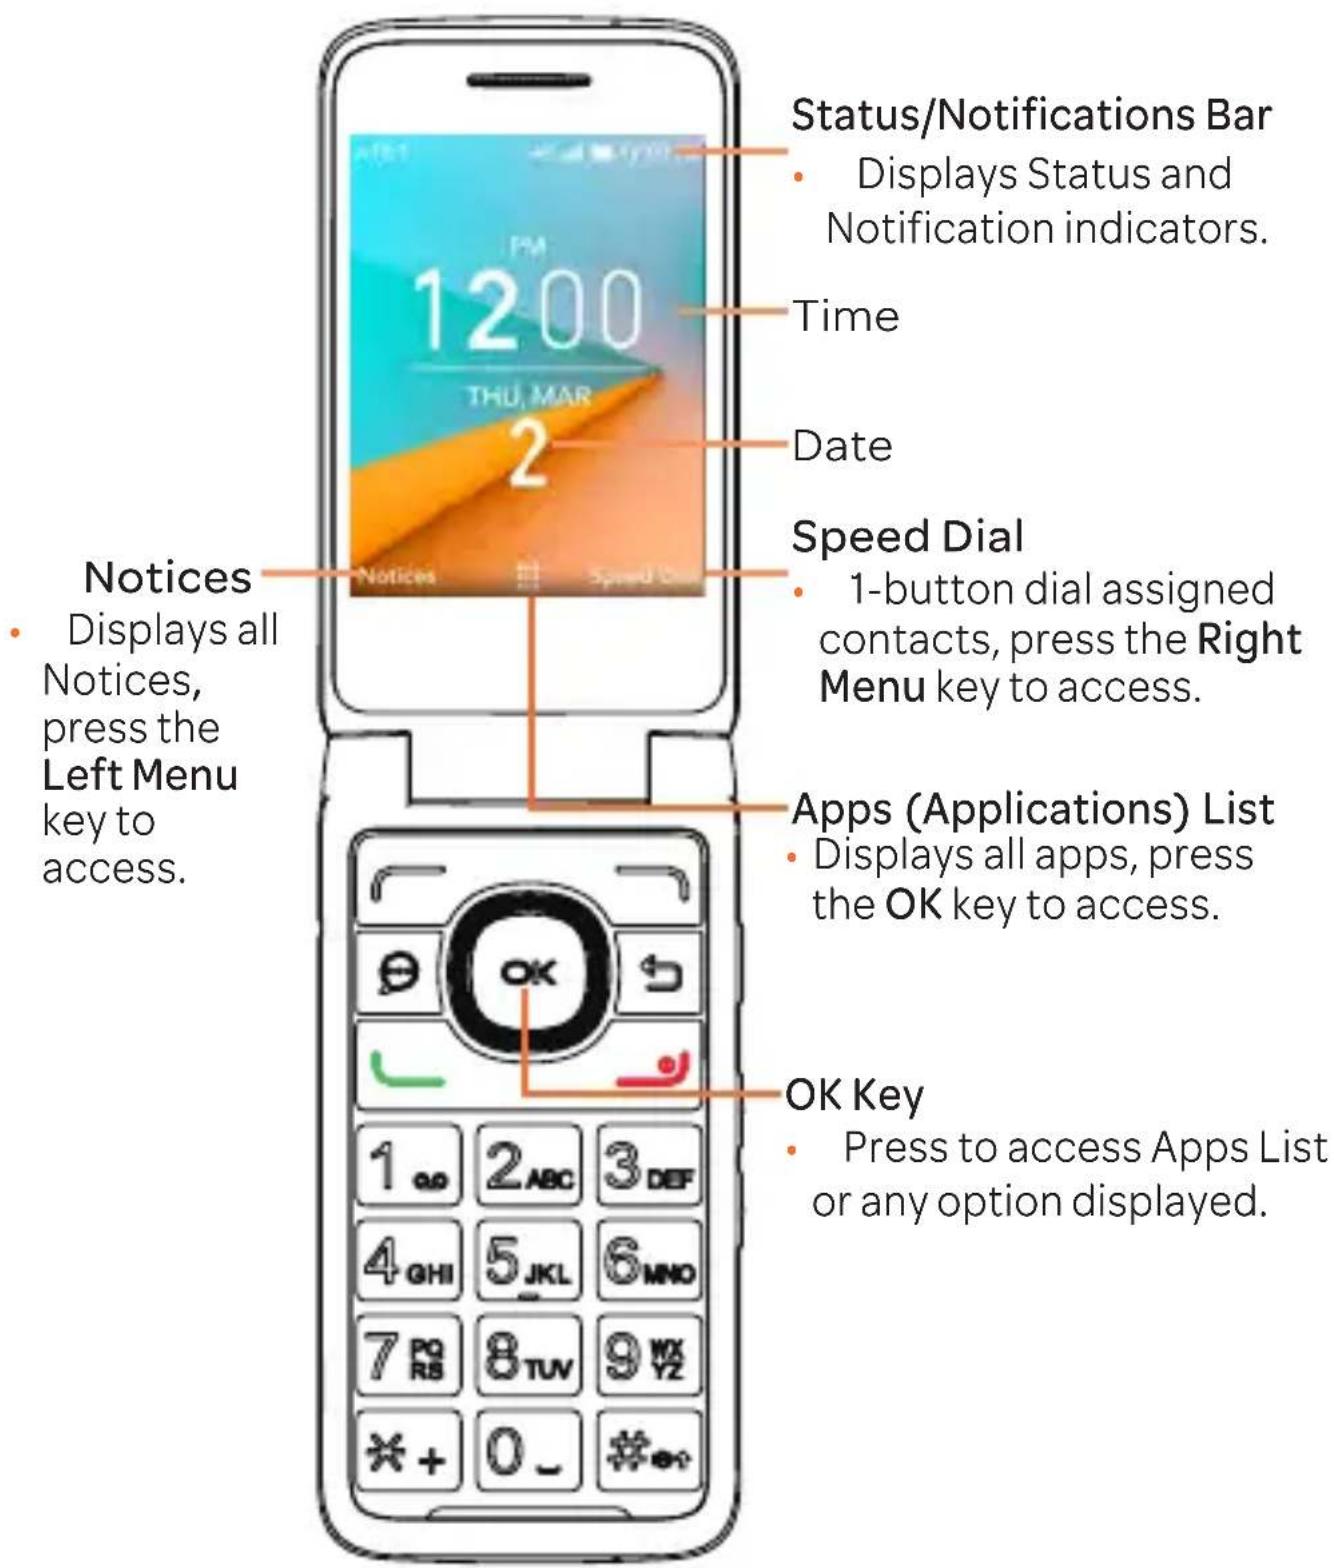
1.3.1 Status bar
From the status bar, you can view both the phone status (to the right side) and the notification information (to the left side).
| Icon Status | |
 | Bluetooth®active |
 | Wi-Fi®active |
 | Vibrate |
 | Silent |
 | Network (full signal) |
| [GB28] | Network (roaming) |
 | 4G LTE data service |
 | 3G data service |
 | Airplane mode |
 | Alarm set |
 | Battery (charging) |
 | Battery (full charge) |
 | Missed call |
 | New email |
 | New message |
1.3.2 Change home screen wallpaper
- From the Home screen, press the OK key OK, select Settings icon and then press the Navigation key to the right to select Personalization.
- Press the Navigation key 📄 and select Display > Wallpaper. Select Wallpaper, Gallery or Camera and press the OK key OK to enter option.
- When browsing Wallpaper or Gallery options, select an image and press the OK key OK or the Right Menu key → to Save.
- When using Camera option, press the OK key OK to take photo, then press the Right Menu key → to Save. To Retake pictures press the Left Menu key ↗.
- Press the Back/Clear ↩ key to exit out, the new image will be displayed on the Home screen.
2 Phone

2.1 Making a call
Dial the desired number, press the Call/Answer key → to place call, or select the Phone app 📋, press the Right Menu key → to access Contacts. Press up or down on the Navigation key 🔒 to select the desired contact and press the Call/Answer key → to place call. If you make a mistake, you can delete the incorrect digits by pressing the Back/Clear key ↩. To hang up the call, press the End/Power key ↙.
International call
To dial an international call, select the Phone app then press and hold ✗to enter “+” in dial screen, then enter the international country prefix followed by the full phone number and finally press the Call/Answer key
Emergency call
To make an emergency call, dial the emergency number and press the Call/Answer key ⬇. This works even without a SIM card, requires network coverage.
2.2 Answer or decline a call
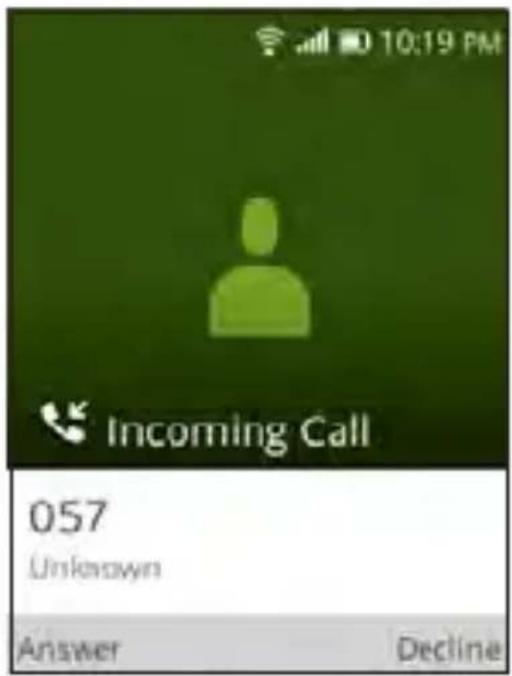
When you receive a call:
- Press the Left Menu key — or the Call/Answer key to answer.
- Pres the Right Menu key or the End/Power key to decline.
To mute the ringtone volume of an incoming call, press the Volume key.
2.3 Calling your voicemail (1)
- Press and hold the 1. key to set up voicemail or review voicemail messages.
- Follow the prompts to set up your voicemail account or once set up, to listen to voicemail messages.
3 Contacts......

3.1 Consult your Contacts
Contacts app provides quick and easy access to your stored contacts.
You can access this app by pressing the OK key from the Home screen, then selecting the Contacts app and pressing the OK key OK.
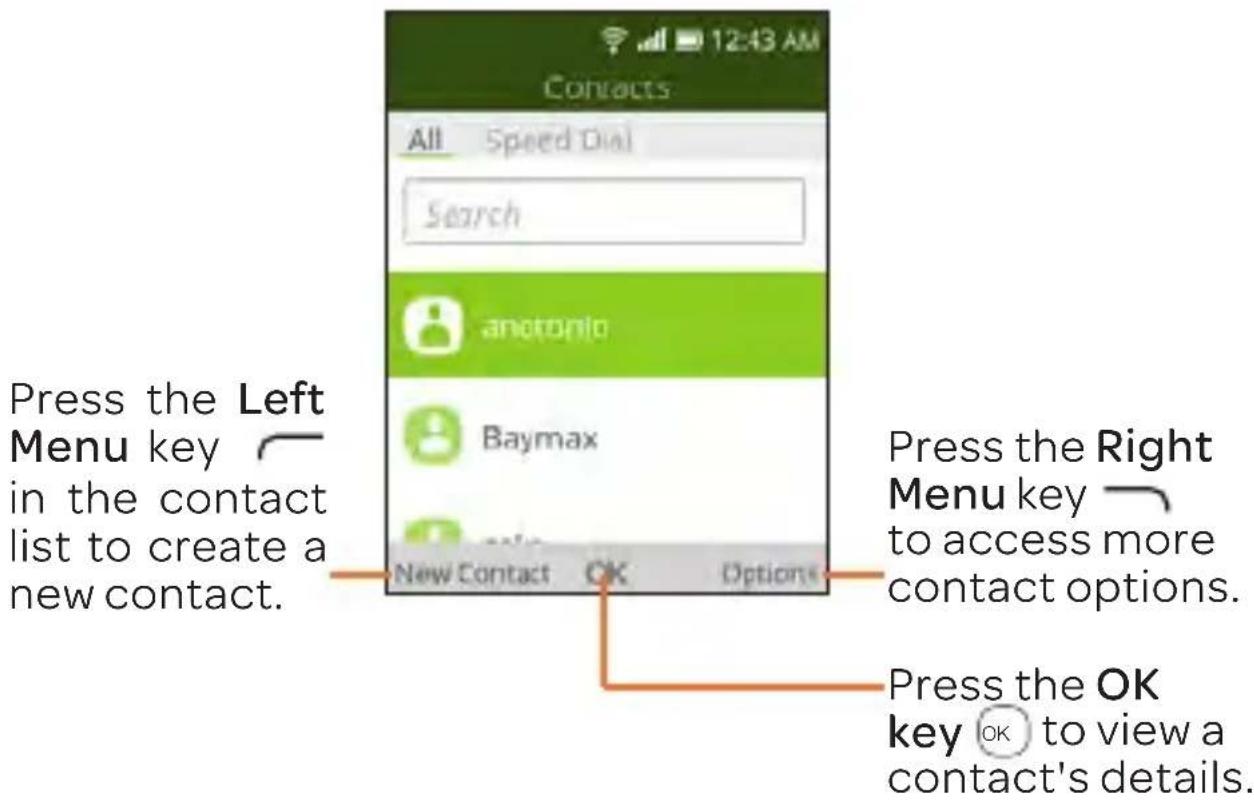
(1) Contact your network operator to check service availability.
3.2 Adding a contact
In contacts list screen, press the Left Menu key → to access New Contact screen and enter contact details. Press the Navigation key ○ down to access next contact information category.
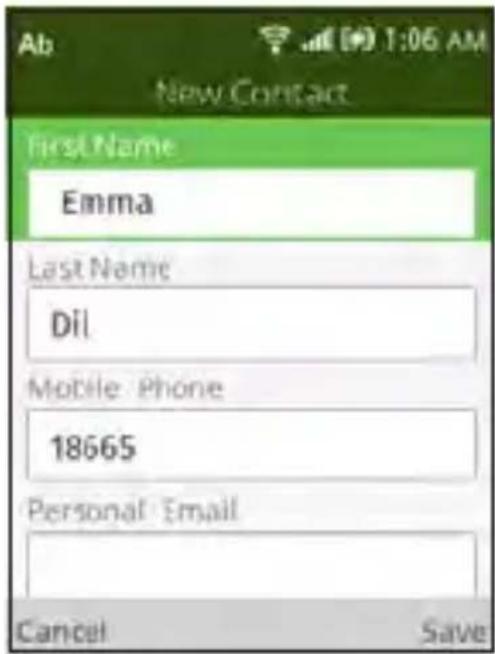
When finished, press the Right Menu key to save.
3.3 Editing your contacts
In contacts list screen, select contact and press the Right Menu key → to access Options, select Edit Contact, and press the OK key OK to edit.
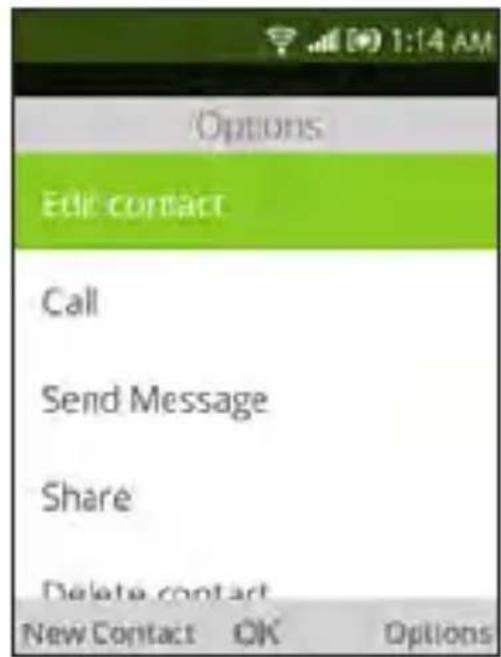
When finished editing, press the Right Menu key → to save. To cancel edit mode, press Left Menu key → to cancel and exit.
3.4 Deleting a contact
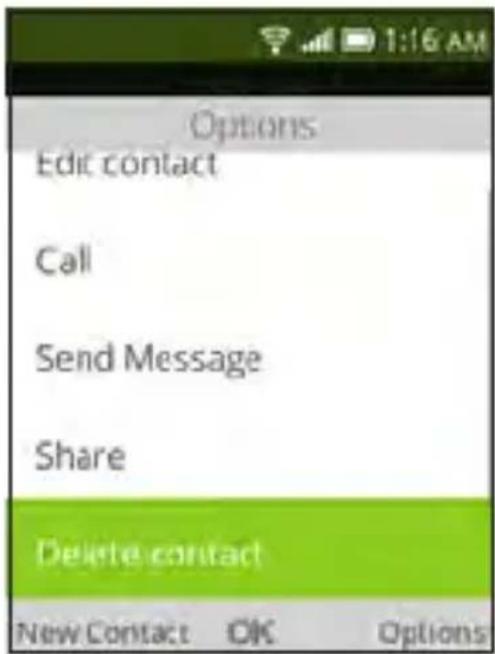
In contacts list screen, press the Right Menu key → to access Options, then select Delete contact, and press the OK key OK. A confirmation page will be displayed, press the Right Menu key → to delete.
3.5 Sharing your contacts
You can share a single contact with others by sending the contact's vCard via E-mail, Messages, or Bluetooth.
Select a contact you want to share, press the Right Menu key → to access Options, then select Share and press the OK key OK. Select Share with option: E-mail, Messages, or Bluetooth and follow the option prompts.
3.6 Additional options
From the contact list, you can access the following options:
Call
Make a call to the selected contact.
Send message
Send an SMS/MMS to the selected contact.
Settings
- Sort contacts
Press the OK key OK to choose contacts sorted by first name or by last name. - Import contacts Import contacts from SIM card, memory card, Gmail, or outlook.
- Export contacts Export contacts to SIM card, memory card, or Bluetooth.
- Set ICE contacts Add two contacts for making "In Case of Emergency" calls.
• Delete contacts Delete one or more contacts at once.
4 Messages

Use the Messages app to send and receive text (SMS) and multimedia (MMS) messages.
4.1 Write message
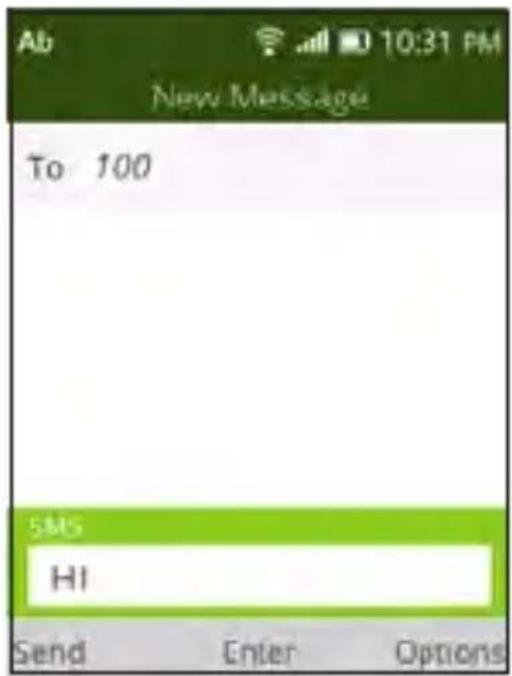
- From the Home screen, press the OK key OK, select Messages app and press the OK key OK or press the Messages key on the device keypad to launch Messages app.
- Press the Left Menu key √ to write a new message.
- Enter the phone number of the recipient in the To bar at the top of the screen or press the Right Menu key to add a contact from the Contacts app.
- Press the Navigation key down to access the Message bar and enter message text.
- Press the Left Menu key to send message.
An SMS of more than 160 characters will be counted as an additional SMS. Specific letters or characters will also increase the size of the SMS. This may cause multiple SMS to be sent to your recipient.
4.2 Send a multimedia message
MMS enables you to send video clips, images, photos, contacts and sounds by pressing the Right Menu key → to access Options. Next select Add Attachment, press the OK key OK and select from Video, Music, Gallery, Contacts or Camera. Select image/file and follow prompts on screen to attach to message. Press the Left Menu key → to send message.
An SMS will be converted to MMS automatically when media files (image, video, audio, etc.) are attached or email addresses are added.
4.3 How to type a message
When in edit mode, the default input method is English language. You can press the 🔊 key to switch between Spanish and English language.
- For normal text input, press a number key, 2-9, repeatedly until the desired character is displayed. If the next letter is located on the same key as the present one, wait until the cursor is displayed to input.
- To insert a punctuation mark or special character, please press the *+ key, select a character and press OK key OK.
- To delete inputted letters or symbols press the ☑ once to delete one character at a time or long press to delete full words or all text.
Note: Use T9 input method to quickly type words. To turn T9 option ON select Settings > Personalization > Input Methods > Use T9 > On. Once activated T9 will be available under input options when pushing 📄To deactivate T9 select Settings > Personalization > Input Methods > Use T9 > Off.
4.4 Settings
In the Messages app screen, press the Right Menu key to access Options > select Settings and press the OK key to view the following options:
• Auto Retrieve Messages
Select On without roaming to automatically download the multimedia message header, body and attachments when not roaming, this is default option. Select On with roaming to automatically download the multimedia message header, body and attachments even when roaming. Select Off to only download the message header which will be displayed on Messaging screen.
WAP Push
Press to turn the WAP push messages On/Off.
• Emergency Alert
Press to view the alert inbox or to access messaging emergency alert settings.
5 Email
To access the Email app, press the OK key OK from the Home screen, select Email app and press the OK key OK.
An email wizard will guide you through the steps to set up an email account.
- Welcome screen will display, press the Right Menu key to select Next. Then enter the name, email address and password of the account you would like to set up.
- Press the Right Menu key → to access Next and set up account. If your email service provider does not allow your phone to have quick email set up, you will be prompted to enter settings manually. Press the Left Menu key → to access Manual setup and input required information for email account set up.
- To add another email account, you can press the Right Menu key → to access Options/ Settings. And then select Add account.
To create and send emails
- Press the Left Menu key → to Compose a new email from the Inbox screen.
- Enter recipient(s) email address(es) in the To field.
- Use the Right Menu key → to access Options and add Cc/Bcc or attachment to the message.
• Enter the subject and the content of the message.
- Press the Left Menu key √ to send.
- If you do not want to send the email right away, you can press the Right Menu key and select Save as draft or touch the Back to save a copy.
6 Camera......

Your phone features a Camera app to take photos and record videos.
6.1 Camera
To access the Camera app, press the OK key OK from the Home screen, select the Camera app and press the OK key OK.
App Permission
Upon first use of the Camera, the App Permission screen will display, asking for permission to know your location. Press the Right Menu key → to Allow or the Left Menu key → to Deny.
To take a picture
Position the object or landscape in the screen, and press the OK key OK or the Camera Key on the right side of the phone to take the photo. Photos will automatically be saved to Gallery app. After taking a photo, press the Left Menu key to preview.
Zoom in/out
- Press the Navigation key ○ up or down to zoom lens in and out.
Options
Press the Right Menu key → to access:
- Self Timer
Sets the time a photo is taken after pressing the OK key OK or the Camera key. - Grid Adds grid lines to photo screen to help take better photos by using grid lines to align photo image.
• Gallery Select Go to Gallery Application to view photos previously taken. - Modes Select to switch between Photo and Video Mode.
6.2 Video
To shoot a video
- Zoom in/out Press the Navigation key ○ up or down to zoom lens in and out.
- Press the right side of Navigation key ☐ to switch to Video mode from Camera mode.
- Press the OK key OK or the Camera key to record a video, press either key again to stop recording.
• Videos will be automatically saved to Video app

7 Gallery

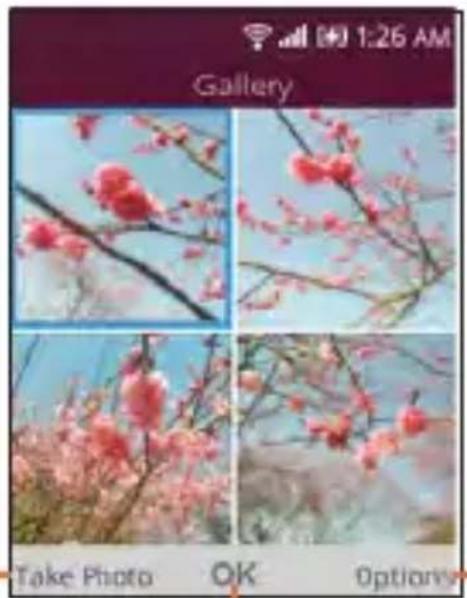
The Gallery app provides you with one location to view and organize all your saved photos. The Gallery app also offers additional photo options.
To access the Gallery app, press the OK key OK from the Home screen, select the Gallery app and press the OK key OK.
Press the Left Menu key to take photo.
natural_image
Four-panel photo grid showing cherry blossoms in bloom, displayed within a mobile app interface (no text or symbols on the images themselves)Press the Right Menu key → to access more options.
Press the OK key OK to view the selected photo.
Gallery app photo options
When viewing photos in the Gallery app, select an image and press the Right Menu key → to access options below:
- Delete Delete the selected photo.
- Edit Select this option to adjust exposure value, rotate the photo, crop, add filters and auto-correction.
- Rename Rename the selected photo.
• Share Share the photo via E-mail, Messages and Bluetooth. - Select Multiple Allows you to select more than one photo in the Gallery.
- File Info Displays file name, size, image type, date taken and resolution.
- Lock Select to lock photo from being deleted, edited, or renamed. Unlock photo to gain access to options again.
- Sort and group Sorts photo by date and time or groups by date.
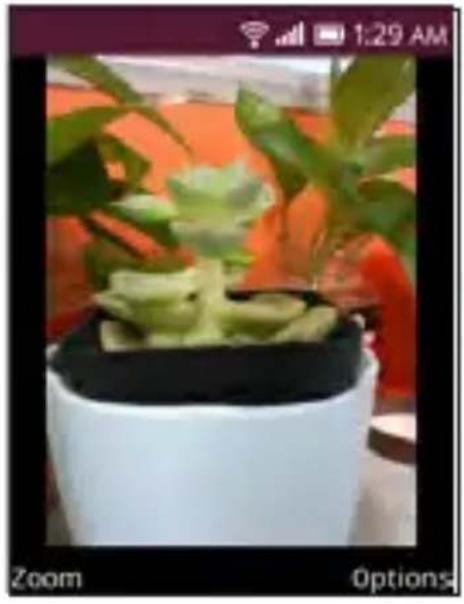
Individual photo view options
natural_image
Potted succulent plant with green leaves and black base, set against orange background (no text or symbols)When previewing an individual image in the Gallery app, the options above are also available by pressing the Right Menu key ↗, with the two additional options below:
- Rotate Rotates the picture 90^ clockwise.
- Set As Sets selected image as wallpaper or existing contact image.
8 Video......

To access the Video app, press the OK key OK from the Home screen, select the Video app and press the OK key OK.
To view video options, select a video, press the Right Menu key → and select from Share, File Info, Delete and Select Multiple videos.
9 Music

Use the Music app to play music files stored on your phone. Music files can be downloaded from your computer to your phone using a USB cable.
To access the Music app, press the OK key (OK) from the Home screen, select the Music app and press the OK key (OK).
10 Browser

Use the Browser app to navigate the Web.
To access the Browser app, press the OK key ☐ from the Home screen, select the Browser app 📋 and press OK key ☐.
- To search the Internet, press the Left Menu key — enter the website and press the OK key OK.
- Use the Navigation key to move cursor on the screen.
- You can also press the Right Menu key → to access Options and Pin your current web address to your top sites. Pinning to top sites, provides a shortcut to pinned web addresses in Browser app.
11 Calendar......
Use the Calendar app, to keep track of important meetings, appointments, etc.
To access the Calendar app, press the OK key OK from the Home screen, select the Calendar app and press the OK key OK.
11.1 Multimode view
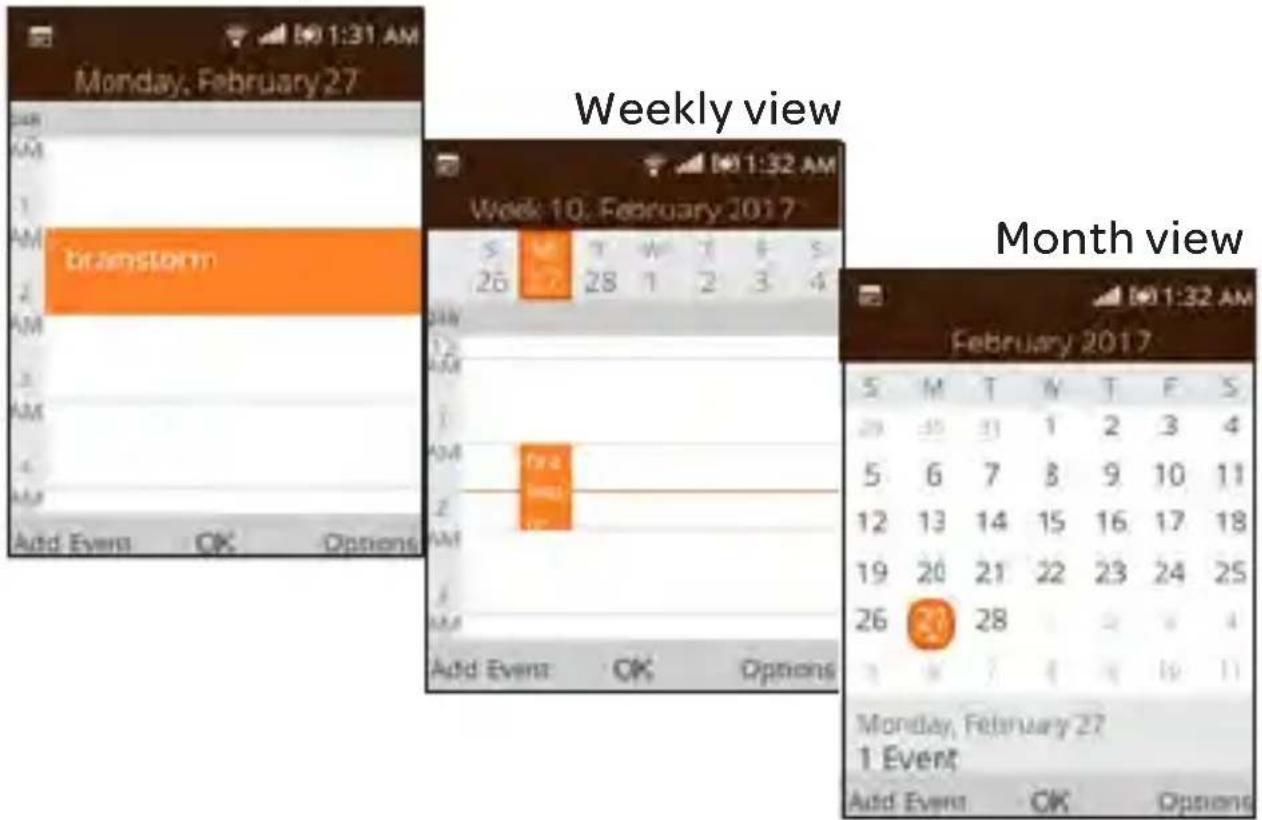
You can display the Calendar in Day, Weekly, or Month view. Press the Right Menu key → to change your Calendar view.
Day view
11.2 To create new events
Press the Left Menu key → to add new events from any Calendar view.
- Fill in new event information. If it is a whole-day event, you can select All-day Event.
- When finished, press the Right Menu key → to save.
More Options are available by pressing the Right Menu key from the Calendar main screen:
- Go to date Use to go to preferred date.
• Search Searches scheduled events. - Calendar to Display Displays phone calendar or another account if added.
- Sync calendar Syncs calendar.
- Settings Sets a series of Calendar settings.
11.3 Event reminder
If a reminder is set for an event, the upcoming event icon

will appear on the Status bar as a notification when the under time arrives.
12 Alarm

Your mobile phone features an Alarm app with an Alarm, Timer and Stopwatch function.
To access the Alarm app, press the OK key OK from the Home screen, select the Alarm app and press the OK key OK.
12.1 Alarm
To set an alarm
From the Alarm screen, press the Left Menu key to add a new alarm. The following options will appear:
• Time Press to set the alarm time.
- Repeat Select the days you want your alarm to go off.
• Sound Select a ringtone for the alarm.
• Vibrate Press to activate vibration.
• Alarm name Press to enter a name for the alarm.
To adjust alarm settings
More Options are available for saved Alarms, by highlighting Alarm to be edited and pressing the Right Menu key from the Alarm screen:
• Edit Press to edit alarm.
- Delete Press to delete alarm.
- Settings Press to set snooze time, volume, vibration and sound.
12.2 Timer
From the Alarm screen, press the right side of the Navigation key to enter the Timer screen.
- Press the OK key OK to edit hour, minute and second, when finished, press the OK key OK to select and start timer.
- When the Timer is ongoing press the OK key OK to select II and pause timer.
- When the Timer is paused press the OK key OK to select and continue timer.
- When the Timer is ongoing press the Right Menu key to add 1 minute.
- When Timer is paused press the Left Menu key to reset the timer.
- When timer is reset press the Right Menu key → to enter Settings, allowing you to activate the Timer Vibrate or select Timer Sound.
12.3 Stopwatch
From the Timer screen, press the right side of Navigation key to enter the Stopwatch screen.
- Press the OK key OK to select and start stopwatch.
-
When the Stopwatch is ongoing press the Right Menu key to record the lap.
-
When the Stopwatch is ongoing press the OK key OK to select || to pause the time.
- When the Stopwatch is paused press OK keyok to select ▶ and continue the total time.
- When Stopwatch is paused press the Left Menu key to reset the stopwatch and clear lap times.
13 Calculator......
With the Calculator app, you can solve many mathematical problems.
To access this app, press the OK key OK from the Home screen, select the Calculator app + x and press the OK key OK.
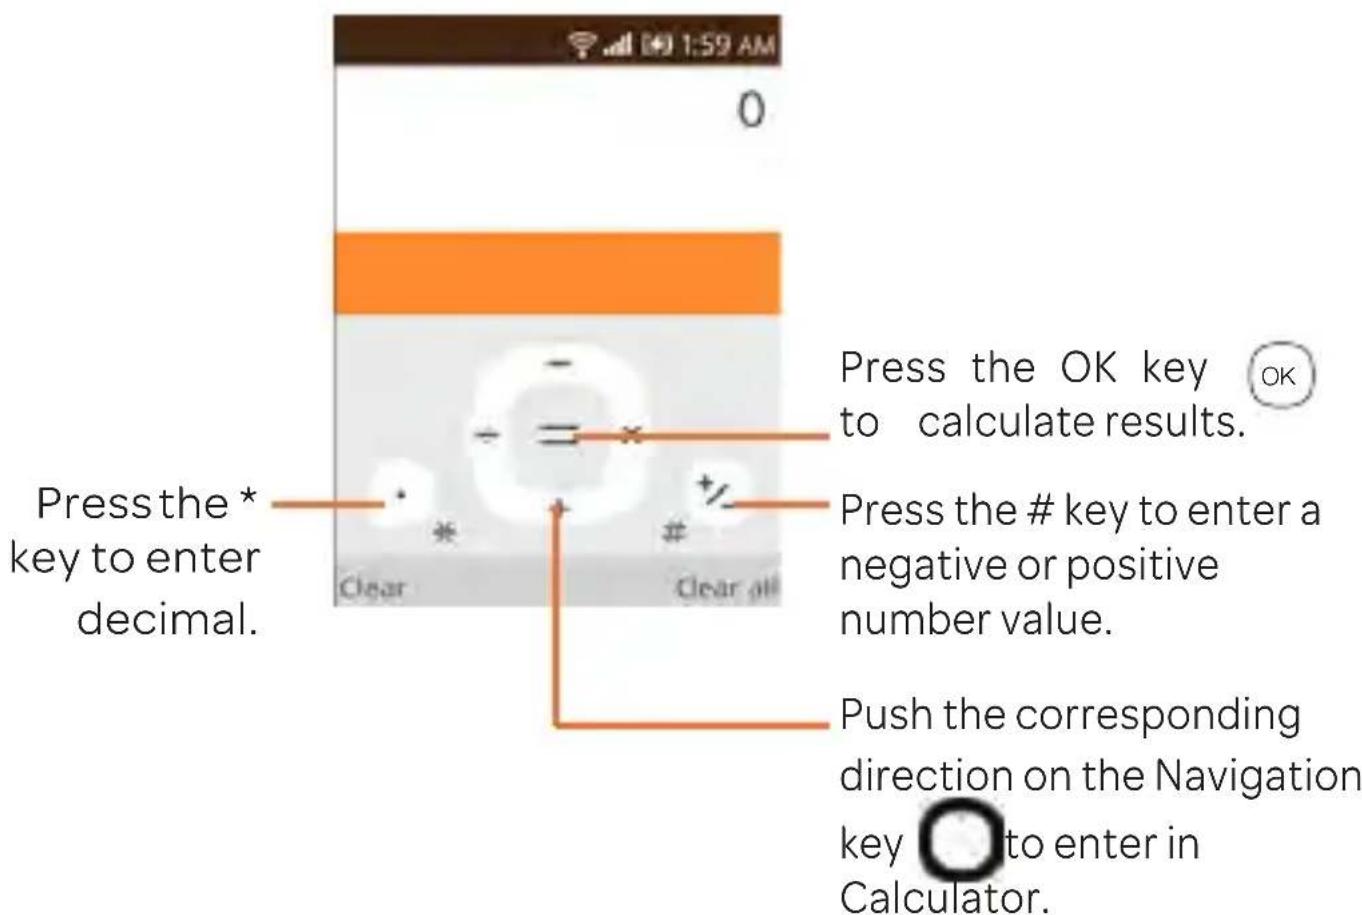
Enter the numbers using the keypad. Select the mathematical operation to be performed using the Navigation key ☐, follow the onscreen guide for each navigation direction and the corresponding mathematical operation. Press the OK key OK to select equals = and get results.
14 FM Radio
Your phone is equipped with a radio ^(1) with RDS ^(2) functionality. You can use the application as a traditional radio with saved channels or with parallel visual information related to the radio program on the display, if you tune to stations that offer Visual Radio service.
To access this app, press the OK key OK from the Home screen, select the FM Radio app and press the OK key OK.
To use this feature, you must plug in a wired headset, sold separately, into the phone. The headset works as an antenna for your phone.
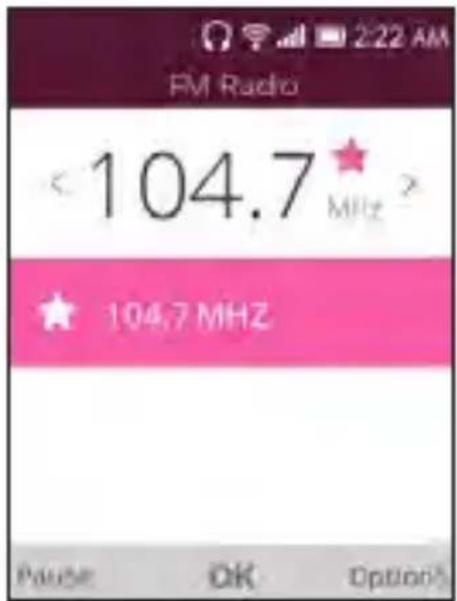
(1) The quality of the radio depends on the coverage of the radio station in that particular area.
(2) Depending on your network operator and market.
Press the left/right side of the Navigation ☐ key to decrease/increase 0.1MHz.
Long press the left/right side of the Navigation 🔒 key to search and go to the nearest lower/higher frequency channel.
Press the Right Menu key → to access Options, select from Add to favorites, Edit favorites or Switch to speaker/earphone.
Favorite channels will have red start added and will be displayed in the channel list for easy access.
15 Settings......

To access the Settings app, press the OK key the Home screen, select the Settings app press the OK key OK.

from and
15.1 Network & connectivity
15.1.1 Airplane mode
When Airplane mode is on, it will simultaneously disable all wireless connections including Wi-Fi, Bluetooth and more.
15.1.2 Cellular & data
Mobile data
If you do not need to transmit data on all mobile networks, turn off Mobile data to avoid incurring significant charges for data use on local operator mobile networks, particularly if you do not have a mobile data agreement.
International data roaming
If you don't need to transmit data on other operators' mobile networks, disable Data roaming to avoid incurring significant roaming charges.
Enhanced LTE
Press to enable enhanced LTE.
15.1.3 Geolocation
KaiOS uses GPS, and additional supplemental information such as Wi-Fi and mobile networks to approximate your location.
Location data may be used by KaiOS and service providers to improve accuracy and coverage of the location databases.
15.1.4 Wi-Fi
Using Wi-Fi you can surf the Internet without using your SIM card whenever you are in range of a wireless network. The only thing you have to do is to enter the Wi-Fi screen and configure an access point to connect your phone to the wireless network, enter password if applicable.
15.1.5 Bluetooth
Bluetooth allows your phone to exchange data (videos, images, music, etc.) within a small range with another Bluetooth supported device (phone, computer, printer, headset, car kit, etc.).
15.1.6 Calling Settings
DTMF tones
Dual Tone Multi-Frequency, or DTMF is a method for instructing a telephone switching system of the telephone number to be dialed, or to issue commands to switching systems or related telephony equipment.
Press to set DTMF tones to normal or long.
Call waiting
Press to enable or disable call waiting.
Caller ID
Press to set how your phone number is displayed when making a call; network default, hide number or show number.
Call forwarding
Press to configure how your calls are forwarded when you are busy, call is unanswered or you are unreachable.
Call barring
Press to set the outgoing and incoming call barring.
Call duration
Press to view last call duration, and outgoing/incoming calls/all calls duration.
15.1.7 Messaging Settings
Auto retrieve
Press to disable or enable auto-retrieve with or without roaming.
WAP push
Mark the checkbox to enable receipt of push messages from network.
Service center
Displays the service center number 1-312-314-9810.
15.1.8 Internet Sharing
USB tethering
USB tethering can share your phone's Internet connection with a single USB-connected device. Press to turn the USB tethering On. Note: Turning USB tethering On will automatically turn off Wi-Fi network.
15.1.9 Emergency Alert
Alert inbox
Press to view Alert message in the alert box.
Emergency alert sound
Mark the checkbox to enable the emergency alert sound.
Emergency alert vibrate
Mark the checkbox to enable the emergency alert vibrate.
Multi language support
Mark the checkbox to enable the Multi language support.
Presidential alert
Presidential alert is enabled by default.
Extreme alert
Mark the checkbox to enable the extreme alert.
Severe alert
Mark the checkbox to enable the severe alert.
AMBER alert
Mark the checkbox to enable the amber alert.
15.2 Personalization
15.2.1 Sound
Volume
Press to set the volume for Media, Rightones & Notifications and Alarm.
Tones
Press to set Vibrate, Ringtones, Alerts, or to Manage Tones. Manage Tones offers access to System Ringtones and Notice Alerts for reviewing or sharing, and My Ringtones to assign music in Music Library to Ringtones.
Other sounds
Press to enable or disable the sound for Dial pad, camera or sent message.
15.2.2 Display
Wallpaper Press to select the wallpaper from available wallpapers, gallery or to use camera to take photo.
Brightness Press to set the level of brightness.
Screen Timeout Press to set the screen timeout time.
15.2.3 Search
Search engine
Press to select the preferred default search engine. Select from: Yahoo, Google, Bing or DuckDuckGo.
Search suggestions
Press to enable or disable the search suggestions.
15.2.4 Notices
Show on lock screen
Press to enable or disable having notices shown on the lock screen.
Show after reboot
Press to enable or disable having notices shown after reboot.
15.2.5 Date & time
Date
Select to manually set the phone's date.
Time
Select to manually set the phone's time.
Time zone
Select to manually set the phone's timezone.
Format
Press to select 12-hour clock format or 24-hour clock format.
Home Screen Clock
Select whether to show or hide the clock on home screen.
15.2.6 Language
Press to select the preferred language, English or Spanish.
15.2.7 Input methods
Use T9
Select to turn the T9 On or Off.
Input Languages
Press to select the input languages.
15.2.8 Answer mode
Press to enable the flip to answer.
15.3 Privacy & security
15.3.1 Screen lock
Screen lock allows you to set a 4-digit pass code which protects your phone information, if lost or stolen. Your phone will ask for the pass code entry in order to access device.
15.3.2 SIM Security
A SIM PIN prevents access to the SIM card cellular data networks. When it's enabled, any device containing the SIM card will request the PIN upon restart. A SIM PIN is not the same as the screen lock pass code used to unlock the device.
15.3.3 Reset Password
Reset screen lock pass code allows you to change the original password.
15.3.4 APP Permission
Camera
Press to set the Geolocation permission for the Camera app.
15.3.5 Do Not Track
Press to set whether you want your information to be tracked by websites and apps.
15.3.6 Browsing Privacy
Press to clear the browsing history or to clear the cookies and stored data.
15.4 Storage
15.4.1 USB storage
Enabling USB storage allows another computer or device connected using USB to access files on this phone.
15.4.2 End user storage
Use these settings to monitor the total and available space on your phone.
15.5 Device
15.5.1 Device information
This contains information about Model number, Software version, Hardware, OS Version, Platform Version, Bluetooth Address, MAC Address, MEID, IMEI, IMSI, ICCID, Build Number, KaiOS License Terms, Open Source Licenses, AT&T Software Update, Tutorials, Factory Reset, Device Reset and Network Settings Reset.
AT&T Software Update
Press Check for Update to search for software updates or Continue Update to continue updating software if interrupted.
Tutorials
Press to review the device Keypad, Softkeys, Change Text Input Method, Browser Contacts or Messages tutorials.
Factory Reset
Press Reset to erase all your data and restore the phone to factory condition. None of your settings or data will be saved.
Device Reset
Press to erase all device configurations and settings.
Network Settings Reset
Press to erase all device network configuration settings.
15.5.2 Downloads
Press to view downloads.
15.5.3 Battery
Current Level
Press to view current battery level or to set the power saving mode.
Power Saving Mode
Turning power saving mode On will turn off the phone's data, Bluetooth and Geolocation connections to extend battery life.
You can select to turn power saving mode On automatically once there is 5%, 10% or 15% battery left.
You can adjust power use via the screen brightness or the screen timeout settings in the Display screen.
15.5.4 Accessibility
Invert color
Press to turn the color inversion On/Off.
Backlight
Press to turn the backlight On/Off.
Large Text
Press to turn the large text On/Off.
Captions
Press to turn the captions for phone screen On/Off.
Readout
Readout mode function reads the labels of interface elements and providers sound response.
Mono audio
Press to turn the mono audio On/Off.
Volume balance
Press to set the volume balance value.
Keypad vibration
Press to turn the keypad vibration On/Off.
TTY
TTY mode can be used by people who are deaf, have poor hearing or speech impairments.
Press to set TTY to full, VCO, HCO or turn off TTY.
Hearing Aid Compatibility (HAC)
Hearing aid mode can be used by people who are deaf, have poor hearing or speech impairments. After connecting the phone and hearing aid device, calls are linked to a relay service, which converts incoming speech to text for the person using the hearing aid and converts outgoing text from the hearing aid device to a spoken voice for the person on the other end of the conversation.
15.6 Account manager
Use the settings to add, remove, or manage your email and other supported accounts.
15.6.1 KaiOS Account
Setup a KaiOS Account to use Anti-Theft option that remotely locks device or wipes all personal information in event of loss or theft. To create account:
• Select KaiOS Account.
- Press the OK key OK to Create Account then press the Right Menu key → to select Accept.
- Enter your email and press Down on the Navigation key
- Press the OK key OK to select that you are over 13, then press the Right Menu key → to select Next.
- Enter your password then press Down on the Navigation key to verify the password.
- Press the Right Menu key → to select Next.
- Verify your email address via the email link sent to your email account.
- Once you verify your email address, return to Account Manager settings and Sign in to KaiOS.
15.6.2 Anti-Theft
Once you log in to your KaiOS Account on your phone, Anti-Theft will automatically be turned On. Only after logging in to KaiOS Account can anti-theft be enabled.
Go to the KaiOS Anti-theft website to access Anti-theft features: https://services.kaiostech.com/antitheft
Make Ring
Press to have anti-theft make your phone ring for locating.
Remote Lock
Press to lock your phone if lost.
Remote Wipe
Press to wipe all phone personal data if lost.
16 Making the most out of your phone......
16.1 Upgrade
You can use the Over-the-air Upgrade tool to update your phone's software.
16.1.1 Over-the-air Upgrade
Using the Over-the-air Upgrade tool you can update your phone's software.
To access Update phone, select Settings > Device > Device Information > AT&T Software Update. When there is a new software version available, one indicator will be shown on Updates menu. If you want to update your system, select Download, after download is done select Install to complete the upgrade.
You should turn on data connection before searching for updates. Settings for auto-check intervals is also available once you restart the phone.
If you have chosen auto-check, when the system discovers the new version, dialog will pop up to choose download or ignore, the notification also will show in Notices.
17 Safety information......
We recommend that you read this chapter carefully before using your device. The manufacturer disclaims any liability for damage, which may result as a consequence of improper use or use contrary to the instructions contained herein.
TRAFFIC SAFETY
Given that studies show that using a device while driving a vehicle constitutes a real risk, even when the hands-free kit is used (car kit, headset...), drivers are requested to refrain from using their device when the vehicle is not parked.
When driving, do not use your device or headphone to listen to music or to the radio. Using a headphone can be dangerous and forbidden in some areas. When switched on, your device emits electromagnetic waves that can interfere with the vehicle's electronic systems such as ABS anti-lock brakes or airbags. To ensure that there is no problem:
- do not place your device on top of the dashboard or within an airbag deployment area,
- check with your car dealer or the car manufacturer to make sure that the dashboard is adequately shielded from device RF energy.
• CONDITIONS OF USE
You are advised to switch off the device from time to time to optimize its performance.
Switch the device off before boarding an aircraft.
Switch the device off when you are in healthcare facilities, except in designated areas. As with many other types of equipment now in regular use, these devices can interfere with other electrical or electronic devices, or equipment using radio frequencies.
Switch the device off when you are near gas or flammable liquids. Strictly obey all signs and instructions posted in a fuel depot, petrol station, or chemical plant, or in any potentially explosive atmosphere.
When the device is switched on, it should be kept at least 15 cm from any medical device such as a pacemaker, a hearing aid or insulin pump, etc. In particular when using the device, you should hold it against the ear on the opposite side to the device, if any.
To avoid hearing impairment, move the device away from your ear while using the "hands-free" mode because the amplified volume might cause hearing damage.
Do not let children use the device and/or play with the device and accessories without supervision.
When replacing the cover note that your device may contain substances that could create an allergic reaction.
Always handle your device with care and keep it in a clean and dust-free place.
Do not allow your device to be exposed to adverse weather or environmental conditions (moisture, humidity, rain, infiltration of liquids, dust, sea air, etc.). The manufacturer's recommended operating temperature range is 0°C (32°F) to +50°C (122°F).
At over 122^ the legibility of the device's display may be impaired, though this is temporary and not serious.
Emergency call numbers may not be reachable on all cellular network. You should never rely only on your phone for emergency calls.
Do not open, dismantle or attempt to repair your device yourself.
Do not drop, throw or bend your device.
Do not use the device if the screen is damaged, cracked, or broken to avoid any injury.
Do not paint it.
Only use batteries, battery chargers, and accessories which are recommended by TCL Communication Ltd. and its affiliates and are compatible with your device model. TCL Communication Ltd. and its affiliates disclaim any liability for damage caused by the use of other chargers or batteries.
Remember to make back-up copies or keep a written record of all important information stored in your device.
- PRIVACY
Please note that you must respect the laws and regulations in force in your jurisdiction or other jurisdiction(s) where you will use your device regarding taking photographs and recording sounds with your device. Pursuant to such laws and regulations, it may be strictly forbidden to take photographs and/or to record the voices of other people or any of their personal attributes, and duplicate or distribute them, as this may be considered to be an invasion of privacy. It is the user's sole responsibility to ensure that prior authorization be obtained, if necessary, in order to record private or confidential conversations or take a photograph of another person; the manufacturer, the seller or vendor of your device (including the operator) disclaim any liability which may result from the improper use of the device.
BATTERY
Following air regulation, the battery of your product is not charged. Please charge it first.
Before removing the battery from your device, make sure that the device is switched off.
Observe the following precautions for battery use:
- Do not attempt to open the battery (due to the risk of toxic fumes and burns).
- Do not puncture, disassemble or cause a short-circuit in a battery.
- Do not burn or dispose of a used battery in household rubbish or store it at temperatures above 140^ F.
- Do not disassemble or open crush, bend or deform, puncture or shred.
- Do not modify or remanufacture, attempt to insert foreign objects into the battery, immerse or expose to water or other liquids, expose to fire, explosion or other hazard.
Only use the battery with a charging system that has been qualified with the system per CTIA Certification Requirements for Battery System Compliance to IEEE 1725. Use of an unqualified battery or charger may present a risk of fire, explosion, leakage, or other hazard.
Batteries must be disposed of in accordance with locally applicable environmental regulations. Only use the battery for the purpose for which it was designed. Never use damaged batteries or those not recommended by TCL Communication Ltd. and/or its affiliates.
This symbol on your device, the battery and the accessories means that these products must be taken to collection points at the end of their life:
- Municipal waste disposal centers with specific bins for these items of equipment.
- Collection bins at points of sale.
They will then be recycled, preventing substances being disposed of in the environment, so that their components can be reused.
In European Union countries:
These collection points are accessible free of charge.
All products with this sign must be brought to these collection points.
In non-European Union jurisdictions:
Items of equipment with this symbol are not to be thrown into ordinary bins if your jurisdiction or your region has suitable recycling and collection facilities; instead they are to be taken to collection points for them to be recycled.
CAUTION: RISK OF EXPLOSION IF BATTERY IS REPLACED BY AN INCORRECT TYPE. DISPOSE OF USED BATTERIES ACCORDING TO THE INSTRUCTIONS.
- CHARGERS
Main power chargers will operate within the temperature range of: 0^ C ( 32^ F) to +45^ C ( 113^ F).
The chargers designed for your device meet with the standard for safety of information technology equipment and office equipment use. They are also compliant to the eco design directive 2009/125/EC. Due to different applicable electrical specifications, a charger you purchased in one jurisdiction may not work in another jurisdiction. They should be used for this purpose only.
The charger shall be installed near the device and shall be easily accessible.
• Federal Communications Commission (FCC) Declaration of Conformity
This device complies with part 15 of the FCC Rules. Operation is subject to the following two conditions: (1) This device may not cause harmful interference, and (2) this device must accept any interference received, including interference that may cause undesired operation. Changes or modifications not expressly approved by the party responsible for compliance could void the user's authority to operate the equipment.
This device has been tested and found to comply with the limits for a Class B digital, pursuant to Part 15 of the FCC Rules. These limits are designed to provide reasonable protection against harmful interference in a residential installation. This equipment generates, uses and can radiated radio frequency energy and, if not installed and used in accordance with the instructions, may cause harmful interference to radio communications. However, there is no guarantee that interference will not occur in a particular installation If this equipment does cause harmful interference to radio or television reception, which can be determined by turning the equipment off and on, the user is encouraged to try to correct the interference by one or more of the following measures:
- Reorient or relocate the receiving antenna.
- Increase the separation between the equipment and receiver.
- Connect the equipment into an outlet on a circuit different from that to which the receiver is connected.
- Consult the dealer or an experienced radio/TV technician for help.
FCC Caution:
Changes or modifications not expressly approved by the party responsible for compliance could void the user's authority to operate the equipment.
FCC RF Exposure Information (SAR):
This device is designed and manufactured not to exceed the emission limits for exposure to radio frequency (RF) energy set by the Federal Communications Commission of the United States.
During SAR testing, this is set to transmit at its highest certified power level in all tested frequency bands, and placed in positions that simulate RF exposure in usage near the body with the separation of 15 cm. Although the SAR is determined at the highest certified power level, the actual SAR level of the device while operating can be well below the maximum value. This is because the device is designed to operate at multiple power levels so as to use only the power required to reach the network. In general, the closer you are to a wireless base station antenna, the lower the power output.
The exposure standard for wireless s employs a unit of measurement known as the Specific Absorption Rate, or SAR. The SAR limit set by the FCC is 1.6W/kg.
Tests for SAR are conducted using standard operating positions accepted by the FCC with the device transmitting at its highest certified power level in all tested frequency bands.
The FCC has granted an Equipment Authorization for this model device with all reported SAR levels evaluated as in compliance with the FCC RF exposure guidelines. SAR information on this model device is on file with the FCC and can be found under the Display Grant section of HYPERLINK "http://www.fcc.gov/oet/ea/fccid" www.fcc.gov/oet/ea/fccid after searching on:
FCC ID: 2ACCJN012
This device is HAC M4/T4 compatible. Reference ANSI C63.19 (2011).
For this device, the highest reported SAR value for usage near the body is:
| Maximum SAR for this model and conditions under which it was recorded: | |
| Body-worn SAR 1.14 W/kg | |
| Head SAR 0.61 W/kg | |
SAR compliance for body operation is based on a separation distance of 15 mm between the device and the human body. During use, the actual SAR values for this device are usually well below the values stated above. This is because, for purposes of system efficiency and to minimize interference on the network, the operating power of your device is automatically decreased when full power is not needed. The lower the power output of the device, the lower its SAR value.
Body-worn SAR testing has been carried out at a separation distance of 15 mm. To meet RF exposure guidelines during body-worn operation, the device should be positioned at least this distance away from the body.
If you are not using an approved accessory ensure that whatever product is used is free of any metal and that it positions the device the indicated distance away from the body.
Organizations such as the World Health Organization and the US Food and Drug Administration have suggested that if people are concerned and want to reduce their exposure they could use a hands-free accessory to keep the wireless device away from the head or body during use, or reduce the amount of time spent on the device.
Please note by using the device some of your personal data may be shared with the main device. It is under your own responsibility to protect your own personal data, not to share with it with any unauthorized devices or third party devices connected to yours. For devices with Wi-Fi features, only connect to trusted Wi-Fi networks. Also when using your device as a hotspot (where available), use network security. These precautions will help prevent unauthorized access to your device. Your device can store personal information in various locations including a SIM card, memory card, and built-in memory. Be sure to remove or clear all personal information before you recycle, return, or give away your device. Choose your apps and updates carefully, and install from trusted sources only. Some apps can impact your device's performance and/or have access to private information including account details, call data, location details and network resources.
Note that any data shared with TCL Communication Ltd. is stored in accordance with applicable data protection legislation. For these purposes TCL Communication Ltd. implements and maintains appropriate technical and organizational measures to protect all personal data, for example against unauthorized or unlawful processing and accidental loss or destruction of or damage to such personal data whereby the measures shall provide a level of security that is appropriate having regard to:
(i) the technical possibilities available,
(ii) the costs for implementing the measures,
(iii) the risks involved with the processing of the personal data, and
(iv) the sensitivity of the personal data processed.
You can access, review and edit your personal information at any time by logging into your user account, visiting your user profile or by contacting us directly. Should you require us to edit or delete your personal data, we may ask you to provide us with evidence of your identity before we can act on your request.
- Licenses

microSD Logo is a trademark.
The Bluetooth word mark and logos are owned by the Bluetooth SIG, Inc. and any use of such marks by TCL Communication Ltd. and its affiliates is under license. Other trademarks and trade names are those of their respective owners.
4044O Bluetooth Declaration ID D032964

The Wi-Fi Logo is a certification mark of the Wi-Fi Alliance.
18 General information......
• Internet address: http://www.alcatelonetouch.us
• Facebook: http://www.facebook.com/alcatelonetouchusa
• Twitter: https://twitter.com/ALCATEL1TOUCH
- Instagram: https://www.instagram.com/alcatelonetouchusa/
• Call support: U.S.A.: 855-368-0829
Canada: 855-844-6058
- Email support: U.S.A.: http://www.alcatelonetouch.us/contact
Canada: http://www.alcatelonetouch.ca/contact
• Manufacturer: TCL Communication Ltd. 5/F, Building22E, Science Park West Avenue, Hong Kong Science Park, Pak Shek Kok, Hong Kong.
An electronic version of this user guide is available in English and other languages according to availability on our website: http://www.alcatelonetouch.us.
Your device is a transceiver that operates on Wi-Fi with 2.4GHz and Bluetooth with 2.4GHz.

Battery Recycling (USA & Canada):
Alcatel partners with Call2Recycle® to offer a safe and convenient battery recycling program. For more information on our Battery Recycling Program, please visit the USA and Canada website at www.alcatelonetouch.us/battery-recycling and www.alcatelonetouch.ca/battery-recycling
Protection against theft ^(1)
Your device is identified by an IMEI (phone serial number) shown on the packaging label and in the product's memory. We recommend that you note the number the first time you use your device by entering *#06# and keep it in a safe place. It may be requested by the police or your operator if your device is stolen. This number allows your device to be blocked preventing a third person from using it, even with a different SIM card.
Disclaimer
There may be certain differences between the user manual description and the device's operation, depending on the software release of your device or specific operator services.
TCL Communication Ltd. shall not be held legally responsible for such differences, if any, nor for their potential consequences, which responsibility shall be borne by the operator exclusively.
This device may contain materials, including applications and software in executable or source code form, which is submitted by third parties for inclusion in this device ("Third Party Materials").
All third party materials in this device are provided "as is", without warranty of any kind, whether express or implied, including the implied warranties of merchantability, fitness for a particular purpose or use/third party application, interoperability with other materials or applications of the purchaser and non-infringement of copyright. The purchaser undertakes that TCL Communication Ltd. has complied with all quality obligations incumbent upon it as a manufacturer of mobile devices and devices in complying with Intellectual Property rights. TCL Communication Ltd. will at no stage be responsible for the inability or failure of the Third Party Materials to operate on this device or in interaction with any other devices of the purchaser. To the maximum extent permitted by law, TCL Communication Ltd. disclaims all liability for any claims, demands, suits or actions, and more specifically – but not limited to – tort law actions, under any theory of liability, arising out of the use, by whatever means, or attempts to use, such Third Party Materials. Moreover, the present Third Party Materials, which are provided free of charge by TCL Communication Ltd., may be subject to paid updates and upgrades in the future; TCL Communication Ltd. waives any responsibility regarding such additional costs, which shall be borne exclusively by the purchaser. The availability of the applications may vary depending on the countries and the operators where the device is used; in no event shall the list of possible applications and software provided with the devices be considered as an undertaking from TCL Communication Ltd.; it shall remain merely as information for the purchaser. Therefore, TCL Communication Ltd. shall not be held responsible for the lack of availability of one or more applications wished for by the purchaser, as its availability depends on the country and the operator of the purchaser. TCL Communication Ltd. reserves the right at any time to add or remove Third Party Materials from its devices without prior notice; in no event shall TCL Communication Ltd. be held responsible by the purchaser for any consequences that such removal may have on the purchaser regarding the use or attempt to use such applications and Third Party Materials.
Accessory
1350mAh Battery
Quick Start Guide
5V, 550m A charger with wire
19 Warranty
Your device is warranted against any defect or malfunctioning which may occur in conditions of normal use during the warranty period of twelve (12) months ^(1) from the date of purchase as shown on your original invoice.
Batteries ^(2) and accessories sold with your device are also warranted against any defect which may occur during the first six (6) months ^(1) from the date of purchase as shown on your original invoice.
In case of any defect of your device which prevents you from normal use thereof, you must immediately inform your vendor and present your device with your proof of purchase.
(1) The warranty period may vary depending on your country.
(2)The life of a rechargeable mobile device battery in terms of conversation time, standby time, and total service life, will depend on the conditions of use and network configuration. Batteries, being considered expendable supplies, should have optimal performance for your device during the first six months after purchase and for approximately 200 more recharges.
If the defect is confirmed, your device or part thereof will be either replaced or repaired, as appropriate. Repaired device and accessories are entitled to a one (1) month warranty for the same defect. Repair or replacement may be carried out using reconditioned components offering equivalent functionality.
This warranty covers the cost of parts and labor but excludes any other costs.
This warranty shall not apply to defects to your device and/or accessory due to (without any limitation):
1) Non-compliance with the instructions for use or installation, or with technical and safety standards applicable in the geographical area where your device is used;
2) Connection to any equipment not supplied or not recommended by TCL Communication Ltd.;
3) Modification or repair performed by individuals not authorised by TCL Communication Ltd. or its affiliates or your vendor;
4) Modification, adjustment or alteration of software or hardware performed by individuals not authorized by TCL Communication Ltd.;
5) Inclement weather, lightning, fire, humidity, infiltration of liquids or foods, chemical products, download of files, crash, high voltage, corrosion, oxidation...
Your device will not be repaired if labels or serial numbers (IMEI/SN) have been removed or altered.
There are no express warranties, whether written, oral or implied, other than this printed limited warranty or the mandatory warranty provided by your country or jurisdiction.
In no event shall TCL Communication Ltd. or any of its affiliates be liable for indirect, incidental or consequential damages of any nature whatsoever, including but not limited commercial or financial loss or damage, loss of data or loss of image to the full extent those damages can be disclaimed by law.
Some countries/states do not allow the exclusion or limitation of indirect, incidental or consequential damages, or limitation of the duration of implied warranties, so the preceding limitations or exclusions may not apply to you.
How to obtain Support: In United States please call, (855) 368-0829 or go to www.alcatelonetouch.us for technical support. In Canada please call, (855) 844-6058 or go to www.alcatelonetouch.ca for technical support. We have placed many self-help tools that may help you to isolate the problem and eliminate the need to send your wireless device in for service. In the case that your wireless device is no longer covered by this limited warranty due to time or condition, you may utilize our out of warranty repair options.
Electronic Recycling (Within USA Only):
For more information on Electronic Recycling, please:
1) Visit ALCATEL ONETOUCH Electronic Recycling Program website at http://www.alcatelonetouch.us/electronic-recycling-program, or
2) Call Alcatel US Customer Support at 1-855-368-0829.
Before contacting the service center, follow the instructions below:
- You are advised to fully charge (☐) the battery for optimal operation.
- Avoid storing large amounts of data in your phone as this may affect its performance.
- Use Factory reset and the upgrade tool to perform phone formatting or software upgrading. ALL Users phone data: contacts, photos, messages and files, downloaded applications will be lost permanently. It is strongly advised to fully backup the phone data and profile before doing formatting and upgrading.
Carry out the following checks:
My phone has not responded for several minutes
- Restart your phone by pressing and holding the End/Power key.
My phone turns off by itself
- Check that your screen is locked when you are not using your phone, and make sure the End/Power key is not miscontacted due to unlocked screen.
• Check the battery charge level.
My phone cannot charge properly
• Make sure that your battery is not completely discharged; if the battery power is empty for a long time, it may take around 20 minutes to display the battery charger indicator on the screen.
• Make sure charging is carried out under normal conditions ( 0^ C ( 32^ F) to +45°C ( 113^ F)).
- When abroad, check that the voltage input is compatible.
My phone cannot connect to a network or "No service" is displayed
• Try connecting in another location.
- Verify the network coverage with your service provider.
• Check with your service provider that your SIM card is valid.
• Try selecting the available network(s) manually.
• Try connecting at a later time if the network is overloaded.
My phone cannot connect to the Internet
- Check that the IMEI number (press *#06#) is the same as the one printed on your warranty card or box.
• Make sure that the internet access service of your SIM card is available. - Check your phone's Internet connecting settings.
• Make sure you are in a place with network coverage.
• Try connecting at a later time or another location.
Invalid SIM card
- Make sure the SIM card has been correctly inserted (see "Inserting or removing the SIM card").
• Make sure the chip on your SIM card is not damaged or scratched.
• Make sure the service of your SIM card is available.
Unable to make outgoing calls
• Make sure you have dialed a valid number and have touched.
• For international calls, check the country and area codes.
• Make sure your phone is connected to a network, and the network is not overloaded or unavailable.
- Check your subscription status with your service provider (credit, SIM card valid, etc.).
• Make sure you have not barred outgoing calls.
• Make sure that your phone is not in airplane mode.
Unable to receive incoming calls
• Make sure your phone is switched on and connected to a network (check for overloaded or unavailable network).
- Check your subscription status with your service provider (credit, SIM card valid, etc.).
• Make sure you have not forwarded incoming calls.
• Make sure that you have not barred certain calls.
• Make sure that your phone is not in airplane mode.
The caller's name/number does not appear when a call is received
- Check that you have subscribed to this service with your service provider.
- Your caller has concealed his/her name or number.
I cannot find my contacts
• Make sure your SIM card is not broken.
• Make sure your SIM card is inserted properly.
- Import all contacts stored in SIM card to phone.
The sound quality of the calls is poor
- You can adjust the volume during a call by pressing the Volume Up/Down key.
- Check the network strength
• Make sure that the receiver, connector or speaker on your phone is clean.
I am unable to use the features described in the manual
- Check with your service provider to make sure that your subscription includes this service.
• Make sure this feature does not require an Alcatel accessory.
When I select a number from my contacts, the number cannot be dialed
• Make sure that you have correctly recorded the number in your file.
• Make sure that you have selected the country prefix when calling a foreign country.
I am unable to add a contact in my contacts
• Make sure that your SIM card contacts are not full; delete some files or save the files in the phone contacts.
My callers are unable to leave messages on my voicemail
- Contact your service provider to check service availability.
I cannot access my voicemail
• Make sure your service provider's voicemail number is correctly entered in "Voicemail number".
• Try later if the network is busy.
I am unable to send and receive MMS
• Check your phone memory availability as it might be full.
- Contact your service provider to check service availability and check MMS parameters.
- Verify the server center number or your MMS profile with your service provider.
• The server center may be swamped, try again later.
SIM card PIN locked
- Contact your service provider to obtain the PUK code (Personal Unblocking Key).
I am unable to download new files
• Make sure there is sufficient phone memory for your download.
- Check your subscription status with your service provider.
The phone cannot be detected by others via Bluetooth
• Make sure that Bluetooth is turned on and your phone is visible to other users.
- Make sure that the two phones are within Bluetooth's detection range.
How to make your battery last longer
• Make sure you follow the complete charge time (minimum 3.5 hours).
• After a partial charge, the battery level indicator may not be exact. Wait for at least 20 minutes after removing the charger to obtain an exact indication.
- Switch off the backlight upon request.
- Extend the email auto-check interval for as long as possible.
- Update news and weather information on manual demand, or increase their auto-check interval.
- Exit background-running applications if they are not being used for a long time.
• Deactivate Bluetooth, Wi-Fi, or GPS when not in use.
The phone will become warm following prolonged calls, game playing, internet surfing or running other complex applications.
- This heating is a normal consequence of the CPU handling excessive data. Ending above actions will make your phone return to normal temperatures.
alcatel
To download the complete user manual and learn more about your phone, visit alcatelonetouch.us.
- Table of Contents
- Your mobile....5
- Phone....15
- Contacts....17
- Messages ......21
- Email 24
- Camera....25
- Gallery 27
- Calendar.... 31
- Alarm ....33
- Your mobile......
- Keys and connectors
- Getting started
- Set-up
- Removing or installing battery
- Inserting or removing the Nano SIM card and microSD
- Charging battery
- Power on your phone
- Set up your phone for the first time
- Power off your phone
- Home screen
- Status bar
- Change home screen wallpaper
- Phone
- Making a call
- International call
- Emergency call
- Answer or decline a call
- Calling your voicemail (1)
- Contacts......
- Consult your Contacts
- Adding a contact
- Editing your contacts
- Deleting a contact
- Sharing your contacts
- Additional options
- Call
- Send message
- Settings
- Messages
- Write message
- Send a multimedia message
- How to type a message
- Settings
- To create and send emails
- Camera......
- Camera
- App Permission
- To take a picture
- Zoom in/out
- Options
- Video
- To shoot a video
- Gallery
- Gallery app photo options
- Individual photo view options
- Video......
- Music
- Browser
- Calendar......
- Multimode view
- To create new events
- Event reminder
- Alarm
- Alarm
- To set an alarm
- To adjust alarm settings
- Timer
- Stopwatch
- Calculator......
- FM Radio
- Settings......
- Network & connectivity
- Airplane mode
- Cellular & data
- Mobile data
- International data roaming
- Enhanced LTE
- Geolocation
- Wi-Fi
- Bluetooth
- Calling Settings
- DTMF tones
- Call waiting
- Caller ID
- Call forwarding
- Call barring
- Call duration
- Messaging Settings
- Auto retrieve
- WAP push
- Service center
- Internet Sharing
- USB tethering
- Emergency Alert
- Alert inbox
- Emergency alert sound
- Emergency alert vibrate
- Multi language support
- Presidential alert
- Extreme alert
- Severe alert
- AMBER alert
- Personalization
- Sound
- Volume
- Tones
- Other sounds
- Display
- Search
- Search engine
- Search suggestions
- Notices
- Show on lock screen
- Show after reboot
- Date & time
- Date
- Time
- Time zone
- Format
- Home Screen Clock
- Language
- Input methods
- Use T9
- Input Languages
- Answer mode
- Privacy & security
- Screen lock
- SIM Security
- Reset Password
- APP Permission
- Camera
- Do Not Track
- Browsing Privacy
- Storage
- USB storage
- End user storage
- Device
- Device information
- AT&T Software Update
- Tutorials
- Factory Reset
- Device Reset
- Network Settings Reset
- Downloads
- Battery
- Current Level
- Power Saving Mode
- Accessibility
- Invert color
- Backlight
- Large Text
- Captions
- Readout
- Mono audio
- Volume balance
- Keypad vibration
- TTY
- Hearing Aid Compatibility (HAC)
- Account manager
- KaiOS Account
- Anti-Theft
- Make Ring
- Remote Lock
- Remote Wipe
- Making the most out of your phone......
- Upgrade
- Over-the-air Upgrade
- Safety information......
- TRAFFIC SAFETY
- • CONDITIONS OF USE
- - PRIVACY
- BATTERY
- In European Union countries:
- In non-European Union jurisdictions:
- - CHARGERS
- • Federal Communications Commission (FCC) Declaration of Conformity
- FCC Caution:
- - Licenses
- 4044O Bluetooth Declaration ID D032964
- General information......
- Battery Recycling (USA & Canada):
- Protection against theft (1)
- Disclaimer
- Accessory
- Warranty
- Electronic Recycling (Within USA Only):
- My phone has not responded for several minutes
- My phone turns off by itself
- My phone cannot charge properly
- My phone cannot connect to a network or "No service" is displayed
- My phone cannot connect to the Internet
- Invalid SIM card
- Unable to make outgoing calls
- Unable to receive incoming calls
- The caller's name/number does not appear when a call is received
- I cannot find my contacts
- The sound quality of the calls is poor
- I am unable to use the features described in the manual
- When I select a number from my contacts, the number cannot be dialed
- I am unable to add a contact in my contacts
- My callers are unable to leave messages on my voicemail
- I cannot access my voicemail
- I am unable to send and receive MMS
- SIM card PIN locked
- I am unable to download new files
- The phone cannot be detected by others via Bluetooth
- How to make your battery last longer
- alcatel
Brand : AT&T
Model : Cingular Flip 2
Category : Mobile Phone