
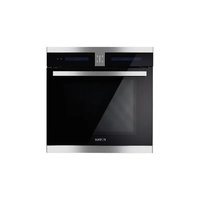
HZK72-H1 - Oven Fotile - Free user manual and instructions
Find the device manual for free HZK72-H1 Fotile in PDF.


User questions about HZK72-H1 Fotile
0 question about this device. Answer the ones you know or ask your own.
Ask a new question about this device
Download the instructions for your Oven in PDF format for free! Find your manual HZK72-H1 - Fotile and take your electronic device back in hand. On this page are published all the documents necessary for the use of your device. HZK72-H1 by Fotile.
USER MANUAL HZK72-H1 Fotile
Please keep the Operation
Instructions in a safe place for future reference.
Please read the Instructions carefully before use
Built-in
Combi Oven
HZK72-H1
Dear user, thank you for your choice of FOTILE products. Please read through the Instructions to be familiar with the correct operation norms and enjoy the cooking.
FOTILE's promise is to "Make Our Home Better". It is our duty to let you satisfy with FOTILE products. Please read the Operation Instructions carefully before using the products, and operate the products in compliance with the requirements in the Operation Instructions. The operation instructions herein are important to keep the product in a good working condition. And you will lose the free warranty right in case of any product failure due to your improper use, and any direct or indirect application for free repair will be rejected by FOTILE after-sales service center. Meanwhile, we suggest you contact FOTILE service center when the product need to be repaired whether it is within the warranty period or not, which is quite important for you and FOTILE. Good service is an indispensable part of the product. Our after-sales service center will provide you with the spare parts and professional technical so that high-quality and fast maintenance guarantee as well as easy and careful service is available for you.
CONTENTS
Contents 1
Safety precautions 2
Introduction to product structure 8
Installation Instruction 8
Guide to Quick Operation 11
Control Panel Diagram 11
Precautions Prior to Use 12
Operation Guide for Steaming-roasting built in combi oven ----15
Suggestions on use 21
Location diagram of grill 21
Common problems in cooking----21
Packing List 22
Main technical parameters 23
Suggestions on cleaning and maintenance 23
Common fault identification and troubleshooting 25
Customer Service 27
Safety precautions
In order to avoid harm and property damage to users and other personnel, the following distinctions and signs are made.
All are important matters related to safety, and you are required to strictly abide by them and use them correctly on the basis of fully understanding the contents.
- This appliance is not intended for use by persons (including children) with reduced physical, sensory or mental capabilities, or lack of experience and knowledge, unless they have been given supervision or instruction concerning use of the appliance by a person responsible for their safety.
- Children should be supervised to ensure that they do not play with the appliance.
Content distinguished based on the degree of harm and damage

Ignorance of this sign and conduct of incorrect operations will be extremely likely to cause personal damage, serious injury, or fire.

Ignorance of this sign and conduct of incorrect operations will be likely to cause personal damage, serious injury, or fire.

Ignorance of this sign and conduct of incorrect operations will be likely to cause personal injury or property damage.
Recommendations: Content we hope you to understand for safe and correct operation.
■ Caution and prohibition signs

Caulion scold
S.E.10

Caution electric
wacinc shock

Execute strictly
strichy

Grounding required

Prohibited

No open times

No touch

Do not operate with

Disassembly prohibited
Caution: The glass used in FOTILE products is tempered glass. However, the strengthening mechanism of the tempered glass determines the existence of a small probability of self-explosion. In case of self-explosion due to any cause rather than improper use, FOTILE promises to replace the part free of charge.
★Special Please operate the product in strict accordance with the Instructions. FOTILE will not be liable for any property loss or personal injury caused by improper use of this product. If the provisions of the Instructions are inconsistent with the mandatory provisions of national laws, the legal provisions shall prevail.
Danger

Please don't touch the built-in combi oven when your hands and feet are humid, or you are barefooled.

Do not place any heavy object on the open door of the built in combi oven.

Do not use any loose or poorly connected power socket. Otherwise, electric shock, short circuit or fire may occur.

Do not use any multi-purpose socket with multiple plugs.
Danger
Children and people with limited mobility are not allowed to use the product. Especially, keep the product out of reach of children. Otherwise, it may cause scalds, electric shocks and other accidental injuries.

The built in combi oven is only applicable to household cooking and cooking in similar working and living scenarios such as baking, roasting, barbecuing, thawing and food drying. No other purpose is supported. The product used for any other purpose may cause a hazard. The Company will not be liable for any loss caused by incorrect use or improper operation.
Do not clean the glass and handle of the built in combi oven with rough abrasive cleaner or a sharp cleaning tool, as such cleaner or tool will damage the glass surface, thus causing the glass to break.

Do not use the built-in combi oven to heat covered canned food. Otherwise, the sharp pressure rise can cause an explosion, leading to injury or damage. (For example, when roasting chestnuts, cut the shell with a knife)
Do not place any aluminum foil, ovenware or tableware directly on the bottom of the liner. Otherwise, the heat will build up and thus damage the built in combi oven.

To minimize the risk of injury to children, they shall not be allowed to use the built in combi oven as a toy, nor shall they play near the built in combi oven.
Do not add cold water to high-temperature food under roasting because the steam generated may cause severe scalds.

Do not immerse the power plug or wire in water to avoid the danger of electric shock in next use.
A steam cleaner is not to be used. Prohibited

Power must be cut off before installation
Grasp the end of the plug when removing the plug from the socket. Do not remove the plug by grasping the power cable with your hand. Otherwise, electric shock, short circuit, fire and other hazards may occur.

In case of abnormalities, press the power button to turn off the built in combi oven, and remove the power plug or cut off the main power, and immediately call FOTILE service hotline. Continuous operation under abnormal conditions is prone to electric shock, fire and other hazards
In case of any fault of the built in combi oven, please cut off the power immediately and shut down the built in combi oven, and follow the "Common fault identification and troubleshooting".
| Danger | ||
| Non-professionals shall notdismantle the machine to repair orreplace parts without authorization. | Keep the whole machine away fromheat sources, gas, alcohol and otherinflammable products. | |
| Upon completion of work, pleaseopen the door of the built in combioven after 30~60 seconds. Steamsprays out when the door is opened.You shall stand at a little distancefrom the built in combi oven door toavoid burning by the steam. | After work, the bottom of the liner isstill hot. Do not clean the linerimmediately to avoid scalds and waitthe liner to cool down before cleaningit. | |
| During the cooking process in order to ensure better cooking results, the door maybe slightly opened multiple times to exhaust excess steam (which may beaccompanied by sound), which is a normal phenomenon. Please feel free to use.Besidos, due to the relatively high temperature of the steam generated, please keepa certain distance from the door exhaust port to prevent scalds. | ||
| Warning | |
| During use the appliance becomes hot. Care should be taken to avoid touching heating elements inside the oven. | Accessible parts may become hot during use. Young children should be kept away. |
| Do not use harsh abrasive cleaners or sharp metal scrapers to clean the oven door glass, since they can scratch the surface, which may result in shattering of the glass. | the oven must be switched off before removing the guard and that, after cleaning, the guard must be replaced in accordance with the instructions. |
| Ensure that the appliance is switched off before replacing the lamp to avoid the possibility of electric shock. | the appliance must not be installed behind a decorative door in order to avoid overheating. |
| If the supply cord is damaged, it must be replaced by the manufacturer, its service agent or similarly qualified persons in order to avoid a hazard. | When cooking with oil or grease, make sure the built in combi oven is attended as overheating may cause a fire. |
| Warning | ||
| If the place where the built in combi oven is located is vulnerable to rats or insects, please pay special attention to keep the built in combi oven and its surrounding environment clean. For the damage of the built in combi oven caused by rats or insects, the Company does not undertake any warranty responsibility. | Wear heat-insulation gloves when putting food into the built in combi oven, turning over or taking out the food from the built in combi oven and adjusting the grill or ovenware. Avoid scalds by the heating elements or liner. | |
| Any plastic container to be used for cooking shall be provided with the statement by its manufacturer that the container is suitable for an oven. Any plastic container other than the above will melt at a high temperature and may damage the built in combi oven or cause a fire. | If your recipe ingredients contain alcohol, high temperatures will cause the alcohol to evaporate, and the alcohol may even burn when coming into contact with the heating element. Therefore, to avoid such risk, the alcohol shall be removed before the food is put into the built in combi oven. | |
| Cut off the power before cleaning the built in combi oven with mild cleaning agent. Meanwhile, use a soft cloth to clean the built in combi oven to prevent scratching its surface. | The built in combi oven generates heat during working. Therefore, avoid contacting the heating element and the door glass of the built in combi oven. Especially, keep the built in combi oven away from children. | |
| Do not allow children to play with plastic films and packing boxes, which may cause suffocation accidents. Therefore, keep the packaging materials away from children, because the packaging materials are not toys. | The socket must be equipped with a reliable grounding wire for the sake of safety. Do not connect the grounding wire to any gas pipe, water pipe, lightning rod or telephone wire. Poor grounding may cause electric shock or other accidents. | |
| It is not allowed to connect this product with a long-range plug board because too long cable may cause overheating of the cable and thus lead to fire or power leakage when the built in combi oven is working. | You'd better wear heat-insulation gloves when carrying hot utensils in order to enhance protection. Avoid wet gloves. Otherwise, heat will quickly pass through the gloves, thus resulting in scalds. | |
| Accessible parts may emit heat during use and shall be kept away from children. | To avoid possible electric shock, make sure the built in combi oven is powered off before replacing the lamp. | |
| Warning | ||
| The built in combi oven will not cool down immediately after the door is opened during work. Please pay attention to safety to avoid scalds. | No touchDo not touch the upper heating tube inside the built in combi oven until the built in combi oven completely cools down. Because the heating tube is the heat source of the built in combi oven. | |
| The built in combi oven shall be provided with an independent 16A socket which shall be in good contact and shall not be shared with any other electrical appliance. | Disassembly prohibitedDo not open the shell of this product without authorization. It is dangerous to touch the connecting wires, electrical parts or structural parts, which may cause an electric shock or mechanical injury. | |
| Please use pure water for cooking to avoid damage to the built in combi oven due to scale accumulation. | Do not place any cooking utensils on the bottom of the built in combi oven. | |
| After installing the built in combi oven, if the power plug cannot be touched, it shall be realized by the fixed wiring switch meeting wiring rules, in order to cut off the power through such switches during repair or in an emergency. | There is steam overflowing through the air outlet when the built in combi oven is working. Even after the built in combi oven stops, the inside and outside of the door are warm to some extent. Thus, your children shall keep a safe distance with the built in combi oven. | |
| When observing or taking food, slightly open the door to allow a large amount of steam to overflow before fully opening the door to protect your hands or body from scalds due to direct contact with the steam. | Do not clean the built in combi oven handle with a rough scrub or a sharp metal scraper, which will scratch the surface of the handle. | |
| Caution | ||
| This product is intended for household cooking only and is dangerous if used for any other purpose. The Company will not be liable for any personal injury or property loss caused by failing to use the built in combi oven according to this Instruction. | ||
| To maintain hygiene, pour the excess water out of the water tank after each use to avoid condensation buildup. | ||
Caution: Ignorance of this sign and conduct of incorrect operation will be likely to cause personal damage, serious injury, or fire. The Company will not be liable for the consequences caused by failing to obey the Safety Precautions.
Recommendations
Before the first use of the built in combi oven, please read the instructions on safe use, operation and maintenance in this Operation Instruction thus to avoid accidents and damage.
■ Clean the built-in combi oven before the first use. Take out the water tank and flush the inside of the tank with hot water instead of any cleaning fluid or detergent. Take out the accessories to the built-in combi oven out for washing, including the grill in the liner (Refer to [Maintenance and Cleaning]). It is recommended to clean the inner wall of the liner of the Built-in-combi oven with cleaning liquid diluted by hot water.
■ Dry the condensate tank with a soft cloth after each use.
■ Open the door of the Built-in-combi oven to let the moisture in the built in combi oven escape until the built in combi oven is dry.
The Built-in-combi oven shall be thoroughly cleaned if it intends to remain idle for a long time in order to avoid odor. See the [Maintenance and Cleaning].
■ Ensure that the voltage and frequency of the household power supply are consistent with those of the Built-in-combi oven before installation.
■ Please ensure that this product is correctly and reliably installed in the cupboard before being put into operation.
■ Clean and dry the built in combi oven after each use as the condensed concentrate may corrode the built in combi oven over a long period of time.
The Built-in-combi oven must be installed at a safe and appropriate height which is convenient for you to open and close the door and take out food during cooking. Otherwise, the overflowed steam may scald you. In addition, the appropriate installation height can reduce the risk of scalding your children when they put their hands on the door.
■ When opening the door, pay attention to the hinges, edges and corners of the door. Do not touch these locations to avoid mechanical trauma.
When cooking food, be careful to operate the built in combi oven and not to tilt the food container so that liquid or food may flow out.
■ Remove the power plug before discarding or moving your Built-in-combi oven. The Built-in-combi oven shall be discarded in strict compliance with the local laws and regulations.
Installation and Repair Safety
■ Make sure the installation, repair and maintenance of your Built-in-combi oven are completed by professional service personnel from FOTILE. Do not disassemble the built in combi oven without authorization. Before the first use of the built in combi oven, please read the instructions on safe use, operation and maintenance in this Operation Instruction thus to avoid accidents and damage.
■ Ensure that the voltage and frequency of the household power supply are consistent with those of the Built-in-combi oven before installation.
■ Ensure that the built-in combi oven is installed safety and reliably and well grounded. To guarantee the power safety of the Built-in-combi oven, ensure correct and reliable grounding of the built-in combi oven and correct and reliable grounding and connection of the household power grid, which is a basic safety requirement. The manufacturer of this product will not be liable for any damage caused by the problem of the household power grid.
Introduction to product structure

① Control panel
② Door gasket
③ Display screen
④ Temperature probe
⑤ Air heater apron
⑥ Water tank
⑦ Door switch
⑧ Built In Combi Oven mounting column
⑨ Hinge
⑩ Liner heating plate
⑪ Handle
12 Door
Installation Instructions
■ An all pole disconnect switch must be provided during installation.
The Built-in-combi oven shall be installed steadily at a convenient and secure place for operation and maintenance without tilt.
It is strictly prohibited to install the Built-in-combi oven and power socket in places that may be damp or easily wet with water.
For handling and placing, the Built-in-combi oven shall be lifted from the handle hole or the bottom and handled with care, instead of moving it by dragging the door or handle.
This Built-in-combi oven is embedded in the cupboard, so the bottom of the cupboard hole must be able to bear a weight of more than 60kg.
■ After installing the Built-in-combi oven, if the power plug cannot be touched, it shall be realized by the fixed wiring switch meeting wiring rules, in order to cut off the power through such switches during repair or in an emergency.
The built in combi oven must be installed by the installation personnel designated by the Company, and the Company will not be responsible for any loss caused by improper installation of unqualified installation personnel.
Note: 1. In order to maintain ventilation, please keep the rear space larger than 45mm.
-
If there is a high-temperature electrical appliance nearby, ensure that the built in combi oven is installed at a place over 80mm away from such electrical appliance.
-
The cupboard in which the built-in combi oven is installed must be made of materials (wood, adhesive) that can withstand a temperature of more than 120°C.
-
After installation, left & right sides and upper side of the Built-in-combi oven panel shall keep a gap of more than 3mm with the surrounding wall, cupboard and appliance, etc., and its lower side shall keep a gap of more than 10mm with the surrounding wall, cupboard and appliance, etc.
-
The Built-in-combi oven shall undergo a full aging test before delivery, so there will be a small number of residual water in the internal pipeline, and it is normal to have a small number of water droplets in the liner and water tank.
-
If the Built-in-combi oven is installed below the hob, the gas pipe of the hob must be bellow and effectively fixed to ensure that it will not touch this product.
-
If the Built-in-combi oven is installed below the hob, make sure no water or debris drops (leaks) into the cupboard during use.
-
If the Built-in-combi oven is installed below the hob, its top cover shall not affect the adjustment function of underside intake hob damper switch, and the spacing between the base plate of hob and the top cover of Built-in-combi oven should be ≥ 8cm.
-
If the Built-in-combi oven is installed below the hob, the cupboard ventilation conditions refer to the hob installation standards and the Built-in-combi oven shall not block the air vent.
-
If the preceding requirements are not met, remind the user to improve the installation environment; otherwise, property loss or personal injury may occur.
-
The Built-in-combi oven is front exhaust type, so if it is installed below the hob, the user will feel a certain amount of heat or hot steam. Meanwhile, there may be condensate on the hob glass, which is considered normal.
Remove the outer packaging and film bag of the Built-in-combi oven and then place the Built-in-combi oven close to the mounting hole. Connect to the power socket (de-energized), hold the Built-in-combi oven bottom with one hand while putting the other hand at its handle, and then slowly put it in the cupboard hole. Loosen one hand and gently push the Built-in-combi oven to the end. Put the front end of Built-in-combi oven on the cupboard base plate. Use the wood screws in the accessory bag to fix the Built-in-combi oven to the cupboard (see screw fixing sketch).
■ Schematic diagram of cupboard installation
Flush installation

Schematic diagram of screwing

Note: The minimum spacing between each part of appliance and its surrounding structure is 10mm.
Guide to Quick Operation
I. Control Panel Diagram
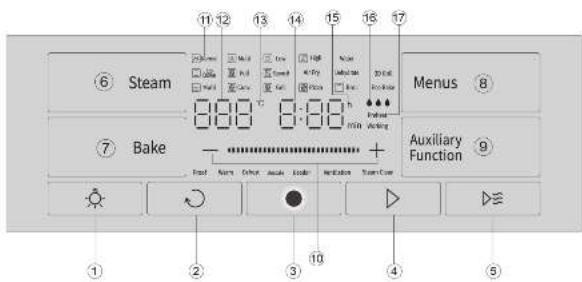
■ Introduction to control panel buttons and display interface
Operation buttons
① "Lighting" button: Touch the button to turn on or off the LED lamp.
② "Cancel/return" button: In the process of setup, touch the button to return to the previous state; In the process of work, touch the button to return to the mode selection interface and stop the work.
③ "On/off" button: Touch the button to power on or off.
④ "OK/start" button: Touch this button to confirm the current operation and start related work.
⑤ "Quick preheating" key: Touch this button to activate quick preheating.
⑧ "Steam function" button: Touch this button to switch the steam mode. There are four optional modes for steam function: Steam, Multi-layer Steam, Low Steam, and High Steam.
⑦ "Bake function" button: Touch this button to switch the roast mode. There are 12 optional modes for roast function: Top Bollom Heating, Full Convection, Stearn Bake, etc.
⑧ "Menus" button: Touch this button for smart menu selection.
⑨ "Auxiliary function" button: Touch this button to switch between auxiliary modes, Auxiliary functions include fermentation, Proof, KeepWarm, Defrost, Descale, Deodor, and Ventilation
⑩ "Select" button: Cooking parameter selection button. Short press a single button to switch parameters, long press to quickly switch parameters.
II. Precautions Prior to Use
Prior to the first use, take out all accessories from the Built-in-combi oven, remove the packing bags from the ovenware and grill, take out the Instructions, remove the protective film from the handle and clean all the accessories.
Heat the Built-in-combi oven when it is empty. Before heating, you'd better wipe the liner of the Built-in-combi oven with a wet cloth, thus to remove the dust or residual packaging left in the liner during storage and unpacking. Set the Built-in-combi oven to Full convection mode and the temperature to 220°C. Heat the Built-in-combi oven 1 hour when it is empty, and then open the door of the Built-in-combi oven and guarantee ventilation of the room as odor is generated when the Built-in-combi oven is used for the first time. The odor comes from the volatile substances used to protect the Built-in-combi oven during storage and installation. In the process of the above operations, close the doors to other rooms to prevent the odor from entering the rooms.
■ Filling the water tank with water
When using the steam function of the Built-in-combi oven for the first time or when water needs to be filled to the water tank, please press the water tank first, and after the water tank pops up, fill it with fresh drinking water (Purified water is recommended) until it reaches the "maximum water level" mark. Then, push the water tank into the hook groove adequately.


Warm tips: We recommend you turn on the range hood to the Weak button when the Built-in-combi oven is in use. Before cooking greasy food, you'd better wrap it with aluminum foil.
■ When cooking food on the grill, please put the ovenware on the first layer of the Built-in-combi oven liner.
■ List of product functions
| Function | Mode | Default temperature (°C) | Temperature range (°C) | Default time (min) | Time range (min) | Suggested uses |
| Steam | Normal | 100 | 91-100 | 20 | 1-300 | Suitable for cooking food such as fish and pastry |
| Multi | 100 | 85-100 | 20 | 1-300 | Suitable for steaming two layers of food simultaneously | |
| Low | 90 | 30-90 | 20 | 1-300 | Suitable for cooking food such as steamed eggs with clams and asparagus | |
| High | 110 | 110/120 | 20 | 1-300 | Suitable for cooking hard-to-cook food and food with more soup | |
| BAKE | Up Down | 180 | 60-250 | 20 | 1-300 | Suitable for cooking food such as cookies, bread rolls and cakes |
| Full | 160 | 60-250 | 20 | 1-300 | Suitable for baking food such as egg tarts and meat | |
| Steam.B | 180 | 60-230 | 20 | 1-300 | Suitable for cooking some European bread, meat, and other dishes | |
| Air Fry | 200 | 180-230 | 15 | 1-300 | Suitable for baking food such as French fries and chicken wings | |
| Dohydrate | 80 | 60-120 | 120 | 1-599 | Suitable for baking dried fruits, dried meat, dissolved beans and other products | |
| Multi | 160 | 60-230 | 20 | 1-300 | Suitable for simultaneously baking two layers of the same food, with recommended layers of 2 or 4 | |
| Conv | 160 | 60-230 | 20 | 1-300 | Suitable for baking food such as preserved fruits and meats | |
| Grill | 160 | 60-230 | 20 | 1-300 | Suitable for baking food such as chicken wings and grilled fish | |
| Pizza | 160 | 60-230 | 20 | 1-300 | Suitable for roasting food such as pizza and tart and pie | |
| Broll | 160 | 60-230 | 20 | 1-300 | Suitable for cooking food such as sliced toast, bun slice, pizza, and pancake | |
| Eco Bake | 160 | 60-230 | 20 | 1-300 | Suitable for determining energy consumption and equivalent level in circulating air mode | |
| 3D Grill | 200 | 60-230 | 20 | 1-300 | Suitable for grilled poultry, whole fish, and larger meat pieces | |
| Menus | / | / | / | / | / | Supported by recipes, cooking mode specified, quick cooking |
| Auxiliary function | Proof | 35 | 28-45 | 40 | 1-599 | Food fermentation |
| Warm | 80 | 50-80 | 30 | 1-300 | Food heat preservation | |
| Defrost | 50 | 40-50 | 30 | 1-300 | Food thawing | |
| Descalé | 50 | / | 35 | / | Cavity descaling | |
| Doodor | / | / | 20 | / | Cavity deodorization | |
| Ventilation | 150 | / | 15 | / | Drying cavity | |
| Steam Clean | 100 | / | 10 | / | Cavity cleaning |
Note: After the set temperature exceeds 230°C, the time can be set up to 40min at most.
■ Menus
The "Smart menu" mode is available to the Built-in-combi oven, which aims at quickly starting the cooking of some dishes. Generally, there is no need to manually modify the cooking conditions. However, the smart menu time for multi-stage cooking cannot be adjusted, while time of other dishes can be adjusted according to the actual cooking conditions.
The corresponding relationship between dishes and codes displayed on the screen under the "Menus" mode is shown below. Among them, the dishes with symbols shall be preheated, which means that the dishes shall not be put into the cavity to heat until the cavity temperature reaches the set one after the "Menus" function is started.
| Category | Code | Dish name | Category | Code | Dish name | Category | Code | Dish name |
| Steam Cooking | P01 | Steamed Rice | Baking | * P20 | New York Cheesecake | Combi Steam & Bake | * P39 | Braised Duck |
| P02 | Steamed Buns | P21 | Tarts | Air fry | * P40 | Fries | ||
| P03 | Steamed Bread | P22 | Toast | * P41 | Chicken Nuggets | |||
| P04 | Steamed Dumpings | * P23 | Pastry | * P42 | Fried Chicken Chop | |||
| P05 | Steamed Egg | * P24 | Pizza | * P43 | Fried Chicken Wings | |||
| P06 | Steamed Branzino | P25 | Caramel Milk Pudding | * P44 | Fried Shrimp | |||
| P07 | Steamed Cod | * P26 | Mooncake | Dehydrate | * P45 | Yogurt | ||
| P08 | Steamed Crab | P27 | Grilled Chicken Wings | P46 | Lemons | |||
| P09 | Steamed Scallops | P28 | Baked Prawn | P47 | Beef Jerky | |||
| P10 | Steamed Ribs | Grill | P29 | Lamb Skewer | P48 | Jujuba/Plum/Raisin | ||
| P11 | Stewed Chicken Soup | P30 | Chicken Skewer | P49 | Ginger Slices | |||
| P12 | Steamed Corn | Combi Steam& Bake | * P31 | Baked Potato | Steam & Bake Cooking Together | P50 | Toast & Steamed Buns | |
| P13 | Steamed Vegetable Soup | P32 | Grilled Lamb Chops | P51 | Roast Meat & Steamed Fish Head | |||
| P14 | Steamed Okra | P33 | Roasted Whole Chicken | P52 | Baked Muffin & Steamed Potatoes | |||
| Baking | * P15 | Cookies | P34 | Grilled Drumstick | Multi-layer baking | P53 | Cookies (Multi-layer) | |
| P16 | Cranberry Shortbread Cookies | P35 | Roasted Beef Trotters | P54 | Brownic (Multi-layer) | |||
| * P17 | Cupcake | * P36 | Grilled Steak | P55 | Chicken wings (Multi-layer) | |||
| P18 | Almond Cookies | * P37 | Sour Dough | / | / | |||
| P19 | Chiffon Cake | * P38 | Baguette | / | / |
Note: 1. The dishes marked with * after the code are those that require preheating.
- Multi-layer baking is suitable for simultaneously baking two layers of the same food. It is recommended to use an ovenware and grill, with 2 or 4 layers.
3.P50-52 is for simultaneous steaming and roasting. The ovenware for roasted dish is placed on the fifth layer, while the grill for steamed dish is placed on the second layer.
III. Operation Guide for Built-in-combi oven
Power on
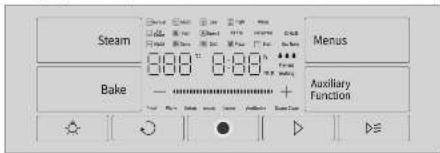
Power on. Upon power on, all the icons and buttons will blink and buzz.
● Traditional cooking
Ordinary steam mode:
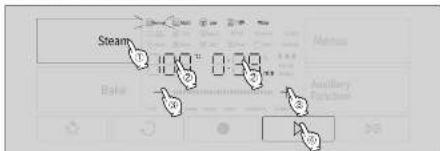
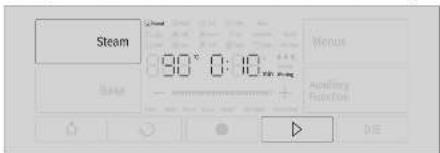
- Turn on and select the mode, sel the cooking temperature and time. After power-on by touching the button area, click the "steam function" button to select the desired steam mode, touch the temperature and time digit area, then touch the "-" and "+" buttons, select the desired temperature and time, and click the ▷ button to confirm.
- Preheating. The Built-in-combi oven starts to preheat and displays the current real-time temperature.
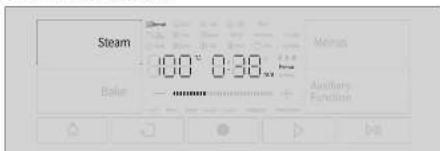
Note: The dishes that do not require preheating can be placed into the built in combi oven directly.
- Working. When the set temperature is reached, the built in combi oven starts cooking and the countdown starts. At this time, the time colon flashes.

- Cooking finished. The countdown reaches zero, the work is completed, with ten buzzers given.

Steam Bake mode:
- Turn on and select the mode, set the cooking temperature and time. After power-on by touching the button area, click the "Bake function" button to select the Steam Bake roast, touch the temperature and time digit area, then touch the "-" and "+" buttons, select the desired temperature and time, and click the ▷ button to confirm.

- Select the gear. Press the water droplet icon to select the desired humidification gear, and click the ▷ button to confirm. The number of water droplet icons in the humidification gear corresponds to low humidity, medium humidity, and high humidity, respectively.
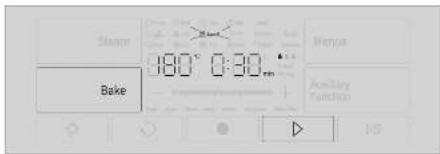
- Preheating. The Built in combi oven starts to preheat and displays the current temperature.

- Working. When the set temperature is reached, the built in combi oven starts cooking and the countdown starts.

- Cooking finished. The countdown reaches zero, the work is completed, with ten buzzers given.

Note: After the cooking is done, the built in combi oven is auto powered-off and turns black without operation within 2min.
- Modify and set parameters
- During prehealing or working, touch the temperature and time digit area to enter the parameter modification interface, and then continue pressing "-" or "+" button to modify temperature or time parameters.

- Press the ▷ button to confirm the modification and continue working.
- Cancel cooking
During preheating or working, if you want to cancel the current cooking, click the ⬇ button to enter the following mode selection interface:

- Menus
- Choose Preset Menus. On the power-on interface, click the Menus button, then click on the number display area, and press the "-" or "+" button to select the dish code and time. After selecting, click the ▷ button to confirm.
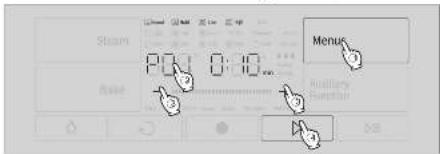
2. Preheating.
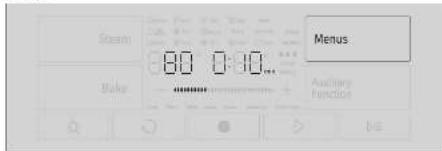
- Working. Begin countdown.

- Cooking finished. The countdown reaches zero, the work is completed, with ten buzzers given.

Auxiliary function
- Auxiliary function selection (for example, descaling). On the power-on interface, click the auxiliary button to select the desired auxiliary function.
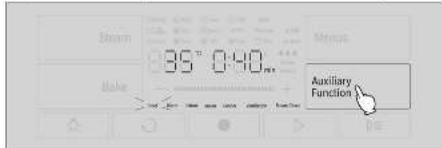
- Select descaling and click the ▷ button to confirm.
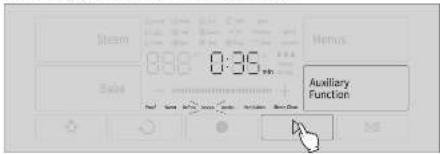
- Working. The countdown starts.

- Descaling is completed. After the work is completed, the countdown reaches zero, with ten buzzers given.

Suggestions on use
■ Location diagram of grill
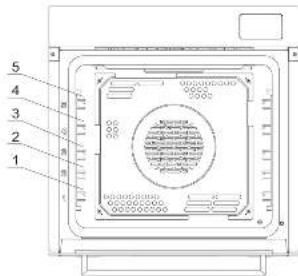
For cooking, 3 layers are recommended. It is recommended to place an oil drip pan on the first layer.
■ Common problems in cooking
- The preheating time exceeds 20 minutes. Firstly, check whether the door suffers obvious air leakage, the door seal ring has been well installed and then dirt exists on the temperature sensor in the built in combi oven body.
- The cooking time is too long. Firstly, try not to open the door as possible during cooking. Then, check whether the cooking temperature is set too low, and finally check whether the door is closed tightly or suffers air leakage.
- There is a lot of oil fume during cooking. Check whether the built in combi oven body is timely cleaned and the dirt in it is removed thoroughly after each cooking.
- There is obvious color difference during cooking. Confirm whether an appropriate cooking mode is chosen. Lower the setting temperature appropriately. Put in the dish after preheating.
- The door is not closed off. Make sure the door is closed off when the built in combi oven is working. If the door is not closed off or is not closed in place, the word "preheating" or "working" will flash and there will be a beeping prompt.
- The cavity is ponded. During cooking, there will be a lot of steam, some of which condenses to the cavity wall, making the cavity ponded. Please clean up the water immediately after use.
- There is a peculiar smell in the cavity. Residual water and grease in the cavity are not cleaned timely after many times of cooking. Please clean up the cavity timely to keep it dry and tidy.
-
Water drops from the cavity underside. Please check whether the condensate tank is full of ponded water. Overflowing ponded water from the condensate tank will cause water dropping at the cavity underside. Please clean up the ponded water in the condensate tank timely after each cooking.
9 There is a lot of oil fume/steam when opening the door. In order to ensure the cooking effect, the cavity shall have good sealing performance. Thus, some of oil fume and steam generated during cooking will reside in the cavity. When opening the door, please open the door slightly for 10^-15^ to release oil fume and steam in the cavity in advance. Then, the door is opened fully. -
Due to the difference in cooking environment (e.g. voltage, humidity and room temperature), the cooking effect will be affected. If this problem occurs, please adjust the cooking temperature and time at your own discretion according to the cooking effect.
- When enabling the Bake function, please make sure that the cavity is dry and free from ponded water, especially when baking food such as cake.
- Descaling. Scale is easily caused during the steam generation. When the scale deposits on the surface of liner heating plate, please use scale remover timely to remove the scale and follow the instructions on the water tank to remove it, so as not to affect the cooking effect.
- Cavity drying. After cavity drying, it is necessary to open the Built-in-combi oven door in order to better disperse the residual steam inside the cavity.
- There is more condensed water on the plate after cooking. The dishes can be covered with plastic wrap before cooking.
Packing List
Please check the following products and accessories item by item when unpacking. In case of missing or damage:
■ Please contact the distributor if the responsibility lies with the Company or the distributor.
■ Please contact FOTILE service hotline if the responsibility lies with the user itself.
| Complete machine | 1set |
| Wood screw | 2pcs |
| Operation Instruction | 1copy |
| Steaming & baking grill | 1piece |
| Warranty card | 1sheet |
| Baking rack | 1piece |
Main Technical Parameters
| Model | HZK72-H1 | ||
| Rated voltage | 220~240V | Heating temperature range | 30^ C - 250^ C^( 1) |
| Rated frequency | 50-60Hz | Capacity | 72 L^( 3) |
| Rated power | 3300 W^( 7) | Net weight | 39kg |
(1) As this built in combi oven has no refrigeration function, the cavity temperature will not be lower than the indoor temperature.
(2) In fully open mode, the cavity center is heated from normal temperature (20±5°C) to 220±4°C, namely average value of measured input power.
(3) The volume refers to the volume calculated in accordance with IEC 60350-1 by measuring effective length, effective width and effective height.
Suggestions on Cleaning and Maintenance
■ General precautions
Caution:
Clean the used inner cavity, door, handle, control panel, condensate tank and door seal ring after each use. Cut off the power before cleaning to avoid electric shock. Cleaning can only be carried out after the inner cavity cools, and ensure that the inner cavity is completely dry before closing the door. This can avoid oil or other dirt from sticking to the cavity surface, which is not easily cleaned and sometimes even leads to surface discoloration. The deposition of oil will also make the door seal ring brittle and easy to break.
Caution:
All surfaces shall be cleaned with a soft sponge, a soft cloth dipped in water and a small amount of detergent, and then dried with a soft cloth. Do not use a steam cleaner to clean this built in combi oven. Pressurized steam may cause permanent damage to its surface and fittings, for which the Company is not responsible.
■ Door seal ring
Clean and dry the door seal ring of this built in combi oven after each use. Please use clean sponge and warm water. The door seal ring of this built in combi oven may be perforated or cracked over time, and if this happens, please inform FOTILE service personnel for replacement.
■ Cooking and roasting containers
Wash and dry the cooking and roasting containers after each use. When using the steam function, if using plastic cooking containers, please ensure that the containers can withstand 120°C high temperature and steam. When using the roast function, please use a special baking container to hold food to ensure that the container can withstand high temperatures. Please place the cooking container on the accompanying grill. The top edge of the container shall be at least 3cm away from the top of the cooking cavity to allow enough steam to enter the container.
■ Inner cavity of built in combi oven
After each use, please clean the inner cavity of built in combi oven, wipe the condensate on the inner cavity wall with a cleaning sponge or soft cloth. Most cooking residues can be removed by hot water with a cloth and a mild detergent. In the area with poor water quality, on the inner wall of built in combi oven, there may be a layer of white sediment, which can be wiped with a wet cloth and a small amount of vinegar, and then cleaned with clean water. Meanwhile, the condensate tank and water tank hook groove of built in combi oven shall be dried.
■ About water tank
- The maximum water level scale is printed at the top outside of the water tank. When filling the water tank, please try to inject water near the maximum water level scale, so as to maximize the continuous cooking time of one injection. For water filling, do not exceed the maximum water level scale to avoid water in the water tank from overflowing during inserting or removing the water tank.
- The built in combi oven can only work after pushing the filled water tank into the water tank hook groove.
- The icon "please fill water" on the display screen flashes and there is a beep prompt, which means the water in the water tank is below the minimum water level, and the steaming-roasting built in combi oven stops working. At this time, please fill water timely, and then push the filled water tank into the water tank hook groove in place.
- To ensure the lifespan of water systems such as water tank and pump, please choose room temperature pure water as cooking water and do not use pure water at high temperatures.
■ About cavity drying
For drying, in order to keep the cavity dry, enable the cavity drying function after each cooking to evaporate the water in the cavity completely. Alternatively, use a rag to clean the cavity.
■ Liner cleaning and maintenance
- Mix 20g of edible soda with 150g of warm water, and wipe the oil stains on the liner with a rag dipped in such soda water.
- Close off the built in combi oven door, choose "steam cleaning" mode (make sure the water tank has been filled with water), and start working.
- Steam can soften the oil on the liner. After cooking, wipe the liner with a rag dipped in such soda water, and then a wet rag. At this time, the oil is basically removed.
- Finally, choose "steam cleaning" mode and wipe the liner again.
General stain
After each use, clean it as soon as possible with a rag, a soft sponge or a soft nylon brush, and then the mixed solution of warm water and cleaning solution. The longer the stain remains, the more difficult it is to clean.
Stubborn stain
For removing stubborn stains such as those caused by roasting, it is possible to soak the stain and then remove it with a wet sponge. If necessary, use a scraper suitable for glass surfaces to scrape the stain off. After cleaning, rinse thoroughly with water.
★ Important notice
In order to keep the best cooking effect, it is recommended to clean the built in combi oven body and accessories after each use.
If they are not cleaned timely, oil stain accumulated will make it difficult to clean the built in combi oven body and accessories, and affect your operating environment and experience feeling.

It is best to clean up dirt (e.g. spilled juice and cake batter) when the built in combi oven body or ovenware is still warm. During cleaning, please ensure that the built in combi oven body is not hot, so as to avoid scalding.
The spilled juice and other acidic liquid may make the liner yellow. Thus, please clean it in time, so as to avoid irreparable yellowing of the liner.
Common Fault Identification and Troubleshooting
For your safety, please press the power button to shut down the combi oven firstly, and then proceed with the corresponding troubleshooting.
| Fault description | Cause analysis | Solutions |
| After inserting the power cable plug, the oven still cannot work. | Cause1: the power socket has no electricity. | Contact a qualified electrician for inspection and repair |
| Cause2: The power cable plug is loose | Reinsert the power cable plug | |
| Cause3: The cable between the control panel and power pan is loose | Contact FOTILE service hotline for repair. | |
| The button is insensitive | Cause1: There are slains on the control panel | Clean the control panel |
| Cause2: The mounting box is aged and damaged | Contact FOTILE service hotline for repair. | |
| Cause3: The control panel is faulty | ||
| The fan is still working after cooking | Cause1: The liner temperature is more than 70°C after using the roast function. It occurs within 20 minutes after using the steam function. | Open the steaming-roasting built in combi oven door to accelerate heat dissipation. The fan stops working after the liner temperature is less than 70°C after using the roast function. The fan stops working after 20 minutes after using the steam function. |
| Cause2: The power panel or temperature probe malfunctions | Contact FOTILE service hotline for repair. | |
| Grill "rusting"/ovenware "porcelain-off" | Cause1: The food is not cleaned thoroughly, causing yellowing | Soak the grill/overware in hot water and clean it with a cleaning cloth. |
| Cause2: Grill "rusting"/ovenware "porcelain-off" | Contact FOTILE service hotline for repair. | |
| Overware/grill stuck | Cause1: The placement method is improper | When the grill contacts the liner stop, lift it up slightly and insert it into the grill. |
| Cause2: The slain on the inner wall or ovenware is not cleaned | Clean the liner and ovenware | |
| Cause3: The ovenware is not placed horizontally | Place the ovenware flat and place it in place | |
| Water leakage of built in combi oven | Cause1: Water overflowing from the condensate tank | Clean it with a cloth timely |
| Cause2: The door is not lightly closed off | Check whether there are foreign matters and dirt at the door, built in combi oven mouth and seal ring. | |
| Cause3: Others | Contact FOTILE service hotline for repair. | |
| The built in combi oven can produce steam, but food is not cooked well | Cause1: Too short cooking time | Extend the cooking time. |
| Cause2: Excessive volume of food | Cut the food into small pieces or divide the surface. | |
| Cause3: Too many layers for food | Try to place the steamed food in containers on layers 1 and 2 of built in combi oven body to keep it close to the liner heating plate. | |
| Cause4: An inappropriate cooking ware is chosen | Pay attention to choosing a porous and low-walled cooking/steaming ware. | |
| Cause5: Others | Contact FOTILE service hotline for repair. | |
| Display E2 | The temperature sensor for liner heating plate is short-circuited or disconnected | Contact FOTILE service hotline for repair. |
| Display E3 | Communication fault | Contact FOTILE service hotline for repair. |
| Display E6 | Inlet fault | Contact FOTILE service hotline for repair. |
| Display F3 | The temperature sensor for oven body is short-circuited or disconnected | Contact FOTILE service hotline for repair. |
| Display F4 | The temperature sensor for oven body is short-circuited | Contact FOTILE service hotline for repair. |
| Display E0 | The inlet pump is short-circuited or disconnected | Contact FOTILE service hotline for repair. |
| Add water | Too low water level in the water tank | Please fill the water tank with appropriate amount of water |
| Water level detection fault | Contact FOTILE service hotline for repair. |
Warning: After the above simple troubleshooting, if the steaming-roasting built in combi oven still cannot work normally, please contact FOTILE service hotline.
In order to ensure safety and correct use, this product must be repaired by professionals appointed by the Company. If the built in combi oven cannot be used normally because the consumer entrusts personnel who are not appointed by the Company to carry out repair or the consumer carries out repair, even during the warranty period, it is not within the scope of free maintenance, and the Company will not bear any responsibility for the property loss and personal injury caused thereby.

This marking indicates that this product should not be disposed with other household wastes throughout the EU. To prevent possible harm to the environment or human health from uncontrolled waste disposal, recycle it responsibly to promote the sustainable reuse of material resources. To return your used device, please use the return and collection systems or contact the retailer where the product was purchased. They can take this product for environmental safe recycling.
Customer Service
Please stop using the combi oven and unplug the power cable if any abnormal condition occurs, and please contact FOTILE service hotline.
⚠ Warning: Only the repair personnel who have been trained professionally and obtained the repair qualification in the combi oven can repair the combi oven. Other unauthorized personnel are not allowed to repair this combi oven to avoid serious consequences.
Precautions for warranty:
- The following items are not within the scope of free warranty, so they shall be charged for repair if it is possible to be repaired and the "Product No." on the product packing box or the oven can be clearly identified.
◆Damage resulting from improper handling, installation, use, maintenance or storage by consumers;
◆Damage resulting from removal by the person who is not responsible for warranty in repair, replacement and return;
◆Product without warranty certificate in repair, replacement and return as well as valid invoice;
◆Damage caused by force majeure;
◆ All damages and losses resulting from the product service environment (e.g. power supply, temperature, humidity and other factors beyond the control of the Company) are not within the scope of free warranty, and the Company will not be responsible for them.
2. If the "Product No." on the product packing box or the oven cannot be clearly identified, please contact the distributor, who shall provide services, in accordance with relevant national provisions. The Company will not provide such services as installation and commissioning, return, replacement and repair.
- Built-in
- Combi Oven
- CONTENTS
- Safety precautions
- Danger
- Recommendations
- Installation and Repair Safety
- Installation Instructions
- ■ Schematic diagram of cupboard installation
- Guide to Quick Operation
- Precautions Prior to Use
- ■ Menus
- Operation Guide for Built-in-combi oven
- Power on
- ● Traditional cooking
- Steam Bake mode:
- - Modify and set parameters
- - Cancel cooking
- - Menus
- Preheating.
- Auxiliary function
- Suggestions on use
- Packing List
- Suggestions on Cleaning and Maintenance
- ■ Inner cavity of built in combi oven
- ■ About water tank
- ■ About cavity drying
- ■ Liner cleaning and maintenance
- General stain
- Stubborn stain
- ★ Important notice
- Common Fault Identification and Troubleshooting
- Customer Service
- Precautions for warranty:
Brand : Fotile
Model : HZK72-H1
Category : Oven