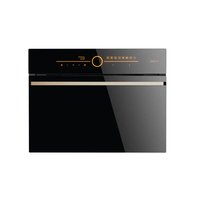
SCD42-C2T - Oven Fotile - Free user manual and instructions
Find the device manual for free SCD42-C2T Fotile in PDF.


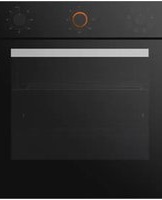
| Product Type | Built-in Steam Oven |
| Brand | Fotile |
| Model | SCD42-C2T |
| Capacity | 42 L |
| Dimensions (W x H x D) | 595 x 455 x 550 mm |
| Weight | 36 kg |
| Power Supply | 220-240 V, 50/60 Hz |
| Total Power | 3200 W |
| Heating Functions | Bake, Grill, Convection, Steam, Combination |
| Temperature Range | 30 °C - 230 °C (steam up to 120 °C) |
| Control Type | Touch + Rotary Knob |
| Display | LED Touchscreen |
| Interior Material | Stainless Steel with Eco-Clean Coating |
| Door Type | Drop-down, Cool Touch |
| Child Lock | Yes |
| Cleaning Method | Steam Cleaning + Drying Function |
| Water Tank Capacity | 1.3 L (removable) |
| Accessories Included | Baking tray, Grill rack, Steam tray, Recipe booklet |
| Installation Type | Built-in under counter or in column |
| Energy Efficiency Class | A+ (estimated) |
Frequently Asked Questions - SCD42-C2T Fotile
User questions about SCD42-C2T Fotile
0 question about this device. Answer the ones you know or ask your own.
Ask a new question about this device
Download the instructions for your Oven in PDF format for free! Find your manual SCD42-C2T - Fotile and take your electronic device back in hand. On this page are published all the documents necessary for the use of your device. SCD42-C2T by Fotile.
USER MANUAL SCD42-C2T Fotile
Please read this instruction manual carefully before using
BUILT-IN ELECTRIC STEAM OVEN
SCD42-C2T / SCD42-F1

Thank you for choosing our products, please read the handbook carefully before use.
CONTENTS
Important safety description 1
Packing list 5
Main technical parameters 5
Installation method 6
Introduction to product structure 8
Quick use instruction 9
Senior advanced operations 16
Common problems handling 22
Suggestions for cleaning and maintenance 24
Important safety description
In order to prevent damages or property losses to users and other people, the following distinction and identification are made hereby.
The following content is important matters related to safety. Please follow them strictly and use them properly based on fully understanding.
■ Content difference according to hazard and damage degree
| Warning | Ignorance of the identification and faulty operation may lead to personal injury, serious injury or fire. |
| Caution | Ignorance of the identification and faulty operation may lead to personal injury or goods damage. |
| Advice | Content to be understood for the safety and proper use. |
■ Icon of caution and forbidden content

Caution: The quality of tempered glass on our products is monitored in accordance with GB15763.2, but the tempered glass has a very small probability of self-explosion due to its toughening mechanism. The self-exploding mechanism can be referred to GB15763.2. In case of self-explosion not arising from improper use, our company promises to replace the accessories free of charge.
* Special description: please use the product in strict accordance with the instruction
book. The Company will not be responsible for property loss and personal injury due to improper use.

| Warning | |
| To ensure safety, there should be reliable grounding line of plug. Grounding line should not be connected to gas pipe, tap water pipe, lightning rod and telephone wire. Bad grounding may lead to electric shock or other accidental events. | It can not be used by children and person with limited activity. Keep it away from children; otherwise it may lead to scalp, electric shock and other accidental events. |
| Only professional personnel can disassemble the machine to repair it or replace parts. | The product is for family daily use only. Do not use it for commercial purpose or use it in other special environment. |
| Caution | ||
| Electric steam oven will get hot during usage. Pay attention to avoid getting touch with hot element in steam oven. | ||
| The whole machine should stay away from inflammable substance such as hot resource, gas and alcohol. | ||
| Please put heavy substance on the opening steam oven door. | ||
| The plug must be pulled off by handling end of the plug. Do not pull off the plug by handling the line. Otherwise it will bring dangers such as an electric shock and short circuit, firing and so on. | ||
| Suggestion |
| ● The product is only used for family cooking. It will bring risks for other purposes. We will not assume the responsibility of any personnel damage or properly loss resulting from deviation of requirement of the instruction. |
| ● Clean the machine before first time use. Take out the water tank at first and wash its inner part with hot water. Do not use any cleaning liquid or agent; inner side scaffold of inner container and attachment can also be taken out for a wash. (Please refer to Maintenance and Cleaning section); it is suggested to use cleaning liquid diluted by hot water to clean inner container and inner wall of steam oven. |
| ● In order to keep it clean, please pour out redundant water after being used each time to avoid concentrated condensate in the machine. |
Suggestion
● After being used each time, soft cloth should be used to wipe condensate water groove.
● Open the steam oven door and let damp air disperse until it becomes dry completely.
- If the machine is left alone for a time (for example spending holidays), the machine should be cleaned at first. Then open the steam oven door to avoid peculiar smell.
● Wipe the water in the groove bottom of water tank with cloth at each time of adding water into the water tank.
- When steam oven is not in use, you should ensure it is in close status at first.
- When steam oven function is not unusual, please pull off the power and plug in again. If the problem is not solved, please refer to "Recognition and Treatment on Common problem" for corresponding treatment.
- In order to enhance protection, it is suggested to wear hot insulation gloves when carrying hot vessel at hand. The gloves should avoid being wet otherwise the heat passed through the gloves quickly to cause scald.
Safety of installation and maintenance
Before using the machine for the first time, please read important instruction relative to safe machine usage, operation and maintenance in the instruction manual to avoid accidents or damages.
■ Ensure the family power voltage and frequency is accordant with that of machine before steam oven installation.
■ Ensure your steam oven is handled by specialized service personnel and its safe installation and well grounding. Machine grounding and family grid grounding connection must be ensured to be correct and reliable in order to ensure the electric safety of steam oven. It is a basic safety requirement. The product manufacturer will not assume any responsibility of any damage resulted from problems in family grid.
■ Installation, maintenance and repair must be specialized service personnel of FOTILE. Do not install, repair or maintain without authorization.
The product can not be connected with long distance socket because of its too long cable and it is easily to cause wire overheating and thus brings fire or electric leakage accidents.
■ Opening product casing without authorization is forbidden. It is dangerous to touch connection line and electrical element or structure and it may bring electric shock and mechanic trauma.
■ Urban transmission line connecting power must be provided with full - pole circuit breaker which can withstand current above 20A independently to satisfy that the steam oven power can be cut off by turn off circuit breaker in case of maintenance or urgent incidents.
Application safety
- Please make sure that the product is installed in cabinet correctly and reliably before operation.
The product is only used for family cooking and can not be use for cooking of any commercial purpose. There may be safety risk in any other application and may result in personnel damage.
■ The power plug or power line can not be immersed by water to prevent dangerous electric shock during using it again.
■ From view of safety, please pour out and wipe the water in the water tank to avoid scale.
■ After finishing use and cooling, clean the inner container, inner side of door and condensate water groove with clean cloth.
If it will be not used for a long time, the steam oven should be cleaned completely to avoid peculiar smell. See details in Maintenance and Cleaning section.
About children's safety
During application, steam comes out from outlet. Even after use, there is still hot temperature on the inner and outer side of the door. Please tell your children to keep a distance with the product for safety.
■ When steam oven is in use, it is necessary to take care of children near the product.
■ It is forbidden to let your children lean or suspend on the door of the steam oven.
In order to reduce the risk of damaging your children, do not let your children take the steam oven as plaything or let them play around the steam oven.
■ Ensure the plastic bags are saved in place where your children can not reach to prevent suffocating during children playing.
Production safety
■ Do not heat the food in the closed container or otherwise it will result in explosion by increasing pressure of container, which is harmful to both machine and operator.
■ Please clean and dry the machine after being used each time in time. Because condensed concentration may be corrosive to the machine after a long time.
- Do not use substance that will rust machine or otherwise steam oven will be damaged.
- Try to use the citric acid rust remover when cleaning the rust. Using other rust removers may be harmful to your steam oven.
■ Steam cleaner should not be used for cleaning your steam oven because the steam will enter into electric element, which may result in short circuit leading to machine stoppage or even getting an electric shock.
Please cut off the plug-in strip of steam which supplies chamber power resource in unusual condition and call Service Department of FOTILE for personnel treatment in time. Please stay away from it and do not get close to machine before treatment.
■ Relative operations such as maintenance and installation must be finished by professional service staff of FOTILE.
Personnel safety
The steam oven must be installed at the safe and proper height for convenience of opening or closing the chamber door and taking out food during cooking. Otherwise the coming out steam may scald you. Besides, proper installation height will reduce risks of scalding your child when putting hands on the chamber door.
Take care of hinge, edge or corner of the chamber door when opening it. Please do not touch it to avoid injury caused by machine.
■ Open the chamber door slightly at first when observing or taking out food to let the large amount of steam come out. Then open the chamber door completely to prevent scalding by avoiding the body to touch de steam directly.
■ Please take care of the falling drops from condensed water tank when opening the chamber door.
During cooking, please operate carefully and do not tilt the food in container to make liquid or food come out from the container.
■ When getting or putting hot container, please wrap it with thick cloth to prevent it from scalding your hand.
■ When removing or moving your steam oven, please pull off power plug of steam oven.
Packing list
Please check whether product and accessory are in a complete set one by one after opening package.
■ Please call distributor for treatment if it is the responsibility of us or distributor.
■ Please call nearby After-sales Service Centre of company if it is the responsibility of user.
| Complete machine | 1 set | Steam tray | 1 piece |
| Instruction manual | 1 piece | Oil-receiving tray | 1 piece |
| Sealing ring of water tank interface | 2 pieces | Power line | 1 piece |
| Wood screw | 2 pieces |
Main technical parameters
| Type | SCD42-C2T/SCD42-F1 | Rated capacity | 42L |
| Rated voltage | 220-240V | Net weight | 23.2Kg |
| Rated power | 2200W | Heating method | Steam heating |
| Rated frequency | 50-60Hz | Control method | Touch |
Installation method
Electric steam oven should be installed at fixed places with easy access for operation and maintenance and should not be installed obliquely.
Electric steam oven and power outlet should not be installed at places with easy access of being damp or wet by water.
During removal and placement, electric steam oven should be lifted from handle hole and bottom. Electric steam oven can not be moved by pulling door or handle.
The electric steam oven is embedded in cabinet. The bottom board of cabinet hole must be able to withstand the weight above 60kg.
Attention: 1. Cabinet material (wood and adhesive) for steam oven installation must be able to withstand the temperature above 100°C.
-
In order to maintain ventilation, the gap larger than 45mm should be saved at the back side.
-
Space larger than 80cm must be saved in front the steam oven during installation.
-
Secure the steam oven to the cabinet with the wood screws in the accessory pack (see the schematic drawing for screwing).
-
The steam oven needs to use 10A socket alone and make sure that the socket contacts well. Do not share it with other electrical steam ovens.
-
After installation, the left, right and upper panels of the steam oven should maintain a distance of more than 3 mm from the surrounding walls, cabinets, steam ovens, etc., and the bottom panel of the steam oven should maintain a distance of 10 mm or more from the surrounding walls, cabinets, steam ovens, etc.
-
As the steam oven is subject to a full-inspection aging test before delivery, it is normal that there is small amount of residual water remaining in the internal piping and there are a few water droplets in the liner and the water tank.
Remove the outer packaging of the steam oven and the membrane bag, and place the steam oven closer to the mounting hole. One end of the power cord is plugged to the power socket at the back of the steam oven, and the other end is connected to the mains socket (no power). With one hand lifting the steam oven at the grasping location of the steam oven and the other hand supporting the bottom of the steam oven, gently place the steam oven into the hole of the cabinet. Release one hand, and gently push the steam oven to the end. Place the front end of the steam oven on the bottom board of the cabinet. Secure the steam oven to the cabinet with the wood screws in the accessory pack (see the schematic drawing for screwing).
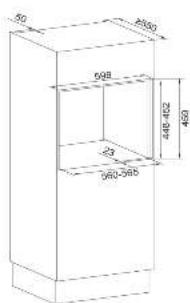
Full built-in installation diagram
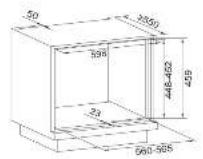
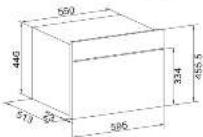
Indication unit: mm
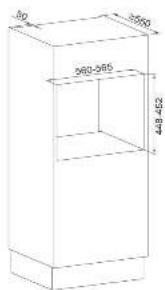
Half built-in installation diagram

Indication unit: mm
Schematic Drawing for Screwing


SCD42-C2T
Schematic Drawing for Screwing

natural_image
Technical line drawing of a mechanical or electrical component with no visible text, numbers, or symbols.

SCD42-F1
Introduction to product structure
★ SCD42-C2T

★ SCD42-F1

① Control panel
② Touch key
© Display screen
④ Erection column for whole machine
© Steam oven door
© Water tank
⑦ Temperature sensor of inner container
④ Inner container heater
③ Sealing of rubber door
Control panel
② Touch Key
③ Display screen
④ Erection column for whole machine
⑤ Steam oven door
⑩ Water tank
⑦ Temperature sensor of inner container
⑧ Inner container heater
⑨ Sealing of rubber door
Accompanying accessories
A steam tray with several-hole design:
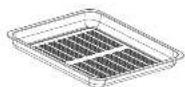
An oil-receiving tray:

Quick use instruction
★ SCD42-C2T
1. Control panel figure
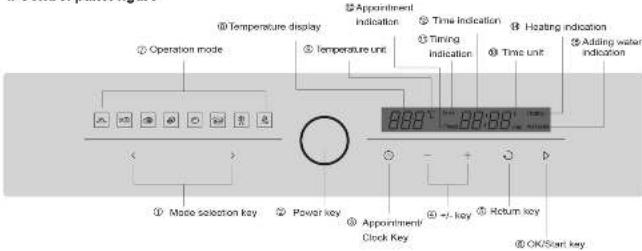
■ Description of the control panel, keys, and display interface
Operation keys
① Mode selection key: Touch this key to select operation mode in a loop.
② Power key: Touch this key to turn on. Touch this key to turn off when it is on.
⑤ Appointment/Clock Key: Touch this key to set the clock and appoint cooking time. (See Section: Clock settings, using appointment function for cooking)
④ +/- key: Touch this key to set the value required for cooking temperature, cooking time, or clock time.
⑤ Return key: During setting, touch this key to return to the previous setting interface: when working, touch this key to return to the mode selection interface.
® OK/Start key: Touch this key to confirm the set cooking temperature, time and start cooking.
- Icons and text on the display interface
⑦ Operation mode: The operation mode icon is used to identify the available steaming operation mode. There are 8 operation modes available: ordinary steaming, steaming fish, steaming meat, steaming vegetables, steaming pasta, fermenting, defrosting and descaling.
⑥ Temperature display: It can display the temperature you set and the real-time temperature inside the steam oven.
⑧ Temperature unit: This icon shows the temperature unit you set (°C).
⑩ Appointment indication: This icon indicates that you have chosen the appointment mode for cooking.
① Timing indication: This icon shows that you are setting or have set the cooking time.
⑫ Time indication: It displays the set cooking time and the scheduled countdown time.
⑧ Time unit: It displays the unit of time you are setting.
⑧ Heating indication: When the icon "heating" is constantly on, it means that the steam oven is in operation. When the door of steam oven is opened during operation, this icon flashes
Adding water: When this icon flashes, it means you need to add water into the water tank of the steam oven, then push the tank into the tank slot and push it into place.
II. Precautions before every use
Water tank filling
Before operation of the steam oven, firstly fill fresh water into the water tank to the highest water level mark of 'MAX', and then insert the water tank into the tank slot, and push it in place. (pure water is preferred).
■ Insert the oil pan (no holes) in the bottom layer of the tank before using the steaming pan (with holes).
Function list
| Steaming mode icon | Steaming function | Default temperature (°C) | Default time (min) | Temperature range (°C) | Time range |
| Ordinary steaming | 100 | 20 | 30-100 | 1 minute - 5 hours | |
| Steaming fish | 100 | 15 | 90-100 | 1 minute - 5 hours | |
| Steaming meat | 100 | 30 | 90-100 | 1 minute - 5 hours | |
| Steaming vegetables | 100 | 20 | 90-100 | 1 minute - 5 hours | |
| Steaming pasta | 100 | 15 | 90-100 | 1 minute - 5 hours | |
| Fermenting | 35 | 30 | 35-45 | 1 minute - 12 hours | |
| Defrosting | 50 | 30 | 40-50 | 1 minute - 5 hours | |
| Descaling | Fixed settings of program | Fixed settings of program | Fixed settings of program | Fixed settings of program |
Note: The default temperature is for reference only. The cooking temperature can be selected according to the characteristics of the cooking ingredients: for example, in the "steaming fish" mode, the default temperature (100°C) is more appropriate when cooking salted or older fish, while when cooking fish with relatively tender meat, cooking temperature and cooking time shall be reduced appropriately. For detailed cooking methods, please refer to the steam oven recipe provided together with the steam oven.
III. Cooking with steam oven
Operation steps: place the dishes in the steam oven → fill water in the tank → turn on the steam oven → select the cooking mode → set the cooking temperature → set the cooking time → confirm and start cooking → finish cooking and shut down → daily cleaning
- Power on/off
Touch the 'Power' key to turn it on (Operation ①), then enter the mode selection interface; touch the 'Power' key in the power-on state and any operation mode to shut down, and the display screen will go out.
- Choose the cooking mode
In the mode selection interface, the display screen shows all operation mode icons and the first mode icon ⌘ flashes. At this time, touch the <, > key to cycle through the mode, touch < to select to the left, touch > to select to the right (Operation ②). For example, when the "ordinary steaming" mode is selected, only the "ordinary steaming" icon will flash in the cooking mode icon displayed on the interface. The display interface at this time is shown in the figure below.
Note: The icon or text "Flash" mentioned in the manual is to remind you to set the corresponding item.

- Sel cooking temperature
Touch ▷ key to confirm the cooking mode is "Ordinary steaming" (operation ③), the corresponding default temperature value is flashing, touch- or + key to set the required cooking temperature. For each touch, subtract 1 or add 1. Long press the touch to fast forward, as shown in the figure (operation ④). For example, set the cooking temperature to 95°C. Then, touch the ▷ to enter the cooking time setting interface (Operation ⑤)

- Set cooking time
When entering the cooking time setting interface, the time value on the display interface starts to flash. At this time, touch the - or + key to set the required cooking time (in minutes). For example, set the cooking time to 30 minutes, as shown below (Operation ⑥).

- Start cooking
After the time setting is completed, touch the ▷ key (Operation ⑦) and the steam oven starts cooking.
- Finish cooking
After the set cooking time is reached, the steam oven automatically stops working, and the buzzer sounds for 10 times to remind the user to enter the mode selection interface, and the cooking ends.
Note: Since the steam oven has no cooling function, when the ambient
temperature is higher than the set cooking temperature, the steam oven will not be able to cook according to the set temperature.
■ Preheat
In the cooking process, the oven needs a certain preheating time (preheating time is about 5-10 minutes according to the use environment and the set temperature). When the temperature in the steam oven reaches the set cooking temperature, the steam oven is preheated. At this point, the steam oven starts cooking and counts down according to the set cooking time.
★ SCD42-F1
I. Control Panel Diagram
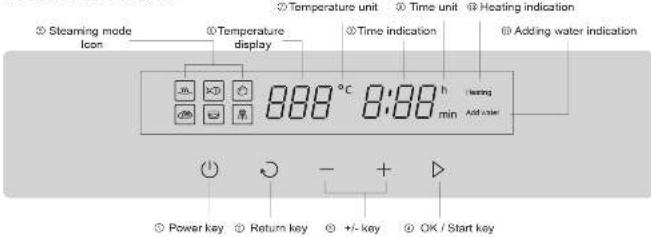
■ Description of the control panel, keys and display interface
● Operation keys
① Power Key. Touch this key to start the steam oven, and touch this key to turn off the steam oven when it is on.
② Return key: Touch this key to exit the existing interface, selling or function.
② +/- key: Touch this key to set the value required for cooking temperature and time.
④ OK/Start key: Touch this key to confirm the set cooking temperature and time, and start cooking.
- Icons and text on the display interface
③ One-key Menu: The icon in this area displays the dishes preset by the system.
Steaming Mode Icon: It is used to identify the available steam cooking modes.
There are 6 kinds of available steam cooking modes: Ordinary steaming,
steaming fish, steaming pasta, steaming meat, fermenting, descaling.
© Temperature display: It can display the temperature you set and the temperature inside the steam oven.
① Temperature unit: This icon shows the temperature unit you set (°C).
⑧ Time indication: It can display the cooking time you set
② Time unit: it can display the time unit you are setting.
① Heating indication: When the icon "heating" is constantly on, it indicates that the steam oven is in operation. When the door of steam oven is opened during operation, this icon flashes.
Adding water indication: When this icon flashes, it indicates you need to add water into the water tank of the steam oven, then push the tank into the tank slot and push it into place.
II. Precautions before use
Water tank filling
Before operation of the steam oven, firstly fill fresh water into the water tank to the highest water level mark of 'MAX', and then insert the water tank into the tank slot, and push it in place. (Please use pure water for cooking to avoid damage to the steam oven due to scale accumulation)
■ Insert the oil pan (no holes) in the bottom layer of the tank before using the steaming pan (with holes).
Function list
| Steaming mode icon | Steaming function | Default temperature (°C) | Default time (min) | Temperature range (°C) | Time range |
| Ordinary steaming | 100 | 20 | 30-100 | 1 minute - 5 hours | |
| Steaming fish | 100 | 15 | 90-100 | 1 minute - 5 hours | |
| Steaming pasta | 100 | 15 | 90-100 | 1 minute - 5 hours | |
| Steaming meat | 100 | 30 | 90-100 | 1 minute - 5 hours | |
| Fermenting | 35 | 30 | 35-45 | 1 minute - 9 hours59 minutes | |
| Descaling | Fixed settings of program | Fixed settings of program | Fixed settings of program | Fixed settings of program |
Note: The default temperature is for reference only. The cooking temperature can be selected according to the characteristics of the cooking ingredients: for example, in the "steaming fish" mode, the default temperature (100%) is more appropriate when cooking salted or older fish, while when cooking fish with relatively tender meat, cooking temperature and cooking time shall be reduced appropriately.
III. Use Steam oven for Cooking
Operation steps: place the dishes in the steam oven → fill water in the tank → turn on the steam oven → select the cooking mode → set the cooking temperature → set the cooking time → confirm and start cooking → finish cooking and shut down → daily cleaning
1. Power on/off
Touch the 'Power' key to start the steam oven, then enter the standby interface; touch the 'Power' key in the power-on state to complete the power-off, and the display goes out at the same time.
2. Choose the cooking mode
When the standby interface is set, the required cooking mode is selected by touching the "+/-" key, for example, the 'Ordinary Steam' mode is selected, and all cooking mode icons are displayed on the display interface, in which the 'Ordinary Steam' icon flashes and displays the corresponding default temperature. The display interface at this time is shown in the following figure (Operation ①).
Note: The icon or text "Flash" mentioned in the manual is to remind you to set the corresponding item.

3. Set cooking temperature
Touch the 'OK/Start' key to determine the cooking mode as "Ordinary Steam" (Operation ②), with the default temperature value flashing at this time. Touch the '+' key to set the required cooking temperature, as shown in the following figure (Operation ③), e.g., after selling the cooking temperature to 100°C, , touch the 'OK/Start' key to enter the time setting interface (Operation ④).

4. Set cooking time
When entering the cooking time setting interface, the time value on the display interface starts flashing, and the cooking time required (in minutes) is set by touching the *+/- key, e.g., the cooking time is set to 1 hour and 30 minutes, as shown in the following figure (Operation ⑤).

5. Start cooking
After the temperature setting is completed, touch the 'OK/Start' key (Operation ⑥), and the steam oven starts cooking.
6. Finish cooking
After the set cooking time is reached, the steam oven automatically stops working, and the buzzer sounds for 10 times to remind the user to enter the mode selection interface, and the cooking ends.
Note: Since the steam oven has no cooling function, when the ambient temperature is higher than the set cooking temperature, the steam oven will not be able to cook according to the set temperature.
Preheat
In the cooking process, the steam oven needs a certain preheating time (preheating time is about 5-10 minutes according to the use environment and the set temperature). When the temperature in the steam oven reaches the set cooking temperature, the steam oven is preheated. At this point, the steam oven starts cooking and counts down according to the set cooking time.
Senior advanced operations
★ SCD42-C2T
I. Description on Display \ Function Settings of the Product
Power on
After the steam oven is connected to the power supply, a buzzer will sound and the clock setting interface is shown. If there is no operation within 2 minutes after the power is turned on, the digital clock standby interface will be entered, and the digital clock interface will be displayed for 40 seconds before entering the shutdown interface.
Clock setting
In the mode selection interface, touch the ⏻ key to enter the clock setting interface (Operation ①), at then the time value flashes, as shown below:

Set the time value (hours) by touching the - or + key (Operation ②).
Set the hour first, then set the minute: After setting the hour value, touch the > key to enter the minute value setting (Operation ③).

Set the time value (minutes) by touching the - or + key (Operation ④). After the clock is set, touch the ▷ key to complete the clock setting (Operation ⑤). The interface returns to the mode selection interface.
■ Mode selection interface
Touch "Power" key ○ to turn on the steam oven, and it will enter the mode selection interface. Note: In power-off state, only "Power" key ○ is valid. The mode selection interface is shown in the figure below, and the first mode icon is flickering.

Note: While on the mode selection interface, if there is no operation within 2 minutes after power-on, the digital clock standby interface will be entered, and the digital clock interface will be displayed for 40 seconds before entering the shutdown interface.
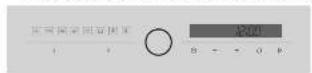
Digital clock standby interface
Shutdown interface
Cooking interface

While in preheating process, the time displayed by "Time Indication" is the set cooking time, and the temperature displayed by "Temperature Indication" is the real-time temperature inside the steam oven: the preheating is finished when the actual temperature in the steam oven reaches the set temperature. Then, the time displayed by "Time Indication" is the count-down time for cooking, and "Temperature Indication" is the set temperature.
■ Setting of the other seven functions
Setting of the other seven functions: steaming fish ' ☑', steaming meat ' ☑', steaming vegetables ' ☑', steaming flour foods ' ☐', fermentation ' ☑', and thawing ' ☒' are set the same as for common steaming.
As different ingredients require different cooking temperature and firepower in different time periods, it is recommended to select an appropriate cooking mode according to the main ingredients of the dishes in order to achieve optimal cooking performance.
II. Setting of Descaling Function
As scaling may occur on the heating plate at the bottom of the liner after a period of service, the user can choose the descaling program to descale in order to improve the performance.
The basic operation process for "Descaling" is as follows:
a) Put a pack of special scale scavenger to the water tank, fill warm water to "Descaling Level" on the water tank scale marking, and stir well until it is completely dissolved;
b) Put the water tank into the water tank slot. On the mode selection interface, touch < or > key to select the "descaling" function icon ⚙️ and touch key ▷ to start descaling. The display interface while in the descaling process is shown in the figure below:

c) Upon completion of descaling, the steam oven stops operation automatically, and the mode selection interface appears after the buzzer beeping for 10 times, then the descaling ends. After descaling, empty the remaining water in the water tank, and clean the steam oven chamber and water tank;
Note: 1. While in descaling work mode, the time and temperature cannot be selected, and their settings are fixed the program:
- To buy scale scavenger, please go to FOTILE official website or dial 4000-315-315.
III. Cooking via Appointment Function
Operation steps: Fill the water tank → place dishes in the steam oven → turn on the steam oven → select cooking mode → set cooking temperature → set cooking time → set appointment time for cooking → confirm, complete appointment setting → start cooking when the set appointment time arrives → cooking in progress → the steam oven shuts down automatically upon completion of cooking → clean
The first 6 steps above steps, i. e. those till "set cooking time", are exactly the same as for [Use the Steam oven to Cook], and the rest steps from "set appointment time for cooking" are introduced as follows:
- Setting appointment cooking time
After setting the cooking time, don't touch key ▷ and touch key ⏻ within 2 minutes to enter the setting appointment time for cooking (operation ①), and the time value flickers, as shown in the figure below

Set the desired appointment time (hours) by touching key - or + (operation ②).
Set the hour first, then set the minute: After setting the hour value, touch the ▷ key to enter the minute value setting (Operation ③).

- Completing appointment settings
Set the time value (minutes) by touching key - or + (operation ④), touch key ▷ upon completion of time setting (operation ⑤), and as shown in the figure below, the interface will display the appointed starting time for cooking. If key ▷ is not touched to confirm, the clock interface appears after 2 minutes.

- Starting cooking
When the appointed time for cooking arrives, the steam oven starts cooking automatically, and when the steam oven is heated to the set cooking temperature for cooking, the count-down time is displayed.
- End of cooking
After the set cooking time is reached, the steam oven automatically stops work, and the buzzer for 10 times to remind the user to enter the mode selection interface, and the cooking ends.
IV. Other Additional Functions
| Function Name | Function Description |
| Cooking time, cooking temperature change function | While the entire steam oven is working, the cooking temperature can be reset by touching key - or +, then touch ➤ to confirm; after setting the cooking temperature, touch key - or + to reset the cooking time, then touch ➤ to confirm. |
| Changing appointment time | While the appointment is in waiting, touch ➤ to enter the setting for changing the appointment time, touch key - or + to change the appointment time, then touch ➤ to confirm. If key ➤ is not touched to confirm, the new set appointment time will be nullified. While the entire steam oven is working, setting or changing the appointment is disabled. |
| Fan cooling function | Upon the end of the steam oven's timed operation, the fan continues to run for 20 minutes. |
| Water shortage warning func | When the water in the water tank is lower than the minimum level, "Add Water Please" will be displayed on the screen, and the buzzer boops three times every 30 seconds. At this time, please take out the water tank and add normal temperature drinking pure water to the "MAX" mark, and then push in place the water tank in the tank slot (Please use pure water in cooking to avoid damage to the steam oven due to scale accumulation) |
★ SCD42-F1
1. Description of Product Display\Function Settings
Power on
After the steam oven is connected to the power supply, the display screen is turned off after all of them are displayed, and the buzzer beeps and enters the power-off state. Power-off status: No display on display screen.
Standby interface
Touch the 'Power' key to start the steam oven and enter the standby interface.
Note: In power-off state, only the 'Power' key is valid.
In standby state, the display interface is shown in the following figure

Standby state
Note: If there is no operation in the standby interface for 2 minutes, the steam oven will be shut down.
Note: If there is no operation within 2 minutes in the setting state, the steam oven will enter the standby state.
■ Cooking work interface

While in preheating process, the time displayed by "Time Indication" is the set cooking time, and the temperature displayed by "Temperature Indication" is the real-time temperature inside the box: the preheating is completed when the actual temperature in the box reaches the set temperature. The time displayed by "Time Indication" is the count-down time for cooking, and "Temperature Indication" is the real-time temperature.
■ Setting of descaling function
As scaling may occur on the heating plate at the bottom of the liner after a period of service, the user can choose the key/descaling program to descale in order to keep the performance efficiency. The basic operation process for "Descaling" is as follows:
a) Put a pack of special scale scavenger to the water tank, fill warm water to "Descaling Level" on the water tank scale marking, and stir well until it is completely dissolved;
b) Put the water tank into the water tank slot. On the mode selection interface, touch key "+/-' to select the "Descaling" function icon "###", touch key 'OK/Start' to start descaling. The display interface in the descaling process is shown in the following Figure below:

c) Upon completion of descaling, the steam oven stops operation automatically, and the buzzer sounds for 10 times and the steam oven enters the mode selection interface, and the descaling ends. After descaling, empty the remaining water in the water tank, and clean the steam oven chamber and water tank.
Note: 1. While in descaling work mode, the time and temperature in default setting cannot be selected.
- To buy scale scavenger, please go to the official website of FOTILE or dial 4000-315-315.
II. Other Additional Functions
| Function Name | Function Description |
| Cooking time, Cooking Temperature change function | While the entire appliance is working, the cooking temperature can be reset by touching key '+/-' and key 'OK/Start'. After setting the cooking temperature, touch key '+/-' to reset the cooking time, then touch key 'OK/Start'. |
| Fan cooling function | Upon the end of the steam oven's timed operation, the fan continues to run for 20 minutes. |
| Water shortage Warning function | When the water in the water tank is lower than the minimum level, "Add Water Please" will be displayed on the screen, and the buzzer beeps three times every 30 seconds. At this time, please take out the water tank and add normal temperature drinking pure water to the "MAX" mark, and then push in place the water tank in the tank slot (Please use pure water in cooking to avoid damage to the steam oven due to scale accumulation) |
Common problems handling
■ About water tank
-
The highest water level scale identification is in the top part outside the water tank. When you fill water into water tank, please fill to the extent that water level reaches the highest water level scale line. This can prolong continuous cooking time of one-time water injection furthest. During water injection, water level should not exceed the highest water level scale line and water in water tank should not overflow during insertion and extraction of water tank;
-
In order to reduce vapor generation time, hot water below 80°C may be used. Hot water should not be poured out.
- Push water tank with injected water into the steam oven and the machine can operate. If water tank is not pushed into the steam oven completely, steam oven will not be heated and "Add water" icon will flash.
- If "Add water" icon on the display screen flashes and buzzer buzzes, it indicates that water level in water tank is below the minimum water level. The steam oven will stop working and please inject water promptly at this time.
■ About cooking time and cooking effect
- Preheating time is too long. Inspect whether door is closed firmly or not or whether there is air leakage in the door. Please close the door firmly if it is not. If there is still obvious air leakage at this time, please contact service of FOTILE Company for repair; inspect whether there is dirt on temperature sensor in the box, if there is, please clean it promptly.
- Cooking time is too long. First of all, steam oven door should not be open during cooking process frequently so as to reduce heat loss in this process; Inspect whether door is closed firmly or not or whether there is air leakage in the door. Please close the door firmly if it is not. If there is still obvious air leakage at this time, please contact service of FOTILE Company for repair.
- Much condensed water in the box. Inspect whether the steam oven is cleaned and water in the box is discharged after each time of use.
- Much condensed water in the dinner plate after completion of cooking. Dished may be covered with preservative film before cooking or steam oven may be preheated ahead of time and then dishes may placed in the box when preheating is almost finished.
■ Selection of cooking container
Stainless steel cooking containers are attached to the steam oven and users can also purchase other accessories. Pay attention to the following content during selection of appropriate cooking container: try to use cooking container with multi-hole as vapor can contact food through small holes and food will be cooked more equally with faster healing speed; when food such as stewed product are cooked, cooking time will be longer as food is small, and placed densely and space among food is small or there is even no such space and vapor can not exert its function completely. Therefore, food should be placed in the oblate body container to make more space for vapor during cooking; appropriate placement height of food is 3-5cm and too much amount of food will prolong cooking time and even influence food taste. Steam oven is designed to cook for 6-8 people and too much food should not be placed in it.
Heat-resistant glass, glass-ceramic, porcelain, stainless steel and enamel container can also be used.

Attention:
If plastic cooking container is used, please ensure that it can resist 100°C high temperature and vapor.
If cooking container with large thickness is used, cooking time will be long.
Please place cooking container on the steaming tray attached to the machine.
Edge top of the container should be at least 3cm away from top of cooking box so as to let
sufficient vapor into the container.
■ Common fault identification and handling
For the sake of your safety, please press power key for shut down and then conduct
corresponding fault handling.
| Fault phenomenon | Cause analysis | Solution |
| E2 | The temperature sensor on the heating plate at the bottom of the liner is short or open circuited | Disconnect the power from the steamer, and power on again to restart. If the fault persists still, please call FOTILE service. |
| F3 | The liner temperature sensor is open circuited | |
| F4 | The liner temperature sensor is short circuited | |
| No response after the power cord of the steamer is plugged. | Cause 1: The power cord is disconnected from the steamer. | Unplug the power cord from the mains socket, and power on again after the other end of the power cord is connected appropriately to the steamer. |
| Cause 2: The connection cable of the control panel is not connected. | Please call FOTILE service to get service arranged. | |
| Cause 3: No power on the mains socket. | Contact a qualified electrician for inspection and repair. | |
| The steamer works but no steam is generated. | Cause 1: The heating plate of the liner is open circuited. | Unplug the power cord of the steamer from the mains socket, and call FOTILE service to get service arranged. |
| Cause 2: Fuse broken. | ||
| Cause 3: The relay in the power panel controlling the heating plate at the bottom of the liner has failed. | ||
| Cause 4: The temperature sensor of the liner has failed. | ||
| Cause 5: Blades on the mains socket plugged incorrectly. | ||
| Cause 6: Door not closed tightly or troubled. | ||
| The steamer leaks | Cause 1: Water in the condensation box overflows. | Absorb with cloth. |
| Cause 2: The heating plate at the bottom of the liner is not tightly sealed. | Unplug the power cord of the steamer from the mains socket. Please call FOTILE service to get service arranged. | |
| Cause 3: Poor sealing of the liner. | ||
| Cause 4: Leaking water tank. | ||
| Cause 5: Broken inlet water pipe or exhaust pipe. | ||
| Cause 6: Poor sealing of the temperature sensor of the liner. | ||
| Cause 7: The water tank has not pushed in place. | ||
| Steam is generated but food cannot be well cooked | Cause 1: The temperature sensor of the liner has failed. | Unplug the power cord of the steamer from the mains socket, and call FOTILE service to get service arranged. |
| Cause 2: Blades on the mains socket plugged incorrectly. | ||
| Cause 3: Broken or deformed inlet water pipe. | ||
| Cause 4: Failure of heating plate at bottom of the liner | ||
| Food can be cooked, but messy codes or slow temperature rise is displayed | Cause 1: The temperature sensor of the liner has dropped off. | Unplug the power cord of the steamer from the mains socket, and call FOTILE service to get service arranged. |
| Cause 2: The temperature sensor of the liner has failed. |
Warning: If the steamer still fails to work normally after all of above simple troubles have been eliminated, please call FOTILE service. This product must be repaired by a professional appointed by the Company in order to ensure the safety and correct use. If the product cannot be used normally due to the customer entrusting the person not appointed by the Company for repair or repair by customer himself/herself, even during the warranty period, it will not be repaired free of charge, and the Company shall not be liable for any property loss or personal damage caused thereby.
Suggestions for cleaning and maintenance
General precautions
The inner container should be cleaned after being used each time. The cleaning must be executed after inner container become cool. Making sure the inner container is completely dry before closing the steam oven door.
Warning: the steam can not be used for cleaning the machine otherwise pressurized steam will make permanent damage on surface and accessories. We will not assume the responsibility of consequences above. Do not use cleaner of alkali/soda, acid or chlorine, cleaning spray or cleaner for dishwashing machine and corrosive cleaner, hard brush or scouring pad and wire brush. Sponge with corrosive cleaner should not be used to prevent scratching surface.
Edge banding/ steam oven edge banding
Please clean or wipe steam oven edge banding after being used each time. Please use sponge with hot water but cleaner. Edge banding may have perforations or breaks for a long-term use. Please replace edge banding if above conditions occur.
Warning: do not use cleaner of surface active agent and make sure no cleaner sticking on steam oven edge banding.
Panel and casing of steam oven
Panel, chamber door and casing of steam oven can be cleaned by with hot water and little cleaner, and wiped with cloth. Wipe it with soft cloth after cleaning. Screen painting area is easily scratched and rusted by acid materials. Therefore please clean it carefully according to above requirement. Try not to use stainless steel cleaner or cleaning media otherwise it should be wiped as soon as possible to prevent the remaining dirt from damaging your steam oven surface.
Stainless steel panel and/or casing
Never-wear cleaner and care agent are recommended for use. Please wipe along with the steel line with average strength.
Steam tray, side scaffold and cooking container
Steam tray, side scaffold and cooking container must be cleaned and wiped after being used each time.
Suggestion: Accessory above can be put into dishwasher for wash.
Inner container of steam tank
Please clean inner container of steam tank after being used each time. Wipe the coagulum in inner container or inner wall with sponge or soft cloth with strong suction. Most cooking residue can be cleaned with cloth and mild cleaner with hot water. In areas with poor water quality, there may be a layer of sellings in inner wall of steam oven and it can be wiped with wet cloth with little vinegar. Clean and swipe the inner wall with clean water. Clean and swipe chamber top and condensed groove, inner wall of chamber door and card slot for storing water tank.
Suggestion: cleaning will be easier by taking out side scaffold of two sides before cleaning inner wall. At the same time, clean and wipe steam oven top and condensed groove, inner wall of chamber door and card slot for storing tank.
Water tank
Please pour out and wipe the water in water tank after being used each time.
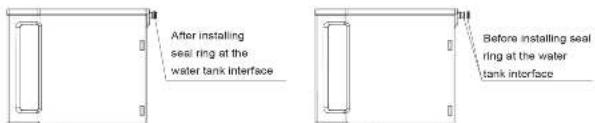
Sealing ring of water tank interface is quick-wear part. It may be damaged or broken seriously after being used for many times. If the condition occurs and affects sealing effect between water tank and water tank seat, sealing ring (two amenities attached with machine) of water tank interface can be replaced by self or by calling After-sales Department of FOTILE to arrange staff by door-to-door service.
Heating tray of inner container bottom
Please wipe water in inner container bottom after being used each time.
After steam oven operates for a period of time, it is hard to avoid dirt on heating tray of inner container bottom. Please remove dirt by scale remover at food grade in order to increase its working efficiency and expand its usage span. See operation details in "Function settings of dirt removal".
Warning: in order to keep it clean, please wipe water in water tank and inner container, inner wall and heating tray of inner container bottom to avoid settings after being used each time; do not use scouring pad or wire brush for cleaning. Due to higher temperature on the heating plate at the bottom of the liner after being used, the steam oven should not be cleaned before the temperature on the heating plate drops to a proper level.

- CONTENTS
- Important safety description
- ■ Content difference according to hazard and damage degree
- ■ Icon of caution and forbidden content
- Suggestion
- Safety of installation and maintenance
- Application safety
- About children's safety
- Production safety
- Personnel safety
- Packing list
- Installation method
- Introduction to product structure
- Accompanying accessories
- Quick use instruction
- ■ Description of the control panel, keys, and display interface
- Operation keys
- - Icons and text on the display interface
- Precautions before every use
- Water tank filling
- ■ Insert the oil pan (no holes) in the bottom layer of the tank before using the steaming pan (with holes).
- Cooking with steam oven
- ■ Preheat
- ★ SCD42-F1
- ■ Description of the control panel, keys and display interface
- Precautions before use
- Function list
- Use Steam oven for Cooking
- Power on/off
- Choose the cooking mode
- Set cooking temperature
- Set cooking time
- Start cooking
- Finish cooking
- Preheat
- Senior advanced operations
- ★ SCD42-C2T
- Cooking via Appointment Function
- Description of Product Display\Function Settings
- ■ Setting of descaling function
- Common problems handling
- ■ About water tank
- ■ About cooking time and cooking effect
- ■ Selection of cooking container
- ■ Common fault identification and handling
- Suggestions for cleaning and maintenance
- General precautions
- Edge banding/ steam oven edge banding
- Panel and casing of steam oven
- Stainless steel panel and/or casing
- Steam tray, side scaffold and cooking container
- Inner container of steam tank
- Water tank
- Heating tray of inner container bottom
Brand : Fotile
Model : SCD42-C2T
Category : Oven