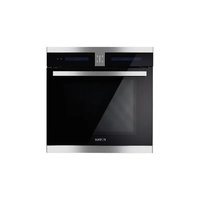
KSS7002A - Oven Fotile - Free user manual and instructions
Find the device manual for free KSS7002A Fotile in PDF.


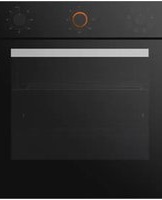
| Product Type | Built-in Electric Oven |
| Model | KSS7002A (also KSG7003AT) |
| Dimensions (W x H x D) | 595 x 595 x 552 mm |
| Net Weight | 40 kg |
| Power Supply | 220-240 V, 50-60 Hz, 3200 W |
| Oven Capacity | 70 L |
| Energy Source | Electric |
| Number of Oven Functions | 10 (including top heat, fan forced, conventional, bottom heat, defrost, fermentation, etc.) |
| Temperature Range | 40 °C to 250 °C (approx.) |
| Controls | Touch keys with display, selectable cooking modes, temperature and time setting |
| Clock/Timer | Yes, with minute minder, timed roast, and preset roast |
| Child Lock | Yes, touch key for 3 seconds to activate/deactivate |
| Interior Light | Yes, touch key to switch on/off |
| Cooling Fan | Automatic, continues after cooking until oven cools |
| Door Type | Removable hinged door for cleaning |
| Cleaning Method | Wipe with warm water and mild detergent; avoid abrasive cleaners; door can be removed for thorough cleaning |
| Safety Features | Child lock, automatic shut-off, overheat protection, earthing required |
| Accessories Included | Tray, grill grid, tubular grip, screws with shims, user manual |
| Installation Type | Built-in (full built-in) |
| Warranty | Refer to manufacturer; use only genuine FOTILE spare parts |
| Manufacturer | Ningbo Fotile Kitchen Ware Co., Ltd., China |
| Website | WWW.FOTILE.COM |
Frequently Asked Questions - KSS7002A Fotile
User questions about KSS7002A Fotile
0 question about this device. Answer the ones you know or ask your own.
Ask a new question about this device
Download the instructions for your Oven in PDF format for free! Find your manual KSS7002A - Fotile and take your electronic device back in hand. On this page are published all the documents necessary for the use of your device. KSS7002A by Fotile.
USER MANUAL KSS7002A Fotile
Please read this instruction manual carefully before using
BUILT-IN OVEN
KSS7002A KSG7003AT

Every effort has been made to ensure that the information given in this manual is correct at the time of printing. However, due to the continuous product improvement, FOTILE reserves the right to make changes to the products and technical data without prior notice.
Ningbo Fotile Kitchen Ware Co., Ltd
No. 218 Binhai 2 Road, Hangzhou Bay New District, Ningbo, China
Website:WWW.FOTILE.COM
E-mail:overseas@fotile.com
CONTENTS
Warning and Safety Instructions 2
Caring for the Environment 4
Guide to the Appliance 5
Packing List 5
Parts Name 6
Technical Data 6
Features 7
Cleaning and Heating up for the First Time 7
Controls 8
Function set up - KSS7002A 8
Function set up - KSG7003AT 12
Temperature Set up 13
Oven Interior Light 13
Child Lock 14
Clock/Timer 14
Programming Cooking Durations 17
Oven Functions 19
Oven Functions 19
Cooking Suggestions 20
Cleaning and Care 21
Problem Solving Guide 24
Installing the Oven 25
Electrical Connection 25
Installing the Oven 25
Warning and Safety Instructions
This appliance conforms to current safety requirements. Inappropriate use can, however, lead to personal injury and damage to property. To avoid the risk of accidents and damage to the appliance, please read these instructions carefully before using it for the first time. They contain important notes on installation, safety, use and maintenance. Keep these instructions in a safe place and ensure that new users are familiar with the content. Pass them on to any future owner.
■ Correct application
- The appliance is intended for domestic use to cook food, and in particular to bake, roast, grill, defrost and dry fruit. Any other usage is at the owner's risk and could be dangerous. The manufacturer cannot be held liable for damage resulting from incorrect or improper use or operation.
- This oven is not intended for use by persons (including children) with reduced physical, sensory or mental capabilities, or lack of experience and knowledge, unless they have been given supervision or instruction concerning its use by a person responsible for their safety.
- WARNING- Accessible parts may become hot during use. To avoid burns young children should be kept away.
■ Safety with children
- Children should be supervised to ensure that they do not play with the appliance.
- Older children may only use the oven when its operation has been clearly explained to them and they are able to use it safely, recognizing the dangers of misuse.
- Great care should be taken to ensure that children do not touch the appliance when it is being used. Children's skin is far more sensitive to high temperature than that of adults. External parts of the oven such as the door glass, and the vent will become quite hot.
- During use, the appliance becomes hot. Care should be take to avoid touching heating elements inside the oven.
WARNING - Accessible parts may become hot during use. To avoid burns young children should be kept away.
■ Technical safety
- Installation, maintenance and repairs may only be carried out by a suitably qualified and competent person in accordance with current national and local safety regulations. Repairs and other work by unqualified persons could be dangerous. The manufacturer cannot be held liable for unauthorized work.
- Before installation, check the appliance for visible signs of damage. Under no circumstances should you use a damaged appliance. A damaged appliance could be dangerous.
- The electrical safety of this appliance can only be guaranteed when continuity is complete between it and an effective earthing system. It is most important that this basic safety requirement is present and tested regularly, and where there is any doubt the household wiring system should be inspected by a qualified electrician. The manufacturer cannot be held liable for the consequences of an inadequate earthing system (e.g. electric shock).
- Before connecting the oven to the mains supply, make sure the rating on the data plate corresponds to the voltage and frequency of the on-site supply. Consult a competent person if in doubt.
-
WARNING: Accessible parts may become hot during use, young children should be kept away.
-
Do not connect the appliance to the mains electricity supply by a multi-socket unit or an extension lead. These do not guarantee the required safety of the appliance (e.g. danger of overheating).
- For safety reasons, this appliance may only be used when it has been built in.
- Never open the housing of the appliance. Tampering with electrical connections or components and mechanical parts is highly dangerous to the user and can cause operational faults.
- While the appliance is under guarantee, repairs should only be undertaken by a service technician authorized by the manufacturer. Otherwise the guarantee will be invalidated.
- During installation, maintenance and repair work, the appliance must be switched off.
- Faulty components must only be replaced by genuine FOTILE original spare parts. The manufacturer can only guarantee the safety of the appliance when FOTILE replacement parts are used.
- If the supply cord is damaged, it must be replaced by a FOTILE approved service technician to avoid a hazard.
- In countries where there are areas which may be subject to infestation by cockroaches or other vermin, pay particular attention to keeping the appliance and its surroundings in a clean condition at all times. Any damage which may be caused by cockroaches or other vermin will not be covered by the guarantee.
- Warning: Ensure that the appliance is switched off before replacing the lamp to avoid the possibility of electric shock.
■ Correct use
Caution: Danger of burning. High temperature are produced by the oven
- Use oven gloves etc. when placing food in the oven, turning or removing it and when adjusting oven shelves etc. in a hot oven. Be very careful that you do not burn yourself on the top heating / grill element.
- Never leave the appliance unattended when you cooking with oil or fats, as these are a fire hazard if allowed to overheat.
- Do not use the oven to finish drying flowers or herbs. Fire hazard!
- If using alcohol in your recipes, high temperature can cause the alcohol to vaporize and even to ignite on the hot heating elements. Alcohol should be burnt off before the dish is placed in the oven to avoid this danger.
- Cover any food which is left in the oven to be kept hot. Any moisture in the food could lead to corrosion damage in the oven. This also prevents the food from drying out.
- If you wish to complete a cooking process using the residual heat in the oven, leave the function selector at the position set and turn the temperature selector to the lowest setting. Do not switch the appliance off until the food has been removed. Increased moisture in the oven could cause condensation to form, which could lead to corrosion in the oven compartment and damage to the control panel, worktop and surrounding kitchen furniture.
-
Never line the floor of the oven with aluminium foil. This would cause concentrations of heat which could cause damage to the floor of the oven. For this reason do not place a dish, tin, or baking tray directly on the oven floor.
-
Never add water to food on a hot baking tray or directly onto food in a hot oven. The steam created could cause serious burns or scalding and the sudden change in temperature can damage the enamel.
- Always ensure that food is suitably cooked or reheated. Some foods may contain micro-organisms which are only destroyed by thorough cooking at temperature over 70 °C for a minimum of 10 minutes. Therefore when cooking or reheating foods, e.g. poultry, it is particularly important that food is fully cooked through. If in doubt select a longer cooking or reheating time. It is important that the heat is allowed to spread evenly throughout the food being cooked. This can be achieved by stirring and/or turning the food during cooking.
- If using plastic containers for cooking, they must be declared by the manufacturer as being suitable for use in an oven. Other types of plastic containers melt at high temperatures, and could damage the oven.
- Do not heat up unopened tins or jars of food in the oven. Pressure can build up and they may explode, resulting in injury or damage.
- Do not push pots and pans around on the oven floor, as this could damage the surface.
- Do not lean or sit on an open oven door, or place heavy items on it. The oven door can support a maximum load of 15 kg. Make sure that nothing gets trapped between the door and the oven compartment. This could damage the oven.
- Do not use the appliance to heat up the room. Due to the high temperature radiated, objects left near the oven could catch fire.
- Please make sure the door is closed when the oven is heating.
■ Accessories
Only use genuine FOTILE spare parts and accessories with this appliance. If spare parts or accessories from other manufacturers are used, this will invalidate the guarantee, and FOTILE cannot accept liability. The manufacturer cannot be held liable for damage caused by non-compliance with these Warning and Safety instructions.
Caring for the Environment
■ Disposal of the packing material
The transport and protective packing has been selected from materials which are environmentally friendly for disposal and can normally be recycled.
Ensure that any plastic wrappings, bags etc. are disposed of safety and kept out of the reach of babies and young children. Danger of suffocation!
Rather than just throwing these materials away, please ensure they are offered for recycling.
■ Disposal of your old appliance
Electrical and electronic appliances often contain materials which, if handled or disposed of incorrectly, could be potentially hazardous to human health and to the environment. They are, however, essential for the correct functioning of your appliance. Please do not therefore dispose of it with your household waste.
Please dispose of it at your local community waste collection / recycling centre or contact your dealer for advice. Ensure that it presents nodanger to children while being stored for disposal. It should be unplugged or disconnected from the mains electricity supply be incompetent person.
Guide to the Appliance
Packing list
- Take the packing material out of oven, and examine carefully whether the oven is intact.
a. Is the oven impacted or pressed by heavy object?
b. Is the oven door flat and switch unhindered?
c. Is there any scarcity or shatter in accordance with packing list?
d. Is the power cord damaged or loose?
If you find any one of the above happens, please contact FOTILE authorized service people.
- Packing list
The following accessories are supplied with this oven.
| Item | Quantity | Picture |
| Electrical built-in oven | 1 Pcs | |
| Handbook | 1 Pcs |  |
| Tray | 1 Pcs |  |
| Tubular grip | 1 Pcs |  |
| Grill grid | 1 Pcs |  |
| Woodscrew & Shim (for installation) | 4 Pcs |  |

Parts name

KSS7002A
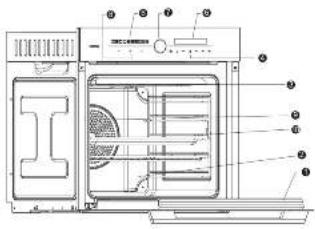
KSG7003AT
| 1. Door | 2. Air inlet back panel of fan | 3. Top heat / grill element (inside) | ||
| 4. Touch keys for: | Clock/Timer | ← Child lock | — Minus | OK OK |
| Alarm | Light | + Plus | ||
| 5. Touch keys for: | Return | Confirmation / Pause | < Reduce | > Increase |
| 6. Icon display for: | Cooking duration has been set | >> The oven is working | ||
| The started time has been set | ← Alarm has been set | |||
| 7. Power | 8. Function touch keys | 9. The left support | ||
| 10. The right support | 11.Lamp key | |||

Please refer to the different description according to the actual oven you purchased.

Technical data
| Model | KSS7002A | KSG7003AT |
| Rating | 220-240V 50-60Hz | 220-240V 50-60Hz |
| Input Power | 3200W | 3180W |
| Product Size(W x H x D) | 595×595×552mm | 595×595×552mm |
| Oven Capacity | 70 L | 70 L |
| Net Weight | 40kg | 42kg |
Features
Oven controls
The oven controls are used for selecting the various cooking programmes for baking, roasting and grilling.
Appliances with a clock-timer also feature the following:
- Clock display
- Minute minder
- Timer to automatically switch cooking programmes off, or on and off.
Cooling fan
A cooling fan will come on automatically when a cooking programme is started. The cooling fan mixos hot air from the oven cavity with cool room air before venting it out through vents located between the appliance door and the control panel. The cooling fan will continue to run for a while after the oven has been switched off to prevent any humidity building up in the oven, on the control panel or on the oven housing unit. When the temperature in the oven has fallen sufficiently, the cooling fan will switch off automatically.
■ Cleaning and heating up for the first time
New ovens have a slight smell on first use and this will dissipate the smells before you use it to cook any food.
Before use, please
- remove any stickers from the floor of the oven, baking trays, rack etc.
● take all accessories out of the oven and wash them. - wipe the oven out with a damp cloth first. By way any dust or bits of packaging that may have accumulated in the oven cavity during storage and unpacking will be removed.
Then heat the oven up once with nothing in it.
- Turn the function to
● Use the temperature touch keys to set the highest temperature.
● Heal the empty oven up at least an hour. Please ensure that the kitchen is well ventilated during this operation. Close the doors to other rooms to prevent the smell spreading throughout the house.
- On models with a clock/timer, you can set this procedure to finish automatically, see the appropriate section.
Please wait until the oven has cooled down to room temperature. Then wipe out the oven cavity with a solution of hot water and a mild detergent and dry it thoroughly with a clean cloth. Leave the oven door open until the oven interior is completely dry.
Controls
■ Function set up - KSS7002A
1) Power on:
Press the ^a touch key for 0.5 second; the power is on.
2) Oven setting:
- After the power is on, all the left area cursors of cooking mode are bright; enter into the cooking setting mode; at this time, the "Return" key "☐" and "Confirm" key "▶1" are invalid.

- Press direction key "<<" or ">>" and the corresponding function cursor lights. The function of Return key "↔" and "Confirm" key "▶" resume.

- Press the "Confirm" key "▶", the selected mode cursor highlights and the other mode cursors go out.

natural_image
Pure interface toolbar icons without any text or symbols- Alter mode selection is completed, temperature (default display is *160°) lights. Then enter into the cooking temperature setting mode.

- Press direction key " < " or " >" to set the temperature (1°C one jump, Press it long, and the number will jump fast 5°C one jump). After the temperature is appropriate, press " >"; (for example, we need to set the temperature at 170°C.)

● After the temperature setting is completed, the cooking time (default display is 00:25) lights; the direction key "<<" or ">>" lights, entering into the cooking time setting mode. Press the direction key "<<" or ">>" to set hour and minute (one minute one jump) and the corresponding unit "h" and "min" light. Press it long, and the number will jump fast until the time is appropriate; then press "Confirm" key "▶" for confirmation, and the "h" and "min" will not light since then;

- Press direction key "<<" or ">>" to set the time (one minute one jump, press it long, and the number will jump fast). After the time is appropriate, press ">>": (for example, we need to set the time at 30 minutes)

- After cooking time setting is completed, the appointment time lights (default display is 00:00). If there is need to make an appointment, then enter into appointment time setting mode. Press direction key “<” or “>” to set the time. Press it long, and the number will jump fast. When the time is appropriate, press “>” to confirm. Then enter appointment time state and the time is started time. If there is no need to make an appointment, then press “>” twice to enter into the cooking state directly after the cooking time is set. The direction key is invalid when the oven is working;

- No appointment state: the light-emitting bar displays red and the working time is counted down. When it reaches the set working temperature, the light-emitting bar displays orange, and there will be a prompt tone (0.5 second);

* Appointment time state: the light-emitting bar displays no color, and the appointment time is counted down. The direction key is invalid when the oven is working. When it reaches the appointment time, there is prompt tone (0.5 second). Then enter into working state (the same as no appointment state).
For example: we need to set the appointment time for 30 minutes.

● The end of baking:
- When it reaches the cooking time, there is prompt tone (5 seconds of multiple short sounds), and the light-emitting bar does not display color;

- If you want to suspend the cooking, press "▶" in the central area. If you want it to start working again, press "▶" to make it continue to work.

3) Return function:
When all parameters are set and it starts to work officially, press return key " ➕" in the central area to modify the parameters. After pressing return key " ➕", the first step in the default will be going back to the left mode area for modification. At this time, the cursor of the setting mode begins to be highlight and flashing. Then, press direction key " <" or " ➕" key to select. After that, press the confirm key " ➕" in the central area and it will automatically jump to modify temperature, time and appointment time on the right. At this time, all steps of modification, selection and confirmation are the same as those said above.

4) Lamp function:
During the cooking process, touch " 🔊" in the right area, the cooking lamp will light. Press it again, and it will go out. In the parameter setting, press any key, and all lamps are lit.

5) Conversion of degree Fahrenheit to degree Celsius:
Press "8" for long time to switch the temperature unit. This setting will be the default in the next working.

6) Child-Lock function
Press "▶" for 3 seconds to start the Child-Lock function; at this time, all keys are invalid, and the Child-Lock function will not be closed until "▶" key is pressed for 3 seconds again.
■ Function set up - KSG7003AT
There are ten heating modes for selection. Every heating mode has its correspondingly default temperature.
1) Touch the "O" key to turn the oven on, and the display will be as following. If there is no any key touched, the screen will go out after two minutes.

2) Touch the "F" key, and the display will be as following.

3) Then touch the “<” or “>” near the “F” to select the required function whose icon will flash accordingly, and the display will be as following.

4) Slightly touch the "OK" to confirm your request, and the display will be as following.


If you want to change your setup, please touch the "F" twice, then repeat step 3)\~4).
■ Temperature set up
Set the required cooking temperature after cooking function is set. Because every cooking mode has its recommended heating temperature:
Please set the function which you want. Refer to "Function set up".
1) The temperature icon will flash as soon as the function has been set, please touch the “-” or “+” to select the required temperature (touch it long and the number will jump fast 5 C one jump). Refer to the following fig.

2) Please confirm the required temperature through touching the "OK" key.
3) The oven starts heating up as soon as the cooking programmes are set.

-
If you want to change the temperature you set, please touch the "—" or "+" to repeat step 3).
-
Each touch of the “—” or “+” key alters the temperature in one Fahrenheit or Celsius unit increments. Constantly touch one of these keys, it will speed up the process.
Temperature display

The oven starts heating up as soon as the cooking programmes are set, and the display will show the oven inner cavity temperature. There is a temperature process bar beside the temperature icon, which reflects the difference between the actual temperature of cavity and the temperature you set.
Simultaneously touch “—” and “+”, which can change the temperature unit between Fahrenheit and Celsius.
During the heating, touch " - " or " + " can view the set temperature.
When the set temperature is reached, a sound like "D" is heard.
■ Oven interior light
" 🔍 " can switching on the oven light independently. Slightly touch the Key " 🔍", the light in the oven will be switched on. Touch it again, the light will be switched off. This can be useful when cleaning the oven.

Child Lock
Set the child lock: touch the Key "0-m", and the icon "0-m" appears, then any key will be invalid. Release the child lock: touch the Key "0-m" for three seconds, the icon "0-m" will disappear.

Clock/Timer
The clock/timer can:
- show the time of day,
- be used as a minute minder,
- switch the oven off, or on and off automatically.
Controls
The clock/timer is operated by using the "☐", "☐", "−", "+", and "OK" keys together with the display.
| Keys | Function |
| -To select the "Cooking duration" function-To select the "Time of day" function-To select the starting time of the cooking programme | |
| -To select the "Minute minder" function | |
| OK | - Confirmation |
| — | -To decrease the time or temperature |
| + | -To increase the time |
| Display icon | Meaning |
| Alarm has been set. | |
| Cooking duration has been set | |
| The oven is working | |
| The started time has been set |
Operation
When you select a function, its icon will flash in the display, e.g. "☐", * ⊙* etc. You can only enter a time/duration while the icon is flashing (6 seconds approx.). If you fail to make an entry during these 6 seconds you will have to call up the icon in the display again.
Each touch of the “—” or “+” key alters the time in one minute or one hour increments. Constantly touch one of these keys, it will speed up the process.
Touching the * OK * key to save your setting.
When the display screen is displaying for more than two minutes without cooking, the display will be off automatically, turn into energy-saving mode.
To set the time of date for the first time

After connecting the appliance to the mains electricity supply, the machine will utter a sound like "D". The display window flashes "0:00" for six times, reminding the user to input the present time. Please enter the time by touching "—" or "+" key immediately, then touch "OK" to confirm your setting.
e.g. eight o'clock, then the display will be the following:


If the user does not input the time in six seconds, the window will display 0:00 and the clock begins automatically timing.
Changing the time of date

- Touch the Key "☐", and the icon displaying hour will flash to remind the user to input time.
-
Touch the Keys “—” or “+” to set the hour. Touch the Key “☐”, then the minute will flash. If you don’t set the hour, Please wait for 3 seconds till the digital screen automatically changes to the minute setting. Touch the Keys “—” or “+” to set the minute.
-
Touch the Key "OK" or "L" to confirm the time, or wait for 3 seconds till the time is automatically confirmed, and then the icon will stop flashing.
The clock has a 24 hours display.
The timer counts down in minutes
If there has been a power cut off, the time of day has to be re-entered.

The time of day can not be adjusted during cooking or in the preset roast state.
Using the minute minder
The minute minder can be used to time any activity in the kitchen, e.g. boiling eggs.
You can set the minute minder at the same time as another timed programme, e.g. as a reminder to baste your roast or add seasoning etc.
A minute minder time can be entered between 1 minute and 23 hours 59 minutes.
To set the minute minder

- Touch the Key “☐”, the “hour” icon displaying and the icon “☐” will flash. After setting the hour, touch the “☐” Key then minute will flash. Enter the time required for the minute minder whilst the bell symbol “☐” is flashing. The method is the same as setting the time of date such as the above. After the setting, the display will revert to showing current clock. The “☐” icon continues to be visible as a reminder that the minute minder is working.
- When current clock is on display, the user can touch the Key "☐" to view the remaining time through the display. Six seconds later the display will revert to display current clock. The minute minder time set can be changed as long as the bell symbol "☐" is flashing.
- Cancel the minute minder: Whilst "☐" is flashing in the display use the "—" or "+" keys to set the minute minder time to "0:00". The minute minder time is deleted and the time of day reappears in the display.
● At the end of the lime set for the minute minder
- the oven will sound for approx. 10 times.
Then display will show current clock.

The minute minder can be used independently, that is, its work will not influence other functions. The alarm will not stop work when the oven is turned off. When oven is turned off and the it reaches the alarm time, there is prompt tone and the screen will show current time. After two minutes, the screen will go out.
■ Programming cooking durations
Oven will start cooking as long as the heating mode and temperature are set. the cooking duration is a maximum of 10 hours.
On oven with a clock/timer you can also programme cooking durations so that the oven switches off, or on and off automatically.
When baking, the oven should not be set to work for a long time. Otherwise baller or dough will dry out, and raising agents will lose their effectiveness.
Timed roast:
Place the food in the oven.
Set the required function and set the temperature.
- Touch the Key “⊕”, the icon displaying hour and the icons “⊕” and “h” will flash to remind the user to entry cooking duration. The user can touch the Keys “—” and “+” to adjust the hour. Three seconds later the display will automatically switched to the “minute” setting or switched to the “minute” setting by touched the key “⊕” and the icons “⊕” and “min” will flash. Please adjust the min by touch “—” or “+”.

- Touch the "OK", then the oven will start a timed roasting, the display will show current clock as well as the icons "①" and ">>".
● After the setting
Touch the icon "⊕", and the remaining time will appear in the display. And 6 seconds later, it will come back to the former state. You can adjust the duration when flashing, and the operation will be as the same as setting. If you want to stop timed roast, please touch * F * or " ○".
- When the cooking ends, the heating is stopped too. The appliance will beep 10 times and the display will flash for 10 times in order to notify the user. Then it will show current clock.

The longest cooking duration is 6 hours. When the time duration for roasting is between 0 and 6, the icon " ⊕" will appear. When it starts a timed roasting, touch the key " ⊕" one time to modify cooking duration.
Preset roast:
Place the food in the oven.
Select the required function and set the temperature.
- Touch the Key * once to input time duration for roasting. It is the same as setting timed roasling.
- Touch the key " ⊕" again, the preset started time and the icon " |→" will flash. Touch the key " + " to set the started time. The key " — " can't be touched at this moment (the started time must be more than the clock time). Then touch the key " OK " to confirm. Before reaching the started time, the screen shows the clock time and when reaching the stared time, the screen shows the duration time and starts count down. If you don't touch the key " OK " to confirm, the icon " |→" will flash to remind and temperature will be shown.

● After the setting
Touch * ② * twice, it will show the ending time. and six seconds later, it will come back to the former state.
You can adjust the time when flashing, and the operation will be the same as setting.
Touch * once, it will show the healing duration that you set. and six seconds later, it will come back to the former state.
You can adjust the time when flashing, and the operation will be as the same as setting. If you want to stop Preset roast, please touch "F" or "○".
- When the roasting is finished, the appliance will beep 10 times in order to notify the user. Then it will display current clock.

The duration from time-setting point to finish time point is at most 23 hours and 59 minutes.
Oven Functions
■ Oven functions
Your oven has ten function modes to choose.
| Clockwise sequence | Icon | Desirable cooking function | Remarks |
| 1 | Top heating, applicable for making golden surface of the foods that are cooked by other appliances. For example, plate-filled broad noodles, potatoes, cheese and varied sausage foods. | The cooking result is similar to the heating elements on the top will be working. Set directly to the highest temperature for food needing high surface temperature. Put the grill on "3" and "4". Put the food in the middle of the grills. | |
| 2 | Quickly roast foods on several grills at the same time. Applicable for large-volume meat. Remain the original flavor. Like a rotisserie, applicable for large-volume food. | The cooking result is similar to the back heating elements start working with the upper and lower heating pipes and the fans; two grill racks at most can be used at the same time. | |
| 3 | Preheat the oven to required temperature, applicable for cooking large-volume food (e.g. cakes). Place the food in the middle of the oven. | The cooking result is similar to the upper and lower elements are working simultaneity. Use one grill rack, otherwise, the heat may not be evenly distributed. | |
| 4 | Applicable for crispy cakes and pizzas, as well as preserving heat. | The cooking result is similar to the lower heating element working. Set temperature at 40°C to preserve heat for cooked foods, ferment dough and brew wines. | |
| 5 | Applicable for various foods and frozen foods in particular. Remain the original flavor. Long cooking time but more delicious taste. | The cooking result is similar to the back heating element and fan working together. When the temperature is set at 40°C it can be used to defrost meat even in winter. | |
| 6 | Applicable for cooking foods like pizza, cheese biscuit, and fruit pies that should not be overcooked. | The cooking result is similar to the back heating element and lower heating element will be turned on and off together. | |
| 7 | Applicable for making crispy foods. | The cooking result is similar to the upper element is working with fan. | |
| 8 | Applicable for small food like steak to save energy. | The cooking result is similar to the upper also middle element. | |
| 9 | Defrost | ||
| 10 | fermentation | Put the kneaded clough into a container and cover with a plastic wrap. Then put the container on the baking tray which is placed in the second lager, Add a bowl of water of 200ml and select the mode " ☐". It will work after setting time. |
Cooking Suggestions
| Number | Icon | Food | Weight(Kg) | Suggested temperature/°C | Cooking time (minutes) | Location of grills |
| 1 | Cookies | 0.25 | 140-160 | 20-30 | 2 | |
| Chiffon cake | 0.5 | 150-160 | 30-50 | 2 | ||
| Bread | 0.5 | 160-220 | 15-40 | 2 or 3 | ||
| Tart&Pie | 0.5 | 170-190 | 20-60 | 2 | ||
| Puff | 0.5 | 190-210 | 25-45 | 3 | ||
| 2 | Cupcake | 0.5 | 160-180 | 20-35 | 2 | |
| Toast | 0.5-1 | 150-170 | 35-55 | 2 | ||
| Sponge cake | 0.5 | 150-160 | 30-50 | 2 | ||
| Lamb baby back ribs | 1-1.5 | 190-210 | 20-30 | 3 | ||
| Muffin | 0.5 | 180-190 | 15-25 | 3 | ||
| 3 | Pizza | 0.5 | 190-210 | 10-30 | 2 | |
| Egg tart | 0.5 | 180-200 | 15-30 | 2 | ||
| 4 | Sliced meat | 0.5 | 180-200 | 10-25 | 3 | |
| Vegetable skewer | 0.5 | 160-180 | 15-25 | 3 | ||
| Kebab(a little) | 0.5 | 190-210 | 10-25 | 3 | ||
| 5 | Chicken wing | 0.5 | 160-180 | 15-30 | 2 | |
| Drumstick | 0.5 | 160-180 | 20-30 | 3 | ||
| Fish | 0.5 | 180-200 | 20-30 | 2 | ||
| 6 | Kebab | 0.5 | 190-210 | 10-25 | 3 | |
| Sausage | 0.5 | 150-170 | 15-25 | 3 | ||
| 7 | Bread fermentation | 0.5-1 | 35-45 | 40minutes-4hours | 2 | |
| 8 | Beef jerky | 0.5 | 70-100 | 90-150 | 2 or 3 | |
| Dried shrimps | 0.5 | 70-100 | 90-150 | 2 or 3 | ||
| Preserved fruit | 0.5 | 70-100 | 90-150 | 2 or 3 | ||
| 9 | Applicable for coloring, reheating, decoct for toast, pizza and pancake. | |||||
| 10 | Meat | 35-60 | 20-40 | 2 | ||
| Fishsh | 35-50 | 20-40 | 2 | |||
Cleaning and Care

Do not use a steam cleaner to clean the appliance. The steam could reach electrical components and cause a short circuit.
■ Appliance front and control panel
Clean the
- controls,
- door handle.
- trim inside the door.
- seal between the appliance door and the cooking compartment regularly, preferably after each use. This will help to prevent grease and other deposits adhering to the surfaces and becoming difficult to remove and also in some cases, causing discolouration.
Grease deposits can also cause the seal to become brittle and crack.
-
All surfaces and controls should be cleaned using with warm water and a little washing up liquid applied with a soft sponge or cloth.
-
Wipe the surfaces dry using a soft cloth. Do not use scouring agents, hard sponges, brushes or sharp metal tools to clean glass as these can scratch the surface.
To prevent the risk of scratches and damage to the surface structure of glass, stainless steel and aluminium fronted appliances, pay particular attention to the following cleaning instructions.
Glass fronted appliances
The appliance front and controls are susceptible to scratches and abrasion.
Avoid:
- abrasive cleaning agents, e.g. powder cleaners and cream cleaners;
- abrasive sponges, e.g. pot scourers or sponges which have been previously used with abrasive cleaning agents;
- sharp metal tools;
- oven sprays.
Stainless steel fronted appliances
The appliance front and controls are susceptible to scratches and abrasion.
Stainless steel surfaces can be cleaned using a cloth or with a proprietary non-abrasive cleaning agent designed specifically for use on stainless steel. N.B. Do not use stainless steel cleaning agents on the controls.
Avoid.
- cleaning agents containing soda, acids or chlorides;
- abrasive cleaning agents, e.g. powder cleaners and cream cleaners;
- abrasive sponges, e.g. pot scourers or sponges which have been previously used with abrasive cleaning agents.
Accessories
Always remove all accessories, trays and racks which are not being used when using the oven to get the best results and to keep cleaning of the trays to a minimum.
Normal soiling
Clean as soon as possible after each use with a dishcloth, soft sponge (such as the Vileda sponge supplied with ovens in the UK) or a soft nylon brush, and a solution of hot water and a little washing-up liquid. The longer soiling is left the harder it may become to remove.
Stubborn soiling
Slubborn soiling e.g. from roasting may need to be soaked first with a damp sponge to loosen it and if necessary a non-abrasive stainless steel spiral pad or a scraper suitable for glass surfaces can be used to remove it.
After cleaning rinse thoroughly with clean water. The water must run off the surface easily. Any residual cleaning agents will hinder this effect.

1) Soiling such as spilt juices and cake mixtures are best removed whilst the oven or tray is still warm. Exercise caution, make sure the oven is not hot -danger of burning! Spilt fruit juices may cause lasting discolouration of the surfaces and roasting can cause malt areas to appear. Clean these following the instructions given above and do not try and use force to remove them! This discolouration is permanent but will not affect the efficiency of the enamel. 2) When baking items with a high salt content (e.g. continental pretzels) place them on baking parchment in the baking tray or grill pan. Sodium deposits can cause lasting discolouration to porcelain enamel surfaces
■ Oven interior
Allow the oven to cool down before cleaning.
Danger of burning!
The oven interior (including the left / right support) and the inside of the door should be cleaned after each use. If this is not done subsequently soiling from baking and roasting will become worse and make cleaning harder. In extreme cases soiling will be impossible to remove or even cause damage to the surface material.
Do not use harsh abrasive cleaner or sharp metal scarapors to clean the oven doorglass/the glass of hinged lids of the hobs(as approariae)/the ceramic surface, since they can scratch the surface, which may result shallering of the glass.
There is a rubber scaling-ring around the door of the oven, which should be checked frequently and cleaned when necessary, however, abrasive detergent should not be used.
If it is damaged, please contact local after-sales service center.
The oven should not be used before the sealing ring is replaced.
To make cleaning easier you can
- remove the oven door,
- dismantle the oven door,
Instructions for doing so are given further in this chapter.
The oven door is heavy. It should be gripped firmly at the sides when being removed or refitted. The oven door is connected to the oven by hinges.
Before removing the door, the locking clamps on both hinges have to be released.
● Open the door fully.(fig.1)
- Release the locking clamps on the hinges turn them upwards as far as they will go until they are at an angle. (fig.2)
- Lift the door upwards as far as it will go. Hold the door securely at both sides and lift upwards the hinges.(fig. 3)

1) To avoid the risk of the accident, injury, please DO NOT try to take the door out when it is in the horizontal position
2) To avoid the risk of accident, please DO NOT lifts the door up by the handle.
3) Make sure that you lift the door up equally on both sides.
■ Refit the door
- Hold the door securely at both sides and carefully fit it back onto the hinges. Make sure that there is no space between the door and hinges. (fig. 4)
- Open the door fully
- Flip both locking clamps back up as far as they will go into a horizontal position. (fig. 5)

To avoid the risk of hinges loosing, accident, damage, please make sure that the locking clamps lock tightly when the door is refitted after cleaning.

fig.1

fig.2

fig.3

fig.4

fig.5
Problem Solving Guide
In strict accordance with current national and local safety regulations, maintenance and repairs may only be carried out by a suitably qualified and competent person. Repairs by the other persons could be dangerous.
With the aid of the following guide, minor problems can be easily corrected. If this can not be solved, please switch off the power supply and contact our customer service center.
| Problem | Possible cause and remedy |
| The oven does not heat up. | - Check that the function and the temperature have been set at the function and temperature required.- Check whether the mains fuse has tripped. If it has, contact a qualified electrician or the FOTILE Customer Service Centre. |
| A noise can be heard after a cooking process. | This is not a fault.The cooling fan continues to run for a while after the oven has been switched off to prevent any humidity building up in the oven, on the control panel or on the oven housing unit. When the temperature has fallen sufficiently, the fan switches off automatically.The temperature will fall faster with the oven door open. |
| Foods are not cooked properly after following the times given in the chart | - Check that the correct temperature has been set.- Check that rack/tray position is correct or the shelf is level. |
| Browning is uneven. | There will always be a slight unevenness. If browning is very uneven, please check:- whether the temperature was set too high,- whether the correct shelf level was used |
| “ + ”is flashing“ - ”is flashing | It may be the reason that you forgot touching “ok” key |
In the event of any faults which you cannot remedy yourself, or if the appliance is under guarantee, please contact
- Your FOTILE Local Dealer
When contacting the Customer Service Centre, please quote the model and serial number of your appliance. These are shown on the data plate, visible at the top of the oven.
Installing the Oven
Electrical connection
The installer must check that
- The voltage and cycles of the mains supply correspond to that indicated in the rating plate of the appliance.
- The electrical installation can stand the maximum power indicated in the rating plate of the appliances.
- The electrical connection has adequate earthing in accordance with regulations in force.
- Must use the socket NEMA 14-30R to connect the oven, the oven's plug is NEMA 14-30P. Pull out the plug when clean the oven, exchange bulb or in emergency.
- Air Switch connecting 25A electric current.
- After making the electrical connection, verify the correct working of all the electrical parts of the oven.
- The manufacture is not liable for any direct or indirect damage caused by faulty installation operations are carried out by unqualified personnel or not complying with the local and general regulation in force.
Installing the oven
The oven must be built in before it can be used. Otherwise it poses an electric shock hazard.

Do not fit insulation material inside housing unit. This would hinder the intake of air to the appliance.
Before installing the oven, please pull out the plug.
Full built-in

-25-

Open the oven door and using two screws secure it to the side walls of the housing unit through the holes in the oven trim.
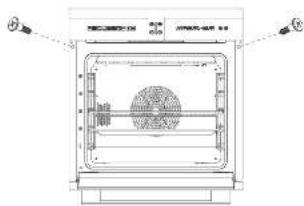

1) To protect the surface coating the rubber rings should be put when fasten the screws.
2) Install the oven firmly and upright on level places that are convenient for operation and maintenance.
3) The oven and power cord should not be installed on humid places or places easily affected by rain.
4) Lift the oven from the hand held hole or from the bottom during the transition and installation. Never draw the door or the handle to move the oven.
5) The oven can be built into a cupboard, whose base plate should undertake at least 60kg.
6) The materials of the cupboard should resist above 120°C temperature.
7) Leave at least 45mm-long space at the rear of the cupboard for the sake of ventilation.
-26-

- BUILT-IN OVEN
- CONTENTS
- Warning and Safety Instructions
- ■ Correct application
- ■ Safety with children
- ■ Technical safety
- ■ Correct use
- ■ Accessories
- Caring for the Environment
- ■ Disposal of the packing material
- ■ Disposal of your old appliance
- Guide to the Appliance
- Packing list
- Features
- Oven controls
- Cooling fan
- ■ Cleaning and heating up for the first time
- Controls
- ■ Function set up - KSS7002A
- ■ Function set up - KSG7003AT
- ■ Temperature set up
- ■ Oven interior light
- Child Lock
- Clock/Timer
- Operation
- Using the minute minder
- ■ Programming cooking durations
- Timed roast:
- Preset roast:
- Oven Functions
- Cleaning and Care
- ■ Appliance front and control panel
- Glass fronted appliances
- Stainless steel fronted appliances
- Accessories
- Normal soiling
- Stubborn soiling
- ■ Oven interior
- ■ Refit the door
- Problem Solving Guide
- Installing the Oven
- Electrical connection
Brand : Fotile
Model : KSS7002A
Category : Oven