
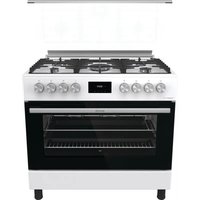
GGI9C21B - Built-in oven GORENJE - Free user manual and instructions
Find the device manual for free GGI9C21B GORENJE in PDF.


| Product Type | Built-in Oven / Free-Standing Cooker (Gas & Electric) |
| Brand | Gorenje |
| Model | GGI9C21B |
| Dimensions (H x W x D) | 890 x 985 x 680 mm |
| Voltage / Frequency | 220-240 V, 50-60 Hz |
| Total Power Consumption | 0.006 – 5.6 kW |
| Fuse Rating | 16 – 25 A |
| Oven Light | 25 W |
| Grill Power | 2000 W |
| Oven Functions (Electric) | Upper & Lower Heating, Grill, Turbo, AirFry, Pizza, Defrost, Aqua Clean, Gratin, Meat, Fish |
| Gas Burners (Hob) | Auxiliary, Semi-Rapid, Rapid, Dual Wok, Triple Wok (depending on configuration) |
| Oven Burner | Gas grill and oven burner with safety thermocouple |
| Timer | Mechanical or Digital Touch Timer with alarm |
| Included Accessories | Oven tray (90x60), Wire rack (90x60) |
| Optional Accessories | Rotisserie set |
| Energy Saving Features | Preheat only when needed, use dark/ enamel cookware, cook multiple dishes at once |
| Cleaning | Aqua Clean function, removable oven door, easy-clean enamel interior |
| Safety Features | Child safety, auto shut-off, thermal element on gas burners, overheat protection |
| Installation Requirements | Proper ventilation (room >8m², volume >20m³), gas connection, earthed electrical outlet |
| Service Life | 10 years (replacement parts availability) |
Frequently Asked Questions - GGI9C21B GORENJE
User questions about GGI9C21B GORENJE
0 question about this device. Answer the ones you know or ask your own.
Ask a new question about this device
Download the instructions for your Built-in oven in PDF format for free! Find your manual GGI9C21B - GORENJE and take your electronic device back in hand. On this page are published all the documents necessary for the use of your device. GGI9C21B by GORENJE.
USER MANUAL GGI9C21B GORENJE
Free Standing Cooker, Electrical & Gas Combination
Please read this manual carefully before using the product.
Dear Customer,
We hope you use the product in the most efficient way. It has been produced in modern facilities and is subject to strict quality control procedures.
For this reason, please read the manual thoroughly before using the product and keep it for future reference. If you transfer the product to someone else, please provide the manual along with it.
The user manual will help you use the product quickly and safely.
- Read the user manual before installation and use of the product.
- Follow the safety instructions without fail.
- Keep the user manual in an easily accessible place for future reference.
- Also read other documents supplied with the product.
Please note that this user manual may also apply to other versions of the product.
Any differences between versions are clearly indicated.
Symbols and Descriptions:
The following symbols are used in this user manual.


1- Important information and useful hints for use 2- Warnings against the life and property risks 3- Warning against electric shock 4- Warning against fire risk 5- Warning against hot surfaces
Table of contents
1) Your product 3
- General view 3 •Technical Specifications 4 •Accessories 5
2) Important Safety Instructions 6
- General safety 6-8 •Safety for children 8 •Safety for electric-related work 9 •Intended use 9
3) Installation 9
•Prior to installation 9-10
• Installation and connections 10-16 - Disposal of the product – Destruction of the packaging 16 • Future transportation procedures 16 • Disposal of the former product 17
4) Preliminary Preparation 17
• Things required to be done for energy saving 17 - First Use – First Cleaning - Firkt Heating 18
5) Use of the oven 18
• General information about cooking, roasting and grilling in the oven 18 •Use of the electric oven 19 • Use of the gas range 20 • Use of the gas oven 22 •Use of the grill plate 23 •Use of the grill roasting 23 - Operating modes 24-33
• Use of the oven timer 30-36 • Cooking Durations Table 37 • Operation of the grill – Grilling durations table 37-41.1
6) Maintenance and cleaning 42
• General Information 42 - Cleaning of the control panel - Cleaning of the oven 43 - Replacement of the oven lamp 43
7) Recommended solutions for the problems 43-44
8) Labels 45-48
1) Your product
GENERAL VIEW


1- Average burner 2- Wok burner 3- Small burner 4- Big / mini wok burner 5- Splash back / Glass cover 6- Cooking Hob 7- Pan Supports 8- Front panel 9- Door handle 10- Front glass 11- Button 12- Timer 13- Bottom Drawer 14- Legs
| Voltage/Frequency | 220-240 V 50-60 Hz |
| Total power consumption | Min. 0,006 kw/h – Max. 5, 6 kw/h |
| Fuse to be used Min. 16 A – Max. 25 A | |
| Cable type/section | 3 X 0,75 PVC – 3 X 1 PVC – 3 X 1,5 PVC – 3 X 2,5 PVCH05VV-F... |
| Cable length | Max. 1,5 mt |
| Outer sizes (height/width/depth) | 890 x 985 x 680 |
| Oven Optional | |
| Internal lighting 25 W | |
| Grill power consumption | 2000 W |
Basis: For the domestic electric ovens, the power label info are given as per the standard EN 50304. The values are determined according to the standard load and functions of the lower-upper heater or fan supported heating (if any).

Technical specifications may be modified to improve the product quality without any prior advice.

The figures in this manual are schematic and they may not be strictly same with your product.

The values given in the marks on the product or other printed documents provided together with the product are values obtained in laboratory according to the respective standards. These values may vary depending on the use and environmental conditions of the product.
ACCESSORIES

Accessories provided may vary depending on the version of the product. All accessories described in the operating manual may not be available in your product.
Oven Tray: It may be used for pastry, frozen food and large frying.
90 x 60 cm oven tray

Wire rack: Used for grilling or for adjusting the position of grilled meals at the desired level.
90 x 60 cm oven wire shelf

OPTIONAL: 90 x 60 cm rotisserie stand
This section contains safety instructions to help prevent risks of personal injury or property damage. Violation of these instructions will make any warranty invalid.
General Safety
- This product is not designed for use by any persons (including children) with reduced physical, sensory, or mental capabilities, or lack of experience or knowledge, unless they are supervised by a person responsible for their safety and given appropriate instructions on the use of the product. Children should always be supervised and not allowed to play with the product.
- Connect the product to an earthed socket/mains protected by a fuse in compliance with the values given in the “Technical specifications”. In case of use with or without a transformer, remember to commission a qualified electrician for the earthing installation. In case the product is used before earthing is done according to local regulations, our firm will not be responsible for any possible loss.
- If the power cable/plug is damaged, do not operate the product. Call the authorized Service Center.
- If the product is defective and has visual damage, do not operate the product.
- Do not make any repair or modification on the product. However, you may remove some failures; see solution proposals for problems, pp. 35.
- Never wash the product by spraying or pouring water on it! Risk of electric shock!
- Do not use the product when your mind is adversely affected due to use of drugs and/or alcoholic drinks.
• Power to the product should be disconnected during installation, maintenance, cleaning, and repair operations.
• Always have installation and repair operations done by an authorized Service Center. The manufacturing firm may not be held responsible for, and the warranty of the product becomes invalid in case of any loss that may arise from operations performed by unauthorized persons.
- CAUTION: The cooking process has to be supervised. A short-term cooking process has to be supervised continuously.
- Danger of fire: Do not store items on the cooking surfaces.
- Any spillage should be removed from the lid before opening.
- The hob surface should be allowed to cool before closing the lid.
- Warning: Ensure that the appliance is switched off before replacing the lamp to avoid the possibility of electric shock.
- WARNING: Unattended cooking on a hob with fat or oil can be dangerous and may result in a fire.
- Instructions for cooking ranges state that the range must not be placed on a base.
- Be careful when you use alcohol in your food. Alcohol evaporates at high temperature and may cause fire by bursting into flame when in contact with hot surfaces.
- Do not heat closed tin cans and glass jars. The pressure generated inside will cause the jar to burst.
- As the sides of the product will get hot during operation, do not place inflammable substances nearby.
- Do not put baking trays, plates, or aluminum foil directly on the base of the oven. Accumulated heat may damage the base of the oven.
- All ventilation channels should be kept unobstructed.
- The product may be hot during use. Do not touch the hot parts, the inside of the oven, or heating components.
- When placing food inside and taking it out of a hot oven, always use heat-resistant oven gloves.
- Do not use the product when the front glass door is removed or broken.
- When the oven operates, its rear surface may also get hot. Power connections should not come into contact with the rear surface; otherwise, connections may be damaged.
- Do not compress the connection cables to the door of the oven and do not pass them over hot surfaces. Melting of the cable may cause a short circuit and this can cause fire.
- Make sure the product is switched off after each use.
• The product and accessible parts of the product are hot when operating.
• Do not touch the product while operating.
- Do not use sharp and piercing materials to clean the inside and glass of the product; such materials may damage your product.
- As hot oil may cause fire, always be careful and attend the product when it operates.
- Do not attempt to extinguish fire with water; immediately disconnect the power of the product and close the burning part with a wet blanket.
- Do not keep any flammable or combustible substance in the product.
• Do not use a steam cleaner.
- Do not use aggressive cleaning materials or sharp metal scrapers to clean the oven door, as they may destroy the surface and cause the glass to break.
- Instructions for cooking ranges and ovens shall state that the appliance must not be installed behind a decorative door in order to avoid overheating.
- The instructions for hobs shall state that the appliance is not intended to be operated by means of an external timer or separate remote-control.
• Stationary appliances not fitted with means for disconnection from the supply mains having a contact separation in all poles that provide full disconnection under overvoltage category III, the instructions state that means for disconnection must be incorporated in the fixed wiring in accordance with the wiring rules.
- CAUTION: Prior to replacement of the oven lamp, disconnect the power and allow it to cool down to eliminate risk of electric shock.
•1st shelf of the oven is the lowest shelf.
- Do not use the product or nylon, flammable and heat-sensitive materials.
•The cooking pots to be placed on the heaters should be in proper size.

Safety for children
During and after use of the product, the exposed parts of the product will be hot before they cool down; keep the children away.
• CAUTION: The accessible parts may be hot during use of the grill. Little children should be kept away from the product.
• Children under 8 years are forbidden to touch the product unless they are attended by an adult person.
- This product may be used by children above 8 years old and/or physically, sensually or mentally impaired people provided they are informed about risks of the product and safe use of it is shown to them.
•Children should not play with the product. Cleaning and maintenance of the equipment should not be performed by the children unattended.
• Packaging materials may be dangerous for the children. Keep the packaging materials at a place not accessible by the children or sort them out and dispose in accordance with the instructions on waste.
- When the door is open

do not put any
heavy object on it or do not allow the children to sit on the door. It may cause overturn of the oven or give damage to the door hinges.
Safety for power related operations
- All operations to be performed on the electric equipment and systems should be performed by competent and authorized persons.
- This product is not suitable for use by remote control.
- In case of any damage, switch off the product and disconnect the power. For this purpose, switch off the main switch of your home.
- Make sure the fuse current complies with the product current.
Intended use
This product is designed for domestic use. You should not allow commercial use of it. “CAUTION: This product should be used for cooking purpose only. It should not be used for any other purpose such as heating the room.”
This product should not be used for heating plate under the grill or hanging towel or clothing for drying or heating purpose.
The manufacturer does not assume any responsibility for any loss that may arise due to improper use or transportation of the product. The oven section may be used for defrosting, baking, frying and grilling the food.
Service life of the product you purchase is 10 years. This is the period during which the manufacturer should make available the required replacement parts for operation of the product as specified.
3) Installation
Prior to use of the product

Make sure the power and/or gas installation is proper. If not, call a competent electrician and installer to make the required arrangements.

Preparation of the installation place of the product and electric and/or gas installation is performed by the customer.

Requirements specified in the related local standards with respect to power and/or gas should be observed for set-up of the product.

Control the product before installation for any damage. If the product is damaged, do not have it set up. Any damaged products would create risk for your safety.

Any work on the gas equipment and systems should be performed by authorized and competent persons.

The products have no system for discharge of the gases released as a result of combustion. The product should be installed and connected according to the applicable installation regulations. Especially take care of requirements for ventilation.

Air required for combustion is taken from the room air and the released gases are directly given into the room.

A well-ventilated room is essential for safe operation of your product. If there is no door or door for ventilation of the room, additional ventilation should be installed.

Kitchen footprint should be more than 8m2 . Kitchen volume should be greater than 20m3 .

Chimney outlet should be at height of 1.80 meters from the floor and open to the atmosphere in a diameter of 150mm.

Air vent should be minimum 75cm2 near the kitchen floor for opening to the outer atmosphere.

Installation and connections

Property damage!
Do not use the door and/or handle to move or handle the.
Mounting of the legs

The legs of the product is not assembled during the installation oft he product. The legs of the products are packed in the bag located inside the oven.
Mount the legs of your product and adjust it to the kitchen counter.
For the gas-fired ovens, if the legs are not mounted, the oven may not be supplied sufficiently during use of the oven and may impair burning.

Power connection
The product should definitely be used with an earthed line! The manufacturer will not be responsible for any damages that may occur if it is used without an earthed line.

Risk of electric shock, short circuit or fire due to installation made by unprofessional persons! Connection of the product to the mains may be performed only by an authorized and competent person, and the warranty of the product starts only upon correct installation.

Risk of electric shock, short circuit or fire caused by use of damaged power cable! The power cable should not be crushed, twisted or compressed, nor should it come into contact with hot parts of the product. If the power cable is damaged, it should be replaced by a competent electrician.
- Mains supply data should be the same as the data given on the nameplate of the unit. The nameplate of the product is on the rear.
- The connection cable of the product should comply with the technical specifications and power consumption.

Risk of electric shock! Prior to starting any work on the power installation, please disconnect the product electrically.


Any work on the gas equipment and systems should be performed by authorized and competent persons.
Prior to installation, check that the local supply conditions (gas type and gas pressure) are compliant with the product settings.
LPG connection
Be careful that the gas hose and gas valve you use for your oven should be safe.
Attach the gas supply hose at the hose end being the oven and tighten by means of clips and screws (Figure 6). Make sure it is tightened.
The gas hose of the oven should not be longer than 1500mm.
The pressure of the valve to be used for LPG should be 30 mbar - 300mmSS and certified.
Do not use an adjustable pressure reducing valve.

Gas supply hose should not pass through the hot section behind the oven. Temperature of the gas hose should not exceed 90°C.
Prior to use, make sure the system is gastight.

1- G1/2 Nipple (union)
2- Silicone gasket
3- G1/2 Hose inlet (gas inlet)
4- Metal clamp
5- Gas hose (inner diameter 8mm)
Figure 6
NG (natural gas) connection

1- G1/2 Nipple (union)
2- Silicone gasket
3- G1/2 NG hose (natural gas hose as per EN 14800)
If your equipment is set for natural gas, you should have it connected by an installer registered with the natural gas distribution company. Natural gas connection of your equipment is 1/2".
If you desire to convert your equipment from LPG to natural gas or from natural gas to LPG, please call the nearest service center for gas conversion settings.
Assembly of Splashback (Optional)
For some versions, we use "Splash Back" instead of the top glass cover; and the said Panel is located in the Lower Drawer as packed; how to mount this Panel is described below step by step:

Untighten the screws (10) at the right and left sides on the rear of the tray by help of spanner and ensure the skirt sheet into the channel in the lower part and tighten the screws again.
Regulator

This part is used in some countries or regions.
If the regulator is mounted on the product, do not remove it and do not play with its adjustment.
This device is fixed to prevent any failures arising from high gas pressure.
In case of conversion from LPG to NG, you are not required to remove the part.
LPG - NG, NG - LPG conversions;

Figure 19


Figure 19.2 Figure 19.3
Figure 19.1
Figure 19.4
Remove the burner cover and burner as shown in the Figure 19.
Remove the injector by help of 7's socket screw driver as shown in the Figure 19.1.
Fix the injector (D) you want to convert as shown in the Figure 19.2 (see Table 1).
Put the burner in place again as shown in Figure 19.3.
Upon completion of the conversion, then burn the burners in order and remove the switch on the control panel and adjust the low flame length by tightening or untightening the screw on the gas valve (19.4 cock) or inside the valve shaft.
- When you desire to convert the oven burner, you should first remove the oven cover by referring to the removal of the cover (page 36).
- Remove the screws at the marked points (Figure 20).

- Lift up the burner housing sheet first in the direction of the arrow and then upward towards the inside of the boiler and pull towards you to take the sheet out of its place (Figure 21).
- Remove the mounting screws of the burner and pull the burner by 15mm to release the burner (Figure 22).
- If there is a lighter and thermo element on the burner, remove the fixing rings and take the parts away from the burner.
• After the burner is released, the injector is removed with the help of a 7mm socket spanner and the desired injector is mounted. See page 22 for the injector table.
- Untighten the screw of the air adjusting screw on the burner and bring the corresponding letter of the desired gas type you want to adjust to the same axis of the screw and tighten the screw.
You should bring it to GPL indicated on the air adjusting sheet for LPG.
For NG, you should bring it to 'N' on the air adjusting sheet.


Leakage control:
Open the valve or natural gas valve and apply soap water with ample foam to the connection point to control for gastightness.
Never control by flame.
Final control
- Plug the power cable into the socket and activate the fuse of the equipment.
- Control the functions.
Placement
Place your product after you control the required power and gas connection. When placing, make sure that the gas hose and power cable are not near the hot surface of the product.
When placing, make sure that the gas hose and power cable have not been damaged.
Set your product on the kitchen counter as a minimum according to the dimensions shown in Figure 8.

Disposal of the product
Destruction of the product
Packaging materials are dangerous for children. Keep the packaging materials in a place that cannot be reached by children.
The package of the product is made of recyclable materials. Sort it out according to the instructions on waste and dispose of it. Do not throw it together with normal domestic waste.
Transportation operations in the future
- Keep the original package of the product and move the product in this original packaging. Observe the instructions on the box. If the original box is not available, then wrap it with blister packaging material or thick paperboard and tape it firmly.
- In order to prevent the wire grill and tray in the oven from causing any damage to the inner side of the oven's door, place a cardboard strip on the inner side of the oven's door so that it is in alignment with these trays. Tape the oven's door to the side walls. • Tape the caps and tray supports firmly in place.
- Do not use the door or handle to move or transport the product.

Do not put any object on the product. The product should be moved upright.

Check the product for any damage that may have occurred during transportation.
Disposal of old product

Dispose of the old product in an environmentally friendly manner. This product bears the WEEE symbol, indicating that waste electrical and electronic equipment should be collected separately. This means that to recycle or disassemble this equipment and minimize its environmental impact, the EU Directive 2002/96/EC should be followed. For further information, contact your local or regional authorities.
Electronic products that are not subject to controlled waste collection pose a potential risk to both the environment and human health because they contain harmful substances.
You may refer to your authorized dealer or your municipality's waste collection center for proper disposal of the product.
Always cut the power plug and break the door lock, if any, to prevent children from being exposed to danger.
4) Initial Preparation
Things required to be done for energy saving
The following information will help you use the product ecologically and save energy:
- Use containers that are dark in color or enamel-coated for better heat transmission in the oven.
- When cooking food, preheat the oven if required by the recipe or the table given in the operating manual.
- Do not open the oven door frequently when cooking.
Try to cook more than one food in the oven simultaneously. You can do this by placing two cooking pots on the wire shelf.
Cook more than one meal consecutively. This way, the oven will not lose its heat. Switch the oven off several minutes before the cooking time is up. In such a case, do not open the oven door. Defrost frozen food before cooking.
First use
First cleaning

Some detergents or cleaning agents may damage the surface.
- Remove all packaging materials.
- Wipe the surface of the product with a damp cloth or sponge and wipe it dry with a cloth.
First heating
Heat the product for about 30 minutes and then switch it off. This will eliminate any waste and layers left in the oven during production by incineration.

Hot surfaces may cause burns! Do not touch hot surfaces of the unit. Keep children away from the product and use oven gloves!
- Take out all oven trays and wire shelf from the oven.
- Close the oven door.
- Select the static position.
- Select the highest temperature; see Use of the electric oven.
- Operate for about 30 minutes.
- Switch off the oven; see Use of the electric oven.

Smell and smoke occurs during the first heating. Ensure well-ventilation.
5) Use of the oven
General information about cooking, frying and grilling in the oven

Risk of burn caused by hot steam. Be careful when opening the oven door as you may be subject to hot steam
Hints on cooking in the oven
- Use appropriate metal plates with non-sticking coating or aluminum containers or heat-resistant silicone moulds.
- Use the space on the shelf in an optimum way.
- Place the cooking mould at the centre of the shelf.
- Select the correct shelf position prior to operating the oven or grill. Do not change the shelf position when the oven is hot
- Hold the oven door firmly.
Hints on roasting
- When cooking whole chicken, turkey and large part of meat, the cooking performance will be improved if you marinate them by use of lemon juice and black pepper. • Cooking of the bone-in-meats would last 15-30 minutes more than those without bones. • Calculate the cooking time as about 4-5 minutes per centimeter of the meat thickness. •After expiration of the cooking time, keep the meat in the furnace for 10 minutes. Meat juice is better distributed on the fried meat and when the meat is cut, it does not come out. • Fish should be put on the medium or lower shelf on a flame-resistant plate
Use of electric oven
Selection of temperature and operation mode Models with sealed burners:


1 Timer switch 2 Electric function switch 3 Electric temperature switch 4 Gas hob switch 5 Gas oven switch 6 Gas oven temperature switch
Use of the gas burners:

Switch symbols on the control panel indicate switch positions.
1: Push the gas burner switch and turn it anticlockwise to the high flame and/or temperature position on the panel. 2: Ignite the lighter according to the version of your oven. 3: Set to the desired flame position. 4: When cooking is complete, turn the oven switch clockwise to the upper point to switch off the oven heater.


Gas flow is cut off. High flame. Low flame.


The size of the container and the dimension of the gas flame should match each other. Adjust the gas flame so that it does not protrude from the container base. Place the container on the pot carrier, centering it.
| GAS TYPE & PRESSURE | ||||||||
| BURNER TYPE | G20 13mbar | G20 20mbar | G20 25mbar | G25.3 25mbar | G30 30mbar | G30 37mbar | G30 50mbar | G31 37mbar |
| AUXILIARY | 0,92 | 0,70 | 0,70 | 0,75 | 0,50 | 0,50 | 0,45 | 0,50 |
| 1,15 kW | 0,90 kW | 0,95 kW | 0,90 kW | 0,90 kW | 1,10 kW | 0,90 kW | 0,90 kW | |
| 0,110 m3/h | 0,086 m3/h | 0,090 m3/h | 0,097 m3/h | 65 g/h | 79 g/h | 65 g/h | 64 g/h | |
| SEMI RAPID | 1,10 | 0,92 | 0,92 | 1,00 | 0,65 | 0,65 | 0,60 | 0,65 |
| 1,75 kW | 1,55 kW | 1,65 kW | 1,60 kW | 1,65 kW | 1,70 kW | 1,65 kW | 1,65 kW | |
| 0,167 m3/h | 0,148 m3/h | 0,157 m3/h | 0,173 m3/h | 120 g/h | 124 g/h | 120 g/h | 118 g/h | |
| RAPID | 1,40 | 1,20 | 1,20 | 1,20 | 0,80 | 0,80 | 0,70 | 0,80 |
| 2,80 kW | 2,60 kW | 2,80 kW | 2,40 kW | 2,50 kW | 2,60 kW | 2,50 kW | 2,50 kW | |
| 0,268 m3/h | 0,248 m3/h | 0,267 m3/h | 0,260 m3/h | 182 g/h | 189 g/h | 182 g/h | 179 g/h | |
| RAPID (SABAF) | 1,40 | 1,15 (Y) | 1,10 | 1,21 (F2) | 0,85 | 0,80 | 0,75 | 0,85 |
| 2,80 kW | 2,90 kW | 2,90 kW | 2,80 kW | 2,80 kW | 2,50 kW | 2,80 kW | 2,80 kW | |
| 0,268 m3/h | 0,276 m3/h | 0,276 m3/h | 0,310 m3/h | 204 g/h | 182 g/h | 204 g/h | 200 g/h | |
| DUAL WOK (SABAF) | 1,90 | 1,55 | 1,55 | 1,50 | 1,03 | 1,00 | 0,83 | 1,03 |
| 4,80 kW | 4,20 kW | 5,30 kW | 4,60 kW | 4,60 kW | 4,60 kW | 4,50 kW | 4,60 kW | |
| 0,457 m3/h | 0,400 m3/h | 0,505 m3/h | 0,509 m3/h | 335 g/h | 335 g/h | 327 g/h | 329 g/h | |
| TRIBLE WOK (DEFENDI) | 1,55 | 1,45 | 1,45 | 1,40 | 0,98 | - | 0,98 | 0,98 |
| 3,30 kW | 3,70 kW | 3,60 kW | 3,40 kW | 3,80 kW | 4,80 kW | 3,80 kW | ||
| 0,309 m3/h | 0,352 m3/h | 0,343 m3/h | 0,368 m3/h | 276 g/h | 276 g/h | 271 g/h | ||
Gas cut-off safety assembly (for versions with thermal element)


If the hob burners have a thermal element, the safety mechanism is activated and cuts off the gas immediately to prevent turning off due to liquid overflowing.
1: Push the gas range switch and turn it anticlockwise to the high flame position. 2: Ignite the lighter according to the version of your range. 3: After ignition, push and hold the switch for 3-5 seconds to activate the safety mechanism. 4: If no ignition occurs after pushing and releasing the switch, repeat the same action by pushing and holding the switch for 15 seconds. 5: Set to the desired flame position. 6: When cooking is complete, turn the oven switch clockwise to the upper point to switch off the oven heater.
Use of the gas oven
Switch symbols on the control panel indicate switch positions.


1- Push the gas oven switch and turn it one turn anticlockwise to the high flame and/or temperature position on the panel. 2- If, as shown in Figure 9, the oven button controls the burner of the upper heater, push the switch and turn it clockwise to the grill inscription or flame sign. 3- Ignite the lighter according to the version of your oven.

4- For versions with a thermal element, after ignition, push and hold the switch for 3-5 seconds to activate the safety mechanism. 5- If no ignition occurs after pushing and releasing the switch, repeat the same action by pushing and holding the switch for 15 seconds. 6- Set to the desired flame position. 7- When cooking is complete, turn the oven switch clockwise to the upper point to switch off the oven heater.
| F9 Series | F9 Series Bottle Compartment | ||||||||
| G31 37mbar | G20 20mbar | G20 25mbar | G30 30mbar | G30 50mbar | G30 30mbar | G30 50mbar | G31 37mbar | ||
| Oven Burner | ∅ 0,75 | ∅ 0,70 | ∅ 0,75 | ||||||
| Oven Burner | ∅0,92 | ∅1,30 | ∅1,30 | ∅0,92 | ∅0,85 | 2,40 kW | 2,40 kW | 2,40 kW | |
| 3,50 kW | 3,00 kW | 3,50 kW | 3,50 kW | 3,80 kW | 175 g/h | 175 g/h | 171 g/h | ||
| 250 g/h | 0,286 m3/h | 0,333 m3/h | 254 g/h | 276 g/h | Grill Burner | ∅0,70 | ∅ 0,65 | ∅0,70 | |
| Grill Burner | ∅0,85 | ∅1,20 | ∅1,20 | ∅0,85 | ∅0,85 | 2,00 kW | 2,00 kW | 2,00 kW | |
| 3,00 kW | 2,60 kW | 3,00 kW | 3,00 kW | 3,80 kW | 145 g/h | 145 g/h | 143 g/h | ||
| 214 g/h | 0,248 m3/h | 0,286 m3/h | 218 g/h | 276 g/h | |||||
Use of grill sheet (if grill sheet is available for your product)
- When using the upper burner in gas ovens, the oven door opens as shown in Figure 13.
- The grill sheet is mounted on the rollers located under the control panel; the cover is pushed forward to make contact with the grill sheet.


Use of the chicken roasting (optional)
- If your product has chicken roasting accessories, take the skewer among the accessories and loosen the screw of the V-shaped plate (dovetail) on the skewer. Insert the skewer into the chicken, then replace the V-shaped plate firmly and tighten the screw.
•The Bakelite part behind the skewer will help you carry the product easily. During the cooking process, this part should be removed.
- Attach one chicken with a maximum weight of 8 kg on the skewer.
•The grill burner is used to fry the chicken.
- Chickens should be placed on the skewer with their thighs crossed as shown in Figure 14.

Figure 14

•The chicken should be placed in this way.
in the center of the skewer. Otherwise, the skewer will bend and the mechanism may malfunction.

• Maximum 2x4 = 8 kg when mounted in this way.
Use of the electric oven
Operation of the electric oven is selected using the function switch.
Temperature is set by the temperature switch. All oven functions are switched off by bringing the respective switch to the off (upper) position.
- Set the oven timer to the cooking time; see Use of the oven timer.
- Bring the temperature switch to the desired operating mode.
- Bring the function switch to the desired operating mode. The oven heats up to the set temperature and maintains it. The temperature light is on during the heating process.
Switching the electric oven off
Turn the oven timer to the 'off' position.
If the timer is set to a certain time, the timer will stop automatically; see Use of the oven timer.
Turn the function switch and temperature switch to the off (upper) position.
Operation modes
The order of the operating modes shown here may vary depending on the arrangement with your product.
Upper and Lower Heating
Upper and lower heating is on. The food is heated from below and above at the same time. For example, it is suitable for cakes, pies, or cakes in cooking moulds and casseroles. Do the cooking with a single tray.
Upper Heating
Only the upper heating is on. For example, it is suitable for cakes with a bright surface and food you desire to be brown on the surface.
Lower Heating
Only the lower heating is on. For example, it is proper for food you desire to be brown on the underside.
Lower + upper + turbo fan (optional)
Upper + lower and turbo motor heating is on. The food ensures more homogenous heating thanks to the turbo motor. It is, for example, suitable for cakes, pies, or cakes in cooking moulds and casseroles. Do the cooking with single trays.
Turbo motor (optional)

It is used for defrosting thanks to its turbo motor.
How to use the functions on cookers with gas oven
AirFry Function
To activate AirFry function press in and turn the bottom burner knob to AirFry position and program knob to AirFry position.
Bottom burner knob
Program selection knob
Pizza Function
To activate Pizza function press in and turn the bottom burner knob to Pizza position and program knob to Pizza position.
Bottom burner knob
Program selection knob
Defrost Function
To activate Defrost function turn the program knob to Defrost position.
Program selection knob
How to use the functions on cookers with electric oven
Gratin Function
To activate the Gratin function, turn the program knob to the Gratin position and the temperature knob to maximum temperature. During gratin, monitor the baking process.
Program selection knob
AirFry Function
To activate the AirFry function, turn the program knob to the AirFry position and the temperature knob to the AirFry position.
Program selection knob
Oven temperature knob
Pizza Function
To activate the Pizza function, turn the program knob to the Pizza position and the temperature knob to the Pizza position.
Program selection knob
Oven temperature knob
EN
Meat Function
To activate the Meat function, turn the program knob to the Meat position and the temperature knob to the desired temperature.
Program selection knob
Aqua Clean Function
Put 1/2 liter of warm water in the oven tray. Place the tray on the first level in the oven. To activate the Aqua Clean function, turn the program knob to the Aqua Clean position and the temperature knob to 85 degrees. The recommended time for this function is 45 minutes. We recommend using the Aqua Clean function frequently.
Program selection knob
Oven temperature knob
Fish Function
To activate the Fish function, turn the program knob to the Fish position and the temperature knob to the desired temperature.
Program selection knob
Defrost Function
To activate the Defrost function, turn the program knob to the Defrost position.
Program selection knob
Cooking functions
AirFry Function
This cooking method gives food a crispy crust without added fat. It is a healthy version of "fast food" with lower calorie content. Suitable for small cuts of meat, fish, vegetables, and pre-cooked frozen products (fries, chicken medallions).
Pizza Function
Perfect for making pizza and pastries with a higher water content. For cooking on one level when you want your dishes cooked and crisp as quickly as possible.
Defrost Function
Use this function to slowly defrost frozen food (cakes, pastry, bread, rolls, and deep-frozen fruit).
Halfway through the defrost time, the pieces should be turned over, stirred and separated if they were frozen together.
Aqua Clean Function
This program allows easy removal of stains from the oven.
Gratin Function
This function is used in the last phase of cooking, when we add dressing/topping to the dish or we want to crispen its surface.
Meat Function
For optimal meat preparation. It is suitable for meat cuts such as roast beef, fillet of beef, back cuts, etc.
Fish Function
Perfect function for fish preparation. It is suitable for different fishes.
Use of the oven timer

Version 2
MECHANICAL TIMER (version 2)
If the timer is as shown in Version 2:
Turn the timer switch clockwise for cooking. Set the duration.
Digital Touch Timer (version 1)
 | “In progress” indicator | || | Pause indicator |
 | Cooking duration indicator | ← | Back button |
 | Cooking completion indicator | OK | OK button |
 | Clock setting indicator | + | Time increasing button |
 | Alarm indicator | — | Time decreasing button |
First Use
Clock Setting
① Apply the clock setting before starting to use the oven.
All numbers light up and go out for 2 seconds after establishing the power connection. 1200 appears on the screen.
① Use the -/+ buttons to change the time more quickly.
Firstly, the minute is entered and it is confirmed with the OK button, and you switch to the clock.
As the minute field flashes, when you press the ← button for a short time, the clock setting shall be terminated without recording any data. In order to return to the minute field while performing the clock setting, press the ← button for a short time.
① As long as the clock data are not confirmed, the screen shall stay as the setting screen. ① In case of a power failure, the time of the day is cancelled and you should apply the setting again.

Firstly, select the minute with the -/+ OK button.

After that, select the clock and confirm it with the OK button.

The time of the day appears.
The clock is set and the Ⓞ indicator disappears.
The brightness on the screen decreases 1 minute after the setting is applied.
Afterwards, you can change the time of the day from 'Settings Mode'.
Use of Digital Timer

It is an electronic timer which makes the food to be cooked prepared at the time you desire. You should adjust the cooking duration of the meal and the time when you desire it to be prepared.
Automatic Cooking Programme
After selecting the temperature and function, which are suitable for the meal you put in the oven, you shall start the cooking immediately by adjusting the cooking duration. In order to adjust the cooking duration;

|→| press and hold OK button until .... indicator appears.

Firstly, select the minute with -/+ buttons and activate the clock by pressing on OK button. (e.g.; 40 minutes)

with OK button, move forward until the screen above appears and start the cooking.
• The time, which is set on the screen, starts to count down. Adjust the temperature and the function you desire. The oven shall cook for 40 minutes beginning from the moment you confirm the time.
- When the adjusted time is up 0000 II appears on the screen, indicator flashes II and it gives an audible alarm for 2 minutes. In order to turn off the alarm, press on OK button. After turning it off, the time of the day appears on the screen.
- When the cooking ends, switch the temperature and the function to the closed position and turn off the oven.
① In order to complete the cooking before the adjusted time and cancel the selected time, long press on ← button. The time of the day appears on the screen.
Pause Mode
When the screen indicates the time of the day and you long press ↩ button, the time of the day and ll symbol appear and the oven switches to pause mode. In this case, you cannot cook. When you press on OK button for a short time in order to exit the mode, ▶ symbol appears and is deactivated.
Operation continues while the commutator is turned on.
Setting the cooking ending time forward →
This programme is used when you want your meal to be prepared at a later time. It starts with a delay. After the delay ends, cooking starts and the adjusted cooking time completes at the end.
By entering cooking duration:

|→| press and hold OK button until indicator appears.

First, select the minutes with the -/+ buttons and activate the clock by pressing the OK button.

After selecting the time, confirm it with the OK button and proceed to →| mode.

For cooking completion, after selecting the minutes and the hour, move forward with the OK button until the cooking screen appears.

Cooking screen; Cooking screen; The time left until the end of cooking.
The oven time indicates the remaining time on the screen by subtracting the time of day from the ending time, and it starts to count down.
We set our oven to start cooking at 01:00 p.m., cook for 30 minutes, and end cooking at 01:30 p.m. When cooking ends, the || indicator flashes and it gives an audible alarm for 2 minutes. To turn off the alarm, press the ← or OK button.
When cooking ends, switch the temperature and the function to the closed position and turn off the oven.
Without entering cooking time:

|→| press and hold OK button until indicator appears.

Without entering the cooking duration, move forward with the OK button and proceed to Imode.

For cooking completion, after selecting the minutes and hours, move forward with the OK button until the cooking screen appears.

Cooking screen;
Cooking screen; The time left until the end of the cooking.
Manual Cooking Mode
You can start cooking immediately without adjusting the duration by selecting the temperature and the function which are suitable for your meal. The oven does not turn off automatically and you should observe it.
In case of a power failure, your oven shall be deactivated and the clock shall be reset. You should adjust the time of the day again when the power is back on.
Alarm Setup
The alarm can be set at any time. You can use it as a warning or reminder. The alarm indicator shall go out after the alarm rings for 2 minutes. Until the |→| indicator appears, press and hold the OK button.

With the OK button, move forward until the indicator appears.

Firstly, select the minutes with the -/+ buttons, then press the OK button to select the hours and confirm with the OK button.

After the duration is adjusted, the screen indicates the time of the day.
Turning Off The Alarm
The alarm shall ring for 2 minutes after the adjusted time is up. In order to turn off the alarm, you can press the OK or ← button. After turning it off, the time of the day appears on the screen.
Setting Mode
Alarm Tune Setting (AL)

Long press ← and OK buttons together and enter the menu.

With -/+ buttons, proceed to RL option and confirm it with OK button.

With -/+ buttons, select the level you desire and confirm it with OK button.
Changing The Time (CL)

Long press ← and OK buttons together and enter the menu.

With -/+ buttons, proceed to CL option and confirm it with OK button.

Select the minute and the hour with -/+ buttons and confirm it with OK button.
Changing The Tone (So)

Long press ← and OK buttons together and enter the menu.

With -/+ buttons, proceed to So option and confirm it with OK button.

With -/+ buttons, select the level you desire and confirm it with OK button.
Changing The Brightness of The Screen (Sc)

Long press ← and OK buttons together and enter the menu.

With -/+ buttons, proceed to Sc option and confirm it with OK button.

With the -/+ buttons, select the desired level and confirm with the OK button.
Cooking duration table
The lowest shelf of the oven is the 1st shelf.

- The indicated values are determined in the laboratory. The values may vary according to your taste.
- Switch off the function switch and the oven using the temperature switch.
Operation of the grill

Hot surfaces may cause burns. Close the oven door during grilling. When grilling, turn the timer setting switch, if any, to the hand symbol.
Opening the grill
1) Turn the function switch to the grill symbol you will select.
2) Then set it to the desired grill temperature.
3) If required, preheat for about 5 minutes.
The temperature light turns on.
Switching off the grill
- Bring the function switch to the off (upper) position.
GAS90
NOTE:
* preheating for 10 min ** turn the dish after 2/3 of cooking
| Dish | °C | min | |||
| PASTRY AND BAKERY PRODUCTS | |||||
| sponge cake | 3 |  | 140 * | 25-35 | |
| apple pie | 3 | 180 | 60-80 | ||
| revani | 3 | [c866] | 170*** | 25-35 | |
| cupcakes | 4 | 140 * | 25-35 | ||
| yeast-leavened small pastry | 3 |  | 170 | 20-30 | |
| puff pastry | 3 | 190 20-30 | |||
| bread 1 kg - 1.5 kg | 2 |  | 210 * | 50-70 | |
| bread rolls | 3 | 210 * 20-30 | |||
| toast | 4 |  | max * | 1-5 | |
| pizza | 3 | max *** | 10-20 | ||
| MEAT, POULTRY, FISH | |||||
| lamb chops, 16 pcs | 3 | 200 | 50-70 | ||
| lamb thigh, 1.5 kg | 3 |  | 190 | 120-140 | |
| beef roast (loin, rump), 1.5 kg | 3 | 190 | 120-140 | ||
| beef roast, slow cooked, 1.5 kg | 3 |  | 120 | 180-220 | |
| burgers, 6 pcs, thickness 3 cm | 4 | max * | 30-40** | ||
| veal roast, 1.5 kg | 3 |  | 190 | 120-150 | |
| whole chicken, 1.5 kg | / | max | 70-90 | ||
| whole fish 350 g, 4 pcs | 4 | [4456] | max * | 25-35 * | |
| CONVENTIONAL PRODUCTS – frozen | |||||
| french fries, 400 g | 4 |  | 120 * | 30-40 | |
| chicken medallions, 200 g - 400 g | 4 | 120 * | 20-30 | ||
| fish sticks, 200 g - 400 g | 4 |  | 120 * | 20-30 | |
| DISHES | |||||
| Quzi | 3 | 220 *** | 120-180 | ||
| Tepsi baytinijan | 3 |  | 220 *** | 35-45 | |
| 180 | 15-25 | ||||
| Manakeesh | 3 |  | 250 *** | 15-20 | |
| Kibbeh | 3 | 220 *** | 40-50 | ||
| Sfiha | 3 | [2740] | 220 *** | 15-25 | |
| Chicken with potatoes | 3 | 200 70-90 | |||
Continuation of the table from the
| Dish | ||||
| OTHER | ||||
| rising and proofing of dough | 2 | / | 30-60 | |
| defrosting 2 / 60-120 | ||||
ELECTRO90
NOTE:
* preheating for 10 min
** turn the dish after 2/3 of cooking *** preheating until the temperature is reached
| Dish | J-c | Omin | ||
| PASTRY AND BAKERY PRODUCTS | ||||
| sponge cake | 2 | 170 | 25-35 | |
| apple pie | 3 | 180 | 60-80 | |
| revani | 2 | 170** | 25-35 | |
| cupcakes | 3 | 160* | 30-40 | |
| yeast-leavened small pastry | 3 | 170 | 20-30 | |
| puff pastry | 3 | 170 | 25-35 | |
| bread 1 kg - 1.5 kg | 3 | 190* | 50-70 | |
| bread rolls | 3 | 210* | 10-20 | |
| toast | 4 | max* | 10-15 | |
| pizza | 2 | max *** | 7-15 | |
| MEAT, POULTRY, FISH | ||||
| lamb chops, 16 pcs | 2 | 200 | 50-70 | |
| lamb thigh, 1.5 kg | 2 | 190 | 130-160 | |
| beef roast (loin, rump), 1.5 kg | 2 | 190 | 130-160 | |
| beef roast, slow cooked, 1.5 kg | 3 | 130 | 180-220 | |
| burgers, thickness 3 cm | 4 | max* | 30-45 ** | |
| veal roast, 1.5 kg | 2 | 190 | 120-150 | |
| whole chicken, 1.5 kg | / | 210 | 60-100 | |
| whole fish 350 g, 2 pcs | 4 | max* | 30-45 * | |
| CONVENTIONAL PRODUCTS – frozen | ||||
| french fries, 400 g | 4 | 225* | 35-45 | |
| chicken medallions, 200 g - 400 g | 4 | 225* | 20-30 | |
| fish sticks, 200 g - 400 g | 4 | 225* | 20-30 | |
| DISHES | ||||
| Quzi | 2 | 220 *** | 120-180 | |
| Tepsi baytinijan | 2 | 220 *** | 35-45 | |
| 180 | 15-25 | |||
| Manakeesh | 2 | max *** | 8-15 | |
| Kibbeh | 2 | 220 *** | 40-50 | |
| Sfiha | 2 | 220 *** | 10-20 | |
| Chicken with potatoes | 2 | 200 | 60-80 | |
Continuation of the table from the
| Dish | °C | min | ||
| OTHER | ||||
| rising and proofing of dough | 2 | / | 30-60 | |
| yogurt | 1 | 40 | 240-360 | |
| defrosting 2 / 60-120 | ||||
General information

If the product is cleaned regularly, the service life of the product extends and the frequently encountered problems reduce
Risk of electric shock!
Power connection of the product should be switched off prior to the cleaning to avoid of any risk of electric shock.

"Caution: Glass lid may crack when heated.
Switch off all burners before the glass cover is closed.


Hot surfaces may cause burns!
Allow the product to cool down prior to cleaning it.
- The product should be cleaned well after each use. This makes it easy to remove food remnants and prevents them from burning onto the surface during subsequent use.
- No special cleaning agent is required to clean the product. Clean it with washing liquid, lukewarm water, and a soft cloth or sponge, then dry with a dry cloth. Make sure any liquid left after cleaning is completely wiped off, and any food splashes during cooking are cleaned immediately.
- For cleaning stainless steel or inox surfaces and the handle, do not use acid- or chlorine-containing cleaning products. Wipe in one direction with a soft cloth dampened with soapy water and a non-abrasive liquid detergent.

Some detergents or cleaning agents may damage the surface. Do not use aggressive detergents, cleaning powders or creams, or sharp objects.

Do not use steam cleaning products for cleaning.
Cleaning the control panel
Clean the control panel and control switches with a damp cloth and wipe dry with a dry cloth.

The control panel may get damaged! Do not remove the control switch to clean the control panel.
Cleaning the oven
No oven cleaner or other special cleaning agents are required to clean the oven. It is recommended to wipe the oven with a damp cloth while it is still lukewarm.

Cleaning and removal of the oven door
Do not use hard or aggressive cleaning agents for cleaning the oven door; these substances may scratch the surface and damage the window.


Removal of the oven door Turn part A shown in figure 1 in the direction of the arrow.
As shown in figure 2, insert part A into part B.


Push forward in the direction of the arrow and pull the oven door toward you as shown in figure 3.
Replacement of the oven lamp

Hot surfaces may cause burns!
- Open the oven door.
To eliminate electric shock, disconnect the power and allow it to cool down prior to removal of the oven lamp.

The oven lamp is a special electric lamp resistant to 300°C. For specifications of the lamp, see Technical specifications, page 3.

Oven lamps may be supplied from the Authorized Service Centers. The position of the lamp may be different from the one indicated in the figure.
If your oven has a round lamp:
- Disconnect the mains power.
- Turn the glass cover anticlockwise and remove.
- Turn the oven lamp anticlockwise and replace with a new one.
- Put the glass cover back in place.

7) Recommended solutions for problems
Product does not operate.
- The plug of the product (earthed) is possibly not plugged into the socket. Make sure it is plugged into the socket.
- The fuse blows or fails. Inspect the fuses in the fuse board. If it is disengaged, engage it again.
Steam goes out when the oven operates.
- Steam going out of the oven during operation is normal. It is not a failure.
Clanging is heard when the product is getting hot and cold.
- The metal parts may make a sound due to expansion at time of heating. It is not a cause of failure.
Oven is not getting warm.
- No power supply. Make sure whether power is available at home and inspect the fuses in the fuse board. If required, engage the fuses again.
- For versions equipped with timer, the timer is not set. Set the time or bring it to the manual (hand) symbol.
- The function and/or temperature switch is not set. Set the function and/or temperature switch.
Oven light does not turn on.
- No power. Make sure whether power is available at home and inspect the fuses in the fuse board. If required, engage the fuses again.
- Oven light is damaged. Replace the oven light.
Problems with the gas oven.
- Burner burns late when ignition is performed. Control the gas pressure whether your product operates at the set pressure (see the nameplate in the rear).
- The burner turns off when it burns for a while. Control the gas pressure whether your product operates at the set pressure (see the nameplate in the rear). • Do not use the cylinder regulator as set.
If the problem is not eliminated although you have applied the instructions given in this section, consult to the dealer or authorized service center. Do not try to repair the any failed product yourself.
8) Labels


Free Standing Cooker, Electrical & Gas Combination

- TABLE OF CONTENTS
- YOUR PRODUCT
- IMPORTANT SAFETY INSTRUCTIONS
- INSTALLATION
- PRELIMINARY PREPARATION
- USE OF THE OVEN
- MAINTENANCE AND CLEANING
- RECOMMENDED SOLUTIONS FOR THE PROBLEMS
- LABELS
- GENERAL VIEW
- ACCESSORIES
- GENERAL SAFETY
- SAFETY FOR CHILDREN
- INTENDED USE
- INSTALLATION AND CONNECTIONS
- MOUNTING OF THE LEGS
- POWER CONNECTION
- LPG CONNECTION
- NG (NATURAL GAS) CONNECTION
- ASSEMBLY OF SPLASHBACK (OPTIONAL)
- REGULATOR
- LEAKAGE CONTROL
- FINAL CONTROL
- PLACEMENT
- DESTRUCTION OF THE PRODUCT
- TRANSPORTATION OPERATIONS IN THE FUTURE
- DISPOSAL OF OLD PRODUCT
- INITIAL PREPARATION
- FIRST USE
- FIRST CLEANING
- FIRST HEATING
- HINTS ON COOKING IN THE OVEN
- HINTS ON ROASTING
- GAS CUT-OFF SAFETY ASSEMBLY (FOR VERSIONS WITH THERMAL ELEMENT)
- USE OF THE GAS OVEN
- USE OF THE CHICKEN ROASTING (OPTIONAL)
- USE OF THE ELECTRIC OVEN
- SWITCHING THE ELECTRIC OVEN OFF
- OPERATION MODES
- UPPER AND LOWER HEATING
- UPPER HEATING
- LOWER HEATING
- TURBO MOTOR (OPTIONAL)
- HOW TO USE THE FUNCTIONS ON COOKERS WITH GAS OVEN
- AIRFRY FUNCTION
- PIZZA FUNCTION
- DEFROST FUNCTION
- HOW TO USE THE FUNCTIONS ON COOKERS WITH ELECTRIC OVEN
- GRATIN FUNCTION
- EN
- MEAT FUNCTION
- AQUA CLEAN FUNCTION
- FISH FUNCTION
- COOKING FUNCTIONS
- USE OF THE OVEN TIMER
- MECHANICAL TIMER (VERSION 2)
- CLOCK SETTING
- USE OF DIGITAL TIMER
- AUTOMATIC COOKING PROGRAMME
- PAUSE MODE
- SETTING THE COOKING ENDING TIME FORWARD →
- BY ENTERING COOKING DURATION
- MANUAL COOKING MODE
- ALARM SETUP
- TURNING OFF THE ALARM
- SETTING MODE
- ALARM TUNE SETTING (AL)
- CHANGING THE TIME (CL)
- CHANGING THE TONE (SO)
- CHANGING THE BRIGHTNESS OF THE SCREEN (SC)
- COOKING DURATION TABLE
- OPERATION OF THE GRILL
- OPENING THE GRILL
- SWITCHING OFF THE GRILL
- GAS
- NOTE
- ELECTRO
- GENERAL INFORMATION
- CLEANING THE CONTROL PANEL
- CLEANING THE OVEN
- CLEANING AND REMOVAL OF THE OVEN DOOR
- REPLACEMENT OF THE OVEN LAMP
- IF YOUR OVEN HAS A ROUND LAMP
- RECOMMENDED SOLUTIONS FOR PROBLEMS
- PRODUCT DOES NOT OPERATE
- STEAM GOES OUT WHEN THE OVEN OPERATES
- CLANGING IS HEARD WHEN THE PRODUCT IS GETTING HOT AND COLD
- OVEN IS NOT GETTING WARM
- OVEN LIGHT DOES NOT TURN ON
- PROBLEMS WITH THE GAS OVEN
Brand : GORENJE
Model : GGI9C21B
Category : Built-in oven