
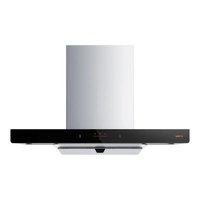
EMG9008 - Range hood Fotile - Free user manual and instructions
Find the device manual for free EMG9008 Fotile in PDF.


| Product Type | Under-cabinet range hood (Exhaust or Recirculating) |
| Model | EMG9008 |
| Brand | Fotile |
| Voltage / Frequency | 220-240 V / 50 Hz |
| Motor Power | 294 W |
| LED Lamp Power | 3 W x 2 |
| Total Power | 300 W |
| Air Volume (Turbo) | 1180 m³/h |
| Air Volume (High) | 1120 m³/h |
| Air Volume (Middle) | 900 m³/h |
| Air Volume (Low) | 500 m³/h |
| Noise Level (Turbo) | 57 dB(A) |
| Noise Level (High) | 56 dB(A) |
| Noise Level (Middle) | 51 dB(A) |
| Noise Level (Low) | 39 dB(A) |
| Max Static Pressure | 900 Pa |
| Grease Separation Degree | 96% |
| Odor Reduction Degree | 99% |
| Installation Height (above stove) | 650 - 700 mm |
| Controls | Touch buttons with gesture control |
| Special Functions | Delay-off, lock screen, carbon filter reminder, gesture activation |
| Cleaning | Removable wing plate and oil filter; clean surface after each use |
| Safety Features | Auto shut-off after 2 minutes idle, thermal protection |
| Warranty | Refer to manual; free warranty subject to conditions |
Frequently Asked Questions - EMG9008 Fotile
User questions about EMG9008 Fotile
0 question about this device. Answer the ones you know or ask your own.
Ask a new question about this device
Download the instructions for your Range hood in PDF format for free! Find your manual EMG9008 - Fotile and take your electronic device back in hand. On this page are published all the documents necessary for the use of your device. EMG9008 by Fotile.
USER MANUAL EMG9008 Fotile
■ 電源 / 延時鍵 ○
Fig.2Fig.1
油網清潔
natural_image
Diagram of a hand placing a grid on a device frame (no text or symbols)
Fig.4Fig.3
清潔保養周期
natural_image
Hand inserting a plug into an electrical outlet with a black arrow indicating direction (no text or symbols)natural_image
Line drawing of a hand pressing down on a device casing (no text or symbols)

natural_image
Illustration of hands inserting a component into a printer (no text or symbols visible)natural_image
Illustration of hands operating a printer with a magnified inset showing the printer's handle (no text or symbols present)natural_image
Abstract geometric shape with gray and white blocks forming an L-shape (no text or symbols)FOTILE
Range Hood
Operation and Installation Manual | EMS6008/EMS6008-C
Please read this product manual carefully before installation and use.
Please keep this product manual for future use.
Dear user, thank you for choosing the Fotile product range meticulously manufactured for you by Fotile. Please read through this Operation and Installation Manual before use (hereinafter referred to as the "manual") to help you familiarize yourself with information concerning safety, operation, and maintenance of this range hood, and enable you to enjoy the new joy of cooking.
Please be sure to read this manual carefully before use, and follow the requirements set out in the manual during use. The operation instruction in this manual is very important for the product to be kept in a good working condition. In case of any product failure due to improper use, you will lose the right to free warranty, and any direct or indirect free warranty application will be rejected by our regional authorized service centers. In addition, it is important to both of us that you are suggested to contact Fotile's local authorized service center when in need of maintenance during or after the warranty period.
Our authorized service center will provide you with professional spare parts and technical support of Fotile, so as to give high-quality and fast maintenance support to your product and offer you the most relaxing and attentive service.
If you need service, please provide the product model and serial number on the product nameplate. Refer to diagram A below to locate the nameplate on your product.

Aurora Trading Group Pty Ltd
* Address: 127/45 Gilby Road, Mount Waverley VIC 3149
* Telephone (03) 9939 9926
* Official Website: www.fotile.com.au
* Service Mailbox: service@fotile.com.au

FOTILE Australia official wechat
Contents
Warnings and Safety Instructions.... 2
Installation 2
Use 2
Don'ts 3
Product Information 5
Product Specifications....5
Product Performance 6
Method of Use 6
Operation Instruction....6
Cleaning and Maintenance....8
Surface Cleaning of the Appliance 8
Cleaning the Wing Plate....8
Cleaning of Oil filter 9
Cleaning and Maintenance Cycle....9
Identification and Troubleshooting of Common Faults 10
Troubleshooting of Common Faults 10
Disclaimer....10
Repair instructions....10
Replacement of the LED Lamp....11
Installation 12
Assembly Height 12
Fume Collection Rangs....14
Packing List.... 15
Precautions before Installation....16
Installation of Exhaust Type Range Hood....18
Installation of Inner Circulating Range Hood....24
Commissioning after Installation 30
Explosive View 31
Product features and parameters are subject to change at any time without notice and may differ slightly from this manual. Visit our official website at www.fotile.com.au for the latest information.
Warnings and Safety Instructions
Installation
Please follow the instructions below precisely
 | As this range hood is heavy and has a complex installation procedure, its installation should be performed by installation and maintenance professionals according to the manual. Such dangers as electric shock, detachment or fire may be caused if installation of screws or fixtures is not completed in accordance with this manual. |
 | The wall on which the range hood is installed should have sufficient support strength. For hollow walls, the thickness of the solid layer of the hollow plate must be greater than 30 mm; for drywalls, the range hood shall be fixed onto the wooden pillar at the back; mounting holes can be drilled directly into concrete walls. The appliance must be firmly installed onto the wall. |
 | Be careful not to damage power cables or other hidden equipment such as gas or water pipes when cutting or drilling walls or ceilings. |
 | Make sure that the exhaust duct of the exhaust type range hood is connected to the outdoors to discharge the exhaust gas, so as to avoid fire hazard and ensure fresh air. |
 | To avoid electric shock, the range hood must be powered off before being moved for installation, cleaning or repairing. Be sure to wear protective gloves during installation, cleaning or repair to protect hands from being injured by the sharp edges of metal plates in the range hood. |
 | A separately controlled power socket is recommended for the range hood. If the range hood is to remain unused for a long time, please power it off. |
Use
Please follow the instructions below precisely
 | Before using this product, please unpack it to check for damage. Do not install and use it in case of any obvious damage, and contact the Fotile authorized service center immediately. |
| [KSOZ] | This product is for daily household use only. Do not use it for commercial purposes or in other specialenvironments (e.g. outdoors); do not use it for discharging hazardous or explosive substances or gases. If this product is used in special circumstances, Fotile will assume no responsibility. |
| [WXAY] | When the range hood and gas stove are used at the same time, make sure that the doors and windows are not fully closed to guarantee a good air circulation in the room. |
 | Please follow the method specified in the manual to clean the range hood to avoid the risk of fire. |
 | To prevent oil overflow, it is recommended that the oil collection device is emptied weekly. Please do not reuse the waste oil collected in the oil collection device for cooking! |
 | Install the range hood directly above the stove and keep it horizontal. |
Don'ts
| Do not modify, stretch, knot, or squeeze the power cable or put it under weight, otherwise accidents such as electric shock or fire may occur due to breakage of the power cable. | |
 | Do not modify the internal wiring of the range hood without permission, otherwise human injury may be resulted from possible abnormal operation. Improper repair may lead to electric shock, fire or other dangers. |
 | Do not discharge the exhaust gas of the range hood into the hot flue used to discharge the smoke from burning gas or other fuels. The relevant air emission regulations must be complied with. |
 | Do not use the gas stove without cookware, otherwise the range hood above may get damaged. |
 | Do not touch the lamp bulb when it is turned on or has just been turned off, otherwise you may suffer burns. |
 | To avoid injury, do not put your hands or other articles into the rotating blades when the range hood is working. |
 | Electrical parts such as motor, switch and connector must not be damped by water. Do not clean the range hood with water. Do not use the range hood after it becomes wet as accidents such as electric leakage and electric shock may occur. |
 | Do not touch the power plug or electrical parts, or operate the power switch with wet hands as electric shock is likely to occur. |
 | The wall for installation shall be noncombustible. The range hood must not be installed on a flammable wall such as wooden wall. |

Reminders: a. Please wipe the outer surface of the range hood after each use.
b.Frequently clean the outer surface of the range hood and oil
collection device to ensure continued use of the product.
Safety
Caution: Accessible parts may become hot when used with cooking appliances.
Special Instructions: Please use the product in strict accordance with the regulations of this manual. Our company will assume no responsibility for any loss of property or personal damage caused by improper use of the product.
Warning: This product is not intended to be used by people with impaired physical, sensory or mental abilities, or a lack of experience or knowledge (including children), unless under the supervision or guidance of the person responsible for their safety.
Please follow the instructions below precisely
 | The plug must be inserted into a power socket which has been installed appropriately and grounded reliably to ensure safety. The grounding wire shall not be connected to a gas pipe, water pipe, lightning rod, telephone line, etc. Poor grounding may cause electric shock or other accidents. |
 | Please follow the safety guide of heating equipment manufacturer, and the safety standards issued by fire control and other administrative departments. |
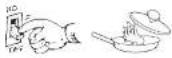 | If the cooking pan is on fire, turn off the range hood immediately (continued operation of the range hood will fuel the fire). Please extinguish the fire with effective methods; for example, cover the open flame with a metal lid, close the main gas valve immediately, and keep combustibles away from the flame. |
 | The temperature of the operating environment of the range hood shall not exceed 40°C. |
 | If the power cable becomes damaged, please contact the Fotile authorized service center for replacement to avoid danger. |
 | If anything abnormal occurs during operation, please turn off the power switch of the range hood, unplug the power plug, or cut off the main power, and call Fotile authorized service center immediately. Continuous operation in abnormal conditions may cause dangers such as electric shock or fire. |
 | Children are not allowed to use the range hood alone, or do not put the range hood in a place where the infant can reach it, otherwise burns, electric shock or other accidental injuries may occur. |
 | To avoid risk of suffocation, children are not allowed to play with plastic packaging bags or boxes: keep the packaging away from children, as it is not a plaything. Children must be supervised strictly, to ensure that they do not play with the product. |
Product Information
Product Specifications
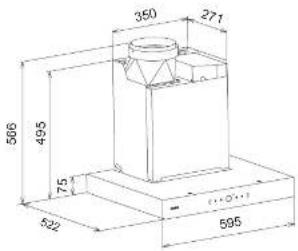
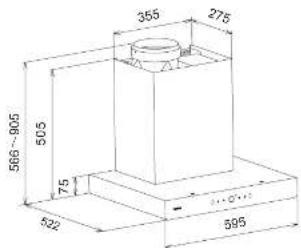
The marked dimensions are for reference only (unit:mm)
EMS6008
EMS6008-C
Product performance
Product model: EMS6008/EMS6008-C
Electrical parameters
| Voltage/frequency | Motor power LED lamp | power | Total input | power |
| 220-240V/50Hz | 294W | 3W×2 | 300W |
Performance parameter
| Grease separation degree 96% | Odor reduction degree | 99% | ||
| Shift Turbo mode High mode Middle mode Low mode | ||||
| Air volume (m3/h) | 1180 1120 | 900 | 500 | |
| Noise (dB(A)) | 57 | 56 | 51 | 39 |
| Maximum static pressure (Pa) | 900 | |||
Notes a. Air volume is tested in accordance with IEC 61591 standard, and noise tested in accordance with IEC 60704-3 standard.
b. The indicated noise value is A-weighted sound pressure level, and the sound power level are 69 dB(Turbo mode), 68 dB(High mode), 64 dB(Middle mode), 51 dB(Low mode);
c. Such parameters as air volume and noise may have a deviation of less than 5%.
Method of Use
Operation instruction
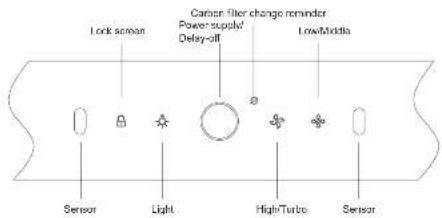
Gesture Function
In Off state, wave your hand and quickly pass by the induction windows on both ends of the operation panel. The range hood will start its high-speed operation and the LED lamp will be switched on. Wave your hand again and quickly pass by the induction windows on both ends of the operation panel, the power/delay indicator will flash and the range hood will be in the shutdown delay status. The LED lamp remains in its original state, and the light can be turned off by gently touching the lamp button. After operating for 1 minute in its current state, the fan will switch to low-speed operation and operate for 4 minutes before shutting down.
In Off state, press the lighting button ⚙ and low-speed/middle-speed button ⚙ simultaneously for 5 seconds, all the buttons on the control panel will be lit for 1 second and then go out. the gesture induction function is enabled/disabled.

■ Power/Delay button ○
In Off state, gently touch the power/delay button once, the range hood will be in the standby state, the power/delay button indicator will be fully lit, and other button indicators will be slightly lit; in the operating state, gently touch the power/delay button, the power/delay button indicator will flash and the range hood will be in the shutdown delay state. The LED lamp remains in the original state, and the light can be turned off by gently touching the lamp button. After operating for 1 minute in the current state, the fan will switch to low-speed operation for 4 minutes before shutting down. In the standby state or delayed shutdown state, gently touch the power/delay button once. All the button indicators will go out and the range hood will then be powered off.
All the following button commands will be carried out in standby mode:
■ High mode/Turbo mode
Gently touch the high mode/turbo mode. The high mode/turbo mode indicator will be half lit. and range hood will operate in high mode; gently touch the high mode/turbo mode again, the high mode/turbo mode indicator will be fully lit and flash, and the range hood will operate in turbo mode state. After 100 seconds, the range hood will return to high mode operation. and the high mode/turbo mode indicator will be half lit.
When the range hood is operating in turbo mode state, gently touch the high mode/turbo mode again, the high mode/turbo mode indicator will be lit slightly, and the range hood will stop operating.
■ Low mode/Middle mode button ✿
Gently touch the low mode/middle mode button, the low mode/middle mode indicator will be half lit, and the range hood will operate in low mode state; gently touch the low mode/middle mode button again, the low mode/middle mode indicator will be fully lit, and the range hood will operate in middle mode state; gently touch the low mode/middle mode button again, the low mode/middle mode indicator will be lit slightly, and the range hood will stop operating.
Lighting button
Gently touch the lighting button, the button will be fully lit and the LED lamp will be turned on. Gently touch the lighting button again, the button will be lit slightly and the LED lamp will be switched off.
■ Lock screen button
When the range hood is not in operation, press the lock screen button for 2 seconds. After the machine makes a clicking sound, the indicator of lock screen button will be fully lit and flash, all buttons will be locked. The screen locking function can be cancelled by long pressing the lock screen button again for 2 seconds.
During operation of the range hood, the lock screen button is not active. If pressed, it will make a clicking sound.
Carbon filter change reminder
It is off by default, and it is only applicable to users who have separately purchased and installed the "carbon filler".
In Off state, simultaneously hold down the lighting button ☐ high mode/turbo mode and low mode/middle mode button for 3 seconds. After hearing a clicking sound, the carbon filter change reminder lamp will be lit and then go out after 1 second. The carbon filter change reminder function is enabled. When this function is enabled, simultaneously holding down the lighting button ☐ high mode/turbo mode and low mode/middle mode button for 3 seconds will disable the carbon filter change reminder function, and a clicking sound will be heard.
When the carbon filter change reminder lights up, please promptly change the carbon filter in the range hood. After completing the change in Off state, simultaneously hold down the lighting button and high mode/turbo mode for 3 seconds. After hearing the clicking sound, the carbon filter change reminder lamp will go out, and the change process is finished.

Prompts: 1. The range hood will shut down automatically if it is not operated for two minutes;
-
It is suggested to turn on the range hood when cooking to keep the kitchen air fresh, otherwise the gesture function may be triggered when more vapor passes by the induction window;
-
For the specific change process of carbon filter, please refer to the following P9 "Operating Steps of carbon filter Change".
Cleaning and Maintenance
Warning:
-
There will be a risk of fire if the range hood is not cleaned as specified in this manual.
-
To avoid electric shock, ensure the power cable is unplugged before cleaning and maintaining the range hood.
-
Make sure that no water gets into the electrical parts such as the motor or control buttons during cleaning.
4.Do not put your hand into the fan operating area during operation of the fan.
- Do not use such solvents as gasoline and benzene or such corrosive chemicals as strong alkali and strong acid for cleaning the range hood.
For better use, please clean the surface of the range hood, oil collection device and front filter assembly frequently. Frequent cleaning of the surface of the range hood, oil collection device and front filter assembly is beneficial to prolonging the service life of the range hood.
Surface Cleaning of the Appliance
Warning: When cleaning, please do not use such rough items such as cleaning balls, brushes or coarse cloth to protect the surface of machine body from scratches.
1. Clean with neutral soap or neutral detergent, and dry the surface of machine body with a soft cloth after cleaning.
2. Use neutral detergent to clean any stubborn dirt on the surface of range hood. Drop detergent onto the dirty area and leave it for a while, wipe off the dirt with a soft cloth, remove the detergent with a slightly damp towel, and then wipe the surface of the range.
3. Do not allow stains to remain on the surface of the range hood for too long.
4. If the stainless steel surface is accidentally stained with saline solution, disinfectant, bleaching powder or other detergents (most of the solvents contain harmful chemical components). Immediately wipe it with wet cloth and then wipe it dry with a dry cloth.
Cleaning the Wing Plate
- Grasp the front edge of wing plate with hands, pull it down to detach the locking tab of the wing plate (Fig. 1).
Then flip it down at a certain angle, and remove the wing plate horizontally with hands finally (Fig. 2). - Soak the wing plate in warm water with neutral detergent, and wash it clean with soft brush or in the dishwasher.
- Reinstall the wing plate after cleaning and wiping.

Fig.1

Fig.2
Cleaning of Oil filter
- First remove the wing plate (see Fig. 1 and Fig. 2);
- Remove the screw and oil filter (see Fig. 3 and Fig. 4);
- Immerse the front filter in warm water with neutral detergent;
- Reinstall oil filter and wing plate after cleaning and airing.

natural_image
Line drawing of a hand inserting a grid into a microwave oven (no text or symbols)Fig.3

Fig.4
Cleaning and Maintenance Cycle
| Parts to be cleaned | Recommended Cleaning (or Change) Cycle |
| Surface of the complete appliance | After each use |
| Wing plate | Clean weekly |
Note: Please determine the specific cleaning period based on the actual cooking situation.
Identification and Troubleshooting of Common Faults
Troubleshooting of Common Faults
| Fault Symptoms Possible | Reason Repair Method | |
| Range hood is not working and the LED lamp is not on | Not powered on | Check whether the power plug is properly plugged in |
| Check whether the socket has power | ||
| Motor rotates but the LED lamp is not on | LED lamp damaged Replace the LED lamp | |
| Noise of mechanical vibration Loose screws | Check whether the screws on the surface of the range hood are tight | |
| Poor suction effect | Installation distance between the range hood and the stove surface is too large | Lower the installation height of the range hood (this operation must be carried out by a maintenance professional) |
| There is too much ventilation and convection in the doors and windows around the range hood | Reduce ventilation or close some doors or windows | |
| Gesture function does not work Gesture function is off | Follow the operation on page P7 to restart the function | |
Disclaimer
- If the range hood still does not function normally after the above troubleshooting, please contact the Eotile authorized service center center.
- Personnel from non-Fotile authorized service center are not allowed to repair the range hood to avoid serious consequences. Otherwise, the product will not enjoy warranty service.
- Free warranty will not be provided in the following circumstances:
a. Damage resulting from improper handling, installation, use, maintenance and safekeeping conducted by the customer.
b. Failure and damage caused by using the product beyond the normal operating conditions (damage caused in the case that the voltage is higher than 264V or lower than 206V)
c. The product installed, dismantled or repaired by customer or any party other than Fotile's authorized service staff or agency.
d. Discrepancy between the information on the purchase voucher and the warranty card and the product.
e. Product damage caused by a force majeure event (such as natural disaster and war, etc.)
Repair instructions
The following information is required:
a. Date of purchase
b. Product model
c. Serial number (please see P2 for specific location)
d. Relevant vouchers for purchase
Replacement of the LED Lamp
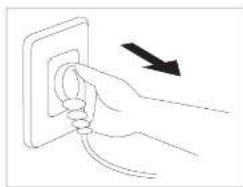
- Unplug the power plug of the range hood, or turn off the power of at the socket
natural_image
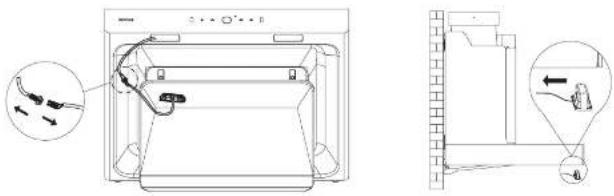
Hand inserting a cable into an electrical socket with a black arrow indicating direction (no text or symbols)- Slightly insert a small blade-type screwdriver into the edge of the lamp, push down and remove the lamp assembly.

natural_image
Line drawing of a refrigerator interior with a hand pointing to the front panel (no text or symbols)- Disconnect the lamp connection line and replace the whole LED lamp(The lamp wire should be assembled toward the wall).
Danger of electric shock: Please unplug the power plug or cut off the power supply of the range hood socket before replacing the LED lamp to avoid electric shock.
Installation
Assembly Height
The marked dimensions are for reference only (unit: mm) Installation diagram of Exhaust Type Range Hood

The hole size of the ceiling or cupboard top plate

The hole size of the cabinet bottom plate
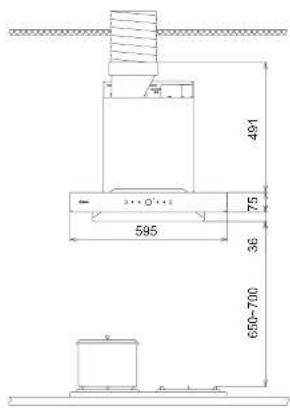
EMS6008 Installation diagram (★ indicating the distance to the wall)


EMS6008-C Installation diagram (★ indicating the distance to the wall)

Installation diagram of Inner Circulating Type Range Hood (★ indicating the distance to the wall)

Note: 1. The installation height of the range hood is the recommended value (this height is the clearance value, i.e. the distance between the supporting surface of the cooking appliance on the stove and the lowest part of the range hood). The diagram of the collocation between the cupboard and the range hood is for reference only.
2. Please pay attention to the clearance between the exhaust fume collecting hood of the range hood and the cupboard on both sides before installation or disassembly.
3. If there is a relevant local law specifying the installation of range hood, it is suggested that you comply with such relevant laws. The suction effect might be influenced.
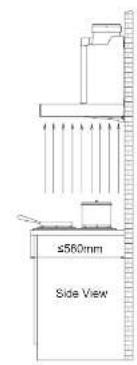
Fume Collection Range
Left and right fume collection range of the range hood

Front and rear fume collection range of the range hood

INADEQUATE
Rangheed smaller than cooking zone
ADEQUATE
Hangshood same size as cooking zone
OPTIMAL Rangahood larger than cooking zone
Packing List
 | ||
 | Outlet housing 1 | |
 | Product instruction manual | 1 |
 | ||
 | Wood screw ST5×65mm | 4 |
 | Gypsum board expansion tube φ4×40mm | 4 |
 | Screw for exhaust duct ST3.9×9.5mm | 4 |
 | Decorative cover screw ST2.9×19mm | 2 (Only for EMS&O8-C) |
 | Decorative cover | 1 (Only for EMS&O8-C) |
 | Wing plate rack 1 |
The following accessories must be purchased separately (please contact the authorized Fotile branch)
| Cover accessories list | |||||
| Fan cover 1 | Decorative cover | 1 | |||
| Decorative cover hook | 1 | Hook screw ST4.2×36mm | 2 | ||
| Gypsum board expansion tube 4 × 40 mm | 2 | Product installation manual | 1 | ||
| Decorative cover screw ST2.9×19mm | 2 | Foam cushion 4 | |||
| Accessories for Recirculating System | |||||
| Wind-guide box accessories list | |||||
| Wind-guide box | 1 | Gypsum board expansion tube φ4×40mm | 5 | ||
| Hook screw ST4.2×36mm | 5 | Product installation manual | Product installation manual | 1 | |
| Carbon filter list | |||||
| Connecting bracket | 1 | Cleaning the Front filter | 1 | ||
| Carbon filler | 1 | ||||
Precautions before installation
Safety Precautions
Special Note: In order to ensure the safe and correct use of this product, the installation and maintenance must be carried out by the service professionals authorized by Fotile. If the product does not function normally due to the installation or repair by customer or any party other than Fotile's authorized service staff, even during the warranty period, it is not within the scope of free warranty.
Please read all the instructions carefully prior to installation. Pay special attention to the following matters:
1. If you are decorating your kitchen, please do not leave the range hood exposed: the surface of the range hood will be corroded and lose luster due to building materials, dust, paint, coatings and the gases they volatilize. It is suggested to install the range hood after the kitchen is decorated.
2. As this range hood is heavy and has a complex installation procedure, it must be installed according to the instructions in the manual by installation and maintenance professionals authorized by Fotile.
3. When cleaning items around the range hood (such as suspended ceiling and cupboard) that may touch the range hood, please wear protective gloves and take other protective measures to prevent injuries or scratches.
4. Please be careful not to damage wires and other hidden equipment when drilling holes in the wall. The power supply cannot be switched on during installation, and the power should be turned off in the main power box.
5. A dedicated power socket which is reliably grounded must be used for the range hood. Electric shock, plug and socket heating and fire may easily occur when the power cable is connected in the middle, or if extension lines or multiport wiring devices are used. Please ensure that the operation is carried out by a professional electrician and in strict accordance with the power regulations of all applicable countries and regions: before wiring, please turn off the power supply and take reasonable measures to prevent the power supply from being automatically connected.
6. If the gas stove needs to be moved before installing the range hood, please close the main gas valve first.
7. The wall on which the range hood is installed should be sufficiently strong.
8. In order to ensure safety and smooth installation, during the installation of the expansion tube, there must be tight coordination between the expansion tube and the hole in the wall. It is strictly prohibited to drill
too much, so as to prevent the expansion tube from getting loose and accidentally falling.
-
To avoid fire hazards and keep the air fresh, the exhaust duct of the exhaust type range hood must be connected to the outdoor to discharge the exhaust gas.
-
It is not permitted for the exhaust gas discharged from the range hood to be discharged into the hot flue for burning gas or other fuel.
-
Try to ensure the fuselage remains horizontal during installation.
- Confirm there are no abnormalities found in the trial operation upon installation. Please read the manual carefully and keep it for future reference.
- Where there is a step difference on the installation wall of the range hood as shown in Fig.1, if there is a situation as shown in Fig.2, the operation shall be carried out as shown in Fig.3, i.e., the support plates shall be added on the back of the hook and the foot-pad of the range hood. The thickness of the support plates shall be consistent with the height of the steps.

Fig. 1
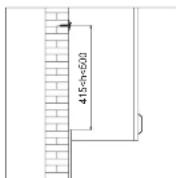
Fig. 2

Fig. 3
Installation position
- The range hood can only be installed in domestic kitchens, please do not use it in other situations.
- The range hood must be installed above the stove, and the installation position is as shown in the installation diagram.
- The temperature of the surrounding environment of the range hood cannot exceed 40°C.
- The installation wall shall be noncombustible, and it is strictly forbidden to install on such flammable walls as those made of wooden wall.
- Please follow the installation dimensions recommended in this manual to ensure the best oil fume suction effect.
■ Precautions before Installation
⚠ Warning: In order not to cause damage to the range hood, please make sure that no sundries enter the exhaust outlet.
1. To estimate the position of the exhaust duct from the range hood to the outside, refer to the installation diagram.
2. A straight short exhaust duct will make the smoke exhaust of the range hood more effective.
3. Try to avoid using an exhaust duct that is too long and has many bends, which will affect the smoke exhaust effect of the range hood.
4. The connection between the exhaust duct and the wall hole shall be tightly sealed with pipe adhesive tape. The exhaust duct must also be firmly connected to the exhaust hood
5. If the hole in the wall hole is too small, the smoke exhaust effect shall be affected. To ensure safety, it is recommended the hole is expanded to the original size of the exhaust duct.
● Tool preparation
The following tools are required for installation of this range hood
(1) Electric impact drill (with drill φ 8) (2) Phillips screwdriver
(3) Wire pliers (4) Tape measure
(5) Ribbon saw (6) Level bar
Installation of Exhaust Type Range Hood

EWS6008 Installation dimension drawing (uniform)

EM3005-C Installation dimension drawing : unit mm
Warning: make sure operate with protective gloves.
- Open the packing box and remove the main body. Check the packing list (see P15)

- Remove the fan cover and decorative hood (only for EMS6008-C): remove the 2 screws that fix the fan cover behind the main body with a screwdriver(see Fig.6), and then grab the fan cover and decorative hood with both hands to take them out upward(see Fig.7).

Fig.6

Fig.7
- Confirm the position for fixing the hook: first, draw a vertical center line at the center point where the range hood is to be installed, then take the supporting surface of the cooking utensils on the stove as the reference point, accurately determine the installation position of the hook on the solid wall, and make a punch mark. The hook size of the main body is 1132mm-1182mm from the supporting surface of cooking utensils on the stove to the bolt hole of the hook; the hook size of the decorative hood (special for EMS6008-C) is 156mm-439mm from the bolt hole of the main body hook to the bolt hole of the cover hook,
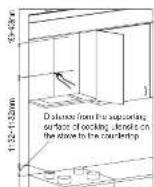

Notes: If ceramic tile, marble or glass and other decorative plates are found to protrude from the mounting surface of the hook, please refer to Point 13 of "Installation Precautions" in P17 for operation.
- How to fix the hook:
1) Ceramic tile (marble) at the drilling mark: drill φ 8mm hole at the drilling mark with an electric drill, then embed the ceramic tile expansion tube (5.3 × 32mm), fix the hook with the hook screw (ST4.2 × 36mm), and use a spirit level to make sure the hook is level.
2) Gypsum board at the drilling mark: screw the gypsum board expansion tube (4 × 40mm) directly into the wall surface with a screwdriver at the drilling mark, then fix the hook with the hook screw (ST4.2 × 36mm), and use a spirit level to make sure the hook is level:

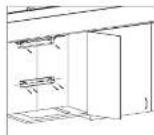
3) For the cover hook, two cover hook screws (ST2.9 × 19 mm) can be used to fix it to the ceiling.

Notes: 1) The drill bit shall be selected according to the specific situation of the wall material at the installation site.
2) After cleaning with strong acid/alkali detergent or dish washing powder, it may cause the change of color of the front filter screen, but it does not affect the use.
- Drilling the cupboard base board: First confirm the center line of the cupboard base board, then draw the drilling line according to the drilling size of the upper cupboard base board, and finally cut the hole in the cupboard base board along the drilling line with the wood cutting tool;

- Installation of the exhaust duct: if the common flue interface or wall hole is larger than the diameter of the aluminum foil exhaust duct, the aluminum foil exhaust duct can be directly connected. If the common flue interface or wall hole is smaller than the diameter of the aluminum foil exhaust duct, the exhaust duct adapter shall be fitted on the end of the aluminum foil exhaust duct without plastic fixing ring, and shall be glued and sealed with adhesive tape. The small end of the exhaust duct adapter has two outer diameter specifications of 150mm and 125mm. Please cut off the excess part smaller than the common flue interface or wall hole according to the actual situation;
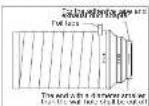
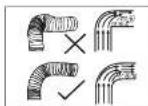
Notes: a. The joint between the exhaust duct and the common flue or the wall hole must be tightly sealed to prevent smoke leakage, and the exhaust duct should not be squeezed, deformed or turned at a small angle. The number of bending should no more than one, and the extraction hose should be straight;
b. The diameter of the common flue interface or wall hole should be basically the same as the diameter of the exhaust duct and should not be too small, otherwise it will cause poor smoke exhaust, increased noise and reduced air volume.
- Installation of the exhaust hood: fix the exhaust hood and sealing ring at the air outlet of the main body with 8 exhaust hood screws (M4 × 18 mm);

- Remove the protective film from the top plate surface;

- Lift the main body, let the fan frame pass through the cupboard bottom plate, hang the back hook hole onto the hook, confirm the level of the main body with a level bar, and fix the fan frame and the hook with the fan frame screw (M4 × 6mm);

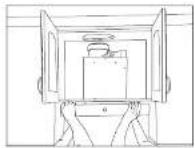

- Connect and fix the exhaust duct: according to the actual installation position of the main body, cut off the redundant exhaust duct with wire pliers, then fix the exhaust duct on the exhaust hood with two exhaust duct screws (ST3.9x9.5), and wrap and seal with sealing tape;

- Insert the power plug of the main body into the power socket, start the range hood, and check whether the connection between the exhaust duct and the exhaust hood is sealed in good condition;

- Installation of the fan cover and decorative hood (only for EMS6008-C); 1) Remove the protective film from the surface of fan cover and decorative hood;
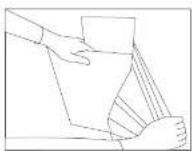

2) Put the decorative hood into the fan cover;
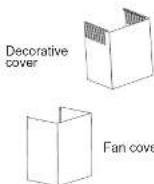

3) Take up the fan cover and the decorative hood at the same time, hang the decorative hood on the hook of the decorative hood first, and then simultaneously push the decorative hood and the fan cover to the end along the cover hook;


4) Slide the fan cover down slowly, clip the locking tab of the fan cover into the fan frame, and then insert the fan cover into the gap between the top plate and the fan frame.

natural_image
Simple line drawing of a box with a downward arrow, no text or symbols present
- Installation the wing plate rack;
1) Remove the components of the rack;

2) Remove the screw cap:
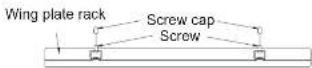
3) Fix the components of the rack to the bottom of the range hood with a cross screwdriver.

Before installation
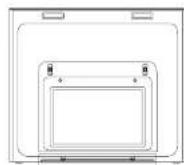
After installation
- Installation of the wing plate;
1) Remove the protective film from the wing plate;
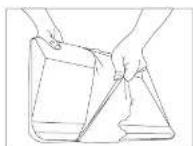
2) Hold the front side of the wing plate tightly with both hand, and putting the left and right hook on the rear side of the wing plate into the hook frame at the bottom of the exhaust fume collecting hood;
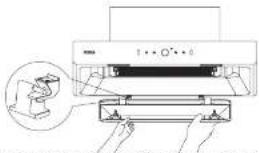
3) Hold the wing plate with both hands and rotate it upward, clamp the locking tab of the wing plate into the bump buckle on the exhaust fume collecting hood.

Notes:1.Failure to install all the parts (e.g. wing plate) in accordance with these instruction, may result fire hazard.
- If it takes much effort to clip the locking tab of the wing plate into the buckle on the exhaust fume collecting hood, please refer to Point 13 of "Precautions for Installation" in P17 to check the status of installation surface for the range hood and operate according to the instructions.
Installation of Inner Circulating Type Range Hood

Warning: make sure operate with protective gloves.
- Open the packing box and remove the main body, and check the packing list (see P15);

- Remove the fan cover and decorative hood (only for EMS6008-C): remove the 2 screws that fix the fan cover behind the main body with a screwdriver(see Fig.8), and then grab the fan cover and decorative hood with both hands to take them out upward(see Fig.9);

Fig.8

Fig.9
- Confirm the position used to fix the hook of main body and wind-guide box: first, draw a vertical center line at the center point where the range hood to be installed, then take the supporting surface of the cooking utensils on the stove as the reference point, accurately determine the installation
position of the hook of main body and wind-guide box on the solid wall, and make a punch mark. The hook size of the main body is 1132mm-1182mm from the supporting surface of cooking utensils on the sleeve to the bolt hole of the hook.
The size of the wind-guide box: the top surface of the wind-guide box shall be installed close to the ceiling, the screw hole at the lower end of the wind-guide box shall be 118mm from the ceiling, and the screw hole from the screw hole of hook of main body to the screw hole at the lower end of the wind-guide box shall be ensured to be within the range of 211mm-341mm.


Note: If ceramic tile, marble or glass and other decorative plates are found to protrude from the mounting surface of the hook, please refer to Point 13 of "Installation Precautions" in P17 for operation.
- Fix the exhaust duct on the wind-guide box with sealing tape;

- Fix the hook of main body:
1) Ceramic tile (marble) at the drilling mark: drill 8mm hole at the drilling mark with electric drill, then embed the ceramic tile expansion tube (5.3 × 32mm), fix the hook with the hook screw (ST4.2 × 36mm), and make sure the hook is level with a level bar.
2) Gypsum board at the drilling mark: screw the gypsum board expansion tube (4 × 40mm) directly into the wall surface with a screwdriver at the drilling mark, then fix the hook with the hook screw (ST4.2 × 36mm), and use a spirit level to make sure the hook is level.


Note: After cleaning with strong acid/alkali detergent or dish washing powder, it may cause the change of color of the front filter screen, but it does not affect the use.
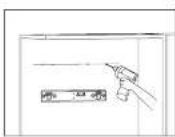
- Fix the wind-guide box: directly screw the gypsum board expansion tube (φ4×40mm) into the wall surface with a screwdriver at the drilling mark (3 on the back wall and 2 on the ceiling), and then fix the wind-guide box with the hook screw (ST4.2 × 36 mm);

- Install the exhaust hood: fix the exhaust hood and sealing ring at the air outlet of the main body with 8 exhaust hood screws (M4 × 18 mm);

- Remove the protective film from the top plate surface;

- Lift the main body, hang the back hook hole onto the hook, confirm the level of the main body with a level bar, and fix the fan frame and the hook with the fan frame screw (M4 × 6mm);

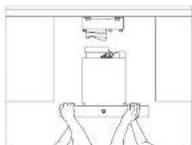

- Connect and fix the exhaust duct: according to the actual installation position of the main body, cut off the redundant exhaust duct with wire pliers, then fix the exhaust duct on the exhaust hood with two exhaust duct screws ST3.9x9.5mm, and wrap and seal with sealing tape;

- Insert the power plug of the main body into the power socket, start the range hood, and check whether the connection between the exhaust duct and the exhaust hood is sealed in good condition;

- Install the fan cover and decorative hood :
1) Remove the protective film from the surface of fan cover and decorative hood;


2) Put the decorative hood into the fan cover;


3) Take up the fan cover and the decorative hood at the same time, hang the decorative hood on the wind-guide box first, and then simultaneously push the decorative hood and the fan cover to the end along the wind-guide box:
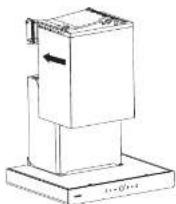

4) Slide the fan cover down slowly, clip the locking tab of the fan cover into the fan frame, and then insert the fan cover into the gap between the top plate and the fan frame.
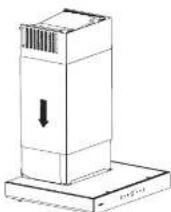

- Install Carbon Filter:
1) First, detach the locking tab of the front filter directly, and remove the front filter;
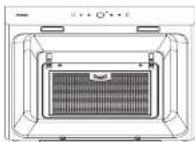

2) Install the carbon filter.


3) Finally, install the removed front filter in the original position.
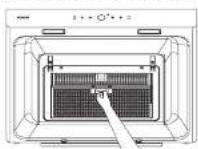
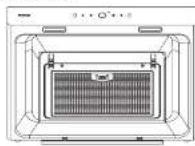
- Installation the wing plate rack;
1) Remove the components of the rack;

2) Remove the screw cap:

3) Fix the components of the rack to the bottom of the range hood with a cross screwdriver.

Before installation

After installation
- Install the wing plate;
1) Remove the protective film from the wing plate;

2) Hold the front side of the wing plate tightly in both hands, and put the left and right hook on the rear side of the wing plate into the hook frame at the bottom of the exhaust fume collecting hood;

natural_image
Illustration of hands operating a printer with a magnified inset showing the printer's internal structure (no text or symbols present)3) Hold the wing plate with both hands to rotate it upward, and then clamp the locking tab of the wing plate into the bump buckle on the exhaust fume collecting hood.
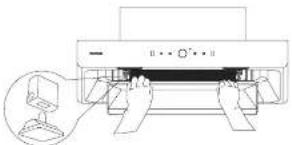
Notes:1. Failure to install all the parts (e.g. wing plate) in accordance with these instruction, may result fire hazard.
- If it takes much effort to clip the locking tab of the wing plate into the buckle on the exhaust fume collecting hood, please refer to Point 13 of "Precautions for Installation" in P17 to check the status of installation surface for the range hood and operate according to the instructions.
Commissioning after Installation
- Press the power/delay button, then press the high-speed /turbo button to check whether the motor rotates normally. In case of the following abnormal conditions, cut off the power supply immediately, stop the operation, and check whether this is due to installation
(1) The body vibrates violently (2) The blades not rotate
(3) There is an obvious friction sound when the blades rotate (4) The motor makes an abnormal - Check whether all buttons are functioning normally according to the operation instructions. (If it is determined that the range hood is faulty, please call the Fotile authorized service center)
Correct Disposal of this product

This marking indicates that this product should not be disposed with other household wastes throughout the EU. To prevent possible harm to the environment or human health from uncontrolled waste disposal, recycle it responsibly to promote the sustainable reuse of material resources. To return your used device, please use the return and collection systems or contact the retailer where the product was purchased. They can take this product for environmental safe recycling.
Explosive View



- ■ 電源 / 延時鍵 ○
- 油網清潔
- 清潔保養周期
- Range Hood
- Aurora Trading Group Pty Ltd
- Contents
- Warnings and Safety Instructions
- Please follow the instructions below precisely
- Don'ts
- Safety
- Product Information
- Product Specifications
- Product performance
- Method of Use
- Operation instruction
- Gesture Function
- ■ Power/Delay button ○
- ■ High mode/Turbo mode
- ■ Low mode/Middle mode button ✿
- Lighting button
- ■ Lock screen button
- Cleaning and Maintenance
- Surface Cleaning of the Appliance
- Cleaning the Wing Plate
- Cleaning of Oil filter
- Cleaning and Maintenance Cycle
- Identification and Troubleshooting of Common Faults
- Disclaimer
- Repair instructions
- Replacement of the LED Lamp
- Installation
- Assembly Height
- Fume Collection Range
- Precautions before installation
- Safety Precautions
- Installation position
- ■ Precautions before Installation
- ● Tool preparation
- Installation of Exhaust Type Range Hood
- Warning: make sure operate with protective gloves.
- Installation of Inner Circulating Type Range Hood
- Commissioning after Installation
- Correct Disposal of this product
- Explosive View
Brand : Fotile
Model : EMG9008
Category : Range hood