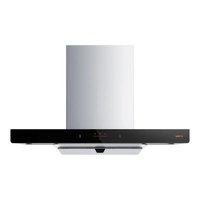
EMG9037 - Range hood Fotile - Free user manual and instructions
Find the device manual for free EMG9037 Fotile in PDF.


| Product Type | Range Hood |
| Brand | Fotile |
| Model | EMG9037 |
| Placement | Wall-mounted |
| Width | 900 mm |
| Depth | 500 mm |
| Height (adjustable chimney) | 600 mm |
| Weight | 28 kg |
| Power Supply | 220-240 V, 50 Hz |
| Motor Power | 280 W |
| Maximum Suction Capacity | 1100 m³/h |
| Noise Level | 45 dB (min) - 65 dB (max) |
| Controls | Touch control panel with LED display |
| Lighting | 2 x 1.5 W LED lights |
| Grease Filter | Aluminum mesh, dishwasher safe |
| Carbon Filter | Optional, for recirculation mode |
| Exhaust Diameter | 150 mm |
| Energy Efficiency Class | A+ |
| Special Features | AutoClean function, remote control |
| Safety Features | Motor overheat protection, auto shut-off |
| Maintenance | Clean grease filters every month |
| Spare Parts Available | Grease filters, carbon filters, LED bulbs, motor |
| Warranty | 2 years (with registration) |
Frequently Asked Questions - EMG9037 Fotile
User questions about EMG9037 Fotile
0 question about this device. Answer the ones you know or ask your own.
Ask a new question about this device
Download the instructions for your Range hood in PDF format for free! Find your manual EMG9037 - Fotile and take your electronic device back in hand. On this page are published all the documents necessary for the use of your device. EMG9037 by Fotile.
USER MANUAL EMG9037 Fotile
Any needs, please contact FOTILE service center. Some pictures in this manual are sketch map, only for reference. If there are some discrepancies, please subject to real object.
WWW.FOTILEGLOBAL.COM
Please read carefully about the user manual before using the product. And keep it well after reading, for future reference.
Dear User, thank you for purchasing the Fotile Range Hood. At Fotile, we manufacture exquisite appliances that are expertly crafted with the finest materials. Before using the Fotile Range Hood, please take some time to read through this Product Manual (manual). It will familiarize you with important safety, operation and maintenance instructions, as well as help maximize your culinary experience.
Before using the Fotile Range Hood, you must follow the instructions, as specified in this manual. Any damage resulting from the improper operation and/or maintenance of the appliance may result in the loss of warranty. The warranty will become invalid, and your warranty application, whether direct or indirect, will not be accepted by authorized service center of Fotile. If you require warranty or post-warranty after-sale service, please contact the local authorized service center of Fotile nearest you.
Your satisfaction with the Fotile brand is important to us. Our after-sales service centers provide assistance in resolving issues with Fotile appliances.
Product model and serial number on the plaque are required if you need services.
CONTENTS
Warning and Safety Instructions 1
Usage 4
Main Technical Specifications 4
Operation Instruction 5
Cleaning and Maintenance 6
Normal Malfunction and Trouble Shooting 8
Installation 9
Packing List 9
Installation Methods 10
Product Basic Conditions 11
Installation Suggestions 11
Installation Steps 13
Debugging 15
Component Name Diagram 16
Product features and specifications are subject to change, at any time, without notice and may be different from those in this material. Please visit our website at www.fotileglobal.com for the most up-to-date information.
Warning and Safety Instructions
CAUTION: Accessible parts may become hot when used with cooking appliances.
Special version:
Please properly use the appliance, strictly complying with the user manual. FOTILE company will not bear responsibility for property loss and personal injury due to improper use
Warning:
The appliance can be used by children aged from 8 years and above and persons with reduced physical, sensory or mental capabilities or lack of experience and knowledge if they have been given supervision or instruction concerning use of the appliance in safe way and understand the hazards involved(only for EU market).
Children shall not play with appliance.
Cleaning and user maintenance shall not be made by children without supervision. This appliance is not intended for use by persons (including children) with reduced physical, sensory or mental capabilities, or lack of experience and knowledge, unless they have been given supervision or instruction concerning use of the appliance by a person responsible for their safety.

Pour out the gathering oil periodically according to the oil cup indication; please wipe the range hood surface once after every using the range hood; clean the air inlet outer cover and inner cover every three days; clean the impeller once every year (clean by professional people).
b. Please frequently clean the range hood surface, rectification plate and oil cup.
c. There is a fire risk if cleaning is not carried out in accordance with the instructions.
d. please do not flambe under the range hood.
Strictly execute
| Ground Connection | The plug should be connected with reliable ground wire to ensure safety. The ground wire should not be connected with gas pipe, tap water pipe, lightening rod and telephone line. Bad ground connection may cause electric shock or other accidents. |
| Failure to install the screws or fixing device in accordance with these instructions may result in electrical hazards. | |
| If the new range hood is damaged obviously before using, please don't install and contact FOTILE service center soon. | |
| Please comply with the safety guideline provided by the heating equipment manufacturer priorly and safety regulations published by the fire authority simultaneously. |
| The wall should be strong enough to support the range hood. As for hollow wall or hollow plate, the thickness of its solid part should be no less than 30mm. As for concrete wall, the installation can be directly operated. The range hood should be firmly fixed on the wall. | |
| When drilling on the roof or ceiling, please make sure not damage the electric wires and any other hidden devices. | |
| The range hood is for family use only, and don't use it in special environment (e.g. outdoor), and it also can't be used to exhaust dangerous or explosive substance or gas.Fotile assumes no responsibility if you use it in special environment. | |
| There shall be adequate ventilation of the room when the range hood is used at the same time as appliances burning gas or other fuels. | |
| When the cooking pots catch fire, turn off the range hood immediately (It will stimulate the fire if the range hood is working). Effective fire extinguishing measures must be taken at once, such as covering the open flame with metal cover, turning off the general gas valve and keeping flammable substance away from the open flame, etc. | |
| Make sure the exhausting pipe can reach outdoors to avoid the fire and keep the fresh air in the room. Please don't make the waste gas stay indoor, loft, garage, etc. (This is only for ducted range hood) | |
| The working temperature should not be more than 40°C. | |
| Please clean the range hood according to the user manual, otherwise, it may catch fire or cause other dangers. | |
| Please clean the oil cup timely to avoid overflowing when the oil reaches the very scale in the oil cup. Please don't use the waste oil. | |
| Before install, clean or repair the range hood, please make sure cut off the power to avoid the electric shock. And wear protective golves to avoid your hands being hurt by range hood metal panel. | |
| The plug shall be accessible after the appliance has been installed.Cut off the power if you are not going to use range hood for a long time. | |
| If the supply cord is damaged, it must be replaced by the manufacturer, its service agent or similarly persons in order to avoid a hazard. |
FOTILE
RANGE HOOD
 |  | If there is abnormality, please turn off the range hood and cut off the main power supply, contact FOTILE service center to repair it. It will easily cause dangers like electric shock, fire, if the range hood still working under abnormal conditions. |
 | Please don't let children use range hood by themselves and don't place it where infants can touch, otherwise, it will cause burning injury, electric shock or other accidents. | |
 |  | Please keep the product plastic package away from the infants, to avoid suffocation, etc. Children should be supervised to ensure that they do not play with the appliance. |
Forbidden
 | Please clean the range hood according to the user manual, otherwise, it may catch fire or cause other dangers. | |
 | Don't transform, stretch, tie, ballast or extrude the power cord, or it may cause electric shock or fire. | |
 | Don't change the internal wiring by yourself, otherwise, it will cause possible abnormality and personal injury; and the improper repair leads to electric shock, fire or other dangers. | |
 | The air must not be discharged into a flue that is used for exhausting fumes from appliances burning gas or other fuels.Regulations concerning on the discharge of air have to be fulfilled. | |
 | Don't let the stove working without pot otherwise it will damage the above range hood. | |
 | Don't touch the bulb that is still working or finish working for a short while, to avoid scalding. | |
 | Don't put your hands or other things into impeller when it is working to avoid hurting. | |
  | All electrical parts including motor, switch and connections, etc. should be away from water. Don't rinse range hood directly with water. Don't use the range hood when it is wet to prevent electric shock. | |
 | Never touch the power plug, power switch or other electric parts with wet hand, otherwise, it may cause electric shock. |

a. Services guaranteed under warranty must be performed by Fotile certified service provider or personnel. The warranty is not effective for products removed for repair without authorization.
b. Adhere to the voltage and frequency settings listed in this manual to avoid possible damages to the range hood.
c. When the range hood and appliances supplied with energy other than electricity are simultaneously in operation, the negative pressure in the room must not exceed 4 Pa (4 x 10⁻⁵ bar) (only for GERMANY).
d. Range hoods and other cooking fume extractors may adversely affect the safe operation of appliances burning gas or other fuels (including those in other rooms) due to back flow of combustion gases. These gases can potentially result in carbon monoxide poisoning. After installation of a range hood or other cooking fume extractor, the operation of flued gas appliances should be tested by a competent person to ensure that back flow of combustion gases does not occur.
e. Tempered glass is applied to the products of the company and the tempering treatment of the glass determines the extremely little possibility of spontaneous explosion. If the occurrence of spontaneous explosion is not due to improper use, our company promises free replacement of the accessories. The possibility of tempered glass breaking can be significantly increased in the following situations, which should be avoided: For instance, hitting the glass, especially the corners of the glass, with cooking utensils or other hard objects; The glass is impacted when you open a cabinet door around the Range Hood; Put the glass in an extremely hot or cold environment or an environment where heat and cold are excessively alternated.
Usage
Main Technical Specifications
Electrical parameter
| Model | Voltage/Frequency | Input Power |
| EMG9037 | 220~240V/50Hz | 300W |
Exhaust model (exhaust pipe)
| Model | EMG9037 | Overall dimension | 895mm×513mm×518mm | |
| 220V/50Hz | Max static pressure(Pa) | 420 | ||
| Gear | Low | High | Boost | |
| Air flow(m3/h) | 790 | 1160 | 1160 | |
| Noise(dB) | 47 | 53 | 54 | |
| 240V/50Hz | Max static pressure(Pa) | 420 | ||
| Gear | Low | High | Boost | |
| Air flow(m3/h) | 880 | 1160 | 1240 | |
| Noise(dB) | 49 | 54 | 55 | |

a. For the Boost mode, air flow and noise in the table are the maximum value.
b. Noise shown in table is sound pressure level. The corresponding sound power level is: 220V: 59dB (A) for low speed, 65dB (A) for high speed and 66dB (A) for boost; 240V: 61dB (A) for low speed, 66dB (A) for high speed and 67dB (A) for boost.
c. The air flow in the table are tested in accordance with IEC 61591-2010 standard. The noise in the table are tested in accordance with 60704-3-2006 standard.
Operation Instruction
EMG9037
- Let's be familiar with the range hood control interface.

Power supply
(1) Touch ① slightly, and the range hood enters the standby state, if no other button is pressed in 2 minutes, the range hood will shut down automatically.
(2) When the fan is on, touch ⏻ slightly and ⏱ flashes. Then the range hood enters the delay state and it will automatically turn off if no other operation is made within 2 minutes.
(3) In the delay state, touch ① slightly, and the range hood will turn off.
(4) In the delay state, touch ♂ slightly, and the delay state will remain unchanged.
(5) In the delay state, touch ✧/ ✧ slightly to exit the delay state and enter the corresponding function state.
(6) If only the LED lamp is on, touch ① slightly to power off the range hood.
(7) In the standby or delay state, touch slightly and hold ① for 5 seconds to terminate all functions (including gesture sensing) and the range hood switches to the Off state; touch ① slightly again, and the gesture sensing recovers automatically.
■ ☐ ☐ Gesture induction
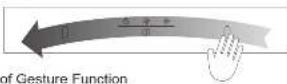
(1) Wave your hand ♂ quickly through the sensing windows at both ends to turn on/off the range hood (including the fan & LED lamp).
(2) In the Off state of the range hood, press ✕ and ✦ at the same time for 5 seconds to enable/disable the gesture sensing function.

The following keys are only valid when the power is on.
Boost speed
Touch ◆ slightly, and ◆ flashes to enable the boost speed for 3 minutes, 3 minutes later, boost speed ends, ◆ goes off, the range hood switches to the high speed, and ◆ lamp is constantly on. Touch ◆ slightly during boost speed, and the fan will turn off. (If no other operation is performed after pressing ◆ for the first time, the range hood will be automatically switched to the high speed 3 minutes later, and the ◆ lamp is constantly on at this moment.)
High/Low speed
(1) Touch ✦ slightly, and ✦ lamp is constantly on and the range hood operates in high speed.
(2) In high speed, touch ✕ slightly, ✕ lamp decreases in brightness and the range hood operates in low speed.
(3) In low speed, touch ⚙ slightly, and the fan will turn off.
Lighting
Touch ♂ slightly, ♂ lamp is constantly on, so the lamp is turned on. Touch it slightly again, the lamp will turn off.
Cleaning and Maintenance
Warning:
• The range hood may be at risk of fire if it is not cleaned as specified in the Instruction.
- Before the range hood is cleaned or repaired, it should be made sure that the power cord is unplugged to avoid electric shock.
- While the range hood is being cleaned, water should be prevented from entering electrical components such as motors and control keys.
- When the fan is in operation, it is forbidden to put your hand within the operating area of the fan.
- Gasoline, acids, benzene, solvents or any other chemicals shall never be used to clean the range hood.
In order to use the range hood more comfortably, the surface of the range hood, wing plate, air intake hood and oil cup should be frequently cleaned.
Cleaning the surface of the range hood, wing plate, air intake hood and oil cup frequently will facilitate the normal use of it.
■ Cleaning the surface of the range hood
⚠ Warning: In order to avoid scratching the surface of the range hood, never clean the machine with rough objects such as cleaning balls, brushes, scouring pad and coarse cloth.
- The range hood shall only be cleaned with neutral soap or detergent. After cleaning, dry the surface with a soft cloth.
- If the surface of the range hood appears to be smeared, a neutral detergent shall be used to clean the stain and the detergent shall not touch the control keys. Drip the detergent to the stain and leave it on the stain for a moment (the detergent should not stay on the range hood for too long, otherwise damage will be caused to the range hood). Wipe off the stain using a soft rag; remove the detergent with a slightly damp towel, and then dry the body with a soft dry towel.
- Do not leave stains on the surface of the range hood for too long.
- If you accidentally drip salt solution, disinfectant, bleach and other detergents on the stainless steel panel (most of these detergents contain harmful chemical ingredients), immediately wipe it with damp cloth and then dry it with dry cloth.
FOTILE
RANGE HOOD
■ Cleaning the oil cup, wing plate and air intake hood
- Hold both ends of the oil cup with both hands, keep the oil cup horizontal, move out slowly toward the front direction of the range hood, take down the oil cup and then drain off the accumulated oil (Figure 1);
- First, grasp the front edge of the wing plate with both hands, turn it down to disengage the wing plate locking tab, and then turn it down at a certain angle, take down the wing plate (Figure 2), then hold the air intake hood with left hand, loose the two screws fixing the air intake hook with right hand by using cross-head screwdriver (Figure 3), take down the air intake hood (Figure 4), soak the oil cup, wing plate and air intake hood in warm water containing neutral detergent, and clean them with soft brush;
- After cleaning, dry it, fix the air intake hood in the original position with screws, and then install the wing plate and oil cup.
★Suggestion: After each operation of the range hood, please wipe the outer surface of the range hood (including the outer surface of the wing plate); clean the wing plate every three months;

fig 1

fig 2

fig 3
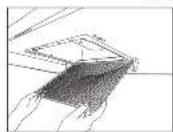
fig 4

a. Please cut off the power first before cleaning and replacing components so as not to get an electric shock.
b. Please wipe surface of range hood after using range hood every time.
c. Use type lamp is self-ballasted fluorescent reflector lamp - Integral induction type
ballast.
- Max wattage: 2W
- Voltage range: 9\~10V
- Dimensions: width 7 7/8"(199mm)/depth 5/8"(15.5mm)/height 1 15/16 *(49.1mm)
Normal Malfunction and Trouble Shooting
| Malfunctions | Possible reasons | How to check |
| Range hood can't work, light can't lighten | Haven't connected with power supply | Check whether the plug is well inserted or not |
| Check whether there is electricity or not in the plug | ||
| Motor can working, but light can't lighten | LED light is damaged | Replace LED light (done by professional people) |
| There is machinery shaking noise | Screw is foosed | check whether the surface screws are tightened or not |
| Surfion power is weak | Too long distance between range hood and above | Lower the range hood installation height (done by professional people) |
| Too much ventilation near the range hood leads to strong convection | Close some doors and windows | |
| Noisy | Exhaust pipe surface is distorted | Reinstall exhaust pipe (done by professional people) |

a. If the range hood still can't work after getting rid of the above malfunctions, please contact FOTILE service center.
b. The ventilator shall be not allowed to be repaired by any party other than Fotile's appointed technicians. Otherwise it may cause serious consequences and exempt the product from warranty.
c. The following circumstances do not fall into the scope of free warranty, and a fee will be charged for repair.
- Damage resulting from improper handling, installation, use, maintenance and safekeeping conducted by customer.
- Failure and damage caused by using the product beyond the normal operating conditions (damage caused in the case that the voltage is higher than 264V or lower than 189.2V).
- The product installed, dismantled or repaired by customer or any party other than Fotile's appointed service staff or agency.
- Discrepancy between the information on the purchase voucher and the warranty card and the product.
5.Product damage caused by force majeure (such as natural disaster and war, etc.). 6.Product failure or damage arising from use not in conformity with the "instructions".
Installation
Packing List
 | Complete Appliance | 1 |  | Cross recess pan head self-tapping locking screws M4 X 18 | 8 |
 + + + + | Exhaust Pipe | 1 |  | Ring suction plate assembly | 1 |
| Scaling tape | 2 |  | Wooden Screw 4.5x80 | 6 | |
| Outlet housing connecting ring | 1 |  | Cross recessed pan head self-tapping screw ST2.9x19 galvanized | 4 | |
 | Pothook | 1 |  | Cross recessed pan large flat head self-tapping lock screw M4X8 galvanized | 2 |
 | Decorative Cover | 1 |  | Oil Cup | 1 |
 | Decorative Cover Pothook | 1 |  | User Manual | 1 |
 | Cross Recess Head Self-tapping Screw ST 3.9x9.5 | 4 |  | Upper Gasket | 1 |
 | Expansion Pipe +10X60 | 6 |  | Outlet Housing | 1 |
Installation Methods
| Attention | Suggest install the range hood after finish the kitchen decoration | Simple Exercise | If it is necessary to move the gas stove before installing the range hood, please close general gas valve before moving the gas stove. |
| Forbidden | Make sure to keep the appliance horizontal. | Simple Exercise | After finishing installation and make sure the range hood can work normally, please read carefully and keep the user manual well. |
| Simple Exercise | Package of new range hood: to keep a well environment, please deal with the plastic package by environmental way Packing material is not toy, so please keep the plastic bags and box away from the infant to prevent such dangers as suffocation, etc. | Simple Exercise | Please abandon and recycle the old range hood which can't work any more, to protect the environment. |
| Simple Exercise | The range hood is heavy and the installation is complex, so the installation should be done by professional people according to the user manual. | Simple Exercise | Please wear protective golves to avoid your hands being hurt by rang hood sharp edge. |
Attentions
| ▲Attentions | ||
| Please do not damage the electric wire and other hidden equipment when drilling on wall. Power off the range hood when installation. | ||
| The wall should be strong enough to support the range hood, otherwise the range hood may drop down and result in damage. | ||
| Make sure the exhausting pipe can reach outdoors to avoid the fire and keep the fresh air in the room. Please don't make the waste gas stay indoor, loft, garage, etc. (This is only for ducted range hood)The waste air from the range hood couldn't share the same flue with other infilamble gas. | ||
FOTILE
RANGE HOOD

Wall Preparation
The wall should be strong enough to support the range hood. As for hollow wall or hollow plate, the minimum thickness of the lumber should be 30mm. As for concrete wall, the installation can be directly operated. The range hood should be firmly fixed on the wall.
Product Basic Conditions
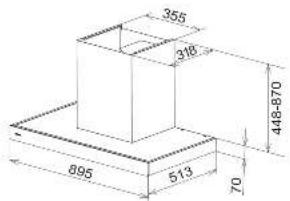
Figure 5: Product Basic Conditions
Installation Suggestions
■ Installation Position
The range hood is only for family use only; Please do not use the range hood under other conditions.
The range hood should be installed above the stove. Keep parallel between the blower outer cover bottom end and cabinet bottom end.
The temperature of the range hood should not be more than 40°C.
The wall should be none-flammable. Never install the range hood on the flammable wooden wall.
■ Installation Diagram of the Range Hood
Opening size of the top cupboard or ceiling:


Figure 6
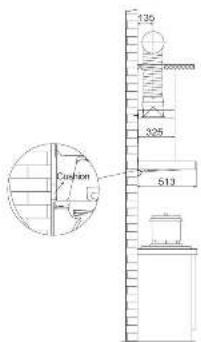
Figure 7

The installation height of the range hood (i.e. the distance between the support surface of the cooking appliance on the cooking range and the lowest part of the range hood) shall not be less than 650mm. A greater installation distance, if any, specified in the cooking range installation instructions should be considered. To ensure the effectiveness of the range hood, please install the range hood within the recommended installation height range. If the actual installation height exceeds the recommended range, the oil fume absorption effect may be affected to some extent. If there are relevant local laws and regulations for the installation height of the range hood, it is recommended to comply with them.
FOTILE
RANGE HOOD
■ Preparation before installation
-
Warning, Please don't make sundries into exhaust pipe to avoid damaging the range hood. Estimate the exhaust pipe position. A straight and short exhaust pipe makes smoke extraction more smooth, please refer to installation diagram. The joint between exhaust pipe and wall hole should be sealed with tape, and ensure firm connection between exhaust pipe and exhaust cover. Too small wall hole will affect smoke extraction, therefore, please broaden the wall hole to fit exhaust pipe size under safety condition.
-
Tool preparation
Please prepare the following tools before range hood installation.
(1) Impact electric drill (with drillbit of 10mm )
(2) Cross screwdriver
(3) Internal hexagonal wrench (M6)
(4) Measuring tape
(5) Hammer
Installation Steps
- Open the packing box, take out the main body and count the packing lists;
- Confirm the position for fixing the hook of main body:
Confirm the installation position of the range hood, draw a center line, and then accurately determine the installation positions of the hook of main body and decorative cover hook on the wall with the bearing surface of the cooking appliance of the stove as the reference point, and make hole signs. (fig6)
- Fix the hook
Use the electric drill to drill φ10mm holes (4 hooks of main body and 2 decorative cover hooks), embed expansion tubes (φ10×60mm), use the level ruler to ensure that the hooks are horizontal, and then use hook screws (ST4.5×60mm) to fix the hooks of main body and the decorative cover hooks. (fig8)
Note: the wall on which the range hood is installed shall have sufficient support strength, and the thickness of the solid layer of the hollow wall and hollow plate must be 30mm or more.

fig8

fig9

lig10
- Install outlet housing and outlet housing connecting rings:
- Move the whole machine out of the packing box, unscrew two screws used for fixing the fan cover on the back of the range hood, and remove the fan cover and the decorative cover .(fig9)
- Place the outlet housing and the sealing rings at the air outlet of the main body, and use 8 screws (M4×18mm) to fix the outlet housing and the sealing rings. (fig10)
- Remove the outlet housing connecting rings from the plastic packaging bag of the smoke tube, put one end of the large diameter on the outlet housing, and fix and seal the outlet housing and the outlet housing connecting rings with butyl tapes. (fig11)
- Arrange the exhaust duct: the aluminum foil exhaust duct and the reserved smoke tube or wall hole shall be sealed tightly to prevent smoke leakage, the smoke tube shall be free from extrusion, deformation and small-angle elbow, the number of elbows shall not exceed 2, and the smoke tube shall be straightened and fixed.(fig12)


fig13

fig11

fig12
- Hook the machine:
Lift the main body, hang the hook holes at the upper part of the back of the range hood at the hooks, use the level ruler to confirm that the range hood is horizontal, and use the screws (ST4×6mm) to fix the fan frame and the hooks; (fig13)
7. Connect the exhaust duct; cut off the redundant exhaust duct or connect the smoke tube according to the actual distance, put the smoke tube into the outlet housing connecting rings, then pre-fix the exhaust dust with two screws (ST3.9x9.5), and finally wrap it with foil tape for fixation and sealing; (fig14)
8. Insert the power cable plug of the range hood into the power socket, start the range hood, and check whether all joints of the exhaust duct are sealed well;
9. Tear the films: tear off the protective films of the fan cover and the decorative cover; Cautions: wear protective gloves; (fig15)

fig14

fig15
FOTILE
RANGE HOOD
- Install the fan cover and the decorative cover
Put the decorative cover into the outer cover and pick them up at the same time, firstly, hang the decorative cover on the decorative cover hooks, then push the decorative cover and the fan cover inwards along the decorative cover hooks at the same time, when the fan cover slides down slowly, clamp the upper locking tab of the fan cover into the fan frame, and insert the lower edge into the gap between the top plate and the fan frame. (fig16)
- Install the wing plate and the oil cup
Hold the front side of the wing plate with both hands, hang the left and right hooks on the rear side of the wing plate into the wing plate hanger, and then rotate the wing plate upwards to clamp the wing plate locking tab into the touch tab on the smoke collecting cover. (fig17)
Take out both sides of the oil cup with both hands and install the oil cup on the oil cup hooks of the smoke collecting cove.r(fig18)
- The installation of the range hood is completed.

fig16

fig17

fig18
Notes:
- First take down the fan cover prior to installation;
- Exchange step (4) and step (5) in case of installation with the cupboard;
- Select the drill bit according to the specific conditions of the drilling place.
Debugging
- Put on oil cup;
- Plug the power cable into socket;
- Press light key, check whether light works normally;
- Press motor key, check whether motor turns normally. In the following cases, cut off power, stop turning and check whether it is reason of installation (if range hood breaks down, please contact our service center)
(1) Machine shakes violently
(2) Expansion pipe looses
(3)Impeller doesn't turn
(4)Impeller with obvious grating when turning
(5)Motor with abnormal noise
- Press power key, motor stops turning.
(*) 1. If the power supply wire is damaged, in consideration of the safety, must have the manufacturer, the repair department or similarly qualified personnel to replace; - When the range hood, gas stove or other fuel stove used at the same time, the room must be well ventilated.
Correct Disposal of this product

This marking indicates that this product should not be disposed with other household wastes throughout the EU. To prevent possible harm to the environment or human health from uncontrolled waste disposal, recycle it responsibly to promote the sustainable reuse of material resources. To return your used device, please use the return and collection systems or contact the retailer where the product was purchased. They can take this product for environmental safe recycling.
Component Name Diagram


- CONTENTS
- Warning and Safety Instructions
- Special version:
- Warning:
- FOTILE
- RANGE HOOD
- Forbidden
- Usage
- Operation Instruction
- EMG9037
- Cleaning and Maintenance
- ■ Cleaning the oil cup, wing plate and air intake hood
- Installation
- Installation Methods
- Installation Suggestions
- ■ Preparation before installation
- Installation Steps
- Notes:
- Debugging
- Correct Disposal of this product
- Component Name Diagram
Brand : Fotile
Model : EMG9037
Category : Range hood