MOD-CV31DS - Kettle Imarflex - Free user manual and instructions
Find the device manual for free MOD-CV31DS Imarflex in PDF.


| Product Type | Microwave Oven |
| Brand | Imarflex |
| Model | MOD-CV31DS |
| Capacity | 30 liters |
| Outside Dimensions | 523 x 449 x 300 mm |
| Cavity Dimensions | 355 x 336 x 241 mm |
| Rated Microwave Power Output | 1000 W |
| Convection Power | 2000 W |
| Microwave Frequency | 2450 MHz |
| Power Levels | 5 (100%, 80%, 50%, 30%, 10%) |
| Grill Function | Yes |
| Convection Function | Yes (150°C to 240°C) |
| Combi Cooking Programs | 4 (C-1 to C-4) |
| Air Fry Function | Yes (9 presets: AF1 to AF9) |
| Defrost Methods | By weight (100-2000 g) and by time |
| Child Lock | Yes |
| Turntable | Yes (glass tray with ring assembly) |
| Control Type | Electronic (knob and buttons) |
| Display | Digital LED |
| Exterior Material | Stainless Steel |
| Inner Cavity Material | Stainless Steel |
| Included Accessories | Glass tray, turntable ring assembly, grill rack, bake tray |
| Cooking End Signal | Yes (5 beeps) |
| Cleaning | Wipe with damp cloth; mild detergent; do not use abrasives |
| Safety Features | Door interlock, auto shut-off, child lock |
Frequently Asked Questions - MOD-CV31DS Imarflex
User questions about MOD-CV31DS Imarflex
0 question about this device. Answer the ones you know or ask your own.
Ask a new question about this device
Download the instructions for your Kettle in PDF format for free! Find your manual MOD-CV31DS - Imarflex and take your electronic device back in hand. On this page are published all the documents necessary for the use of your device. MOD-CV31DS by Imarflex.
USER MANUAL MOD-CV31DS Imarflex
natural_image
Modern imarflex microwave oven with digital display and control knobs (no visible text or symbols on main body)
Stainless Steel & Infrared Heaters

Stainless Steel Inner Cavity

Menu Settings
- 5 Power Levels
• Time & Weight Defrost - Cooking End Signal
- Child Lock Function

Air-Fry Settings
Combi Settings

1000W Power
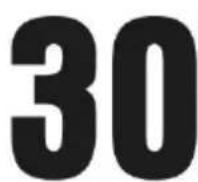
LITERS
CAPACITY
(Convection) : 2000W
Rated Microwave Power Output : 1000W
Microwave Frequency : 2450MHz
Outside Dimension : 523*449*300mm
Oven Cavity Dimension : 355*336*241mm
Oven Capacity : 30 liters
IMPORTANT SAFEGUARDS
The following basic precautions should always be followed when using electrical appliance:
- Read all instructions before using.
- Make sure the voltage in your convenience outlet corresponds to the one shown on the rating label of the appliance.
- Do not use any appliance with a damaged cord or plug. If the cord is damaged it should be replaced with the same type and size or bring the unit to the nearest authorized service center.
-
Use the oven only for its intended use or as described in this manual. Do not use corrosive chemicals. This oven is not designed for industrial and laboratory use.
-
Do not operate the oven if empty.
-
To reduce the risk of fire in the oven cavity:
a. Do not overcook the food.
b. When heating food in plastic or paper containers, check the oven frequently for possible ignition.
c. Remove wire twist-ties from paper or plastic bags before placing bags in the oven.
d. Do not use the cavity for storage purposes. Do not leave paper products, cooking utensils or food in the cavity when not in use.
e. Do not heat oil or fat for deep drying as the temperature of oil cannot be controlled.
f. After use wipe the waveguide cover with a damp cloth, followed by dry cloth to remove any food splashes and grease. Built-up grease may overheat and begin to cause smoke or catch fire.
g. If materials inside the oven should smoke or ignite, keep oven door closed, turn oven off and disconnect from the convenience outlet.
h. Close supervision is necessary when using disposable containers made from plastic, paper or other combustible material.
- To reduce the risk of explosion and sudden boiling:
a. Do not place sealed containers in the oven. Baby bottles fitted with a screw cap or teat are considered to be sealed containers.
b. When boiling liquid in the oven, use the wide-mouthed container and stand about 20 seconds at the end of cooking to avoid delayed eruptive boiling of liquids.
c. Potatoes, sausage and chestnut should be peeled or pierced before cooking. Eggs in their shell, whole hard-boiled eggs should not be heated in microwave ovens since they may explode, even after microwave heating has ended.
d. The cooked liquid should not be removed out immediately. Several moments should be waited before removing in order to avoid possible hazards caused by delayed eruptive boiling of liquids.
e. The contents of feeding bottles and baby food jars are to be stirred or shaken and the temperature is to be checked before consumption, in order to avoid burns.
-
Never operate the oven further if the door or door seals are damaged or the oven is malfunctioned or supply cord is damaged. Return the appliance to the nearest authorized service center for repair and maintenance. Never try to adjust or repair the oven yourself.
-
After cooking, the container is very hot, use gloves to take out the food and avoid steam burns by directing steam away from the face and hands.
-
Slowly lift the furthest edge of dishes cover and microwave plastic wrap and carefully open popcorn and oven cooking bags away from the face.
-
To prevent the turntable from breaking:
a. Allow the turntable cool before cleaning.
b. Do not place hot foods or utensils on the cold turntable.
c. Do not place frozen foods or utensils on the hot turntable.
-
Make sure the utensils do not press the interior walls during cooking.
-
Cookware/containers should be checked to ensure that they are suitable for microwave use.
-
Failure to maintain the oven in a clean condition could lead to deterioration of the surface that could adversely affect the life of the appliance and possibly result in a hazardous situation.
-
Do not operate the oven without any liquid or food inside the oven. This would do damage the oven.
-
Children should be supervised to ensure that they do not play with the appliance.
-
This appliance is not intended for use by persons (including children) with reduced physical, sensory or mental capabilities, or lack of experience and knowledge, unless they have been given supervision or instruction concerning use of the appliances by a person responsible for their safety.
-
Any accessories not recommended by the manufacturer may cause injuries to persons.
-
Do not use outdoors.
-
For household use only; not intended for any business purposes
-
Save these instructions.
-
Microwave is a kind of high frequency electromagnetic wave, which is commonly distributed in the nature. But the existing form of microwave is dispersed so that it cannot be collected together for heating purpose. The key component of magnetron of microwave oven will transform the energy of electricity to microwave and huge energy of microwave field is established under the closed cavity. So, the molecule of food is caused to vibrate at very high speed and the friction heat produced will cook the food in a fast way.
-
There are 3 properties of microwave, that is
a. Absorbability: the microwave can cause the excess vibration of molecule of various foods so as to obtain the heating purpose. But the infiltration ability is largely depending on the size, thickness and properties of the food.
b. Penetrability: microwave can penetrate through ceramics, glass, temperature resistant plastics. It is required to use the containers whose material have good microwave penetrability to achieve best heating result. Please see the below cookware guide.
c. Reflectivity: microwave would be reflected by the metal wall of interior cavity so as to establish an even magnetic field, thus can prevent the overheating of partial area.
INSTALLATION
-
Remove all packaging materials.
-
WARNING: Check for any damages, such as misaligned or bent door, damaged door seals and sealing surface, broken or loose door hinges and latches. If there is any damage do not use the oven.
-
The oven should be placed on a stable surface to hold its weight.
-
Do not place near gas stove, electric burner or a heated oven.
-
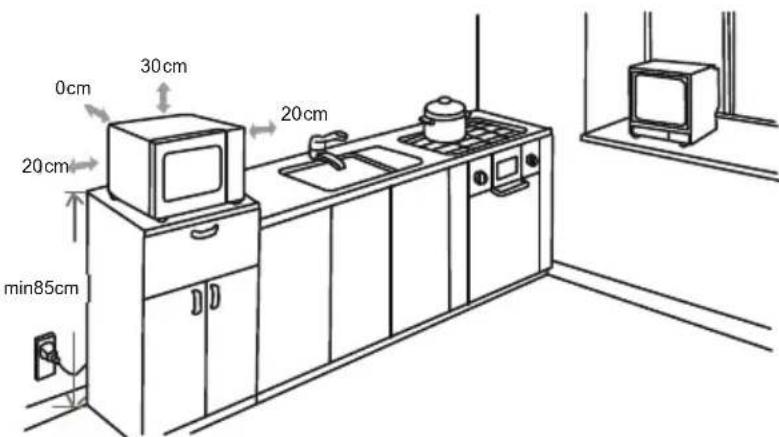
The minimum installation height is 85 cm.
-
The oven must have sufficient airflow, allow 30 ~cm of space above the oven, 20 ~cm at the back and 20 ~cm on both sides. Do not cover or block air vent or any openings of the oven. Do not remove the stand.
-
Do not use the oven without the turntable, roller ring and shaft in their proper positions.
-
The socket should be accessible so that it can be easily unplugged in case of emergency.
-
Do not use the oven outdoors.
-
Make sure that the power supply cord is undamaged and does not run under the oven or over any hot or sharp surface.
RADIO INTERFERENCE
- Operation of microwave oven can cause interference to radio, TV or similar appliance.
- When there is interference, it may be eliminated by:
a. Cleaning the door and sealing surface of the oven.
b. Plug the oven into a different out so that the oven and receiver are on different branch circuit.
PRECAUTIONS TO AVOID POSSIBLE EXPOSURE TO EXCESSIVE MICROWAVE ENERGY
- Do not place any object between the door safety lock system or allow small solid particles or cleaner residue to accumulate on sealing surfaces.
- Do not operate the oven if it is damaged. It is important that the oven is properly closed and there are no damages like:
a. Bent doors.
b. Broken or loosened hinges and latches.
c. Leaks on door seals and sealing surfaces.
- The oven should not be adjusted or repaired by anyone aside from an authorized lmarflex service technician.
- Do not tamper the safety interlocks.
- Check to ensure that the oven is plugged in securely. If not, unplug the unit, wait for 10 seconds and plug it again.
- Check for a blown circuit fuse or a tripped main circuit breaker. If there's no problem with the supply of electricity, test the outlet with another appliance.
- Check to ensure that the control panel is programmed correctly.
- Check to ensure that the door is properly closed
FOR INITIAL USE
As there is manufacturing residue or oil remained on the oven cavity or heat element, it would smell the odor or a slight smoke. It is normal case and would not occur after several use. Keep the door or window open to ensure good ventilation.
- Place thicker areas toward outside of dish and the thinner meat in the center and spread them evenly. Do not overlap if possible.
- Cooking time
- Start cooking with the shorter period of time and extend it according to the actual need.
Overcooking may result in smoking and burning.
- Cover foods before cooking refer to the recipe
- Use paper towels, microwave plastic wrap or a cover-to-cover food to prevent spattering and help foods to cook evenly.
4. Stir foods
- From outside to center of dish once or twice during cooking, if possible.
5. Turn foods
- Foods such as chicken, hamburgers or steaks should be turned over once during cooking.
6. Rearrange foods
- Please change the positions of food in half way during cooking such as: from top to bottom and from the center of the dish to the outside.
7. Allow standing time
- After cooking ensure adequate standing time. Remove food from oven and stir if possible. Cover for standing time which allows the food to finish cooking without overcooking.
8. Check for doneness
- Observe the food color and hardness to determine whether the food is cooked. Doneness signs include:
• Steams throughout food, not just at edge part. - Joints of Poultry move easily.
- Pork and poultry show no evidence of blood.
- Fish is opaque and flakes easily with a fork.
9. Condensation
- It is a normal case of microwave cooking. The humidity and moisture of food will influence the amount of moisture in the oven. Generally, covered foods will not cause as much condensation as uncovered foods. Ensure that the ventilation openings are not blocked.
10. Microwave safe plastic wrap
- For cooking food with high fat content, do not bring the wrap in contact with the food as it may melt.
11. Microwave safe plastic cookware
- Some microwave safe plastic cookware is not suitable for cooking foods with high fat and sugar content.
COOKWARE GUIDE
- Ideal material should be transparent to microwave. Use clear or plain white cookware. It allows energy to pass through the container and heat food.
- Do not use reflective materials such as stainless steel, aluminum foil, etc.
- Do not use recycled paper products as they may contain small metals that can cause sparks or fire.
- Use round containers rather than oblong and square containers because food in corners tend to be overcooked.
- Use the data below as reference.
Utensils
Remarks
| Browning Dish | Follow manufacturer's instructions. The bottom of browning dish must be least 3/16 inch (5mm) above the turntable. Incorrect usage may cause the turntable to break. |
| Dinnerware Microwave-safe only. Follow manufacturer's instructions. Do not use cracked or chipped dishes. | |
| Glass jars Always remove lid. Use only to heat food until just warm. Most glass jars are not heat resistant and may break. | |
| Glassware Heat-resistant oven glassware only. Make sure there is no metallic trim. Do not use cracked or chipped dishes. | |
| Oven cooking bags | Follow manufacturer's instructions. Do not close with metal tie. Make slits to allow steam to escape. |
| Paper plates and cups | Use for short-term cooking/warming only. Do not leave oven unattended while cooking. |
| Paper towels | Use to cover food for reheating and absorbing fat. Use with supervision for a short-term cooking only. |
| Parchment Paper | Use as a cover to prevent splattering or a wrap for steaming. |
| Plastic | Microwave-safe only. Follow the manufacturer's instructions. Should be labeled "Microwave Safe". Some plastic containers soften, as the food inside gets hot. "Boiling bags" and tightly closed plastic bags should be slit, pierced or vented as directed by package. |
| Plastic wrap | Microwave-safe only. Use to cover food during cooking to retain moisture. Do not allow plastic wrap to touch food. |
| Thermometers | Microwave-safe only (meat and candy thermometers). |
| Wax paper | Use as a cover to prevent splattering and retain moisture. |
Materials to be avoided in microwave oven
| Aluminum tray | May cause arcing. Transfer food into microwave-safe dish. |
| Food carton with metal handle | May cause arcing. Transfer food into microwave-safe dish. |
| Metal or metal-trimmed utensils | Metal shields the food from microwave energy. Metal trim may cause arcing. |
| Metal twist ties | May cause arcing and could cause a fire in the oven. |
| Paper bags May cause a fire in the oven. | |
| Plastic foam | Plastic foam may melt or contaminate the liquid inside when exposed to high temperature. |
Wood will dry out when used in the microwave oven and may split
Wood or crack.
DESCRIPTION OF PARTS
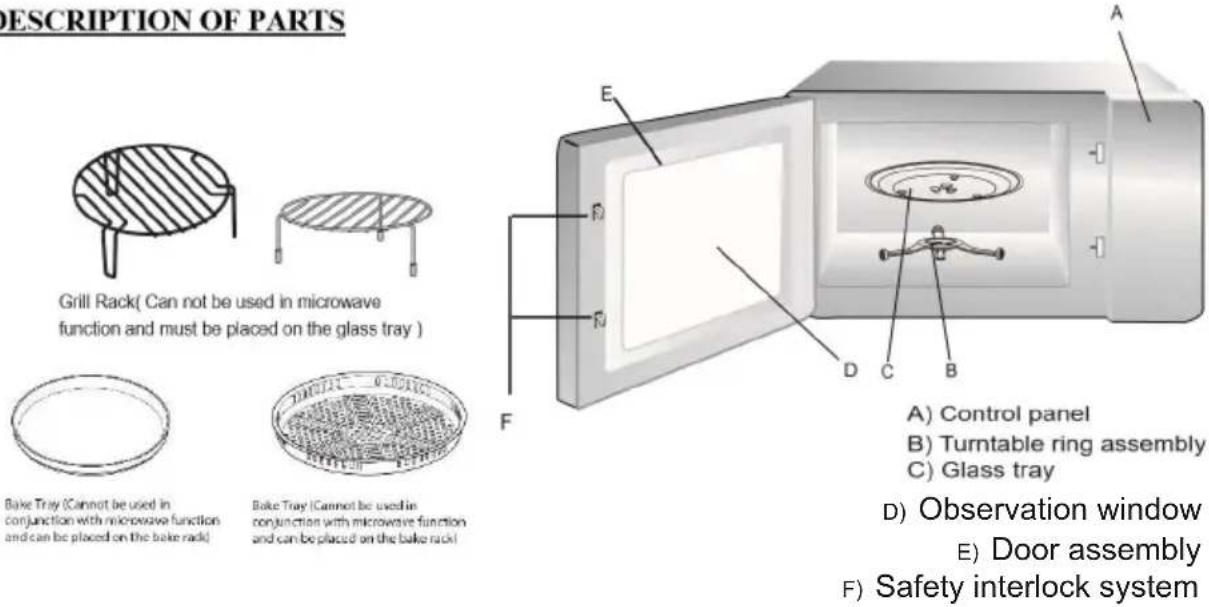
Turntable Installation
Hub (underside) a. Never place the glass tray upside down. The
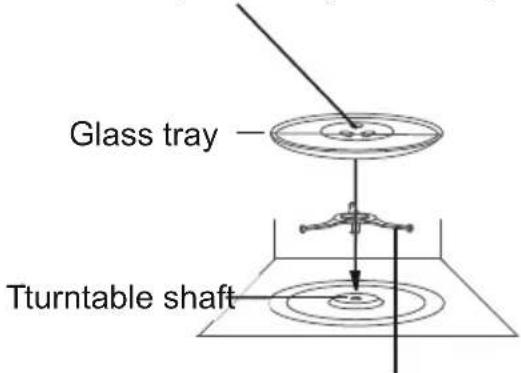
glass tray should never be restricted.
b. Both glass tray and turntable ring assembly must always be used during cooking.
c. All food and containers of food are always placed on the glass tray for cooking.
d. If glass tray or turntable ring assembly cracks or breaks, contact your nearest authorized service center.
Turntable ring assembly
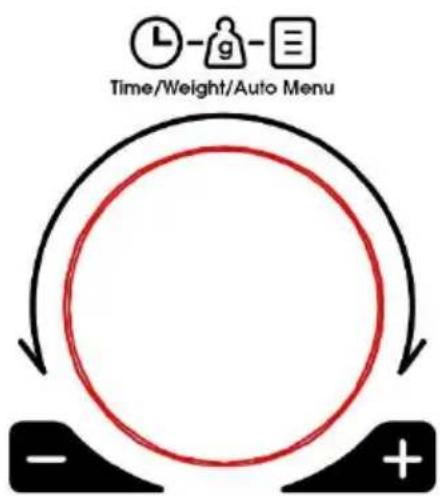
- This microwave oven uses modern electronic control to adjust cooking parameter to meet your needs.
CONTROL PANEL
flowchart
graph TD
    A["Time/Weight/Auto Menu"] --> B["Feedback Loop"]
    B --> C["Power Supply"]
    C --> D["+ Battery"]
    D --> E["- Battery"]
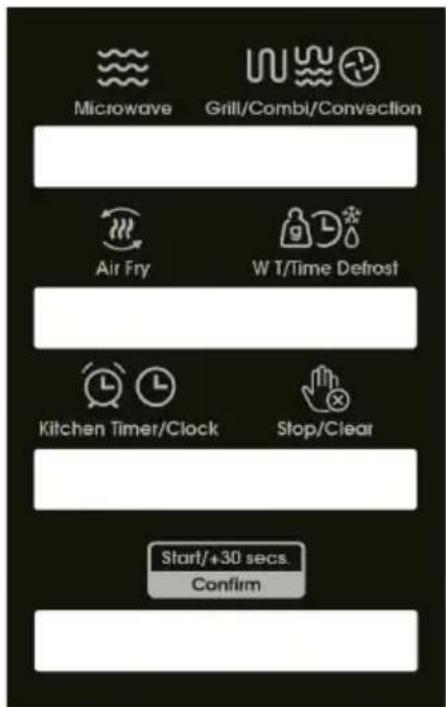
1. Clock Setting
When the microwave oven is powered ON, the oven will display "0:00", and the buzzer will ring once
a. Press 'Kitchen Timer/Clock' twice. "00:00" displays, the hour figures will flash.
b. Turn the knob to adjust the hour figures, the input time should be within 0-23 (24 hours).
c. Press 'Kitchen Timer/Clock', the minute figures will flash.
d. Turn the knob to adjust the minute figures, the input time should be within 0-59.
e. Press 'Kitchen Timer/Clock' to finish clock settings.because will flash.
Note:
(1) If the clock is not set, it would not function when powered.
(2) During the clock setting process if you don't press 'Kitchen Timer /Clock' within 5 minutes, the oven will go back to the previous status automatically.
2. Kitchen Timer
a. Press 'Kitchen Timer/Clock' once, the screen will display 00:00.
b. Turn the knob to enter the correct time. (The maximum cooking time is 95 minutes).
c. Press 'Start/Confirm' to confirm the setting.
3. Microwave Cooking
a. Press ‘Microwave’ once, the screen will display ‘P100’, press ‘Microwave’ repeatedly to choose the power you want, and P100, P80, P50, P30 or P10 will display for each added press.
b. Then press 'Start/Confirm' to confirm the setting, and turn the knob to adjust the cooking time. (Time maximum cooking time is 95 minutes).
c. Press 'Start/Confirm' again to start the cooking cycle.
Example: If you want to use 80% microwave power to cook for 20 minutes, you can operate the oven with the following steps.
- Press 'Microwave' once, the screen display P100.
- Press 'Microwave' once again to choose 80% microwave power.
- Press 'Start/Confirm' to confirm the setting, and the screen displays P80.
- Turn the knob to adjust the cooking time until the oven displays 20:00.
- Press 'Start/Confirm' to start the cooking cycle.
Note: The step quantities for the adjustment time of the coding switch are as follows:
| 0-12 mins : 5 seconds | |
| 1-5 mins : 10 seconds | |
| 5-10 mins : 30 seconds | |
| 10-30 mins : 1 minute | |
| 30-95 mins : 5 minutes |
Microwave Power Chart
| LEVEL | 10 | 8 | 5 | 3 | 1 |
| POWER | 100% | 80% | 50% | 30% | 10% |
| DISPLAY | P10 | P8 | P5 | P3 | P1 |
4. Grill or Combi Cooking
a. Press 'Grill/Combi/Convection' once, the screen will display 'G-1'
b. Press ‘Grill/Combi/Convection’ repeatedly or turn the knob to choose the power you want, and G-1, C-1, C-2, C-3 or C-4 will display for each added press.
c. Then press 'Start/Confirm' to confirm and turn the knob to adjust the cooking time (The maximum time setting is 95 minutes).
d. Press 'Start/Confirm' again to start the cooking cycle.
Example: If you want to use grill power to cook for 10 minutes, you can operate the oven as the following steps.
a. Press ‘Grill/Combi/Convection’ once, the screen display G-1.
b. Press 'Start/Confirm' to confirm the setting.
c. Turn the knob to adjust the cooking time until the oven display'10:00'.
d. Press 'Start/Confirm' to start the cooking cycle.
Note: If half the grill time passes, the oven sounds twice, and this is normal. In order to have a better effect of grilling food, you should turn the food over, close the door, and press 'Start/Confirm' to continue cooking. If no operation the unit will continue cooking.
Note: Combination instructions
| Instructions | Display | Microwave | Grill | Convection |
| 1 | C-1 | |||
| 2 | C-2 | |||
| 3 | C-3 | |||
| 4 | C-4 |
COMBI PROGRAM
| SCREEN C-1 C-2 C-3 C-4 | ||||
| FUNCTION | Microwave + Convection | Microwave + Grill | Grill + Convection | Grill + Convection + Microwave |
| MICROWAVE HEAT TIME | P50 (14s) P50 | (14s) Close P30 | (8s) | |
| GRILL HEAT TIME | Close | Run 15 seconds | Run 5 seconds | Run 21 seconds |
| CONVECTION HEAT TIME | 15 seconds Close | Continuous running | Run 21 seconds | |
| CONVECTION | Continuous running | Continuous running | Continuous running | Continuous running |
| HEATING PERIOD | 29s 29s 29s 29s | |||
5. Convection Cooking (With preheating function)
The convection cooking can let you to cook the food as a traditional oven. Microwave is not used. It is recommended that you should preheat the oven to the appropriate temperature before placing the food in the oven.
a. Press ‘Grill/Combi/Convection’ key once, G-1 will flash. b. Keep pressing ‘Grill/Combi/Convection’ or turn the knob to select the convection temperature.
Note: The temperature is from 150^ C to 240^ C.
c. Press the 'Start/Confirm' to confirm the temperature setting.
d. Press the ‘Start/Confirm’ to start the preheating cycle. When it reaches the preheating temperature, the buzzer will beep twice to remind you to put the food inside the unit.
e. Put the food into the unit and close the door. Then, turn the knob to adjust the cooking time. (The maximum setting time is 95 minutes).
f. Press the 'Start/Confirm' key to start the cooking cycle.
Note:
- Cooking time cannot be input until it reaches the preheat temperature. When it reaches the temperature, door must be opened to input the cooking time.
- If the time not input within 5 minutes, the oven will stop preheating. The buzzer will beep 5 times and turn back to standby mode.
6. Convection Cooking (Without preheating function)
a. Press ‘Grill/Combi/Convection’ key once, G-1 will flash. b. Keep pressing ‘Grill/Combi/Convection’ or turn the knob to select the convection temperature.
Note: The temperature is from 150^ C to 240^ C.
c. Press the 'Start/Confirm' to confirm the temperature setting.
d. Turn the knob to adjust the cooking time. (The maximum time setting is 95 minutes).
e. Press 'Start/Confirm' key to start the cooking cycle.
7. Multi -Stage Cooking
Two stages can be maximally set. If one stage is defrosting, it should be put in the first stage. The buzzer will ring once after each stage and the next stage will begin.
Note: Kitchen Timer, Auto menu and preheating cannot be set as one of the multi-stages.
Example: If you want to defrost the food for 5 minutes, then to cook with 80% microwave power for 7 minutes. The steps are as following:
a. Press 'W T/ Time Defrost' once, the screen will display "d-1";
b. Turn the knob to adjust the defrost time of 5 minutes;
c. Press 'Microwave' once, "P100" will display;
d. Press 'Microwave' again to choose 80% microwave power till "P80" displays;
e. Press 'Start/Confirm' to confirm the setting;
f. Turn the knob to adjust the cooking time of 7 minutes;
g. Press 'Start/Confirm' to start the cooking cycle.
8. Auto Menu
a. In standby mode, turn the knob right to choose the function wanted, and "A-01", "A-02", "A-03".... "A-10" will be displayed.
b. Press 'Start/Confirm' to confirm the menu you need.
c. Turn the knob to choose the weight of menu, and "g" indicator will light.
d. Press 'Start/Confirm' to start the cooking cycle.
Note:
a. When you choose cake, please do not put the cake into the oven at the beginning. The oven needs to be preheated at 160^ C. After several minutes, the buzzer sounds twice to remind you to put the cake into the oven. After putting the cake in the oven, please press ‘Start/Confirm’ again. The timer will start the count down, and the cake will be cooked perfectly.
b. When roast chicken is selected and 2/3 of the time has passed, two beep sound will be heard to remind you to flip/turn the food. You can just leave it to continue. For best result, turn the food accordingly and close the door. Then, press 'Start/Confirm' to continue the cooking cycle.
Auto menu Chart
| Menu | Weight(g) | Display | Power |
| A-1 Auto Reheat | 150 150 | 100% | |
| 250 250 | |||
| 350 350 | |||
| 450 450 | |||
| 600 600 | |||
| A-2 Potato | 1 1 | 100% 2 2 | |
| 3 3 | |||
| A-3 Meat | 150 150 | 80% | |
| 300 300 | |||
| 450 450 | |||
| 600 600 | |||
| A-4 Vegetable | 150 150 | 100% 350 350 | |
| 500 500 | |||
| A-5 Fish | 150 150 | 80% | |
| 250 250 | |||
| 350 350 | |||
| 450 450 | |||
| 650 650 | |||
| A-6 Pasta | 50(with water 450g) | 50 | 80% |
| 100(with water 800g) | 100 | ||
| 150(with water 1200g) | 150 | ||
| A-7 Soup | 200ml 200 | 100% 400ml 400 | |
| 600ml 600 | |||
| A-8 Cake | 475 475 Preheat at 180°C | ||
| A-9 Pizza | 200 200 | C-4 300 300 | |
| 400 400 | |||
| A-10 Chicken | 500 500 | C-4 | |
| 750 750 | |||
| 1000 1000 | |||
| 1200 1200 | |||
10. Defrost by Weight
a. Press 'W T/Time Defrost' button once, the oven will display 'd-1'.
b. Turn the knob to select the weight of the food at the same time, 'g' will light. The weight should be within 100-2000g.
c. Press 'Start/Confirm' key to start defrosting cycle.
11. Defrost by Time
a. Press 'W T/Time Defrost' button twice, the oven will display 'd-2'.
b. Turn the knob to select the cooking time. The maximum setting is 95 minutes.
c. Press 'Start/Confirm' key to start defrosting cycle.
Note: The defrost power is P30, and it cannot be changed.
12. Inquiring Function
During cooking state, press "KitchenCheck the current time. It will be displayed for 3 seconds.
13. Child Lock
Lock: In standby mode, press 'Stop/Clear' for 3 seconds, there will be a long "beep" denoting entering into the children-lock state and "×"Indicator will light.
Unlock: In locked state, press 'Stop/Clear' for 3 seconds, there will be a long "beep" denoting that the lock is released, and "×” indicator will disappear.
14. Specification
a. The buzzer will sound once when turning the knob at the beginning.
b. 'Start/Confirm' must be pressed to continue cooking if the door is opened during cooking
c. Once the cooking program has been set, 'Start/Confirm' is not pressed within 5 minutes. The current time will be displayed and the setting will be cancelled.
d. The buzzer sound once by efficient press, inefficient press will be no response.
e. The buzzer will sound five times to remind you when cooking is finished.
15. Air fry
a. Press 'Air Fry' and then "AF1" will display.
b. Press 'Air Fry' or turn the knob to select menu from AF1 to AF9.
c. Press 'Start/Confirm' to start the cooking cycle.
Air fry menu
| MENU DISPLAY WEIGHT | COOKING TIME | POWER | ||
| AF1 Frozen French fries | 300g 300g | 6:00/16:00 | Grill 100%+convection 240°C / Grill 60% + convection 240°C | |
| AF2 Frozen Potato balls | 350g 350g | 16:00 Grill | 60% + convection 240 | °C |
| AF3 Frozen Squid ring | 250g 250g | 16:00 Grill | 60% + convection 240 | °C |
| AF4 Frozen Onion rings | 250g 250g | 16:00 | Grill 60% + convection 240°C | |
| AF5 Frozen Chickens | 350g 350g | 20:00 Grill | 60% + convection 240 | °C |
| AF6 Steak | 400g 400g | 22:00 Grill | 60% + convection 240 | °C |
| AF7 Shrimp | 250g | 250g | 18:00 | Grill 60% + convection 240°C |
| AF8 Vegetables | 200g 200g | 16:00 | Grill 60% + convection 240°C | |
| AF9 Spring roll | 300g 300g | 18:00 Grill | 60% + convection 240 | °C |
Note: Buzzer will sound during cooking to remind you to turn over the food.
CLEANING AND MAINTENANCE
The oven should be cleaned regularly:
- Unplug the oven from the convenience outlet before cleaning.
-
Do not allow food splatters or spilled liquids adhere to oven walls. Baking soda may be used if the oven gets very dirty. Avoid using spray and other harsh cleaners as this may stain, streak, or dull the door surface.
-
Use damp cloth in cleaning the glass window and the surface of the oven.
-
Do not allow water to seep into the ventilation openings to avoid damages on the operating parts.
-
If the steam accumulates inside or around the oven door, dry it using soft cloth. This may occur when the oven is operated under high humid conditions, but this is normal.
-
If the glass turntable becomes dirty, remove it and wash it with soap and water.
-
The roller rest and oven floor should be cleaned regularly to avoid excessive noise. Simply wipe the bottom part of the oven with mild detergent. The roller ring can be washed with soap and water. If the roller rest is removed from the oven, be sure to return it properly.
-
Never use hard detergent, gasoline, abrasive powder or metal brush to clean any part of the appliance.
a. Exterior:
- Wipe with damp cloth. Do not use abrasive materials to avoid scratches.
b. Door:
- Wipe both sides of the door and the door seals frequently with a damp cloth to remove any spills or spatters.
c. Control Panel:
- Care should be taken in cleaning the control panel. Wipe the panel with a damp cloth slightly. Do not scrub or use any sort of chemical cleaners. d. Interior:
- To clean the interior surfaces and wave guide, wipe with damp cloth to remove any food splashed.
- Build up splashes may cause overheat and begin to smoke or catch fire, make sure to remove by wiping it with damp cloth.
- Do not remove the waveguide cover.
- Do not use a commercial oven cleaner, abrasive or harsh cleaners and scouring pads on any part of your microwave oven.
- Never spray oven cleaners directly onto any part of your oven.
TIPS: When the microwave oven has been used for a long time, there may be some strange odors in the oven, follow these steps to get rid of them:
- Place several lemon slices in a cup, then heat with high power for 2-3 minutes.
- Place a cup of red tea in the oven, and then heat with high power.
- Put some orange peel into oven, and then heat them with high power for 1 minute.
- Turntable/ Rotating ring/Rotating shaft.
REMINDER: Please do not forget to register your product warranty through the warranty registration website at https://imarflex.ph

Distributed by: Topgadget Distributions, Inc. 2120 A.linao St., Malate, Manila Made in China
- IMPORTANT SAFEGUARDS
- INSTALLATION
- RADIO INTERFERENCE
- PRECAUTIONS TO AVOID POSSIBLE EXPOSURE TO EXCESSIVE MICROWAVE ENERGY
- FOR INITIAL USE
- Stir foods
- Turn foods
- Rearrange foods
- Allow standing time
- Check for doneness
- Condensation
- Microwave safe plastic wrap
- Microwave safe plastic cookware
- COOKWARE GUIDE
- DESCRIPTION OF PARTS
- Turntable Installation
- CONTROL PANEL
- Clock Setting
- Kitchen Timer
- Microwave Cooking
- Grill or Combi Cooking
- Convection Cooking (With preheating function)
- Convection Cooking (Without preheating function)
- Multi -Stage Cooking
- Auto Menu
- Note:
- Defrost by Weight
- Defrost by Time
- Inquiring Function
- Child Lock
- Specification
- Air fry
- CLEANING AND MAINTENANCE
- The oven should be cleaned regularly:
- REMINDER: Please do not forget to register your product warranty through the warranty registration website at https://imarflex.ph
Brand : Imarflex
Model : MOD-CV31DS
Category : Kettle