
ACUMEN 8A - Loudspeaker PHONIC - Free user manual and instructions
Find the device manual for free ACUMEN 8A PHONIC in PDF.


| Product Type | Active Studio Monitor |
| Brand | Phonic |
| Model | ACUMEN 8A |
| Woofer Size | 8 inches (paper cone) |
| Tweeter | 1 inch silk dome with neodymium magnet |
| Total Power (RMS) | 100 Watts (25W HF + 75W LF) |
| Total Power (Peak) | 400 Watts |
| Frequency Response | 30 Hz - 30 kHz |
| Maximum SPL | 110 dB |
| Crossover Frequency | 1.7 kHz (4th order Linkwitz-Riley) |
| Inputs | Balanced XLR, 1/4" TRS, unbalanced RCA |
| Input Impedance | Balanced: 20 kΩ, Unbalanced: 10 kΩ |
| HF Control | Adjustable ±3 dB (8 kHz - 20 kHz) |
| Volume Control | Input sensitivity adjustment |
| Voltage Select | Switchable 115VAC / 230VAC (50/60 Hz) |
| Magnetic Shielding | Yes |
| Dimensions (H x W x D) | 425 x 275 x 300 mm (16.7" x 10.8" x 11.8") |
| Weight | 10.9 kg (24 lbs) |
| Mounting | Vertical or horizontal; console top, wall or stand |
| Protection | Driver overload, thermal overload, electronic speaker protection |
| Color Options | Piano Black or Phonic Red |
Frequently Asked Questions - ACUMEN 8A PHONIC
User questions about ACUMEN 8A PHONIC
0 question about this device. Answer the ones you know or ask your own.
Ask a new question about this device
Download the instructions for your Loudspeaker in PDF format for free! Find your manual ACUMEN 8A - PHONIC and take your electronic device back in hand. On this page are published all the documents necessary for the use of your device. ACUMEN 8A by PHONIC.
USER MANUAL ACUMEN 8A PHONIC
natural_image
Line drawings of two PHONIC speakers with speaker holes, shown from different angles (no text or symbols on devices)ACUMEN 6A ACUMEN 8A
MOUNTING THE MONITOR....1
VERTICAL / HORIZONTAL MONITOR....1
CONSOLE TOP MOUNTING....1
INSTALLATION....2
SETTING THE VOLUME....2
SETTING THE HF CONTROL....2
OVERVIEW....2
SPECIFICATIONS....3
Phonic preserves the right to improve or alter any information within this document without prior notice
IMPORTANT SAFETY INSTRUCTIONS
The apparatus shall not be exposed to dripping or splashing and that no objects filled with liquids, such as vases, shall be placed on the apparatus. The MAINS plug is used as the disconnect device, the disconnect device shall remain readily operable.
Warning: the user shall not place this apparatus in the confined area during the operation so that the mains switch can be easily accessible.
- Read these instructions before operating this apparatus.
- K eep these instructions for future reference.
- H eed all warnings to ensure safe operation.
- Follow all instructions provided in this document.
- Do not use this apparatus near water or in locations where condensation may occur.
- Clean only with dry cloth. Do not use aerosol or liquid cleaners. Unplug this apparatus before cleaning.
- Do not block any of the ventilation openings. Install in accordance with the manufacturer's instructions.
- Do not install near any heat sources such as radiators, heat registers, stoves, or other apparatus (including amplifiers) that produce heat.
- Do not defeat the safety purpose of the polarized or grounding-type plug. A polarized plug has two blades with one wider than the other. A grounding type plug has two blades and a third grounding prong. The wide blade or the third prong is provided for your safety. If the provided plug does not fit into your outlet, consult an electrician for replacement of the obsolete outlet.
- Protect the power cord from being walked on or pinched particularly at plug, convenience receptacles, and the point where they exit from the apparatus.
- Only use attachments/accessories specified by the manufacturer.
- Use only with a cart, stand, tripod, bracket, or table specified by the manufacturer, or sold with the apparatus. When a cart is used, use caution when moving the cart/apparatus
combination to avoid injury from tip-over.
-
Unplug this apparatus during lighting storms or when unused for long periods of time.
-
Refer all servicing to qualified service personnel. Servicing is required when the apparatus has been damaged in any way, such as power-supply cord or plug is damaged, liquid has been spilled or objects have fallen into the apparatus, the apparatus has been exposed to rain or moisture, does not operate normally, or has been dropped.




CAUTION: TO REDUCE THE RISK OF ELECTRIC SHOCK, DO NOT REMOVE COVER (OR BACK) NO USER SERVICEABLE PARTS INSIDE REFER SERVICING TO QUALIFIED PERSONNEL

The lightning flash with arrowhead symbol, within an equilateral triangle, is intended to alert the user to the presence of uninsulated "dangerous voltage" within the product's enclosure that may be of sufficient magnitude to constitute a risk of electric shock to persons.

The exclamation point within an equilateral triangle is intended to alert the user to the presence of important operating and maintenance (servicing) instructions in the literature accompanying the appliance.
WARNING: To reduce the risk of fire electric shock, do not expose this apparatus to rain or moisture.
CAUTION: Use of controls or adjustments or performance of procedures other than thosepecified may result in hazardous radiation exposure.
INTRODUCTION
Congratulations on your purchase of another great product from Phonic. The bi-amplified Acumen 6A and Acumen 8A are two-way active monitors designed for high output and unsurpassed clarity.
The Acumen 6A offers a 6" woofer and 73 Watts of power while the Acumen 8A is an 8" model with 100 Watts of power. The paper cone woofers offer extended low frequency response and higher output level.
The Acumen's compact size, excellent dispersion and precise stereo imaging make it ideal for near field monitoring, mobile vans, broadcast, TV control rooms and home studios.
Designed as an active speaker, this unit contains drivers, power amplifiers, active crossover filtering and protection circuitry. The directivity control system used provides excellent frequency balance even in difficult acoustic environments.
FEATURES
Acumen 6A – 6" Active Studio Monitor Acumen 8A – 8" Active Studio Monitor
▶ Long-throw custom-engineered woofer generates stunningly deep bass response
▶ 1" silk dome tweeter with neodymium magnet provides highly transparent and airy highs
▶ Reliable and accurate sound signature; true to source material
▶ Adjustable HF onboard equalizers
▶ Exceptional HF dispersion provides excellent detail and sound stage
▶ Magnetic shielding allows placement near other electronic devices
▶ Balanced XLR input and 1/4" TRS phone jack inputs, unbalanced RCA inputs
▶ 4th Order active Linkwitz-Riley crossover design
Electronic speaker protection works to prevent transducer damage
▶ Voltage switchable between 115V and 230V
▶ Available in Piano Black or Phonic Red
CROSSOVER
The active crossover network consists of two parallel band pass filters. Acoustically the filters are complementary and the slopes are 24dB / octave. The crossover frequency is set to 1.7kHz.
AMPLIFIERS
The amplifier unit is mounted to the rear panel of the speaker with damping material, to ensure rattle free operation and long term reliability. The unit incorporates special protection circuitry as well, for driver overload protection and amplifier thermal overload protection. Variable input sensitivity allows for accurate level matching to the mixing console.
MOUNTING THE MONITOR
Vertical / Horizontal Mounting
The speakers are normally delivered for vertical mounting. Designed for near field monitoring, this studio monitor requires shorter distance than traditional monitors from its location to your ears, which means the reverberation time and general acoustics of the listening room are less critical. Hard surfaces will, however, reflect the higher frequencies, therefore try to avoid putting this monitor close to side walls.
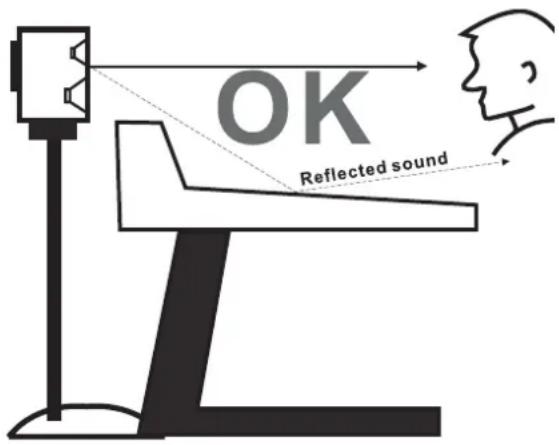
The control surface of your mixing console may also pose a problem. To minimize control surface reflections, position your monitor as shown in the figure below, using the meter bridge or rear panel to block sound from both drivers reaching the control surface. Make sure that there is nothing between your ears and the speakers.
If your console has no meter bridge, try positioning the monitor higher or further behind the desk. Active series is designed to be used in both the upright and horizontal position. If you want to place two Active series horizontally, it is recommended you put the HF drivers on the outer edge. The low frequencies of this unit will generally sound better if the cabinet is against a wall. If possible, provide a rigid surface (eg. shelf) that is separate from the mixing console and other equipment. The speakers should roughly form a 60 degree angle at the listening position, and should be angled towards the listener.
Console Top Mounting
If the active studio monitor series are used for console top mounting, it is recommended not to mount the speakers directly on the console; instead, position the speaker slightly behind the console by using floor stand or wall mount behind the console. This prevents the reflection from the console surface from coloring the sound.
INSTALLATION
Each active studio monitor is supplied with an integrated amplifier unit, a mains cable and an operating manual. Once unpacked, place the loudspeaker in its required listening axis. Before connecting up, ensure that the mains switch is off.
Audio input is made via a balanced XLR and 14 " TRS phone jacks, which operate in parallel. Once connection has been made, the speakers are ready to be powered-up. Before turning the unit on, make sure the mains needed is identical with the AC outlet.
Setting the Volume
Adjustment of the volume of each speaker can be made to match that of the mixing console or other source, by using the input sensitivity control on the rear panel. Turning the control counter-clockwise will reduce the level and clockwise will boost the signal.
Setting the HF Control
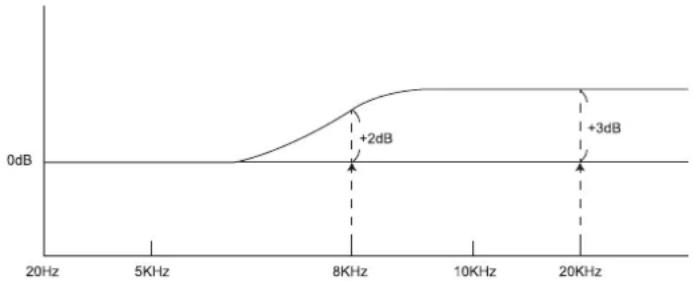
The acoustic response of the system may also have to be adjusted to match the acoustic environment. The adjustment is done by setting the HF control on the rear of the speaker. This will adjust high frequencies on a curve between 8KHz and 20KHz, resulting in an overall boost to high frequency sounds. Set rotary control to the left to cut high frequency sounds, and to the right to boost them.
line
| Frequency | Amplitude | | --------- | --------- | | 8KHz | +2dB | | 20KHz | +3dB |OVERVIEW
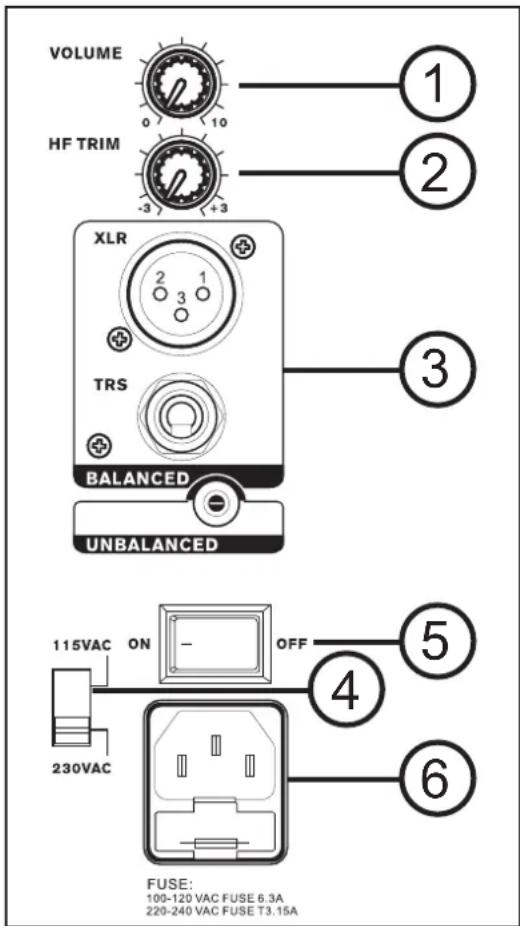
1. Volume Control
This rotary control allows users to adjust the input sensitivity of the Acumen.
2. HF Control
This control adjusts high frequency audio between -3dB and +3dB.
3. Input Connectors
The balanced 14 " and XLR inputs are available for users to connect various output devices to the Acumen studio monitors. In addition to these inputs, the Acumen also features an unbalanced RCA input connector.
4. Voltage Select Switch
This switch allows you to adjust the operating voltage of the Acumen between 115VAC and 230VAC. When set to 115VAC, the Acumen can be used with voltages between 100V and 120V. When set to 230VAC, any voltages between 220V and 240V. Please be sure to check your local voltage levels before using the Acumen speaker.
5. Power Switch
This switch allows users to turn the Acumen on and off.
6. AC Power Connector
This AC power connector is for a suitable AC power cable. Connect the power cable to a suitable AC power source. Be sure to check the local voltage levels and the voltage select switch before use.
SPECIFICATIONS
| Acumen 6A Acumen | 8A | |
| Amplifier Bi-Amplified Bi-Amplified | ||
| High Frequency 25 Watts 25 Watts | ||
| Low Frequency 48 Watts 75 Watts | ||
| Total Power (RMS) 73 Watts 100 Watts | ||
| Total Power (Continuous) 146 Watts 200 Watts | ||
| Total Power (Peak) 292 Watts 400 Watts | ||
| THD (1 kHz) 0.1% | 0.1% | |
| Woofer | 6" | 8" |
| Woofer Cone Material | Paper Cone Paper Cone | |
| Tweeter | 1" | 1" |
| Tweeter Material | Silk Dome | Silk Dome |
| Tweeter Magnet | Neodymium Neodymium | |
| Frequency Response | 35 Hz - 30 kHz 30 Hz - 30 kHz | |
| Maximum SPL | 107 dB | 110 dB |
| Adjustable Controls | HF level adjustment & compensation | HF level adjustment & compensation |
| Crossover | 4th Order L-R active crossover | 4th Order L-R active crossover |
| Crossover Frequency | 1.7 kHz | 1.7 kHz |
| Inputs | XLR, 1/4" TRS, RCA | XLR, 1/4" TRS, RCA |
| Input Impedance | Balanced: 20kohmUnbalanced: 10kohm | Balanced: 20kohmUnbalanced: 10kohm |
| Indicators | Phonic Logo | Phonic Logo |
| Power Requirements | Switchable: 115VAC, 230VAC, 50/60Hz | Switchable: 115VAC, 230VAC, 50/60Hz |
| Fuse Requirements | 100V - 120V: 6.3A220V - 240V: T3.15A | 100V - 120V: 6.3A220V - 240V: T3.15A |
| Dimensions (H x W x D) | 338 x 219 x 259 mm(13.3" x 8.6" x 10.2") | 425 x 275 x 300 mm(16.7" x 10.8" x 11.8") |
| Weight 7.5 kg (16.5 lbs) | 10.9 kg (24 lbs) | |
SERVICE AND REPAIR
For replacement parts, service and repairs please contact the Phonic distributor in your country. Phonic does not release service manuals to consumers, and advice users to not attempt any self repairs, as doing so voids all warranties. You can locate a dealer near you at http://www.phonic.com/where/.
WARRANTY INFORMATION
Phonic stands behind every product we make with a no-hassles warranty. Warranty coverage may be extended, depending on your region. Phonic Corporation warrants this product for a minimum of one year from the original date of purchase against defects in material and workmanship under use as instructed by the user's manual. Phonic, at its option, shall repair or replace the defective unit covered by this warranty. Please retain the dated sales receipt as evidence of the date of purchase. You will need it for any warranty service. No returns or repairs will be accepted without a proper RMA number (return merchandise authorization). In order to keep this warranty in effect, the product must have been handled and used as prescribed in the instructions accompanying this warranty. Any tampering of the product or attempts of self repair voids all warranty. This warranty does not cover any damage due to accident, misuse, abuse, or negligence. This warranty is valid only if the product was purchased new from an authorized Phonic dealer/distributor. For complete warranty policy information, please visit http://www.phonic.com/warranty/.
CUSTOMER SERVICE AND TECHNICAL SUPPORT
We encourage you to visit our online help at http://www.phonic.com/support/. There you can find answers to frequently asked questions, tech tips, driver downloads, returns instruction and other helpful information. We make every effort to answer your questions within one business day.
support@phonic.com
http://www.phonic.com
PHONIC
MANUAL DEL USUARIO
CONTENTS
INTRODUCCIÓN....1
CARACTERÍSTICAS....1
CROSSOVER....1
AMPLIFICADORES....1
MONTAJE DEL MONITOR....1
MONTAJE VERTICAL / HORIZONTAL....1
CONSOLA DE MONTAJE SUPERIOR....1
INSTALACIÓN....2
AJUSTE DEL VOLUMEN....2
AJUSTE DEL CONTROL DE HF....2
INSTALACIÓN
line
| Frequency | Amplitude | | --------- | --------- | | 8KHz | +2dB | | 20KHz | +3dB |DESCRIPCIÓN GENERAL
- ACUMEN 6A ACUMEN 8A
- IMPORTANT SAFETY INSTRUCTIONS
- INTRODUCTION
- FEATURES
- CROSSOVER
- AMPLIFIERS
- MOUNTING THE MONITOR
- Vertical / Horizontal Mounting
- Console Top Mounting
- INSTALLATION
- Setting the Volume
- Setting the HF Control
- OVERVIEW
- Volume Control
- HF Control
- Input Connectors
- Voltage Select Switch
- Power Switch
- AC Power Connector
- SERVICE AND REPAIR
- WARRANTY INFORMATION
- CUSTOMER SERVICE AND TECHNICAL SUPPORT
- MANUAL DEL USUARIO
- CONTENTS
- INSTALACIÓN
- DESCRIPCIÓN GENERAL
Brand : PHONIC
Model : ACUMEN 8A
Category : Loudspeaker