KAVACRBL14W - Robot vacuum Kogan - Free user manual and instructions
Find the device manual for free KAVACRBL14W Kogan in PDF.


| Type | Robot vacuum and mop |
| Brand | Kogan |
| Model | KAVACRBL14W / KAVACRBL14A |
| Dimensions (vacuum) | 327 x 325 x 76 mm |
| Weight | 2.8 kg |
| Battery type | Li-ion, 14.4V, 2600 mAh, 36.0 Wh |
| Rated power (vacuum) | 40 W |
| Charging base dimensions | 160 x 145 x 90 mm |
| Charging base power | 18 W (input), 18 W (output) |
| Navigation | Laser radar (point laser) |
| Wi-Fi compatibility | 2.4 GHz only |
| App control | Kogan SmarterHome app (iOS/Android) |
| Voice control | Google Home, Amazon Alexa |
| Cleaning modes | Auto, spot, partial, scheduled |
| Suction power levels | Quiet, Normal, Strong |
| Water regulation levels | Low, Medium, High |
| Silent mode | Yes (disables voice prompts) |
| Dustbin capacity | Built-in 2-in-1 dustbin/water tank |
| Filtration | HEPA filter, sponge filter, filter gauze |
| Side brushes | 2 (L and R, replaceable) |
| Roller brush | Yes, removable for cleaning |
| Mop cloth | Included, washable |
| Sensors | Anti-drop (x3), wall sensor, infrared anti-collision |
| Operating environment | 0–40°C, indoor only |
| Recommended filter replacement | Every 3–6 months |
| Recommended side brush replacement | Every 3–6 months |
Frequently Asked Questions - KAVACRBL14W Kogan
User questions about KAVACRBL14W Kogan
0 question about this device. Answer the ones you know or ask your own.
Ask a new question about this device
Download the instructions for your Robot vacuum in PDF format for free! Find your manual KAVACRBL14W - Kogan and take your electronic device back in hand. On this page are published all the documents necessary for the use of your device. KAVACRBL14W by Kogan.
USER MANUAL KAVACRBL14W Kogan
natural_image
Line drawing of a circular robotic vacuum cleaner with control buttons and wireless signal icon (no text or symbols)KOGAN SMARTERHOME™ POINT LASER ROBOT
VACUUM CLEANER AND MOP
KAVACRBL14W & KAVACRBL14A
Safety & Warnings 3
Components 5
Overview 6
Installation 9
Connect to SmarterHome™ App 15
Google Home Control 19
Amazon Alexa Control 22
Operation 24
Cleaning & Care 27
Specifications 32
Troubleshooting 32
Notes 35
SAFETY & WARNINGS
Ensure to read all instructions and warnings in this user guide prior to first use. Retain this user guide for future reference.
- The vacuum can be used adults and by persons with reduced physical, sensory, or mental capabilities, or lack of experience and knowledge if they have been given supervision or instruction concerning use of the vacuum in a safe way and understand the hazards involved.
- Do not allow children to use this appliance as a toy.
• Children must be supervised to ensure they do not play with the appliance.
- Keep children and pets away from the vacuum.
- This vacuum can only be used for indoor domestic floor cleaning. Do not use outdoors, on objects, or in commercial/industrial environments.
- Do not use the vacuum in the environments where it may fall (for example, on top of furniture or on balconies).
- The operating environment of this vacuum is between 0–40°C.
- Do not use this vacuum if there are liquids on the ground.
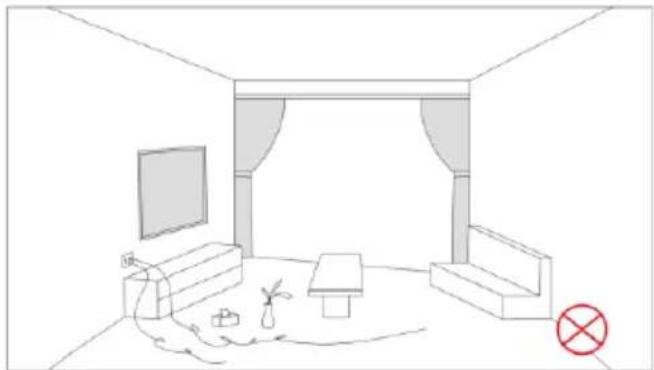
- Remove any cables or wires on the floor before cleaning to prevent them from being tangled or dragged by the vacuum.
- Remove any fragile articles or miscellaneous items that may block the path of the vacuum. Not removing these may lead their damage.
- Do not place anything (including children and pets) on the vacuum.
- When the vacuum is operating, keep hair, fingers and other parts of human body and pets away from the brushes.
- Do not use the vacuum to clean flammable items (for example, burning cigarette butts).
- Do not use the vacuum to clean long-haired carpets. Some darker carpets also might not be able to be cleaned normally.
- Do not use the appliance to vacuum hard or sharp objects (for example, glass, nails).
- Do not use the protective cover of the laser radar or bumper as a handle to carry the vacuum.
- Do not use the mopping function on carpet or on top of furniture.
- Ensure the power cord is unplugged before cleaning or maintaining the appliance.
- Ensure there is no water in the dustbin/ water tank when charging the vacuum.
- Do not place objects (including children and pets) on a stationary or moving appliance.
- Please do not use the product to sweep burning objects (such as burning cigarette end)
- Before cleaning or performing maintenance ensure the power is off and the vacuum has been disconnected from power,
- Do not use this product in any way that deviates from the instructions provided in this User Guide.
Battery and Charging
- Do not use any third-party batteries, non-rechargeable batteries charging bases, or chargers.
- Do not disassemble, repair, or modify the battery or auto-empty dock by yourself.
- Do not place the auto-empty dock near heat sources (for example, heating radiators).
- Do not use a damp cloth or wet hands to wipe or clean the auto-empty dock.
- Dispose of used batteries properly and send them to professional recycling agencies.
- If the power cord is damaged or broken, cease use immediately and contact help.Kogan.com for support.
- When transporting the vacuum, ensure that the appliance is turned off and the original packaging box is used for packaging.
- If the machine is left unused long, it should be fully charged and then placed in a cool and dry place. Charge the vacuum at least every 3 months to avoid damaging batteries due to excessive discharge.
- The charging base is only suitable for charging the vacuum KAVACRBL14W & KAVACRBL14A supplied with the Li-ion cylindrical rechargeable battery C375-E1-4S1P (Rating: 14.4V, 2600mAh, 36.0Wh). It is not suitable to charge any other vacuums or batteries.
- Warning: Do not recharge non-rechargeable batteries.
Disposal Instructions
- The following instructions apply only when disposing of the vacuum, not for daily operation.
- The built-in battery of the main unit contains chemicals that can harm the environment.
- Before disposing of the product, ensure the battery is removed and handed to a licensed recycling organisation. Only remove the battery when it is fully discharged, and never allow it to come into contact with metal objects.
COMPONENTS
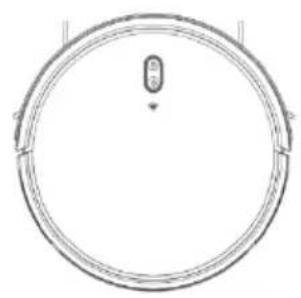
natural_image
Simple circular diagram with a central arrow and label '圆' (circle), no text or symbols present.Vacuum Cleaner
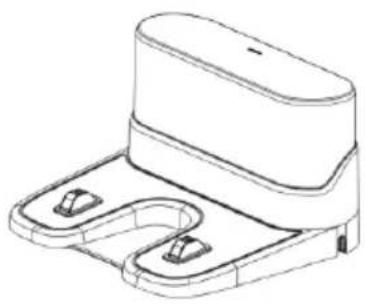
natural_image
Technical line drawing of a mechanical component with two mounting holes and a central housing (no text or symbols)Charging dock
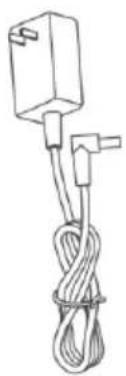
natural_image
Simple line drawing of a cable tied with a rectangular component (no text or symbols)Power adapter
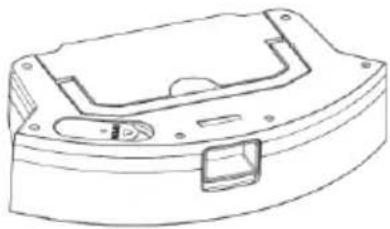
natural_image
Line drawing of a mechanical housing component with mounting flanges and a central button (no text or symbols)2-in-1 Dustbin/Water tank (preassembled)
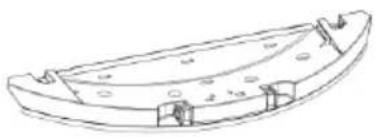
natural_image
Line drawing of a curved mechanical component with mounting holes and internal ribs (no text or symbols)Mopping module (preassembled)
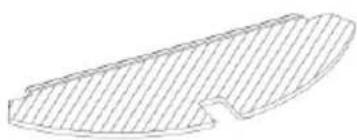
natural_image
Simple line drawing of a curved, elongated object with diagonal hatching (no text or symbols)Mop cloth (preassembled)
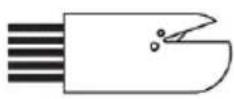
Cleaning brush
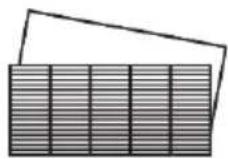
HEPA & sponge filter (preassembled)
natural_image
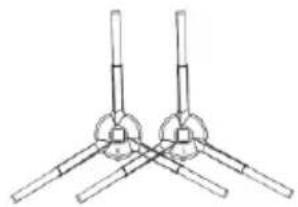
Pure mechanical linkage diagram with four arms and central hub (no text or symbols)L & R side brushes (x2)

User guide
OVERVIEW
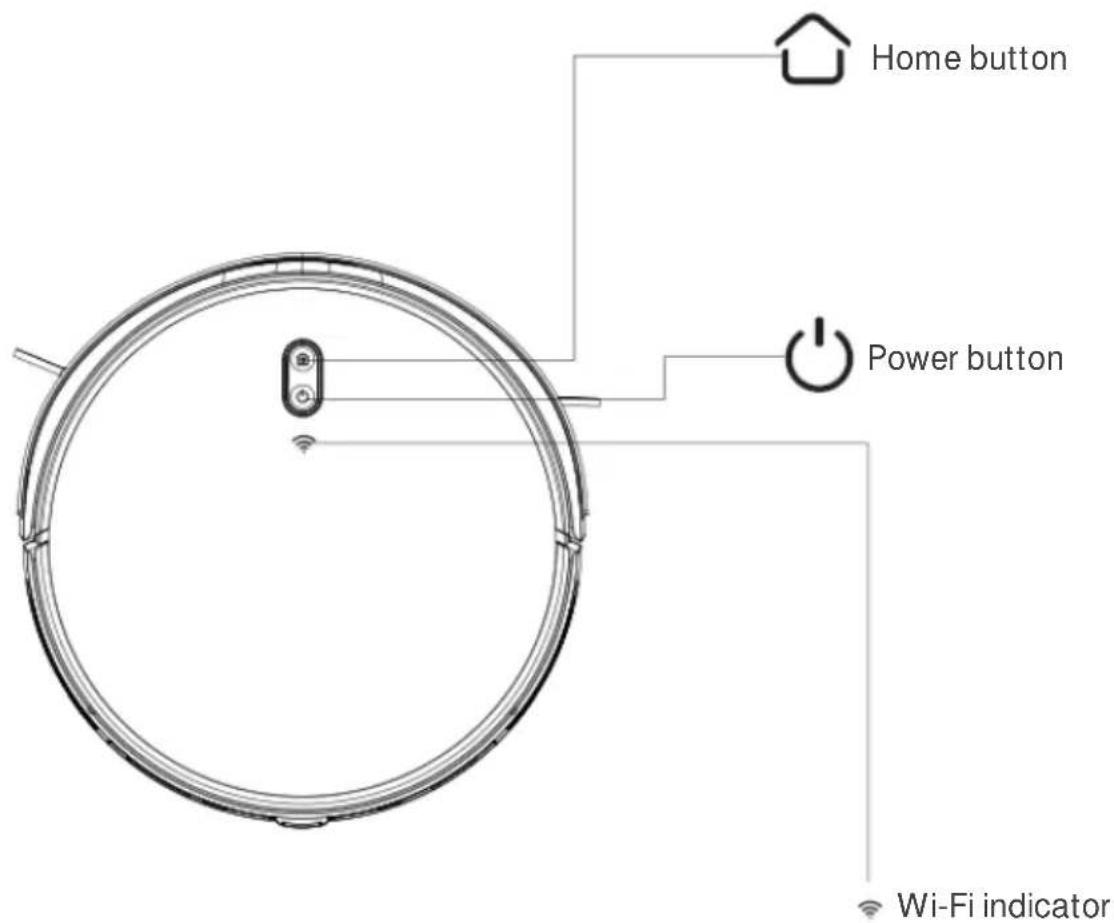
| Home button | Short press to recharge/ pause. |
| Long press to start local cleaning | |
| Power button | Press and hold the button for 3 seconds to power on/ off |
| Short press to start Sweep/ Pause | |
| Long press for 15s for forced shutdown under normal circumstances | |
| Indicator | Blue: Normal operation or charging |
| Orange: Abnormal condition or low battery | |
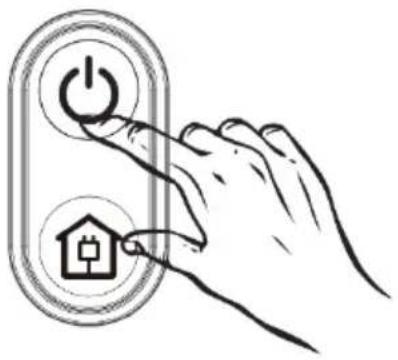
| Wi-Fi pairing mode | Press and hold Home and Power buttons simultaneously for 3 seconds |
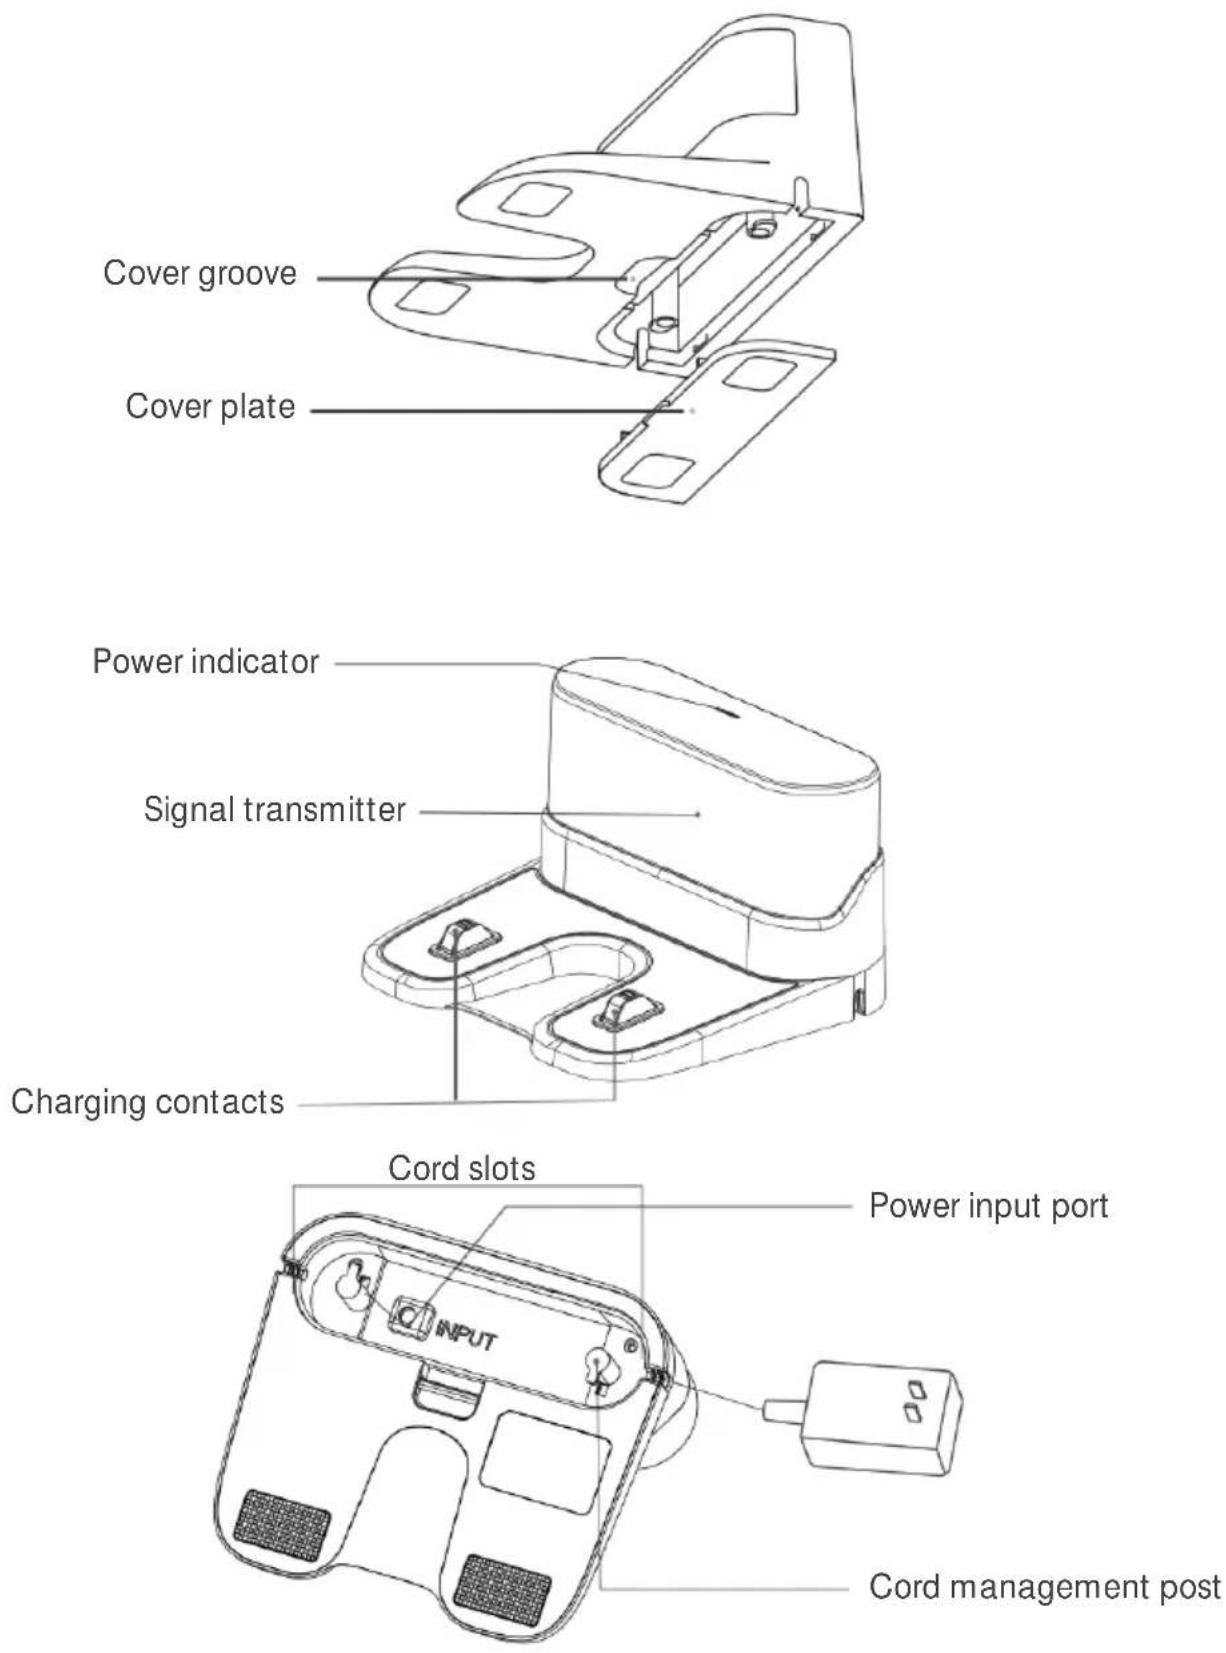
Charging Dock
INSTALLATION
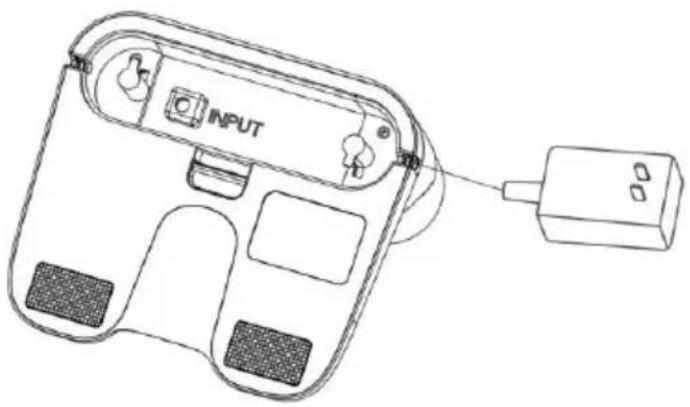
- Connect the power adapter to the power input port on the underside of the charging dock.
- Connect the power adapter to an electrical outlet. Wrap any excess cord around the cord management posts.
natural_image
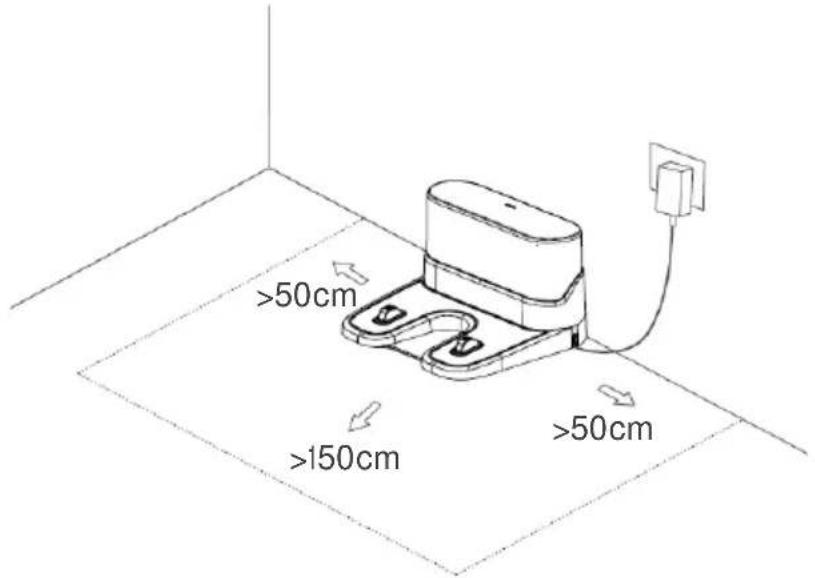
Line drawing of a handheld device with a connected power outlet (no text or symbols)- Place the charging docks against a wall on a flat surface and then turn the outlet on.
Notes:
- Ensure there is a 50cm clearance either side, and 150cm clearance in front of the dock. When installing, keep the power cord in the air; if it is close to the ground, it may be dragged by the vacuum, causing the charging dock to lose power.
-
The power indicator will stay on when connected to power.
-
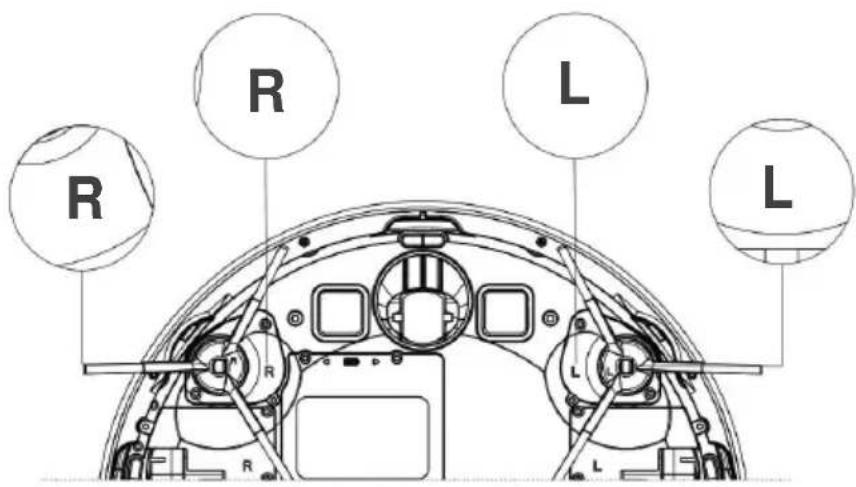
Attach the left and right side brushes (L, R) to the corresponding letter on the underside of the vacuum. There should be a clicking sound when each side brush is secured.
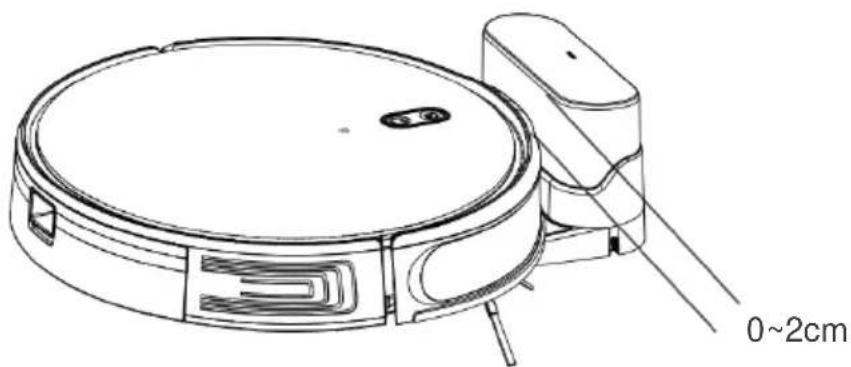
- Place the vacuum on the charging contacts on the dock to charge.
Notes:
- If the product cannot turn on due to low power, place the vacuum on the charging dock. The product will automatically power on once the battery level reaches 20% or more.
- Ensure the front of the vacuum is aligned with the charging dock, so the charging contacts on the product connect with the charging pins. The distance between the front of the vacuum and the dock should be approximately 0-2 cm, as shown in the image.
Install 2-in-1 Dustbin/ Water tank
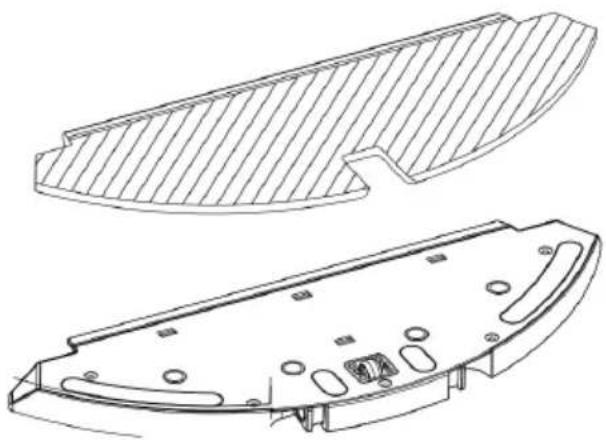
- Attach the mop to the bottom of the mop module.
natural_image
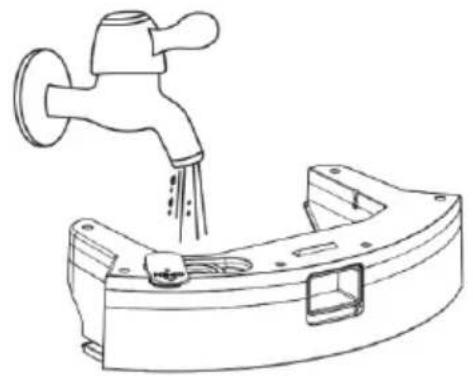
Technical line drawing of a mechanical component with two views: top shows ribbed structure, bottom shows internal components (no text or symbols)- When using the mopping function, open the water plug and fill the dustbin/water tank with water. Replace the water plug securely. Do not add detergent to the dustbin/water tank. Lift the handle, remove the dustbin from the water tank, fill it with water, and ensure the lid is fastened tightly.
natural_image
Line drawing of a faucet pouring liquid into a mechanical housing (no text or symbols)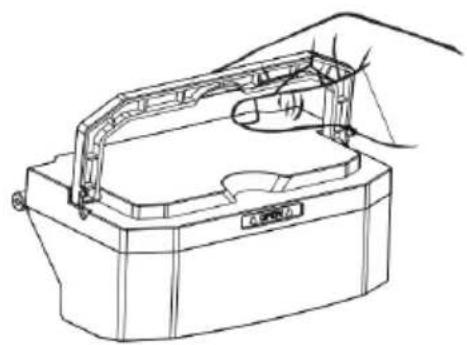
natural_image
Line drawing of a mechanical device with a handle and internal structure (no text or symbols)Note:
It is recommended to remove the dustbin before adding water to avoid water entering the dust box.
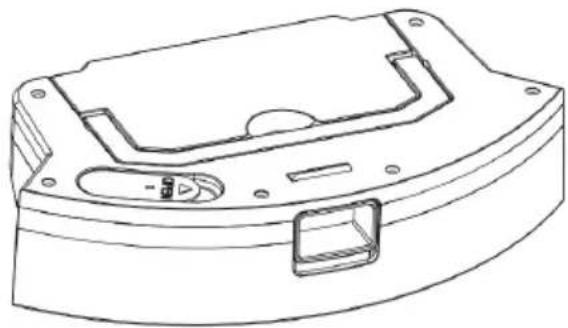
- Put the dustbin back into the water tank, lay the handle flat, and install the water tank.
natural_image
Technical line drawing of a mechanical component with mounting flanges and a central housing (no text or symbols)- Press and hold the button in the 2-in-1 dustin/water tank and push it until you hear a 'click' indicating it is securely in place.
natural_image
Line drawing of a robotic vacuum cleaner with handle and control panel (no text or symbols)- Press and hold the 2 buttons in the middle of the mop module and attach it to main unit. Push it in horizontally until you hear a 'click' indicating it is securely in place.
natural_image
Line drawing of a robotic vacuum cleaner with open lid and hand holding part (no text or symbols)Note:
The mopping function of the equipment only has the effect of wiping, which is helpful for deep cleaning, but cannot effectively remove stubborn stains and cannot completely replace manual labour
Removing the 2-in-1 Dustbin/ Water Tank
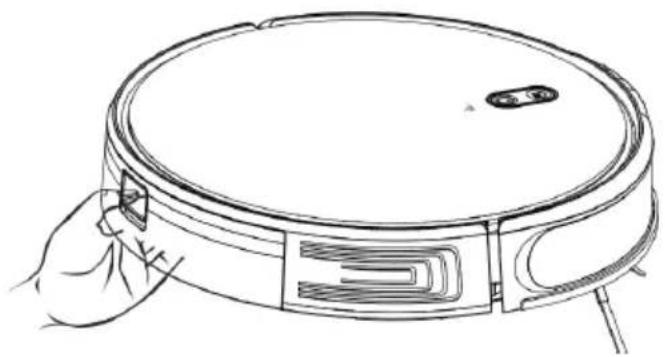
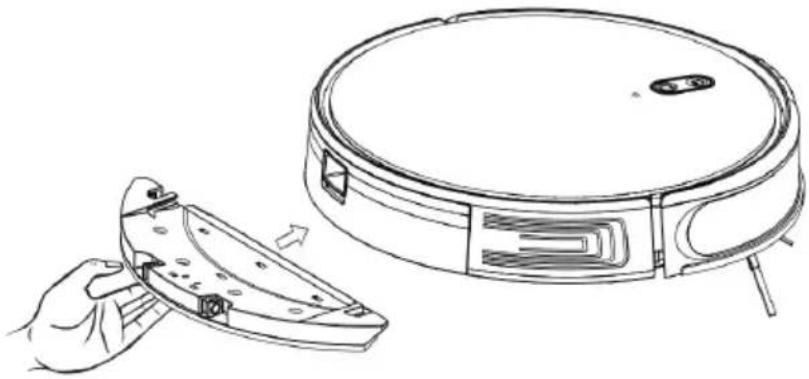
- After the cleaning, press and hold the 2 buttons in the middle of the moping module. Slide the moping module backward and remove it, then take out the mop cloth. (Do not move or flip the main unit while it is in operation.)
natural_image
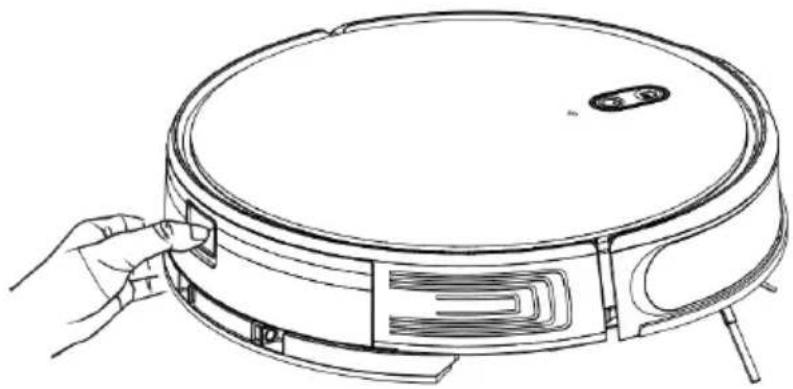
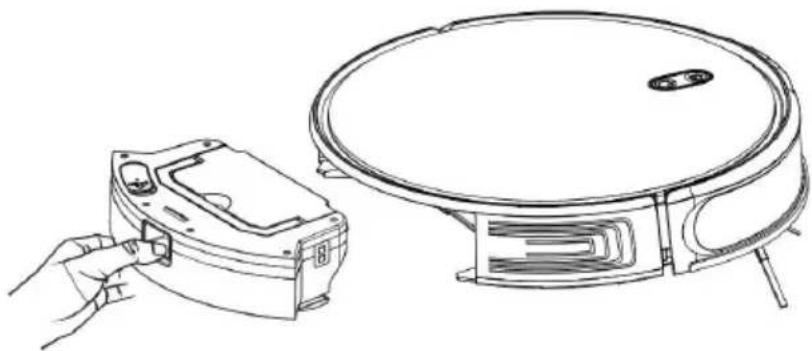
Line drawing of a robotic vacuum cleaner with a hand adjusting the component (no text or symbols)- After removing the moping module, press and hold the button in the middle of the water tank and pull it out horizontally from the rear of the main unit. Empty the remaining water from the water tank and remove any debris from the dustbin. (Do not move or flip the unit during operation.)
natural_image
Line drawing of a hand inserting a device into a circular vacuum cleaner (no text or symbols)Tips for use
- Do not use the water tank when no one is home.
- For safety, be sure to remove the water tank when charging or not in use.
- Do not use the mopping function on carpeted areas. You can prevent the device from entering the carpet by setting a forbidden area.
- To obtain a better mopping effect, it is recommended to install the mopping module after cleaning it 3 times before first use.
- If you need to add water or clean the mop cloth during operation, pause in place first, follow the above steps and then resume cleaning.
BEFORE FIRST USE
Checks to the area
- Ensure there are no loose wires or cables scattered on the ground. This is to prevent the vacuum becoming entangled or dragged along.
- Ensure all fragile items, those easy to topple, dangerous items, and valuables are removed. This is to prevent items being damaged and to avoid personal injuries.
- Do not use the vacuum to clean liquids.
- To reduce the likelihood of accidental damage, it is recommended to block off steps or steep drop-offs.
natural_image
Line drawing of a living room interior with TV, sofa, coffee table, and lamp (no text or symbols)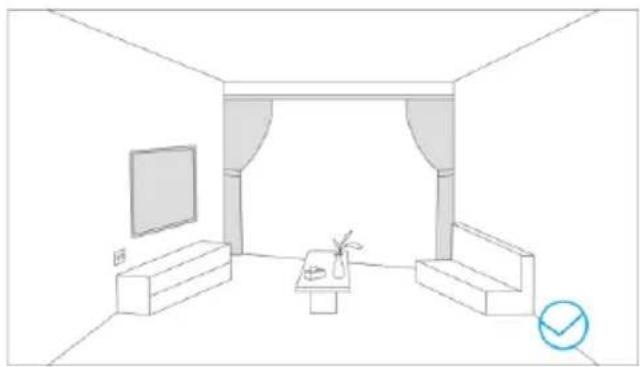
natural_image
Line drawing of a room layout with TV, curtains, and furniture (no text or symbols)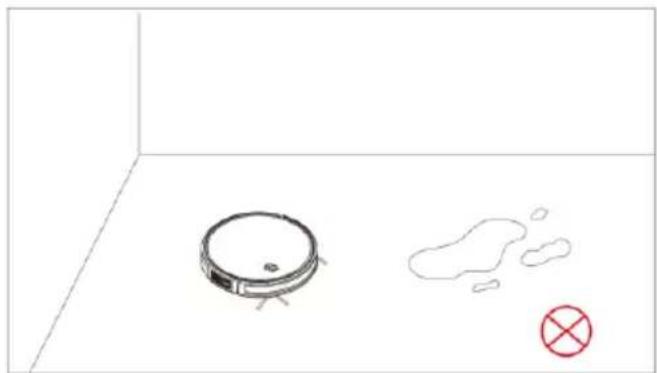
natural_image
Simple line drawing of a vacuum cleaner and a paint swab on a floor, with a red X mark symbol (no text or labels)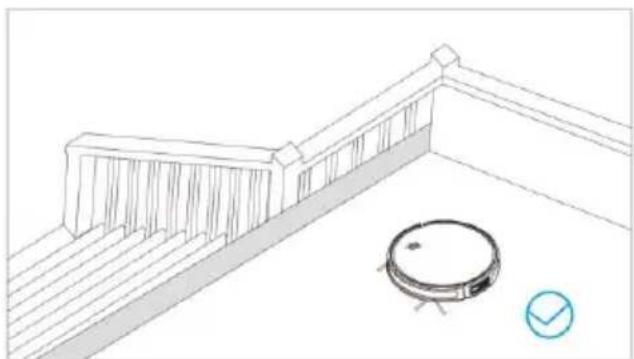
natural_image
Line drawing of a room with a robotic vacuum cleaner and a checkmark icon (no text or symbols)CONNECT TO SMARTERHOME™APP
Install App
Download the "Kogan SmarterHome" app from the Play Store (Android) or App Store (iOS).
Play Store (Android)
App Store (iOS)

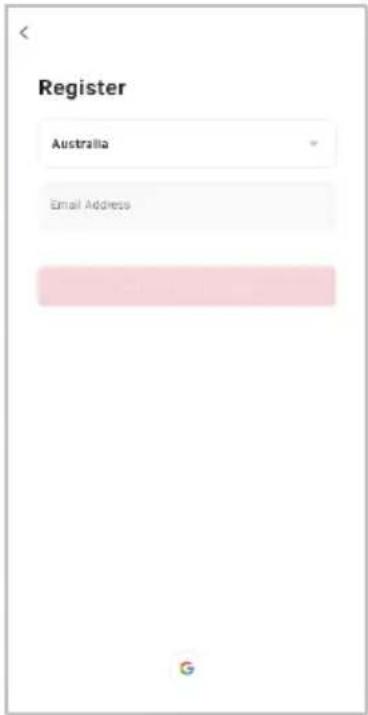
To register:
- If you already have a SmarterHome account, select 'Log In'. To register a new account, select 'Sign Up'.
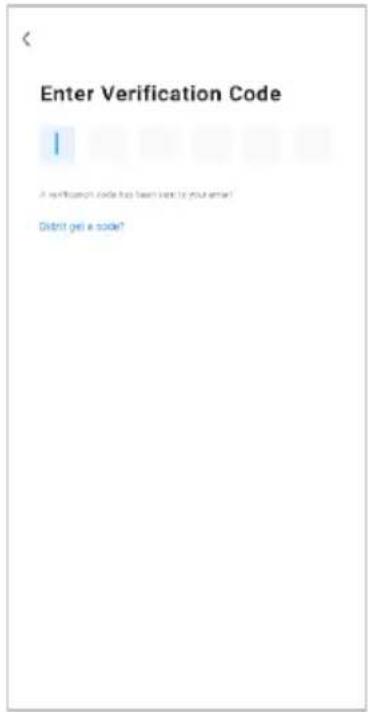
- The system will automatically recognise your country. If needed, you can manually select your country from the drop-down box. Enter your email address and tap 'Verification Code' to continue.
- A 6-digit code will be sent to the submitted email address. Enter this code before the one-minute timer expires.
- Continue to the next page and complete your SmarterHome profile.
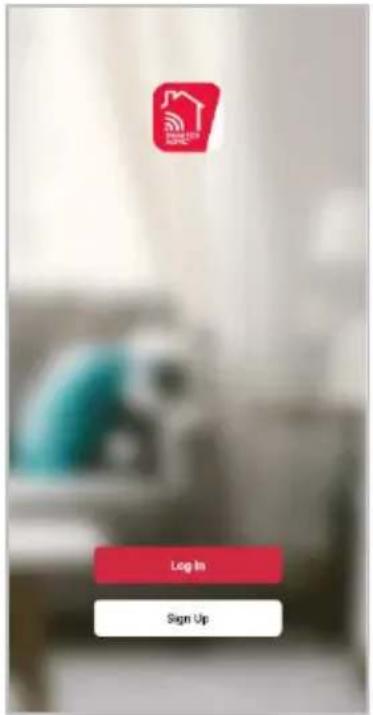
Set device in pairing mode
When the device is first turned on, it may automatically enter pairing mode (both buttons are slowly flashing purple).
If not automatically in pairing mode when powered on, you can manually set the device in pairing mode by pressing and holding the home and power buttons simultaneously for 3 seconds voice prompt 'WIFI resetting'ise heard and the Wi-Fi indicator begins flashing B
Add device through network
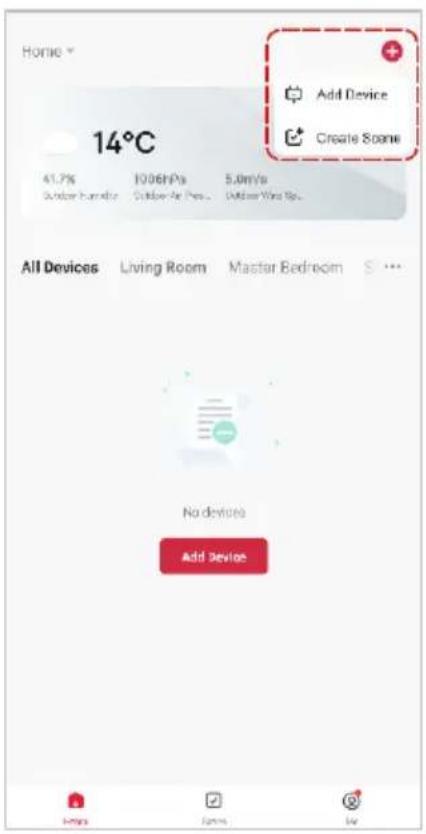
- Once registered, tap "Add Device" on the app's home page, or the "+" in the upper right corner, to add a new device through the network.
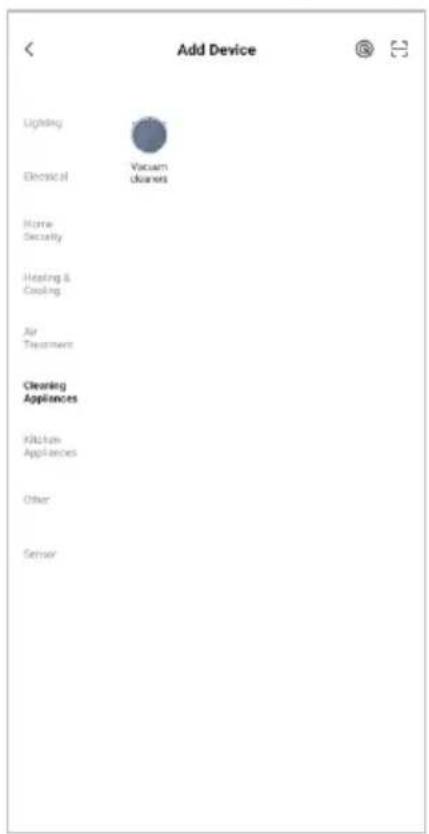
- Select the product type from the list of options in the app (Cleaning Appliances > Vacuum cleaners).
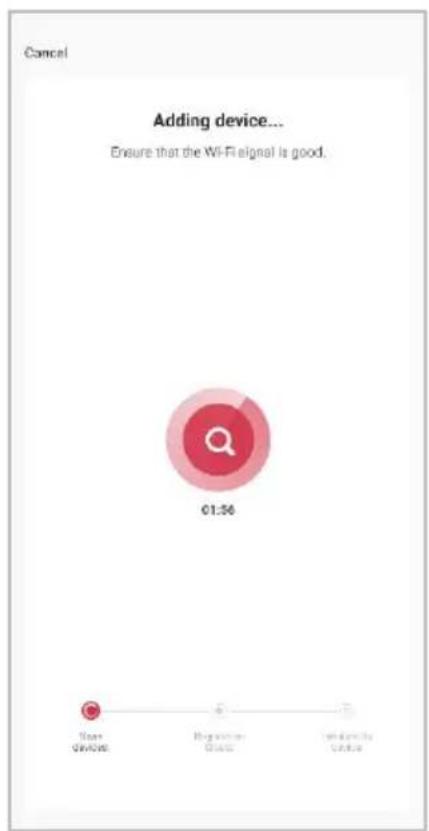
- Enter your Wi-Fi details. It is important that your SmarterHome™ device and the app are connected to the same Wi-Fi network during setup.
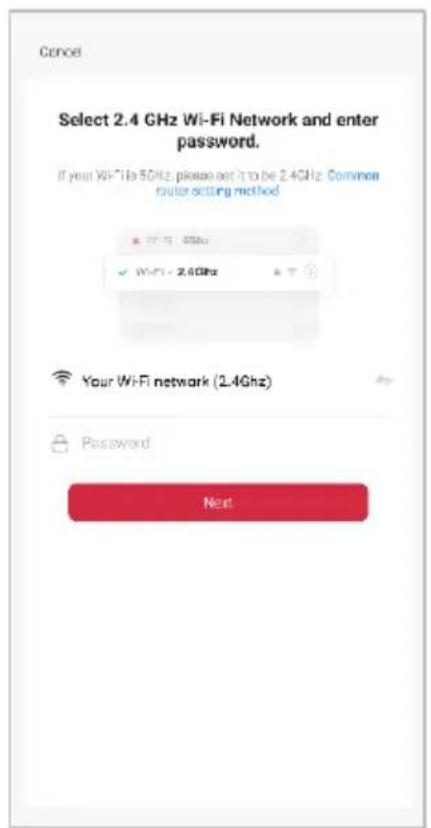
Notes:
- The device and the app have to use the same Wi-Fi network.
-
The device is only compatible with 2.4Ghz networks.
-
Adjust your connection method by tapping on the mode type in the top-right corner of the screen. Select 'AP Mode' for the set-up type.
- Ensure that the device is in pairing mode, with the power and home buttons are slowly flashing Blue, select 'Confirm indicator is slowly blink' and tap 'Next'.
- Follow the in-app prompts to continue AP Mode connection, which will pair your mobile phone to the device's Wi-Fi hotspot to ensure a connection. This may be named "SL-KoganSmart", "SmartLife XXXX", or another similar name.
Note:
If the Wi-Fi hotspot does not appear on your phone in the list of available networks, your device may not be set in AP Pairing Mode correctly. Try repeating the steps outlined above to ensure your device is ready for connection.
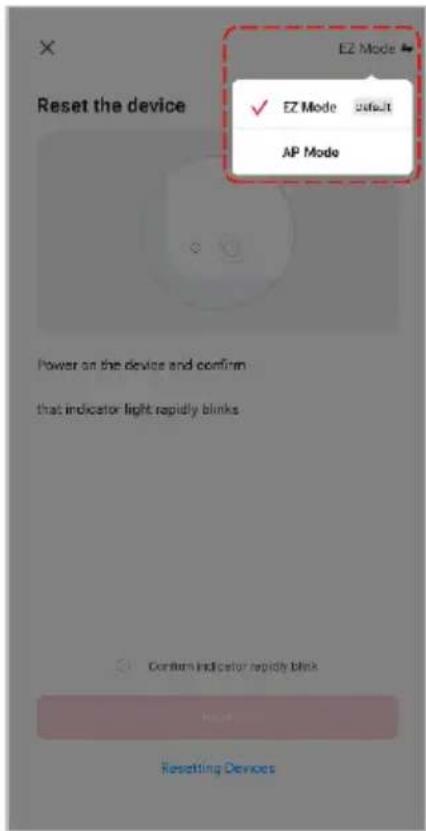
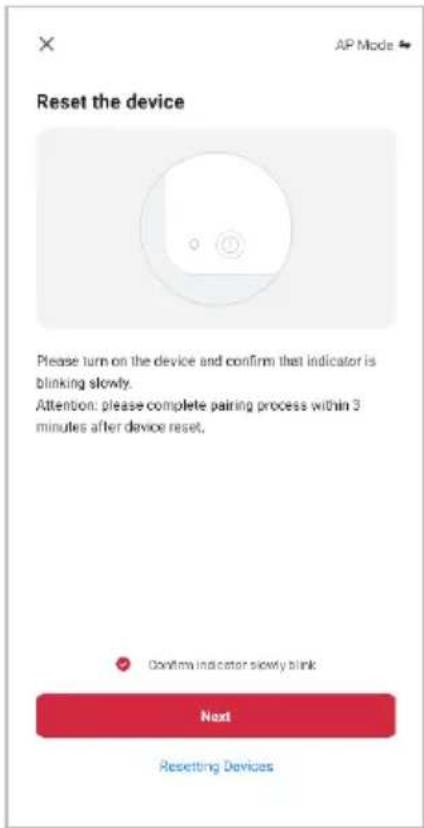
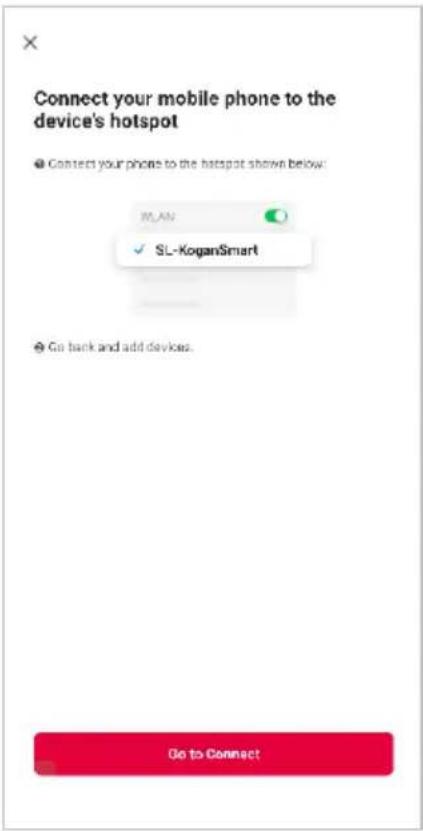
- The device will commence the pairing process and connect to the app. Ensure your Wi-Fi router, mobile phone, and the SmarterHome™ device are kept close until connection is complete.
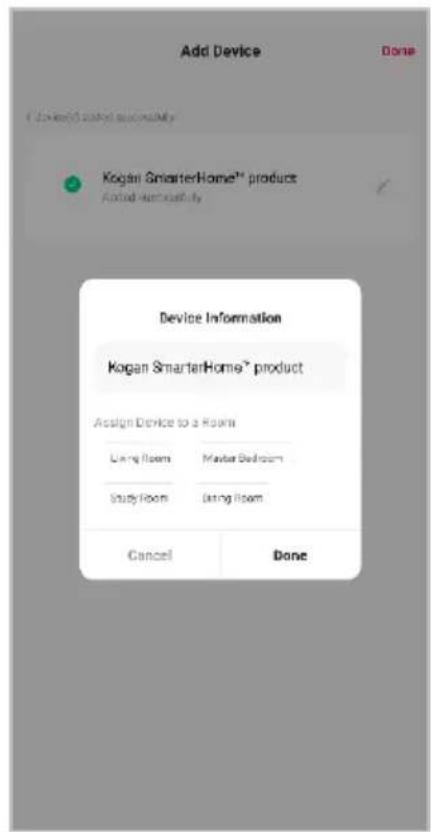
- After successfully being added, you will have the option to rename the device and assign it to a location. It will now be listed on the app's home page. Tap the device listing to enter its control page.
Note:
Once connected, you can select Create Scene from the “+” in the upper right corner (or from the Scene tab) to group connected SmarterHome™ products and automate their functions.
GOOGLE HOME CONTROL
Note:
You will need to have set up a Google Home account prior to linking your Kogan SmarterHome™ device.
Adding "SmarterHome" to the Google Home app
-
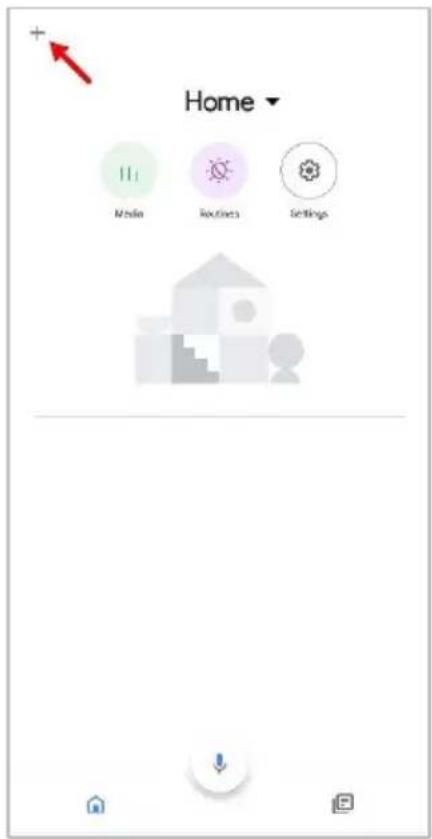
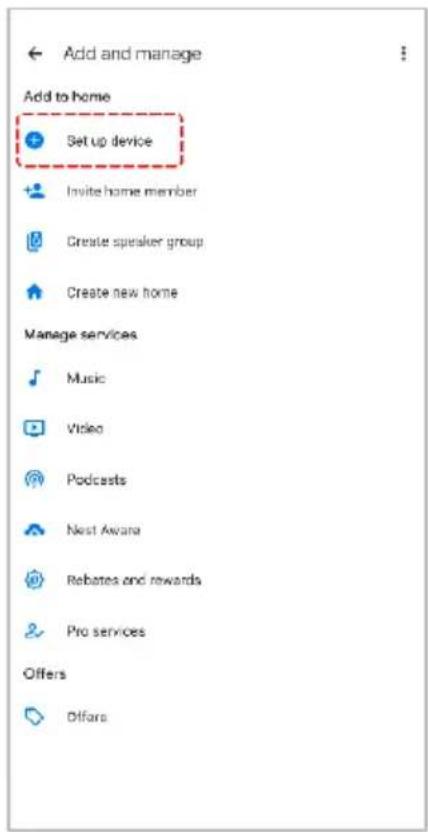
- (top left corner page of the Google Home app, select the “ ” icon see arrow in the below screenshot) to access the ‘Add and manage’ page.
- selectWorks with Googthen the ' option.
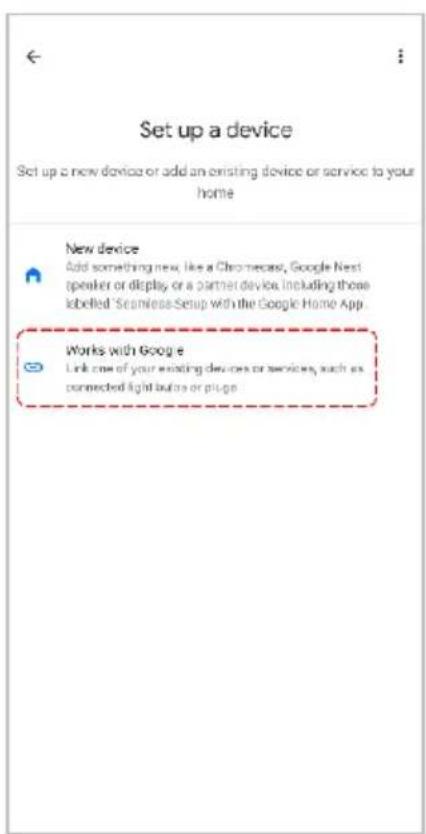
- Select the search bar and type 'Smarter Home' to locate the Kogan SmarterHome™ service.
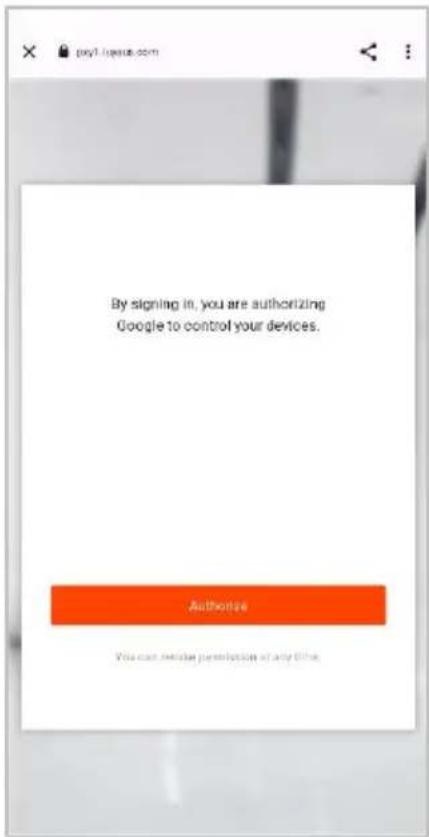
- From here, you will be prompted to sign into your SmarterHome™ account using either your email or mobile phone number, depending on which method you used to register your account.
- Select "Kogan SmarterHome™" from the app options.
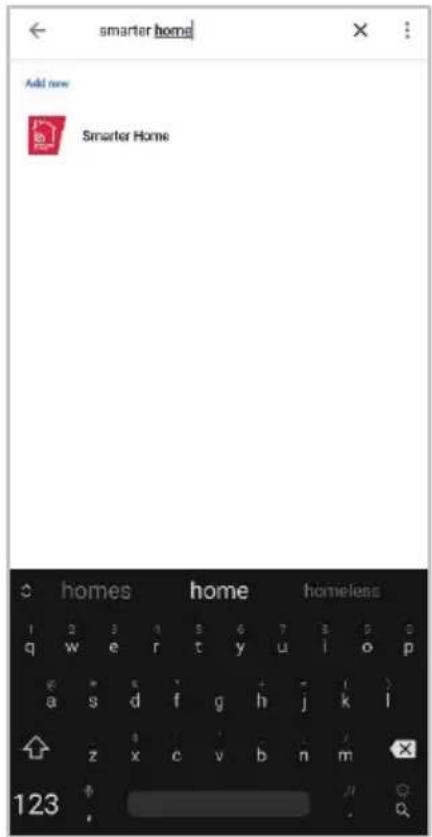
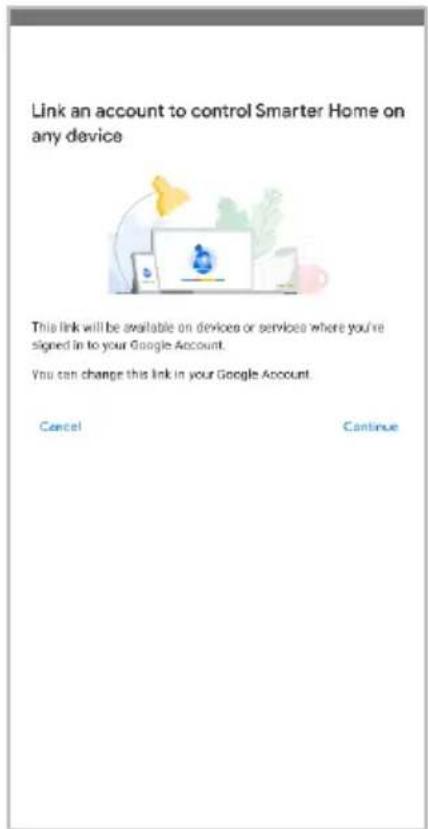
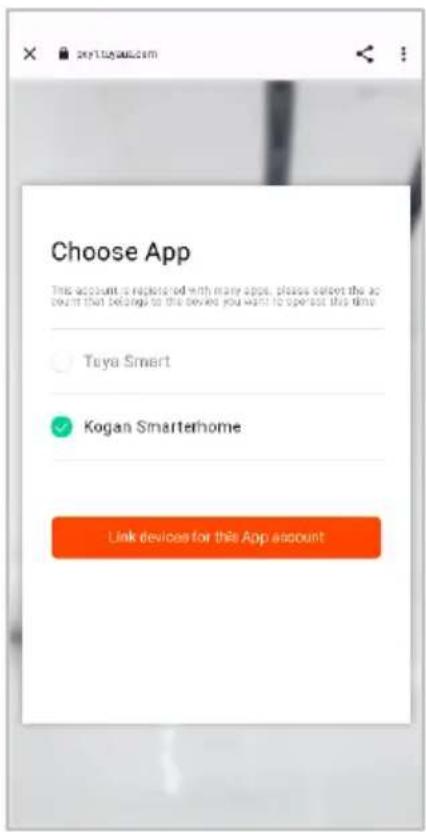
- app and Authorise' to grant Google permission to access the SmarterHome™ your devices.
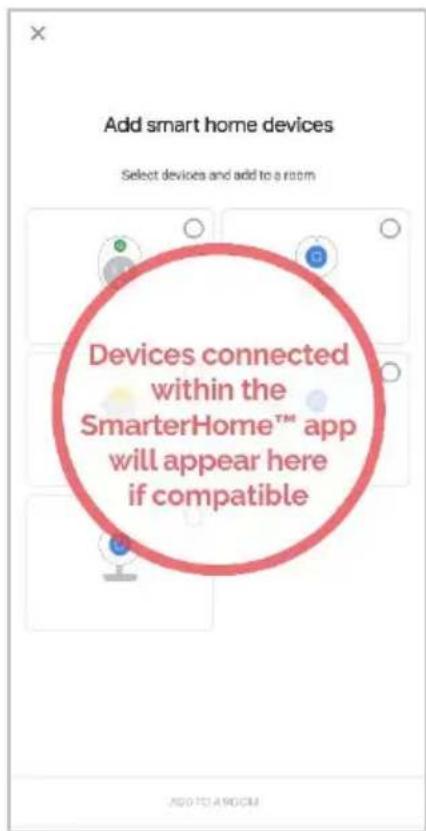
- Once connected, the app will display any compatible devices linked to your SmarterHome™ account. From here you can assign them to rooms and set up any routines. Tap on any of the devices to view a list of available commands.
Note:
Please note that Google Home can only control the base/core functions of any compatible SmarterHome™ devices. To make full use of this product's smart functionality, please use the Kogan SmarterHome™ app.
AMAZON ALEXA CONTROL
Note:
You will need to have set up an Alexa account prior to linking your Kogan SmarterHome™ device.
Adding "SmarterHome" to the Alexa app
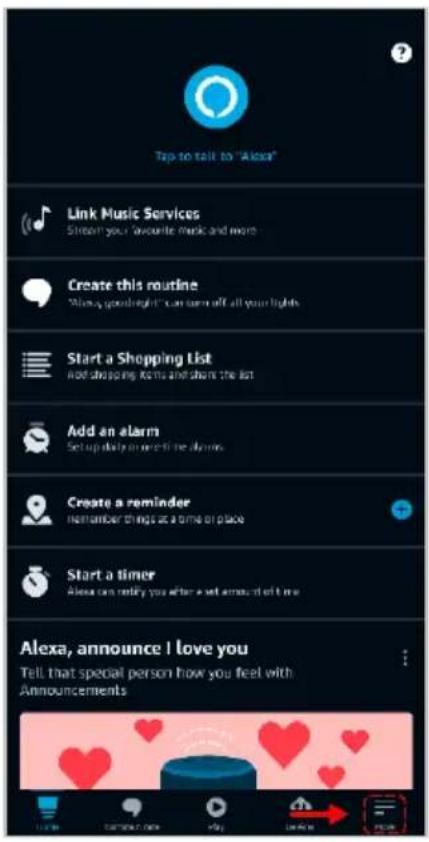
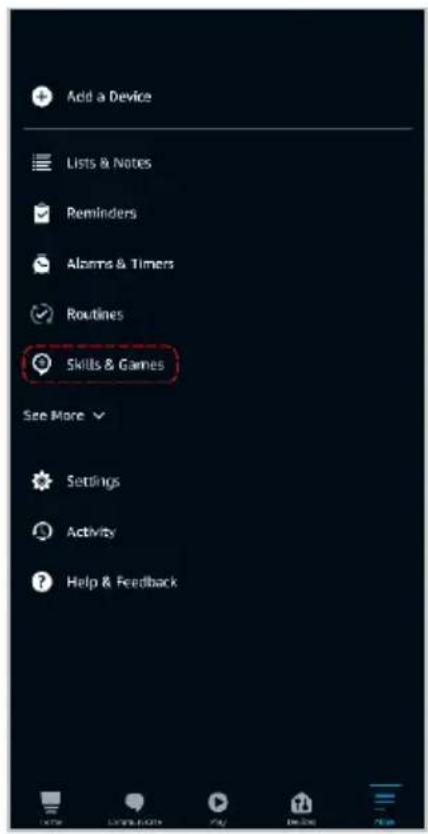
- -right and the home page of the Alexa app, select the "≡" icon in the bottom select "Skills & Games" from the sidebar.
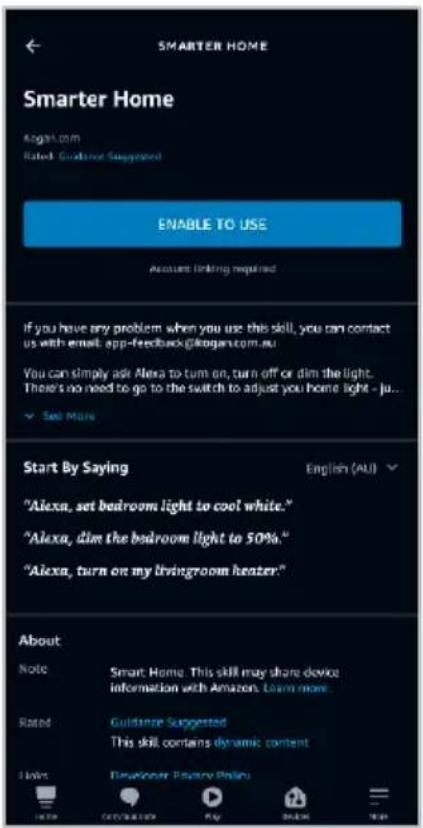
- Select the search bar and type 'Smarter Home' to locate the Kogan SmarterHome™ skill.
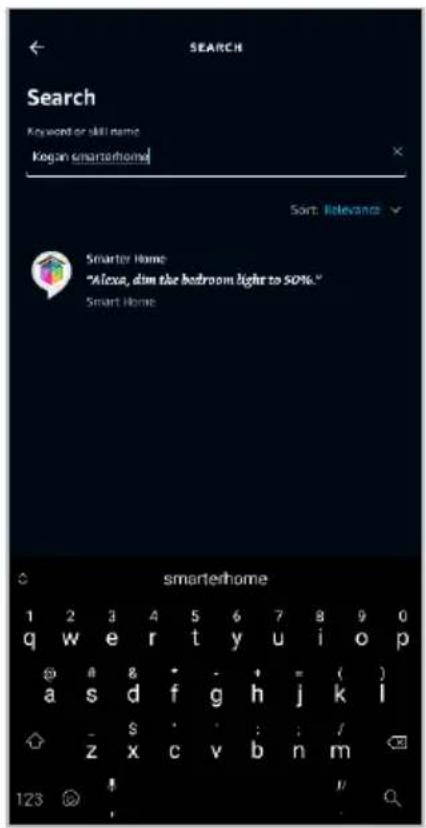
- skill to Alexa to Use' to add the Kogan SmarterHome™
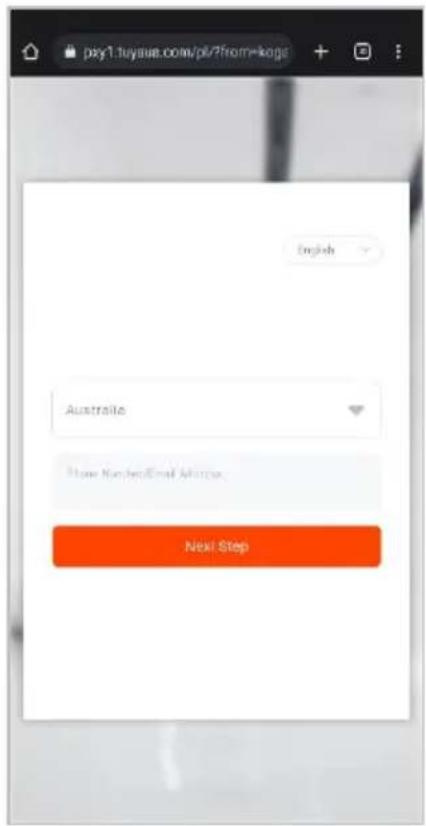
- From here, you will be prompted to sign into your SmarterHome™ account using either your email or mobile phone number, depending on which method you used to register your account.
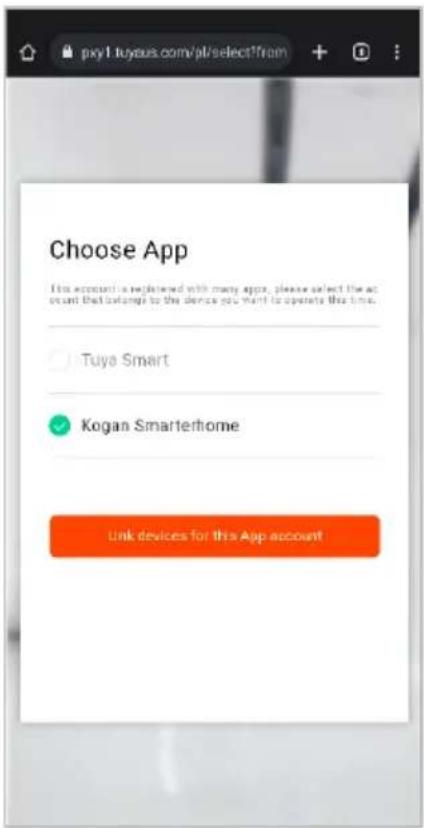
- Select "Kogan SmarterHome™" from the app options.
OPERATION
Powering On/ Off:
- Power On: Press the power button. The vacuum indicator will flash Blue and voice prompt 'POWER ON' indicating it is ready to work.
- Power Off: Press and hold the power button for 3 seconds. The vacuum indicator will flash White and voice prompt 'POWER OFF' indicating the shutdown is complete.
Sweeping/ Pause
After the vacuum starts, press the power button or use the mobile app to start or pause automatic cleaning.
Notes:
- The vacuum cannot be used to clean liquids.
- If the battery level is below 20%, the vacuum cannot perform cleaning tasks.
- Charge the vacuum first before resuming cleaning if the battery falls below 20% during operation. The vacuum will automatically return to the charging base.
- Remove all wires and obstacles from the floor before cleaning.
- When recharging, either start the process manually or use the mobile app. The indicator will flash Blue while the vacuum is charging.
- If the charging base cannot be located, the vacuum will return to its starting position. In this case, manually place the vacuum on the charging stand.
- The mobile app can also control recharging.
Suction Adjustment
Use the SmarterHome app to select from three suction modes: Quiet, Normal, or Strong (Default is Normal).
Water Regulation (mopping configuration)
Using the SmarterHome app, you can choose between three water volume levels: Low, Medium, or High (Default is Medium).
Silent Mode
To enable Silent Mode, use the SmarterHome app. In Silent Mode, the device will not play any voice prompts. You can turn this mode on or off via the app.
Reset Wi-Fi
If the App fails to connect to the vacuum due to router settings, password changes, or other reasons:
Press and hold the Home and Power buttons for 3 seconds until you hear 'Wi-Fi resetting' The Wi-Fi light will turn on and begin flashing Blue, indicating the reset was successful.
natural_image
Hand pressing a button on an electrical switch with a power icon and a house symbol (no text or labels)Schedule Cleaning
Use the SmarterHome app to set a scheduled cleaning time. The vacuum will automatically start cleaning at the specified time.
Note: Avoid moving the vacuum frequently while it is in operation.
Cleaning mode
After the vacuum is powered on, it will scan and generate the map and divide it into areas intelligently. Then sweep the areas one by one along the wall orderly, efficiently and thoroughly and plan the cleaning route in a bow/S shape. The vacuum will return to the charging dock automatically after cleaning.
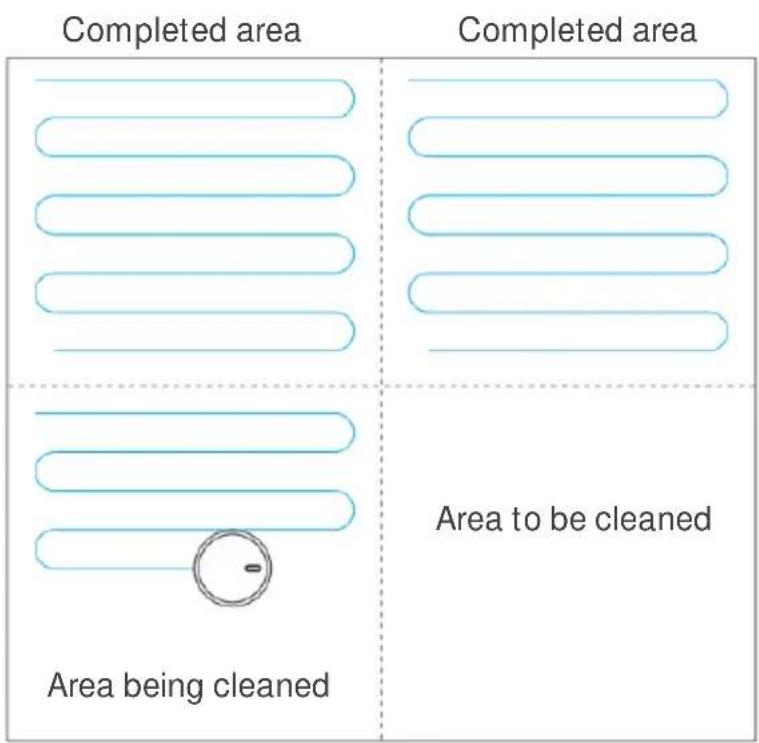
Note: Avoid moving the vacuum frequently while it is cleaning. If the vacuum is moved, place it back near its original position. When restarted, it will attempt to reposition itself. If successful, it will follow the planned cleaning path and resume work. If positioning fails, the vacuum will cancel the previous task, create a new map, and start cleaning again. In this case, it may not be able to find the charging base.
Spot Cleaning
For a deep clean in a specific area, select a point on the map in the SmarterHome app. The vacuum will automatically move to the designated area and clean a 1.5x1.5m area centred on that point.
Partial Cleaning
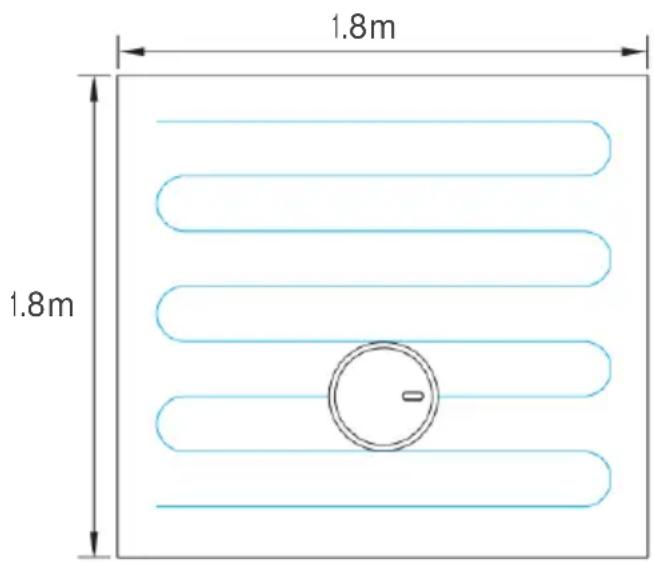
If the vacuum cannot be controlled via the app, manually place it in the area you want to clean. Press and hold the power button for 3 seconds, and the vacuum will clean twice within a 1.8x1.8m area centred around itself.
Firmware upgrade
To upgrade the firmware, access the firmware upgrade function via the SmarterHome app. If a new firmware version is detected, follow the on-screen prompts to complete the upgrade. Ensure the battery level is at least 50% before upgrading. It is recommended to place the vacuum on the charging stand during the upgrade process.
CLEANING & CARE
Roller brush
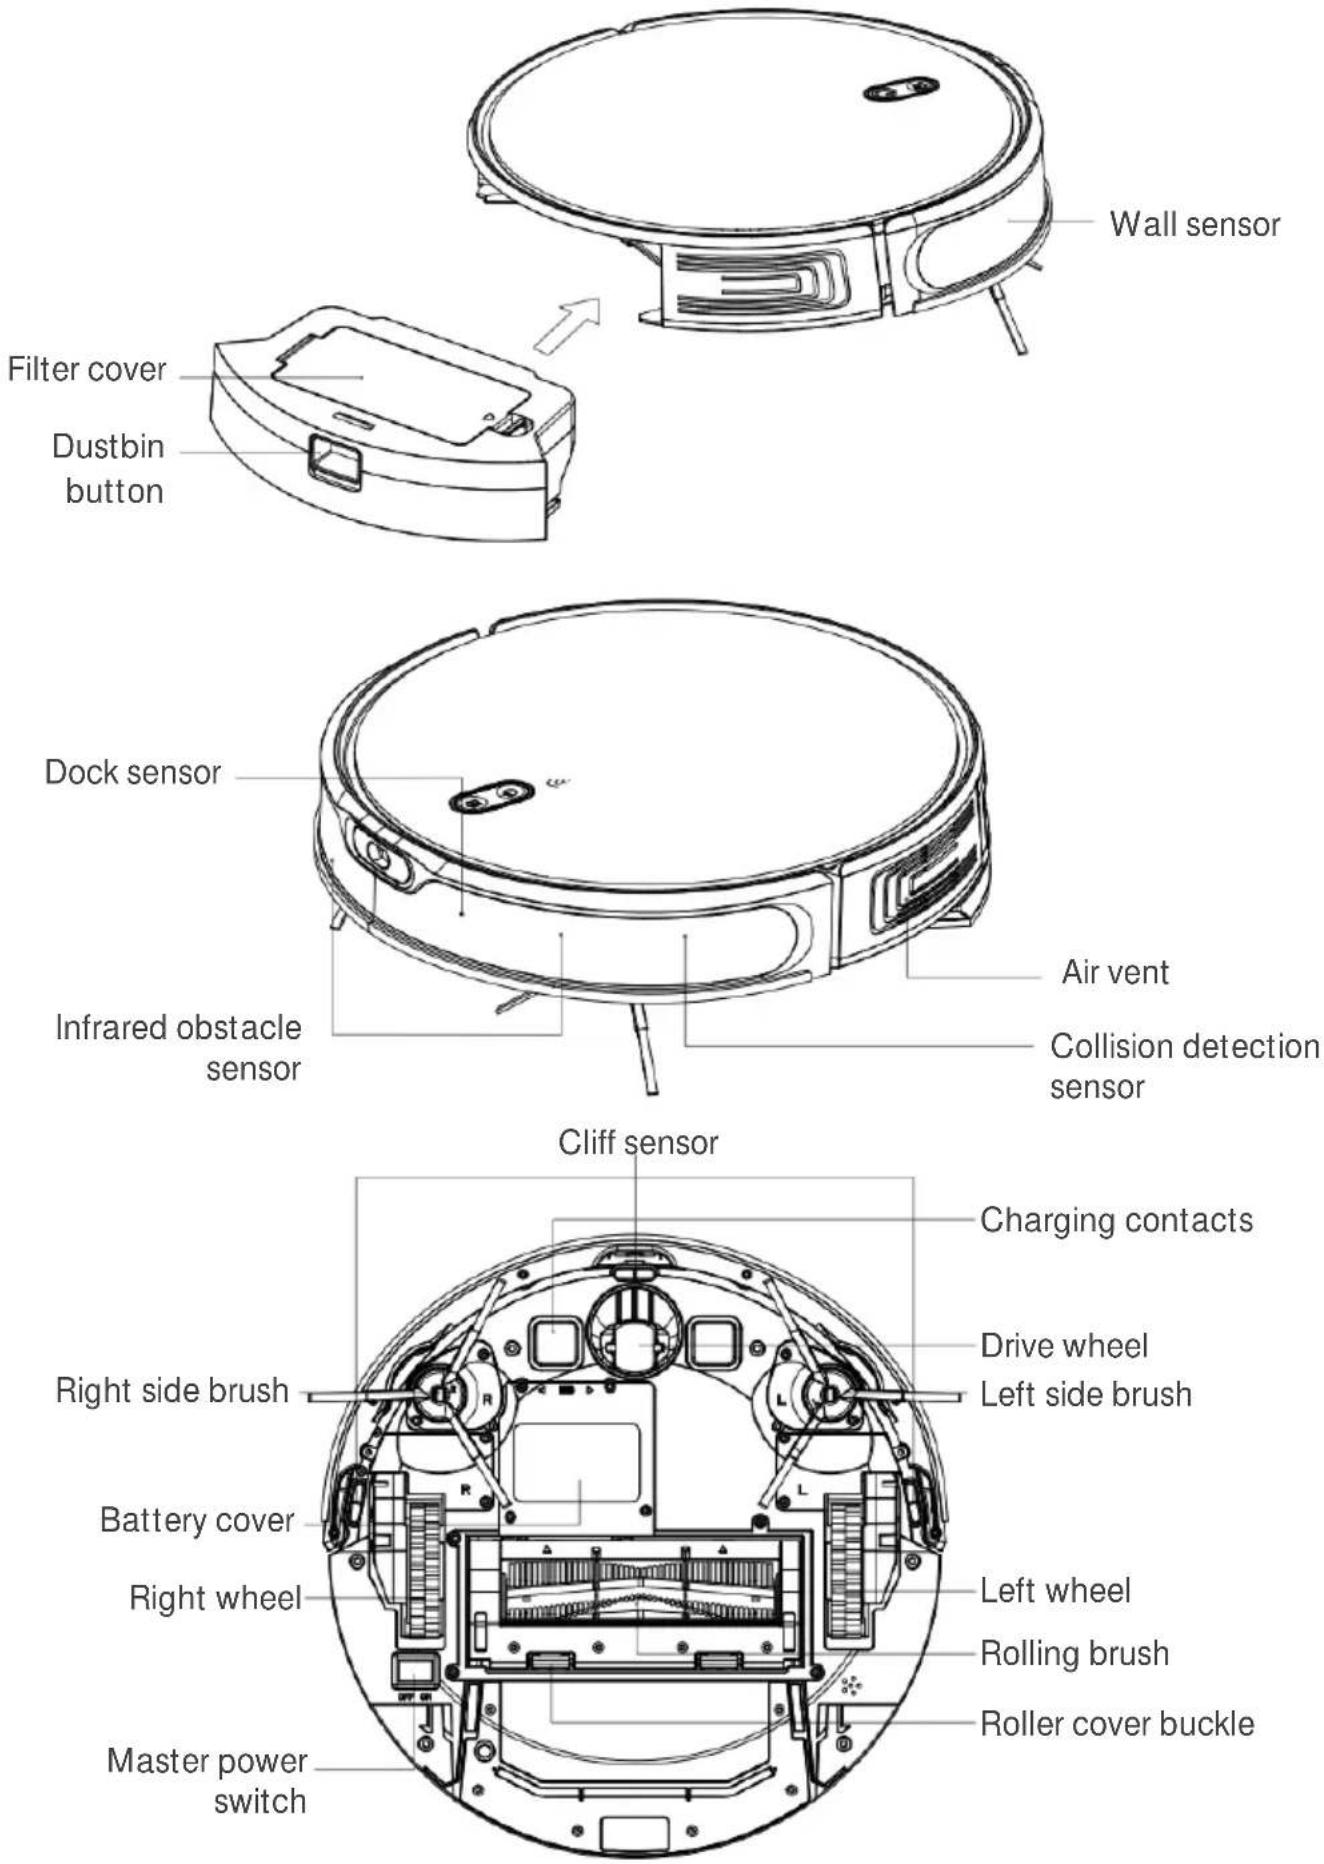
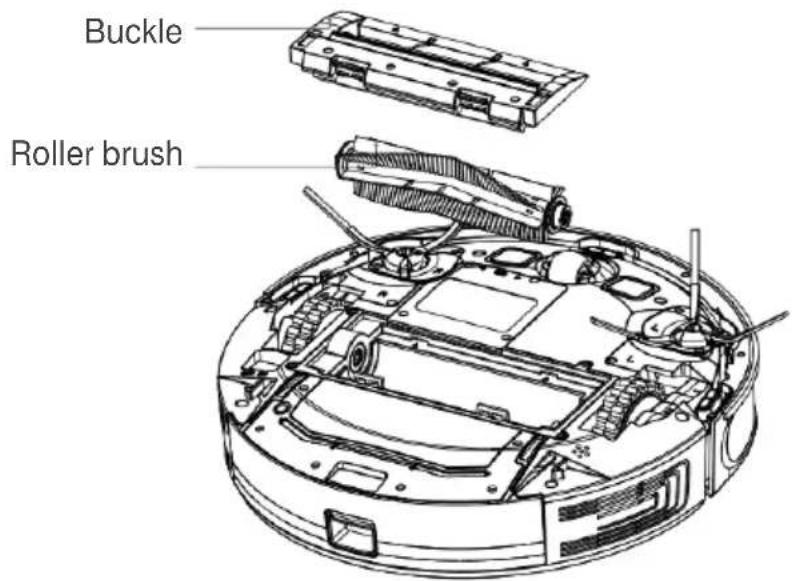
- Turn the vacuum over and press the latch on the brush cover to remove the roller brush.
- Use the included cleaning tool to remove dust from the roller brush and its cavity. Clean any debris or hair tangled on the roller brush.
- Reinstall the roller brush and secure it by pressing the brush cover latch.
Side brush
- Turn the vacuum over and pull the side brush straight upwards.
- After cleaning any tangled hair or dirt, reinstall the side brush.
- Match the left (L) and right (R) brushes with the corresponding letters (L and R) on the bottom of the vacuum, then press down to secure them.
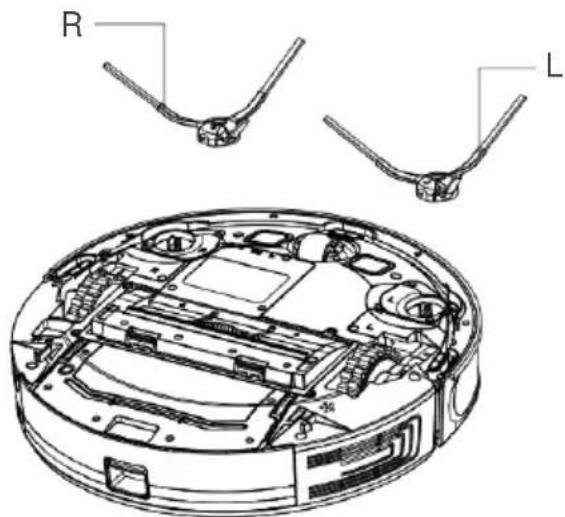
Note:
It is recommended to replace the side brush every 3-6 months to ensure the cleaning effect.
Dustbin
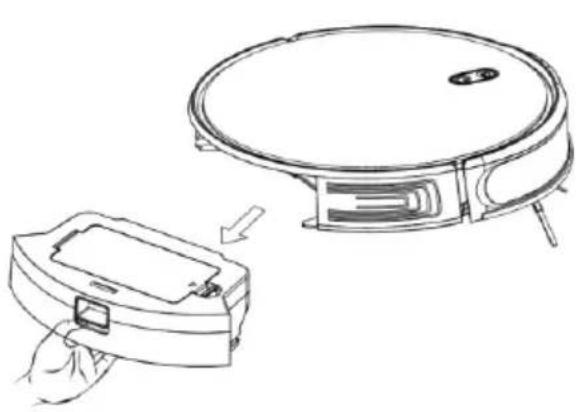
- Press and hold the dustbin button and remove the dustbin by pulling backwards.
- Open the dustbin and empty the debris into the garbage.
natural_image
Line drawing of a robotic vacuum cleaner with a hand inserting a component (no text or symbols)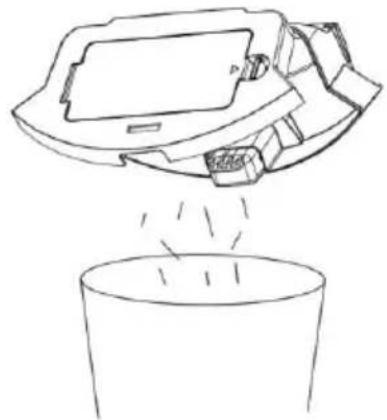
natural_image
Line drawing of a mechanical device above a cup, showing spray or dust dispersion (no text or symbols)Filter
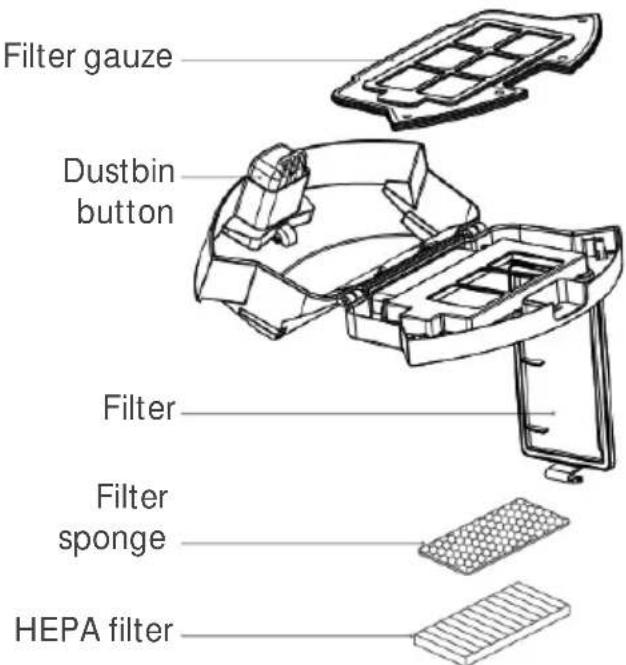
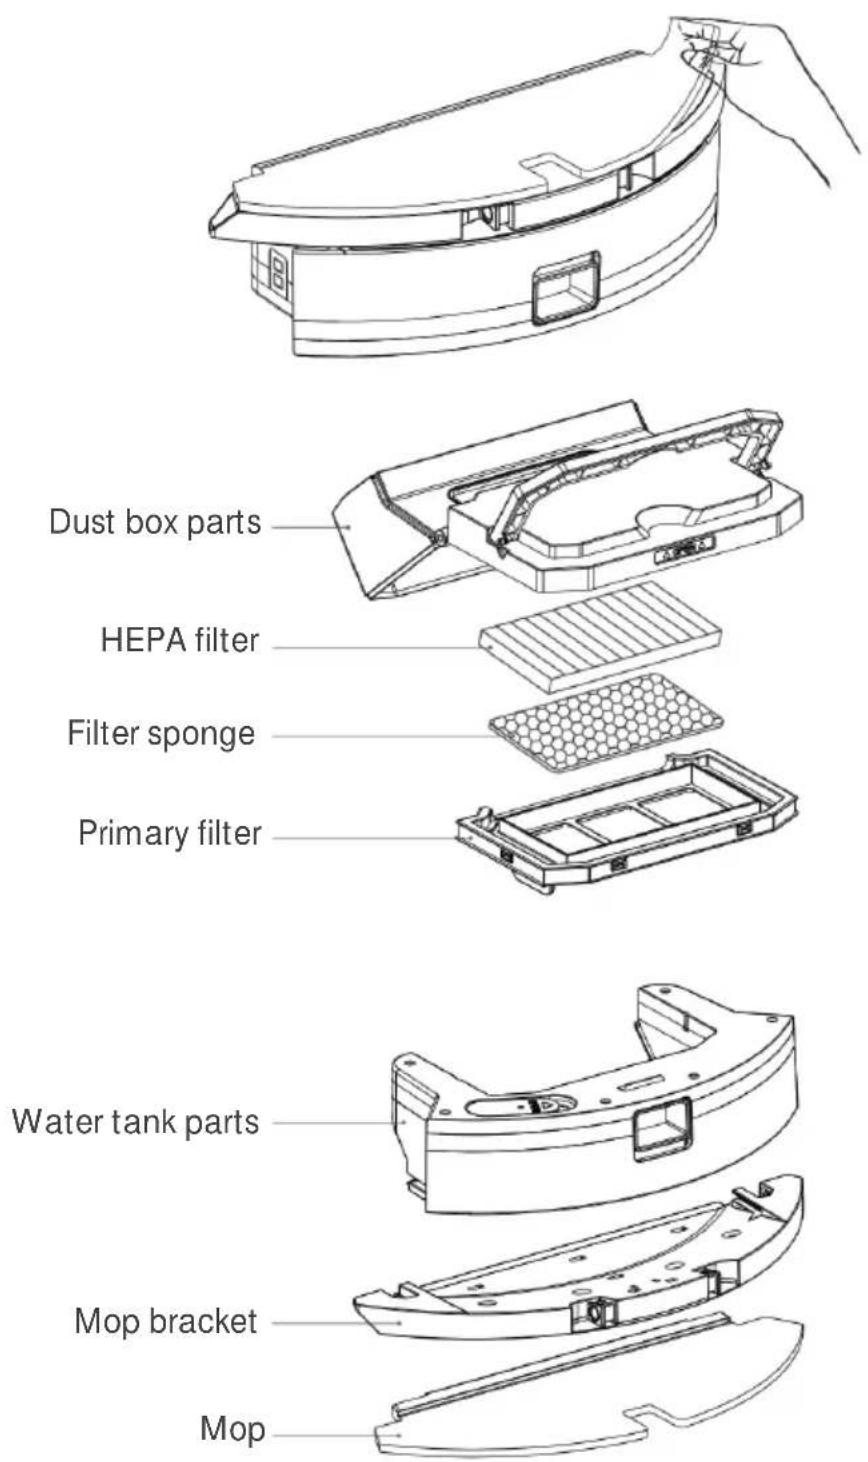
- After extended use, remove the filter gauze, filter sponge, and HEPA filter.
- Rinse the filter gauze, filter sponge, HEPA filter, and dustbin under running water.
- After rinsing, shake off any excess water and allow the filter components and dustbin to dry completely before reusing.
- Once thoroughly dry, reinstall the components in the following order: filter gauze, filter sponge, and HEPA filter.
Notes:
- Rinse with clean water, do not add any detergent.
- Do not use a brush or fingers to clean the filter.
• Air-dry the filter for at least 24 hours and dry thoroughly. - It is recommended to replace a set of filters every 3-6 months.
2-in-1 Dustbin/ Water Tank
- Remove the mop cloth and drain the water from the tank.
- Clean the mop cloth, then dry both the water tank and cloth before the next use.
- Lift the handle, remove the dustbin from the tank, pour out any remaining water, and dry the tank.
Note: It is recommended to clean after every use.
Battery
- The vacuum is equipped with a built-in high-performance rechargeable lithium-ion battery. To maintain optimal battery performance, keep the vacuum charged during regular use.
- If not in use for an extended period, turn off the vacuum, store it properly, and recharge it at least once every three months to prevent battery damage from excessive discharge.
Sensors
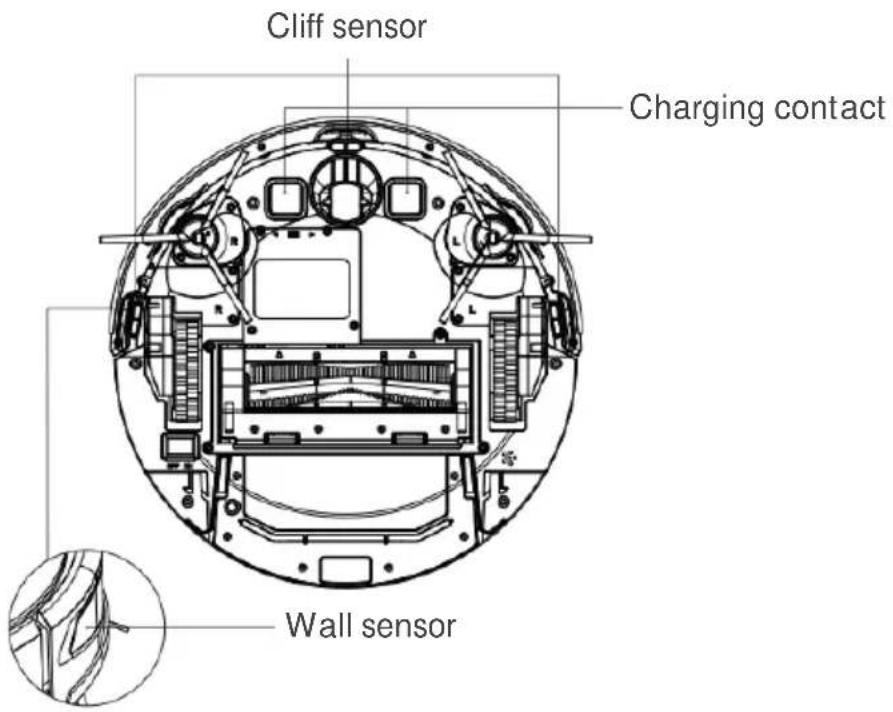
Wipe the various sensors on the machine with a soft dry cloth, including:
- Along the wall sensor on the right side of the main unit
• 3 anti-drop sensors at the bottom of the main unit
• The infrared anti-collision sensor in front of the host - Charging contacts at the bottom of the host, charging shrapnel of the charging base (power off when cleaning)
• Charging dock signal transmitting area
Note: It is recommended to clean frequently.
Product hazardous Substance Content and Name
This form is prepared according to the provisions of SJ/T 11364
- O: Indicates that the content of the hazardous substance in at least one homogeneous material of the part exceeds the limit requirement specified in GBT/T 26572
- X: Indicates that the content of the hazardous substance in at least one homogeneous material of the part exceeds the limit requirement specified in GBT/T 26572
Removing the Battery
- Allow the vacuum to run until the battery is fully discharged and the vacuum automatically shuts down. Do not let it return to the charging base.
- Unscrew the battery cover.
- Remove the battery cover, disconnect the battery, and then take the battery out.
SPECIFICATIONS
Vacuum
| Dimension | 327 x 325 x 76mm |
| Weight | 2.8kg |
| Battery | 2600mAh-Lin |
| Rated Voltage | 14.4V |
| Raed Power | 40W |
Charging base
| Dimension | 160 x 145 x 90mm |
| Rated Voltage | 18W |
| Rated Power | 18W |
TROUBLESHOOTING
| Questions | Solution |
| Vacuum won’t turn on | The battery is low. Place the vacuum on the charging dock and align the charging pads. The device will automatically turn on. (When completely dead, it may take some time to turn on.)When the ambient temperature is lower than 0°C or higher than 40°C. Use in the environment within 0-40°C |
| Vacuum won’t charge | Remove the vacuum from the charging dock if the indicator light is on. Ensure both ends of the power adapter are plugged in, and the front of the vacuum is 2cm away from the charging dock. |
| Can't recharge | The main unit is too far from the charging dock. Place the vacuum near the charging dock. |
| Abnormal behaviour | Restart the vacuum. |
| Abnormal noise when cleaning | The dustbin is full; clean the dustbin.The filter is clogged; clean or replace the filter.The roller brush is entangled with foreign objects; clean the roller brush. |
| Won't connect to App | The Wi-Fi signal is weak; ensure the vacuum is in a good coverage area.Reset the Wi-Fi and download the latest mobile app if the connection fails.Ensure the Wi-Fi password is correct.The router may be on the 5G band. The vacuum only supports the 2.4G band. |
| Reservation for cleaning does not take effect | When the battery is low, scheduled cleaning will only start when the battery is ≥20%. |
| The machine running out of power when it is on the charging | Power consumption is minimal when the vacuum is always on the charging cradle, helping to keep the battery at peak performance. |
| Do you need to charge for 16 hours for the first 3 uses? | Lithium batteries do not require a memory effect. You can use the vacuum immediately after fully charging without waiting. |
Troubleshoot
| Error tone | Solution |
| Error 1: Dustbin removed | Reinsert the dustbin into the vacuum. |
| Error 2: Water tank removed | Reinsert the water tank into the vacuum. |
| Error 3: Restart in new position | Move the vacuum to a flat surface and restart. |
| Error 4: Clean bottom sensor | Clean the cliff sensor with a dry cloth and place the vacuum on level ground before restarting. |
| Error 5: Clean front sensor: | Wipe the front infrared anti-collision sensor with a soft, dry cloth. |
| Error 6: Clean right-side sensor | Clean the right-side wall sensor with a soft, dry cloth. |
| Error 7: Robot inclined: | Ensure the vacuum is on a level surface and restart. |
| Error 8: Bumper stuck | Push the bumper left and right to ensure the collision sensor is not stuck. |
| Error 9: Clean dustbin and filters | Clean the dust box and filter or replace the filter |
| Error 10: Dustbin out, clean filter | Reinsert the dustbin and clean the filter if necessary. |
| Error 11: Robot blocked | Move the vacuum to a flat surface and restart. |
| Error 12: Main wheel stuck | Check the main wheel for foreign objects and clean if necessary. |
| Error 13: Brush bar stuck | Check the roller brush for foreign objects and clean if necessary. |
| Error 14: Side brush stuck | Check the side brush for foreign objects and clean if necessary. |
| Error 15: Charging station not found | Ensure the charging station is plugged in and the indicator light is on. If not found, manually place the vacuum on the charging station. |
| Error 16: Unknown fault | Restart the vacuum due to an unknown error. |
| Error 17: Low battery | Place the vacuum on the charging stand to charge. |
| Error 18: Remove from charging station for power off | Move the vacuum away from the charging station, then press and hold the power button to turn it off. |
NOTES
Need more information?
We hope that this user guide has given you the assistance needed for a simple set-up.
For the most up-to-date guide for your product, as well as any additional assistance you may require, head online to help.kogan.com
kogan.com
- KOGAN SMARTERHOME™ POINT LASER ROBOT
- SAFETY & WARNINGS
- Battery and Charging
- Disposal Instructions
- COMPONENTS
- OVERVIEW
- Charging Dock
- INSTALLATION
- Notes:
- Install 2-in-1 Dustbin/ Water tank
- Note:
- Removing the 2-in-1 Dustbin/ Water Tank
- Tips for use
- BEFORE FIRST USE
- Checks to the area
- CONNECT TO SMARTERHOME™APP
- Install App
- To register:
- Set device in pairing mode
- Add device through network
- GOOGLE HOME CONTROL
- Adding "SmarterHome" to the Google Home app
- AMAZON ALEXA CONTROL
- Adding "SmarterHome" to the Alexa app
- OPERATION
- Powering On/ Off:
- Sweeping/ Pause
- Suction Adjustment
- Water Regulation (mopping configuration)
- Silent Mode
- Reset Wi-Fi
- Schedule Cleaning
- Cleaning mode
- Spot Cleaning
- Partial Cleaning
- Firmware upgrade
- CLEANING & CARE
- Roller brush
- Side brush
- Dustbin
- Filter
- 2-in-1 Dustbin/ Water Tank
- Battery
- Sensors
- Removing the Battery
- SPECIFICATIONS
- TROUBLESHOOTING
- NOTES
- Need more information?
Brand : Kogan
Model : KAVACRBL14W
Category : Robot vacuum