
NEC500WH00 - Air conditioner NewAir - Free user manual and instructions
Find the device manual for free NEC500WH00 NewAir in PDF.


| Type | Portable Evaporative Cooler and Fan |
| Model | NEC500WH00 |
| Dimensions | 11.10"D x 16.10"W x 35.00"H |
| Weight | 17 pounds |
| Voltage | 120V |
| Wattage | 110W |
| Coverage Area | 250 square feet |
| Water Tank Capacity | 1.76 gallons (6.7 liters) |
| Fan Speeds | 3 (Low, Medium, High) |
| Noise Level | 66 dB |
| Airflow | 500 CFM |
| Oscillation | Yes |
| Warranty | 1 Year Limited Manufacturer's Warranty |
| Cooling Pad | Honeycomb pad for evaporative cooling |
| Ice Pack | Included to enhance cooling |
| Remote Control | Included with CR2032 battery |
| Timer | Up to 7.5 hours programmable |
| Modes | Normal, Natural, Sleep |
| Safety | Polarized plug, automatic shutoff if water tank removed or low water |
| Maintenance | Clean dust filter monthly, clean water tank and cooling pad regularly |
Frequently Asked Questions - NEC500WH00 NewAir
User questions about NEC500WH00 NewAir
0 question about this device. Answer the ones you know or ask your own.
Ask a new question about this device
Download the instructions for your Air conditioner in PDF format for free! Find your manual NEC500WH00 - NewAir and take your electronic device back in hand. On this page are published all the documents necessary for the use of your device. NEC500WH00 by NewAir.
USER MANUAL NEC500WH00 NewAir
Portable Evaporative Cooler and Fan

OWNER'S MANUAL
Read and save these instructions.
READ AND SAVE THESE INSTRUCTIONS.
TABLE OF CONTENTS
Register Your Product Online....3
Safety Information & Warnings 4
Parts List....6
Operating Instructions 7
Maintenance....13
Troubleshooting....15
Limited Manufacturer's Warranty 17
SPECIFICATIONS
| MODEL NO: | EC111B/EC111W |
| PRODUCT DIMENSIONS: | 11.10"D x 16.10"W x 35.00"H |
| PRODUCT WEIGHT: | 17 Pounds |
| VOLTAGE: | 120V |
| WATTAGE: | 110W |
| COVERAGE AREA: | 250 square feet |
| TANK SIZE | 1.76 Gallons |
| FAN SPEEDS: | 3 |
| NOISE LEVEL (dB): | 66 |
| AIRFLOW: | 500 CFM |
| OSCILLATION: | Yes |
| WARRANTY: | 1 Year Manufacturer's Warranty |
REGISTER YOUR PRODUCT ONLINE
Register Your NewAir Product Online Today!
Take advantage of all the benefits product registration has to offer:

Service and Support
Diagnose troubleshooting and service issues faster and more accurately

Recall Notifications
Stay up to date for safety, system updates and recall notifications

Special Promotions
Opt-in for NewAir promotions and offers
Registering your product information online is safe & secure and takes less than 2 minutes to complete:
newair.com/register
Alternatively, we recommend you attach a copy of your sales receipt below and record the following information, located on the manufacturer's nameplate on the rear of the unit. You will need this information if it becomes necessary to contact the manufacturer for service inquiries.
Date of Purchase: ____
Serial Number: ____
Model Number: ____
SAFETY INFORMATION & WARNINGS

These instructions are not meant to cover every possible condition and situation that may occur. Please read all instructions before using this evaporative cooler. Failure to carefully read all instructions may result in possible electric shock or fire hazard, and will void the manufacturer's warranty.
- Use this evaporative cooler only as instructed in this owner's manual. Other uses may cause electric shock, injury or fire.
- Close supervision is required if this cooler is used near children or pets.
- To protect against electric shock, do not immerse this cooler or its plug and cord in water.
- If the cooler is being transported or will not be in use, disconnect it from the power supply by pulling on the evaporative cooler's power cord.
- Avoid contact with any of the evaporative cooler's moving parts.
- Place the evaporative cooler on a level surface.
- This evaporative cooler is intended to fit into a matching receptacle. Under no circumstances should the plug be altered in any way. An improper connection can result in electric shock.
- If possible, avoid using extension cords with this evaporative cooler. If an extension cord is absolutely necessary, do not use more than one extension cord to operate more than one cooler.
- Do not insert objects or allow fingers to enter into the cooler's grills, as this may cause electric shock or bodily injury. Do not block or tamper with the evaporative cooler while it is in operation.
- Do not run the power cord under mats or carpeting, and do not cover the power cord with runners. Arrange the power cord away from room traffic and where it can be tripped over.
- Do not operate this evaporative cooler in the presence of flammable substances or explosives.
- Do not place the cooler near an open flame or cooking/heating appliances.
- If the evaporative cooler will not be in use, empty the tank of any remaining water.
- Always fill the evaporative cooler's tank with fresh water. Using air fresheners, scented oils or cleaners is not recommended and can cause damage to the unit's internal parts.
- Drain the evaporative cooler's tank and clean it at least once a week to prevent calcium deposits and/or mold growth.
- When using this evaporative cooler in “Cool” mode, make sure the water tank is full or at least above the minimum water level.
- Operating the air cooler in “Cool” mode without sufficient water in the tank can cause damage to the water pump and will void the manufacturer’s warranty.
- To reduce the risk of fire or electric shock, do not use this fan with any solid-state speed control device.
- This appliance has a polarized plug (one blade is wider than the other). To reduce the risk of electric shock, this plus is intended to fit in a polarized outlet only one way. If the plug does not fit fully in the outlet, reverse the plug. If it still does not fit, contact a qualified electric. Do not attempt to defeat this safety feature.
- If the cooler's plug or power cord is damaged, do not attempt to repair the components yourself. Please contact NewAir's customer service hotline at 1-866-737-6390 or have the unit examined by an authorized service provider.
Safety Warnings and Precautions:

- WARNING: Chemical Burn Hazard. Keep batteries away from children.
- This product contains a lithium button/coin cell battery. If a new or used lithium button/coin cell battery is swallowed or
enters the body, it can cause severe internal burns and can lead to death in as little as 2 hours. Always completely secure the battery compartment. If the battery compartment does not close securely, stop using the product, remove the batteries, and keep it away from children. If you think batteries might have been swallowed or placed inside any part of the body, seek immediate medical attention.
PARTS LIST


15


- Fan head
- Display panel
- Water level indicator
- Caster
- Control panel
- Remote control storage slot
- Carrying handles
-
Cooling pad knob
-
Cooling pad slot
- Dustproof air filter
- Water tank
- Power cord bracket
- Power cord
- Water tank knob
- Ice pack
- Remote control
OPERATING INSTRUCTIONS
Carefully remove all packaging materials and retain for future storage/use. Make sure there is no residual foam left in any of the components. No tools will be required to assembly this evaporative cooler.
FILLING THE WATER TANK
- Remove the water tank by turning the water tank knob counterclockwise 90° .
-
Before using the evaporative cooler for the first time, we recommend cleaning the tank with a warm water and light detergent solution.
-
Fill the tank with clean water. Pay attention to the water level indicator located on the front of the cooler to avoid overfilling the evaporative cooler. The approximate tank size of the EC111W is 1.5 gallons (5.5 liters).
- Replace the tank back onto the back of the unit. Turn the water tank knob clockwise 90°. This locks the water tank back into place.

USING THE ICE PACK
The EC111W evaporative cooler includes an optional ice pack for added cooling.
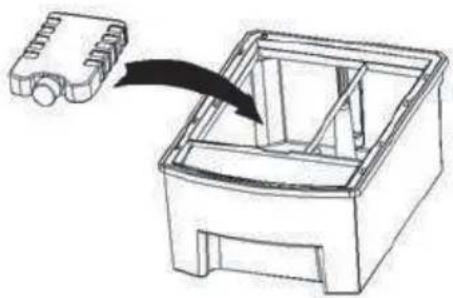
- Place the ice pack in the freezer until frozen. Do not open the ice pack or ingest its contents.
- Put the ice pack into one of the water tank's chambers.
- The ice pack is not necessary for operation, but will help enhance the cooling effect in higher temperatures.
- The ice pack will last approximately four hours before melting.
USING THE REMOTE CONTROL
The EC111W is equipped with a remote control. A CR2032 3V coin-type replacement battery is included for your convenience.
a) The cells shall be disposed of properly, including keeping them away from children; and
b) Even used cells may cause injury.
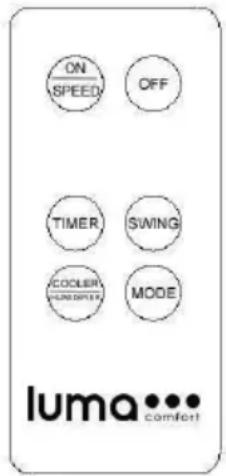
To use the remote control, aim it at the unit and select one of the functions on the remote control. The effective distance is approximately 24".
- ON/SPEED = Power ON and adjusts speed.
- OFF = Power OFF
- TIMER = Timer function of up to 7.5 hours
- SWING = Swinging air louvers
- COOLER/HUMIDIFIER = Controls cooling/humidification function
- MODE = Adjust the airflow mode
CONTROL PANEL AND DISPLAY

After the tank is filled with water, connect the evaporative cooler to a power outlet. The unit will beep twice, indicating that the power source is connected. The cooler will be in standby mode at this time.
ON/SPEED & OFF BUTTONS
- Press the ON/SPEED button to turn on the evaporative cooler.
- To adjust the fan speed, press the ON/SPEED button again until your desired speed has been reached. The current fan speed will be indicated on the display panel. To turn the unit off and revert back to standby mode, press the OFF button.
Fan Speed Indicators:
LOW

MEDIUM

HIGH
COOLER/HUMIDIFIER BUTTON
Cooler/Humidifier Indicator
After the desired fan speed has been selected, press the COOLER/HUMIDIFIER button to activate the cooling/humidifying function. This powers the water pump and will cool and add moisture to the air at the same time. The blue cooling icon will also be visible on the display panel.
Please note that if the initial fan speed is set to 3, the unit will revert back to the second speed setting for five minutes. After five minutes, the unit will automatically switch to the third fan speed. This is to allow the cooling pad to be thoroughly absorbed with water, which results in optimized cooling. The cooler will not revert back to other speeds if the initial fan speed was set to either 1 or 2.
MODE BUTTON
The EC111W has two different automatic airflow modes. Setting the airflow mode is optional.
To set the airflow mode, press the MODE button.

Natural Mode
Natural Mode – Indicated by the palm tree icon on the display panel, this setting will adjust the airflow speed between 1, 2 and 3.

Sleep Mode
Sleep Mode – Indicated by the moon icon on the display panel, this setting will cycle through the fan speed settings, and gradually lower the speed at different intervals, depending on the selected fan speed.
TIMER BUTTON
- This evaporative cooler is equipped with a 7.5 hour programmable timer. To set the timer, press the TIMER button. Each press of this button will add 0.5 hours to the set time.
- The set time will be indicated in the middle of the display panel.
SWING BUTTON

Swing Indicator
To activate the oscillation feature, press the SWING button. The fan head will automatically oscillate counterclockwise, which directs cool air into a cyclone for a more focused cooling effect.
ADDITIONAL FEATURES
- If the water level in the tank drops below the minimum level, the unit will produce an audible alert that will last for ten seconds. After ten seconds, the evaporative cooler will automatically turn off.
- If the water tank is removed while the unit is on, it will automatically turn off.
MAINTENANCE
Regular cleaning and maintenance is an essential step in maintaining the longevity of your evaporative cooler and ensuring that it operates free of defects. Maintain your evaporative cooler by following these steps:
GENERAL MAINTENANCE INSTRUCTIONS
- Always unplug the evaporative cooler from the power supply before servicing or cleaning.
- Use a soft cloth and a mild soap and warm water solution to clean the unit's exterior. Do not use harsh cleaners, gasoline, paint thinner, benzene, etc., as these substances can damage the evaporative cooler.
- Thoroughly dry all of the cooler's parts with a soft cloth before reconnecting the unit to the power supply.
- Empty the water tank after the evaporative cooler has been in use. Regular, scheduled cleaning of the water tank before each use is also recommended.
- If the evaporative cooler will not be in use for an extended period of time, place the unit back in its original carton and keep it stored in a clean, dry place.
- The evaporative cooler's filter, tank and cooling pad will need to be removed prior to cleaning. Once all of the different components have been cleaned, place them back into the unit in this order: water tank, cooling pad and dust filter.
CLEANING THE DUST FILTER & COOLING PAD
To prevent clogging of the dust filter, we recommend cleaning the filter at least once a month.
- To clean the dust filter, remove it from the back of the unit by pushing down on the two tabs located above the filter and pull it out. Gently scrub it with a soft brush and rinse with water. Allow it to thoroughly air dry before placing it back in the unit.


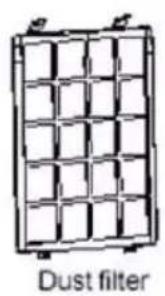
- To clean the cooling pad, first remove the dust filter to expose the pad. Turn the knob on the pad clockwise and pull it out from the back of the unit. Rinse it with clean water and allow it to thoroughly air dry before placing it back in the unit.
CLEANING THE WATER TANK
-
Unplug the evaporative cooler from the power supply and empty the water tank after the evaporative cooler has been in use. Regular, scheduled cleaning of the water tank before each use is also recommended.
-
To clean the water tank, rinse it in a warm water and light detergent solution or a water and vinegar solution. Rinse it with clean water and dry it thoroughly before placing it back into the cooler.
TROUBLESHOOTING
| Problem | Possible Causes | Solution |
| The unit produces no air. | The unit is not plugged in. | Check to make sure the plug is plugged into an outlet.The unit should beep twice once the power supply is connected. |
| The water tank is not locked into the unit. | Make sure the water tank is locked into the back of the unit. | |
| The unit does not cool. | There is insufficient water in the tank. | Check the water level in the tank and make sure there is enough water. |
| The cooler/humidifier button was not pressed. | Press the COOLER/HUMIDIFER button. | |
| The pump is defective. | Contact customer service if there is an issue with the water pump. | |
| The unit does not cool on high speed. | The cooling pad is not sufficiently saturated with water. | If speed 3 is selected when in cooling mode, the unit will automatically revert to speed 2 for 5 minutes to allow the pad to be fully soaked. The cooler will automatically turn to speed 3 when the pad is soaked. |
| Water is coming out of the vents. | The cooling pad may be clogged with debris. | Clean the cooling pad by rinsing it in water and allowing it to thoroughly dry.You can also clean it with a water and vinegar solution.If the problem persists, contact customer service. |
| The full tank indicator turns on when there is still enough water in the tank. | There is an issue with the water pump's sensor. | Clean the water pump by wiping it down with a damp cloth or try rinsing it with a water and vinegar solution. |
| The water tank is leaking. | There is mineral buildup on the cooling pads. | Mix together a water and vinegar solution and pour it in the tank. Turn the cooler on and let the solution run through the pads to break up any buildup that may be clogging the cooling pad. |
| The water tank is damaged. | Contact customer service if there is an issue with the water tank. | |
| There is an odor coming out of the evaporative cooler. | The unit is brand new and has never been used before. | If the evaporative cooler has never been used before, the unit may emit a slight odor upon initial use. This odor will dissipate within a week. |
| There is algae buildup in the tank or on the cooling pad. | If the evaporative cooler is not new, there may be algae buildup in the tank or on the cooling pad. Clean the tank out with a vinegar/water solution and/or call customer service for a new replacement pad. |
LIMITED MANUFACTURER'S WARRANTY
This appliance is covered by a limited manufacturer's warranty. For one year from the original date of purchase, the manufacturer will repair or replace any parts of this appliance that prove to be defective in materials and workmanship, provided the appliance has been used under normal operating conditions as intended by the manufacturer.
Warranty Terms:
During the first year, any components of this appliance found to be defective due to materials or workmanship will be repaired or replaced, at the manufacturer's discretion, at no charge to the original purchaser. The purchaser will be responsible for any removal or transportation costs.
Warranty Exclusions:
The warranty will not apply if damage is caused by any of the following:
- Power failure
• Damage in transit or when moving the appliance - Improper power supply such as low voltage, defective household wiring or inadequate fuses
- Accident, alteration, misuse or abuse of the appliance such as using non-approved accessories, inadequate air circulation in the room or abnormal operating conditions (extreme temperatures)
• Use in commercial or industrial applications - Fire, water damage, theft, war, riot, hostility or acts of God such as hurricanes, floods, etc.
• Use of force or damage caused by external influences - Adjustments to temperature by removal of sticker and/or screw
• Partially or completely dismantled appliances
Obtaining Service:
When making a warranty claim, please have the original bill of purchase with purchase date available. Once confirmed that your appliance is eligible for warranty service, all repairs will be performed by a NewAir™ authorized repair facility. The purchaser will be responsible for any removal or transportation costs. Replacement parts and/or units will be new, re-manufactured or refurbished and is subject to the manufacturer's discretion. For technical support and warranty service, please email support@newair.com


- PORTABLE EVAPORATIVE COOLER AND FAN
- OWNER'S MANUAL
- READ AND SAVE THESE INSTRUCTIONS
- TABLE OF CONTENTS
- REGISTER YOUR PRODUCT ONLINE
- REGISTER YOUR NEWAIR PRODUCT ONLINE TODAY
- SERVICE AND SUPPORT
- RECALL NOTIFICATIONS
- SPECIAL PROMOTIONS
- SAFETY INFORMATION & WARNINGS
- SAFETY WARNINGS AND PRECAUTIONS
- PARTS LIST
- OPERATING INSTRUCTIONS
- FILLING THE WATER TANK
- USING THE ICE PACK
- USING THE REMOTE CONTROL
- CONTROL PANEL AND DISPLAY
- ON/SPEED & OFF BUTTONS
- COOLER/HUMIDIFIER BUTTON
- MODE BUTTON
- TIMER BUTTON
- SWING BUTTON
- ADDITIONAL FEATURES
- MAINTENANCE
- GENERAL MAINTENANCE INSTRUCTIONS
- CLEANING THE DUST FILTER & COOLING PAD
- CLEANING THE WATER TANK
- TROUBLESHOOTING
- LIMITED MANUFACTURER'S WARRANTY
- WARRANTY TERMS
- WARRANTY EXCLUSIONS
- OBTAINING SERVICE
Brand : NewAir
Model : NEC500WH00
Category : Air conditioner