ELNEXTDRIPCOFF374G - Coffee maker Electroline - Free user manual and instructions
Find the device manual for free ELNEXTDRIPCOFF374G Electroline in PDF.


| Product Type | Coffee Maker (Drip) |
| Brand | Electroline |
| Model | ELNEXTDRIPCOFF374G |
| Power | 1000 W |
| Input Voltage | 220-240 V |
| Frequency | 50-60 Hz |
| Water Capacity | 1.25 L |
| Number of Cups | Up to 10 cups |
| Filter Material | Nylon |
| Coffee Pot Material | Glass & PP |
| Dishwasher Safe Parts | Pot & Filter |
| Machine Dimensions (mm) | 228 x 185 x 313 |
| Product Weight | 1.32 kg (±5%) |
| Power Cord Length | 80 cm (±3 cm) |
| Coffee Temperature in Cup | ≥75 °C |
| Brewing Time | < 12 minutes |
| Color | Black & Stainless |
| LED Indicator | Yes |
| Auto Keep Warm | Approximately 30 minutes |
| Auto Shut-off | After 40 minutes |
| Pause & Serve Function | Yes |
| Warranty | 2 years |
| Safety Features | Overheat protection, auto shut-off, cool-touch handles |
Frequently Asked Questions - ELNEXTDRIPCOFF374G Electroline
User questions about ELNEXTDRIPCOFF374G Electroline
0 question about this device. Answer the ones you know or ask your own.
Ask a new question about this device
Download the instructions for your Coffee maker in PDF format for free! Find your manual ELNEXTDRIPCOFF374G - Electroline and take your electronic device back in hand. On this page are published all the documents necessary for the use of your device. ELNEXTDRIPCOFF374G by Electroline.
USER MANUAL ELNEXTDRIPCOFF374G Electroline
natural_image
Abstract white geometric shape on black background, resembling a stylized 'E' or crescent (no text or symbols)electroline
natural_image
Line drawing of a electroline coffee maker with control panel and side legs (no text or symbols on the device itself)1000W
Potenza
1,25L
Capacità
10
Tazze
natural_image
Simple line drawing of a trash bin with crossed lines and a blank rectangular base (no text or symbols)Thank you for purchasing our product(s). Before using this appliance, please read the user manual thoroughly as it provides important information regarding the safe use and maintenance of this product.
Table of contents
1 Safety Instructions .... 1
2 Appliance Description 2
3 Before First Use 3
4 Procedure - Using the Coffee Machine 3
5 Cleaning and Maintenance 5
6 Cleaning Scale Deposits 5
7 Troubleshooting 7
8 Technical Specifications 8
9 Disposal 9
10 Warranty and Compliance.... 10
⚠ 1 Safety Instructions
- Warning: To prevent burns, do not remove the lid/cover while the appliance is running. Use only the handle provided.
- Before connecting the appliance to the power supply, check whether the voltage marked on the appliance matches the local power supply voltage. Do not use this appliance if the plug, power cord, or appliance itself is damaged.
- This appliance is not intended for use by persons with physical or mental impairments, or by inexperienced persons (including children), unless they are supervised or instructed by those responsible for their safety.
- Keep the power cord away from hot surfaces.
- The power plug must be correctly inserted into a grounded socket.
- Ensure that there is adequate space around the appliance while in use. Do not place any objects on the heated surface of the appliance or allow the appliance to touch any household items.
- Do not use this appliance outdoors. This appliance is for indoor use only.
• To protect against electric shock, do not immerse the power cord, plug, or appliance in water or any other liquid.
• Use this appliance on a solid, flat, and non-flammable surface.
• Do not allow the coffee machine to run without water.
- Once plugged in, the appliance will immediately begin heating. Do not leave the appliance unattended while heating.
• Do not place the hot glass jug on a cold surface.
- Do not place the glass jug (which is used with this appliance) on any other heating source (as the glass may shatter).
After use and before cleaning, unplug the appliance from the
- socket and allow it to cool to a normal temperature.
• Do not pull on the power cord to unplug the appliance.
- Do not use this appliance for any other purposes beyond the scope of this manual.
2 Appliance Description
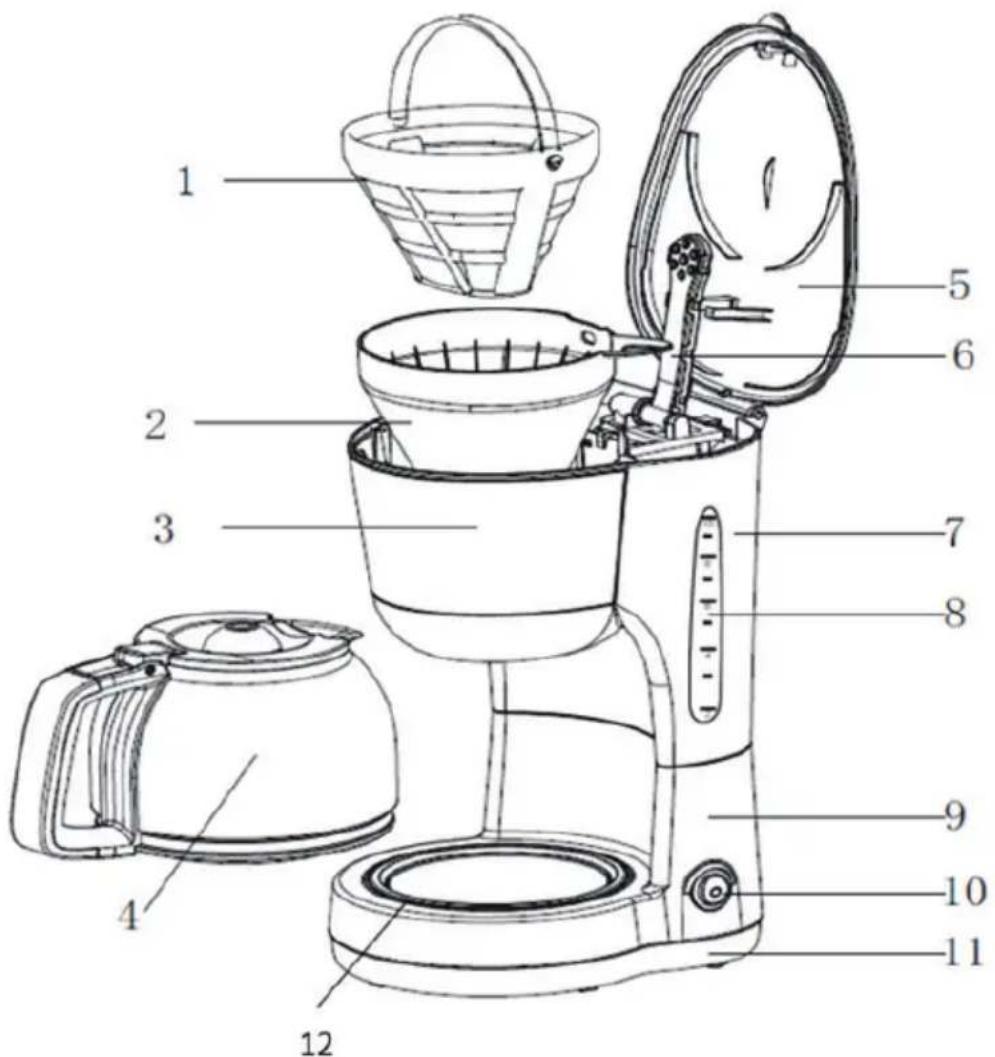
1) Filter
2) Funnel
3) Water tank cover
4) Glass jug
5) Lid/cover
6) Water spout
7) Water tank
8) Water gauge
9) Main body
10) Power switch
11) Bottom cover
12) Hot plate
3 Before First Use
- Before brewing coffee, clean the coffee machine. Add water to the water tank to the maximum water level without adding any coffee powder/granules. Brew two to three times, drain the water and clean and dry all removable parts.
- Insert the power plug into a grounded socket. Allow the appliance to heat up (steam and heat will be emitted).
4 Procedure - Using the Coffee Machine
- Open the lid/cover and fill the water tank (7) with water. Do not exceed the maximum water level.
- Place the funnel (2) into the funnel holder (ensure the funnel is correctly assembled).
- Place the filter (1) into the funnel.
- Add the required amount of ground coffee/coffee powder into the filter (1) before closing the lid/cover (5). (A cup of coffee typically requires one scoop of coffee powder. You can adjust the quantity according to personal taste).
- Place the glass jug (4) horizontally onto the hot plate (12) and ensure that the center line of the glass jug is aligned with the center line of the funnel.
- Plug the appliance into a power socket and press the power switch (10). The indicator light on the power switch will light up, indicating that the appliance is now turned on and running.
Note: This product is designed with a pause and interrupt service function. You can press the switch again at any time to interrupt the brewing process. The power switch (10) indicator light will turn off and the coffee machine will stop running.
- Once brewing is complete, remove the glass jug and enjoy your coffee.
- When pouring coffee, the angle of the glass jug to the vertical position should not exceed 45 degrees. Coffee should be poured out slowly until the glass jug (4) is empty. Otherwise, the coffee in the glass jug will flow to the bottom of the glass jug lid, and the coffee will flow out from both edges of the lid.
- At any time during the brewing process, the glass jug can be temporarily removed to pour a cup of hot coffee. The brewing cycle will not be interrupted, and the coffee will not drip out of the funnel. The brewing cycle can be restarted by simply placing the glass jug back on the hot plate. Note: Do not remove the glass jug for more than 30 seconds.
- After the coffee is brewed, the appliance will automatically switch to the ‘keep warm’ mode and continue to keep the coffee in the glass jug warm for approximately 30 minutes. After 40 minutes, the appliance will automatically stop running. However, for optimum flavour, drink the coffee immediately after brewing.
- Always turn off the coffee machine and unplug the appliance from the power socket after use.
Note: You can brew up to 10 cups of coffee per brew cycle.
5 Cleaning and Maintenance
Note: Always unplug the appliance from the power socket and allow it to cool completely before cleaning. Do not immerse the power cord, plug, or appliance in water or any other liquids.
- Wash all removable parts in hot soapy water after each use.
- Wipe the exterior of the product with a soft damp cloth to remove stains.
- Rinse with cold water to clean the inside of the water tank. Do not use a damp cloth to clean the inside of the water tank, as lint (fabric) may clog the coffee machine.
- During the brewing process, water droplets may accumulate in the area above the funnel and drip onto the base of the product. Please wipe this area with a clean dry cloth after each use.
- Do not use detergents, steel wire balls, or other abrasive materials to clean the glass jug.
6 Cleaning Scale Deposits
To maintain efficient operation of the coffee machine, please regularly follow the steps outlined below to remove residual mineral deposits from the water. Note: The amount and severity of mineral deposit build-up will vary based on water quality and frequency of use.
- Fill the water tank with water and a descaling agent to the maximum water level indicated by the water level scale. The
ratio of water and descaling agent is 4:1. Please refer to the instructions for more detail on the use of household descaling agents. Citric acid may also be used instead of a descaling agent (the ratio of water and citric acid is 100:3).
- Place the glass jug on the hot plate.
- Assemble the funnel (without adding any coffee powder), turn on the power switch and let the appliance run.
- After connecting a cup of the solution, turn off the power switch and allow the solution to sit for 15 minutes. Repeat steps 3-5.
- Turn on the power switch and let the appliance run until the water tank is completely empty.
- Repeat steps 1-6 with drinking water at least three times (to ensure that the appliance is then sufficiently clean and ready for use).
7 Troubleshooting
| Problem Possible reason | Solution | |
| Water leaking from the bottom of coffee machine. | There is water in the hot plate. | Clean the hot plate. |
| The coffee machine is malfunctioning. | Please contact an authorized service facility for repair. | |
| Water leaking from the outside of filter. | The coffee powder in the filter is overflowing into the funnel, causing the leak stop valve to clog and coffee to overflow. | Clean the coffee powder in the funnel and ensure that the coffee powder does not exceed the maximum water level. |
| Sour (vinegar) flavour | The appliance was not washed properly after using the descaling agent(s). | Clean the coffee machine several times. Follow the instructions in the sections: "Cleaning Scale Deposits" and "Before First Use". |
| Coffee powder is stored in a hot and humid place for a long time. Coffee powder has gone off/stale. | Use fresh coffee powder or store unused coffee powder in a cool and dry place. After opening a bag of coffee powder, reseal and store in the refrigerator to maintain freshness. | |
| Coffee machine not working. | The power plug is not plugged in properly. | Insert the power plug into the socket correctly. If the product still does not work, please contact an authorized service facility for repair. |
| When the coffee machine is running, coffee flow rate is small/no coffee produced. | 1. The inlet/outlet of the water tank is blocked by debris. | 1. Check for blockages in the inlet/outlet of the water tank. Ensure that there are no obstructions in the water pipes.2. Check if the outlet of the water spout is blocked. Clean the outlet of the water spout. |
8 Technical Specifications
| Input voltage (V) 220-240 | |
| Frequency (Hz) 50-60 | |
| Power (W) 1000 | |
| Water capacity (L) 1.25 | |
| Filter material Nylon | |
| LED indicator Yes | |
| Coffee pot material Glass & PP | |
| Dishwasher safe Pot & Filter | |
| Machine size (mm) 228 x 185 x 313 | |
| Power cord expose length (cm) | 80+/-3 |
| Product unit weight (kg) 1.32+/-5% | |
| Coffee temperature in cup (°C) ≥75 | |
| Brewing time (min) < 12 | |
| Colour Black & Stainless | |
| Accessories | User Manual Warranty Card |
9 Disposal
This section relates to the processing of electric and electronic equipment at the end of their service life (applicable in member countries of the European Union and other European countries operating a selective waste collection system).
natural_image
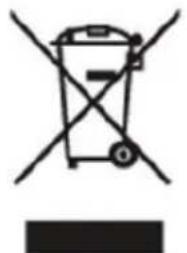
Symbol of a trash bin crossed out by two crossed arms, with no text or labels present.The symbol shown in the image above, affixed to the product or its packaging, indicates that the product must not be processed with household waste. It must be brought to an electric and electronic waste collection point for recycling and disposal. The proper disposal of this product ensures that the appropriate environmental sustainability practices are carried out. The recycling of materials helps to preserve our natural resources and positively impacts the environment and human health. For further information regarding the recycling of this product, please contact your municipality, local waste disposal centre or the store where the product was purchased.
In accordance with the Legislative Decree of March 14, 2014, No. 49, "Implementation of Directive 2012/19/EU on Waste Electrical and Electronic Equipment (WEEE)" the crossed-out wheeled bin symbol on the appliance or its packaging indicates that the product must be collected separately from other waste at the end of its life. Therefore, the user should dispose of the end-of-life appliance at the appropriate collection points for electronic and electrical waste. Alternatively, the user can return it to the retailer when purchasing a new equivalent appliance, on a one-to-one basis. Separate collection of the discarded appliance helps to promote environmental sustainability and the recycling of the individual components of the appliance. Unauthorized disposal of the product by the
user may result in the application of administrative sanctions, enforced by current regulations.
10 Warranty and Compliance
This Electroline Warranty applies only to Electroline products purchased for personal use and not those intended for resale.
Your Electroline product is warranted in accordance with the terms and conditions of this warranty against defects in workmanship and conformity for a period of 2 years. This period begins upon delivery of the item, if purchased from an official dealer.
The warranty will not be valid if the product has been opened, modified, physically damaged, damaged from incorrect use, damaged due to negligence, repaired by unauthorized persons or used for purposes other than those for which it was intended; furthermore, the legal guarantee will not apply if the purchase method or other circumstances demonstrate, with reasonable certainty, that the purchase itself is not exclusively aimed at private consumption.
In the event that the product is defective, it can be returned to the retailer along with a description of the type of malfunction, proof of purchase, and any accessories.
If the product is still under warranty, you will receive a replacement product (if available) from the dealer.
The following reasons for damage/defect to product are not covered by the warranty:
- Accidental damage or damage resulting from incorrect or improper use, contact with liquids; damage caused by accidents or force majeure events such as fires, earthquakes, floods, vandalism, theft, or other external causes.
- Cosmetic damage such as scratches, dents, or breakage of plastic parts, or damage caused by handling errors.
- Defects resulting from normal product wear and tear (product aging).
- Incompatibility with other hardware/software products not listed in the minimum system requirements.
- Consumable accessories such as batteries, protective covers, and fuses, which normally wear out over time.
- Problems due to non-compliance related to labour or materials.
In no event shall the manufacturer be liable for incidental or consequential damages, including loss of business profits or other commercial damage resulting from the use of the product.
Due to the rapidly evolving nature of our products, the content of this manual may be subject to change without prior notice.
CE
Made in China

electroline
Manufactured and imported by Exertis Supply Chain Services Limited. Unit 21 Fonthill Business Park, Clondalkin. Dublin 22, D22 FR82, Dublin, Ireland
- Table of contents
- ⚠ 1 Safety Instructions
- Appliance Description
- Before First Use
- Procedure - Using the Coffee Machine
- Cleaning and Maintenance
- Cleaning Scale Deposits
- Disposal
- Warranty and Compliance
- This Electroline Warranty applies only to Electroline products purchased for personal use and not those intended for resale.
- The following reasons for damage/defect to product are not covered by the warranty:
- electroline
Brand : Electroline
Model : ELNEXTDRIPCOFF374G
Category : Coffee maker