
MAX 10 - Loudspeaker JBL - Free user manual and instructions
Find the device manual for free MAX 10 JBL in PDF.


| Product Type | Amplified two-way 10" portable powered speaker with DSP |
| Dimensions (H x W x D) | 531 x 310 x 300 mm (20.9 x 12.2 x 11.8 in) |
| Net Weight | 11.3 kg (24.9 lb) |
| Gross Weight | 13.8 kg (30.4 lb) |
| Power Output | 200 W RMS (Class D, LF) + 50 W RMS (Class AB, HF) |
| AC Power Supply | 110-127V or 220-240V, manually selectable |
| Maximum SPL | 127 dB |
| Frequency Response (+3 dB) | 70 Hz – 16.5 kHz |
| Frequency Response (+10 dB) | 60 Hz – 18 kHz |
| Coverage Pattern | 110° horizontal x 60° vertical |
| Bluetooth Version | 5.0 BLE (streaming audio reception) |
| DSP Features | Tone presets (Music, Speech, Live, Club, Flat) and Locate presets (Pole, Monitor, Bracket) |
| Inputs | 2 x Combo (XLR/P10), 1 x P2 (3.5 mm aux), 1 x USB (for MP3/WAV playback up to 64 GB) |
| Output | 1 x XLR (THRU) |
| Mounting | 35 mm pole socket (0° and 7.5° tilt), 3 x M10 rigging points |
| Cabinet Material | Molded polypropylene with perforated steel grille |
| Fuse | T5.0AL/250V |
| Operating Temperature | 0°C to 40°C (32°F to 104°F) |
| Maintenance | Clean with dry cloth; unplug before cleaning; no user-serviceable parts inside |
| Safety | Do not open chassis; risk of electric shock; keep away from water and moisture |
Frequently Asked Questions - MAX 10 JBL
User questions about MAX 10 JBL
0 question about this device. Answer the ones you know or ask your own.
Ask a new question about this device
Download the instructions for your Loudspeaker in PDF format for free! Find your manual MAX 10 - JBL and take your electronic device back in hand. On this page are published all the documents necessary for the use of your device. MAX 10 by JBL.
USER MANUAL MAX 10 JBL
natural_image
Three black audio/video speakers with perforated surfaces, no visible text or symbols on the devices themselves.USER MANUAL MANUAL DE USUARIO
CONTENT/CONTENIDO
English
Safety Instructions 3
Quick Start Guide.... 5
Rear Panel Details.... 7
General Description - MAX SERIES family.... 9
MAX 10 Specifications. 10
MAX 12 Specifications. 11
MAX 15 Specifications.... 12
Applications and Functionality.... 13
Bluetooth Connectivity 13
Positioning and Installation. 14
Cables and Connectors 17
Application Examples 18
Troubleshooting 20
Warranty Term 39
Español
The JBL MAX product line covered by this manual is not intended for use in high humidity environments. High humidity levels can damage parts of the transducers, in addition to causing the metal parts and electrical contacts in the circuits to oxidize. Avoid exposing the speakers to direct moisture and do not use them in environments where the surfaces are condensing.
Keep the powered speakers out of direct, prolonged, or intense sunlight. Internal parts of the product can be damaged due to high temperatures generated by sunlight, and product surfaces can be degraded by prolonged exposure to intense ultraviolet (UV) light.
Products in the JBL MAX line can generate considerable sound pressure levels. When placed on a slippery surface, the powered speaker may move due to its operation at high volume. Precautions must be taken to ensure that the powered speaker does not fall from the surface on which it is placed.
HEARING DAMAGE, PROLONGED EXPOSURE TO EXCESSIVE SOUND PRESSURE LEVELS
Products in the JBL MAX line are capable of generating sound pressure levels (dB SPL) sufficient to cause permanent hearing damage to artists, production staff, and audiences. Precautions must be taken to avoid prolonged exposure to sound pressure levels above 85 dB SPL.
MAINTENANCE AND CLEANING
THESE EQUIPMENTS CONTAIN POTENTIALLY LETHAL VOLTAGES. TO AVOID THE HAZARD OF ELECTRIC SHOCK, DO NOT REMOVE THE CHASSIS, AMPLIFIER MODULE OR AC INPUT COVERS. THERE ARE NO USER-SERVICEABLE PARTS INSIDE THE PRODUCT. TECHNICAL ASSISTANCE PROCEDURES MUST BE CHARGED BY DULY QUALIFIED PERSONNEL BY THE MANUFACTURER.
Products can be cleaned with a dry cloth. Do not allow moisture to enter through any openings in the system. Make sure the system is unplugged from the AC outlet before cleaning.
RoHS COMPLIANCE
This product complies with Directive 2011/65/EU and (EU) 2015/863 of the European Parliament and of the Council of 19.
03/31/2015 on the restriction of the use of certain hazardous substances in electrical and electronic equipment.
FCC STATEMENT
- This device complies with Part 15 of the FCC Rules. Operation is subject to the following two conditions:
(1) This device may not cause harmful interference.
(2) This device must accept any interference received, including interference that may cause undesired operation.
- Changes or modifications not expressly approved by the party responsible for compliance could void the user's authority to operate the equipment.
NOTE: This equipment has been tested and found to comply with the limits for a Class B digital device, pursuant to Part 15 of the FCC Rules. These limits are designed to provide reasonable protection against harmful interference in a residential installation. This equipment generates uses and can radiate radio frequency energy and, if not installed and used in accordance with the instructions, may cause harmful interference to radio communications. However, there is no guarantee that interference will not occur in a particular installation. If this equipment does cause harmful interference to radio or television reception, which can be determined by turning the equipment off and on, the user is encouraged to try to correct the interference by one or more of the following measures:
- Reorient or relocate the receiving antenna.
- Increase the separation between the equipment and receiver.
- Connect the equipment into an outlet on a circuit different from that to which the receiver is connected.
- Consult the dealer or an experienced radio/TV technician for help.
FCC Radiation Exposure Statement
This equipment complies with FCC radiation exposure limits set forth for an uncontrolled environment. This equipment should be installed and operated with minimum distance 20cm between the radiator & your body.
The MAX 10, MAX 12 and MAX 15 models are equipped with the MAXBT Bluetooth module - Bluetooth 5.0 BLE (GFSK/1 MBps), BTH EDR (GFSK/8DPSK).

09926-21-10879
This equipment is not entitled to protection against harmful interference and may not cause interference in properly authorized systems.
SAFETY INSTRUCTIONS
- READ these instructions.
- KEEP these instructions.
- HEED all warnings.
- FOLLOW all instructions.
- DO NOT use this equipment near water.
- CLEAN ONLY with a dry cloth.
- DO NOT block the ventilation openings in the amplifier module panel. Do not install the powered speaker near heaters, ovens, radiators, or any other heat sources. Install the powered speaker so that the rear panel remains at least 50 cm from any obstacles. Install the product in a ventilated place to avoid overheating and shortening its lifespan.
- DO NOT modify the AC electrical connector on the cable provided with the product or on the amplifier panel. An electrical connector has two power pins and a third ground pin, designed for your safety. If the provided electrical connector does not fit into the outlet, consult an electrician for adaptation to the location where the product will be installed.
- DO NOT defeat the safety purpose of the electrical connector. An electrical connector has two power pins and a third ground pin, which is provided for your safety. If the provided electrical connector does not fit into the outlet, consult an electrician for replacement of the obsolete outlet.
- PROTECT the power cord to prevent it from being crushed or pinched, particularly at connectors, general purpose outlets and the exit point of the equipment.
- USE ONLY attachments/accessories specified by the manufacturer.
- USE ONLY with a wheeled cart, stand, tripod, or table specified by the manufacturer, or sold with the equipment. When using a transporter cart, use caution when moving the cart/equipment combination to avoid injury from falling.
- UNPLUG the equipment from the power outlet during weather conditions such as thunderstorms or when unused for long periods of time.
- ENTRUST maintenance and repairs only to suitably qualified personnel from authorized service centers. The product must be serviced or repaired when the equipment is damaged in any way, such as when the power cord or connector is damaged, when liquid has been spilled or objects have fallen into the equipment, when the equipment has been exposed to rain or moisture, not working properly or has been dropped.
- DO NOT expose the equipment to dripping or splashing, and ensure that no objects filled with liquids, such as vases, are on top of the equipment.
- To completely disconnect this equipment from the AC mains, disconnect the power cord connector from the AC outlet.
- When the power outlet is used as the sole means of disconnection, the power outlet must remain accessible at all times.
- DO NOT overload wall outlets or extension cords beyond their rated capacity, as this could result in electric shock or fire.
- For proper ventilation, do not install this equipment in a confined or enclosed space such as a bookcase or similar unit.
- The ventilation of the product must not be impeded by covering the ventilation openings with items such as newspapers, tablecloths, curtains, etc.

The arrow ray within an equilateral triangle is intended to alert the user to the risk of electric shock.

The exclamation point within an equilateral triangle is intended to alert the user to the presence of important instructions for use and maintenance (repairs) in the documentation accompanying the product.
WARNING: To reduce risk of fire or electric shock, do not expose this equipment to rain or moisture.
WARNING: Do not place any source of fire near the product, e.g., lighted candles.
WARNING: The equipment must be connected to an electrical outlet with a protective ground connection.
WARNING: This product is intended for use ONLY with voltages listed on the rear panel (110-127V or 220-240V). Operation at voltages other than those indicated may cause irreversible damage to the product and void its warranty (for example, product is set to 110-127V and is connected to an 220\~240V AC outlet). Caution is recommended when using AC Plug Adapters as this may allow the product to be connected to voltages that it is not designed to operate at. If in doubt about the correct operating voltage, contact your local distributor and/or dealer. Regarding the power cord, use only the type provided or specified by the manufacturer or your local distributor.
OPERATING TEMPERATURE RANGE:
0^ to 40^ (32°F to 104°F)

WARNING: Do not open! Risk of electric shock. The voltages in this equipment are harmful to life. There are no user serviceable parts inside. Entrust maintenance and repairs to suitably qualified personnel.
Place the equipment near a power outlet and make sure you can easily access the circuit breaker switch.

Protective ground terminal. The equipment must be connected to an electrical outlet with a protective ground connection.
Prevention of hearing loss

Caution: Hearing loss may occur if earphones or headphones are used at high volume for long periods of time.
Note: To avoid possible hearing damage, do not listen at high volume levels for long periods.
Attention: According to Brazilian Law No. 11,291, prolonged exposure to noise above 85dB can damage the auditory system.
QUICK START GUIDE
Congratulations on purchasing the JBL professional powered speaker MAX SERIES! We know you are looking forward to turning it on as soon as possible and that is why you are reading this section. The following information will help you prepare as quickly as possible.
Packaging Content
Your MAX system must include the following:
1 x MAX Powered Speaker
1 x 1.8m AC Power Cord
1 x Manual and Technical Brochure
1 x Warranty Certificate
Unpack it

natural_image
Simple line drawing of an open box with a square lid (no text or symbols)①

natural_image
Simple line drawing of a 3D rectangular box with an open lid (no text or symbols)②
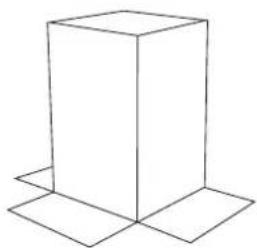
Open the top of the package. Tilt the package on its side, turning it face down.
natural_image
Simple line drawing of a 3D rectangular prism with a folded base (no text or symbols)③
Lift the package, revealing the MAX powered speaker.
Mounting Options

①

2

natural_image
Line drawing of a portable electronic device with a vertical panel and three tripod stand (no text or symbols)③

natural_image
Technical line drawing of a device with a vertical panel and base panel, no text or symbols present④

natural_image
Pure technical line drawing of a rectangular device with mounting holes and a central panel (no text or symbols)5
Default position Monitor position Tripod mount Subwoofer mount Suspended
QUICK START GUIDE
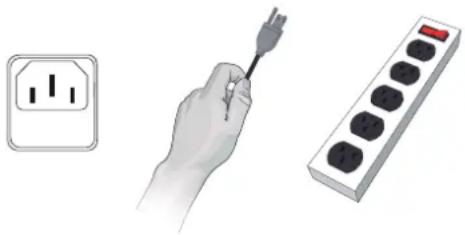
① Check the mains voltage at the outlet where the powered speaker will be installed.
According to the mains voltage, set the voltage selection switch to 127 or 220 volts on the rear panel of the powered speaker (if you have any doubts, do not proceed and ask for assistance from a technician).
See page 7, item R.
③ Connect one end of the AC power cord to the powered speaker and the other end to an electrical outlet.
natural_image
Illustration of a hand holding a plug, next to a power strip and a control panel (no text or symbols)④ To turn on the powered speaker, change the switch position to "ON".
IMPORTANT: To avoid damage to the product's internal circuits, it is mandatory to adjust the power supply voltage selector on the rear panel of the speaker, according to the electrical network voltage of the place where the product will be installed. If you have any doubts about setting the supply voltage selector, identifying the mains voltage at the installation site, or any other questions, ask a trained technician or an electrician for assistance.
CONNECT THE INPUTS
- Turn the Master Volume control all the way to the left before connecting any cables to the audio inputs.
- Connect the device signal cables to the CH1, CH2 and CH3 input connectors, according to your application.
SETTING THE CHANNELS
- Select a Preset with the Preset EQ Selection button.
- Determine the source of the Gain of CH1 and CH2. For the microphone, set it to 3 h. For line source, set it to 9 h.
- Slowly turn the Master Volume control to the right until you reach the desired volume.
PAIR AUDIO BY BLUETOOTH™
This device supports audio reception via Bluetooth. To connect your device:
- Enable Bluetooth on the source device.
- Press the MODE button until the streaming audio reception mode is displayed on the product's graphic display. The product will start pairing mode automatically.
- Find the desired powered speaker on your device and select it.
REAR PANEL DETAILS
REAR PANEL DETAILS
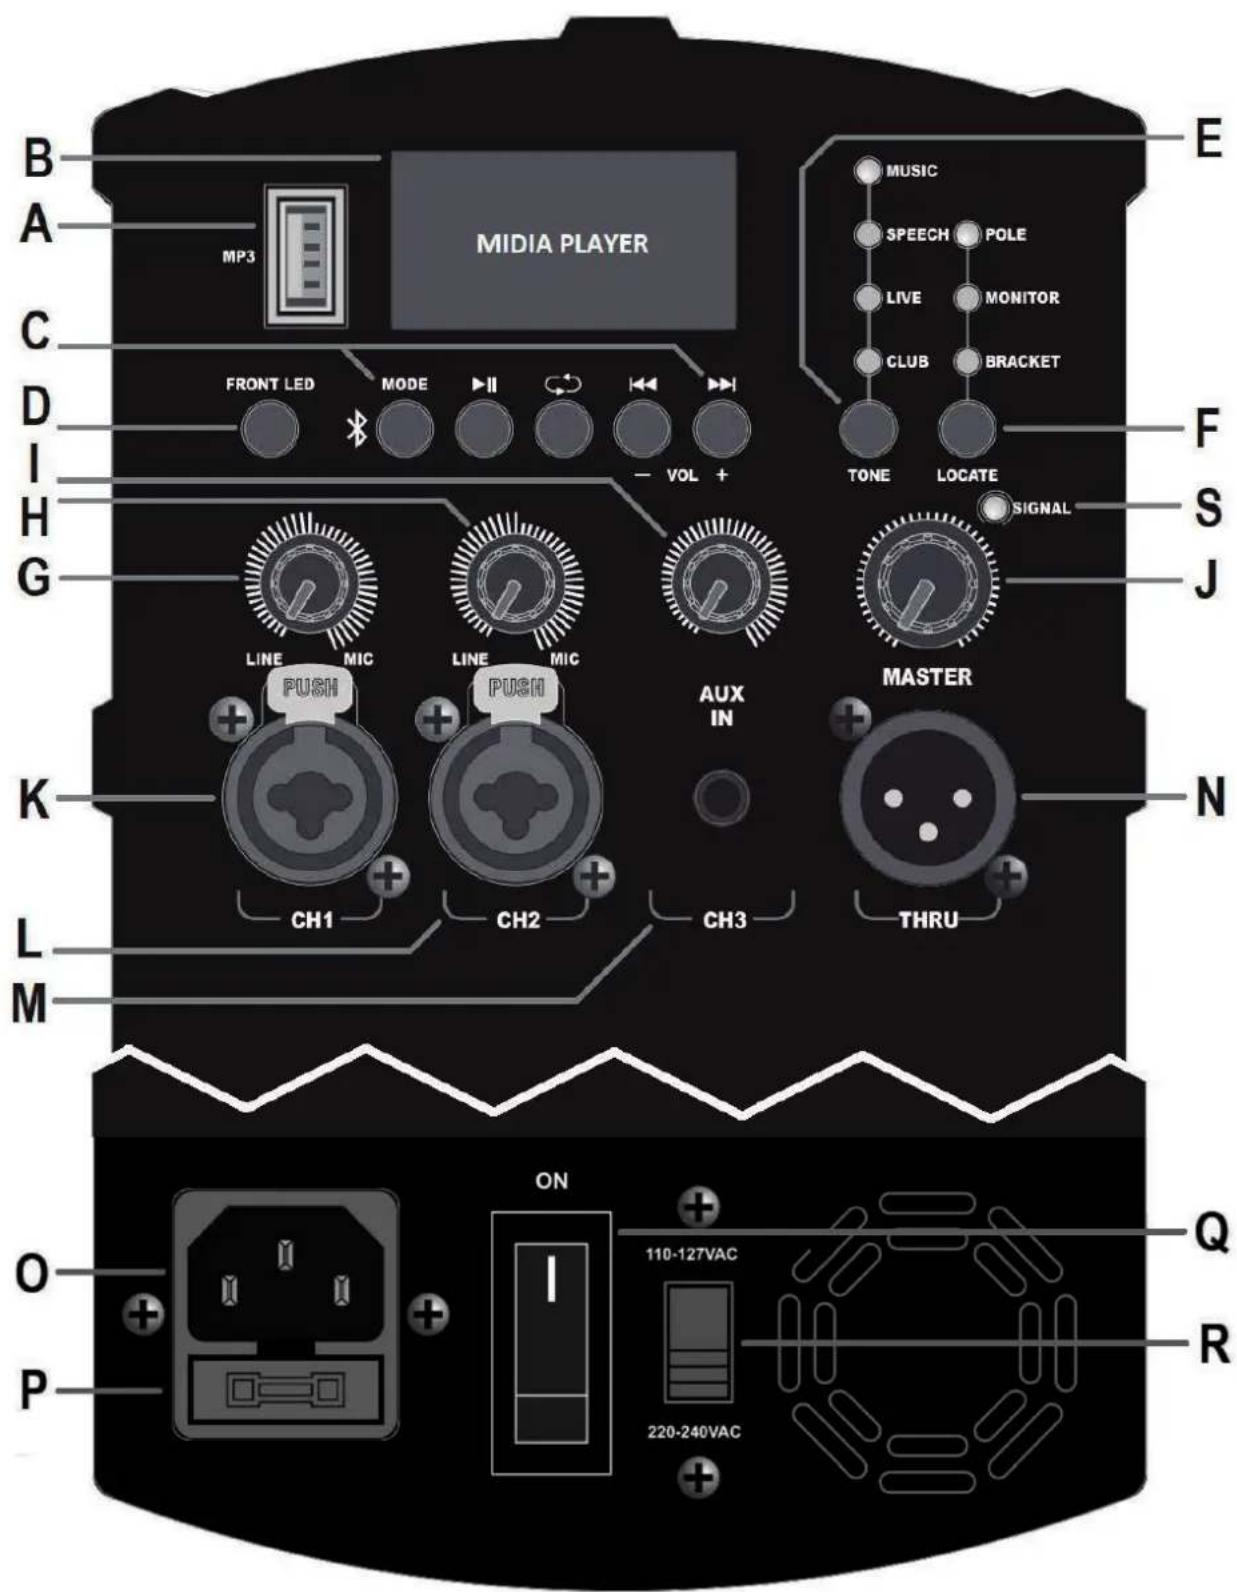
A. USB Port
Use to play music in MP3 and WAV formats through a USB 2.0 or 3.0 pen drive (5V/100mA) with a capacity of up to 64GB (formatted in FAT32 or exFAT). Do not use any types of external hard drives, adapters or mobile devices, such as smartphones and tablets, at the risk of damage to the internal circuits. This USB port does not support power charging for external devices.
B. LCD Display
Displays information about Media Player.
C. Media Player Controls
Media Player control buttons. MODE (toggles between USB and BT modes), PLAY/PAUSE, REPEAT, PREVIOUS (-VOL on hold) and NEXT (+VOL on hold).
D. Front LED Button
Use to turn on/off the front light.
E. TONE Selection Button
Use this button to switch between the five different settings. Being: MUSIC, SPEECH, LIVE, CLUB and FLAT (all lights off).
F. LOCATE Selection Button
Use this button to toggle between three different settings, namely: POLE, MONITOR and BRACKET.
G,H,I. CH1, CH2 and CH3 Volume Control
They control the gain of CH1, CH2 and CH3, respectively. Turning the knob to the left reduces the gain and turning the knob to the right increases the gain.
J. MASTER Master Volume Control
Controls the unit's master volume. Turning the knob to the left decreases the overall speaker volume. Turning the control to the right increases the overall powered speaker volume.
K,L. XLR/P10 Combo Inputs
These balanced inputs accept either a standard XLR (male) connector or a 1/4" P10 connector (TRS or TS). You can connect various types of musical instruments, microphones, mixers, and DJ mixers. The sensitivity of these inputs is automatically adjusted by the MIC/LINE volume controls.
M. AUX Input
This auxiliary input accepts a stereo P2 connector (3.5 mm). It can connect a wide range of devices such as tablets, smartphones, and laptops.
N. THRU Output
This XLR (male) output connector provides a means of sending an audio signal to an external device. The signals from channels CH1, CH2, CH3 and the Media Player are summed and sent to the THRU connector, and the volume control of each channel is reflected in the output.
0. Electrical Outlet
Connect the AC power cord supplied with the product to the electrical outlet on the back of the case. Plug the other end of the power cord into an available outlet.
P. Fuse holder
Product protection fuse compartment. Use fuse as specified in the technical specifications of this manual. Replacement should only be performed by a qualified technician.
Q. On/Off switch
Use this switch to turn the equipment on and off. Before turning on, check that the equipment is connected to the correct supply voltage, according to the local electrical installation.
R. Power Selector Switch
Supply voltage selector switch, to adjust this switch, always perform this change with the equipment turned off and with the electrical power outlet removed.
S. SIGNAL Indicator
Audio signal presence light (green) if there is a signal in any of the K, L, M inputs or coming from the Media Player. This indicator will alternate color (orange) if the signal level reaches the maximum required to provide maximum sound output.
Remark:
Only JBL MAX 12 and JBL MAX 15 models have a ventilation opening at the bottom of the rear panel.
GENERAL DESCRIPTION - MAX SERIES FAMILY

natural_image
Black rectangular electronic device with ventilation grille and mounting feet (no visible text or symbols)MAX 10
10" portable powered speaker with Bluetooth
• 250 WRMS
• 11.3 kg (24.9 lb)
- 60 Hz - 18 kHz

natural_image
Black rectangular electronic device with a curved top and side connectors (no visible text or symbols)MAX 12
12" portable powered speaker with Bluetooth
350 WRMS
• 15.9 Kg (35 lb)
- 55 Hz - 19 kHz

natural_image
Black perforated speaker grille with no visible text or symbolsMAX 15
15" portable powered speaker with Bluetooth
350 WRMS
• 19 Kg (41.9 lb)
• 49 Hz - 19 kHz
Thank you for purchasing the JBL MAX SERIES!
The professional powered speaker market is a highly competitive space where sound quality and volume can still pose a challenge for consumers looking for professional quality speakers. There are many competitors on store shelves or on Internet search lists that take into account only the visual part of the product, forgetting that a professional powered speaker needs to have, above all, a loud and clear sound.
The JBL MAX series is designed to provide budget conscious consumers without sacrificing high quality, professional features, and intuitive use.
MAX 10 SPECIFICATIONS
TYPE OF SYSTEM:
STRUCTURE:
MAXIMUM SPL:
FREQUENCY RESPONSE (+3 dB):
FREQUENCY RESPONSE (+10 dB):
COVERAGE PATTERN:
RATED OUTPUT POWER:
WOOFER DIAMETER:
DRIVER DIAMETER:
INPUT CONNECTIONS:
INPUT IMPEDANCE:
SIGNAL OUTPUT (THRU):
BLUETOOTH:
DSP:
A.C. POWER SUPPLY:
MAXIMUM POWER CONSUMED:
FUSE:
MOUNTING:
LIFT POINTS:
NET WEIGHT:
DIMENSIONS (H x W x D);
GROSS WEIGHT:
PACKAGE DIMENSIONS (H x W x D):
Amplified, two-way, 10" with DSP
Molded polypropylene
127 dB Maximum SPL*
70 Hz - 16.5 kHz
60 Hz - 18 kHz
110° (horizontal) x 60° (vertical) nominal
200 WRMS (Class D, LF) + 50 WRMS (Class AB, HF)
10.0"
1.0"
2 x Combo (XLR/P10), 1 x P2, 1 x USB
100 kΩ
1 x XLR
Streaming audio reception, Bluetooth version 5.0
Tone and Locate Functions
Predefined Independent Compressors and Limiters
110-127V or 220-240V (manually selectable)
250 WRMS
T5.0AL/250V
35 mm rod socket
3 points with standard M10 thread
11.3 kg (24.9 pound)
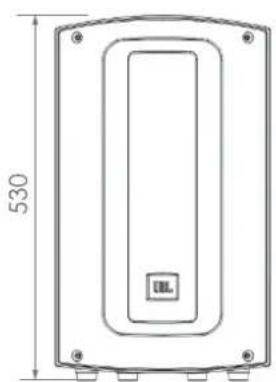
531 x 310 x 300 mm (20.91 x 12.21 x 11.81 in.)
13,80 kg (30,4 lb)
595 x 385 x 395 mm (23,42 x 15,15 x 15,55 in.)
* Measured at 2 meters distance with IEC standard pink noise,
±3 dB tolerance.

natural_image
Technical line drawing of a rectangular device with rounded corners and a central recessed section, dimension标注 530 (no text or symbols beyond measurement lines)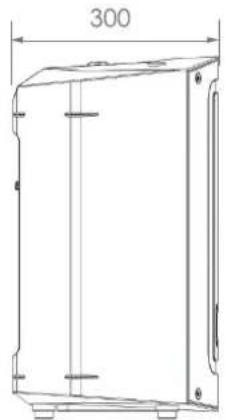
natural_image
Technical line drawing of a rectangular enclosure with dimension标注 (no text or symbols)
natural_image
Technical line drawing of a device rear panel with control panels and buttons (no text or symbols)Bottom view Front view Side view Rear view
MAX 12 SPECIFICATIONS
TYPE OF SYSTEM:
STRUCTURE:
MAXIMUM SPL:
FREQUENCY RESPONSE (+3 dB):
FREQUENCY RESPONSE (+10 dB):
COVERAGE PATTERN:
RATED OUTPUT POWER:
WOOFER DIAMETER:
DRIVER DIAMETER:
INPUT CONNECTIONS:
INPUT IMPEDANCE:
SIGNAL OUTPUT (THRU):
BLUETOOTH:
DSP:
A.C. POWER SUPPLY:
MAXIMUM POWER CONSUMED:
FUSE:
MOUNTING:
LIFT POINTS:
NET WEIGHT:
DIMENSIONS (H x W x D);
GROSS WEIGHT:
PACKAGE DIMENSIONS (H x W x D):
Amplified, two-way, 12" with DSP
Molded polypropylene
128 dB Maximum SPL*
65 Hz - 16.5 kHz
55 Hz - 19 kHz
100° (horizontal) x 60° (vertical) nominal
300 WRMS (Class D, LF) + 50 WRMS (Class AB, HF)
12.0"
1.35"
2 x Combo (XLR/P10), 1 x P2, 1 x USB
100 kΩ
1 x XLR
Streaming audio reception, Bluetooth version 5.0
Tone and Locate Functions
Predefined Independent Compressors and Limiters
110-127V or 220-240V selectable
400 WRMS
T6.3AL/250V
35 mm rod socket
3 points with standard M10 thread
15.9 kg (35 lb)
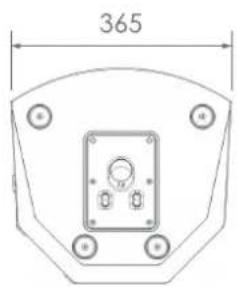
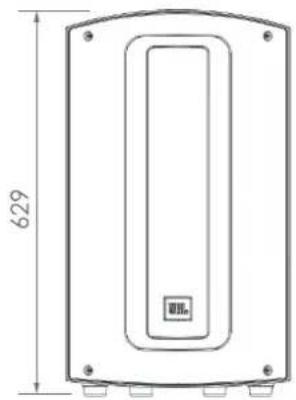
629 x 365 x 355 mm (24.76 x 14.37 x 13.98 in.)
18,55 kg (40,9 lb)
690 x 445 x 445 mm (27,16 x 17,52 x 17,52 in.)
* Measured at 2 meters distance with IEC standard pink noise,
±3 dB tolerance.
natural_image
Technical line drawing of a rectangular device with rounded corners and a central recessed slot, dimension标注 629 (no text or symbols on the diagram itself)Bottom view Front view Side view Rear view

natural_image
Technical line drawing of a mechanical housing or enclosure with dimension标注 (355 mm), no readable text or symbols present.
natural_image
Technical line drawing of a rectangular electronic device with internal components and mounting base (no text or symbols)MAX 15 SPECIFICATIONS
TYPE OF SYSTEM:
STRUCTURE:
MAXIMUM SPL:
FREQUENCY RESPONSE (+3 dB):
FREQUENCY RESPONSE (+10 dB):
COVERAGE PATTERN:
RATED OUTPUT POWER:
WOOFER DIAMETER:
DRIVER DIAMETER:
INPUT CONNECTIONS:
INPUT IMPEDANCE:
SIGNAL OUTPUT (THRU):
BLUETOOTH:
DSP:
A.C. POWER SUPPLY:
MAXIMUM POWER CONSUMED:
FUSE:
MOUNTING:
LIFT POINTS:
NET WEIGHT:
DIMENSIONS (H x W x D);
GROSS WEIGHT:
PACKAGE DIMENSIONS (H x W x D):
Amplified, two-way, 15" with DSP
Molded polypropylene
129 dB Maximum SPL*
59 Hz - 16.5 kHz
49 Hz - 19 kHz
100° (horizontal) x 60° (vertical) nominal
300 WRMS (Class D, LF) + 50 WRMS (Class AB, HF)
15.0"
1.35"
2 x Combo (XLR/P10), 1 x P2, 1 x USB
100 kΩ
1 x XLR
Streaming audio reception, Bluetooth version 5.0
Tone and Locate Functions
Predefined Independent Compressors and Limiters
110-127V or 220-240V selectable
400 WRMS
T6.3AL/250V
35 mm rod socket or lifting (3 points)
3 points with standard M10 thread
19 kg (41.9 lb)
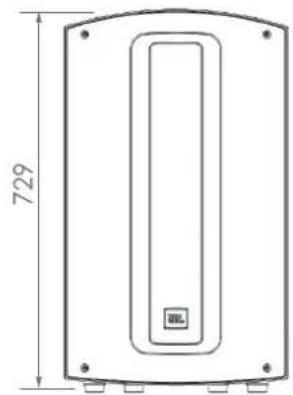
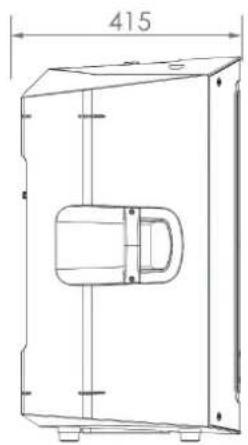
729 x 425 x 415 mm (28.71 x 16.73 x 16.34 in.)
22,85 kg (50,37 lb)
795 x 495 x 515 mm (31,30 x 19,49 x 20,27 in.)
* Measured at 2 meters distance with IEC standard pink noise,
±3 dB tolerance.

natural_image
Technical line drawing of a rectangular device with a vertical slot and dimension label (729), no readable text or symbols present.
natural_image
Technical line drawing of a rectangular enclosure with a central component and dimension label (415), no readable text or symbols present.
natural_image
Technical line drawing of a cylindrical device with internal components and mounting base (no text or symbols)Bottom view Front view Side view Rear view
APPLICATIONS AND FUNCTIONALITY
MUSICIANS/ARTISTS
Musicians and artists looking for a robust, easy-to-use, great-sounding powered speaker in a portable, affordable design.
PRESENTERS/INSTRUCTORS
Fitness instructors and presenters looking for a compact, easy-to-use PA solution with Bluetooth audio and built-in MP3 playback.
FIXED INSTALLATIONS
Installations in churches, theaters or spaces that require professional sound quality with ease of use and minimal setup time.
FUNCTIONALITIES
- High efficiency class D amplifier for the woofer and class AB for the driver.
- Three two-way versions available: MAX10 (10"), MAX12 (12") and MAX15 (15").
- Ultra-fast audio streaming via Bluetooth 5.0.
- MP3 Player via flash drive with folder change.
• High quality display. - Tone are five electronic tone presets.
- Locate are three electronic adjustment presets for positioning.
- 2 XLR / TRS combo input combos accept mic or line.
- XLR signal output for system expansion.
- Lightweight, portable, and durable design.
• Polypropylene case with ultra-resistant screen. - Integrated socket with two angles for rod or pedestal mount.
- Ergonomic handles for easy transport.
BLUETOOTH CONECTIVITY
How to Connect a Bluetooth Device to a MAX Speaker:
- Press the MODE button until the streaming audio reception mode is displayed on the product's graphic display. The product will start pairing mode automatically.
- Navigate to the Bluetooth settings of your smartphone or tablet device.
- Select the MAX Speaker you want to pair. The speaker's name will be JBL MAX "XX", where "XX" is the number according to the speaker size, 10, 12 or 15 inches.
- When the connection is successful, the name of your smartphone or tablet device will appear on the Media Player display.
POSITIONING AND INSTALLATION
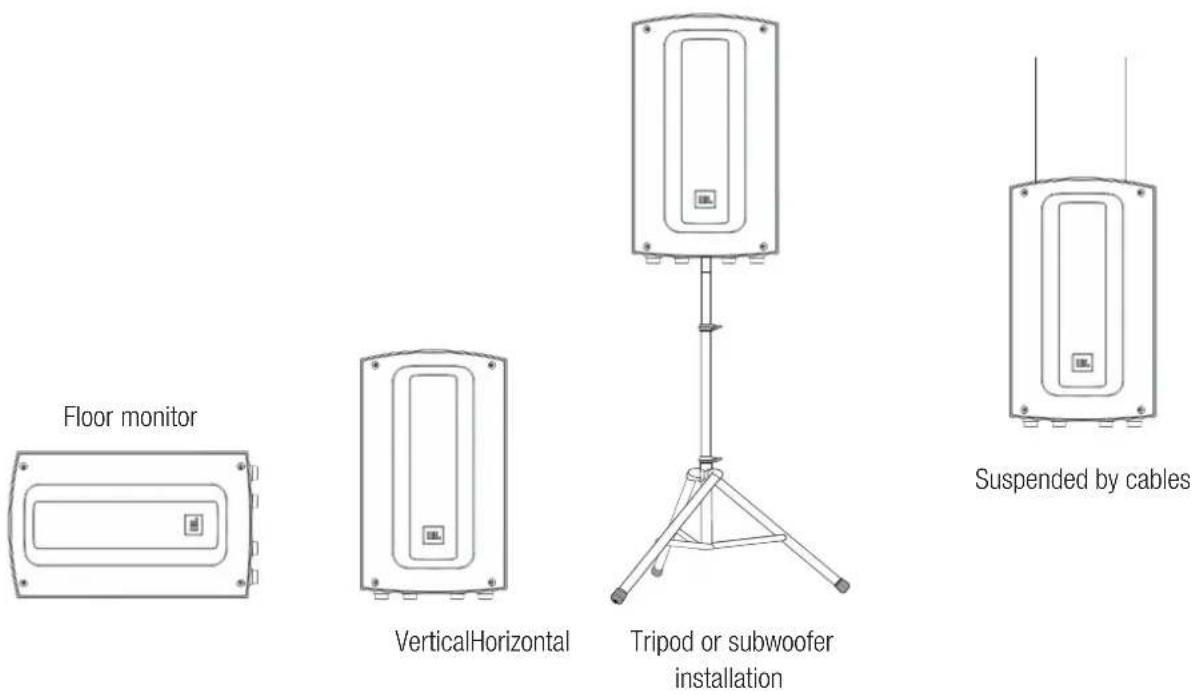
The following guidelines will help you get great sound wherever you use your MAX SERIES speakers:
Place speakers properly.
For best results, when using the powered speakers on a pedestal or tripod, position the top of the MAX line between 0.6 to 1.2 meters above the listening line (audience head) to avoid obstacles to the sound, thus considerably improving auditory perception both near and far from the sound system.
Place the speakers between the microphones and the audience.
The best kind of feedback (microphony) is one that never happens. When we have an assembly with the speakers positioned in such a way as to prevent the sound from the speakers returning to the microphones, it is the best possible option, for this always place the microphones between the speakers and the audience, to assist in this application, use the function Tone in the live option (when using musical instruments and microphones) or speech (when using only with microphones) so your MAX will be automatically adjusted for live use, in order to offer the best sound before the feedback. For best performance use microphones from the AKG line.
POSITIONING AND INSTALLATION
Choose the right shade for each application.
You have at your disposal a set of equalization features that adjust the MAX SERIES to most musical styles, in applications such as DJs or music streaming at home parties. For electronic music, use the Tone function in CLUB mode, for Latin music, Reggae and Pop use this key in MUSIC mode and for Country and Rock and Roll, use this function with all lights off, to activate the fifth function. These are suggestions depending on the frequency spectrum of each musical style, but feel free to choose the mode that best suits your style.
Use speakers that are distributed over larger areas or that are reverberant.
Distributing the powered speakers (spaced 12 meters apart) causes less sound to be directed towards the walls, improving speech interpretation due to room acoustics problems. XLR Thru output can assist in connecting multiple MAX SERIES units in this application
Adjusting the Locate feature for use.
This feature is intended to compensate through frequency equalization, the attenuation that the air offers the highest frequencies as a function of distance, which reduces the sound intensity for people farthest from the powered speaker. This feature is intended to compensate for this physical phenomenon, and for close applications such as stage return, use this function in MONITOR mode, in pedestal or tripod applications use POLE mode and for hoisted or pedestal applications with long reach (larger than 12 meters) use the Locate function in BRACKET mode.
POSITIONING AND INSTALLATION
Using the vertical support at 0°
To use the tilt-free vertical stand, press the two buttons below the powered speaker and adjust to the 0° position indicated.
Use the bracket in the 0^ position for open areas (no end wall) and the 7.5^ position when in closed spaces close to walls. This angle adjustment has the purpose of improving the acoustic perception in the place of use of the powered speaker, because when we have a wall at the end of the room and we leave the support in the 0^ position, the sound reaches the wall and is reflected, which degrades the acoustic quality.

natural_image
Technical line drawing of a mechanical device with a close-up inset showing internal components (no text or symbols)Using the vertical support at 7.5°
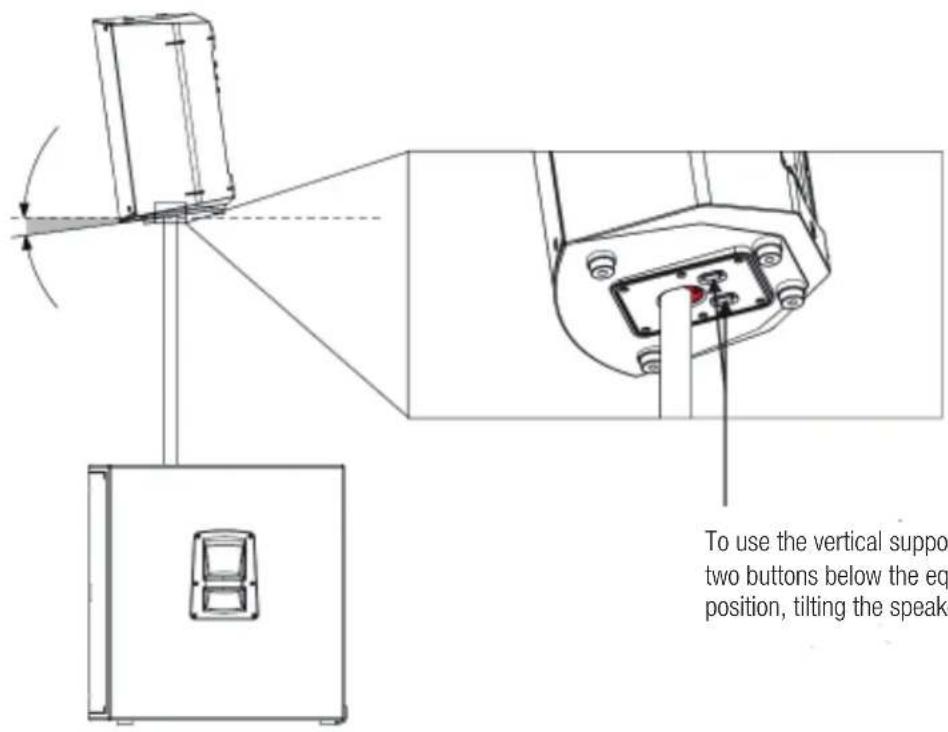
To use the vertical support with an inclination of 7.5^ , press the two buttons below the equipment and adjust to the desired position, tilting the speaker, then release the buttons.
CABLES AND CONNECTORS
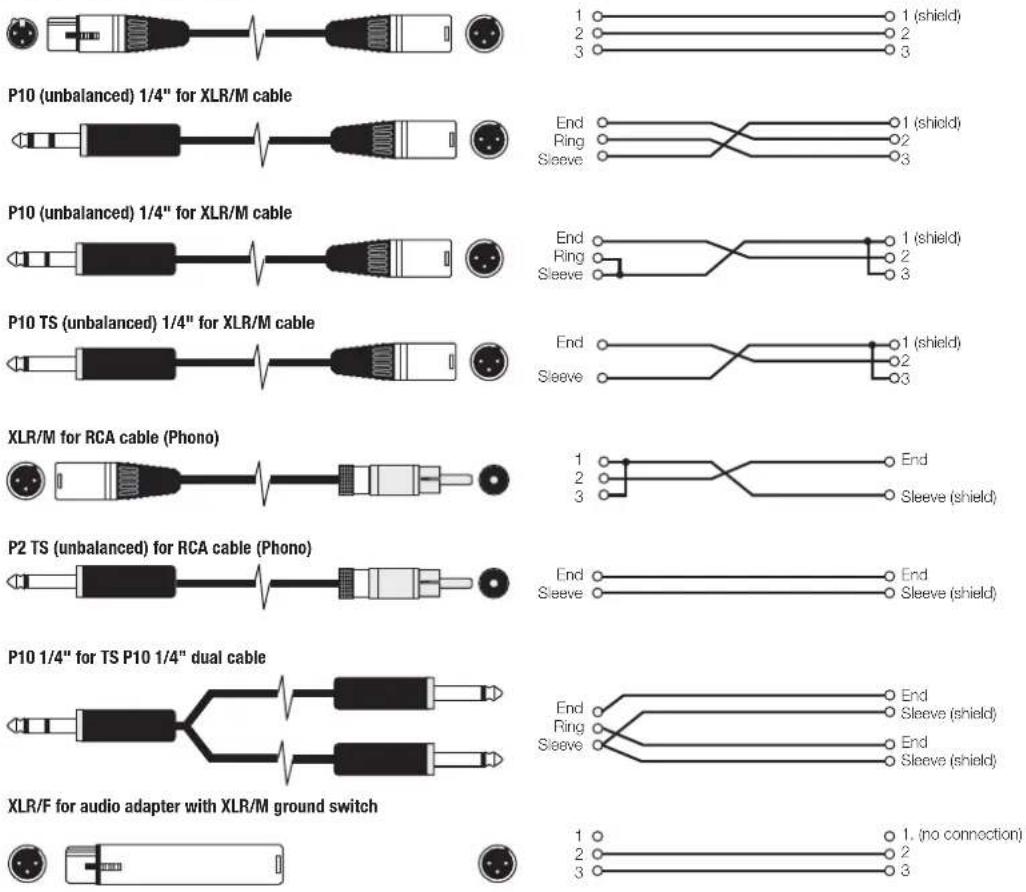
| XLR/F for XLR/M microphone cable | The standard cable for interconnecting microphone and line level signal in professional audio systems. Microphone for the soundboard. |
| 1/4-inch P10 (balanced) input for XLR/M | For connecting balanced 1/4-inch P10 devices and can be used interchangeably. |
| 1/4-inch P10 (unbalanced) input for XLR/M | For connecting instruments with unbalanced outputs to balanced XLR inputs. |
| 1/4-inch P10 TS (unbalanced) connector for XLR/M | This cable is electrically identical to 1/4-inch “P10” (unbalanced) and can be used interchangeably. |
| XLR/M cable for RCA (phono) | Connects audio products and some DJ mixer outputs to professional audio equipment inputs. |
| 1/4-inch P10 inlet for 1/4-inch P10 double inlet Splits a stereo output into separate left/right signals. | |
| TS (unbalanced) P2 for RCA cable (Phono) | P2 connector to connect the output of a laptop, mobile phone, MP3 player, computer to a soundboard. |
| XLR/F for audio with XLR/M ground switch Only with balanced inputs and outputs | |
XLR/F for XLR/M microphone cable
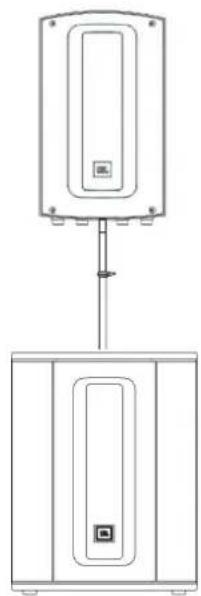
APPLICATION EXAMPLES

PA SYSTEM USING 2 AUDIO INPUTS AND THRU OUTPUT
CH1 input set to "Mic", CH3 input to external auxiliary device.
APPLICATION EXAMPLES

flowchart
graph TD
    A["MIC"] --> B["Ch1"]
    B --> C["MAX I2"]
    C --> D["THRU"]
    D --> E["CH1"]
    E --> F["MAX I2"]
    F --> G["+"]
    style A fill:#f9f,stroke:#333
    style B fill:#ccf,stroke:#333
    style C fill:#cfc,stroke:#333
    style D fill:#fcc,stroke:#333
    style E fill:#cff,stroke:#333
    style F fill:#ffc,stroke:#333
PA SYSTEM USING 2 POWERED SPEAKERS AS MONITORS
CH1 input set to "Mic" CH2 input set to "Line"
TROUBLESHOOTING
| Symptom Probable cause | What to do | |
| It does not emit sound. | Powered speaker not connected to AC mains | Make sure the powered speaker is plugged in and the product is turned on. |
| Power off Turn on the power and | check if the graphic display is lit. | |
| The powered speaker is in sleep mode | Apply an audio signal to any input to activate the equipment. | |
| No sound, the powered speaker is connected to the mains, but it does not work. | The powered speaker's power cord is defective or not connected properly. | Reattach the power cord at both ends.Replace with a good quality power cord. |
| It does not emit sound. The powered speaker turns on. | The signal source (turntable, instrument, etc.) is not sending. | Check the VU meters on the source mixer.Check if the external device is playing.Use headphones to verify that the instrument is actually sending an audio signal. |
| Defective cables and connections | Disconnect and reconnect signal cables.Replace the cable that appears to be defective with a good quality cable. | |
| It does not emit sound with a microphone connected directly to the MIC/LINE input. | Microphone requires Phantom power (48V) | MAX does not provide Phantom power (48V). Replace to a dynamic microphone, use a battery powered microphone (if possible), use an external Phantom power supply (48V) for condenser-type microphones. |
| Distorted and very loud signal sounds. | Excessive input signal, exceeding speaker capacities | Reduce the source output level.Reduce the level controls into the speaker.Use additional MAX speakers. |
| Distorted signal sounds even at moderate volumes, LIMIT light is not lit. | The mixer table or other source is overloaded | Review your mixer Owner's Manual and adjust the controls as needed.Input sensitivity (gain).Channel faders.Main faders, once you are done, review the instructions in the Quick Start section of this guide. |
| Too much hiss in the sound, the mixer controls are at very low settings. | Inappropriate gain structure | Make sure the MIC/LINE switch is in the proper position.The operation of the Mic/Line switch will be slightly different.Reduce the level settings on the speaker. Review your mixer Owner's Manual and adjust the controls as needed.Input sensitivity (gain).Channel faders.Master faders. |
| Noise or hiss at the exit. Noisy source device | Disconnect the devices that are connected to the powered speaker one at a time. If the noise disappears, the problem is with the source or the connecting cable. | |
| Buzz that increases or decreases when you move the mixer level controls. | Inadequate AC power or defective equipment connected to mixer input | Turn off or mute channels one at a time to isolate the problem. Consult the Owner's Manual of the defective equipment for troubleshooting assistance. |
| Faulty cable between source equipment and mixer | Replace the cable that appears to be defective with a good quality cable. | |
| Buzz | Improper ground circuits, AC power | Disconnect the audio jack ground with an XLR/F to XLR/M adapter at one end.Route audio cables away from AC power and lighting cables. |
| Excessively long and unbalanced cable run | Use balanced outputs (if available) from the mixer or source equipment to drive the MAX speaker.Use a DI converter to convert your equipment's unbalanced output into a balanced output. | |
| Inadequate system gain structure | Lower input level controls and increase the output level of source devices. | |
natural_image
Simple line drawing of an open box with a square lid (no text or symbols)①
natural_image
Line drawing of a 3D box with an open lid and folded edges (no text or symbols)②
natural_image
Simple line drawing of a 3D cube placed on a plane, no text or symbols present③
natural_image
Line drawing of a portable electronic device with a vertical panel and three tripod legs (no text or symbols)③
natural_image
Technical line drawing of a device with a top panel and bottom panel, no visible text or symbols④

natural_image
Simple line drawing of a rectangular device with a central rectangular element and mounting holes (no text or symbols)5
natural_image
Illustration of three electrical components: a power outlet, a hand holding a plug, and a multi-pin power strip (no text or symbols)natural_image
Black rectangular electronic device with ventilation grille and mounting feet (no visible text or symbols)natural_image
Black rectangular electronic device with ventilation grille and side connectors (no visible text or symbols)natural_image
Black cylindrical speaker or audio device with perforated grille and mounting feet (no visible text or symbols)DIMENSIONES (AI x An x P);
PESO BRUTO:
DIMENSIONES DELA CAJA DE CARTÓN( Al x An x P):
Amplificado, 2 vias, 10" con DSP
natural_image
Technical line drawing of a rectangular device with rounded corners and a central recessed section, dimension标注 530 (no text or symbols beyond measurement lines)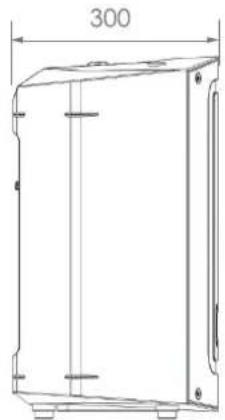
natural_image
Technical line drawing of a rectangular enclosure with dimension标注 (no text or symbols)
natural_image
Technical line drawing of a device rear panel with control panels and buttons (no text or symbols)Vista inferior Vista frontal Vista lateral Vista trasera
DIMENSIONES (AI x An x P);
PESO BRUTO:
DIMENSIONES DELA CAJA DE CARTÓN( Al x An x P):
natural_image
Technical line drawing of a rectangular device with rounded corners and a central recessed panel, dimension标注 629 (no text or symbols on the diagram itself)Vista inferior Vista frontal Vista lateral Vista trasera

natural_image
Technical line drawing of a rectangular enclosure with a central component and mounting feet (no text or symbols)
natural_image
Technical line drawing of a rectangular industrial control unit with internal components and mounting bracket (no text or symbols)DIMENSIONES (Al x An x P);
PESO BRUTO:
DIMENSIONES DELA CAJA DE CARTÓN( Al x An x P):
natural_image
Technical line drawing of a rectangular device with a vertical slot and dimension label (729), no readable text or symbols present.Vista inferior Vista frontal Vista lateral Vista trasera
natural_image
Technical line drawing of a rectangular enclosure with a central slot and dimension label (415), no readable text or symbols present.
natural_image
Technical line drawing of a cylindrical device with internal components and mounting base (no text or symbols)natural_image
Technical line drawing of a mechanical device with a close-up inset showing internal components (no text or symbols)Usando el soporte vertical a 7,5°

Some informations are important when you order the warranty. See below:
- To request the product warranty, you must have a receipt, purchase receipt, invoice or any document that is indicated by Harman do Brasil or its distributors.
- The warranty protects the end user and is not transferable. Any transfer attempt can override it.
- The warranty is valid only for Harman products purchased from authorized Harman dealers in the national territory, and, therefore, does not apply to products purchased or transferred abroad by any other marketer or under any other condition.
When does the warranty apply? Warranty is applied in operation or functioning failures due to material or manufacturing failure, only if:
1) You purchased this product from a dealer that is a Harman do Brasil authorized dealer with respect to this product at the time of your purchase.
2) The original purchase receipt or invoice is available.
3) The product was purchased as a new product.
When does the warranty not apply? This policy does not cover damage or loss: caused by accident (including force majeure or natural forces), misuse, abuse, neglect, product modification; occurring during shipment (even when Harman has arranged or paid for shipping); caused by failure to follow instructions in the owner's guide, including failure to perform recommended periodic or routine maintenance or improper maintenance; resulting from repairs by someone Harman did not authorize; (for products not specified by Harman for commercial or industrial use) caused by any commercial or industrial use; to the decorative surface of this product; to any data, software or information; caused by using this product for other than its intended purpose; or covered under any of your (or your installer's) insurance policy or coverage. The following are also excluded from this warranty: claims based upon any misrepresentations by the seller; if this product's serial number has been altered, defaced or removed; deterioration of component parts, the nature of which is to become worn or depleted with use, including batteries and headphone/headset ear pads/foam pads; any accessory to this product, even if supplied by Harman; any installation, removal or re-installation; any set-up calibration or adjustment; any performance variations due to installation-related circumstances, such as program source quality or AC power fluctuations.
In the event that you require warranty service on this product, contact the local dealer or distributor.
TÉRMINO DE GARANTÍA
- USER MANUAL MANUAL DE USUARIO
- CONTENT/CONTENIDO
- English
- Español
- HEARING DAMAGE, PROLONGED EXPOSURE TO EXCESSIVE SOUND PRESSURE LEVELS
- MAINTENANCE AND CLEANING
- RoHS COMPLIANCE
- FCC STATEMENT
- FCC Radiation Exposure Statement
- SAFETY INSTRUCTIONS
- OPERATING TEMPERATURE RANGE:
- Prevention of hearing loss
- QUICK START GUIDE
- Packaging Content
- Unpack it
- Mounting Options
- CONNECT THE INPUTS
- SETTING THE CHANNELS
- PAIR AUDIO BY BLUETOOTH™
- REAR PANEL DETAILS
- USB Port
- LCD Display
- Media Player Controls
- Front LED Button
- TONE Selection Button
- LOCATE Selection Button
- G,H,I. CH1, CH2 and CH3 Volume Control
- MASTER Master Volume Control
- K,L. XLR/P10 Combo Inputs
- AUX Input
- THRU Output
- Electrical Outlet
- Fuse holder
- On/Off switch
- Power Selector Switch
- SIGNAL Indicator
- Remark:
- GENERAL DESCRIPTION - MAX SERIES FAMILY
- Thank you for purchasing the JBL MAX SERIES!
- MAX 10 SPECIFICATIONS
- MAX 12 SPECIFICATIONS
- MAX 15 SPECIFICATIONS
- APPLICATIONS AND FUNCTIONALITY
- MUSICIANS/ARTISTS
- PRESENTERS/INSTRUCTORS
- FIXED INSTALLATIONS
- FUNCTIONALITIES
- BLUETOOTH CONECTIVITY
- How to Connect a Bluetooth Device to a MAX Speaker:
- POSITIONING AND INSTALLATION
- Place speakers properly.
- Place the speakers between the microphones and the audience.
- Choose the right shade for each application.
- Use speakers that are distributed over larger areas or that are reverberant.
- Adjusting the Locate feature for use.
- Using the vertical support at 0°
- CABLES AND CONNECTORS
- APPLICATION EXAMPLES
- TROUBLESHOOTING
- Usando el soporte vertical a 7,5°
- TÉRMINO DE GARANTÍA
Brand : JBL
Model : MAX 10
Category : Loudspeaker