
L-595ASE - Receiver LUXMAN - Free user manual and instructions
Find the device manual for free L-595ASE LUXMAN in PDF.


| Product Type | Integrated Amplifier |
| Rated Output Power | 30 W + 30 W (8 Ω) |
| Total Harmonic Distortion | 0.007% (8 Ω, 1 kHz, line straight on) |
| Input Sensitivity / Impedance (LINE) | 180 mV / 47 kΩ |
| Input Sensitivity / Impedance (PHONO MM) | 2.5 mV / 47 kΩ |
| Input Sensitivity / Impedance (PHONO MC) | 0.3 mV / 100 Ω |
| Frequency Response (LINE) | 20 Hz – 100 kHz (-3 dB, line straight on) |
| Tone Control (Bass) | ±8 dB at 100 Hz |
| Tone Control (Treble) | ±8 dB at 10 kHz |
| Damping Factor | 370 |
| Power Consumption | 330 W (max), 0.4 W (standby) |
| Power Supply | 115 V ~ (60 Hz) |
| Dimensions (W × H × D) | 440 mm × 193 mm × 462 mm |
| Weight | 29.0 kg |
| Volume Control | LECUA 1000 (electrically controlled attenuator) |
| Distortion Reduction System | ODNF (Only Distortion Negative Feedback) |
| Output Stage Configuration | Triple-paralleled push-pull bipolar transistors |
| Phono Equalizer | MM/MC compatible |
| Separate Pre/Main Function | Yes, with SEPARATE button |
| Headphone Output | Yes, 6.3 mm jack |
| Remote Control | RA-17A (aluminum finish) |
| Speaker Terminals | 2 systems (A/B), compatible with Y-lugs |
| Input Terminals | 4 unbalanced LINE, 2 balanced LINE, PHONO (MM/MC), MAIN IN, PRE OUT |
| Protection Circuit | Overcurrent, over-temperature, DC offset |
| Accessories Included | Power cable, remote control, AAA batteries, owner's manual, safety cautions |
Frequently Asked Questions - L-595ASE LUXMAN
User questions about L-595ASE LUXMAN
0 question about this device. Answer the ones you know or ask your own.
Ask a new question about this device
Download the instructions for your Receiver in PDF format for free! Find your manual L-595ASE - LUXMAN and take your electronic device back in hand. On this page are published all the documents necessary for the use of your device. L-595ASE by LUXMAN.
USER MANUAL L-595ASE LUXMAN
INTEGRATED AMPLIFIER
L-595ASE
Contents
Precautions 1
Features of This Unit 2
Names and Functions.... 4
Connections 10
Operations.... 14
How to use Remote Control 16
Block Diagram....19
Specifications 20
Before Asking for Repair Services....21
Installation place
This unit should be installed in a well-ventilated location to enable heat dissipation because it is an A-class amplifier and generates considerable heat.
Especially, installation of this unit where direct sunlight is present, where the temperature rises excessively high such as close to a heater, or where it is humid or dusty may cause malfunctions even if the heat is efficiently released. Therefore, do not install this unit in such places.
Ventilation
The ventilation holes on the top and bottom panels of this product should never be blocked. If the amplifier is installed in closed rack or similar location, ensure ample space for cooling and leave the door open. Never place anything on top of the amplifier. Failure to observe these may cause malfunctions.
Note:
Ensure heat dispersal. Do not install this equipment in a confined space such as a book case or similar unit.
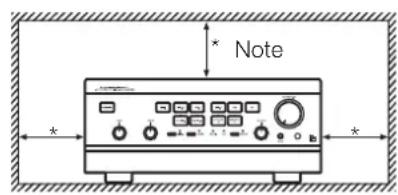
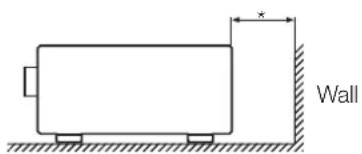
Precautions when connecting to other components
When connecting this unit to other input devices, such as a CD player, SACD player, D/A converter, tuner or recorder, be sure to turn off the power to this unit and all other connected devices first. Failure to observe this may generate a dangerous noise shock resulting in speaker damage and may cause malfunctions.
The connectors to each input terminal of this unit must be pushed in firmly. If the grounding terminal is inadequately connected, noise or hum, may be generated, resulting in an adverse S/N ratio.
Cautions when connecting speakers
When connecting to a speaker system, exercise extra care not to short-circuit between the positive and negative connections of the speaker terminals and the speaker input terminals of this unit. If a large signal is applied to the amplifier while it is short-circuited, a large current may be passed through the output circuit and cause malfunctions.
Sound is not generated shortly after the power supply is turned on.
This amplifier is equipped with a timed muting circuit to protect the output. Therefore, no sound will be generated for a short time after the power supply is turned on.
If the volume control is set to a high volume level before the timed muting circuit disengages, a loud, dangerous volume will be suddenly generated. Set the volume control to a low level first and then adjust it after you hear the output from the speakers.
Protection circuit
This product is equipped with a protection circuit that is activated upon detecting overcurrent, abnormally high temperatures and DC drifts to protect the amplifier and speakers. When the protection circuit is activated, the output to the speaker terminals will be shut off and the operation indicator will blink orange to show that this unit is muted. If the protection circuit is frequently activated, disconnect the AC plug from the wall outlet, wait for a while and then reconnect the plug to the wall outlet again and turn on the power. If the problem persists, please consult your dealer.
Repair and adjustment
When repairs or adjustments are needed, please consult the dealer who sold you the unit.
Cleaning
For cleaning, use a piece of soft fabric such as a cleaning cloth to wipe the unit. If dirt is hard to remove, use a small amount of neutral detergent to wipe it off and then wipe the unit with dry cloth. Do not use a solvent like benzine or thinner because they could damage the exterior.
Batteries
Warning: Batteries used for the remote control shall not be exposed to excessive heat such as sunshine, fire or the like.
Safety caution
Caution
This unit is heavy. Be careful when unpacking, carrying, and installing it.
Take care if you try to perform all the installation work yourself to avoid injury.
New LECUA 1000 — LUXMAN Electronically Controlled Ultimate Attenuator 1000
The new LECUA 1000 has integrated an amplifier circuit and a high-precision attenuator by which uses electrically controlled fixed resistance switching. Fine sound volume is adjustable from 0 dB through -87 dB are achieved with no deterioration in sound quality.
ODNF — Only Distortion Negative Feedback —
The output section features LUXMAN's original distortion-only negative feedback system which enables a high-speed primary slew rate and ultra-wide audio bandwidth. Only distortion generated in the amplification process is fed back for cancellation. This maintains pure, high quality sound reproduction in the main amplifier section. Low impedance and a high signal to noise ratio for the transmission circuits are achieved thanks to the paralleled first stage and Darlington equipped second stage amplification circuits.
Also the input stage error detection circuits are triple-paralleled to moderate frequency characteristics and noise.
Since the latest version of ODNF-u uses dual transistors for the cascode circuit and the current mirror circuit, the error detection accuracy is improved by minimizing the difference between these elements.
Triple-paralleled push-pull output stages
Triple-paralleled bipolar transistors in push-pull configuration are used in the final output amplification stage providing a rated output of 30 W+30 W (8 Ω).
Highly stable power supply
The unit's highly stable power supply circuitry features a large capacity El-core-type power transformer with 8 custom designed 10,000 F blocking capacitors.
Parallel speaker relays
This unit is equipped with 2 large parallel speaker relays with a low resistance value to reduce the impedance of the speaker output lines.
Beeline construction
LUXMAN's Beeline construction ensures that the audio signal path takes the optimum shortest route from input to speaker output.
Selector switch IC
The selector switch IC, as used in our high-end C-900u control amplifier, supports high quality audio and improves input separation and crosstalk performance.
Schottky barrier diodes
By using Schottky diodes, manufactured by KYOCERA Corporation, this unit achieves very high DC conversion efficiency in the power rectifier circuitry and much less switching noise.
LUXMAN's original OFC wiring
Our original OFC cable, with non-plated core wire, is used for internal wiring to achieve smooth signal transmission. Extrathick 3.5 mm² copper cable is used in connections between the amplifier board output and speaker output board.
Non-angled circuitry
After carefully considering the delicate nature of the audio signal flow, non-angled circuit board tracking has been adopted to achieve smooth signal transmission.
Phono amplifier
This unit is equipped with an integral phono amplifier compatible with the MM/MC cartridge to achieve high-quality analog record reproduction without the need for an external dedicated phono amplifier.
Separate function
This unit is equipped with a “Separate” button used for separating the pre-amplifier and main-amplifier sections from each other. This enables bi-amp connections to an external power-amplifier and facilitates integration with an AV or home theatre system.
Loopless chassis structure
This unit features a loop-less chassis, independently constructed to eliminate increases in ground impedance due to chassis current.
Copper alloy RCA terminals
The RCA terminals used for the LINE-1 inputs are specially designed with the high conductivity of copper and the durability of brass.
18 mm pitch RCA terminals
We have used 18 mm pitch RCA input terminals for inputs other than LINE-1 to support high quality audio cables with large connectors.
Cast-iron insulators
For stability and support, this product features cast iron feet with vibration reducing density gradient.
Selector buttons
The source selector's individual buttons and indicators echo the design of our vintage L-570 masterpieces.
Large speaker terminals
The speaker terminals (A and B systems) have a separated inline layout (with the same characteristics for right and left) and are compatible with Y lugs to enable easy connection using extra-thick speaker cables.
Headphone output terminal
This terminal enables you to enjoy sound with headphones.
Aluminum remote controller
The high-grade, aluminum finished, hand-held remote can control applicable CD/SACD players as well as this unit.
Names and Functions
Front panel
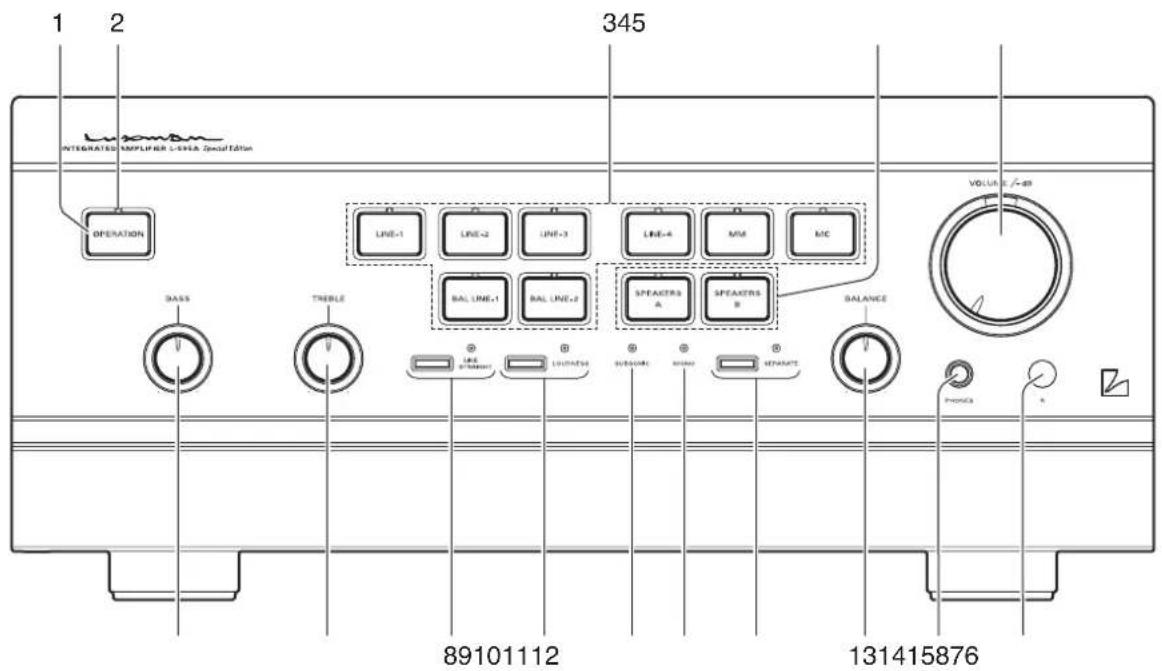
1. Operation button (OPERATION)
This is the power on/off button.
When wiring or connection is performed, be sure to turn off this button.
2. Operation indicator (OPERATION)
Lights up orange when the connected AC cable is plugged into a wall socket and the operation button is set to off (standby state).
Blinks blue during mute mode when the operation button is activated and lights up steady blue when the operation state is achieved after a short time. This indicator blinks orange when the protection circuit is activated.
3.Inputselectors/indicators (INPUT SELECTOR)
These buttons select an input source from devices such as a CD player, SACD player, D/A converter or tuner connected to the input terminals.
The eight input selectors indicate LINE-1, LINE-2, LINE-3, LINE-4, BAL LINE-1, BAL LINE-2, MM (PHONO) and MC (PHONO) which correspond to the input terminals on the rear panel, lighting up the input indicator for the input device to be selected. Select MM (PHONO) or MC (PHONO) to support the playback of analog records as follows:
MC: Selection for a low output voltage MC (moving coil) type cartridge.
When MC is selected while using an MM type cartridge, be aware that the sound volume becomes higher and an unbalanced sound lacking high frequencies will be heard owing to the incorrect impedance.
MM: Selection for a high output voltage MM (moving magnet) type cartridge.
4. Speaker selectors/indicators (SPEAKERS)
Selects either of 2 speaker systems, A or B, located at the rear panel. A is the default setting. When A is pressed in this state, speaker output A will be muted. Pressing this button toggles A on and off. B works in the same manner. The terminal whose indicator is lit is active.
OFF (Both indicators are off):
Turns both A and B off when listening only with headphones and without generating sound from speakers.
A (Indicator is on):
Selects the A system speaker terminals.
B (Indicator is on):
Selects the B system speaker terminals.
A + B (Both indicators are on):
A selection for a bi-wired speaker system.
When using two different pairs of speakers simultaneously, be sure to use speakers with an impedance of 8 ohms or more because the output terminals A and B are connected in parallel.
5. Volume control (VOLUME)
Adjusts the sound volume.
Sound will not be heard when this control is rotated fully counterclockwise. Volume will gradually increase as the control is rotated clockwise as follows: mute → -87 dB → -86 dB → ... → 0 dB in steps of 1 dB.
The volume levels are engraved around the VOLUME control and the position lit by the light above the VOLUME control indicating the current volume level. When the mute button on the remote control is pressed, this light will start blinking.
6. Tone control for bass TONE CONTROL (BASS)
Controls the frequency characteristics of the low-frequency range.
Setting this control to the center position provides flat frequency characteristics. Rotating this control clockwise enhances the low frequency range and rotating this control counterclockwise attenuates the low frequency range. When the line straight button is set to on, this button does not function.
7. Tone control for treble TONE CONTROL (TREBLE)
Controls the frequency characteristics of the high-frequency range.
Setting this control to the center position provides flat frequency characteristics. Rotating this control clockwise enhances the high-frequency range, and rotating this control counterclockwise attenuates the high-frequency range. When the line straight button is set to on, this button does not function.
8. Line straight button/indicator (LINE STRAIGHT)
Enhances sound quality and clarity by bypassing the balance control circuit, tone control circuit and other signal processing.
OFF (line straight indicator off): Line straight off/bypass off ON (line straight indicator on): Line straight on/bypass on
- This switch toggles the line straight on and off.
When the line straight button is set to on, the balance control, tone control, subsonic, monaural and loudness controls will not function.
Front panel
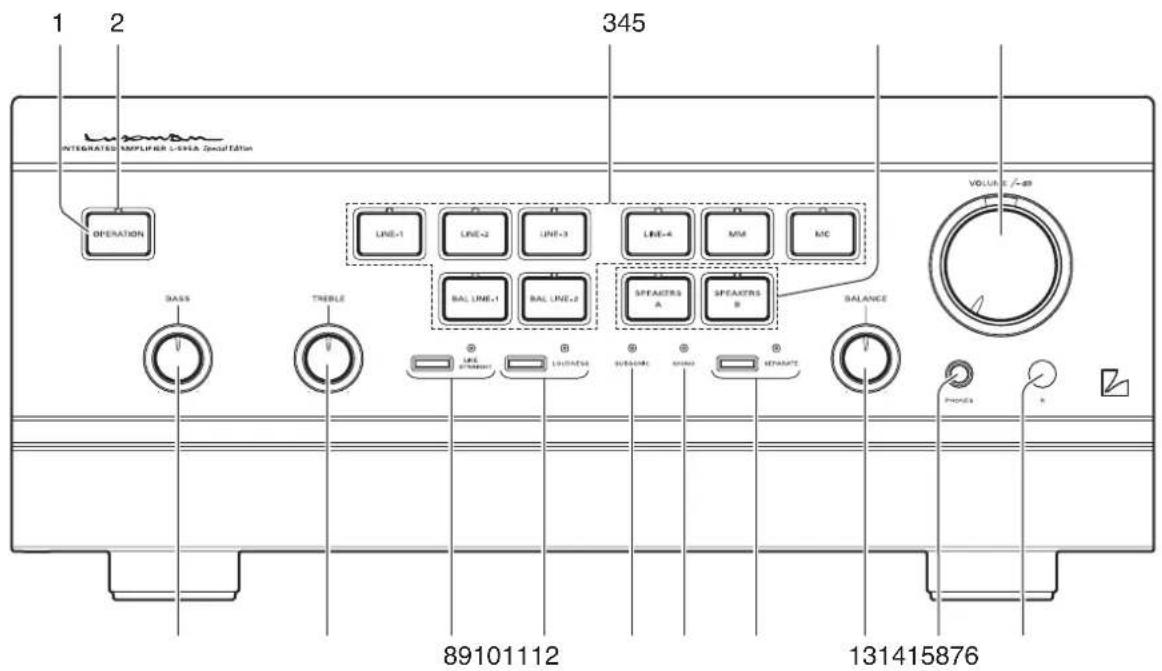
9. Loudness button/indicator (LOUDNESS)
Turns on and off a function that corrects for the characteristics of human ears that have difficulty in listening to low-frequency and high-frequency sounds when the sound volume is low.
OFF (Loudness indicator off): Loudness off
ON (Loudness indicator on): Loudness on
• This button toggles the loudness on and off.
10. Subsonic indicator (SUBSONIC)
Lights up when the subsonic button is on.
Cuts ultra-low frequencies outside the audible range to prevent ultra-low range noise from adversely affecting the audible range.
This function is especially effective when an analog record is warped, or a woofer is shaking owing to ultra-low frequency rangeoverload.
11. Monaural indicator (MONO)
Lights up when the monaural button is on.
The subsonic and monaural functions can be toggled only from the accessory remote control (RA-17A).
12. Separate button/indicator (SEPARATE)
Separates the pre-amplifier and main-amplifier from each other.
OFF (Separate indicator off):
Returns this unit to normal integrated amplifier mode.
ON (Separate indicator on):
Feeds external signals from the MAIN IN terminal on the rear panel to the main-amplifier section.
- This button toggles the separate state on and off.
When the separate button is set to on, the volume control of this unit will not adjust the volume sent to speakers connected to this unit. Volume adjustment needs to be performed at the input device side such as a control amplifier connected to the MAIN IN terminal.
Sources connected to the MAIN IN terminals, such as a CD player or other device that has no integral volume adjustment will be reproduced at full power and may result in speaker damage.
For such input devices, be sure to use a control amplifier equipped with sound volume adjustment, begin feeding audio to the speakers with the volume low and adjust the volume to your preferred level. When connecting devices to this unit, be sure to turn off the power to prevent damage.
13. Balance control (BALANCE)
Adjusts the relative volume of the right and left channels.
Rotating the control counterclockwise gradually cuts the volume of the right channel, rotating the control clockwise gradually cuts the volume of the left channel.
This knob should be set to the center position under normal conditions, and rotated to make adjustment if necessary.
When the line straight button is set to on, this control does not function.
14. Headphone jack (PHONES)
Insert a headphone jack into this stereo output. Even when headphones are connected, signals to the speaker output terminals are not interrupted. To listen to music using only your headphones, set the speaker selector to OFF.
15. Remote control infrared receiver (R)
Receives signals from the accessory remote control.
Rear panel
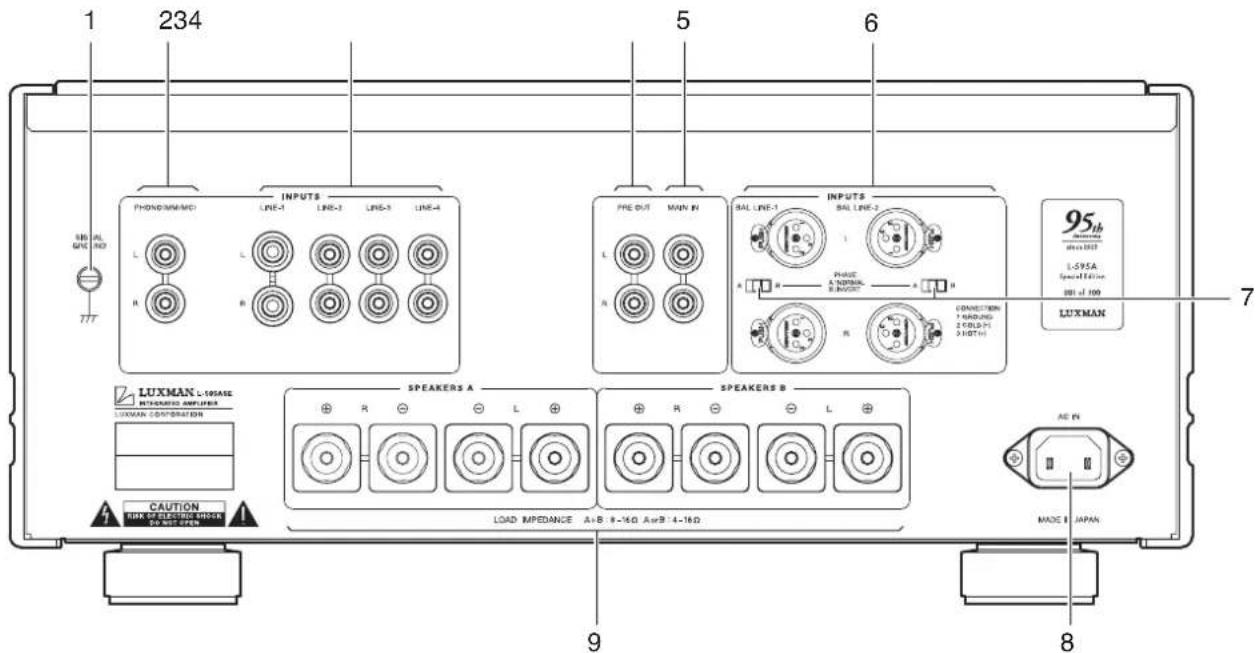
1. Signal ground (ground terminal) (SIGNAL GROUND)
The ground terminal is for a device such as analog player connected to this unit. This terminal is used to reduce noise when other devices are connected. This terminal is not an electrical safety feature.
2. Phono input terminals (PHONO (MM/MC))
An input terminal to connect an analog player.
Do not connect a CD player or other devices with high output levels to these terminals.
CD or other line level signals will be distorted.
3. LINE-1, LINE-2, LINE-3, and LINE-4 input terminals (unbalanced) (LINE-1, LINE-2, LINE-3, and LINE-4)
Used for line level signal inputs from CD players, SACD players, D/A converters, tuners, DVD players, TVs and other such devices. The input sensitivity is 180 mV and the impedance is 47 kΩ. Copper alloy terminals are used only for the LINE-1 inputs, but perform the same as the other inputs.
4. Pre-out terminals (PRE OUT)
These terminals are used to access the pre-amplifier output. Bi-amp connections can be achieved in combination with an external power-amplifier as these terminals always provide output regardless of the separate button setting.
Do not insert shorting plugs into the PRE OUT output as this will mute the main output.
5. Main input terminals (MAIN IN)
Provides input to the main-amplifier section when the pre-amplifier and main-amplifier are separated by setting the SEPARATE selector to on.
6. Balanced input terminals/INPUTS (BAL LINE-1, BAL LINE-2)
The balanced type input terminals of the LINE level for an XLR connector.
7. Phase inverters (PHASE)
Inverts the phase of the balanced input terminals corresponding to the output signal phase of the connected input device.
A: NORMAL position ① GROUND
② COLD (-)
③ HOT (+)
B: INVERT position ① GROUND
② HOT (+)
③ COLD (-)
8. AC inlet (AC IN)
Connect the supplied accessory power cable here to power the unit from an AC wall outlet.
9. Speaker terminals (SPEAKERS)
Use these terminals to connect to your speaker system(s), the R speaker terminals connect to the right side and the L speaker terminals connect to the left side, paying careful attention to their polarity.
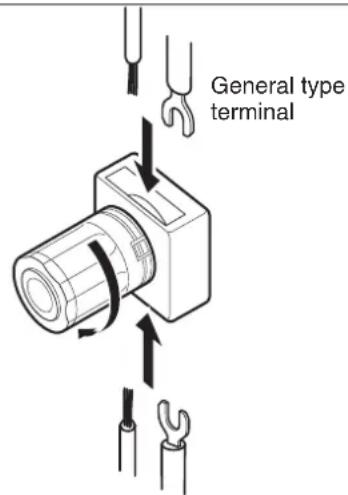
* It is possible to insert cables from below as well as from above.
Connections
flowchart
graph TD
    A["CD/SACD PLAYER"] --> B["D/A CONVERTER"]
    B --> C["ANALOG PLAYER"]
    C --> D["SPEAKER SYSTEM(A)"]
    C --> E["SPEAKER SYSTEM(B)"]
Before connecting
Before connecting other devices, connect the jack side of the accessory power cable to the AC inlet of this unit.
Before connecting anything to this unit, turn off its power supply and the power supplies of auxiliary devices to prevent unexpected noise or potential damage to this unit or connected speakers.
How to connect power supply
Connect the supplied accessory power cable to power the unit from an AC wall outlet.
How to connect CD players, SACD players, D/A converters, tuners and other devices
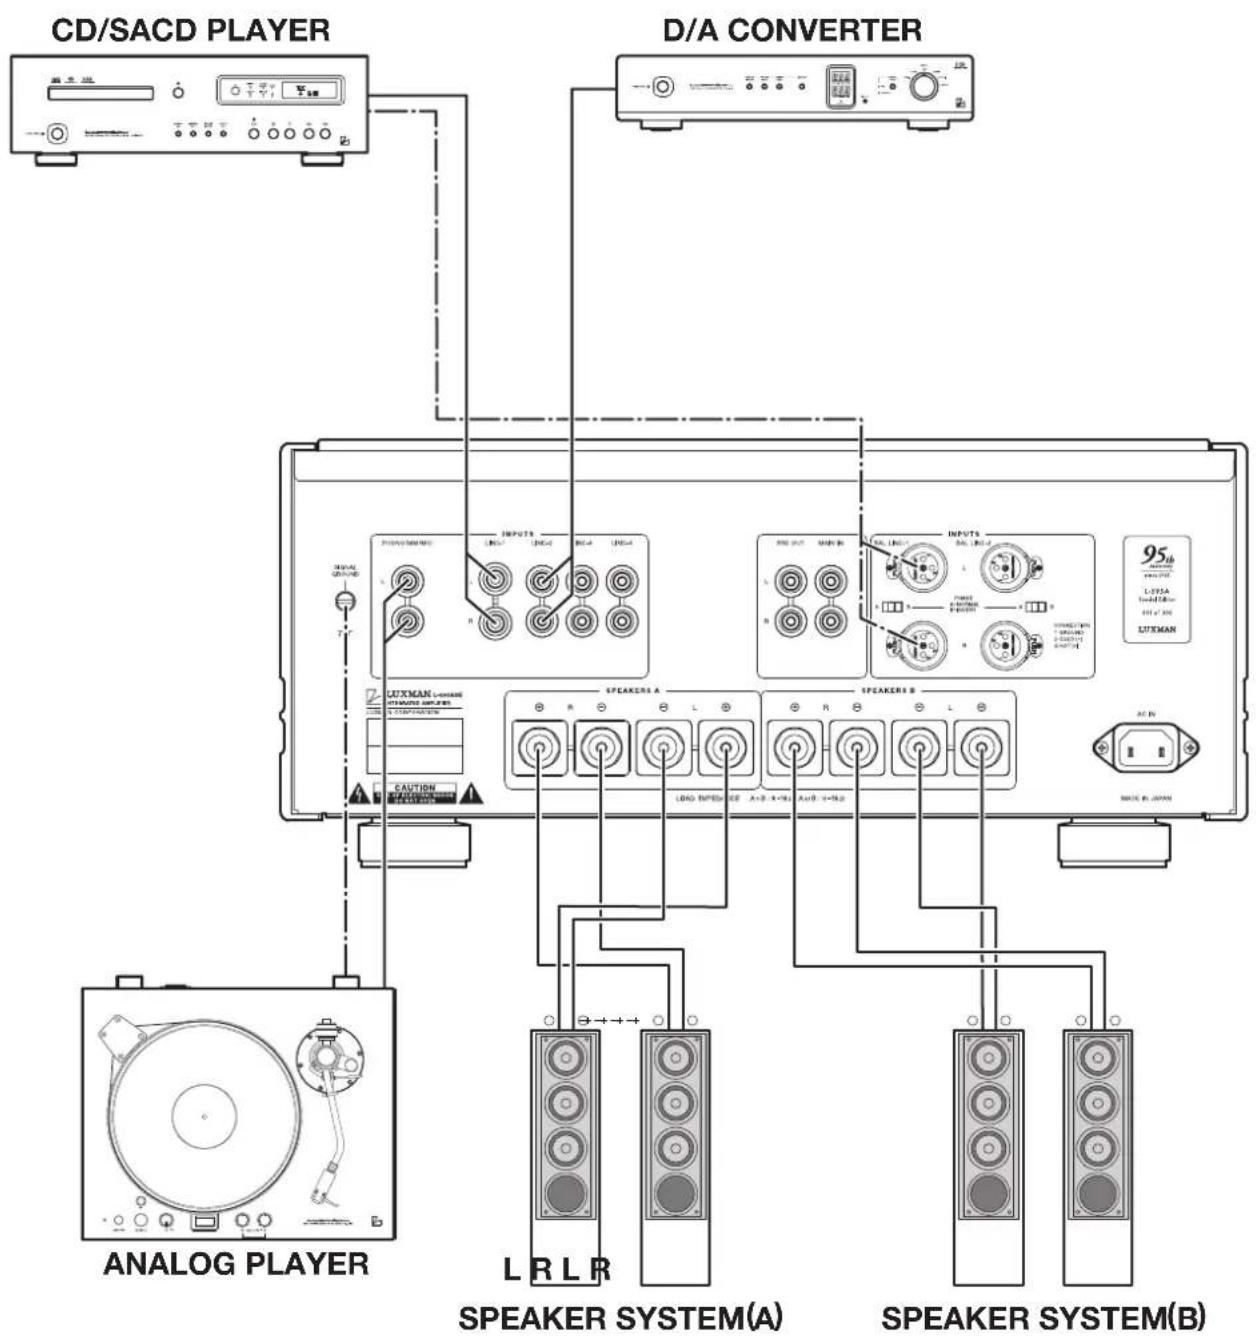
Connect between the output terminals of the CD player, SACD player, D/A converter, tuner or other such input devices and the LINE-1 input terminals of this unit with 2 (R and L) RCA cables or balanced cables.
Similarly, repeat this process for the LINE-2, LINE-3 and LINE-4 input terminals.
How to connect speakers
Connect the left-channel speaker to the SPEAKERS-L terminal (L) and the right-channel speaker to the SPEAKERS-R terminal (R) on the rear panel of this unit.
Securely connect the ⊕ terminal of the speaker system to the ⊕ (red) speaker terminal, and the ⊖ terminal of the speaker system to the ⊖ (black) speaker terminal of this unit. If the ⊕ and ⊖ terminals are connected in reverse to either the right or left speaker systems, the acoustic phases of the sound reproduced from the right and left speaker systems are also reversed. In such a case, be aware that the low frequency sound levels will be reduced and the acoustic stability will worsen, thus failing in normal stereo playback.
Connections
flowchart
graph TD
    A["CD/SACD PLAYER"] --> B["D/A CONVERTER"]
    B --> C["ANALOG PLAYER"]
    C --> D["SPEAKER SYSTEM(A)"]
    C --> E["SPEAKER SYSTEM(B)"]
How to connect to analog players
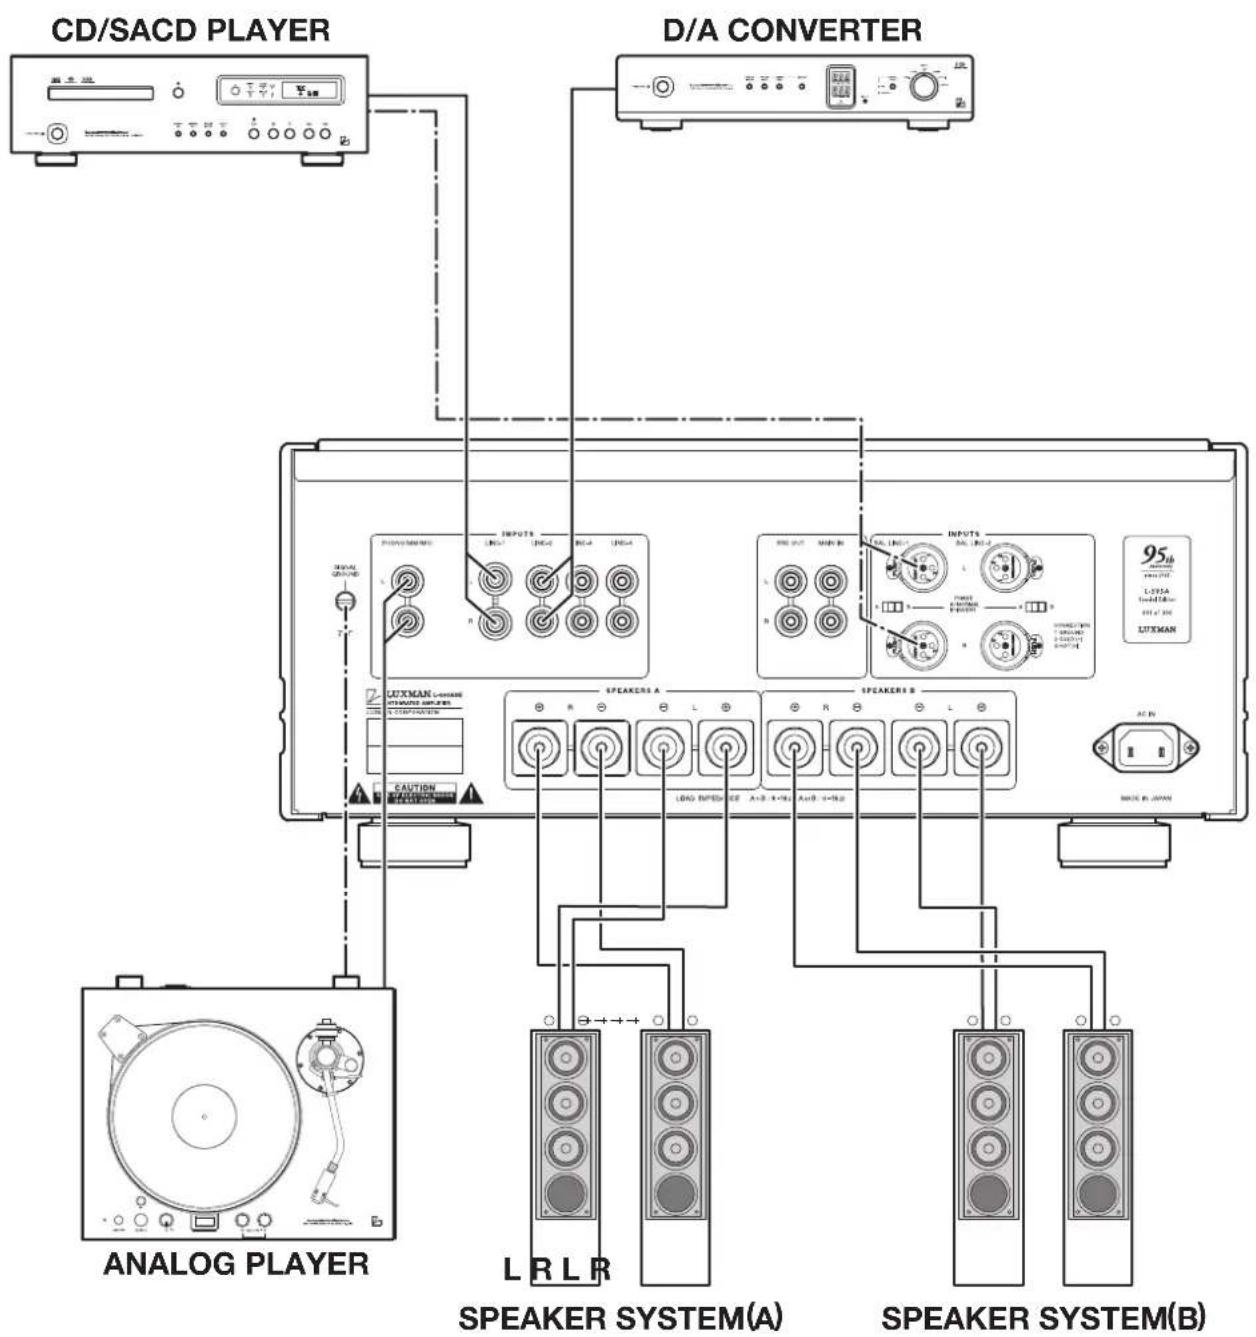
Connect between the output terminals of an analog player and the PHONO terminals of this unit with 2 (R and L) RCA cables. For most analog players, the ground wire from the phono motor or the tone arm should be connected to the ground terminal of this unit.
This unit's phono equalizer is compatible with MM and MC cartridges. If an MC cartridge with low output voltage is used, set the input selector on the front panel to the MC position.
The output from an analog player equipped with its phono equalizer or from an independent phono equalizer should be connected to the line input terminals of this unit.
How to connect PRE OUT/MAIN IN terminal
Either the pre-amplifier or main-amplifier can be separately used.
When the pre-amplifier or main-amplifier is separately used, set the separate button on the front panel to on. When only the pre-amplifier is used, connect the PRE OUT terminal of this unit to the input terminal of another power-amplifier, and when only the main-amplifier of this unit is used, connect the MAIN IN terminal of this unit to the output terminal of another control-amplifier.
When this amplifier is used without separating between the pre-amplifier and main-amplifier, set the separate button on the front panel to off, or no sound will be generated.
Do not insert shorting plugs into the PRE OUT output as this will mute the main output. No sound will be generated.
Before operation
- Ensure that all connections have been correctly performed. (Normal playback cannot be achieved with incorrect connections of R, L, ⊕ or ⊖.)
- Before the power is toggled between on and off or an input selected, be sure to set the volume control to the minimum position.
Playback procedure
- Press the operation button to turn on the unit after ensuring that the volume control is set to the minimum position.
- Select a source with the input selector buttons.
- Adjust the sound level with the volume control.
- Operate the line straight button, balance control and tone controls according to taste.
Line straight selection
The line straight button is used to reproduce audio via the shortest audio signal route for enhancing the clarity of the source selected. When this button is set to on, the balance control, tone controls, subsonic, monaural and loudness functions are bypassed.
Balance control operation
The balance control enables users to adjust the balance of sound volume between the right and left channels.
When the balance adjustment is not required, the balance control should be set to the center position.
When the line straight button is set to on, the balance control will not function.
Tone controls
This unit has a tone controls for the low- and high frequency ranges.
The low frequency range is effective at 300 Hz or lower. This tone control is set to flat frequency characteristic at the center position. Rotating the control clockwise enhances the low-frequency range, and rotating the control counterclockwise attenuates the low-frequency range.
The high frequency range is effective at 3 kHz or higher.
This tone control is set to flat frequency characteristic at the center position. Rotating the control clockwise enhances the high-frequency range, and rotating the control counterclockwise attenuates the high-frequency range.
For both the low- and high-frequency ranges the effects on both right and left channels are matched.
When the line straight button is set to on, the tone controls will not function.
Procedure for timer-controlled playing
- Use the operation button to activate this unit.
- Select a source to be reproduced under timer control.
- Adjust the volume level with the volume control.
- Perform the time setting for start and stop times with your timer.
- Refer to the operating instructions for the timer and other connected devices for further information.
Memory
This unit stores the following items when the power is off:
Item Default
INPUT Selected source
SPEAKERS Selected speaker
SUBSONIC on/off
MONO on/off
LOUDNESS on/off
LINE STRAIGHT on/off
SEPARATE on/off
Memory reset
The following operations restore all the settings to the factory defaults.
(1) Turn off the power of this unit.
(2) Hold down the operation button on the main unit for 5 seconds or more and press the line straight button on the main unit once while holding down the operation button. The power state will switch from on to off.
This will fully reset the memory.
Factory default
Item Default
INPUT LINE-1
SPEAKERS A
SUBSONIC off
MONO off
LOUDNESS off
LINE STRAIGHT off
SEPARATE off
Remote control (RA-17A)
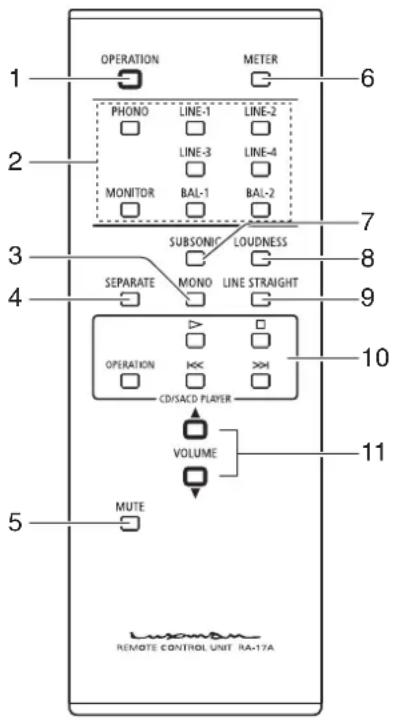
1. Operation button (OPERATION)
This is a power on/off button.
When wiring or connection is performed, be sure to turn the unit off using this button.
2. Input selectors
(LINE-1, LINE-2, LINE-3, LINE-4, BAL-1, BAL-2, PHONO, MONITOR)
Select between input sources from among the unbalanced input terminals on the rear panel consisting of LINE-1, LINE-2, LINE-3, LINE-4 and PHONO or the balanced BAL LINE-1 and BAL LINE-2 input.
Each time the PHONO button is pressed, the selection will toggle between MM and MC. For reference, MONITOR has no effect on this unit.
3. Monaural button (MONO)
Mixes the signals from the right and left channels into mono. The monaural indicator lights up when this button is pressed.
Press the button again to turn off the monaural effect and reproduce a regular stereo output.
* When the line straight button is set to on, this button will not function.
4. Separate button (SEPARATE)
Separates the pre-amplifier and main-amplifier sections from each other.
OFF (Separate indicator off):
Configures this unit as a normal integrated amplifier.
ON (Separate indicator on):
Feeds external signals from the MAIN IN terminal on the rear panel to the main-amplifier section.
- Holding down this button for 1 second toggles the SEPARATE state on and off.
5. Mute button (MUTE)
When this button is pressed and the mute function is activated, the VOLUME control indicator will start blinking and there will be no audio output. Pressing this button again sets the mute function to off.
6. Meter button (METER)
Not applicable to this unit.
7. Subsonic button (SUBSONIC)
Turns on and off a function which cuts ultra-low frequencies outside the audible range to prevent ultra-low range noise from adversely affecting audible frequency range signals.
OFF (Subsonic indicator off): Subsonic off ON (Subsonic indicator on): Subsonic on
- This button toggles the subsonic on and off.
* When the line straight button is set to on, this button will not function.
8. Loudness button (LOUDNESS)
Turns on and off a function which corrects for the characteristics of human ears that cause difficulty in hearing to low-pitched and high-pitched sounds at low volume.
OFF (Loudness indicator off): Loudness off ON (Loudness indicator on): Loudness on
- This button toggles the loudness on and off.
* When the line straight button is set to on, this button will not function.
9. Line straight button (LINE STRAIGHT)
Enhances clarity of the sound quality by bypassing the balance control circuit, tone control circuit and others.
OFF (Line straight indicator off): Line straight off/bypass off ON (Line straight indicator on): Line straight on/bypass on
- This button toggles the line straight function on and off.
10. CD/SACD player operation buttons (CD/SACD PLAYER)
These buttons are used to control the supported CD/SACD players.
The supported CD/SACD players are the following 14 models as of May 2021: D-10X, D-03X, D-N150, D-380, D-08u, D-06u, D-05u, D-08, D-06, D-05, D-10, D-7, D-600S and D-700S.
11. Volume control buttons (VOLUME, ▲, ▼)
Adjusts the sound volume.
- Pressing ▲ increases the sound volume in steps of 1 dB.
- Pressing ▼ decreases the sound volume in steps of 1 dB.
How to use Remote Control
Remote control
The remote control should be aimed at the remote sensor of this unit within the specified angle range as shown in the illustration.
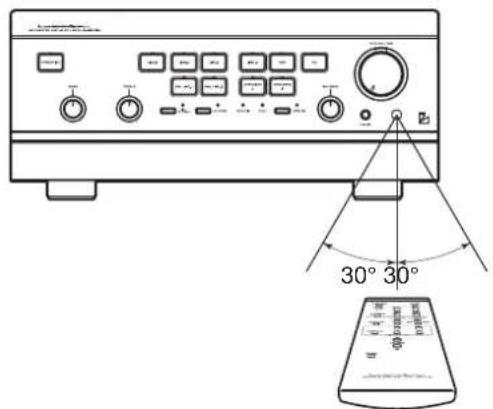
Effective distance: approx. 5 meters
Dry cell
[How to load dry cells]
- Put your finger on the battery cover claw on the rear of the remote control and slide the cover downward to open it.
- Put 2 AAA batteries in the battery case as shown in the illustration.
- Close the battery cover.
![LUXMAN L-595ASE - [How to load dry cells] - 1](/content/2026/05/942874/images/cf5376a9f91d96f268f3921a844f4ba38c9f3da1b3b12e5a3f8521198b7957d8.jpg)
natural_image
Diagram of a mechanical component with a curved arrow indicating rotation or movement (no text or symbols present)- Do not use a combination of new and old batteries together.
- There may be a case in which the voltages are different between two batteries even though they are the same size. Do not use batteries of different types together.
- If the remote control is not used for a long time (more than 1 month), the batteries should be removed from the case. If battery liquid is leaking, wipe away the liquid from the case and clean the contacts before inserting new batteries.
- To discard exhausted batteries, follow the instructions provided by your local authority.
![LUXMAN L-595ASE - [How to load dry cells] - 2](/content/2026/05/942874/images/54c4043d61e1d16efc87d90db8ca434ca2d18d86396f64d97371ab7d8a6b7305.jpg)
flowchart
graph TD
    subgraph Input Line
        direction TB
        A["PHONO"] --> B["EQ"]
        B --> C["RJAA"]
        C --> D["INPUT SELECTOR"]
        D --> E["STRAIGHT"]
        E --> F["Tone Control"]
        F --> G["MONO"]
        G --> H["SUBSONC"]
        H --> I["Buffer"]
        I --> J["LECUA-1"]
        I --> K["LECUA-2"]
        I --> L["Pre amp"]
        L --> M["CRETE"]
        M --> N["PRE OUT"]
    end

    subgraph Phase Invert
        direction TB
        O["INV"] --> P["BAL-UNBAI"]
        P --> Q["PHASE INVERT"]
        Q --> R["INV"]
        R --> S["BAL-UNBAI"]
        S --> T["PHASE INVERT"]
    end

    subgraph Transformer
        direction TB
        U["REC. B2"] --> V["B2'"]
        V --> W["-B2'"]
        W --> X["-B2"]
    end

    subgraph Speaker Selector / Protector
        direction TB
        Y["A - Speakers"] --> Z["+"]
        AA["B - Speakers"] --> AB["+"]
        AC["Phones"] --> AD["+"]
        AE["DC. OC. TEMP."] --> AF["-B1"]
        AG["Speaker selector / Protector"] --> AH["+"]
        AI["Backup Transformer"] --> AJ["FUSE"]
        AK["For Main Amp"] --> AL["B1-L"]
        AK --> AM["B1-R"]
        AK --> AN["B2-L"]
        AK --> AO["B2-R"]
        AK --> AP["For Driver"]
        AK --> AQ["For EQ, TC, Pre amp"]
        AK --> AR["For Protector"]
        AK --> AS["For μ-computer"]
    end

    subgraph Voltage/Tree/Bass/Balance
        direction TB
        AT["Input Selector LINE 1-4/BAL Line 1,2/PHONO (MM/MC)"]
        AU["Speakers (A/B)"]
        AV["Line Straight/Loudness/Separate"]
        AW["LED"]
    end

    subgraph Remote
        direction TB
        AX["μ-com"]
    end

    style Input Line fill:#f9f,stroke:#333
    style Phase Invert fill:#ccf,stroke:#333
    style Transformer fill:#cfc,stroke:#333
    style Speaker Selector fill:#fcc,stroke:#333
    style Backup Transformer fill:#ffc,stroke:#333
Specifications
| Rated output | 30 W + 30 W (8 Ω)4 Ω - 2 Ω stable for music via single speaker pair. | |
| Total harmonic distortion | 0.007 % (8 Ω, 1 kHz for both channels simultaneously, line straight on)0.06 % (8 Ω, 20-20 kHz for both channels simultaneously, line straight on) | |
| Pre-amplifierInput sensitivity/input impedance | PHONO (MM) : 2.5 mV/47 kΩPHONO (MC) : 0.3 mV/100 ΩLINE : 180 mV/47 kΩBAL. LINE : 180 mV/55 kΩ | |
| Main-amplifierInput sensitivity/input impedance | MAIN IN : 550 mV/47 kΩ | |
| Output voltage PRE OUT | : 1 V / 600Ω | |
| S/N ratio PHONO (MM) : 91 dB or more(IHF-A correction, 5 mV input)PHONO (MC) : 75 dB or more(IHF-A correction, 0.5 mV input)LINE : 105 dB or more(IHF-A correction, input shorted, line straight on) | ||
| Frequency response | PHONO (MM) : 20 Hz to 20,000 Hz (±0.5 dB, line straight on)PHONO (MC) : 20 Hz to 20,000 Hz (±0.5 dB, line straight on)LINE : 20 Hz to 100,000 Hz (within -3 dB, line straight on) | |
| Tone control Maximum change BASS : ±8 dB at 100 HzTREBLE : ±8 dB at 10 kHz | ||
| Loudness control 100 Hz | : +7 dB10 kHz | : +5 dB |
| Damping factor | : 370 | |
| Supplied functions | · Input selector (LINE-1 to LINE-4, BAL LINE-1 to BAL LINE-2, PHONO MM/MC)· Speaker selector button (A, B)· Mute button (remote control)· Monaural button (remote control)· Tone control· Phone jack· Phase inverter switch | · Balance control· Subsonic button (remote control)· Separate button· Line straight button· Loudness button |
| Accessories | · Remote control RA-17A· Owner's Manual (This document)· Power cable | · Safety cautions· 2 AAA batteries |
| Power supply | 115 V ~ (60 Hz) | |
| Power consumption | 330 W0.4 W (at standby), 230 W (at no input) | |
| Max. external dimensions | 440 (W) x 193 (H) x 462 (D) mm(19 mm front panel knob and 36 mm rear panel terminals included in depth) | |
| Weight | 29.0 kg (main unit) | |
* Specifications and appearance are subject to change without notice.
While in use, this unit may display phenomena which may be confused as malfunctions. Before contacting your country's official LUXMAN distributor for repair services, please read the operating instructions for any connected input and output devices and check the troubleshooting table below. If the cause of the malfunction cannot be identified, please contact your dealer. After LUXMAN's representatives have accepted your request for repair services, inspection fees and transportation expenses may be claimed, even though the unit may be found to be operating normally.
| Problem | Cause Solution | |
| No power is supplied even though the operation button is pressed. | The power plug is disconnected from the wall outlet, or it is not inserted correctly. | Insert the power plug in the wall outlet completely. |
| The power plug is disconnected from the AC inlet, or it is not inserted completely. | Securely insert the power plug in the AC inlet. | |
| No sound is generated. | The volume control is set to the minimum level. | Rotate the volume control clockwise to adjust the sound volume. |
| The source to be reproduced is not selected with the input selector. | Select the source to be reproduced with the input selector. | |
| Cable connections are incomplete. Secure cable connections. | ||
| The output level of the input device is set to the minimum position. | Adjust the output level. | |
| The separate button is set to on. Set the separate button to off. | ||
| The mute button of the remote control is set to on. | Set the mute button to off. | |
| No sound is generated on one side. | The balance control is fully rotated. The balance control should be set to the center position under normal conditions. | |
| Cables are not connected on one side. Secure cable connections. | ||
| Humming sound is generated. | The ground side of an RCA cable has no contact with the terminal. | Secure connections so that the ground side of the RCA cable can be connected. |
| The ground wire of the analog player is not connected. | Connect the ground wire of the analog player to the GND terminal. | |
| Connections or mounting conditions are incomplete between the cartridge and shell, or between the shell and tone arm of the analog player. | Connect (or mount) the cartridge, shell, and tone arm correctly. | |
| No effect of tone control or balance control is observed. | The line straight button is set to on. When tone control or balance control are used, the line straight button should be set to off. | |
| The subsonic, monaural or loudness is not activated. | The line straight button is set to on. | When the subsonic, monaural or loudness is used, the line straight button should be set to off. |
| The separate button of the remote control is not activated. | To prevent incorrect operations, this unit is designed to toggle the separate on/off by holding down the separate button for approximately 1 second. | Hold down the separate button of the remote control for approximately 1 second. Or turn on and off with the separate button on the main unit. |
- Contents
- Installation place
- Ventilation
- Note:
- Precautions when connecting to other components
- Cautions when connecting speakers
- Sound is not generated shortly after the power supply is turned on.
- Protection circuit
- Repair and adjustment
- Cleaning
- Batteries
- Safety caution
- Caution
- New LECUA 1000 — LUXMAN Electronically Controlled Ultimate Attenuator 1000
- ODNF — Only Distortion Negative Feedback —
- Triple-paralleled push-pull output stages
- Highly stable power supply
- Parallel speaker relays
- Beeline construction
- Selector switch IC
- Schottky barrier diodes
- LUXMAN's original OFC wiring
- Non-angled circuitry
- Phono amplifier
- Separate function
- Loopless chassis structure
- Copper alloy RCA terminals
- mm pitch RCA terminals
- Cast-iron insulators
- Selector buttons
- Large speaker terminals
- Headphone output terminal
- Aluminum remote controller
- Names and Functions
- Operation button (OPERATION)
- Operation indicator (OPERATION)
- 3.Inputselectors/indicators (INPUT SELECTOR)
- Speaker selectors/indicators (SPEAKERS)
- Volume control (VOLUME)
- Tone control for bass TONE CONTROL (BASS)
- Tone control for treble TONE CONTROL (TREBLE)
- Line straight button/indicator (LINE STRAIGHT)
- Loudness button/indicator (LOUDNESS)
- Subsonic indicator (SUBSONIC)
- Monaural indicator (MONO)
- Separate button/indicator (SEPARATE)
- Balance control (BALANCE)
- Headphone jack (PHONES)
- Remote control infrared receiver (R)
- Signal ground (ground terminal) (SIGNAL GROUND)
- Phono input terminals (PHONO (MM/MC))
- LINE-1, LINE-2, LINE-3, and LINE-4 input terminals (unbalanced) (LINE-1, LINE-2, LINE-3, and LINE-4)
- Pre-out terminals (PRE OUT)
- Main input terminals (MAIN IN)
- Balanced input terminals/INPUTS (BAL LINE-1, BAL LINE-2)
- Phase inverters (PHASE)
- AC inlet (AC IN)
- Speaker terminals (SPEAKERS)
- Connections
- Before connecting
- How to connect power supply
- How to connect CD players, SACD players, D/A converters, tuners and other devices
- How to connect speakers
- How to connect to analog players
- How to connect PRE OUT/MAIN IN terminal
- Before operation
- Playback procedure
- Line straight selection
- Balance control operation
- Tone controls
- Procedure for timer-controlled playing
- Memory
- Memory reset
- Remote control (RA-17A)
- Input selectors
- (LINE-1, LINE-2, LINE-3, LINE-4, BAL-1, BAL-2, PHONO, MONITOR)
- Monaural button (MONO)
- Separate button (SEPARATE)
- Mute button (MUTE)
- Meter button (METER)
- Subsonic button (SUBSONIC)
- Loudness button (LOUDNESS)
- Line straight button (LINE STRAIGHT)
- CD/SACD player operation buttons (CD/SACD PLAYER)
- Volume control buttons (VOLUME, ▲, ▼)
- How to use Remote Control
- Remote control
- Dry cell
- [How to load dry cells]
- Specifications
Brand : LUXMAN
Model : L-595ASE
Category : Receiver