VK 100-61 - Keyboard V-Tone - Free user manual and instructions
Find the device manual for free VK 100-61 V-Tone in PDF.


| Product Type | Digital Keyboard |
| Number of Keys | 61 full-size touch-sensitive keys |
| Sound Generation | AWM stereo sampling |
| Polyphony | 48 notes |
| Panel Voices | 400 |
| Auto Accompaniment Styles | 150 |
| Effects | Reverb, chorus, sustain |
| Connectivity | USB MIDI, sustain pedal (6.5 mm), auxiliary input (3.5 mm), headphones (3.5 mm) |
| Display | LCD screen with notation |
| Built-in Speakers | 2 x 4W |
| Power Supply | 9V DC via included adapter or 6 AA batteries |
| Dimensions (W x D x H) | 92 cm x 31 cm x 12 cm |
| Weight | 5 kg |
| Accessories Included | Music stand, power adapter, user manual |
| Warranty | 1 year limited |
| Cleaning Instructions | Wipe with a soft, dry cloth; avoid solvents and liquids |
| Safety | Keep away from moisture, heat, and direct sunlight. Use only specified power supply. |
| Repairability | Contact authorized service center for repairs; no user-serviceable parts inside |
Frequently Asked Questions - VK 100-61 V-Tone
User questions about VK 100-61 V-Tone
0 question about this device. Answer the ones you know or ask your own.
Ask a new question about this device
Download the instructions for your Keyboard in PDF format for free! Find your manual VK 100-61 - V-Tone and take your electronic device back in hand. On this page are published all the documents necessary for the use of your device. VK 100-61 by V-Tone.
USER MANUAL VK 100-61 V-Tone
| M | m | 7 | m7 | |
| C | ||||
| C# | ||||
| D | ||||
| D# | ||||
| E | ||||
| F | ||||
| F# | ||||
| G | ||||
| G# | ||||
| A | ||||
| A# | ||||
| B |
Device construction 14
Device usage....15
Tone table....21
Rhythm table 22
Information about used electrical and electronic equipment....22
Safety rules
 | Please read the user manual in detail before use. Please also keep it for future reference.The manual contains rules for the safe use of the device. |
 | WARNING! THE DEVICE MUST NOT BE DISPOSED OF WITH HOUSEHOLD WASTE.This symbol indicates that this product must not be disposed of with household waste, according to the EU and your national law. In order to prevent potential damage to the environment or health, the used product must be recycled. In accordance with current legislation, unusable electrical and electronic devices must be collected separately at the designated facilities for recycling, acting on the basis of applicable environmental standards. |
 | The product described in this manual comply with European directives and it is therefore CE marked. |
 | Before use, make sure the housing is not damaged. |
 | Ensure a minimum distance of 1 m between the device and flammable materials. |
 | The device for outdoor and indoor use, do not expose to prolonged moisture. Do not expose the product to direct sunlight or other lighting devices. |
Maintenance
- Damage caused by improper use or attempted repair is not covered by the warranty. There are no service parts inside the packaging, repairs may only be carried out by authorized service center.
- Regular cleaning allows of long term use.
Precautions
• Dedicated power adapter shall be used, and in case of adaptor damage, replace it immediately.
- The device can only be disassembled by professionals, and no change can be made to the internal structure. In case of any functional abnormality during performance, stop performing immediately and send the device to professionals for maintenance.
- When connecting the keyboard to other device, ensure both the keyboard and the device to be connected are powered off before connection.
- Do not turn and keep the volume to the maximum or to an uncomfortable degree for a long time when performing.
- Keep the device away from heat source to protect its parts from damage.
- Prevent liquid, dust, small particle and other foreign matters from entering the case of the device, for which may result in element short circuit.
- Pull out the plug before cleaning the device, and do not pull out the plug with wet hand.
- Please use dry and soft cloth to clean the device. Paint, alcohol or other chemical solvents shall not be used for cleaning, for which may damage the device surface.
- Please pull out the plug after performing or when the device is left unused for a long time.
- Warning: the direct plug-in adapter is used as disconnect device, the disconnect device shall remain readily operable.
Device construction
Control panel
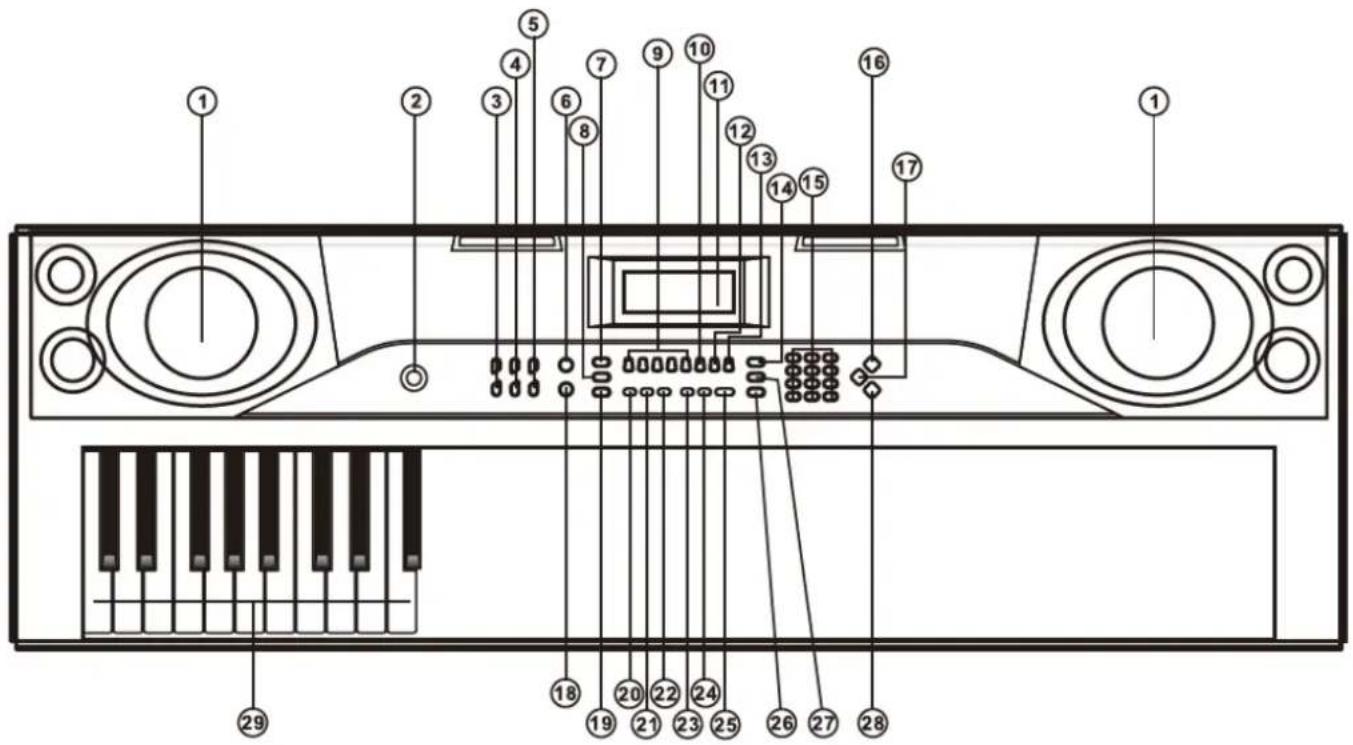
- Speakers.
- Power.
- Master Vol.
- Accom Vol.
- Tempo.
- Single.
- Sync.
- Fill-in.
- Memory M1-M4.
- Rec.
- Display.
- Prog.
- Play.
- Sustain.
-
Numeric buttons.
-
Timbre (tone).
- Keyboard percussion.
- Fingered.
- Start/stop.
- One-Key.
- Follow.
- Ensemble.
- Demo One (first demo track).
- Demo All (all demo tracks).
- Metronome.
- Split.
- Vibrato.
- Rhythm.
- Chord keys.
Rear panel
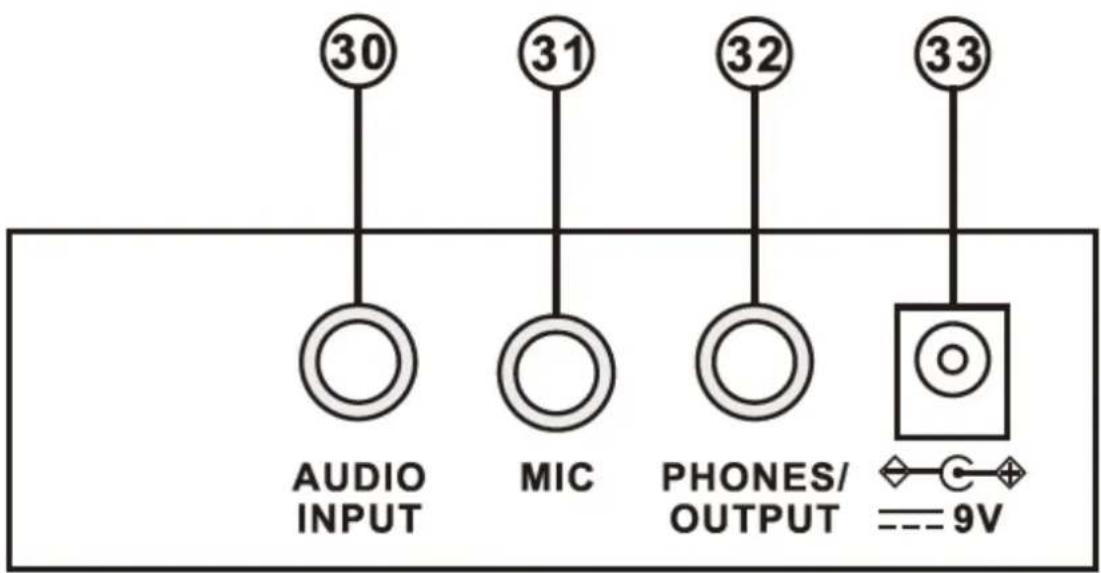
- Audio input.
- Microphone input.
- Phones output.
- Power input DC 9V.
Device usage
Preparations before playing
Power adapter
A dedicated power adapter shall be used. Connect the output end of the adapter to the power port on the rear panel of the keyboard, and then the other end to the power socket. Note: the input voltage of the adapter shall be compatible with the power supply voltage.
Audio output / external headphones
- Audio output: firstly, turn off the keyboard and the external audio devices. Secondly, connect end of the audio cable to the PHONES/OUTPUT port on the rear panel of the device. Then connect the other end to the audio input port of the audio devices.
- Headphones connection: When connecting a headphones to the PHONES/OUTPUT port on the rear panel of the keyboard, the speakers will be disabled automatically. In this way, you can play the keyboard without disturbing others. Note: when using the headphones, do not turn up and keep the volume to the maximum for a long time, which may cause hearing damage or its loss.
Microphone input and audio input
- Microphone input: connect a microphone to the MIC port to start singing and playing.
- The keyboard has the stereo input function. Sound signals from mobile phone, computer and other audio devices can be input into the device system for playing. Firstly turn off the device. Then connect one end of audio cable to the output port of an audio device, and the other end to the AUDIO INPUT port on the rear panel of the device. Finally turn on the device.
Bluetooth connection
Turn on the default Bluetooth connection. In the Bluetooth standby search state, it can be any Bluetooth device search matching. Connect at this time, turn on the Bluetooth function of your phone or Bluetooth device to search. The local Bluetooth name is “piano”. When the connection is successful, mobile phone or Bluetooth device with the music player interface will play music.
Basic playing method
When [Power] is pressed, LCD screen will turn on and show the current tone, tempo and other status. Then you may operate the device as required.
Master volume adjustment
Press [Master Vol +/-] to turn up or turn down the master volume. "VOLUME" and the current volume level will be shown on the display. Press [Master Vol +/-] simultaneously to reset to the default value.
Tone selection
The keyboard provides 255 tones, from "000" to "254". When turning on the device, the tone selection function will be enabled automatically, and "TONE" and current tone number will show on the display. When the device operates in different modes, press [Timbre] to enable the tone selection function. The tone is defaulted to be "000" and it can be adjusted by pressing the corresponding number buttons or pressing the "+"/-" button.
Playing demonstration songs
50 demo songs have been stored in the keyboard, from "000" to "049":
- Press the [Demo one] button. The system will be in the state of playing the present demo song repeatedly. For another one, press the button to stop the present song, and again to play the next one.
- Press the [Demo all] button. The system will be in the stage of playing all demo songs successively. In the course of playing demo songs, the timbre of the songs can be changed.
- During the playing process, you can press the number buttons or the “+”/“-” buttons to select other demonstration song.
- When pressing [Timbre] during the demonstration song playing process, “TONE” will show on the display, press the number buttons or the “+”/“-” button within 3 seconds to select other tones for playing the demonstration song.
Auto rhythm
Rhythm selection
The keyboard provides 255 rhythms, from "000" to "254". The rhythm is defaulted to be "000". Press [Rhythm] to enable the rhythm selection function. "RHYM" and current rhythm number will show on the display. Then you can press the number buttons or the "+"/-" buttons to select other rhythms.
Rhythm control
-
Rhythm enabling.
-
Press [start/stop] to start accompaniment rhythm.
-
Press [Sync], "SYN" will show on the display and the four beat points will flash simultaneously, then play and key in the chord key zone (the 1st-19th key, from the left), the accompaniment rhythm will be enabled.
-
Interlude.
After the accompaniment rhythm is activated, press [Fill-in] to have a temporary rhythm playing during the accompaniment rhythm. If you press and hold [Fill-in], the temporary rhythm will continue.
- Stop rhythm.
During the accompaniment rhythm, press [Start/Stop] to stop the accompaniment rhythm.
Metronome
The metronome contains four tempos: 1/4, 2/4, 3/4 and 4/4, respectively. Press the [Metronome] continuously to select the four tempos. Press the [Metronome] button again to stop the tempo.
Tempo adjustment
Press [Tempo +/-] to increase or decrease the rhythm speed. Press the two buttons simultaneously to reset to the default value.
Auto bass chord
Single chord
Under the state that the rhythm is enabled, press [Single] and "SIN" will show on the display. Then you can play a single chord on the keys in the chord zone of the keyboard.
Fingered chord
Under the state that the rhythm is enabled, press the [Fingered] button. "FIN" will show on the display, and the you can play a fingered chord on the keys in the chord zone of the keyboard.
Fingered chord fingering (the C key chord fingering is as shown below and the rest can be obtained by analogy):
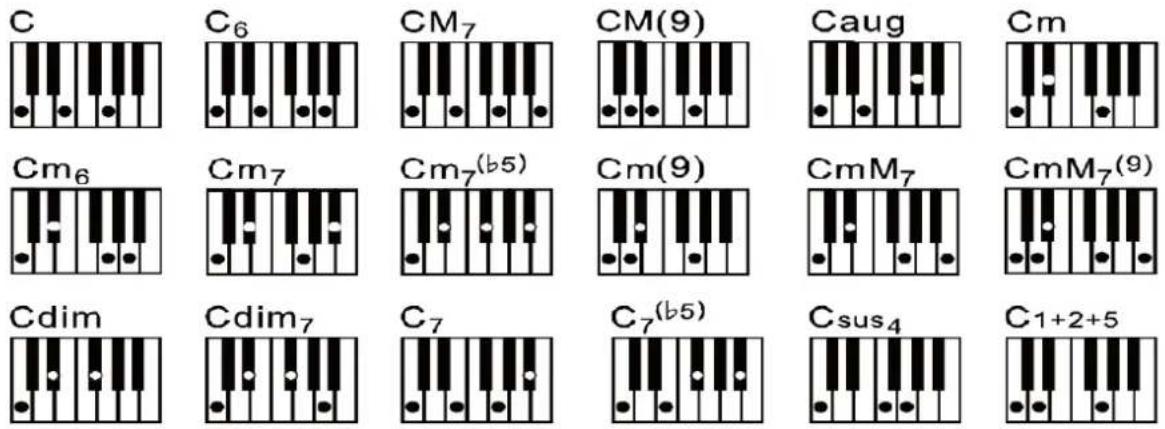
Single chord fingering:
| M | m | 7 | m7 | |
| C | ||||
| C# | ||||
| D | ||||
| D# | ||||
| E | ||||
| F | ||||
| F# | ||||
| G | ||||
| G# | ||||
| A | ||||
| A# | ||||
| B |
Status memory function
With the status memory function, you can save the tone, rhythm, tempo and other parameters to be changed during playing, for fast shifting. This device is equipped with 4 status memories, which can be flexibly called at any time during playing.
Storage of status memory
Set the tone, rhythm, tempo and chord as required, and then press the [Memory] button and one of [M1] to [M4] to save the current status.
Calling of status memory
Press any one of [M1] to [M4] to call the setting parameters saved under this memory to replace the current status. Note: No power failure protection is provided for the saved contents and the saved contents will loss after the device is restarted after power cut.
Effect control
Sustain function
Press [Sustain]. "SUS" will show on the display and the sustain effect will be activated. Press this button again to disenable the sustain effect.
Vibrato function
Press [Vibrato]. "VIB" will show on the display and the vibrato effect will be activated. Press this button again to disenable the vibrato effect.
Percussion
This keyboard provides 61 kinds of keyboard percussions. Press [Keyboard percussion] to convert the key to percussion key. Each key corresponds to one percussion instrument. Press this button again to disable the keyboard percussion function.
Keyboard splitting function
Press [SPLIT] to enable the keyboard splitting function. "SPLIT" will show on the display. 24 keys on the left side of the keyboard will split with the remaining keyboard. While the left keyboard zone will increase by one octave and maintain the original tone, the right keyboard zone will decrease by one octave to maintain the same pitch with the left keyboard zone. The tone of the right keyboard zone can be set as needed so different tones can be played by the left and right keyboard zones at the same time. Press [SPLIT] again to disable this function.
Recording and rhythm programming
Recording
Press [REC] to enable the recording function. "REC" will show on the display. Under this mode all playing notes will be recorded. When the storage is full, "REC" will show on the display and recording will stop automatically.
- Press [PLAY] to playback the recorded notes and "PLAY" will show on the display. On completion of playback, it will enter to the recording mode and "REC" will show on the display. You can record a new rhythm or you can press [PLAY] to playback the recorded rhythm.
- Press [Start/Stop] or press [REC] again to disenable the recording function and all recorded rhythm will be removed.
Rhythm programming
Press [PROG] to enable the rhythm programming function. “PRG” will show on the display and the keyboard percussion will be activated. Under this mode, you can create custom rhythms by playing the corresponding percussion key.
- 32 percussions can be recorded at maximum. After that "PRG" will flash on the display and programming will stop automatically.
- Press [PLAY] to playback the programming rhythm. Press [PLAY] again to stop layback. "PRG" will show on the display and programming function will be enabled. You can re-program rhythms or you can press [PLAY] again to playback.
- Press [Start/Stop] or press [PROG] again to disenable the programming function and all recorded rhythm will be removed.
Three-step lesson mode
Mode I: One-Key
Press [One-Key] to enable the One-Key learning function. "LEARN", "SONG" and the song number will show on the display, and then press "+"/-" button to select the song to be learned. One-Key mode aims at duration learning, and there is no requirement for pitch or correctness. This mode allows mistakes when playing the keys, but the keyboard still plays correct notes, while the key zone in the display will also show the correct notes. After one song is finished, repeat the current song to be learned. Press [Start/Stop] or press [One Key] to disable the lesson mode.
Mode II: Follow
Press [Follow] to enable the Follow function. "LEARN", "SONG" and the song number will show on the display. Then press "+"/-" button to select the song to be learned. With [Follow] function, you can learn by following the correctly playing notes. You can play according to the demonstration song and you can play correctly by following the guidance. You can also learn how to play by following the indications in the key zone of the display. It will wait for you to play the correct note before it moves to the next one. Note: in this mode, the keyboard plays only the correct notes and gives no response to the wrong notes. Press [Start/Stop] or press [Follow] to disable the lesson mode.
Mode III: Ensemble
Press [Ensemble] to enable the Ensemble training function. "LEARN", "SONG" and the song number will show on the display. Press "+"/-" button to select the song to be learned. The Ensemble lesson mode aims at the correct and comprehensive learning of the song duration and notes. The keynote will be shielded for ensemble. You can perform by following the guidance of the lighted key. You need to play the correct note according to the correct duration of the song. If you fail to play within 3 seconds, the keyboard will automatically play the keynote and the keyboard zone in the screen will display the correct note and tempo. After one song is finished, repeat the current song to be learned. Press [Start/Stop] or press [Ensemble] to disenable the training function.
Tone table
| 000-111 | 140 Koto 2 | 170 Suona | 200 Lead (Bass+Lead)2 | 230 Blown Bottle 2 |
| Refer to the unit panel | 141 Xylophone 2 | 171 Castanets | 201 Melodic Tom 2 | 231 Indian Flute 2 |
| 112 Clavi 2 | 142 Shanai 2 | 172 Attack Harp 1 | 202 Grow Guitar 2 | 232 Slow Violin 2 |
| 113 Celesta 2 | 143 Dulcimer 3 | 173 Electric Vibraphone 1 | 203 Lead (Sawtooth)2 | 233 Electric Guitar (Muted)2 |
| 114 Harpsichord 2 | 144 English Horn 2 | 174 Soft Sax 1 | 204 Jazz Bass 2 | 234 Multi Wind 2 |
| 115 Mellow Fm 1 | 145 Electric Guitar (Clean)3 | 175 Soft Clav. 1 | 205 Chorus Guitar 2 | 235 Electric Vibraphone 2 |
| 116 Pi Pa 2 | 146 Shamisen 2 | 176 Soft Guitar 1 | 206 Feedback Gt. 2 | 236 Bodhran 2 |
| 117 Upright Piano 1 | 147 Koto 3 | 177 Grow Guitar 1 | 207 Fiddle 2 | 237 Mellow Fm 2 |
| 118 Electric Piano 2 | 148 Kalimba 2 | 178 Didgeridoo 1 | 208 Organ Flute 2 | 238 Multi Reed 2 |
| 119 Hard Vibe 1 | 149 Steel Bell 1 | 179 Attack Barafon 1 | 209 Flugel Horn 2 | 239 Contrabass 2 |
| 120 Wood Barafon 2 | 150 Alto Sax 2 | 180 Mute Barafon 1 | 210 Crystal 2 | 240 Barafon 2 |
| 121 Music Box 2 | 151 Woodblock 2 | 181 Nay 1 | 211 Soft Clav. 2 | 241 Wind Organ 2 |
| 122 Marimba 2 | 152 Synth Harpsi. 1 | 182 Soft Santur | 212 Overdriven Guitar 2 | 242 12-str. Gt 2 |
| 123 Santur | 153 Attack Clav. 1 | 183 Dual Horns 1 | 213 Ukulele 2 | 243 Attack Barafon 2 |
| 124 Reed Organ 2 | 154 Crystal 1 | 184 Hard Barsoon 1 | 214 Tango Accordion 2 | 244 Lead (Calliope)2 |
| 125 Puff Harmonica 1 | 155 Bag Pipe 2 | 185 Tron Flute 1 | 215 Twin Trombones 2 | 245 Viola Attack 2 |
| 126 Ukulele 1 | 156 Barafon 1 | 186 Kawala 1 | 216 Jazz Organ 2 | 246 Pad (Warm)2 |
| 127 12-str. Gt 1 | 157 Organ Flute 1 | 187 Jazz Organ 1 | 217 Bright String 2 | 247 Oct Harp 2 |
| 128 Guitar Pinch 2 | 158 Kalimba 3 | 188 Soft Accord 1 | 218 Reed Horn 2 | 248 Bari & Tenor 2 |
| 129 Slow Violin 1 | 159 Reed Horn 1 | 189 Wind Organ 1 | 219 Glockenspiel 2 | 249 Agogo 2 |
| 130 Bright String 1 | 160 Hard Vibe 2 | 190 Viola Attack 1 | 220 Drawbar Organ 2 | 250 Flugel Horn 3 |
| 131 Jungle Bass 2 | 161 Twin Trombones 1 | 191 Bari & Tenor 1 | 221 Muted Horn 2 | 251 Organ Flute 3 |
| 132 Indian Flute 1 | 162 Synth Harpsi. 2 | 192 Soft Sax 2 | 222 Pizzicato Strings 2 | 252 Fiddle 3 |
| 133 Clavi 3 | 163 Attack Clav. 2 | 193 Attack Harp 2 | 223 Nay 2 | 253 Feedback Gt. 3 |
| 134 Celesta 3 | 164 Chorus Guitar 1 | 194 Didgeridoo 2 | 224 Puff Harmonica 2 | 254 Chorus Guitar 3 |
| 135 Church Bells | 165 Steel Bell 2 | 195 Dual Horns 2 | 225 Muted Trumpet 2 | |
| 136 Marimba 3 | 166 Tsugaru | 196 Hard Barsoon 2 | 226 Upright Piano 2 | |
| 137 Dulcimer 2 | 167 Oct Harp 1 | 197 Kawala 2 | 227 Soft Accord 2 | |
| 138 Reed Organ 3 | 168 Bodhran 1 | 198 Soft Guitar 2 | 228 Uillean Harp 2 | |
| 139 Electric Guitar (Clean)2 | 169 Tubular Bells 2 | 199 Mute Barafon 2 | 229 Tron Flute 2 |
Rhythm table
| 000-130 | 155 Tarantella 2 | 181 Jazz 16 Beat 1 | 207 Piano Ballad | 233 Slow & Easy |
| Refer to the unit panel | 156 USA March | 182 Single 16 Beat 1 | 208 70's Disco | 234 Hip Waltz 1 |
| 131 West Shuffle | 157 Espag Nol 2 | 183 Love Song | 209 Jazz Rock 2 | 235 Jazz Latin 2 |
| 132 Big Band Fast 2 | 158 Club Latin 2 | 184 Single 16 Beat 2 | 210 Europe 8 Beat 1 | 236 Rock Disco 2 |
| 133 Espag Nol 1 | 159 Jazz Cha Cha 1 | 185 Disco Fox 2 | 211 Seville 2 | 237 Jazz Tango 2 |
| 134 Disco Funk 2 | 160 Country Cha Cha | 186 Pop Rock 3 | 212 Rumba 3 | 238 Analog Ballad 3 |
| 135 Pop Mambo | 161 Disco Party 2 | 187 Tijuana Waltz | 213 Soul Rock 2 | 239 Europe Swing 2 |
| 136 Europe Swing 1 | 162 Modern R&B 1 | 188 British Pop 2 | 214 European Disco 2 | 240 Hip Waltz 2 |
| 137 Tricks Latin | 163 8 Beat Pop 2 | 189 Show Tune 1 | 215 Analog Ballad 2 | 241 Jazz Swing 2 |
| 138 Disco Samba 2 | 164 Country Jazz | 190 Schlager Alp | 216 Pub Piano 2 | 242 Party Pop |
| 139 Latin Waltz | 165 Soul Rock 1 | 191 Single Rock | 217 Europe Rumba | 243 Jazz Club |
| 140 Dance Pop 3 | 166 Rumba 2 | 192 Swing Waltz | 218 Rock'n Roll 2 | 244 Guad Dance 2 |
| 141 Jazz Rock 1 | 167 Samba 3 | 193 Slow Waltz | 219 Disco Trop | 245 Jazz Bo 2 |
| 142 Detroit | 168 Modern R&B 2 | 194 Cat Groove 2 | 220 Rock Salsa 1 | 246 Dixie Jazz 2 |
| 143 Fanatical Sand | 169 Club Dance 2 | 195 Country Slow Rock | 221 Europe 8 Beat 2 | 247 Acoustic Ballad 2 |
| 144 European Rock 1 | 170 Country Bossa Nova | 196 Rock Disco 1 | 222 Europe Samba | 248 Jazz Slow Rock |
| 145 Ground Beat | 171 Jazz Bo 1 | 197 16 Beat Shuffle 1 | 223 Show Tune 2 | 249 16 Beat Shuffle 2 |
| 146 8 Beat Modern 2 | 172 Modern Cha Cha 1 | 198 Jazz 8 Beat 2 | 224 Jazz 16 Beat 2 | 250 Polka Pop |
| 147 Jazz Disco 1 | 173 Pop Reggae 2 | 199 Casa | 225 Rock Samba 2 | 251 Latin Party Pop |
| 148 Dixie Jazz 1 | 174 Rock Samba 1 | 200 Guad Dance 1 | 226 Jazz Waltz 2 | 252 Parranda |
| 149 Disco Chocolate | 175 Jazz 8 Beat 1 | 201 Jazz Cha Cha 2 | 227 Europe Reggae | 253 Carnival |
| 150 Disco Latin 2 | 176 Disco | 202 Country Waltz | 228 Modern Cha Cha 2 | 254 60's Vintage Pop |
| 151 Synth Boogie | 177 Seville 1 | 203 European Rock 2 | 229 R&B Ballad 2 | |
| 152 Saturday Night 2 | 178 Disco Hands 2 | 204 Caribbean Dance 2 | 230 Rock Boogie | |
| 153 Club Dance 1 | 179 Rock Ballad | 205 Jazz Disco 2 | 231 Jazz Bossa Nova | |
| 154 Tricks Bossa Nova | 180 Mixed Bossa Nova | 206 Medium Jazz | 232 Rock Salsa 2 |
Information about used electrical and electronic equipment
The main goal of European and national law regulations is to reduce the amount of waste produced from used electrical and electronic equipment, to ensure an appropriate level of collection, recovery and recycling of used equipment, and to increase public awareness of its harmfulness to the environment, at each stage of use of electrical and electronic equipment. Therefore, it should be pointed out that households play a key role in contributing to reuse and recovery, including recycling of used equipment. The user of electrical and electronic equipment – intended for households – is obliged to return it to authorized collector after its use. However, it should be remembered that products classified as electrical or electronic equipment should be disposed of at authorized collection points.
- Maintenance
- Precautions
- Device construction
- Control panel
- Rear panel
- Device usage
- Power adapter
- Audio output / external headphones
- Microphone input and audio input
- Bluetooth connection
- Basic playing method
- Master volume adjustment
- Tone selection
- Playing demonstration songs
- Auto rhythm
- Rhythm selection
- Rhythm control
- Metronome
- Tempo adjustment
- Auto bass chord
- Single chord
- Fingered chord
- Fingered chord fingering (the C key chord fingering is as shown below and the rest can be obtained by analogy):
- Status memory function
- Storage of status memory
- Calling of status memory
- Effect control
- Sustain function
- Vibrato function
- Percussion
- Keyboard splitting function
- Recording and rhythm programming
- Recording
- Rhythm programming
- Three-step lesson mode
- Mode I: One-Key
- Mode II: Follow
- Mode III: Ensemble
- Information about used electrical and electronic equipment
Brand : V-Tone
Model : VK 100-61
Category : Keyboard