
1697261 - Hand tool Victa - Free user manual and instructions
Find the device manual for free 1697261 Victa in PDF.


| Product Type | Line Trimmer (Hand tool) |
| Brand | Victa |
| Model | 1697261 |
| Cutting Diameter | 300 mm |
| Motor Type | Brushed DC |
| Motor Voltage | 18 V |
| Motor Speed (Operating) | 8000 rpm |
| Head Type | Auto feed, centrifugal |
| Line Diameter | 1.6 mm |
| Line Length (Spool) | 4 m |
| Shaft Telescopic Range | 215 mm |
| Shaft Diameter | 25 mm |
| Head Articulation | 0° to 90° (5 positions) |
| Front Handle Articulation | 0° or 180° |
| Edging Function | Yes |
| Weight (without battery) | 2.1 kg |
| Sound Pressure Level | 76.7 dB(A) (K=3 dB(A)) |
| Sound Power Level (Guaranteed) | 93 dB(A) |
| Vibration Level (Max) | 3.36 m/s² (K=1.5 m/s²) |
| Battery Type | 18V Li-ion (Briggs & Stratton) |
| Battery Included | No (with some products) |
| Safety Features | Presence switch, cut-off blade, bump guard, guide wheel |
| Intended Use | Domestic grass trimming only |
| Maintenance | Regular cleaning, line replacement, visual inspection |
Frequently Asked Questions - 1697261 Victa
User questions about 1697261 Victa
0 question about this device. Answer the ones you know or ask your own.
Ask a new question about this device
Download the instructions for your Hand tool in PDF format for free! Find your manual 1697261 - Victa and take your electronic device back in hand. On this page are published all the documents necessary for the use of your device. 1697261 by Victa.
USER MANUAL 1697261 Victa
Thank you for purchasing your Victa product. Victa prides itself in the quality and performance of all its products.
This instruction manual will aid in the assembly, safe operation and maintenance of your product.
Please read the following warnings to ensure safety and the long life of your product.

WARNING
Do not attempt to operate this product until you have read thoroughly and understood completely all instructions, safety rules, etc, contained in this manual. Failure to comply may result in accidents involving electric shock, fire, and/or serious personal injury.
INTENDED USE
This product is intended for domestic grass trimming only. This product is not intended for brushcutting or commercial use.
Do not use the product for any task, except for that which it is intended.
General safety

Warning!

Read the directions for use before operating the machine.

Wear safety goggles and ear protection that meet safety standards.

Wear sturdy, non-slip footwear.

Wear safety gloves.

Do not use machine in wet conditions, protect the machine from rain and damp.
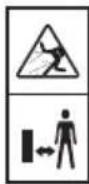
Be careful of objects being thrown out! Ensure bystanders are kept at least 50' (15m) away & stop the machine if approached.

Batteries contain Li-ion. Do not dispose of waste batteries in domestic waste. Contact local authority to find out how to dispose of batteries appropriately.
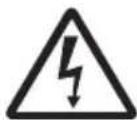
Beware of electric shock hazard when charging.

Read the directions before carrying out any adjustment & maintenance work.

Waitforallcomponents ofthemachinetocompletely stop & remove the battery.

Do not use rigid cutting disk.

Should NOT be disposed of with house hold items.

Keep away from heat and/or open flame.

Do not throw into water.

Ambient temperature 40°C Max.
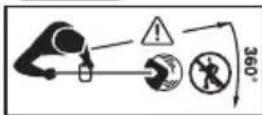
Keep bystanders away.

Keep hands away from cutting area while operating.
Table of Contents
| Features & Definitions | |
| Safety & Handling | Features & supplied items 3 |
| Assembly Procedures | General safety 4Product disposal 5 |
| Unpacking 5Fitting the trimmer guard 6Fitting the front handle 6Fitting the bump guard 6 | |
| Operating Instructions | |
| Maintenance & Care | Cut off blade 7Operating the trimmer 7Installing & removing battery 7Start & stopping 8Height adjustment 9Trimming head angle adjustment 9Trimmer line length adjustment 10Cutting tips 10Trimming edges 11 |
| Cleaning 12Storing 12Trimmer line replacement 13Maintenance chart 14Service 14 | |
| Troubleshooting | |
| Technical Specification | Troubleshooting 15 |
| Product specification 16 | |
NOTE: WARRANTY DETAILS ARE NOT WRITTEN WITHIN THIS OPERATOR'S MANUAL. REFER TO OTHER DOCUMENTS SUPPLIED WITH THIS MACHINE FOR WARRANTY DETAILS.
THE WARRANTY DOCUMENTS MAY INCLUDE TECHNICAL SPECIFICATIONS THAT ARE SPECIFIC TO EACH MODEL THAT ARE NOT WRITTEN WITHIN THIS OPERATOR'S MANUAL.
Features & Supplied Items
NOTE: Refer to figure 1.
1 Operating Handle
2 On/Off Switch
3 Throttle Trigger
4 Battery Housing
5 Front Handle
6 Front Handle Lock Knob
7 Upper Shaft (Telescope)
8 Lower Shaft (Fixed)
9 Height Adjustment Knob
10 Shaft Rotation Button
11 Angle Adjust Pedal
12 Trimmer Guard
13 Guide Wheel
14 Bump Guard
15 Autofeed Head
16 Refill Spool
17 Motor Housing
18 Battery (not included with all products)
19 Battery Charger (not included with all products)
- Grass Trimmer Instruction/Safety Manual (not shown)
- Battery & Charger Instruction/Safety Manual (not shown)

Fig 1
WARNING
Do not operate the product if any component is missing or damaged. Have any missing or damaged components repaired or replaced.
General Safety
- Carefully read all instructions on the machine and in the manual before attempting to assemble and operate the machine. Keep this manual in a safe place for future reference, and consult it regularly. Ensure other users read this manual and are aware of the product safety risks
- The machine should be operated only with a genuine Briggs & Stratton 18V Lithium-ion battery. When using battery operated machine basic safety precaution should always be followed to reduce the risk of leaking batteries and personal injury.
- Become familiar with all controls and their proper operation before using the machine. Know how to stop the machine and how to disengage the power in an emergency.
- Thoroughly inspect the area where the machine is to be used. Remove all stones, sticks, wire, bones, toys, and other objects that could be tripped over or thrown by the cutting mechanism. Thrown objects can cause serious personal injury.
• Always wear a face mask or a dust mask when operating the machine in a dusty environment.
- Always wear appropriate clothing & do not wear loose clothing (or jewellery etc) that can get caught in moving parts.
- Do not operate this machine in bare feet, or while wearing sandals or lightweight (e.g. canvas shoes) Wear long trousers & heavy shoes.
- Do not operate the machine while under the influence of alcohol or drugs.
- Stay alert & do not operate the machine when you are tired. Pay attention to what you are doing and ensure others are aware of your task intentions before commencing.
- Avoid using the machine in dangerous environments. Only use the machine in daylight or in good artificial light.
- Do not use the machine in a rush. Always walk & never run with the machine.
- Before inspecting, adjusting, servicing or cleaning the machine, always stop & remove the battery.
- If the machine starts to vibrate excessively, discontinue use until the machine has been inspected and assessed. Having a machine assessed for vibration problems generally reduces the risk for injury or product failure.
- Don't force the machine beyond its cutting capacity. The machine will perform better and safer if allowed to cut at the pace for which it is rated for.
- Do not use the machine indoors. Only store the machine indoors in a dry & secure location. Keep the machine out of reach of children.
• Always maintain the machine according to the maintenance section of this manual
- If machine strikes a foreign objects, always inspect for damage.
- Do not allow children or impaired persons to operate the machine.
- Use extreme care when approaching blind corners, doorways, shrubs, trees, or other objects that may obscure your view & the path of the machine.
- Do not use the machine near hot ash, combustible materials or immerse in liquids. This may cause fire hazard, serious injury or product damage.
- Donot put any object into ventilation grills. Donot use with any openings blocked, keep openings free from anything that may reduce air flow to the motor.
- Do not point the machine in the direction of people or pets.
- Avoidtreesandshrubs. Treebark, woodmoldings, siding, and fencepostscaneasilybe damaged by the line.
- Product must be completely assembled before attempting to start the machine.
Product Disposal
CORRECT DISPOSAL OF THE PRODUCT

Waste electrical products should not be disposed of with household waste. Please recycle where facilities exist. Check with your local authority or retailer for recycling advice.
The battery contains material which is hazardous to you and the environment. It must be removed and disposed of separately at a facility that accepts lithium-ion batteries.

Refer to Briggs & Stratton 18V Battery & Charger manual for further information relating to battery and charger disposal.
CORRECT DISPOSAL OF THE PACKAGING

The packaging consists of cardboard and correspondingly marked plastics that can be recycled. Make these materials available for recycling.
Emergency Contact
In the rare case a battery is damaged & any of the contents leaks or comes into contact with a persons skin, eyes, or is ingested, follow the first aid instructions inside the battery & charger manual. Seek further medical attention immediately.
ASSEMBLY PROCEDURES
Unpacking
This product requires assembly.
- Carefully remove the product and any accessories from the box. Make sure that all items listed in the packing list are included. Refer to pages 3.
- Do not discard the packing material until you have carefully inspected and ensured product is in correct operating condition.

WARNING
Do not attempt to modify this product or create accessories not recommended for use with this product. Any such alteration or modification is misuse and could result in a hazardous condition leading to possible serious personal injury.
Do not operate the machine unless assembly is complete including guards, handles & harness.
Do not install the battery in the product before finishing the complete assembly.
Fitting the Trimmer Guard
NOTE: Refer to figure 2.
- Remove the mounting screws from the motor housing. These are pre-mounted on the motor housing to help end user locate them easily.
- Align the trimmer guard as shown and push on the motor housing. The guard will slide on and rests securely on the motor housing.
- Tighten all the four mounting screws and fix the trimmer guard.


WARNING
Do not attempt to run the product without installing trimmer guard. Thrown objects may cause serious personal injury to the operator if the trimmer guard is not used.
Do not operate or fit battery before the trimmer guard is completely installed or loose.
Fitting the Front Handle
NOTE: Refer to figure 3 & 4.
The Front Handle may be supplied loose and needs adjustment. Front handle can be adjusted at different angles to suit the desired angle of operation.
- Press the front handle onto shaft so that the handle is angled towards the operating handle.
- Place the front handle along the shaft to a position that allows for comfortable operation.
Adjust until you are comfortable. - Slide the lock knob through the hole in front handle and tighten it completely.
- Check handle position is correct and secured sufficiently.


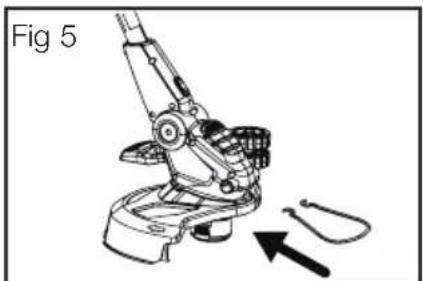
Fitting the Bump Guard
NOTE: Refer to figure 5.
The Bump Guard is designed to protect flowers, trees and garden furniture during operation.
- Align the bump guard with the slot provided on the motor head as shown in figure.
- Push the guard in the slot. If installed correctly, the ring will snap fit in place securely.
Cut-off Blade
NOTE: Refer to figure 6.

The trimmer is equipped with a line trimming cut-off blade on the trimmer guard.
Replace the cutting blade when trimming efficiency diminishes.
This will maintain best performance.

WARNING
Cut off blade is sharp.
Operating The Trimmer
Hold the trimmer with your right hand on the rear handle and your left hand on the front handle. Keep a firm grip with both hands while in operation. The trimmer should be held at a comfortable position with the rear handle about hip height. Always operate the trimmer at full throttle. If debris becomes wrapped around the cutting head, release the trigger, remove battery and then remove the debris.

WARNING
- Motor housing may become hot during operation. Do not rest or place your arm, hand, or any body part against the motor housing during operation.
- Position the unit on the operator's right side & never operate unit with the bottom of the motor above waist level.
- Reverse hand orientation if left hand use is desired.
Installing & removing the Battery
NOTE: Refer to figure 7.
- Align the guide ribs on battery with grooves in the product's battery port.
- Push the battery in the line trimmer battery housing.
- Make sure the latch on bottom of the battery snaps in place and that the battery is fully seated (will "click" into place) and secure in the line trimmer before beginning operation.
- If the machine is not going to be used immediately, remove the battery.
- To remove the battery, press the release trigger on the battery and pull it out from line trimmer. Refer battery manual to locate the release trigger.

Starting & Stopping
NOTE: Refer to figure 8.
PRESENCE SWITCH
The presence switch reduces the possibility of accidental starting. The presence switch is located on the handle above the trigger. The presence switch must be slide forward before you pull the trigger. The lock resets each time the trigger is released.
STARTING the Trimmer:
- Push the presence switch forward and hold it in place.
- Squeeze the throttle trigger. This will start the line trimmer.
- Release the presence switch while keeping the throttle trigger squeezed.
- Allow few seconds for the cutting head to reach max RPM.
STOPPING the trimmer:
- Release the throttle trigger.
- Allow cutting head to come to a complete stop.
- Remove battery from product.

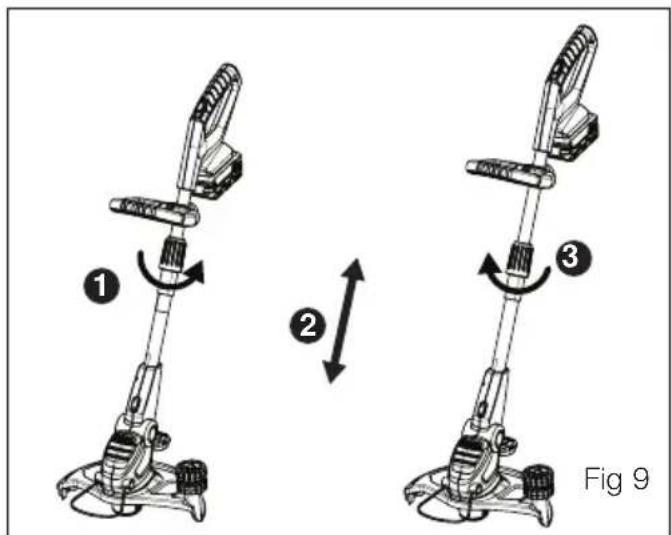
Height Adjustment
NOTE: Refer to figure 9.
- Turn the height adjustment knob in anti-clockwise direction to release the lock.
- Adjust the length of the upper shaft to a suitable height for operation.
- Turn the height adjustment knob in clockwise direction to lock the shaft.

WARNING
Ensure shaft position is secure before operating.
Trimming Head Angle Adjustment
NOTE: Refer to figure 10.
The trimming head of the line trimmer can be easily adjusted at 5 different angles for ease of operation.
- Stop the line trimmer.
- Position the cutting head of the line trimmer on the ground and depress the angle adjust pedal with your foot.
- Tilt the operating bar at the desired angle and release the angle adjust pedal.
- Before starting, make sure the shaft is locked in the new position. If done properly, the shaft will fall into new position with a snap.

Trimmer Line Length Adjustment
Auto Feed
- This line trimmer comes with Auto Feed type trimming Head. The length of the line will automatically be increased by the centrifugal force, when the device reaches maximum rpm.
- Switch off and switch on the device again, to increase the line to right cutting length. The trimmer line will be cut to the right length by the cut-off blade.

WARNING
Repetitive starting and stopping may cause the trimming line to feed quickly.
Manual Feed
NOTE: Refer to figure 11.
Manual feed of the trimmer line may be required in the beginning of work, if the cutting line is too short and cannot be pulled out by centrifugal force.
- Press the release button with one hand and pull out the trimmer line with the other hand.
- Keep pressing and pulling the line, until the desired length of line is out.

Cutting Tips
NOTE: Refer to figure 12 & 13.
• Always hold the trimmer at a safe distance from body and adopt a safe stance.
- Keep the trimmer tilted at an angle of about 20°C toward the area being cut; this is the best cutting area. Use the outer end of the line for best cut and longer life
- The trimmer cuts best when operated in a semi-circular motion around your standing position.


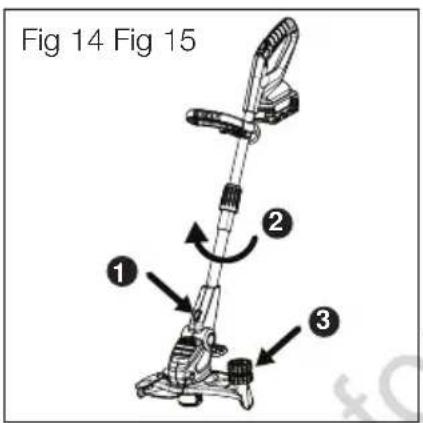
Trimming Edges
NOTE: Refer to figure 14 & 15.
The line trimmer can be used for cutting the lawn edges. To operate the trimmer in edge cutting mode.
- Press the convert button on the trimmer and hold as shown in the figure 14.
- Turn the shaft to approximately 90° in clockwise direction.
- Now release the convert button to lock the shaft in new position. If done properly, the convert button will get locked in a new position with a click sound.
- The trimmer can be moved along the edge of the lawn with the help of guide wheels on the trimmer guard. Adjust the trimmer head angle for the best position
- Make sure, there is no play in the shaft before starting the trimmer.

Cleaning

WARNING
To prevent serious personal injury remove the battery from the machine before servicing, cleaning, or removing debris.
- Clean the unit using a damp cloth with a mild detergent.
- Do not immerse the machine or any part of it in water.
- Moisture can cause a shock hazard. Wipe off any moisture with a soft dry cloth & ensure the machine is dry before replacing the battery.
- Use a small brush or vacuum cleaner to clean the air vents on the product.
- Keep the air vents free of obstructions.
Do not use solvents, strong detergents, certain aromatic oils such as pine and lemon when cleaning plastic parts. Chemicals can damage, weaken or destroy plastic component which may result in serious personal injury.
Storing
The following steps should be taken in order to prepare the machine for storage.
- Clean the machine as described in the previous section.
- Storethemachine inadry, clean location. Donot store it next to corrosivematerials, such as fertilizer or fuel.
- Store the machine indoors, in a cool, dry place, out of the reach of children.
- Ensure battery is removed before storage.
Trimmer Line Replacement
NOTE: Refer to figure 16.

Fig 16 (a)

Fig 16 (b)

Fig 16 (c)
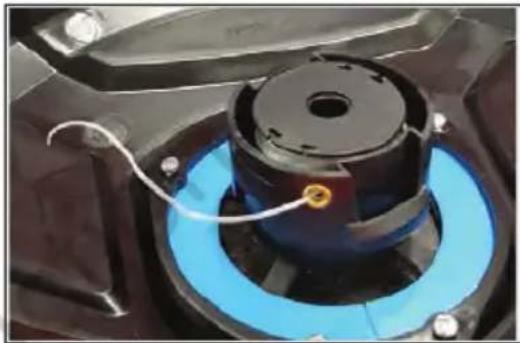
Fig 16 (d)
- Press two cover clips inwards on the spool cover & remove the cover slowly.
- Take the old used spool out and replace it with a new / refilled spool.
NOTE: Ensure inside of autofeed head and spool are clean and free of grass & soil before refilling.
- Remove one end of the line from the spool notch & push it into an eyelet slot on the head.
- Push the spool cover back onto the head so that the cover clips align with the head and clicks back into place.

WARNING
- Trimmer line will deteriorate over time and may require replacement if line breakages and cut performance is not satisfactory.
- Before assembly or any adjustment, make sure the battery has been removed.
- Do not operate the trimmer if the spool cover is not secured by the cover clips.
- Do not operate the trimmer if components are damaged or excessively worn.
- Do not use rigid cutting disk, brush cutter blade, steel wire, rope or any other attachment on this product.
Maintenance Chart
Refer to the following table for routine maintenance.
| Features Requirements | Before use | After use | Recharging | Monthly | Yearly | If damaged | As required |
| Trimmer Visual inspection | ● | ● | |||||
| Throttle trigger Check operation | ● | ||||||
| Presence trigger Check | ● | ||||||
| Battery locking latch Check | ● | ● | |||||
| Cutting Head Assy Check & clean | ● | ● | |||||
| Ventilation Grills Clean | ● | ● | |||||
| Trimmer Line Stock replacement | ●●● | ||||||
| Autofeed Head Clean | ● | ||||||
| Replacement | ● | ● | |||||
| All accessible fasteners Retighten | ● | ● |
Service
Servicing requires extreme care and knowledge and should be performed only by a qualified service technician. For service we suggest you return the product to your nearest authorized service centre for repair. When servicing, use only genuine replacement parts.
- Keep the machine dry, clean, and free of oil and grease.
- In order to reduce the risk of fire, keep the motor free of grass, leaves, and debris build-up.
- Keep all nuts, bolts, and screws tight in order to be sure that the equipment is in safe working condition.
- Never tamper with safety devices. Check them regularly for proper operation.
- Improper repairs may result in product malfunction. This endangers you and your environment.
NOTE: Refer to warranty card supplied with this product for service contact details.
Troubleshooting
| PROBLEMCAUSESOLUTION | ||
| Trimmer fails to start when trigger depressed | Flat battery Recharge batteryBattery disengaged Refit batteryFaulty battery Replace battery | |
| Not cutting grass | No trimmer line in autofeed head | Replace line in autofeed head |
| Excessive Vibration | Grass clippings accumulated in the line spool and underside of the trimmer guardAutofeed head and line spool not fitted correctly | Clean the line spool and trimmer guard of grass clipingsRefit autofeed head |
Product Specifications
| PRODUCT SPECIFICATION | |
| Description 18V, Line Trimmer | |
| Cut Diameter 300mm | |
| Head Type Auto feed, centrifugal | |
| Line Length (Spool) 4m | |
| Nylon Line Diameter 1.6mm | |
| Motor Type Brushed | |
| Motor Specification 18V DC | |
| Motor Speed Range 7200~8800rpm | |
| Run Motor Speed 8000rpm | |
| Head Articulation 0~90, 5 position | |
| Shaft Telescopic Range | 215mm |
| Shaft Diameter | 25mm |
| Front Handle Articulation Range | 0/180 |
| Edging Funtion | Yes |
| Product Weight (No battery) | 2.1 Kgs |
| Sound Pressure Level | Lpa: 76.7dB (A), K: 3dB (A) |
| Sound Power Level (Measured) | Lwa: 88dB (A) |
| Sound Power Level (Guaranteed) | Lwa: 93dB (A) |
| Vibration Total Value (Max) | ah: 3.36m/S2, K: 1.5m/S2 |
A warning:
- That the declared vibration total value has been measured in accordance with a standard test method and may be used for comparing one tool with another;
- That the declared vibration total value may also be used in a preliminary assessment of exposure.
- That the vibration emission during actual use of the power tool can differ from the declared total value depending on the ways in which the tool is used; and
- Of the need to identify safety measures to protect the operator that are based on an estimation of exposure in the actual conditions of use (taking account of all parts of the operating cycle such as the times when the tool is switched off and when it is running idle in addition to the trigger time).
©2018 Briggs & Stratton
Victa is a trademark of Briggs & Stratton Australia Pty. Ltd.
ABN 13 006 576 856
All rights reserved. No part of this booklet may be reproduced by any means without prior written permission. All information herein is subject to change without notice.


- WARNING
- INTENDED USE
- GENERAL SAFETY
- FEATURES & SUPPLIED ITEMS
- NOTE: REFER TO FIGURE 1
- PRODUCT DISPOSAL
- CORRECT DISPOSAL OF THE PRODUCT
- CORRECT DISPOSAL OF THE PACKAGING
- EMERGENCY CONTACT
- ASSEMBLY PROCEDURES
- UNPACKING
- FITTING THE TRIMMER GUARD
- NOTE: REFER TO FIGURE 2
- FITTING THE FRONT HANDLE
- NOTE: REFER TO FIGURE 3 & 4
- FITTING THE BUMP GUARD
- NOTE: REFER TO FIGURE 5
- CUT-OFF BLADE
- OPERATING THE TRIMMER
- INSTALLING & REMOVING THE BATTERY
- NOTE: REFER TO FIGURE 7
- STARTING & STOPPING
- NOTE: REFER TO FIGURE 8
- PRESENCE SWITCH
- STARTING THE TRIMMER
- STOPPING THE TRIMMER
- HEIGHT ADJUSTMENT
- NOTE: REFER TO FIGURE 9
- TRIMMING HEAD ANGLE ADJUSTMENT
- NOTE: REFER TO FIGURE 10
- TRIMMER LINE LENGTH ADJUSTMENT
- AUTO FEED
- MANUAL FEED
- NOTE: REFER TO FIGURE 11
- CUTTING TIPS
- NOTE: REFER TO FIGURE 12 & 13
- TRIMMING EDGES
- NOTE: REFER TO FIGURE 14 & 15
- CLEANING
- STORING
- TRIMMER LINE REPLACEMENT
- MAINTENANCE CHART
- SERVICE
- PRODUCT SPECIFICATIONS
- A WARNING
Brand : Victa
Model : 1697261
Category : Hand tool