VM-22B - Car radio Soundstream - Free user manual and instructions
Find the device manual for free VM-22B Soundstream in PDF.


| Product Type | Car Stereo Receiver |
| Brand | Soundstream |
| Model | VM-22B |
| Chassis Size | Single-DIN (approx. 7 x 2 inches) |
| Display | 2.4-inch LCD Color Display |
| Power Output | 4 x 50 Watts Max |
| RMS Power | 4 x 18 Watts RMS |
| Operating Voltage | 12V DC (11-16V) |
| Bluetooth | Yes (Hands-free Calling & Audio Streaming) |
| USB Port | Front USB (supports MP3/WMA) |
| SD Card Slot | Yes (supports up to 32GB) |
| AUX Input | 3.5mm Front Auxiliary Input |
| Radio Tuner | AM/FM with 30 Presets |
| RDS | Yes (Radio Data System) |
| Audio Features | EQ Presets (Rock, Pop, Classic, Flat), Bass/Treble Control, Loudness |
| Remote Control | Yes (IR Remote Included) |
| Steering Wheel Control | Compatible (with external adapter) |
| Front Panel | Detachable Faceplate (Security) |
| Dimensions (W x H x D) | 178 x 50 x 100 mm (approx.) |
| Weight | 1.2 lbs (0.55 kg) |
| Manual Pages | 16 |
| Language | English |
Frequently Asked Questions - VM-22B Soundstream
User questions about VM-22B Soundstream
0 question about this device. Answer the ones you know or ask your own.
Ask a new question about this device
Download the instructions for your Car radio in PDF format for free! Find your manual VM-22B - Soundstream and take your electronic device back in hand. On this page are published all the documents necessary for the use of your device. VM-22B by Soundstream.
USER MANUAL VM-22B Soundstream
2 Din Car AM/FM Radio, CD/MP3 Player with USB/SD Card Inputs
Model No.: VCD-22B
USER'S MANUAL
Precautions....1
How to Handle Discs....1
Precautions & Warnings....1
Lithium Battery Cell Warnings....1
Drivers and Connections....1
Other Warnings....1
Installation....2
Installation Procedures....2
Important....2
To Install the Car Radio....2-3
Wiring Connections....3
Removal of the Main Unit 3
Control Panel Button Locations....4
General Operation....5
Turn Unit On/Off....5
Adjust Volume (VOL)....5
Adjust Menu Options (SEL)....5
Set the Clock (CLK)....6
Change the Source (MODE)....6
Mute on/off....6
Loudness on/off....6
Preset EQ(Equalizer)....6
USB Port......6
Micro SD Card Slot....6
Built-in Microphone....6
AUX input Connector....6
Radio Operation....7
Switch Between USA area and Europe area Frequency....7
Change Bands (BAND)....7
Manual Tuning (▶)....7
Auto Seek Tuning ( ◀◀/ ▶▶ )....7
To Store/Recall Preset Stations (1 - 6)....7
Automatic Store Station / Preset Station Scan (AMS)....7
Local/DX....7
Stereo/Mono....7
Disc/USB/Micro SD Card Operation....8
To Insert Disc/USB/Micro SD Card....8
Eject Disc/USB/Micro SD Card....8
Play/Pause....8
Next/Previous Track....8
Fast Forward/Backward....8
Introduction Scan....8
Repeating the same track....8
Playing All Tracks in Random....8
Track/Folder Navigation....8
Select the track or file for playback in MP3 format....9
Auxiliary Input operation....9
Bluetooth Operation....10
Pair and Connect....10
Make a Call....10
Redial Last Dialed Number....10
Answer a Call / Reject a Call / End a Call....10
Switch Audio Between Car audio and Mobile Phone....10
Adjust Talk Volume....10
Audio Streaming (A2DP)....10
Remote Control....11
Specifications....12
Troubleshooting....13
How to Handle Discs
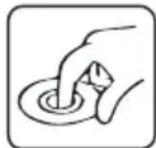
- Handle a disc by its edges. Do not touch the playing side
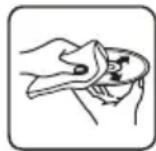
- Before inserting a disc, wipe the disc outward from the disc center with a clean, soft, dry and lint-free cloth. Do not use solvents or thinners such as petrol/benzene or cleaners.
• After removing a disc from the disc slot, place the disc in a sleeve or case to keep it clean and prevent scratches. - Do not stick paper or tape on the disc surface. If there is glue (or adhesive) on the disc surface, remove it before using the disc.
Precautions & Warnings
- To reduce the risk of fire, electric shock, and interference, do not attempt to repair this unit yourself. Refer all service to a qualified technician.
- Some MP3/WMA files may not be playable.
- Keep the volume at a reasonable level to avoid distracted driving. High volume levels may make it difficult to concentrate on traffic and road conditions while driving.
- If the car has been in direct sunlight for an extended period, you may need to reduce the temperature inside the car before turning on and using the unit.
- If the battery is disconnected, discharged, or changed, the preset memory of the unit will be lost and require reprogramming.
- The unit is designed to be installed in a level, horizontal position. For optimal performance, avoid installing the unit at an angle.
- Never use excessive force when removing or attaching the faceplate. Do not tightly grip the display and buttons to avoid damage.
Lithium Battery Cell Warnings
- Cell leakage may cause damage to the remote control.
- Do not throw cells into as this may cause an explosion.
- Keep battery cells out of reach of children.
Drives and connections
Never place any foreign objects into the openings of the car radio (disc compartment, USB jack, card slot, AUX IN connection). Otherwise you might damage the slots and connections.
Others Warnings
Do not switch on the car radio for long periods of time when the motor is switched off. This could cause the car battery to discharge and the vehicle can no longer be started.
Installation Procedures
First complete the electrical connections and then check for correctness.
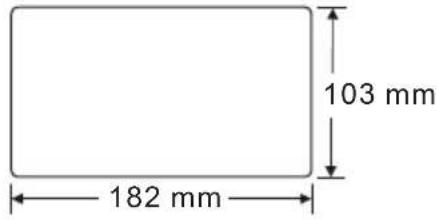
Installation Opening
This unit can be installed in any dashboard Having an opening as shown the right figure.
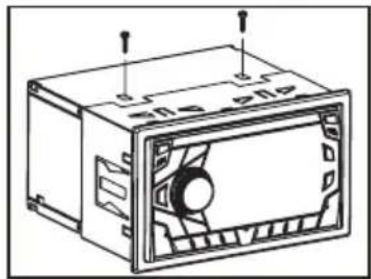
Important:
Remove the transport CD deck screws before use.
natural_image
Technical line drawing of a device casing with mounting holes and a central fan (no text or symbols)To Install the Car Radio
Be sure you test all connections first, and then follow these steps to install this unit.
-
Make sure the ignition is turned off, and then disconnect the cable from the vehicle battery's negative (-) terminal.
-
Disconnect the wire harness and the antenna.
-
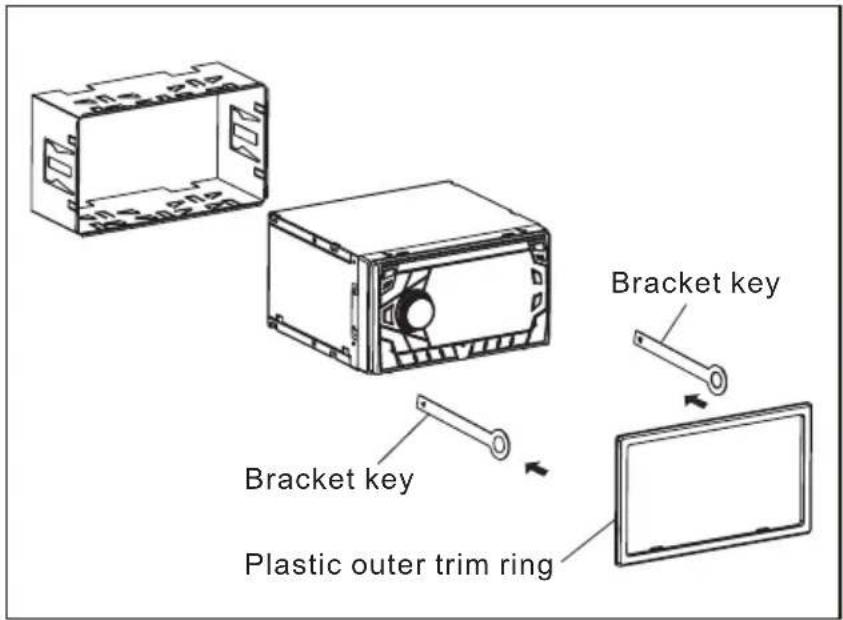
Lift the left or right top corner of the plastic outer trim ring then pull it out to remove it.
-
Insert the two bracket keys into the left and right side of the chassis, as shown the below figure to separate the chassis from the housing.
-
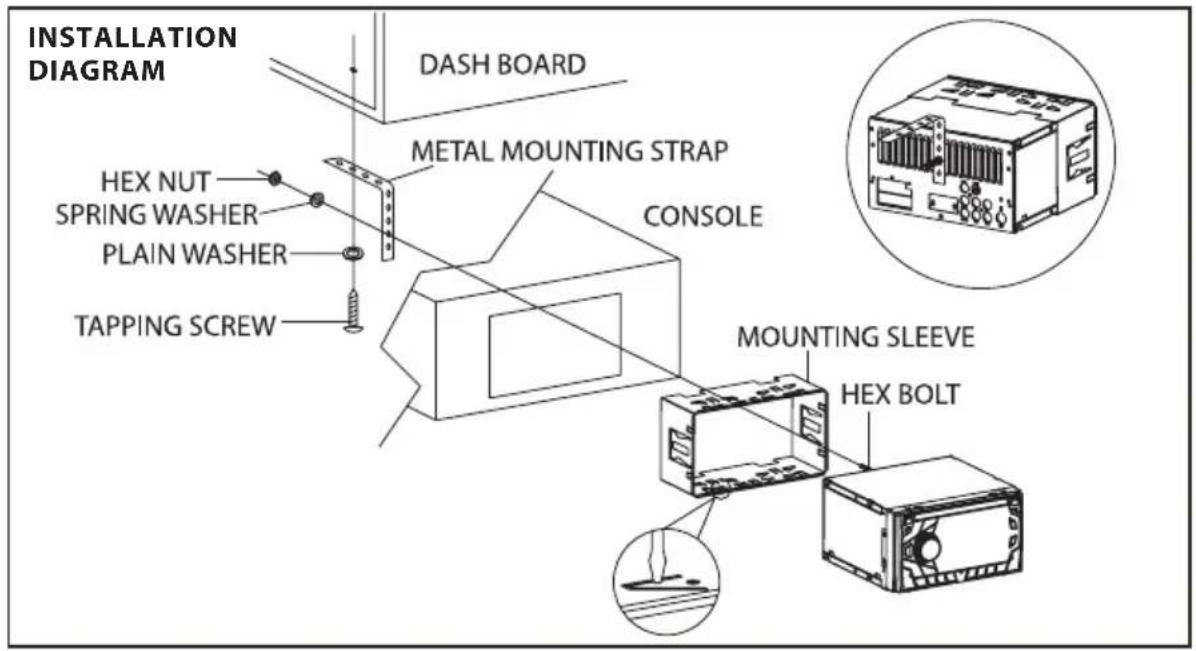
Insert mounting sleeve into the dashboard and bend the mounting tabs out with a screw-driver. Make sure that the lock lever is flush with the mounting sleeve and is not projecting beyond.
-
Insert car radio into the mounting sleeve.
-
Use a metal strap to secure the rear part of the chassis using the hardware indicated.
-
Make wiring connections, as illustrated in the "Wiring Diagram."
-
Install the plastic outer trim ring.

- Only use speakers with 4 ohms impedance.
- Do not attach the control panel to the chassis before wiring is complete.
- The maximum current of the auto antenna is 200mA.
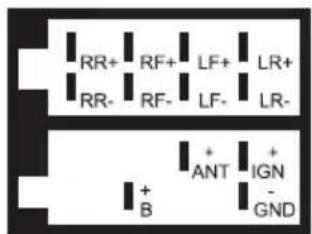
Wiring Connections
WIRING DIAGRAM
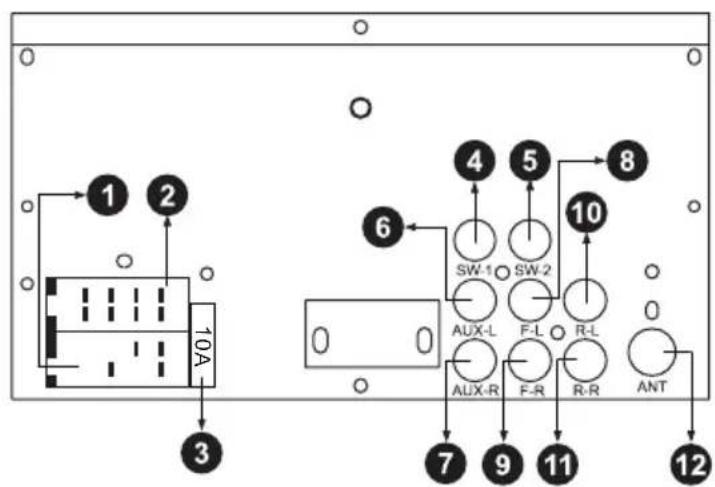
1, 2. ISO Socket: 4PIN&8PIN connector

- Fuse 10A
- Subwoofer output-1(Green)
- Subwoofer output-2(Green)
- Auxiliary audio input Left CH(White)
- Auxiliary audio input Right CH (Red)
- Front left CH RCA output (White)
- Front right CH RCA output (Red)
- Rear left CH RCA output (White)
- Rear right CH RCA output (Red)
- Radio antenna socket
Removal of the Main Unit
- Remove the metal strap from the main unit.
- Remove the plastic trim out from the main unit.
- Insert a bracket key into the left and right side of the main unit and draw the unit out of the mounting sleeve.
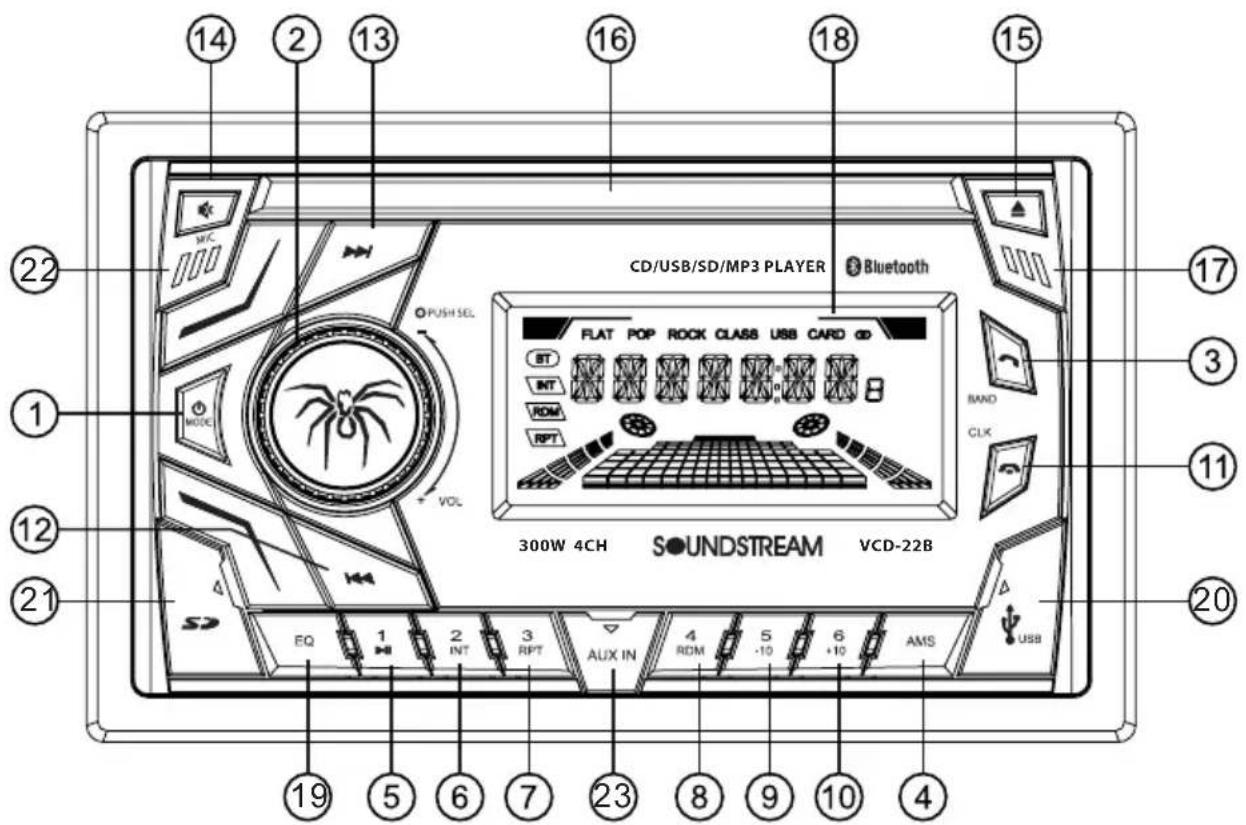
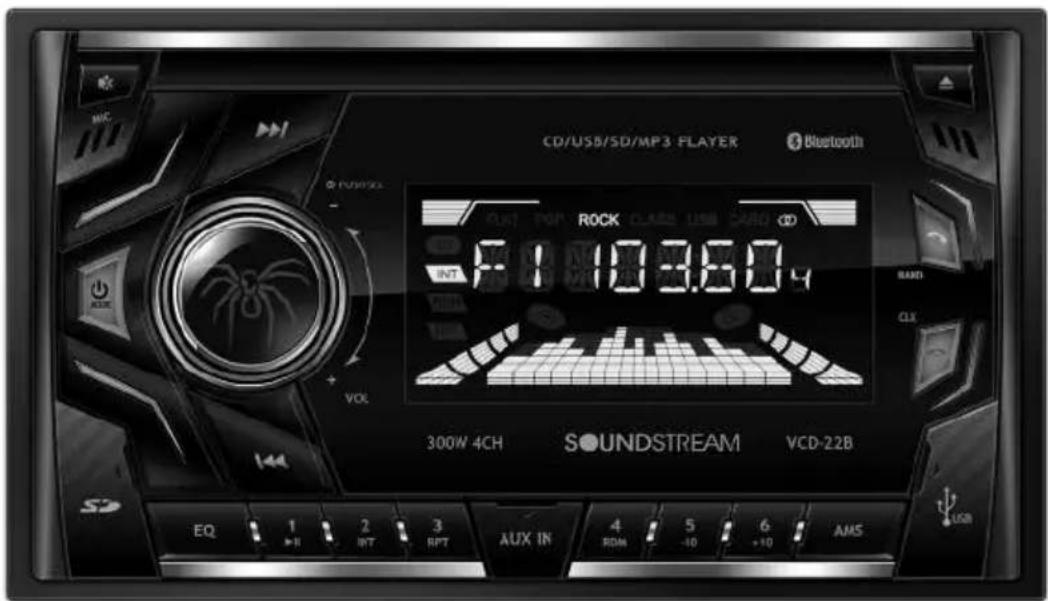
- ⏻ (power)/MODE (source) button
- SEL (select/menu) button and VOL (volume) knob
- BAND(band) button, ↗ (anser call) button
- AMS (automatic store / preset station scan, automatic music search) button
- ▶ (pause/play), Preset station1 button
- INT (intro), Pbestedrstation
- RPT (repeat), P bestedrstation
- RDM (random), 4bestetrstation
- -10(previous 10 tracks), \$bestedstation
- +10(next 10 tracks), Pbestinstation
- CLK (clock setting) button, (end call) button
- (tune down, seek down, track down, fast reverse) button
- ▶▶ (tune up, seek up, track up, fast forward) button
- MUTE button
- ▲ (eject) button
- Disc slot
- IR remote control sensor
- LCD Display
- EQ(Equalizer Preset) Button
- USB port
- Micro SD Card Slot
- MIC hole(built-in Microphone)
- AUX IN (auxiliary input) jack
Turn Unit On/Off
- Press any button on the front panel or on the remote control to turn on the unit.
- Press and hold the power ⏻ ) button on the front panel or on the remote control to turn the unit on or off.
Adjust Volume (VOL)
Rotate the Vool vol the front panel or press the / button on the remote control to increase or decrease the volume level.
Adjust Menu Options (SEL)
- Press the 8.500 byoto the front panel or on the remote control through the following adjustable audio functions: BASS, TREBLE, BALANCE, FADER, EQ OFF/FLAT/POP/ROCK/CLASS, LOUD ON/OFF, CLR(Color) FADE/ CLR BLUE / CLR RED / CLR CYAN / CLR GREEN / CLR PURPLE / CLR YELLOW / CLR GRAY / CLR AUTO , DX/LOC, STEREO/MONO, VOL LAS / ADJ, AREA EU/US, CLOCK 12/24, BEEP ON/OFF, VOLUME.
-
Rotateob oVOL eVOLT+PVD or press the / button on the remote control to adjust the selected item.
-
BASS/TREBLE:-07,-06,\~, -01,00,+01,\~, +06,+07
- BALANCE:L07,L06,\~, L01, 00, R01,\~,R06,R07
- FADER:R07,R06\~,R01,00,F01\~,\~ ,F06,F07
- EQ(Equalizer) Setting:OFF, FLAT, POP, ROCK, CLASS
- Loudness: LOUD ON/OFF
- 7 color-changing illumination:
This car radio device is equipped 7 color-changing illumination feature.
You can preset the illumination to color fade(gradual change color one by one), Blue, Red, Cyan, Green, Purple, Yellow, Gray or color Auto(color sudden change one by one).
- DX/LOCAL: Enables or disables the local broadcast mode (LOCAL).
- Stereo/Mono: Switches between MONO and STEREO reception mode for radio frequencies.
- Volume level:00,01,\~,40
- Press and hold the SEL button on the front panel or on the remote control to access these additional functions: VOL(LAS/ADJ), AREA EU/US, CLOCK 24/12, BEEP ON/OFF.
- VOL(LAS/ADJ): This option allows you to preset a volume level as the power-on memory volume level.
- VOL LAST: In this mode, the unit switches on at the actual volume it had when it was last switched off.
- VOL ADJ: In this mode, the unit power on at the actual volume that you preset a constant switch-on volume level.
Press the SELL on to enter the constant switch-on volume adjusting mode and the "A-VOL XX" will be shown on the LCD display.
Then you can adjust a constant switch-on volume level by rotating the Volob.
- AREA EU/US: This car radio is equipped the Europe / USA frequency.
Rotate the volume knob to switch between USA and europe frequency. The system will change the frequenty setting in about 3 seconds.
- CLOCK 24/12:
This unit is equipped with two types of clock display formats, 24 and 12 hours.
Rotate the volume knob to choose 24 hours format or 12 hours format.
- BEEP ON/OFF:Enables or disables the "BEEP" signal to confirm use.
- Rotate the vol vol the vol at panel or press the / button on the remove control to adjust the selected item.
Set the Clock (CLK)
- To display clock time, press the CLKton.
- To set clock time, press and hold the CLKton and the hour will flash.
- Press the ◀◀ or ▶◀ button on the front panel or on the remote control to adjust the hour.
- Press the CLUKo on and the minutes will flash.
- Press the or button on the front panel or on the remote control to adjust the minute.
- Note: During Bluetooth mode, the clock can not be adjusted.
Change the Source (MODE)
Press the MODE to switch between RADIO, BT(Bluetooth), DISC(with a CD/MP3 disc inside the disc slot), USB(with USB device inserted), CARD(with SD card inserted) and AUX-IN(auxiliary input) modes.
Mute on/off
MUTEIn power on mode, briefly press the muteconstat toggle mute c
will be also released when the volume knob is used.
Loudness on/off
Press the button on the remote control to turn on the loudness to reinforce the output of bass frequencies, press again to turn it off.
Preset EQ (Equalizer)
Press the Botton on the front panel or on the remote control to toggle between EQ OFF, FLAT, POP, ROCK, CLASS.
USB port
The USB port of this car radio is designed for media playback from flash memory devices. Note: This USB port is not designed to charge high-power devices.
Micro SD card slot
This micro SD card slot is designed for media playback from micro SD card.
Built-in Microphone
To receive your voice when you calling by using this bluetooth handsfree system.
Aux input connector
The 3.5mm auxiliary input stereo connection is designed for deiveces with 3.5mm line-out or headphone output.
Switch Between USA area and Europe area Frequency
In radio mode, press the Voton to enter the switch state of the EU(USA) and EU(europe) frequency, then rotate it to switch between US(USA) and EU(europe) frequency.
The system will change the frequency setting in about 3 seconds.
Change Bands (BAND)
Press the BAND to switch between the FM1, FM2, FM3, AM1 and AM2 bands.
Each band stores up to six preset stations.
Manual Tuning (◀◀ /▶◀)
Press and hold the ▶ or ◀ button on the front panel or on the remote control to enter manual tuning mode. In manual tuning mode, press the ▶ or ◀ button to move the radio frequency number up or down one step.
Auto Seek Tuning (◀◀ /▶◀ )
In standby mode or while not in manual tuning mode, quickly press the button to move to the next/previous available station automatically.
To Store / Recall Preset Stations
The radio can be stored 6 preset stations for each band (FM1, FM2, FM3, AM1 and AM2) for a total of 30 preset stations.
To memorize a station:
- Turn the radio on and select the desired band and station.
- Select a station by button
- Press and hold the desired preset button (numbered 1-6 on the face of the radio) for more than 2 seconds to save the station to that preset number.
- To recall a preset station:
- Select the desired band.
- Briefly press a preset button (numbered 1-6) to recall the corresponding preset station.
Automatic Store station/ Preset station scan (AMS)
Press and hold the AMS on for more than 2 seconds to select six strong stations and store them in the current band. The radio will automatically scan the current frequency and enter the six strongest stations into the preset memory positions for that band.
Briefly press the AMS on the remote control to recall each preset station that saved in the memories in each band.
LOCAL/DX
In urban areas, most stations are strong enough and “LOCAL ON” mode should be selected. Switch to LOCAL OFF mode to search for stations with weaker signals.
Press the button on the remote control to choose local or distant reception mode.
STEREO/MONO
FM station is received in stereo mode. However, if the signalsweak or reception is not as good as you would like, switching to MONO mode usually improves the overall sound quality. Press the \$Tutton on the remote control to choose FM STEREO or MONO audio effect.
To insert DISC / USB / SD CARD
- To play files on a disc, insert a disc with the label surface facing upward into the disc slot. Playback will begin automatically.
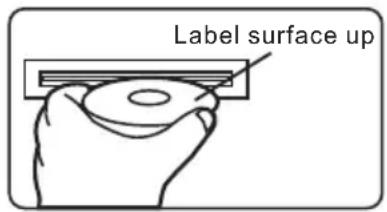
- To play files in a USB device or an SD card, open the USB port cover and insert the USB storage device into the USB port or an micro SD card into the micro SD card slot. Playback will begin automatically.
Eject Disc/USB/Micro SD
- To eject a disc, press the ▶ button to stop playback. Press the ▲ (eject) button to eject the disc and then remove it
- To eject a USB device, press the ▶ button to stop playback, then remove the USB device.
- To eject an Micro SD card, press the ▶ button to stop playback, then press the micro SD card, to eject the SD card then remove the SD card from the micro SD card slot.
Play/Pause
Press the ▶ (play/pause) button to pause or resume playback.
Next/Previous Track
- To play the next track, press the button.
- To play the previous track, press the button.
Fast Forward/Backward
- To fast forward, press and hold the button.
- To fast backward, press and hold the button.
Introduction Scan
Press the INITton to play the first 10 seconds of each track, press again to stop the introduction scan, and play the current track.
Repeating the same track
Press the RPTon to repeat the current track, press again to stop repeat plaback and resume normal playback.
Playing all tracks in random
Press the RDimn to play all tracks in random order, press again to cancel this function.
Track/Folder Navigation
- During a disc, USB or micro SD card mode, press the 5 button to go backward 10 tracks. Press the 6 button to jump forward 10 tracks.
- During a MP3 disc, USB or SD card mode, press and hold the 5/10 ton to go back the previous folder. Press and hold the 6/10 ton to go to the next folder.
You can repeat this function depending on the number and level of folders.
• These buttons have no this function if the USB device or SD card has no folders.
Select the track or file for playback in MP3 format
Press the AMS on repeatedly to select one of the following 3 search modes:
NUM SCH (Searching by track or file serial number)
DIR SCH (Searching by folder serial number)
FILE SCH (Searching by track or file name)
Searching by track or file serial number:
a) In playback of files with MP3 format, press the AMSton once to access the track or file number searching mode which allow you to quickly find a specific MP3 track or file by its serial number, and the "NUM SCH" and "NUM ***" will appear, am the LCD display in the first symbol "*" will blink
b) Rotate the Vod to select the serial number of your favorite file with high speed.
c) Finally press the SELton to confirm and play the selected file.
Searching by folder serial number:
The folder search mode allows you to quickly find an MP3 track or file under a specific group folder.
a) In playback of files with MP3 format, press the AMSton twice, will be "DIR SCH" shown on the LCD display.
b) Rotsetette V@Likert Folder. If there are no root Folder in the MP3 disc, USB or SD card, the LCD will display "ROOT")
c) Press the SETton to play the first track or file of the selected folder.
Searching by track or file name:
This track or file name search function requires only the first few character as search keyword, it will allow you to quickly find an MP3 title by its name.
a) Press the AMS on three times, the "FILE SCH" and " " will be shown on the LCD display in sequence, and the first character "*" will blink.
b) Rotatertge Volfikstodcharacter (*). The character will be changed from "A" to "Z", "0" to "9" and "_", "-", "+", "spPress the button SEL confirm the character entered and the next character will blink for setting. Press the AMST on to delete the incorrect character.
c) When mached files was found, press the SELLton to start play the searched file. If the file was not found, "NO FOUND" message will be visible on the display.
This car radio has an external auxiliary input jack, it is compatible with audio output from an MP3 music player. So you can listen to sounds and music from external devices, if you have plugged such a player into the AUX IN jack with a audio cable. Press thMODEn to switch to the AUX input mode.
Pair and Connect
Prior to using the Bluetooth device as a handsfree system for a Bluetooth-enabled mobile phone for the first time, you must pair and connect the two devices as follows:
- In any mode, prior to pairing and connecting, the BT logo in the LCD indicating that no device is connected. To begin pairing, enable BT mode on your mobile phone.
- When the phone the car audio system, the "SOUNDSTREAM" name will be displayed.
- Choose the "SOUNDSTREAM" from the device list to pair and connect with the car audio system. Upon confirming, the BT logo will stop flashing.
- When pairing is complete, the mobile phone audio will automatically transfer to the car audio system whenever a call is made or received, or when the mobile phone plays music.
Make a Call
• To make a call, dial the call directly from the paired mobile phone.
- To make a call with this bluetooth handsfree system:
a) When linking up the Bluetooth-enabled mobile phone to this bluetooth handsfree system, press the 🔔 button to access the dial telephone number mode, then press the "0\~9", * and # button on remote control to input the telephone number, and the entered number will be shown on the LCD display.
b) If a number has been incorrectly inputted, press the DELton or button to delete it.
c) Press the ↗ button to make outgoing call.
Redial Last Dialed Number
Press and hold the 🔔 button on the control panel to redial the last dialed phone number.
Answer a Call
- When the mobile phone is called, the incoming telephone number displays on the LCD.
- To receive the call, press the button on the control panel.
Reject a Call
To reject the call, press the button on the control panel.
End a Call
To end an active call, press the button.
Switch Audio Between Car Audio and mobile Phone
During a call, press the Vobb/button to switch the audio source from the car audio system back to your mobile phone.
Adjust Talk Volume
- During a call, use VOb or buttVOb+post-the volume level.
- Use the MUTEn to mute sound.
Audio Streaming (A2DP)
- Press the ⏻ MODEn to enter BT mode and display media in the LCD display.
- When a mobile device is paired, music played through that device will automatically be heard through the car audio system.
- Press the ▶ or ◀ button to play the next or previous on the mobile phone.
- Press the ▶ button to pause or resume music playback.
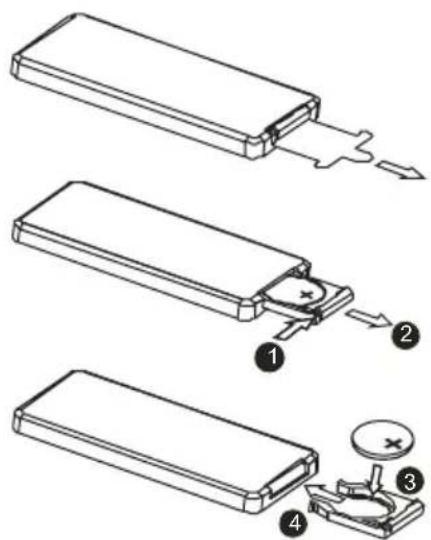
Remove Insulating Sheet
The remote control comes with an insulating sheet attached to the underside of the remote control, as illustrated on the right. The remote control will not work until the insulating sheet is removed.
Replace Lithium Battery Cell
- When the lithium cell battery becomes weak, replace it as illustrated on the right.
- Press and hold the movable block in the direction indicated by arrow 1. At the same time, pull the cell holder out of the remote control in the direction indicated by arrow 2.
- Replace the old cell with a new one, making sure the (+) polarity is facing upward.
- Re-insert the cell holder into the remote control.

- Cell leakage may cause damage to the remote control.
- Do not throw cells into as this may cause an explosion.
- Keep battery cells out of reach of children.
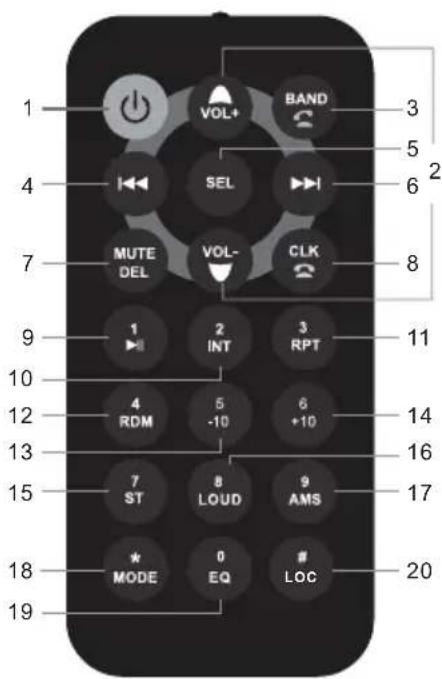
Remote Control Operation
Position the emitting window of the remote control toward the sensor window of the unit.
- The operation angle for front panel remote control reception is about 30 degrees.
- The distance between the emitting window of the remote control and the sensor window of the unit should remain less 5 meters.
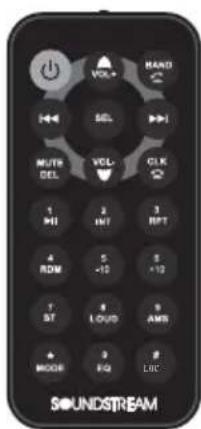
Button Names and Locations
- ⏻ (Power on/off) button
- VOL+/VOL-(volume increase/decrease) button
- Band button, ⚫ (anser call) button
- ▶▶ Tune down, seek down; Track down, fast reverse
- SEL(selection) button
- button:tune up, seek up; Track up, fast forward
- Mute button, DEL(Delete) button
- CLK(clock setting) button, ☎ (end call) button
- ▶ button, preset station 1 button, keypad 1
- INT(intro) Bottom keyptation
- RPT(repeat) Subtuthom, keeppatafion
- RDM (random), 4basteoistateypad 4
- -10 (previous 10 tracks), presto stateypad 5
- +10(next 10 tracks), prestato stateypad 6
- ST (stereo) button, keypad 7
- LOUD(loudness) button, keypad 8
- AMS (automatic music search) button, keypad 9
- MODE button, keypad *
- EQ(Equalizer) button, keypad 0
- LOC (local)/DX button, keypad #
Note: When using the remote control for the first time, you must pull out the portective plastic tab from the battery compartment found on the back of the remote control.
General
Chassis Dimensions....178(W) x 160(D) x 100(H) mm
Power Supply Requirement ....DC 12V
Current Consumption 10A (max.)
Maximum Power Output 25W x 4CH
Radio
FM
USA/ Europe Frequency Range....87.5 - 107.9 MHz (200KHz/Step)
87.5 - 108.0 MHz(50KHz/Step)
Usable Sensitivity ....30 dBu
I.F. Frequency 10.7 MHz
AM
USA/ Europe Frequency Range....530 - 1710KHz (10KHz/Step)
522 - 1620 KHz (9KHz/Step)
Usable Sensitivity ....20 dBu
I.F. Frequency 450 KHz
CD/USB/Card
Usable Audio Formats CD/MP3/WMA
Pre-amp Output ......Front and Rear
Frequency Response 20 Hz - 20 KHz
S/N Ratio 60dB
BT
BT Profile supports ......A2DP, AVRCP,HSP, HFP
Range of frequency 2.4GHz spectrum
The following chart will help in solving most problems that may occur.
If you still have questions after going through the checklist, please consult your local customer service representative. Before going through this check list, refer the wiring and operating procedures.
| Symptom Cause Solution | ||
| No power | The car ignition switch have not turn on. | If the power supply is connected to the car accessory circuits, but the engine is not moving, switch the ignition key to “ACC”. |
| The fuse has been blown. Replace a new one. | ||
| Disc can not be loaded or ejected. | Presence of CD disc inside the player. | Remove the disc from the player, and insert a new one. |
| Inserting the disc in reverse direction. | Insert the CD with the label facing upward. | |
| The surface of CD is extremely dirty or has been scraped. | Clean the disc or try to replace a new one. | |
| Temperature inside the car is too high. | Cool off or until the ambient temperature return to normal. | |
| Condensation | Leave the player off for an hour or so, and then try again. | |
| No sound | Volume is in minimum. | Adjust volume to a desired level. |
| The wiring is not properly connected. | Check wiring connection. | |
| Sound skips | The installation angle is more than 30°. | Adjust the installation angle less than 30°. |
| The surface of CD is extremely dirty or has been scraped. | Clean the disc or try to replace a new one. | |
| The operation keys do not work | 1. Car interior is too hot. | 1. Allow vehicle to cool before using this player. |
| 2. The front panel has not properly installed. | 2. Fixed the front panel into its place. | |
| No radio reception. The antenna cable is not connected. | Insert the antenna cable firmly into the antenna socket of this radio. | |
| In automatic search mode the radio does not stop at a transmitting station. | The transmission signals are too weak. | Select a radio station manually. |
- How to Handle Discs
- Precautions & Warnings
- Lithium Battery Cell Warnings
- Drives and connections
- Others Warnings
- Installation Procedures
- Installation Opening
- Important:
- To Install the Car Radio
- Wiring Connections
- Removal of the Main Unit
- Turn Unit On/Off
- Adjust Volume (VOL)
- Adjust Menu Options (SEL)
- Set the Clock (CLK)
- Change the Source (MODE)
- Mute on/off
- Loudness on/off
- Preset EQ (Equalizer)
- USB port
- Micro SD card slot
- Built-in Microphone
- Aux input connector
- Switch Between USA area and Europe area Frequency
- Change Bands (BAND)
- Manual Tuning (◀◀ /▶◀)
- Auto Seek Tuning (◀◀ /▶◀ )
- To Store / Recall Preset Stations
- To memorize a station:
- - To recall a preset station:
- Automatic Store station/ Preset station scan (AMS)
- LOCAL/DX
- STEREO/MONO
- To insert DISC / USB / SD CARD
- Eject Disc/USB/Micro SD
- Play/Pause
- Next/Previous Track
- Fast Forward/Backward
- Introduction Scan
- Repeating the same track
- Playing all tracks in random
- Track/Folder Navigation
- Select the track or file for playback in MP3 format
- Searching by track or file serial number:
- Searching by folder serial number:
- Searching by track or file name:
- Pair and Connect
- Make a Call
- Redial Last Dialed Number
- Answer a Call
- Reject a Call
- End a Call
- Switch Audio Between Car Audio and mobile Phone
- Adjust Talk Volume
- Audio Streaming (A2DP)
- Remove Insulating Sheet
- Replace Lithium Battery Cell
- Remote Control Operation
- Button Names and Locations
- General
- Radio
- FM
- AM
- CD/USB/Card
- BT
Brand : Soundstream
Model : VM-22B
Category : Car radio