
BC-15PN - Video camera DataVideo - Free user manual and instructions
Find the device manual for free BC-15PN DataVideo in PDF.


| Product Type | 4K NDI POV Camera |
| Image Sensor | 1/2.3" CMOS, 12.3 Megapixels |
| Video Resolution | Up to 2160p 60fps (2160p 60/59.94/50/30/29.97/25, 1080p 60/59.94/50/30/29.97/25) |
| Lens | Interchangeable fixed lens (Standard 6mm equivalent or Wide 2.8mm equivalent, F1.0 fixed iris) |
| Zoom | 2x Digital Zoom |
| Streaming Protocols | RTMP(S), SRT, NDI (BC-15PN only) |
| Control | DVIP via Ethernet, BC View Assist App (iOS/Android) |
| Network | 10/100/1000M Ethernet, Power over Ethernet (IEEE802.3af) |
| Audio Input | 3.5mm stereo line-in or mic-in |
| Video Output | HDMI 2.0 x1 |
| Tally Light | Dual-color (Red/Green) |
| Dimensions (WxHxD) | 77 x 78 x 82 mm |
| Weight | 200 g |
| Power | DC 12V 9W or PoE IEEE802.3af |
| Operating Temperature | 0 to 40°C |
| Warranty | 1 year standard; 3 years with online registration within 30 days |
| Safety Compliance | FCC Part 15, CE, WEEE |
| Cleaning | Use a damp cloth; do not use liquid or aerosol cleaners |
| Mounting | Three 1/4-20 UNC screw holes (top, bottom, left) |
Frequently Asked Questions - BC-15PN DataVideo
User questions about BC-15PN DataVideo
0 question about this device. Answer the ones you know or ask your own.
Ask a new question about this device
Download the instructions for your Video camera in PDF format for free! Find your manual BC-15PN - DataVideo and take your electronic device back in hand. On this page are published all the documents necessary for the use of your device. BC-15PN by DataVideo.
USER MANUAL BC-15PN DataVideo
natural_image
Line drawing of a vintage portable electronic device with front panel and control buttons (no text or symbols)WARNINGS AND PRECAUTIONS 6
WARRANTY 8
STANDARD WARRANTY....8
THREE YEAR WARRANTY....8
DISPOSAL 9
1. PRODUCT OVERVIEW.... 10
FEATURES....10
2. SYSTEM DIAGRAM 11
3. LOCATION AND FUNCTION OF PARTS 12
4. BASIC SETUP(TAKE BC-15P AS AN EXAMPLE) 19
POWER-ON 19
VIDEO OUTPUT 19
AUDIO OUTPUT....20
ETHERNET PORT 21
5. OSD MENU 22
ZOOM....30
GAIN LIMIT 30
SHUTTER 31
WHITE BALANCE....32
Auto 33
Indoor 33
Outdoor 33
One-push 34
Color Temperature 34
R/B Gain 34
Lock....35
EXPOSURE 36
Global....36
Center 36
eSport 36
Lock....36
Manual....36
IMAGE SETTING ....37
CAMERA SETTING....37
Lens Select 38
AGC 38
Gamma Mode 39
3DNR....39
WDR 40
Mirror....40
Rotation 41
Anti-Flicker 41
VIDEO OUTPUT......42
NETWORK....44
DHCP 44
IP 44
NetMask....45
Gateway....45
DNS1 46
DNS2 46
Reset 47
AUDIO 47
Audio Input 48
Soundtrack....48
Audio Standard 48
SYSTEM....49
Camera Name 49
Language....50
Preset....50
Tally Mode ....51
Button Shortcut ....52
Firmware....52
Factory Default ....53
6. HOW TO CONTROL THE BC-15P/BC-15PN BY THE BC VIEW ASSIST APP 54
HOW TO CONNECT AND LAUNCH THE BC VIEW ASSIST APP ....54
INTRODUCTION OF THE BC VIEW ASSIST APP MAIN INTERFACE....57
-
Video Output ....57
-
Preview Screen ....58
-
Zoom 58
-
Gain Limit....58
5.Shutter 59
-
White Balance....59
-
Exposure 60
-
Contrast 60
-
Brightness ....61
-
Saturation ....61
-
Hue....61
-
Sharpness....61
-
Camera Name 62
-
Stream....62
-
Menu Button....62
MENU INTRODUCTION OF THE BC VIEW ASSIST APP....63
Camera....65
Encoder....69
Stream....70
Audio....72
Network 73
BC VIEW ASSIST APP CAMERA LIST INTRODUCTION....74
-
HOW TO VIEW BC-15PN IMAGES WITH NDI STUDIO MONITOR ...... 77
-
HOW TO STREAM BC-15P/BC-15PN IMAGE TO THE STREAMING PLATFORMS (YOUTUBE AND FACEBOOK AS EXAMPLES) 80
HOW TO STREAM TO YOUTUBE....80
HOW TO STREAM TO FACEBOOK 81
-
HOW TO USE BC VIEW ASSIST TO VIEW IMAGES FROM THE BC-15P/PN 83
-
FIRMWARE UPDATE.... 86
REQUIREMENTS....86
UPDATE STEPS....86
Establish a point-to-point connection with a computer (fixed IP mode) 86
Computer connects to multiple cameras via router (DHCP mode) .....90
-
FREQUENTLY-ASKED QUESTIONS....94
-
DIMENSIONS....95
-
SPECIFICATIONS....96
SERVICE AND SUPPORT 100
Disclaimer of Product and Services
The information offered in this instruction manual is intended as a guide only. At all times, Datavideo Technologies will try to give correct, complete and suitable information. However, Datavideo Technologies cannot exclude that some information in this manual, from time to time, may not be correct or may be incomplete. This manual may contain typing errors, omissions or incorrect information. Datavideo Technologies always recommend that you double check the information in this document for accuracy before making any purchase decision or using the product. Datavideo Technologies is not responsible for any omissions or errors, or for any subsequent loss or damage caused by using the information contained within this manual. Further advice on the content of this manual or on the product can be obtained by contacting your local Datavideo Office or dealer.
FCC Compliance Statement
This device complies with part 15 of the FCC rules. Operation is subject to the following two conditions:
(1) This device may not cause harmful interference, and
(2) This device must accept any interference received, including interference that may cause undesired operation.
Warnings and Precautions
- Read all of these warnings and save them for later reference.
- Follow all warnings and instructions marked on this unit.
- Unplug this unit from the wall outlet before cleaning. Do not use liquid or aerosol cleaners. Use a damp cloth for cleaning.
- Do not use this unit in or near water.
- Do not place this unit on an unstable cart, stand, or table. The unit may fall, causing serious damage.
- Slots and openings on the cabinet top, back, and bottom are provided for ventilation. To ensure safe and reliable operation of this unit, and to protect it from overheating, do not block or cover these openings. Do not place this unit on a bed, sofa, rug, or similar surface, as the ventilation openings on the bottom of the cabinet will be blocked. This unit should never be placed near or over a heat register or radiator. This unit should not be placed in a built-in installation unless proper ventilation is provided.
- This product should only be operated from the type of power source indicated on the marking label of the AC adapter. If you are not sure of the type of power available, consult your Datavideo dealer or your local power company.
-
Do not allow anything to rest on the power cord. Do not locate this unit where the power cord will be walked on, rolled over, or otherwise stressed.
-
If an extension cord must be used with this unit, make sure that the total of the ampere ratings on the products plugged into the extension cord do not exceed the extension cord's rating.
-
Make sure that the total amperes of all the units that are plugged into a single wall outlet do not exceed 15 amperes.
-
Never push objects of any kind into this unit through the cabinet ventilation slots, as they may touch dangerous voltage points or short out parts that could result in risk of fire or electric shock. Never spill liquid of any kind onto or into this unit.
-
Except as specifically explained elsewhere in this manual, do not attempt to service this product yourself. Opening or removing covers may expose you to dangerous voltage points or other risks, and will void your warranty. Refer all service issues to qualified service personnel.
-
Unplug this product from the wall outlet and refer to qualified service personnel under the following conditions:
a. When the power cord is damaged or frayed;
b. When liquid has spilled into the unit;
c. When the product has been exposed to rain or water;
d. When the product does not operate normally under normal operating conditions. Adjust only those controls that are covered by the operating instructions in this manual; improper adjustment of other controls may result in damage to the unit and may often require extensive work by a qualified technician to restore the unit to normal operation;
e. When the product has been dropped or the cabinet has been damaged;
f. When the product exhibits a distinct change in performance, indicating a need for service.
Warranty
Standard Warranty
- Datavideo equipment are guaranteed against any manufacturing defects for one year from the date of purchase.
- The original purchase invoice or other documentary evidence should be supplied at the time of any request for repair under warranty.
- The product warranty period begins on the purchase date. If the purchase date is unknown, the product warranty period begins on the thirtieth day after shipment from a Datavideo office.
- All non-Datavideo manufactured products (product without Datavideo logo) have only one year warranty from the date of purchase.
- Damage caused by accident, misuse, unauthorized repairs, sand, grit or water is not covered under warranty.
- Viruses and malware infections on the computer systems are not covered under warranty.
- Any errors that are caused by unauthorized third-party software installations, which are not required by our computer systems, are not covered under warranty.
- All mail or transportation costs including insurance are at the expense of the owner.
- All other claims of any nature are not covered.
- All accessories including headphones, cables, and batteries are not covered under warranty.
- Warranty only valid in the country or region of purchase.
- Your statutory rights are not affected.
Three Year Warranty
- All Datavideo products purchased after July 1st, 2017 are qualified for a free two years extension to the standard warranty, providing the product is registered with Datavideo within 30 days of purchase.
- Certain parts with limited lifetime expectancy such as LCD panels, DVD drives, Hard Drive, Solid State Drive, SD Card, USB Thumb Drive, Lighting, Camera module, PCIe Card are covered for 1 year.

- The three-year warranty must be registered on Datavideo's official website or with your local Datavideo office or one of its authorized distributors within 30 days of purchase.
Disposal

natural_image
Symbol of a trash bin crossed with a diagonal line, representing waste sorting or restriction (no text present)For EU Customers only - WEEE Marking
This symbol on the product or on its packaging indicates that this product must not be disposed of with your other household waste. Instead, it is your responsibility to dispose of your waste equipment by handing it over to a designated collection point for the recycling of waste electrical and electronic equipment. The separate collection and recycling of your waste equipment at the time of disposal will help to conserve natural resources and ensure that it is recycled in a manner that protects human health and the environment. For more information about where you can drop off your waste equipment for recycling, please contact your local city office, your household waste disposal service or the shop where you purchased the product.
1. Product Overview
BC-15P/BC-15PN is an innovative compact POV camera designed specifically for sports events. The camera is equipped with a 1/2.3" 4K CMOS sensor for capturing high quality images and incredible details that present every subtle expression of the player. Built-in lens saves the user hassles of finding suitable but costly lens. With SRT streaming, video, control signals (DVIP), and power (PoE) are carried on a single Ethernet cable, so that system setup is easy and fast. The three 1/4-20 UNC screw holes add greater versatility to hardware installation. The only difference between the BC-15P and BC-15PN is that the BC-15PN supports the NDI protocol and other specifications of the BC-15PN are the same as the BC-15P.
The BC-15P/BC-15PN is one of the best choices for capturing eSport players with the wide angle lens that comes with the package. The standard lens fulfills a wide range of applications.
Features
• Supports video streaming over SRT
• Supports Power over Ethernet
• 1/2.3" CMOS Sensor
• Supports up to 4K 50/60p output
• Supports H.264/H.265 streaming
• Built-in Swappable Fixed Lens
- BC View Assist App can be used to control
- Built-in Tally Light
• Supports the NDI Protocol (for BC-15PN only)
- System Diagram

flowchart
graph TD
    A["BC-15P"] -->|HDMI| B["Showcast 100 4K ShowCast Streaming Studio"]
    C["BC-15P"] -->|HDMI| B
    D["BC-15P"] -->|HDMI| B
    E["Computer"] -->|HDMI| B
    F["Audio Playback"] -->|RCA| B
    G["Microphone"] -->|1| B
    H["Audio Monitoring by Headphone"] --> B
    I["Router"] -->|HDMI| B
    J["HDR-80"] -->|HDMI| B
    K["HDR-1"] -->|HDMI| B
    L["TLM-170L"] -->|HDMI| B
    M["Router"] -->|Ethernet| N["dvdCloud"]
    M --> O["YouTube"]
    M --> P["facebook"]
    M --> Q["WOWZA media system"]
    B <-->|DVIP| B
    B <-->|HDMI| R["Monitor"]
    B <-->|HDMI| S["Video Record"]
3. Location and Function of Parts
Front of Camera

1
Lens The lens focus can only be adjusted manually by physically rotating the lens. Rotate the lens clockwise to focus near and counter-clockwise to focus far. The BC-15P/BC-15PN offers Standard Lens and Wide-Angle Lens. See the table below for differences between the two.
| Standard Lens | Wide-angle Lens | |
| Picture |  |  |
| Lens Number | 10112 | 10110 |
| Equivalent Focal Length | 6mm | 2.8mm |
| Field of View | H: 38.6°V: 21.9° | H: 75.5°V: 46.6° |
| Working Distance | 1m ~∞ | 0.5m ~∞ |
| As both lenses are F1.0 fixed IRIS, the depth of field is quite small, especially with closer object.Note: After changing the camera lens, also follow the menu path OSD Menu → Camera Setting → Lens Select to change the lens setting. | |
| 2 | Tally LEDThe tally LED will turn on upon receiving a tally signal from a DVIP controller. During initialization, you will see the tally LED colors in the sequence of orange, green and red. The tally LED should turn off after initialized. |
Rear of Camera (BC-15P)

Rear of Camera (BC-15PN)
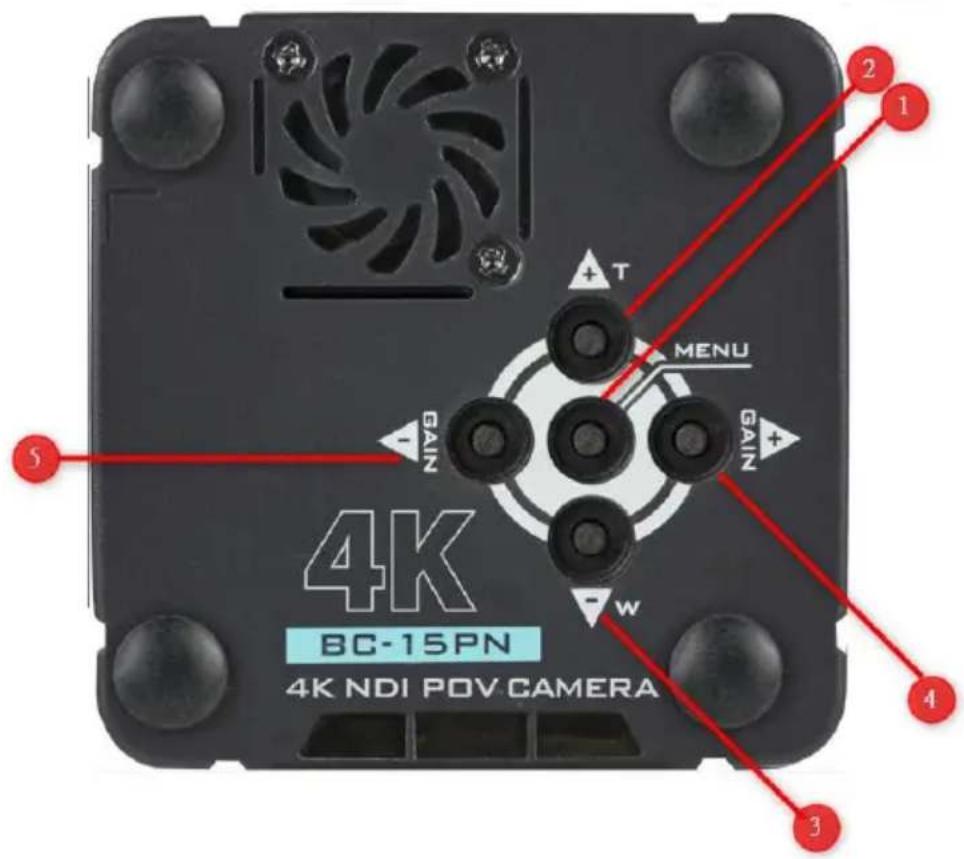
| 1 | MENU buttonPress the MENU key to open the OSD menu on the connected monitor.Once the OSD menu is opened, use the MENU key to confirm a selection. |
| 2 | UP-Arrow (Zoom In) buttonPress the up arrow key to move up the OSD menu.When the Button Shortcut is enabled and the OSD menu is shut down, press this key to zoom in. |
| 3 | Down-Arrow (Zoom Out) buttonPress the down arrow key to move down the OSD menu.When the Button Shortcut is enabled and the OSD menu is shut down, press this key to zoom out. |
| 4 | Right-Arrow (GAIN+) buttonPress the right arrow key to turn to the next page of the OSD menu or increase the value of a parameter.When the Button Shortcut is enabled and the OSD menu is shut down, press this key to increase the gain. |
| 5 | Left Arrow (Gain-) buttonPress the left arrow key to return to the previous page of the OSD menu or decrease the value of a parameter.When the Button Shortcut is enabled and the OSD menu is shut down, press this key to decrease the gain. |
Right Panel of the Camera (BC-15P)

Right Panel of the Camera (BC-15PN)

| 1 | LINE/MIC INThe 3.5mm headphone jack allows you to connect an external audio source using LINE IN or a stereo microphone using MIC IN. The external audio source is embedded in the output video. |
| 2 | DC IN 12VDC in socket connects the supplied 12V PSU. The connection can be secured by screwing the outer fastening ring of the DC In plug to the Socket. |
| 3 | HDMIUse an HDMI cable to connect an external monitor or switcher to display the camera image. |
| 4 | POE/LAN/DVIP(BC-15P)DVIP/LAN/POE/ NDI®|HX (BC-15PN)Use an Ethernet cable to connect the camera to a network for video streaming or firmware update. You can also connect DVIP devices such as a camera controller. |
Left Panel of the Camera
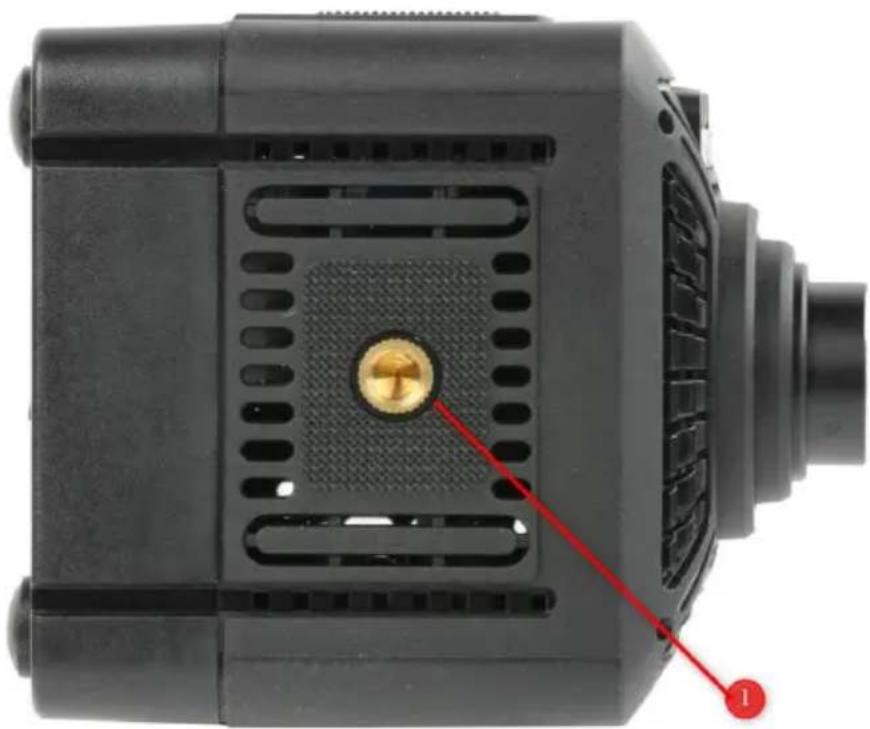
natural_image
Close-up of a black industrial component with ventilation grilles and a central circular feature, marked with red arrows pointing to features (no text or symbols visible)1/4-20 UNC Screw Hole
1 The 1/4-20 UNC screw hole allows you to secure the camera on mounting devices such as a tripod.
Top of the Camera

natural_image
Close-up of a black mechanical device with a gold circular component and red annotation line (no visible text or symbols)1/4-20 UNC Screw Hole
1 The 1/4-20 UNC screw hole allows you to secure the camera on mounting devices such as a tripod.
Bottom of the Camera

natural_image
Black data video camera module with visible ports and a red indicator light, no text or symbols on the device itself.| 1 | 1/4-20 UNC Screw HoleThe 1/4-20 UNC screw hole allows you to secure the camera on mounting devices such as a tripod. |
4. Basic Setup(Take BC-15P as an example)
Power-On
Connect the DC 12V power adapter to the DC IN socket.
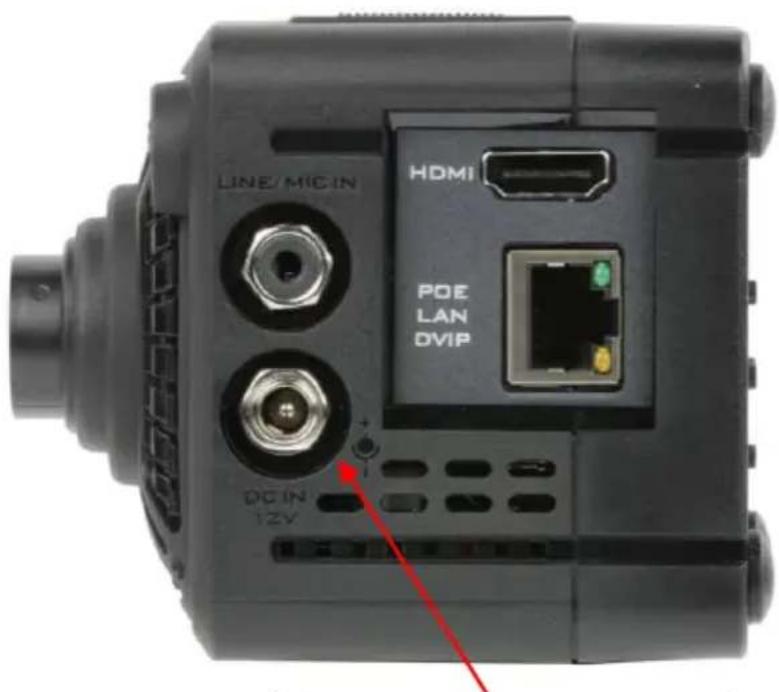
Connect the DC 12 V power adapter
Video Output

Connect HDMI devices such as TLM series monitors, ShowCast 100, iCast 10NDI, and HDR-80/90.
Via an HDMI cable, the HDMI interface will then be able to deliver the camera image to an HDMI display such as an HDMI monitor (TLM series monitors), a switcher (ShowCast 100/iCast 10NDI) or a recorder (HDR-80/90).
See OSD MENU → Video Output for setting the camera video resolution.
Audio Output
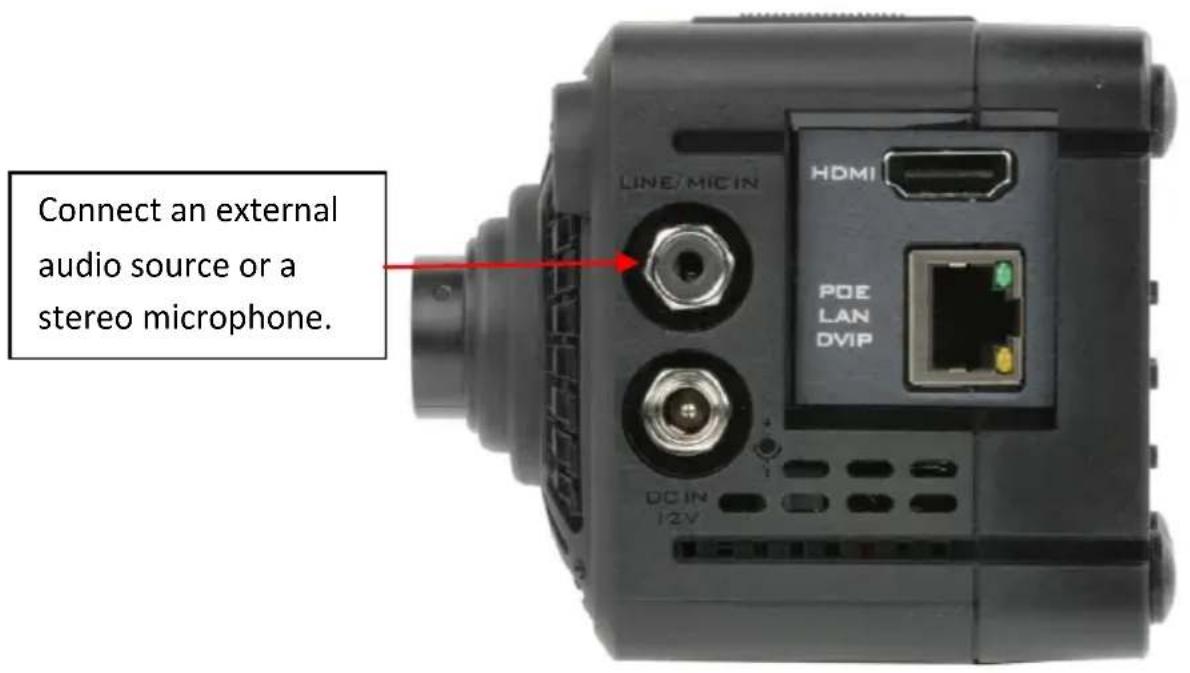
The 3.5mm headphone jack allows you to connect an external audio source using LINE IN or a stereo microphone using MIC IN. The external audio source is embedded in the output video.
Ethernet Port
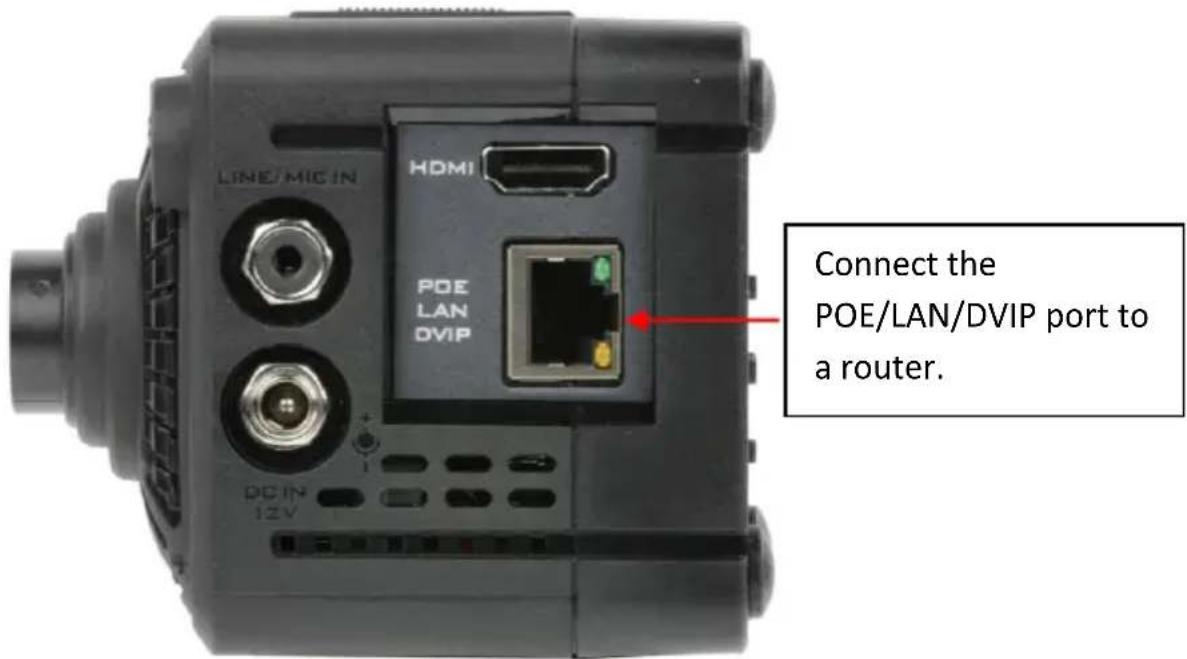
Connect the Ethernet interface to a router. The IP address can be found in Network of the OSD menu.
5. OSD menu
Chapter 5 describes the OSD menu. Most of the OSD menus of BC-15P and BC-15PN are the same, the only difference is that BC-15PN has "Stream/NDI" switching option, while BC-15P does not have "Stream/NDI" switching option. The following diagram shows the BC-15P as an example.

The OSD menu allows the user to modify various camera settings. Press the “MENU” key to open the OSD menu on the connected HDMI display.
Once the OSD menu is opened, press the up and down arrow keys to cycle through the menu, the left and right arrow keys to switch pages and the menu key to select.
Use the left and right arrow buttons to
change the value of a parameter. Press the right arrow key to increase and the left arrow key to decrease. Press the menu key to save the change and return to the previous menu level.
To exit without saving changes, simply select "Escape".
Please note that the current setting is highlighted in blue and indicated by an arrow icon.

The table below summarizes the main options and their sub-options.
| Main Options | |||||||||||||
| Zoom | Gain Limit | Shutter | White Balance | Exposure | Image Setting | Camera Setting | Video Output | Streaming | Network | Audio | System | Escape | |
| Sub Options | Zoom | Gain Limit | Shutter | Auto | Global | Contrast | Lens Select | Video Output | On | DHCP | Audio Input | Camera Name | |
| Escape | Escape | Escape | Indoor | Center | Brightness | AGC | Escape | Off | IP | Soundtrack | Language | ||
| Outdoor | eSport | Saturation | Gamma Mode | Switch To NDI/Switch Off NDI (This item is available for BC-15PN only.) | NetMask | Audio Standard | Preset | ||||||
| One-Push | Lock | Hue | 3DNR | Escape | Gateway | Escape | Tally Mode | ||||||
| Color Temp. | Manual | Sharpness | WDR | DNS1 | Button Shortcut | ||||||||
| R/B Gain | Escape | Escape | Mirror | DNS2 | Firmware | ||||||||
| Lock | Rotation | Reset | Factory Default | ||||||||||
| Escape | Anti-Flicker | Escape | Escape | ||||||||||
| Escape | |||||||||||||
Details of the OSD menu options are listed in the table below.
| Main Menu | Sub Menu | Options | Descriptions | |
| Zoom | Zoom | 1.0X (no zoom) | New setting will be applied without having to press the menu key. | |
| 1.1X | ||||
| 1.2X | ||||
| 1.3X | ||||
| 1.4X | ||||
| 1.5X | ||||
| 1.6X | ||||
| 1.7X | ||||
| 1.8X | ||||
| 1.9X | ||||
| 2.0X | ||||
| Escape | ||||
| Gain Limit | Gain Limit | 1.0dB | New setting will be applied without having to press the menu key. | |
| 2.0dB | ||||
| 3.0dB | ||||
| 4.0dB | ||||
| 5.0dB | ||||
| 6.0dB | ||||
| 7.0dB | ||||
| 8.0dB | ||||
| 9.0dB | ||||
| 10.0dB | ||||
| 11.0dB | ||||
| 12.0dB | ||||
| 13.0dB | ||||
| 14.0dB | ||||
| 15.0dB | ||||
| 16.0dB | ||||
| 17.0dB | ||||
| 18.0dB | ||||
| 19.0dB | ||||
| 20.0dB | ||||
| 21.0dB | ||||
| 22.0dB | ||||
| 23.0dB | ||||
| 24.0dB | ||||
| 25.0dB | ||||
| 26.0dB | ||||
| 27.0dB | ||||
| Escape | ||||
| Shutter | Shutter | NTSC Shutter | PAL Shutter | |
| 1/30 | 1/25 | |||
| 1/60 | 1/50 | |||
| 1/90 | 1/75 | |||
| 1/120 | 1/100 | |||
| 1/150 | 1/125 | |||
| 1/180 | 1/150 | |||
| 1/210 | 1/200 | |||
| 1/600 | 1/500 | |||
| 1/1200 | 1/1000 | |||
| 1/2400 | 1/2000 | |||
| 1/4800 | 1/4000 | |||
| 1/9000 | 1/8000 | |||
| Escape | ||||
| White Balance | Auto | |||
| Indoor | ||||
| Outdoor | ||||
| One-Push | ||||
| Color-Temp. | Color Temp. | 3000K | Manually configured color temperature will be overridden when white balance mode is set to non-manual modes. | |
| 3100K | ||||
| 3200K | ||||
| 3300K | ||||
| 3400K | ||||
| 3500K | ||||
| 3600K | ||||
| 3700K | ||||
| 3800K | ||||
| 3900K | ||||
| 4000K | ||||
| 4100K | ||||
| 4200K | ||||
| 4300K | ||||
| 4400K | ||||
| 4500K | ||||
| 4600K | ||||
| 4700K | ||||
| 4800K | ||||
| 4900K | ||||
| 5000K | ||||
| 5100K | ||||
| 5200K | ||||
| 5300K | ||||
| 5400K | ||||
| 5500K | ||||
| 5600K | ||||
| 5700K | ||||
| 5800K | ||||
| 5900K | ||||
| 6000K | ||||
| 6100K | ||||
| 6200K | ||||
| 6300K | ||||
| 6400K | ||||
| 6500K | ||||
| 6600K | ||||
| 6700K | ||||
| 6800K | ||||
| 6900K | ||||
| 7000K | ||||
| 7100K | ||||
| 7200K | ||||
| 7300K | ||||
| 7400K | ||||
| 7500K | ||||
| Escape | ||||
| R/B Gain | RGain | 0-255 | New setting can be previewed on the monitor and will be applied only after pressing the menu key.Please note that R Gain will be applied along with B Gain.Manually configured R Gain will be overridden when white balance mode is set to non-manual modes. | |
| BGain | 0-255 | New setting can be previewed on the monitor and will be applied only after pressing the menu key.Please note that B Gain will be applied along with R Gain.Manually configured B Gain will be overridden when white balance mode is set to non-manual modes. | ||
| Escape | ||||
| Lock | ||||
| Escape | ||||
| Exposure | Global | |||
| Center | ||||
| eSport | ||||
| Lock | ||||
| Manual | ||||
| Escape | ||||
| Image Setting | Contrast | Contrast | 0 | New setting can be previewed on the monitor and will be applied only after pressing the menu key. |
| 1 | ||||
| 2 | ||||
| 3 | ||||
| 4 | ||||
| 5 | ||||
| 6 | ||||
| 7 | ||||
| 8 | ||||
| 9 | |||
| 10 | |||
| Escape | |||
| Brightness | Brightness | 0 | New setting can be previewed on the monitor and will be applied only after pressing the menu key. |
| 1 | |||
| 2 | |||
| 3 | |||
| 4 | |||
| 5 | |||
| 6 | |||
| 7 | |||
| 8 | |||
| 9 | |||
| 10 | |||
| Escape | |||
| Saturation | Saturation | 0 | New setting can be previewed on the monitor and will be applied only after pressing the menu key. |
| 1 | |||
| 2 | |||
| 3 | |||
| 4 | |||
| 5 | |||
| 6 | |||
| 7 | |||
| 8 | |||
| 9 | |||
| 10 | |||
| Escape | |||
| Hue | Hue | 0 | New setting can be previewed on the monitor and will be applied only after pressing the menu key. |
| 1 | |||
| 2 | |||
| 3 | |||
| 4 | |||
| 5 | |||
| 6 | |||
| 7 | |||
| 8 | |||
| 9 | |||
| 10 | |||
| Escape: | |||
| Sharpness | Sharpness | 0 | New setting can be previewed on the monitor and will be applied only after pressing the menu key. |
| 1 | |||
| 2 | |||
| 3 | |||
| 4 | |||
| 5 | |||
| 6 | |||
| 7 | |||
| 8 | |||
| 9 | |||
| 10 | |||
| Escape : | |||
| Escape | |||
| Camera Setting | Lens Select | Standard Lens | |
| eSport Lens | |||
| Escape | |||
| AGC | ON | ||
| Off | |||
| Escape | |||
| Gamma Mode | Standard | ||
| Mode1 | |||
| Mode2 | |||
| Mode3 | |||
| Escape | |||
| 3D NR | ON | ||
| Off | |||
| Escape | |||
| WDR | ON | ||
| Off | |||
| Escape | |||
| Mirror | Off | ||
| H | |||
| V | |||
| H+V | |||
| Escape | |||
| Rotation | 0 | ||
| 90 | |||
| 270 | |||
| Escape | |||
| Anti-Flicker | Off | ||
| 50HZ | |||
| 60HZ | |||
| Escape | |||
| Escape | |||
| Video Output | Video Output | 2160 60p | |
| 2160 59.94p | |||
| 2160 50p | |||
| 2160 30p | |||
| 2160 29.97p | |||
| 2160 25p | |||
| 1080 60p | |||
| 1080 59.94p | |||
| 1080 50p | |||
| 1080 30p | |||
| 1080 29.97p | |||
| 1080 25p | |||
| Escape | |||
| Streaming | OnOff | This "Streaming" mode is only applicable to BC-15PN, not BC-15P. If in Streaming mode, press "Switch to NDI",it will switch to NDI mode. If in NDI mode, press "Switch Off NDI", it will turn off the NDI mode. | |
| Switch to NDI /Switch Off NDI | |||
| Escape | |||
| Network | DHCP | On | |
| Off | |||
| Escape | |||
| IP | IP | ||
| Escape | |||
| NetMask | NetMask | ||
| Escape | |||
| Gateway | Gateway | ||
| Escape | |||
| DNS1 | DNS1 | ||
| Escape | |||
| DNS2 | DNS2 | ||
| Escape | |||
| Reset | Reset Default Setting No/Yes | ||
| Escape | |||
| Audio | Audio Input | Line IN | |
| Mic IN | |||
| Escape | |||
| Soundtrack | Stereo | ||
| Mono | |||
| Escape | |||
| Audio Standard | SMPTE | ||
| EBU | |||
| Escape | |||
| Escape | |||
| System | Camera Name | BC-15P/BC-15PN | |
| Escape | |||
| Language | English | ||
| Traditional Chinese | |||
| Simplified Chinese | |||
| Escape | |||
| Preset | Preset Default | ||
| Load User1 | |||
| Load User2 | |||
| Save User1 | |||
| Save User2 | |||
| Escape | |||
| Tally Mode | Off | ||
| Red | |||
| Green |
| Red/GreenEscapeOnOffEscapeVersion | NoYes | |
| ButtonShortcut | ||
| Firmware | Update | |
| Factory Default | EscapeNoYes | |
| Escape |
Escape
Zoom
A digital zoom is when a camera recreates the effect of zooming in with a lens by capturing the image from an increasingly smaller area of the camera's sensor, and then blowing up that image to the regular size.
The available zoom ratios are 1.0X (no zoom), 1.1X, 1.2X, 1.3X, 1.4X, 1.5X, 1.6X, 1.7X, 1.8X, 1.9X and 2.0X.
Gain Limit
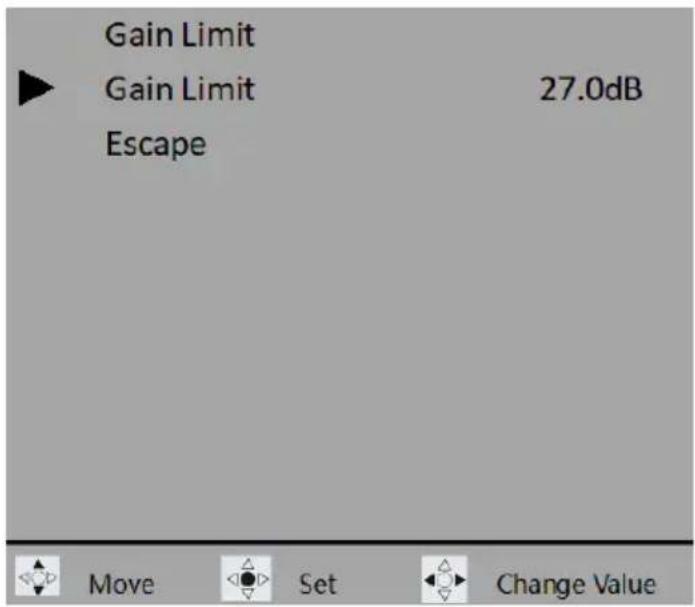
At a higher gain, the brightness becomes more appropriate in dim scenes, but the noise increases. To limit the noise level, you can select the upper limit for the Gain from the list below.
1.0 dB/2.0 dB/3.0 dB/4.0 dB/5.0 dB/6.0 dB/7.0 dB/8.0 dB/9.0 dB/10.0 dB/11.0 dB/12.0 dB/13.0 dB/14.0 dB/15.0 dB/16.0 dB/17.0 dB/18.0 dB/19.0 dB/20.0 dB/21.0 dB/22.0 dB/23.0 dB/24.0 dB/25.0 dB/26.0 dB/27.0 dB
Shutter
Shutter speed is the length of time the camera shutter is open, exposing light onto the camera sensor.
Shutter speeds are typically measured in fractions of a second when they are under a second. For example, 1/4 means a quarter of a second, while 1/250 means one-two-hundred-and-fiftieth of a second (or four milliseconds).
BC-15P/BC-15PN offers NTSC and PAL speeds, sorted by the following
- NTSC: 1/30, 1/60, 1/90, 1/120, 1/150, 1/180, 1/210, 1/600, 1/1200, 1/2400, 1/4800 and 1/9000.
● PAL: 1/25, 1/50, 1/75, 1/100, 1/125, 1/150, 1/200, 1/500, 1/1000, 1/2000, 1/4000, 1/8000

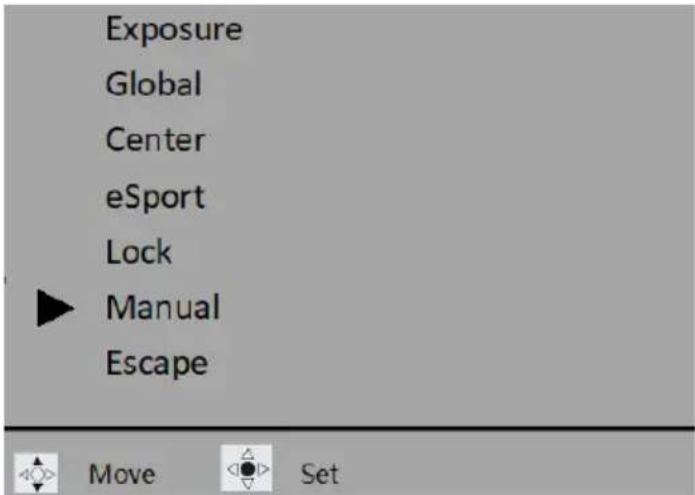
Please note that the exposure mode must be set to manual before you can adjust the shutter speed.
White Balance
Certain light conditions can cause discoloration of your image. White balance allows you to adjust the color balance in order to produce the best image quality. The BC-15P/BC-15PN offers auto and manual modes for white balance adjustment. Various modes will be described in this section.

Auto
If Auto is selected, the most accurate colors will be selected automatically for the current scene. The white balance will be adjusted automatically when lighting conditions change. Auto is the most recommended mode for most situations or when you have to move frequently between different scenes.
Note: Select "Lock" if you want to fix the current white balance setting.
Indoor
If Indoor is selected, the white balance will be adjusted to the following scenes:
- Indoors
- At party scenes or studios where the lighting conditions change quickly
- Under video lamps in a studio, or under sodium lamps or incandescent-like color lamps
- Shooting outdoor at dawn or dusk
- Shooting outdoor on cloudy days or at night with incandescent-like color lamps
Outdoor
If Outdoor is selected, the white balance will be adjusted to the following scenes:
- Outdoors using sunlight as the light source
- Mixed light sources (sunlight and artificial light)
- Night views, neon signs and fireworks
- Sunrise or sunset
- Under daylight fluorescent lamps
One-push
The one-push mode, when selected, adjusts the white balance once according to the ambient light. If the lighting condition changes, you will need to recalibrate the white balance setting by selecting the one-push mode again.
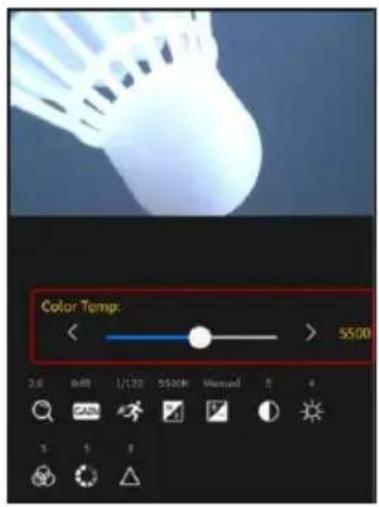
Color Temperature
Set the color temperature to manually adjust the white balance setting.

See the table below for color temperatures of the corresponding light sources:

heatmap
| Value | |---| | 1800K | | 4000K | | 5500K | | 8000K | | 12000K | | 16000K || Lighting Source | Color Temperature Value |
| Sunlight (Sunrise/Sunset) | 3200 °K |
| Tungsten/Halogen Lights | 2800-3400 °K |
| Sunlight (noon) | 5500 °K |
| HID Lights | 5500-7500 °K |
| Sunlight (cloudy day) | 6500-7500 °K |
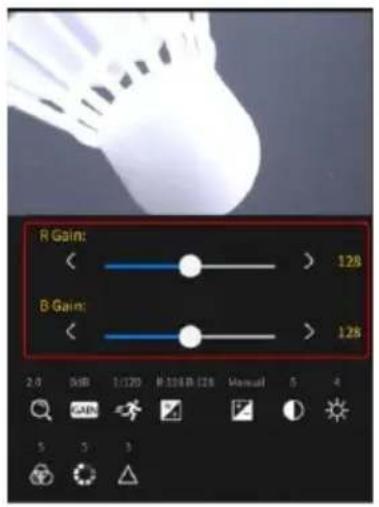
R/B Gain
The "R/G Gain" allows you to adjust the video's red and blue components.

Lock
In Auto mode, you can select "Lock" to fix the white balance setting after the most accurate colors have been selected for the current scene.
Follow the procedure below to lock the current white balance setting in Auto mode:
- Open OSD menu, then select White Balance → Auto to enable auto white balance after which you will return to the main menu.
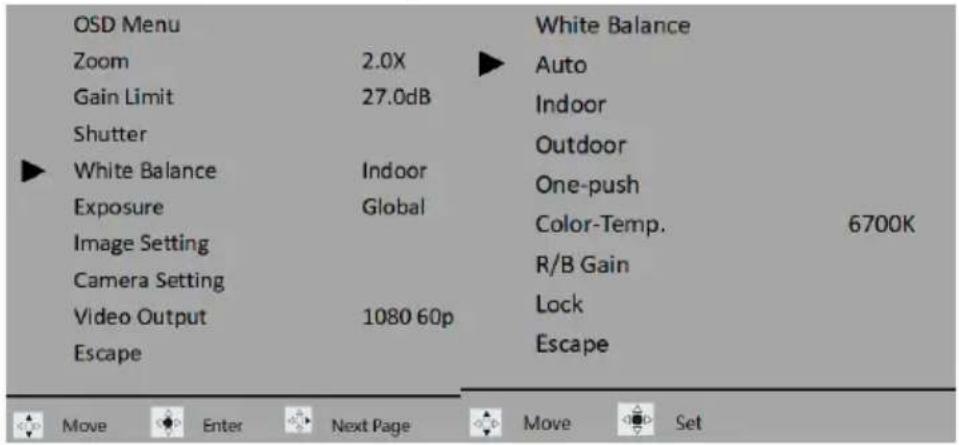
- On the main menu, select White Balance → Lock.

- The current white balance setting is locked when Auto mode appears as Auto Lock as shown below.

To re-enable Auto mode, simply select Unlock.
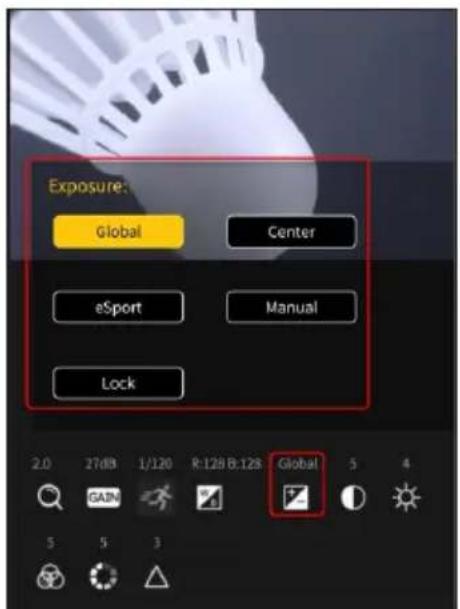
Exposure
The Exposure basically controls the amount of light that reaches the camera sensor. You can allow the camera to adjust the exposure automatically or do it manually.
Global
Auto mode; light intensity is evenly distributed across the entire video image.
Center
Auto mode; light intensity is concentrated in a circular area in the center of the video.
eSport
This auto exposure mode is designed specifically for the eSport games.
Lock
When selected, the current exposure setting will be locked.
Manual
Enable Manual mode to manually adjust the exposure by changing the shutter speed in Shutter sub menu.
| OSD Menu | Exposure | |
| Zoom | 2.0X | Global |
| Gain Limit | 27.0dB | |
| Shutter | 1/60 | Center |
| White Balance | Auto | eSport |
| Exposure | Manual | Lock |
| Image Setting | ||
| Camera Setting | Manual | |
| Video Output | 1080 60p | Escape |
| Escape |
Image Setting
BC-15P/BC-15PN allows you to adjust the following image parameters:
- Contrast: 0/1/2/3/4/5/6/7/8/9/10
- Brightness: 0/1/2/3/4/5/6/7/8/9/10
- Saturation: 0/1/2/3/4/5/6/7/8/9/10
- Hue: 0/1/2/3/4/5/6/7/8/9/10
- Sharpness: 0/1/2/3/4/5/6/7/8/9/10
Note: New setting can be previewed on the monitor and will be applied only after pressing the menu key.
| OSD Menu Zoom 2.0X Gain Limit 20.0dB Shutter White Balance Exposure Global ► Image Setting Camera Setting Video Output 1080 60p Escape | Image Setting ▶ Contrast 6 Brightness 5 Saturation 5 Hue 5 Sharpness 5 Escape |
| Move Enter Next Page | Move Enter |
Camera Setting
Various camera setting options will be described in this section.

Lens Select
Depending on the lens used, you can either select Standard or eSport (wide angle) lens.
| Camera Setting | Lens Select | |
| Lens Select | Standard Lens | Standard Lens |
| AGC | On | eSport Lens |
| Gamma Mode | Standard | Escape |
| 3DNR | Off | |
| WDR | Off | |
| Mirror | Off | |
| Rotation | 0 | |
| Anti-Flicker | Off | |
| Escape | ||
| Move Enter | Move Set | |
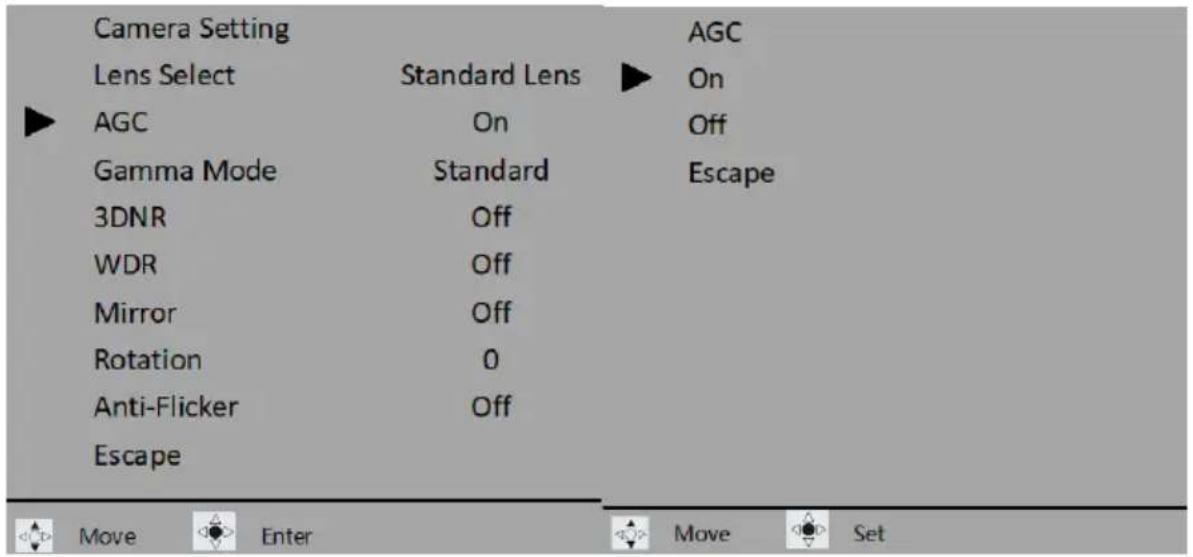
AGC
Automatic Gain Control or AGC, when turned on, allows the camera to automatically boost the image received so that objects can be seen more clearly. When enabled, you will not be able to manually adjust the gain and shutter speed.
Please note that at a higher gain, the brightness becomes more appropriate in dim scenes, but the noise increases. At a lower gain, the noise decreases, but the shutter speed becomes slower to compensate for the lack of brightness, causing camera-shake or subject blur.
Gamma Mode
The gamma modes include Standard, Mode1, Mode2 and Mode3.

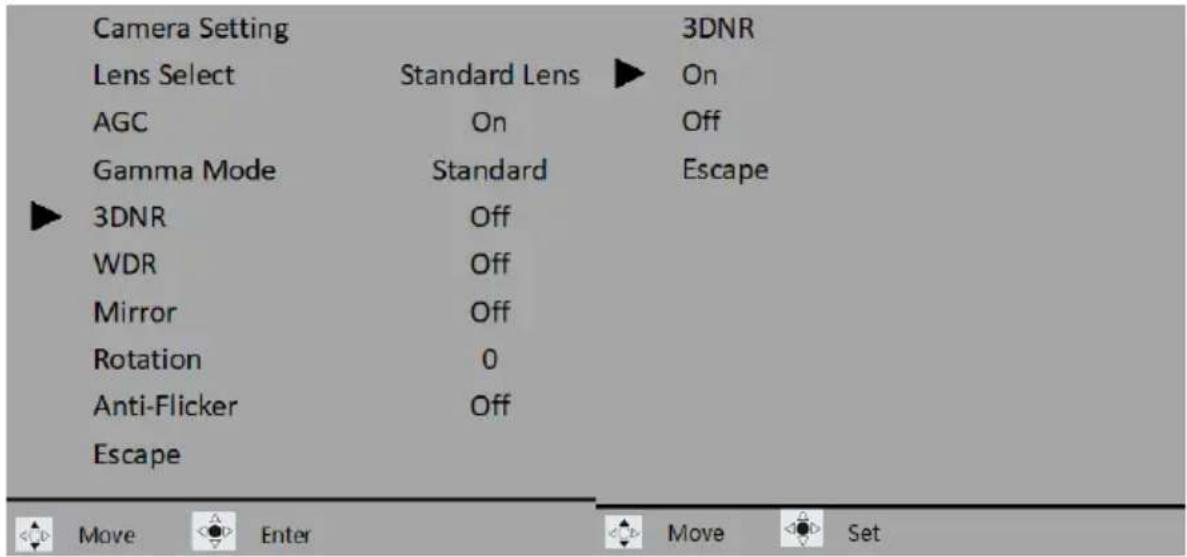
3DNR
3DNR stands for 3D Noise Reduction. Enable to remove image noise from the camera video.
WDR
WDR, short for Wide Dynamic Range, refers to high dynamic range imaging. Enable WDR to improve your image quality.
| Camera Setting | WDR | |
| Lens Select | Standard Lens | On |
| AGC | On | Off |
| Gamma Mode | Standard | Escape |
| 3DNR | Off | |
| WDR | Off | |
| Mirror | Off | |
| Rotation | 0 | |
| Anti-Flicker | Off | |
| Escape | ||
| Move Enter | Move Set | |
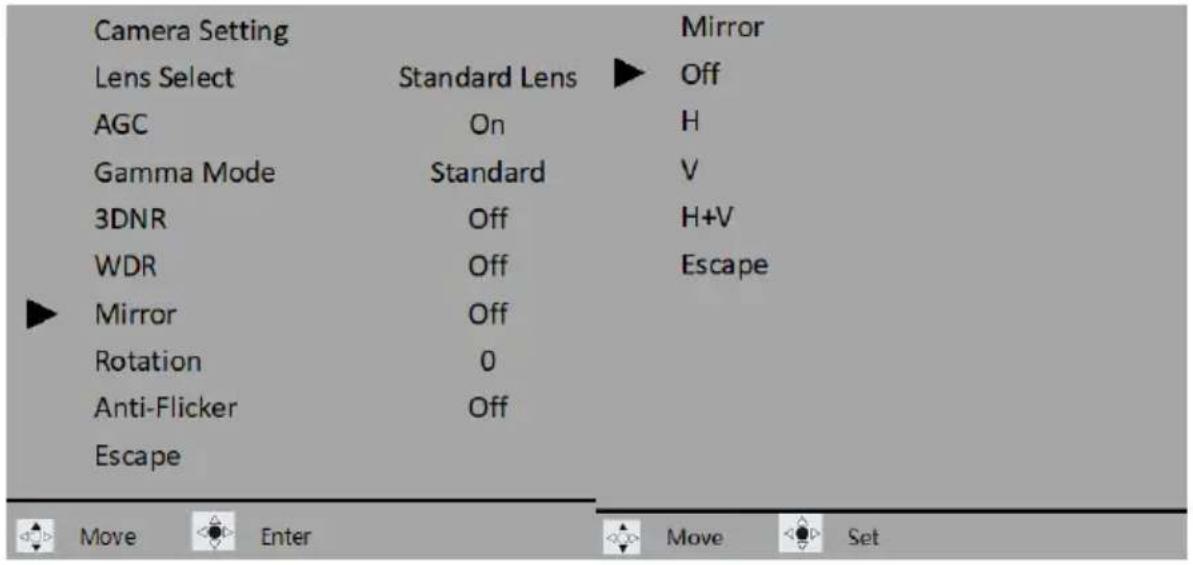
Mirror
Use the mirror function to flip your video. With horizontal mirror, you create a mirror image of the original clip so what's on the left will appear on the right. With vertical mirror, the video appears upside down. If you select H+V, horizontal and vertical mirrors will be enabled at the same time.
Rotation
You can rotate your video by 90 or 270 degrees. 0 means no rotation.

Anti-Flicker
BC-15P/BC-15PN's anti-flicker mode has been designed to work with light flicker occurring at 50Hz and 60Hz frequencies.

Video Output
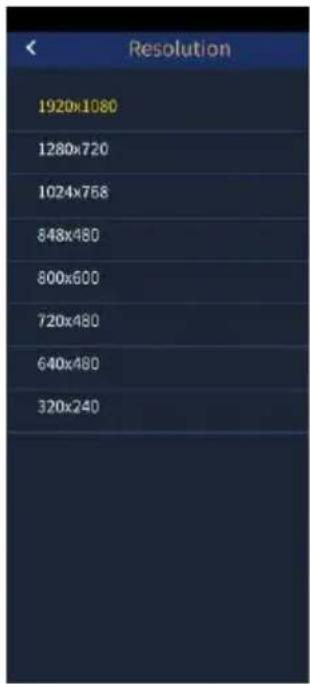
Set the camera's output resolution in Video Output. The available resolutions include 1080 25p, 1080 29.97p, 1080 30p, 1080 50p, 1080 59.94p, 1080 60p, 2160 25p, 2160 29.97p, 2160 30p, 2160 50p, 2160 59.94p, and 2160 60p.

Streaming
If your camera is a BC-15 PN, this "Streaming" option allows you to switch between normal streaming mode and NDI mode. If your BC-15PN camera is in Normal Streaming Mode, use "Streaming→Switch to NDI" to switch your camera to NDI Mode. If your BC-15PN camera is in NDI mode, utilize "Streaming→Switch Off NDI" to turn off NDI mode. When you switch between "Switch to NDI" and "Switch Off NDI" modes, the camera will restart automatically. Please note that the "Switch to NDI" and "Switch Off NDI"
options are only available for the BC-15PN, not the BC-15P. If your camera is a BC-15P, use "Streaming→On" to start the push stream or "Streaming→Off" to stop the push stream.
BC-15P


BC-15PN


Network
The Network option allows you to set several network related parameters. The factory default value for the BC-15P/BC-15PN is DHCP ON. If you set the DHCP to OFF, and then the BC-15P/BC-15PN's static IP address will be 192.168.100.100. Moreover, you can set several parameters manually including NetMask, Gateway, DNS1 and DNS2. Furthermore, there is a “Reset” option for you to reset this option to the factory default.

DHCP
You can select "On" or "Off" in this menu to turn on or turn off the DHCP mode. The factory default is DHCP ON.

IP
The default static IP address of the BC-15P/BC-15PN is 192.168.100.100. If the DHCP is turned "Off", you can adjust the static IP address manually.

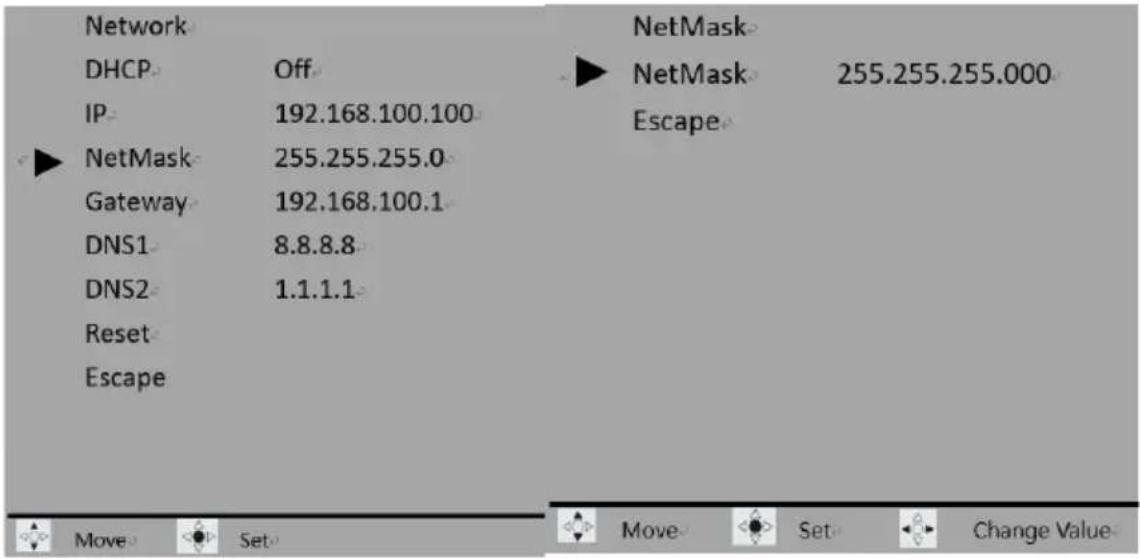
NetMask
This option allows you to adjust the "NetMask" address. If the DHCP is turned "Off", you can adjust the "NetMask" address manually.
Gateway
This option allows you to adjust the "Gateway" address. If the DHCP is turned "Off", you can adjust the "Gateway" address manually.

DNS1
This option allows you to adjust the DNS 1 address. If the DHCP is turned off, you can adjust this option manually.
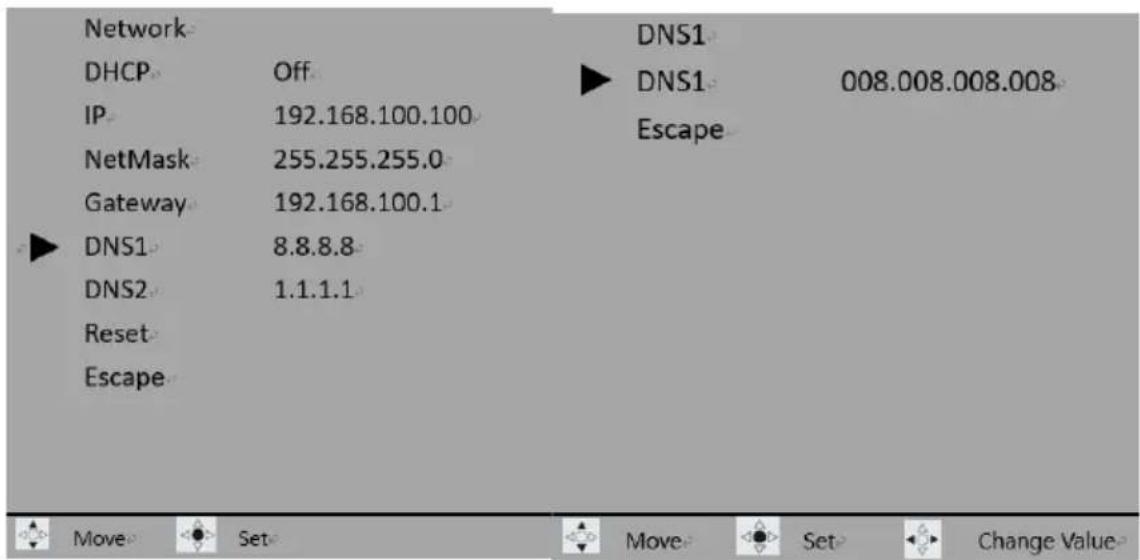
DNS2
This option allows you to adjust the DNS2 address. If the DHCP is turned off, and then you can adjust the DNS2 address manually.
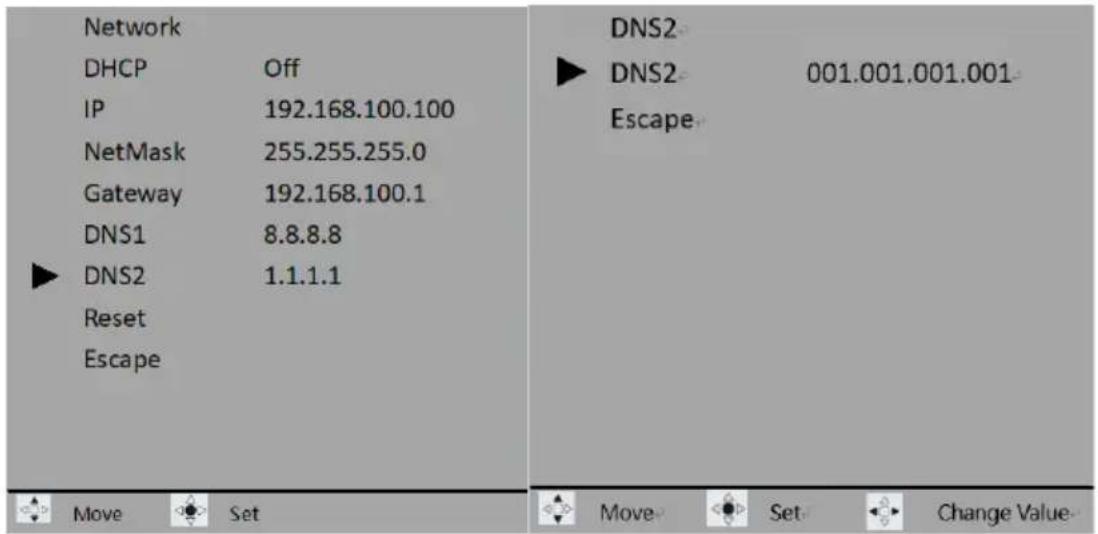
Reset
This option allows you to resume BC-15P/BC-15PN's network related parameters to the factory default.

Audio
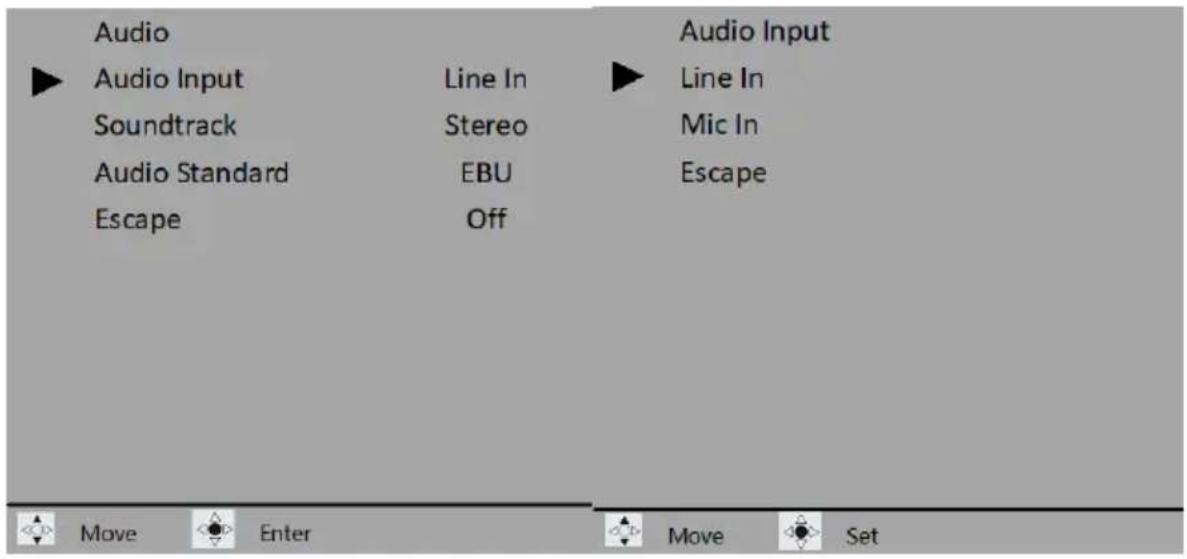
In the Audio menu, you can select the audio input, set the output audio format and audio standard, here is an example of the BC-15PN interface. * Note that the BC-15P/PN needs to be restarted after adjusting the sound settings, and do not change the sound settings while streaming (you must stop streaming first).
Audio Input
You can either select "Mic In" or "Line In" as the audio input.
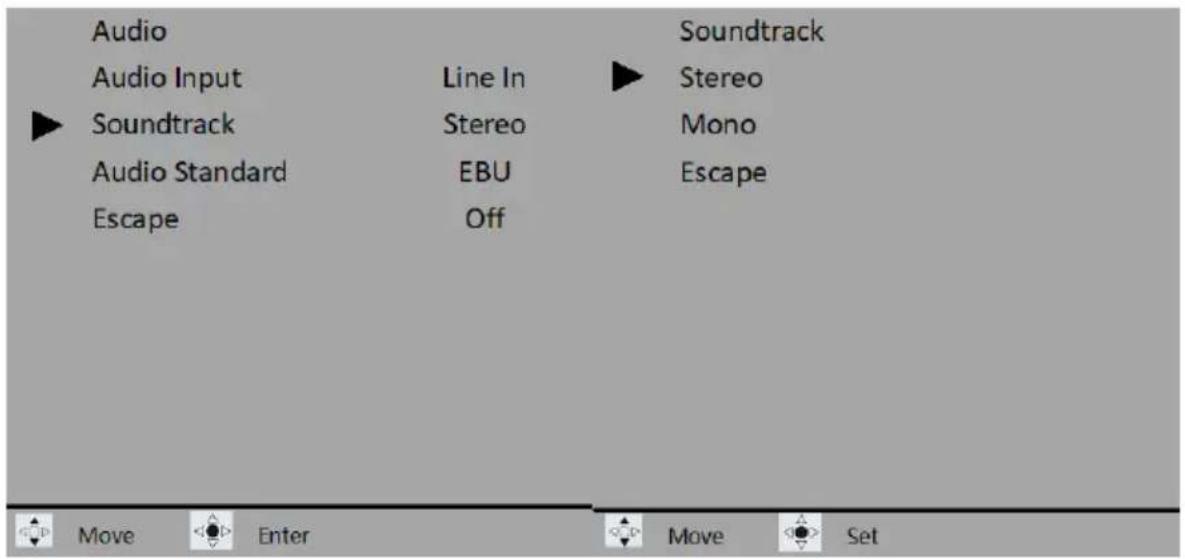
Soundtrack
Set the output audio format to either "Stereo" or "Mono".
Audio Standard
The audio standard options are EBU or SMPTE.

System
System parameters include Camera Name, Language, Preset, Tally Mode, Button Shortcut, Firmware and Factory Default. The following is an example of the BC-15P.
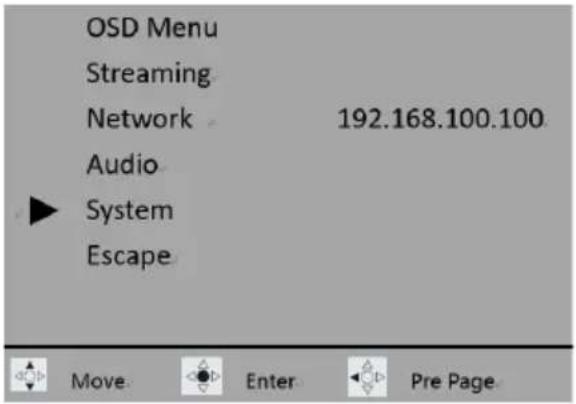
Camera Name
This option can show the camera name which is set by you.

Language
Currently not available.
Preset
BC-15P/BC-15PN provides two presets for saving camera settings. These presets can be loaded for later use. They allow you to quickly apply a set of camera settings, which is useful when switching between different setups or environments.

Once you've finished configuring your camera settings, enter Preset sub menu then select either User1 or User 2 to save the camera settings as a Preset.

To load a preset, simply select the corresponding user preset (Load User1 or Load User2). The camera will reboot itself after the preset is loaded successfully.
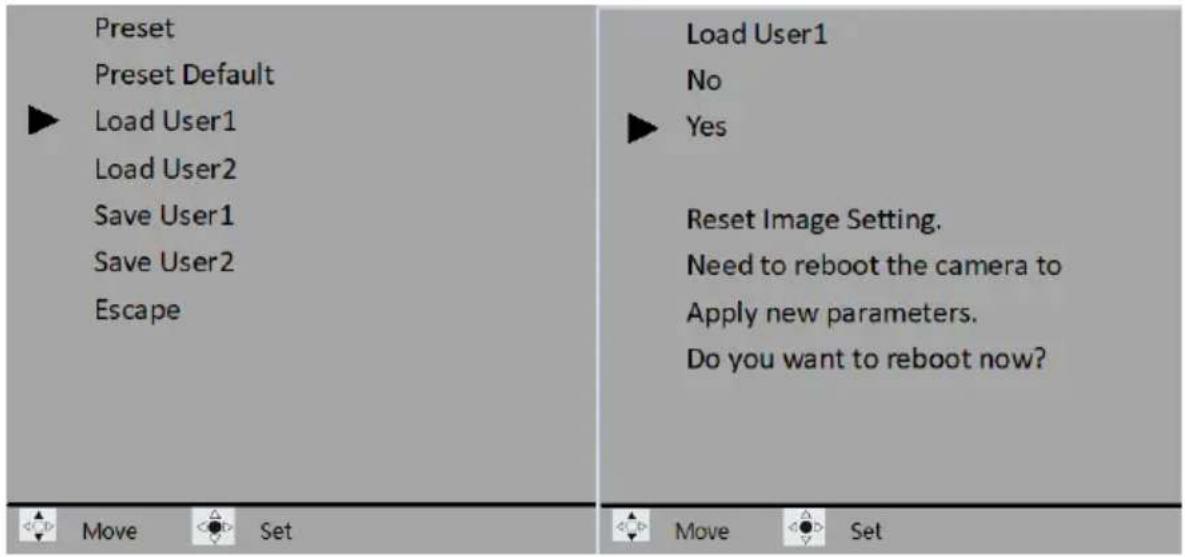
Select Preset Default to restore the preset defaults. Please note that only default settings related to Streaming, Network, Audio and System will be restored.
Tally Mode
This option allows you to select different Tally modes including "Off", "Red", "Green" and "Red/Green".

Button Shortcut
You are allowed to enable the button shortcuts.
| System | Button Shortcut | |
| Camera Name | BC-15P | On |
| Language | English | Off |
| Preset | Escape | |
| Tally Mode | Red | |
| ►Button Shortcut | On | |
| Firmware | Ver.1.01.15 | |
| Factory Default | ||
| Escape | ||
| Move Enter | Move Set | |
Once the button shortcuts are enabled, you can press the left and right arrow keys to increase and decrease the gain respectively. Press the up arrow key to zoom in and down arrow key to zoom out. This chapter takes the BC-15P as an example.

Firmware
The current firmware version is shown.
See Firmware Update for firmware upgrade instructions.
Factory Default
Select Factory Default to reset the camera to its default values except Video Output, Audio Standard and Language.
The camera needs to be rebooted to complete the system reset.

6. How to Control the BC-15P/BC-15PN by the BC View Assist App
The BC View Assist app is developed by Datavideo for you to control the BC-15P/BC-15PN by using mobile device such as handset or tablet. For the details of the BC View Assist app, please refer to the following section.
How to Connect and Launch the BC View Assist App
Before controlling the BC-15P/BC-15PN camera by the BC View Assist app, please follow the procedures below to connect your mobile device and the BC-15P/BC-15PN camera.
-
The factory default IP mode of the BC-15P/BC-15PN is the DHCP mode. Please prepare a router and then use an RJ-45 Ethernet cable to connect from the "POE/LAN/DVIP" interface of your BC-15P/BC-15PN to the "LAN" interface which is located on the rear panel of your router.
-
Please download and install the BC View Assist app by one of the following ways.
-
If your handset is the Android-based system, please go to Google Play and then search "BC View Assist" to download and install (Currently Not Available).
-
If your handset is the iOS-based device, please go to App Store and then search "BC View Assist" to download and install the app (Currently Not Available).
-
After it is downloaded and installed, you can see the BC View Assist icon from your handset (take the Android phone as an example).

- Please turn on the Wi-Fi switch of your handset, and then please select the Wi-Fi signal which is sent by the router which is connected by your BC-15P/BC-15PN camera. In this section, we will take "ASUS_D8_5G" as an example. - Please tap the "ASUS_D8_5G" Wi-Fi signal.

- You can see that the "ASUS_D8_5G" Wi-Fi signal is successfully connected.

- At this time, please open the BC View Assist app, and then it will search the connected DVIP protocol supported device automatically which is shown in the following diagram.

- After the following diagram is shown, it means that your BC-15P/BC-15PN camera is found successfully. Please check the checkbox next to the BC-15P/BC-15PN and then press the "OK" button.
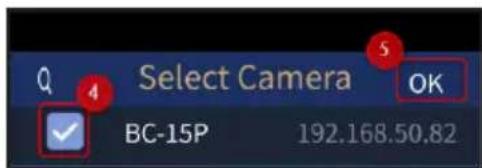
- You can see that your BC-15P/BC-15PN is connected successfully which is shown in the following diagram. Please tap the camera icon to enter the preview screen.

Introduction of the BC View Assist App Main Interface
When the main interface is shown, the values which are shown on the main interface represent the values which are set within BC-15P/BC-15PN's OSD menu. Please slide to the left side from the first page of the main interface, and then you can see the second page of the main interface. For the introduction of the main interface of the BC View Assist app, please refer to the following section.
First page of the main
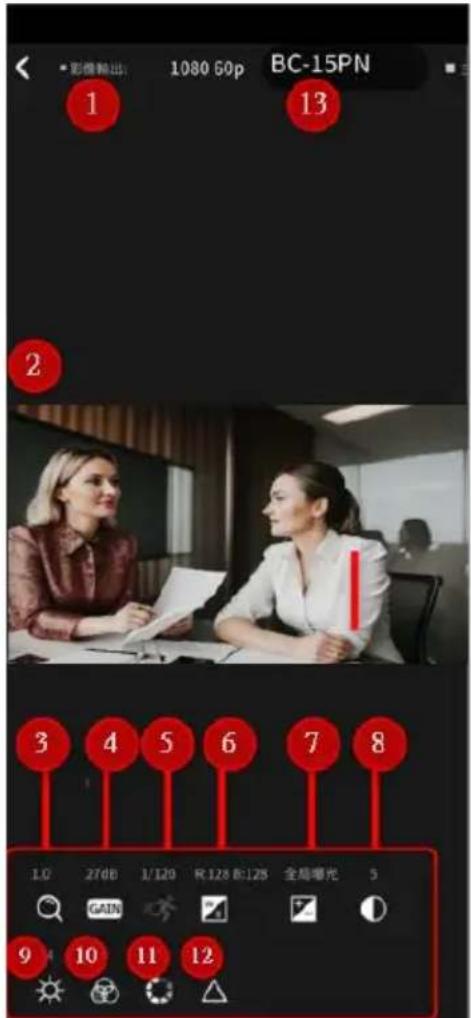
Second page of the main interface
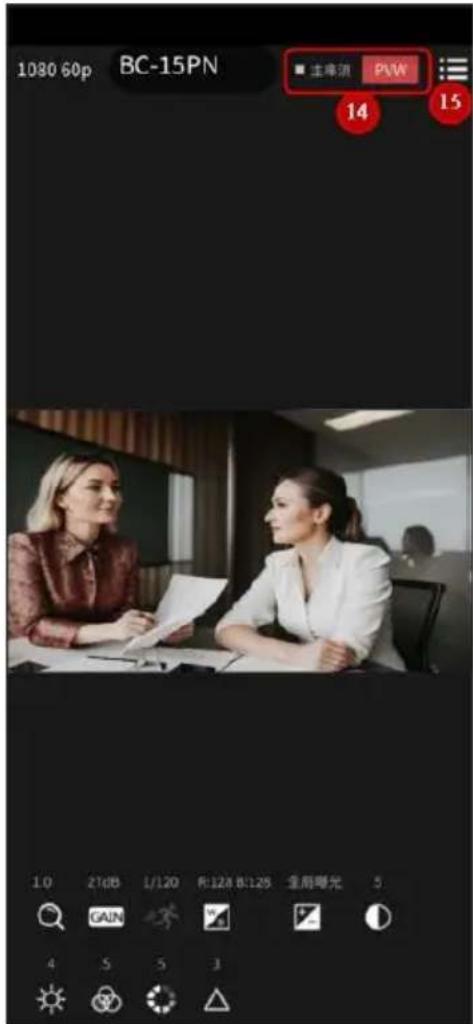
1. Video Output
This option can show the current resolution setting of yours BC-15P/BC-15PN. For details, please refer to Video Output section in Chapter 5.
2. Preview Screen
This preview screen can show the real-time screen which is shot by your BC-15P/BC-15PN. Please refer to "9. How to Use BC View Assist to View Images from the BC-15P/PN".
3. Zoom
This “Zoom” option allows you to adjust the “Zoom” ratio of the BC-15P/BC-15PN. Please tap the “Zoom” icon, and then adjust your desired value by using the left and right button or the slider on the screen. For details, please refer to Zoom section in Chapter 5.
4. Gain Limit
Please use this option to adjust the Gain Limit. Please tap the “Gain Limit” icon, and then adjust your desired value by using the left and right button or the slider on the screen. For details, please refer to Gain Limit section in Chapter 5.


5. Shutter
Please use this option to adjust the Shutter Speed. Please tap the “Shutter” icon, and then adjust your desired value by using the left and right button or the slider on the screen. For details, please refer to Shutter section in Chapter 5.

6. White Balance
Please tap this option and then choose your desired White Balance mode from different White Balance modes. If you want to select the White Balance mode such as “Auto”, “Indoor”, “Outdoor”, “One-push” or “Lock”, please select your desired White Balance mode after pressing the White Balance icon. If you want to select “Color temp.” or “R/B Gain”, please adjust the value directly by the left or right button or by using the slider after pressing those modes. For details, please refer to White Balance section in Chapter 5.

7. Exposure
Please tap this option and then choose your desired Exposure mode. For details, please refer to Exposure section in Chapter 5.
8. Contrast
Please use this option to adjust the Contrast. Please tap the “Contrast” icon, and then adjust your desired value by using the left and right button or the slider on the screen. For details, please refer to Image Setting section in Chapter 5.
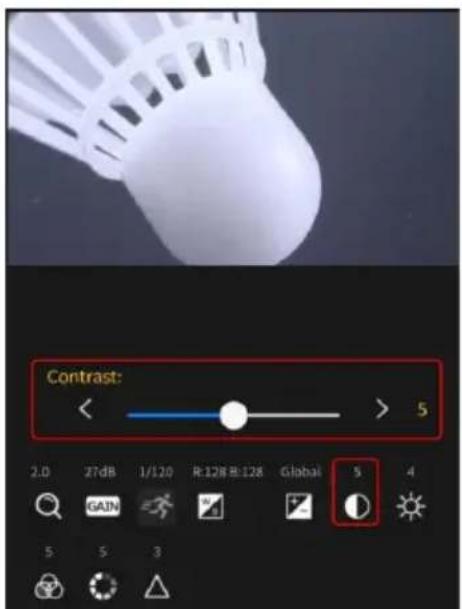
9. Brightness
Please use this option to adjust the Brightness. Please tap the "Brightness" icon, and then adjust your desired value by using the left and right button or the slider on the screen. For details, please refer to Image Setting section in Chapter 5.
10. Saturation
Please use this option to adjust the Saturation. Please tap the “Saturation” icon, and then adjust your desired value by using the left and right button or the slider on the screen. For details, please refer to Image Setting section in Chapter 5.


11. Hue
Please use this option to adjust the Hue. Please tap the "Hue" icon, and then adjust your desired value by using the left and right button or the slider on the screen. For details, please refer to Image Setting section in Chapter 5.
12. Sharpness
Please use this option to adjust the Sharpness. Please tap the "Sharpness" icon, and then adjust your desired value by using the left and right button or the slider on the screen.

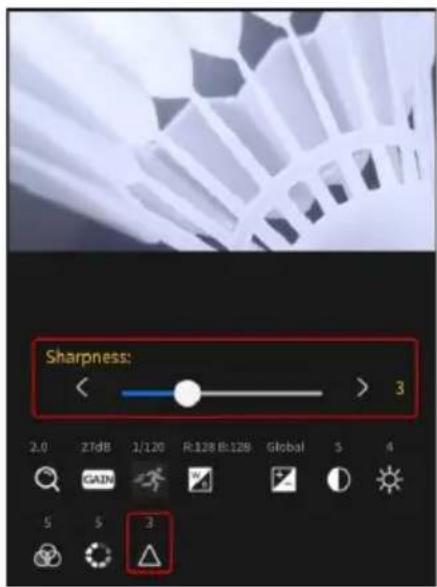
13. Camera Name
This “Camera Name” shows the camera name that is set for the BC-15P/BC-15PN in “Menu>Camera>Camera Name”.
14. Stream
In this section, it will show the streaming situation which is set in "Menu>Stream>Main Stream".

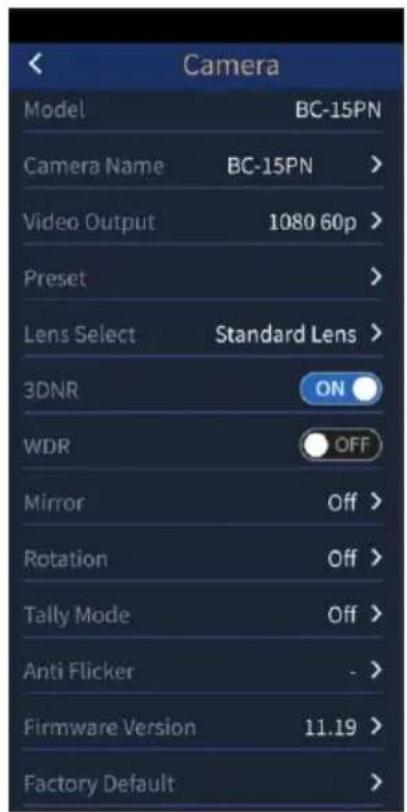
15. Menu Button
After pressing this "Menu" button, you can enter the menu list in "Menu>Camera" which is shown in the following diagram.

Menu Introduction of the BC View Assist App
The Menu of the BC View Assist App will be introduced in the following chapter. You can enter the Menu by the following two ways.
● After the BC View Assist App is connected successfully, you can enter the Menu from "Camera List"
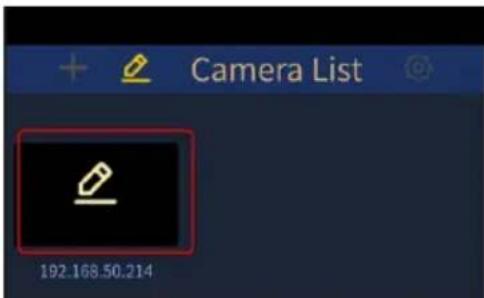
After your BC View Assist app and the BC-15P/BC-15PN is connected successfully, you can see the screen below. Please press the pencil icon which is located at the top side and then please press the pencil icon which is located in the camera icon frame. And then you can enter the "Menu" page.

● After the BC View Assist App is connected successfully, you can press the “Menu” button from the main interface to enter the “Menu” interface
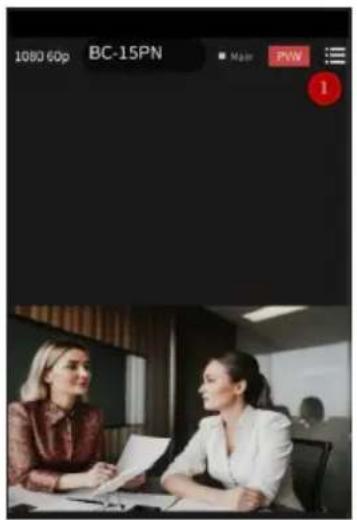
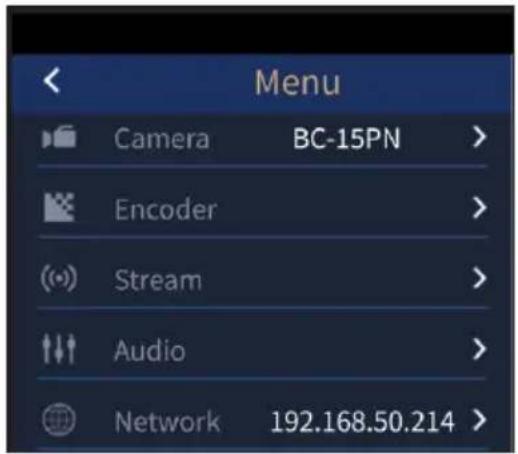
After entering into the Menu, you can see the main interface of the "Menu" which is shown in the following diagram. There are several options including "Camera", "Encoder", "Stream", "Audio" and "Network".

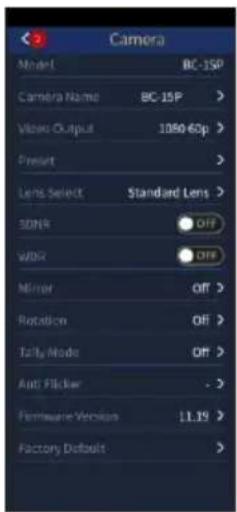
Camera
Please press the “Camera” option and then you can see the camera menu which is shown in the following diagram.
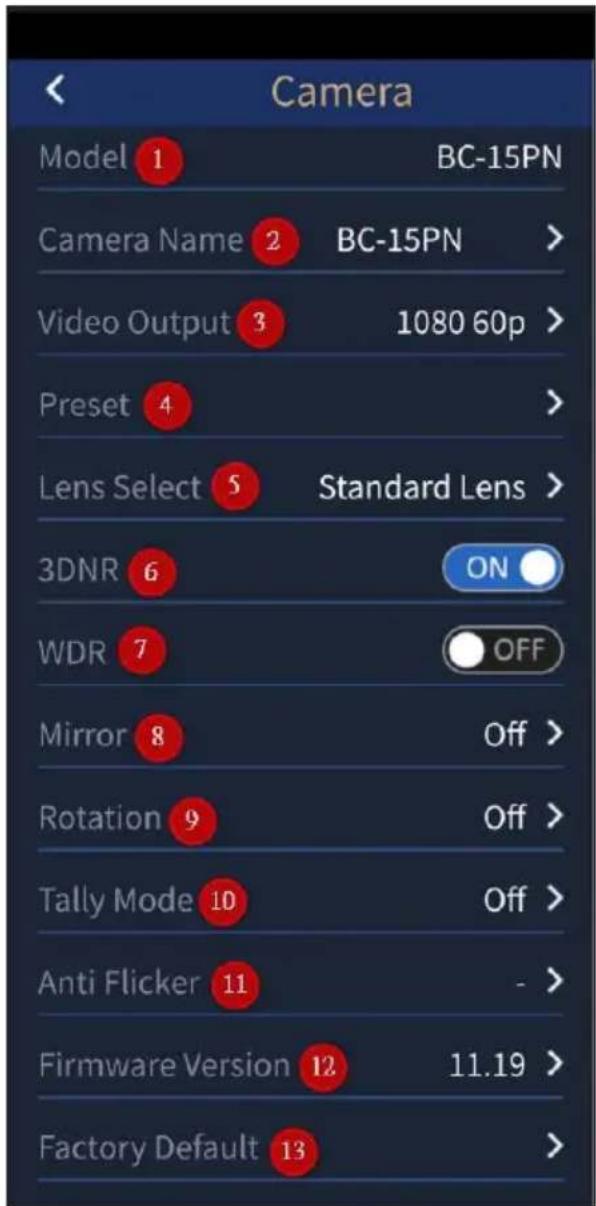
-
Model: This column shows BC-15P/BC-15PN.
-
Camera Name: This column shows the camera that is set by yourself. If you want to modify the camera name, please tap this column once to enter the "Camera Name" interface for modifying the camera name. After that, please press the "OK" button.

- Video Output: Please tap this column to enter the "Video Output" interface to choose your desired output resolution.
- Preset: Please tap this column to enter the "Preset" interface which is shown in the following diagram. After the desired preset values for the BC-15P/BC-15PN are set, please press "Save User 1/Save User 2" for saving the preset settings. Please tap "Load User 1/Load User 2" to load the pre-saved settings. Please tap "Preset Default" to resume the User 1 and User 2 to their default values.

- Lens Select: Please tap this option to select "Standard" or "eSport" camera lens.

- 3D NR: This option allows you to turn on/turn off the 3D NR function.
- WDR: This option allows you to turn on /turn off the WDR function.
- Mirror: Please tap this option to enter the "Mirror" interface to control the output image to be "Horizontal", "Vertical", "Horizontal + Vertical" or you can just turn this function off.

- Rotation: Please press this option to enter the "Rotation" interface to select different rotation angles.

- Tally Mode: Please tap this option to enter the "Tally Mode" interface to select different Tally Modes.

- Anti Flicker: Please press this option to select "50Hz" or "60Hz" to eliminate the influence from different lighting flickering frequency.

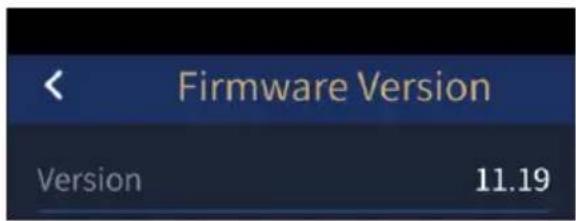
- Firmware version: This option allows you to see the current firmware version.
- Factory Default: Please tap this option and then press the "Yes" button to resume your BC-15P/BC-15PN to its factory default.

Encoder
After entering the "Encoder" option from the "Menu" page, you can see the menu "Main Encoder" which is shown in the following diagram.
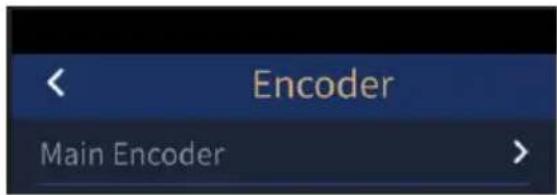
Please tap the "Main Encoder" option and then please tap "Video Bitrate", "Resolution" and "Codec" respectively to set your desired streaming video bitrate, resolution and Codec.


Stream
Please tap "Menu>Stream" to enter the "Stream" interface which is shown in the following diagram. You can tap the button to start/stop the streaming.
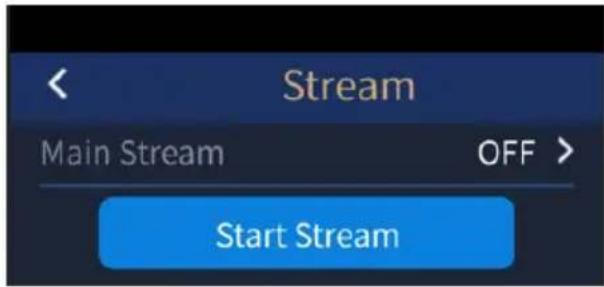
Click the "Main Streaming" option to select the stream type you want from the "Stream Type" option, and then click the "Start Stream/Stop Stream" toggle button to start or stop stream. You can also select "OFF" to turn off "Main Stream". There are NDI/SRT/RTMP/RTMPS/PVW for you to choose. Please note that if you select NDI mode or PVW mode, the BC-15PN will reboot automatically when you press "Start Stream" or "Stop Stream", but it will not reboot automatically if it is BC-15P.
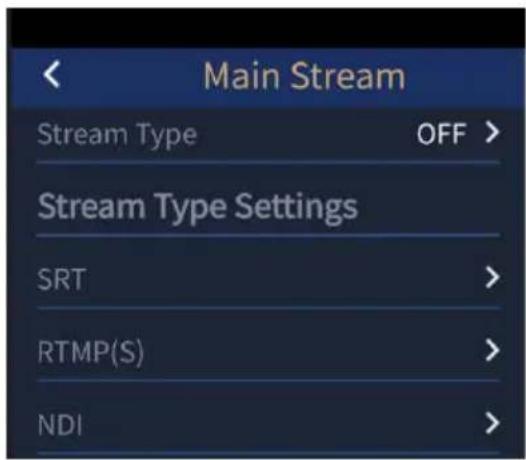
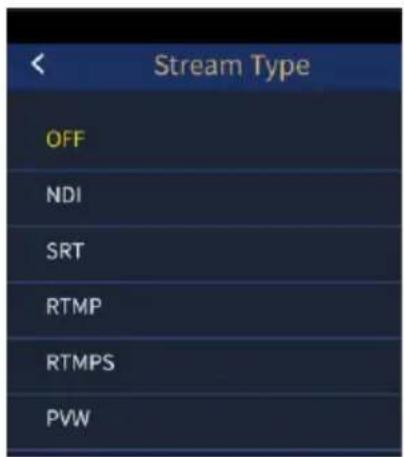
In the "Stream Type" option, you can click "SRT", "RTMP(S)" and "NDI" options to set the parameters of different stream types.
SRT: Allows you to set parameters such as "SRT Port", "SRT URL", "Stream ID" and "Latency".

RTMP(S): Allows you to set the "RTMP URL" and "Stream Key" obtained from the streaming platform as well as your "Account" and "Password" options.
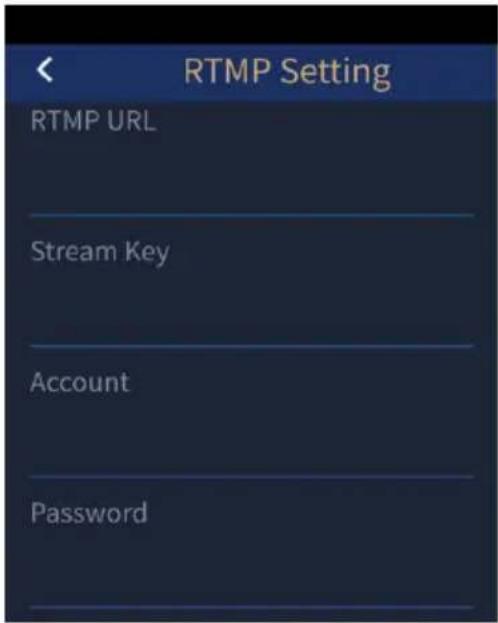
NDI: This option does not need to be set.
Audio
Please tap "Menu>Audio" to enter the "Audio" interface which is shown in the following diagram.

Please press “Audio Input” option to select your desired way for audio input. There are several ways including “Line In (Stereo)”, “Mic In (Stereo)”, “Line In (Mono)” and “Mic In (Mono)” for you to select. You can also tap the “Audio Standard” option to select your desired audio standard.
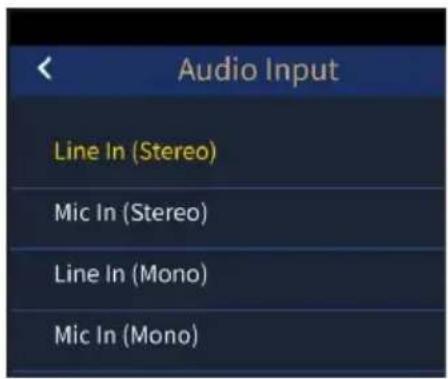
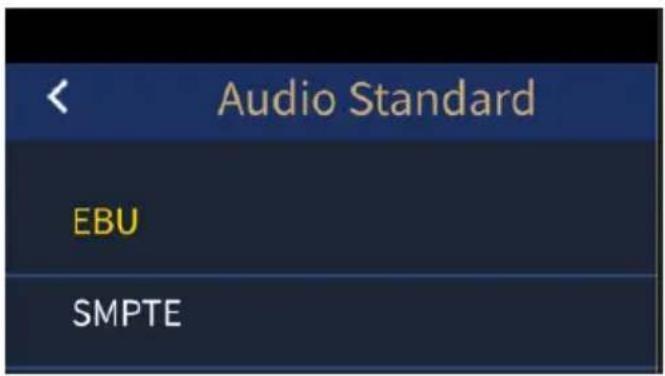
Network
Please tap “Menu>Network” to enter the “Network” interface which is shown in the following diagram. The factory default of the BC-15P/BC-15PN is “HDCP ON”. When it is set as “DHCP ON”, the IP address and network related parameters of the BC-15P/BC-15PN will be distributed by the connected router and it is no need for users to do any change. However, if the BC-15P/BC-15PN is set as “DHCP OFF”, users need to fill in each network related parameter manually by themselves. The factory default static IP address for the BC-15P/BC-15PN is “192.168.100.100”.


When the DHCP is set as “OFF”, users can tap each network parameter for modifying. After the modification is done, please tap the “Apply” button which is located on the top-right side of the screen to apply the new settings.
BC View Assist App Camera List Introduction
When the BC View Assist App is connected to the BC-15P/BC-15PN successfully, you can see the “Camera List” interface which is shown in the following diagram when opening the BC View Assist App.
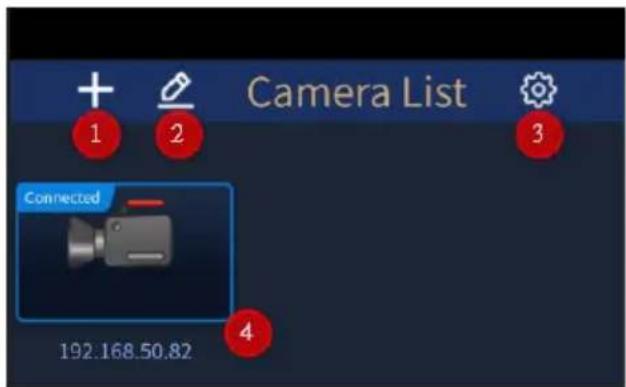
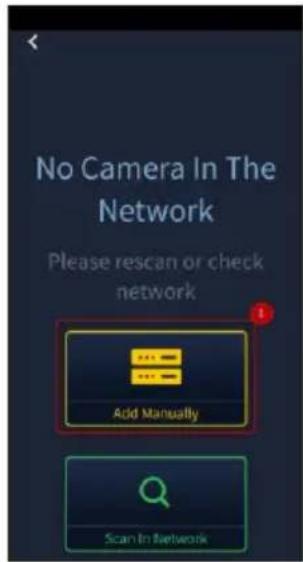
- Add Camera: Please tap this button to select “Scan In Network” to search the BC-15P/BC-15PN camera which is connected in the same IP range automatically. Moreover, you can tap “Add Manually” to add new camera by entering BC-15P/BC-15PN’s static IP address.
Add Automatically

Add Manually


- Menu Button: Please tap the pen icon and then tap the pen icon again to enter the "Menu" interface.


- Please tap this gear button to enter the "System" page. The "Language" option allows you to select English, Simplified Chinese or Traditional Chinese. Moreover, this page also allows you to turn on or turn off the "DVIP Auto Scan" option and "Reload Last Config" option. Once the "DVIP Auto Scan" option is turned "ON", it will scan all of the BC-15/BC-15P cameras which are connected within the same IP range once the app is opened.


- Please tap the camera icon directly to enter the preview window of the screen which is shot by the BC-15P/BC-15PN.
7. How to view BC-15PN images with NDI Studio Monitor
You can also view the camera image on NDI Studio Monitor.
Please follow the steps below to view the image of BC-15PN on NDI Studio Monitor.
- The BC-15PN is defaulted to DHCP ON, please make sure your BC-15PN is connected to your router with an RJ-45 Ethernet cable.
- Please connect your laptop or computer to the same router using an RJ-45 Ethernet cable, and make sure your laptop or computer is set to DHCP mode.
- Please open the BC View Assist App on your phone or tablet, make sure your BC-15PN is successfully connected, and then click the pen icon as below.

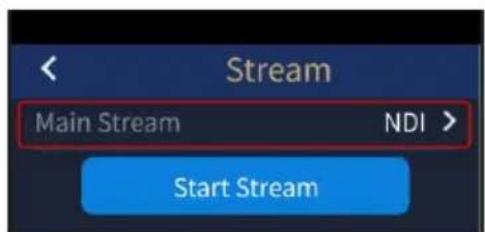
- Please click "Menu > Stream" and select "NDI" in the "Main Stream" option, and finally click "Start Stream" button. Your BC-15PN will reboot.



- Before establishing connection with BC-15PN, you need to install NDI Studio Monitor on your PC/Notebook, please visit NewTek's official NDI website (https://www.ndi.tv/) to download the latest version. After the installation is complete, click "Start" at the bottom left corner of your desktop, and then click Studio Monitor to open the NDI Studio Monitor software.
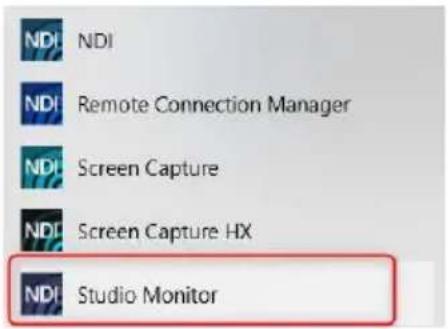
- After the Studio Monitor is turned on, please click the button on the upper left corner and select the detected BC-15PN camera IP address to see the footage captured by the BC-15PN as NDI streaming on your laptop or computer.


natural_image
Two women in a meeting setting, one holding papers, in a modern office environment (no visible text or symbols)Note: If you encounter problems installing or using NDI Studio Monitor, please visit NewTek's official NDI website(https://www.ndi.tv/) or contact NewTek's technical support team.
8. How to Stream BC-15P/BC-15PN Image to the Streaming Platforms (Youtube and Facebook as examples)
Please follow the steps below to stream the image which is shot by the BC-15P/BC-15PN to the streaming platforms.
How to Stream to Youtube
- At first, please connect your BC-15P/BC-15PN to a router by an RJ-45 Ethernet cable, and then please confirm that another Ethernet cable which is connected to the public network is connected to the WAN interface of the router. Moreover, please confirm that your BC-15P/BC-15PN, the connected router, and your handset which installs the BC View Assist App are set within the same IP range. The factory default of the BC-15P/BC-15PN is the DHCP mode.
- Please turn on the Wi-Fi switch of your handset and then please connect to the Wi-Fi signal which is sent by your router. After it is connected successfully, please open the BC View Assist app.
- Please open the BC View Assist app, and then go to "Camera List>Menu>Stream" to set the "Main Stream>Stream Type" as RTMP.

- Please go to Youtube website www.youtube.com. Please select "Create>Go Live", and then please copy the "Stream key" and "Stream URL".

- Please click the RTMP(S) option in “Main Stream>Stream Type Settings”, and then please paste the “Stream URL” and “Stream key” which are copied from Youtube into the “RTMP Setting>RTMP URL” and “RTMP Setting>Stream Key” respectively.

- Finally, please go to "Menu>Stream" page and then click the "Start Stream" button, the image which is shot by the BC-15P/BC-15PN will be streamed to Youtube platform successfully.
How to Stream to Facebook
- The step 1-3 are the same as the step 1-3 for streaming to the Youtube platform.
- Please go to facebook website www.facebook.com. Please click "Live Video>Go Live>Select".

- Please copy the "Stream Key" and "Server URL" which are provided by the Facebook website.
Stream key
FB-10210242177928598-0-AbypUWCrmheSMp-V
Copy
This stream key is valid until you log out of Facebook. Once you start to preview the broadcast you have up to 4 hours to go live.
Advanced Settings
Persistent stream key
This can be reused every time you go live. You can only broadcast one live video at a time with your persistent stream key.

Backup stream
Once a backup stream is added to your live video, it cannot be removed. It will not affect your stream if you choose not to use it.

Server URL
rtmps://live-api-s.facebook.com:443/rtmp/
Copy
This may be referred to as "URL" or "Address" in your streaming software.
- Please click the RTMP(S) option in "Main Stream>Stream Type Settings", and then please paste the "Server URL" and "Stream key" which are copied from Facebook into the "RTMP Setting>RTMP URL" and "RTMP Setting>Stream Key" respectively.

- Finally, please go to "Menu>Stream", and then click the "Start Stream" button for streaming the image which is shot by the BC-15P/BC-15PN to the Facebook platform.
9. How to Use BC View Assist to View Images from the BC-15P/PN
Please fellow the steps below to use the BC View Assist App to view the image which is shot by the BC-15P/BC-15PN through the PVW (Preview) function.
-
The factory default IP mode of the BC-15P/BC-15PN is the DHCP mode. Please prepare a router and then use an RJ-45 Ethernet cable to connect from the "POE/LAN/DVIP" interface of your BC-15P/BC-15PN to the "LAN" interface which is located on the rear panel of your router.
-
Please download and install the BC View Assist app by one of the following ways.
- If your handset is the Android-based system, please go to Google Play and then search "BC View Assist" to download and install (Currently Not Available).
- If your handset is the iOS-based device, please go to App Store and then search "BC View Assist" to download and install the app (Currently Not Available).
- After it is downloaded and installed, you can see the BC View Assist icon from your handset (take the Android phone as an example).

- Please turn on the Wi-Fi switch of your handset, and then please select the Wi-Fi signal which is sent by the router which is connected by your BC-15P/BC-15PN camera. In this section, we will take "ASUS_D8_5G" as an example. - Please tap the "ASUS_D8_5G" Wi-Fi signal.
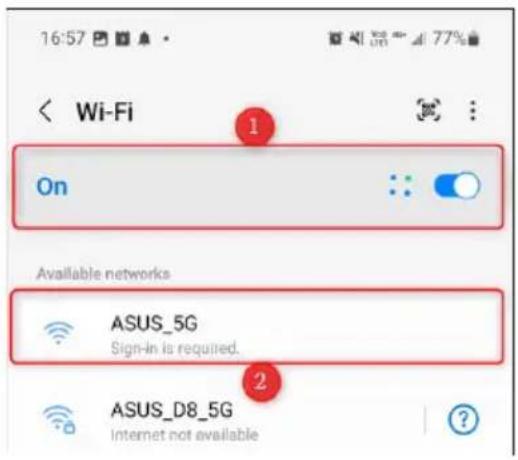
- You can see that the "ASUS_D8_5G" Wi-Fi signal is successfully connected.

- At this time, please open the BC View Assist app, and then it will search the connected DVIP protocol supported device automatically which is shown in the following diagram.
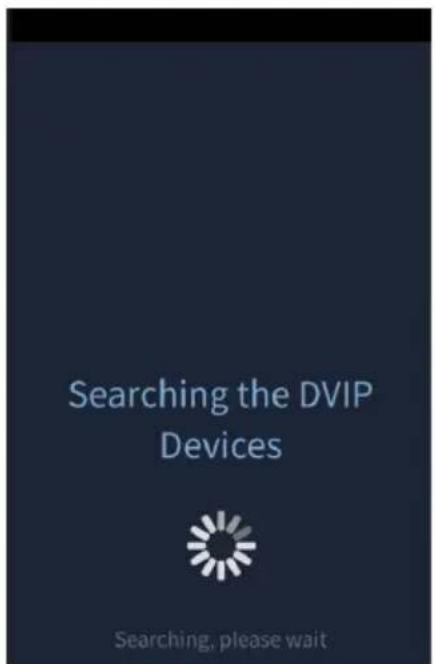
- After the following diagram is shown, it means that your BC-15P/BC-15PN camera is found successfully. Please check the checkbox next to the BC-15P/BC-15PN and then press the "OK" button.

- You can see that your BC-15P/BC-15PN is connected successfully which is shown in the following diagram. Please tap the camera icon to enter the preview screen.

Datavideo usually releases new firmware containing new features or reported bug fixes from time to time. Customers can either download the firmware as they wish or contact their local dealer or reseller for assistance.
This section outlines the firmware upgrade process which should take approximately few minutes to complete.
The existing settings should persist through the firmware upgrade process, which should not be interrupted once started as this could result in a non-responsive unit.
Requirements
- BC-15P/BC-15PN Unit
- 12V DC adapter x 1
- RJ-45 Ethernet Cable x 1
- Laptop or PC x1 (Windows 10 is recommended)
- Latest firmware & firmware update tool
Download from:
BC-15P: https://www.datavideo.com/product/BC-15P
BC-15PN: https://www.datavideo.com/product/BC-15PN - Router x 1 (optional; for multiple BC-15P/BC-15PN devices)
Update Steps
Before starting the firmware update, please make sure that the latest firmware file and the firmware update utility for the BC-15P/BC-15PN have been downloaded to your computer's hard disk. The files can be downloaded from the Datavideo website P(www.datavideo.com/product/BC-15P) or (www.datavideo.com/product/BC-15PN). After downloading, unzip the files and install the firmware update tool on your computer.
Establish a point-to-point connection with a computer (fixed IP mode)
-
Turn on the power of the BC-15P/BC-15PN and connect it to the computer with the firmware update utility installed through the Ethernet interface.
-
The factory default setting of the BC-15P/BC-15PN is DHCP mode. To update the firmware in fixed IP mode, you need to disable the DHCP mode first. After opening the OSD menu of BC-15P/BC-15PN, please go to "Network>DHCP ON" to change the setting to "DHCP OFF". The BC-15P/BC-15PN will change to Fixed IP mode. The fixed IP address is 192.168.100.100. If your model is BC-15PN, there will be "Preview/NDI" option on the second page of the OSD menu above the "Network" option. If your model is BC-15P, there is no such "Preview/NDI" option. The following figure takes the BC-15P interface as an example.
Note: The default fixed IP address of the camera is 192.168.100.100.
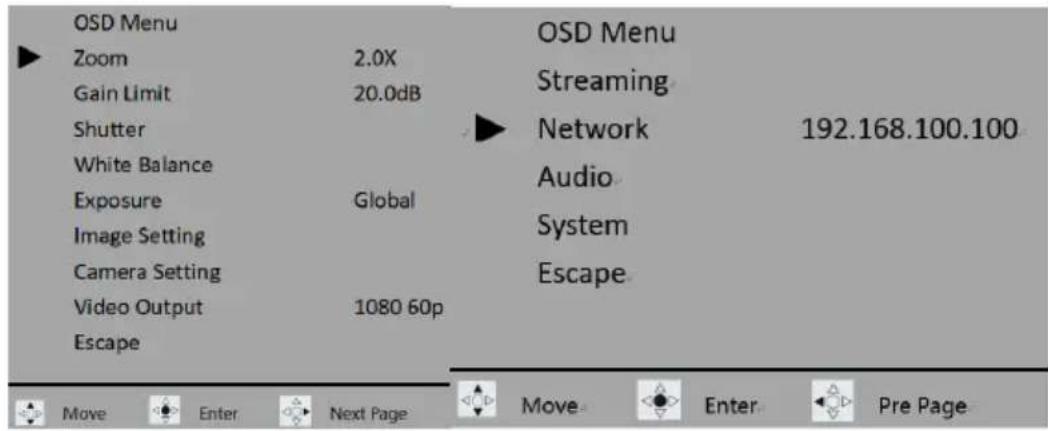
- Since the IP address of the camera is 192.168.100.100, the IP address of the computer in this example should be set to 192.168.100.XXX. XXX is a number between 2 and 255 but not 100. The following figure shows that the computer's IP address is set to 192.168.100.30.

- Go back to the BC-15P/BC-15PN's OSD menu and go to
System>Firmware, then select Update. After pressing Update, you will be prompted by the camera to continue with the firmware update, and if so, select "Yes".

- Open the BC-15P/BC-15PN Firmware Update Utility on your computer and enter the IP address 192.168.100.100 as shown below.
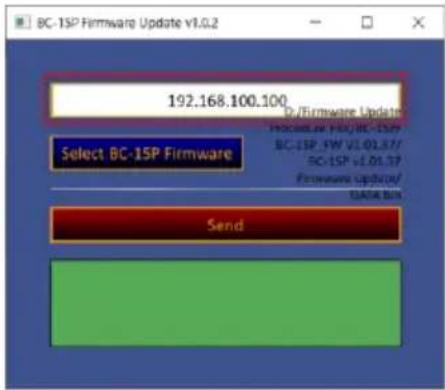
- Click "Select BC-15P/BC-15PN Firmware" to browse your computer's hard disk and search for the latest firmware file. Double-click on the file when it is found.

- Click "Send" to start uploading files to BC-15P/BC-15PN.

- The following screen indicates that the file has been successfully uploaded to the BC-15P/BC-15PN, after which the BC-15P/BC-15PN will be rebooted, and the firmware update will be completed upon completion of the reboot.
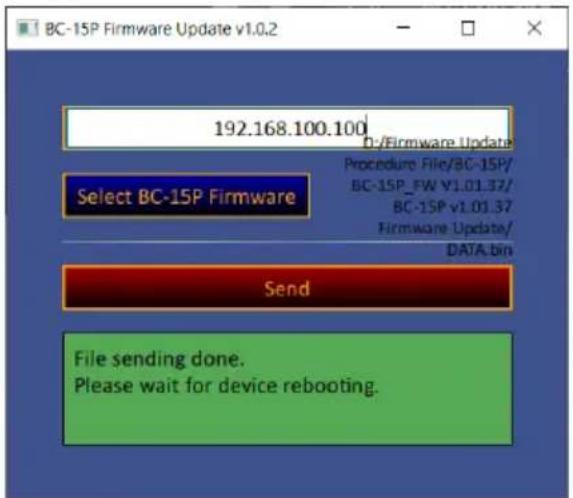
Computer connects to multiple cameras via router (DHCP mode)
- Power on all BC-15P/BC-15PN and connect all devices to the computer with the firmware update utility installed through the router.
- The factory default setting of BC-15P/BC-15PN is DHCP mode. Please make sure the setting is "DHCP ON" in the "Network>HDCP" option of the BC-15P/BC-15PN OSD menu, which means DHCP mode is used. Open the BC-15P/BC-15PN OSD menu and get the IP address of the camera from Network in the main menu. To avoid IP conflict, please make sure that all connected devices have different IP addresses. In this example, the camera's DHCP IP address is 192.168.50.200. If your model is BC-15PN, there will be a "Preview/NDI" option above the "Network" option on the second page of the main OSD menu. If your model is BC-15P, there is no such "Preview/NDI" option. The following picture is an example of BC-15P interface.

- Set the computer to Dynamic IP mode so that its IP address is assigned by the router.

- Go back to the BC-15P/BC-15PN's OSD menu and go to System>Firmware, then select Update. After pressing Update, you will be prompted by the camera to continue with the firmware update.

- Open the BC-15P/BC-15PN's firmware update utility on your computer and enter the IP address 192.168.50.200 as shown below.

- Click "Select BC-15P/BC-15PN Firmware" to browse your computer's hard disk and search for the latest firmware file. Double-click on the file when it is found.

- Click "Send" to start uploading files to BC-15P/BC-15PN.

- The following screen indicates that the file has been successfully uploaded to the BC-15P/BC-15PN, after which the BC-15P/BC-15PN will be rebooted, and the firmware update will be completed upon completion of the reboot.

- Repeat steps 5 through 8 to update the firmware on the other cameras.
11. Frequently-Asked Questions
This section describes problems that you may encounter while using BC-15P/BC-15PN. If you have any questions, please refer to related sections and follow all suggested solutions. If the problem still exists, please contact your distributor or the service center.
| No. | Problems | Solutions |
| 1. | The tally LED displays orange color all the time. | Remove the HDMI connection then reboot the camera. Reconnect the HDMI cable after the camera boot is complete. |
| 2. | What you need to know about setting the "Audio" option. | Note that the BC-15P/PN needs to be restarted after adjusting the "Audio" setting, and do not change the sound setting while streaming (you must stop streaming first). |
12. Dimensions
Unit: mm
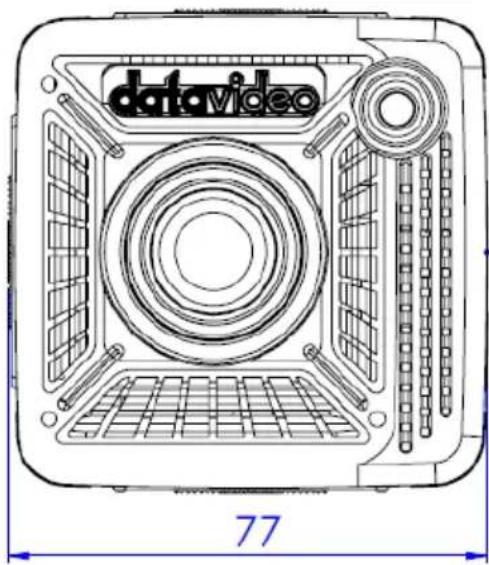
natural_image
Technical line drawing of a device casing with grid pattern and measurement annotation (77), no readable text or symbols beyond the label.
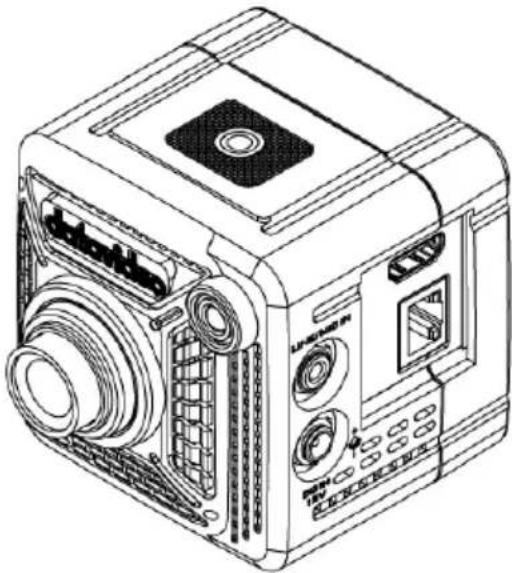
natural_image
Line drawing of a vintage portable radio device with control panel and buttons (no text or symbols)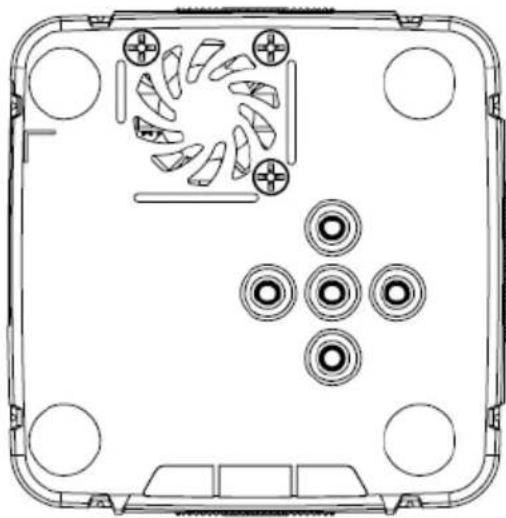
natural_image
Top-down schematic of a device casing with multiple circular components and mounting holes (no text or symbols)
natural_image
Technical line drawing of a mechanical component with internal structure and mounting brackets (no text or symbols)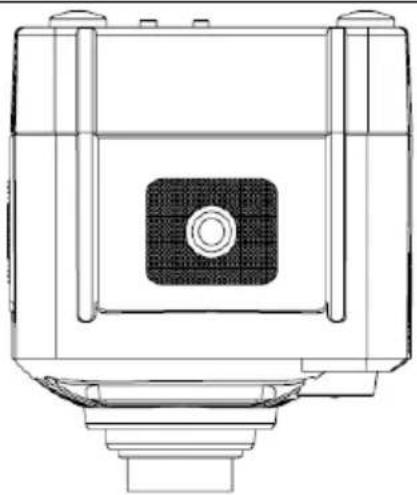
natural_image
Technical line drawing of a mechanical component with no visible text or symbols13. Specifications
| Camera Parameters | |
| Product Model | BC-15P/BC-15PN |
| Product Name | 4K POV Camera/4K NDI POV Camera |
| Video Format/Resolution | 2160p 60/59.94/50/30/29.97/251080p 60/59.94/50/30/29.97/25 |
| Image Sensor | 1/2.3" CMOS |
| Effective Pixels(approx.) | 12.3Mega Pixels |
| S/N Ratio | 50 dB |
| Min. Illumination | 0.5Lux (F1.0, AGC ON) |
| Electronic Shutter | 1/25(1/30), 1/50(1/60), 1/75(1/90), 1/100(1/120), 1/125(1/150), 1/150(1/180), 1/200(1/210), 1/500(1/600), 1/1000(1/1200), 1/2000(1/2400), 1/4000(1/4800), 1/8000(1/9000) sec |
| Zoom Ratio | 2x Digital Zoom |
| Gamma Control | Standard/ Mode1/ Mode2/ Mode3 |
| Iris Control | Fixed Iris (F1.0) |
| Digital Noise Reduction | 2D/3D |
| OSD Language | English/Simplified Chinese/Traditional Chinese |
| White Balance | Auto, Indoor, Outdoor, OnePush, Color Temp., R/B Gain, Lock |
| ACG/Gain Control | Auto (AGC) / Manual / Lock(Follow Exposure Mode) |
| HDR/WDR | WDR |
| Mirror/Flip Image | Yes |
| Focus Mode | Full Manual |
| Focal Length (Equivalent) | Standard Lens: 6mmWide Lens: 2.8mm |
| Field of View (Horizontal, Wide) | Standard Lens: H: 38.6, V:21.9, D: 44.1Wide Lens: H: 75.5, V:46.6, D:82.7 |
| Image Compensation | Auto |
| Video Output | HDMI 2.0 x1 |
| Audio Input | 3.5mm Line in/Mic in (Stereo) |
| Tally LED | Dual Color (Red, Green) |
| Lens Filter | IR cut built-in |
| Control Protocol | DVIP |
| Remote Control Interface | RJ-45: for IP control (DVIP) |
| Video Compression Format | H.264, H.265 |
| Audio Compression Format | AAC |
| Audio Bitrate | 128Kbps |
| IP Interface | 10/100/1000M |
| Streaming Protocols | BC-15P: RTMP(S), SRTBC-15PN: RTMP(S), SRT, NDI |
| First Stream Supported Resolution | 1920x10801280x7201024x576960x540640x480640x360 |
| Video Bitrate | 1Mbps ~ 7Mbps |
| Video Bitrate Mode | VBR, CBR |
| Encoding Frame rate | 50Hz: 1-50fps60Hz: 1-60fps |
| PoE | IEEE802.3af |
| F/W Update | Ethernet |
| Camera Control Unit | RMC-300 series/BC View Assist APP |
| Tripod Mount | 1/4-20 UNC |
| Color | Black |
| Dimension (LxWxH) | 77mm (W) x 82mm (D) x 78mm (H) |
| Weight | 200g |
| Operating Temp. | 0~40 °C |
| Power | DC 12V 9W |
Notes
Notes
Service & Support
It is our goal to make your products ownership a satisfying experience. Our supporting staff is available to assist you in setting up and operating your system. Please refer to our web site www.datavideo.com for answers to common questions, support requests or contact your local office below.
Please visit our website for latest manual update.
BC-15P: http://www.datavideo.com/product/BC-15P
BC-15PN: http://www.datavideo.com/product/BC-15PN
datavideo
www.datavideo.com

@DatavideoUSA
@DatavideoEMEA
@DatavideoTaiwan
@DatavideoAsia
@DatavideoIndia2016
@Datavideojapan
@DatavideoLatam
@DatavideoBrasil

@Datavideo
@Datavideo_EMEA
@Datavideo Taiwan

@DatavideoUSA
@DVTWDVCN

@DatavideoUSA
@DatavideoEurope
- WARNINGS AND PRECAUTIONS 6
- WARRANTY 8
- DISPOSAL 9
- PRODUCT OVERVIEW.... 10
- SYSTEM DIAGRAM 11
- LOCATION AND FUNCTION OF PARTS 12
- BASIC SETUP(TAKE BC-15P AS AN EXAMPLE) 19
- OSD MENU 22
- HOW TO CONTROL THE BC-15P/BC-15PN BY THE BC VIEW ASSIST APP 54
- Disclaimer of Product and Services
- FCC Compliance Statement
- Warnings and Precautions
- Warranty
- Standard Warranty
- Three Year Warranty
- Disposal
- For EU Customers only - WEEE Marking
- Product Overview
- Features
- Location and Function of Parts
- 1/4-20 UNC Screw Hole
- Bottom of the Camera
- Basic Setup(Take BC-15P as an example)
- Power-On
- Video Output
- Audio Output
- Ethernet Port
- OSD menu
- Zoom
- Gain Limit
- Shutter
- White Balance
- Auto
- Indoor
- Outdoor
- One-push
- Color Temperature
- R/B Gain
- Lock
- Exposure
- Global
- Center
- eSport
- Manual
- Image Setting
- Camera Setting
- Lens Select
- AGC
- Gamma Mode
- 3DNR
- WDR
- Mirror
- Rotation
- Anti-Flicker
- Streaming
- Network
- DHCP
- IP
- NetMask
- Gateway
- DNS1
- DNS2
- Reset
- Audio
- Audio Input
- Soundtrack
- Audio Standard
- System
- Camera Name
- Language
- Preset
- Tally Mode
- Button Shortcut
- Firmware
- Factory Default
- How to Control the BC-15P/BC-15PN by the BC View Assist App
- How to Connect and Launch the BC View Assist App
- Introduction of the BC View Assist App Main Interface
- Video Output
- Preview Screen
- Zoom
- Gain Limit
- Shutter
- White Balance
- Exposure
- Contrast
- Brightness
- Saturation
- Hue
- Sharpness
- Camera Name
- Stream
- Menu Button
- Menu Introduction of the BC View Assist App
- Camera
- Encoder
- Stream
- BC View Assist App Camera List Introduction
- How to view BC-15PN images with NDI Studio Monitor
- How to Stream BC-15P/BC-15PN Image to the Streaming Platforms (Youtube and Facebook as examples)
- How to Stream to Youtube
- How to Stream to Facebook
- Stream key
- Advanced Settings
- Persistent stream key
- Backup stream
- Server URL
- How to Use BC View Assist to View Images from the BC-15P/PN
- Requirements
- Update Steps
- Establish a point-to-point connection with a computer (fixed IP mode)
- Computer connects to multiple cameras via router (DHCP mode)
- Frequently-Asked Questions
- Dimensions
- Specifications
- Notes
- Service & Support
Brand : DataVideo
Model : BC-15PN
Category : Video camera