KAWFROBVACA - Robot vacuum Kogan - Free user manual and instructions
Find the device manual for free KAWFROBVACA Kogan in PDF.


| Product Type | Portable Air Conditioner (Reverse Cycle) |
| Model | KAPRA14WFGA |
| Cooling Capacity | 14000 BTU/h (4100W) |
| Heating Capacity | 14000 BTU/h |
| Cooling Range | 17°C – 30°C |
| Heating Range | 17°C – 30°C |
| Dimensions (W x D x H) | 443 x 340 x 830 mm |
| Weight | 29 kg |
| Power Input (Cooling/Heating) | 1450W |
| Voltage | 230V ~ 50Hz |
| Amps | 6A |
| Power Cord Length | 1.8 m |
| Refrigerant | R32 (assumed from typical portable ACs – not explicitly stated) |
| Air Flow Volume | 360 m³/h |
| Moisture Removal | 1.2 L/h |
| Noise Level | 62 dB(A) |
| Max Room Size | 30 m² |
| Water Tank Capacity | 0.6 L |
| Exhaust Hose Length | 1.5 m (diameter 15 cm) |
| Window Bracket Min/Max Length | 67.5 cm / 130.0 cm |
| Modes | Cool, Fan, Dry, Heat |
| Control | Touch Panel, Remote Control, SmarterHome™ App, Google Home, Amazon Alexa |
| Filter Cleaning Interval | Every 2 weeks (recommended) |
| Safety Features | Auto shut-off on full water tank, frost protection, 3-minute compressor delay |
Frequently Asked Questions - KAWFROBVACA Kogan
User questions about KAWFROBVACA Kogan
0 question about this device. Answer the ones you know or ask your own.
Ask a new question about this device
Download the instructions for your Robot vacuum in PDF format for free! Find your manual KAWFROBVACA - Kogan and take your electronic device back in hand. On this page are published all the documents necessary for the use of your device. KAWFROBVACA by Kogan.
USER MANUAL KAWFROBVACA Kogan
natural_image
White Kōgan air purifier with digital display and control buttons (no visible text or symbols on main body)KOGAN SMARTERHOME™ 4.1KW PORTABLE AIR CONDITIONER
(14,000 BTU, REVERSE CYCLE)
KAPRA14WFGA
Note:
Handle with care and inspect regularly to ensure product is in good working order. If this product, power supply cord or plug shows any signs of damage: stop use, unplug the product and contact Kogan.com support.
Read all of the warnings in this user guide, and retain for future reference.

WARNING: Choking hazard – Small parts and batteries. Not for children. Use with adult supervision only.
Precautions
- This air-conditioner is intended for household use only. Not suitable for use in commercial or industrial surroundings.
- This air-conditioner should only be used indoors in a dry environment. Do not use air-conditioner outdoors under any circumstances.
- Do not place or store objects around the air-conditioner. Air must be able to flow freely around the unit.
- Do not place anything on top of the air-conditioner.
- Do not operate the air conditioner with wet hands or in a damp environment.
- To clean the air-conditioner, wipe it with a soft cloth. Do not use wax, thinners or any other cleaning agents.
- Clean the filter regularly. Once every two weeks is recommended.
- Do not drink the water from the condenser that the air-conditioner discharges.
- If you will not be using the air-conditioner for an extended period of time, unplug the power cord.
- There are no user-serviceable parts inside the air-conditioner. All maintenance must be done by a Kogan.com technician or a suitably qualified repair service.
Important Safety Tips
- Do not use damaged power cords or plugs. Do not plug the air-conditioner into a loose power outlet.
- Before use, ensure that the voltage supply matches the requirements of the air-conditioner.
- Do not attempt to modify or extend the power cord.
- Do not handle the plug with wet hands. This may lead to electric shock.
- When unplugging the power cord, hold the plug itself and remove. Never pull on the cord itself to unplug an electrical device.
- Do not operate the unit by turning the power supply on or off at the wall, nor by simply plugging and unplugging the power cord.
• Turn the air-conditioner off before unplugging the unit.
- Do not share a single power outlet with multiple high demand electrical appliances.
- Keep air-conditioner away from heat sources and keep it out of direct sunlight.
- If the air-conditioner starts to emit a strange noise, odour or smoke, switch the unit off immediately and disconnect the plug from the power socket. Contact the Kogan.com customer support team for further information.
- Do not place heavy objects on the power cord.
- Do not place fingers or objects into the air outlet.
- Do not allow water to enter the air-conditioner. If water does get into the unit, turn it off and disconnect the plug from the power socket immediately.
- When cleaning or moving the air-conditioner, turn it off and unplug it.
- Do not allow children to play with the air-conditioner. When children are nearby, adult supervision is required to ensure they do not play with the unit in any manner.
Usage Notes
- The air-conditioner must be placed on flat even ground and kept vertical to ensure the normal operation of the compressor.
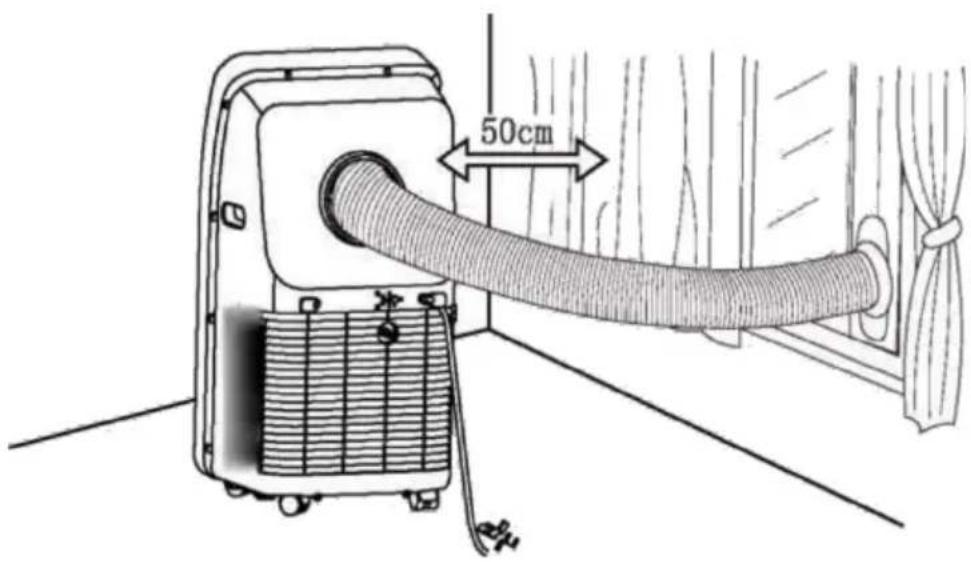
- There must be at least 50cm of space maintained between the air-conditioner and surrounding objects/walls.
- Do not use the air-conditioner near fuel or other flammable liquids.
- Do not use aerosol sprays or other solvents near the air-conditioner, as it may cause plastic deformation or even damage the electrical components of the unit.
OVERVIEW
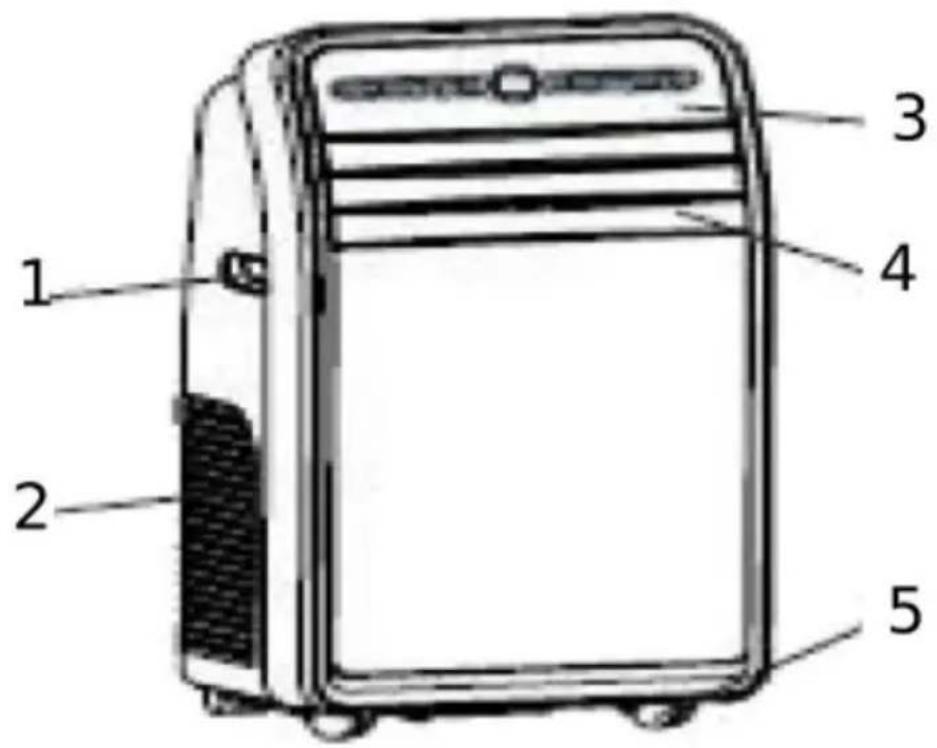
1 Handle
2 Air Inlet (Left)
3 Control Panel
4 Air Outlet Louver
5 Caster wheels
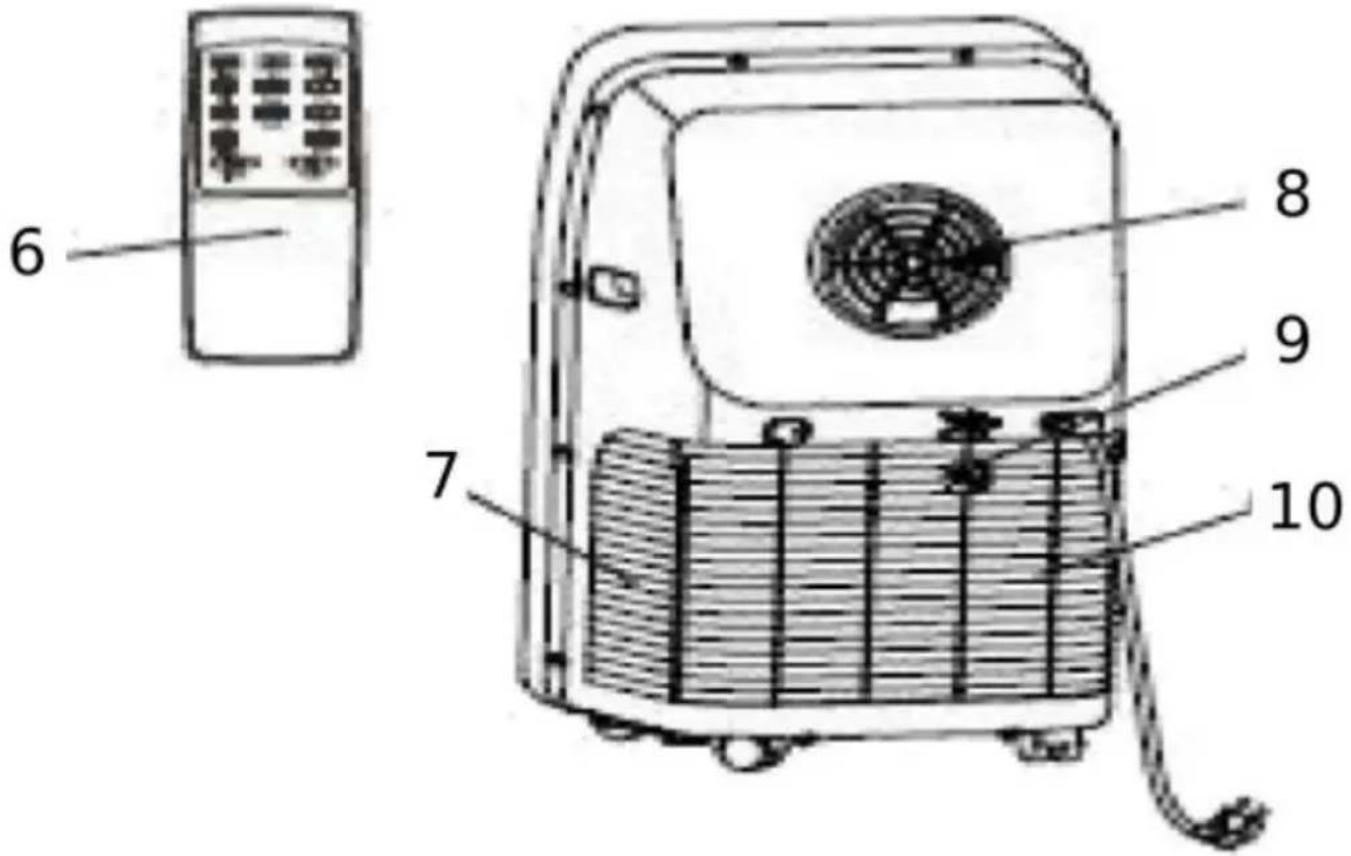
6 Remote control
7 Air Outlet (Right)
8 Exhaust Air Outlet
9 Water Drainage Outlet
10 Air Inlet Grille
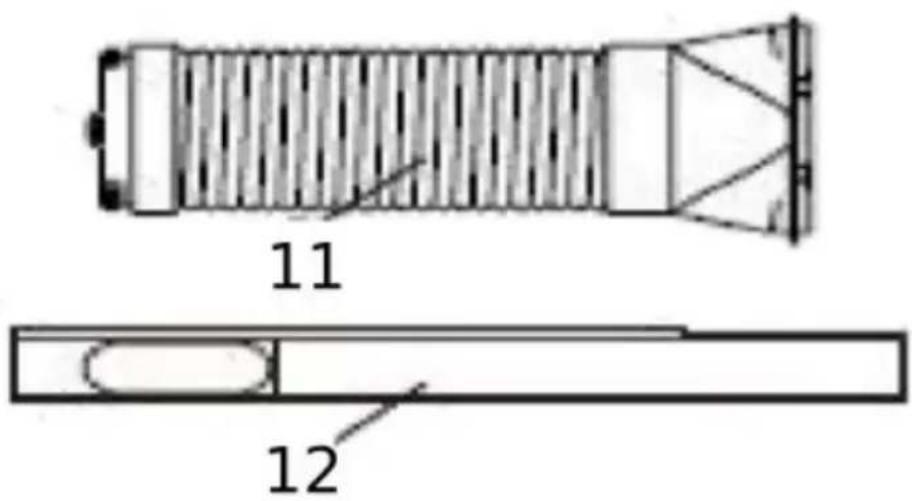
11 Exhaust Duct Assembly
12 Window Sealing Plate Assembly
Not shown: Drainage pipe
Control Panel & Remote Control Functions
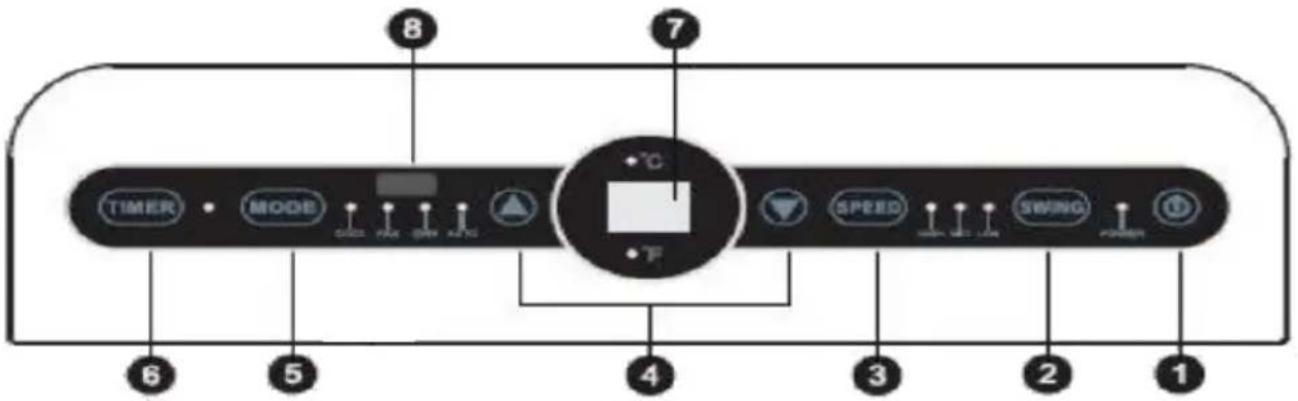
1. POWER button
Press this button to switch the air conditioning on and off.
2. Automatic Swing Function
While in any mode, press to make the air guide bars swing automatically.
Guide bars move up and down exclusively.
3. Air Speed Function
Press to select between high, medium and low airspeeds.
4. Temperature/Time Up and Down Adjustment
When operating in cooling mode, press up or down to set the desired temperature. When in timing mode, press to adjust the on/off times. Pressing the up and down buttons together at the same time will display the conversion between Fahrenheit and Celsius temperatures.
5. Mode Selection
Press to select cool, fan, dry or heat modes.
6. Time Function
In standby mode, press to set the start time;
In running mode, press to set the shutdown time.
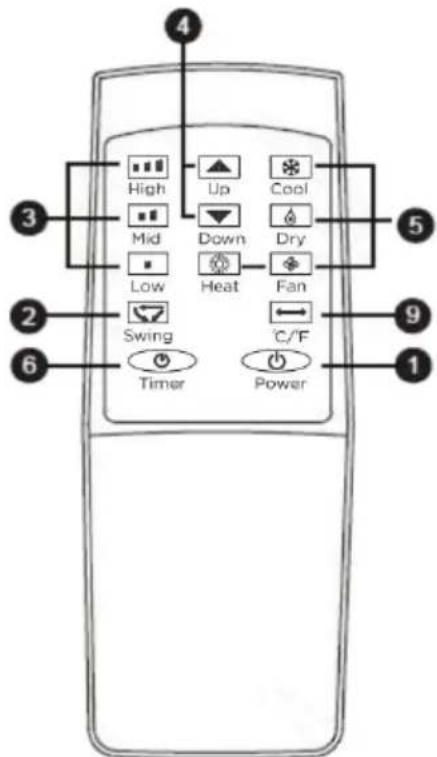
7. Temperature/Time Display Window
This displays the temperature and time information.
8. Remote Control Receiver Window
This small window houses the receiver for the remote control signals.
9. Celsius/Fahrenheit Conversion Button
Remote Control batteries:
Insert the batteries correctly before using the remote control.
- Slide the battery cover on the back of the remote control.
- Insert x2 new AAA (DC 1.5 V) batteries, ensuring the polarity (+/-) is correct. Check the markings on both the batteries and the remote before installing.
- Slide the battery cover back into place.
Note: Only AAA (DC 1.5 V) type batteries may be used. Do not use rechargeable batteries or other types of batteries.
Always replace both batteries simultaneously. Do not mix old and new batteries.
If the remote control is not used for a long time, the batteries must be removed.
WARNING: Risk of injury! Do not use batteries that leak. Chemicals in batteries can cause burns or other health hazards. If battery fluid splashes on skin or clothing, wash it off immediately with clean water. If batteries are accidentally swallowed, immediately rinse your mouth with clean water and then contact a hospital for a medical examination.
INSTALLATION
Installation position
- Place the air-conditioner on a flat floor near a window
- To maintain good air circulation and obtain the optimum air-conditioning performance, ensure there is 50cm of space around the unit.
Notes on installation
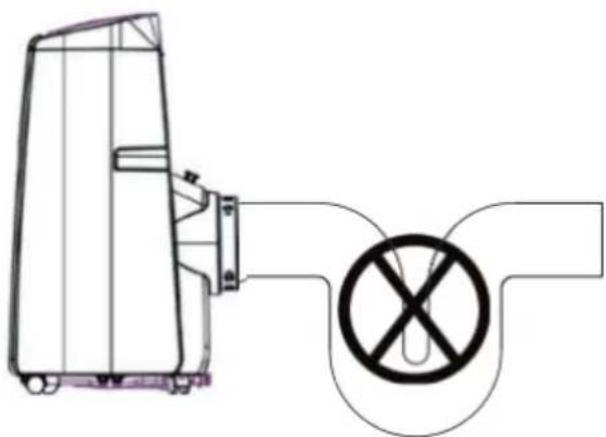
- It is important to keep the exhaust hose straight. Incorrect installation will affect the operation of the appliance.
• Make sure that the exhaust hose is not kinked, twisted or strongly bent.
• Make sure that the exhaust air can flow unhindered into the exhaust hose.
- The exhaust air hose has a maximum length of 1.50 m. Keep the distance between the window and the appliance as short as possible and install the exhaust air hose as horizontally as possible.
Note:
The exhaust air hose is specially designed for this appliance. Do not replace or modify the hose.
Installation accessories for window ventilation
Exhaust Duct assembly
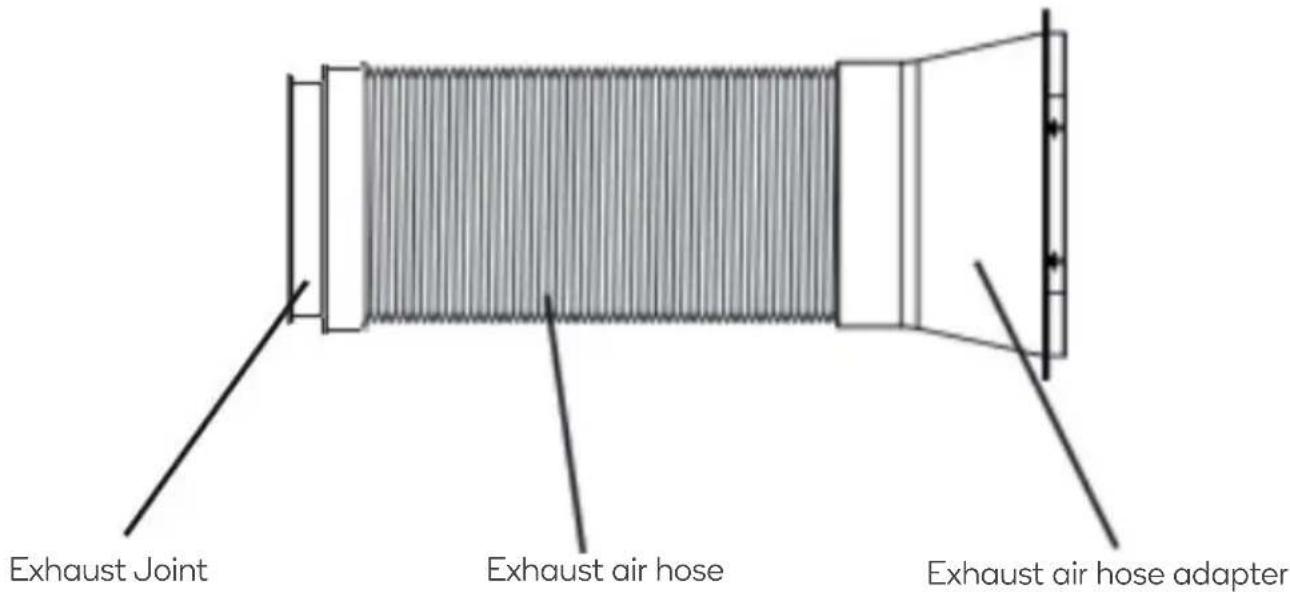
Window sealing plate assembly (sliding bar):
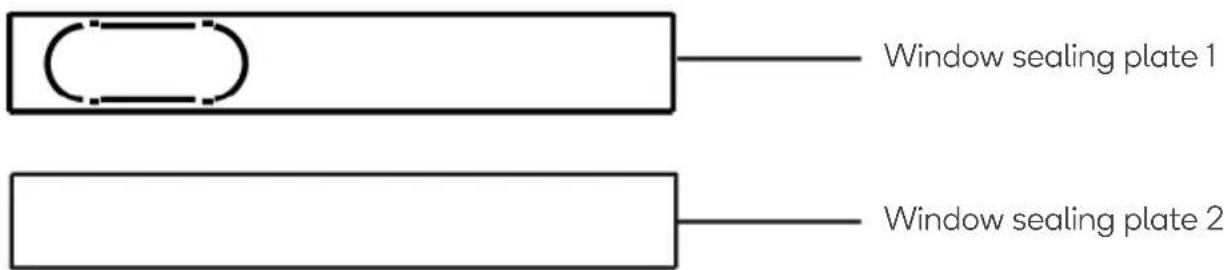
Bolt
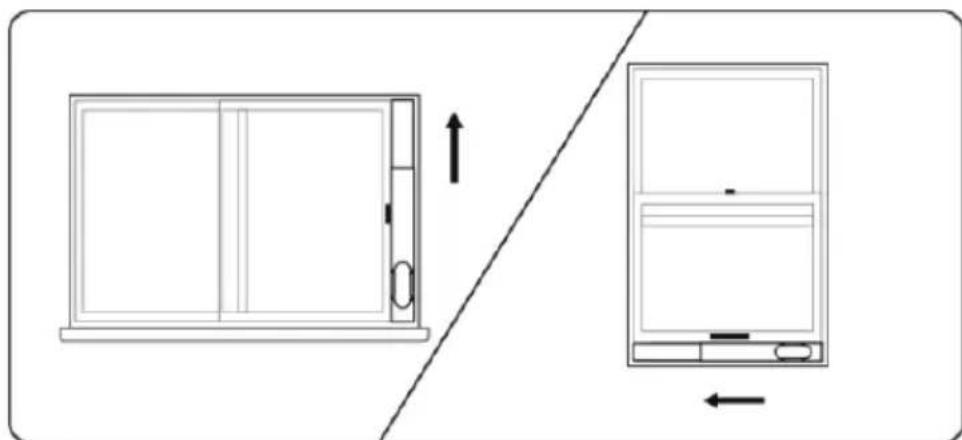
Installation of the window ventilation (For vertical or horizontal sliding window)
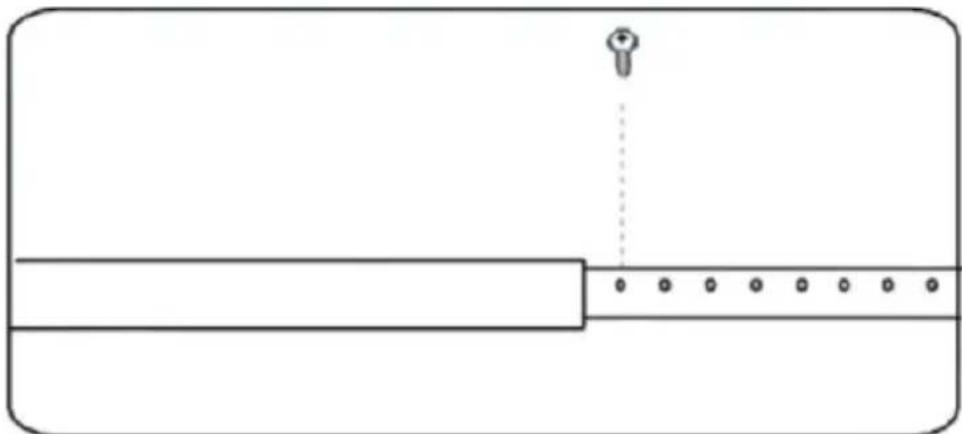
- Measure the window size. Adjust the length of the window sealing plate, making it to fit the size of the window. Once the length of the window sealing plate is determined, fix its length into place with the bolt.
natural_image
Pure technical diagram showing a rectangular block with a vertical dotted line and a small circular mark, no text or symbols present.- Mount the window seal on the window.
natural_image
Diagram showing a door frame with an arrow indicating upward motion, alongside a separate view of the same door (no text or symbols present)- Attach the exhaust pipe assembly (exhaust fitting end) to the exhaust air outlet at the rear of the appliance by turning it counter-clockwise.
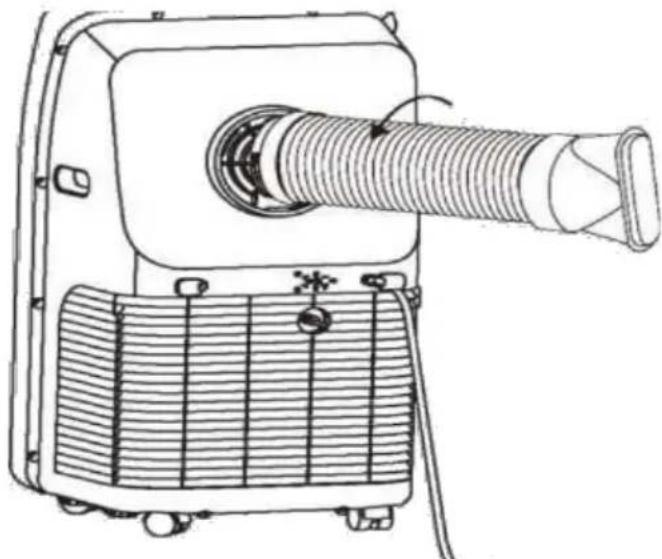
natural_image
Technical line drawing of a mechanical device with coiled tubing and ventilation grilles (no text or symbols)- Place the exhaust pipe assembly into the window sealing plate assembly, then fix it in place with screws.
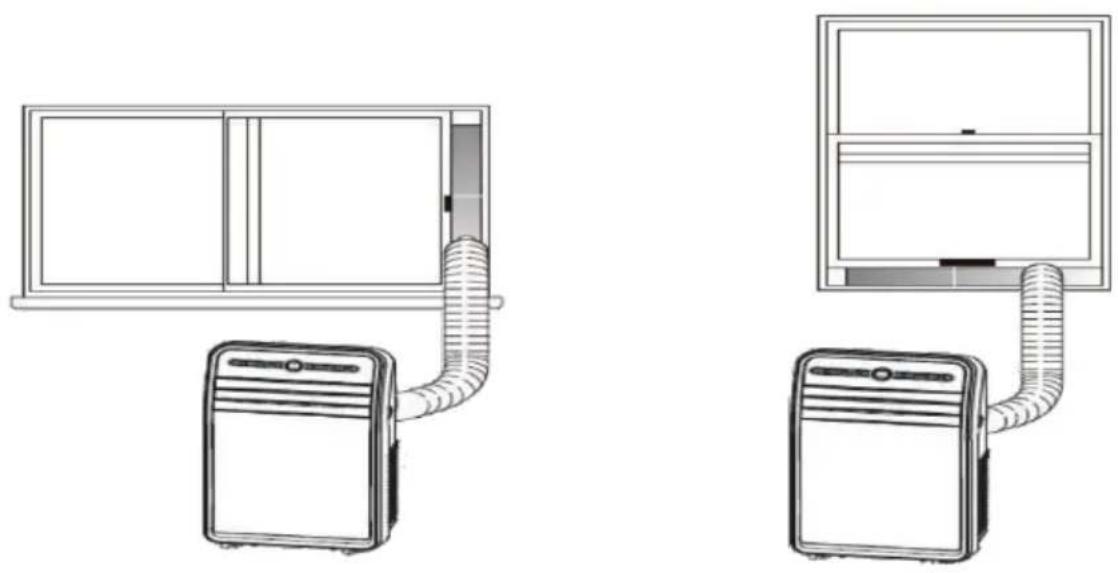
The window ventilation is now completely mounted and the appliance is ready for use.
Note:
If using with a hinged window with an angled opening, a hinged window attachment will be required. This is not included.
Drainage Pipe
When the water tank is full please attach the drainage pipe to the rear of your appliance as shown in Figure 1.
The drainage hole is 34cm above the ground (with the wheels attached), so ensure that the hose does not go above this height at any point.
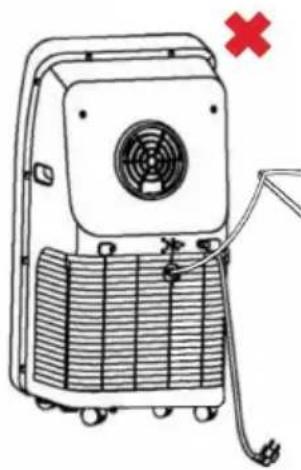
For efficient drainage, please keep the hose heading in a downward slope.
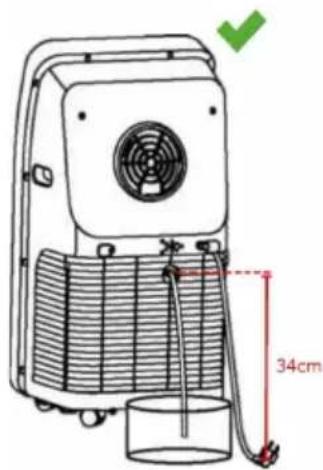
Fig 1
natural_image
Line drawing of a portable air conditioner unit with a fan and warning symbol (no text or labels)Fig 2
OPERATION
Cool mode
- After being powered and turned on to cool mode, the cool mode indicator light will come on.
- Press the UP or DOWN button to adjust the desired temperature (17°C - 30°C).
- Press the SPEED button to select high, medium or low speed.
Fan mode
- Press the MODE button to select fan mode, and the fan indicator light will illuminate.
- Press the SPEED button to select high, medium or low air speed. The temperature cannot be set in this mode.
Dry mode
- Select dry mode by pressing the MODE button, and the dry indicator light will illuminate.
- As shown in the picture below, remove the plug from the water drainage outlet and insert a drainage hose (not included). Put the other end of the hose into a container or into a drain.
- When entering the dry mode, if the room temperature is higher than 15^ C, the compressor will start to work. When the room temperature drops below 13^ C, the compressor will stop. If the room temperature rises up above 15^ C again, the compressor will restart (the restarting of the compressor will be limited by the 3-minute delay protection function).
- In dry mode, the fan will run in low speed by default, and the airspeed is not adjustable.
• Temperature cannot be set.
Note:
It is recommended to remove the exhaust air hose in dehumidification mode. Otherwise, dehumidification may not work properly or the full water tank ("FL") alarm will flash on the display.
Heat mode
- Select heat mode by pressing the MODE button, then the heat mode indicator light should illuminate.
- Press the UP or DOWN buttons to adjust the desired temperature (17°C \~ 30°C).
- Press the SPEED button to select high, medium or low speed.
Timer
- In standby mode, press the TIMER button to program the timer start time. Press the Up and Down buttons to set a delay time (0-24 hours). The TIMER indicator lights up. Once the entered time has elapsed, the appliance will start automatically.
- During operation, press the TIMER button to program the timer end time. Press the Up and Down buttons to set the timer running time (0-24 hours). The TIMER indicator lights up. Once the entered time has elapsed, the appliance switches off automatically.
CONNECT TO SMARTERHOME™ APP
Install App
Download the "Kogan SmarterHome" app from the Play Store (Android) or App Store (iOS).
Register
If you do not have a Kogan SmarterHome™ account, register or sign in with a verification code sent by SMS.
To register:
- Tap to enter registration page.
- The system automatically recognises your country/area. You can also select your country code manually. Enter your email address and tap 'Next.'
- Alternatively, you can select 'Register by mobile number' and enter the verification code sent to you by SMS.
- Create a profile on the next page to define your location and room.


Register by Email
Register by Mobile Number
Get Verification Code
Get Verification Code
Set device in pairing mode
When the air conditioner is first turned on, it may automatically enter pairing mode (the WiFi light will be flashing rapidly).
If not automatically in pairing mode when powered on, you can manually set the air conditioner in pairing mode by holding the SPEED button on the control panel for 5 seconds until the Wi-Fi indicator light begins flashing rapidly.
Add device through network
- Once registered, tap "+" in the upper right corner of the app's home page to add a new device through the network.
- Select the product type from the list of options in the app (Heating & Cooling > Air Conditioners).
- Ensure that the device is in pairing mode, with the WiFi indicator light flashing rapidly, and tap "Confirm light is rapidly flashing".
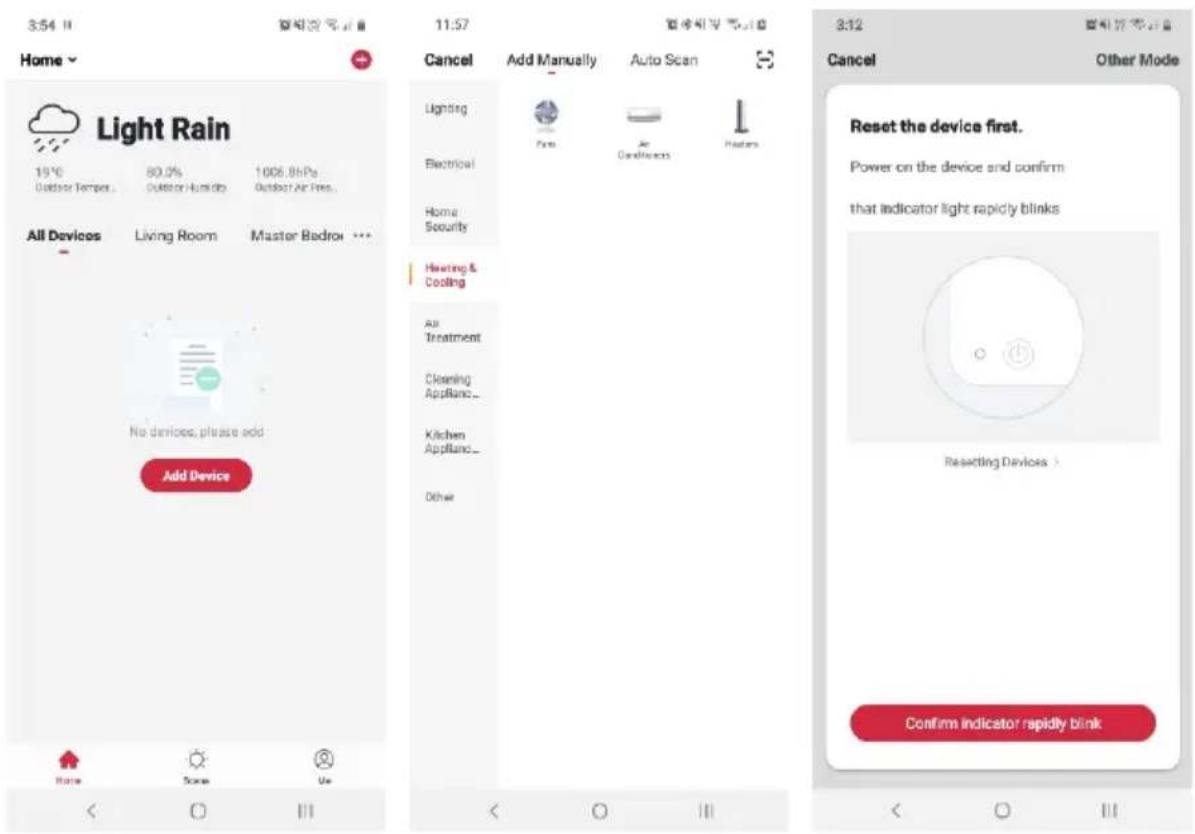
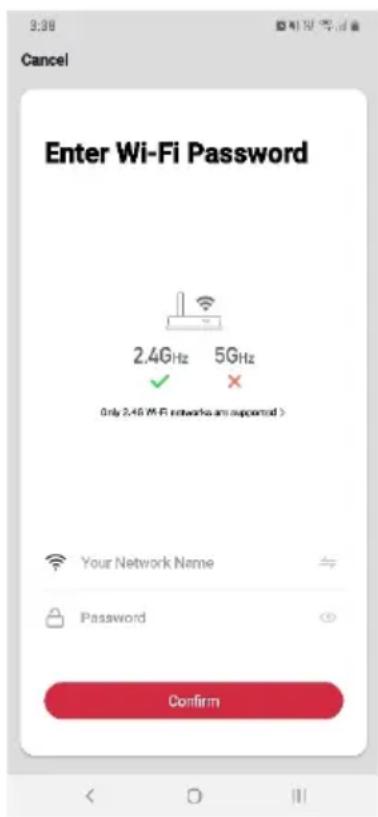
- Upon successfully confirming pairing mode, enter your Wi-Fi details. It is important that your SmarterHome™ device and the app are connected to the same Wi-Fi network during setup.
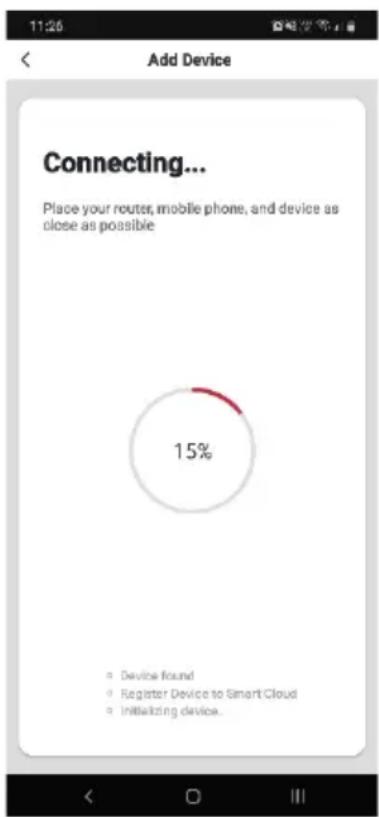
- The device will commence the pairing process and connect to the app. Ensure your Wi-Fi router, mobile phone, and the SmarterHome™ device are kept close until connection is complete.
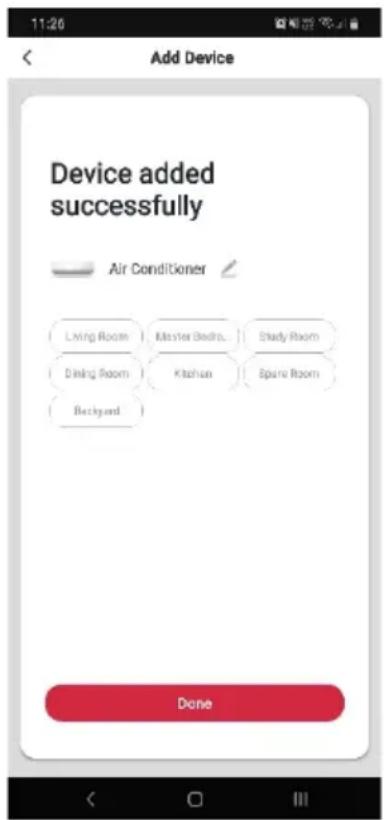
- After successfully being added, you will have the option to rename the device and assign it to a location. It will now be listed on the app's home page. Tap the device listing to enter its control page.
Notes:
• The device and the app have to use the same Wi-Fi network.
• The device is only compatible with 2.4Ghz networks.
GOOGLE HOME CONTROL
Note:
You will need to have set up a Google Home account prior to linking your Kogan SmarterHome™ device.
Adding "SmarterHome" to the Google Home app
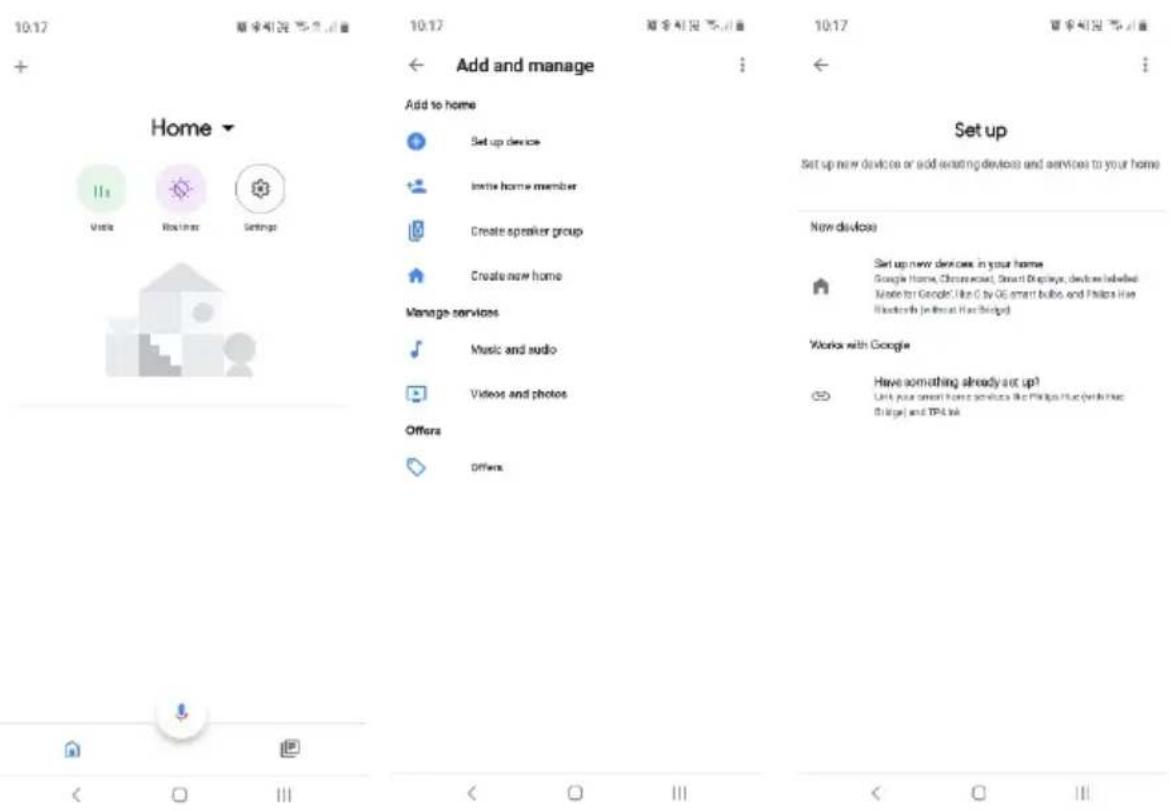
- From the home page of the Google Home app, select the "+" icon to access the 'Add and manage' page.
- Select 'Set up device', then under the Works with Google banner, select 'Have something already set up?'
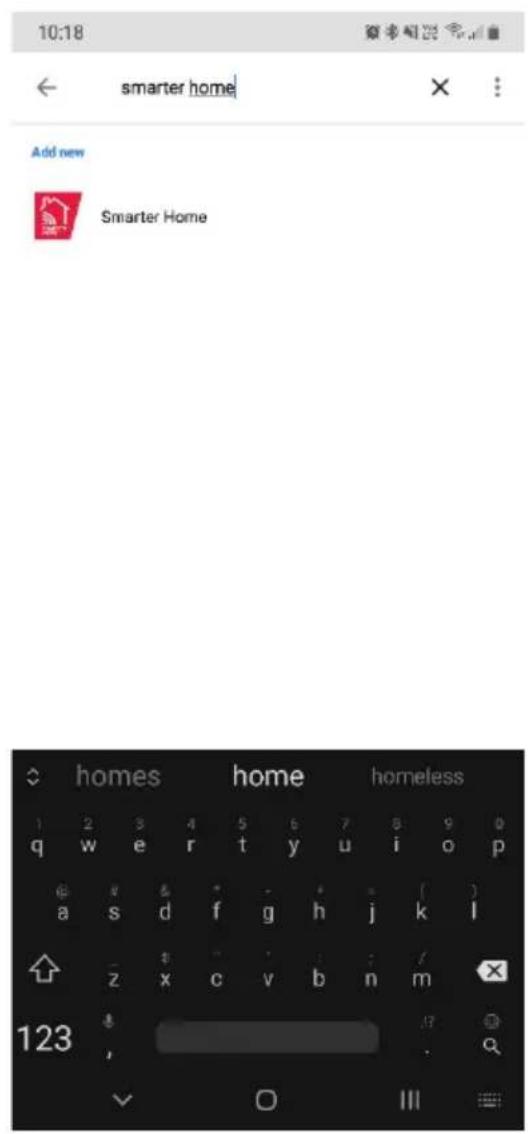
- Select the search bar and type 'Smarter Home' to locate the Kogan SmarterHome™ service.
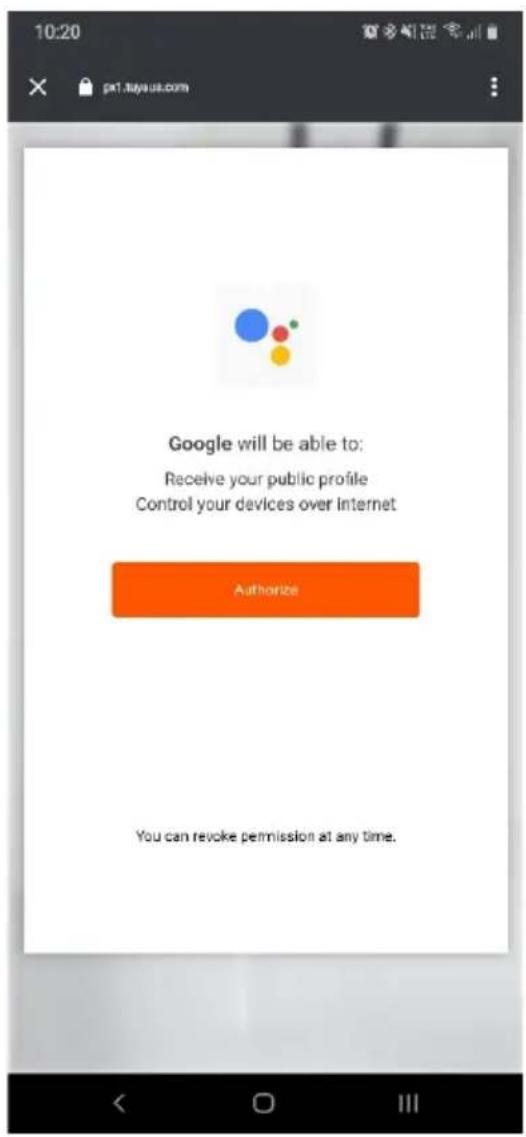
- Tap 'Authorise' to grant Google permission to access the SmarterHome™ app and your devices.
- From here, you will be prompted to sign into your SmarterHome™ account using either your email or mobile phone number, depending on which method you used to register your account.
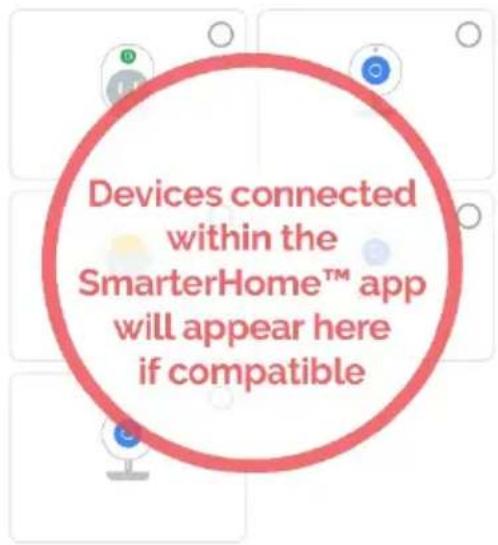
- Once connected, the app will display any compatible devices linked to your SmarterHome™ account. From here you can assign them to rooms and set up any routines.
- Tap on any of the devices to view a list of available commands.
10:21

[Unreadable]
10:23
夏求斯混合

Add smart home devices
Select devices and add to a room
Home

Media

Routines

Settings
Back garden
2 devices

Dog Cam (Backyard)

Dog Cam (Undercover)
Kitchen
1 device

Cat Cam (Kitchen)
ADD TO A ROOM


Other cast devices
8 devices


Note:
Please note that Google Home can only control the base/core functions of any compatible SmarterHome™ devices. To make full use of this product's smart functionality, please use the Kogan SmarterHome™ app.
AMAZON ALEXA CONTROL
Note:
You will need to have set up an Alexa account prior to linking your Kogan SmarterHome™ device.
Adding "SmarterHome" to the Alexa app
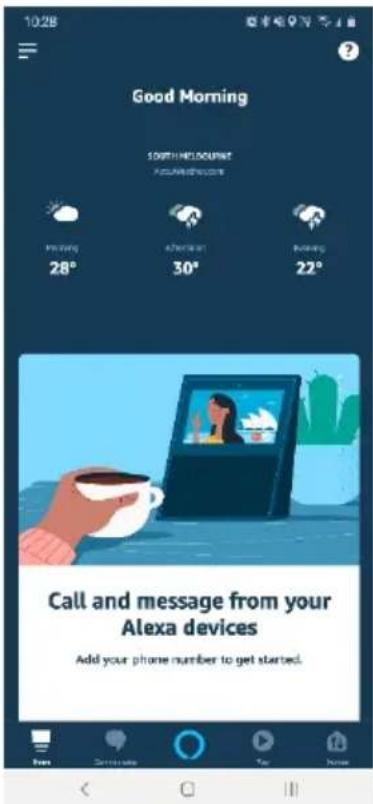
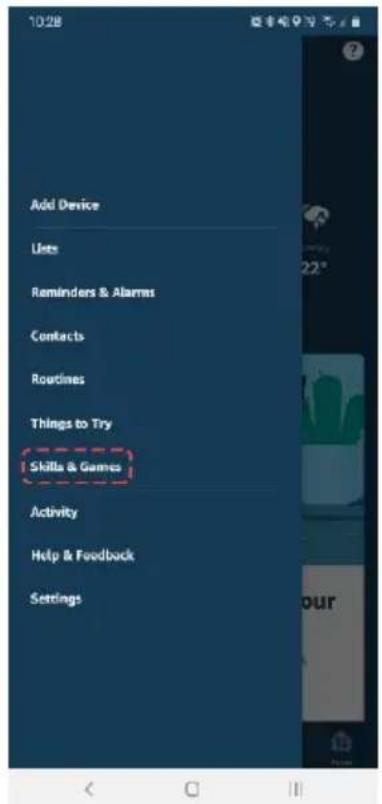
- From the home page of the Alexa app, select the “≡” icon in the top-right and select Skills & Games from the sidebar.
- Select the search bar and type 'Smarter Home' to locate the Kogan SmarterHome™ skill.
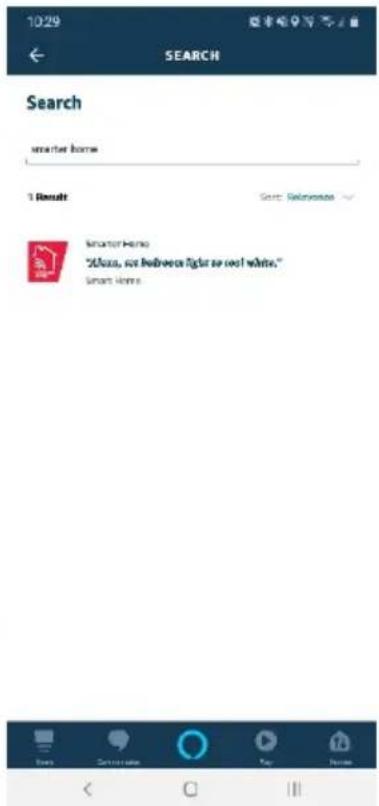
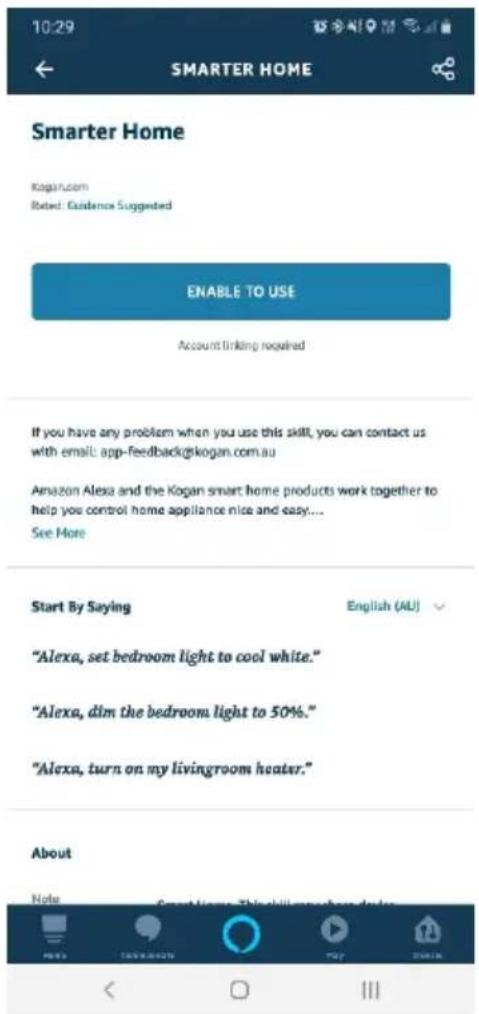
- Tap 'Enable to Use' to add the Kogan SmarterHome™ skill to Alexa.
- From here, you will be prompted to sign into your SmarterHome™ account using either your email or mobile phone number, depending on which method you used to register your account.
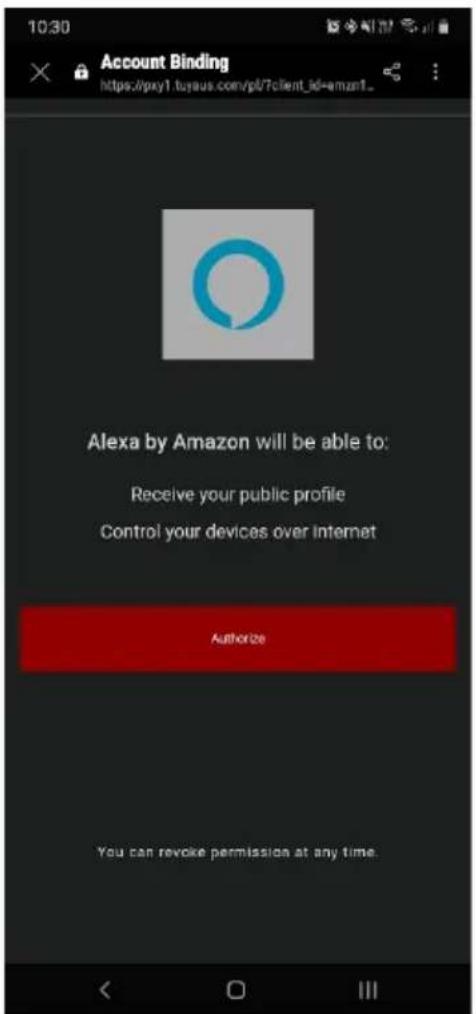
- Tap 'Authorise' to grant Alexa permission to access the SmarterHome™ app and your devices.
-
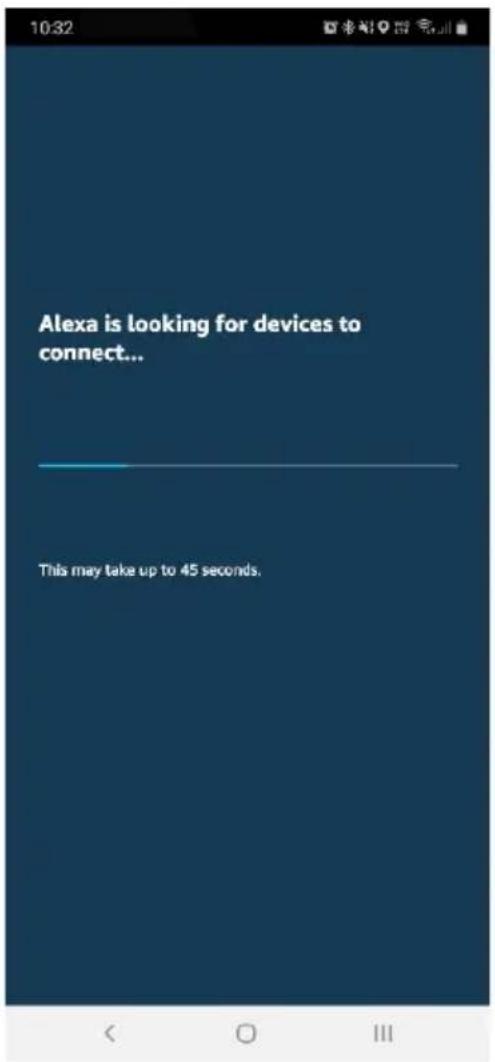
Once connected, the app will perform a search and display the devices linked to your SmarterHome™ account.
-
When your devices have successfully connected to the Alexa app, you will be able to control your Kogan SmarterHome™ devices via Alexa's voice commands.
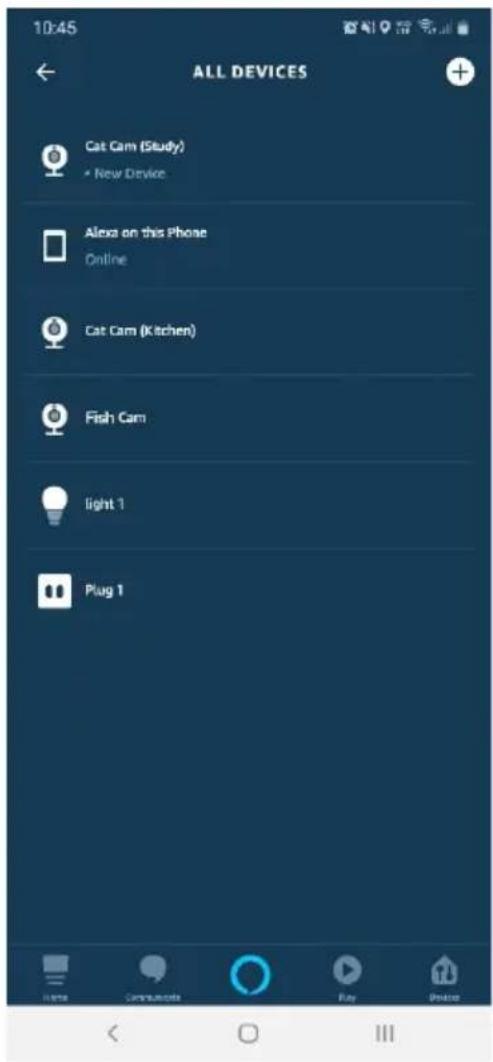
Note:
Please note that Alexa can only control the base/core functions of any compatible SmarterHome™ devices. To make full use of this product's smart functionality, please use the Kogan SmarterHome™ app.
CLEANING & CARE
WARNING: Risk of electric shock! Turn the appliance off and unplug the power cord before cleaning, servicing or repairing the appliance.
This product is equipped with an automatic water vaporisation system. The condenser is cooled by the circulation of the condensed water to improve the cooling capacity and save energy.
Draining the water tank
This unit has an automatic water evaporation system. The circulation of condensed water cools the condenser. This not only increased refrigeration efficiency but also saves energy.
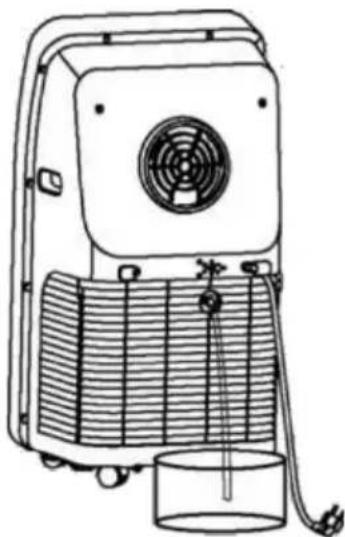
If the air-conditioners water tank does become full, the screen will display "FL" accompanied by an audible alarm, and the compressor will stop working automatically. At this point, you will need to drain the water tank. The method to do so is as follows:
- Unplug the power cord and remove the exhaust pipe assembly.
- Move the conditioner to an appropriate location.
- Disconnect the plug in the water drainage outlet and the water will drain.
- Replace the plug into the drainage outlet.
- Reinstall the exhaust pipe assembly and restart the unit.
natural_image
Line drawing of a portable air conditioner unit with fan, cooling unit, and bulb (no text or symbols)Note: To avoid electric shock, turn off the air-conditioner and unplug it from the power supply before conducting any maintenance or cleaning.
Clean appliance surface
• Unplug the power cord before cleaning.
- Wipe the appliance with a soft, slightly damp cloth. Do not use chemical cleaners, such as benzene, alcohol or gasoline, as they may damage the surface of the appliance or even the entire appliance.
- Do not allow any liquids to get into the internal parts of the air-conditioner.
Cleaning the filters
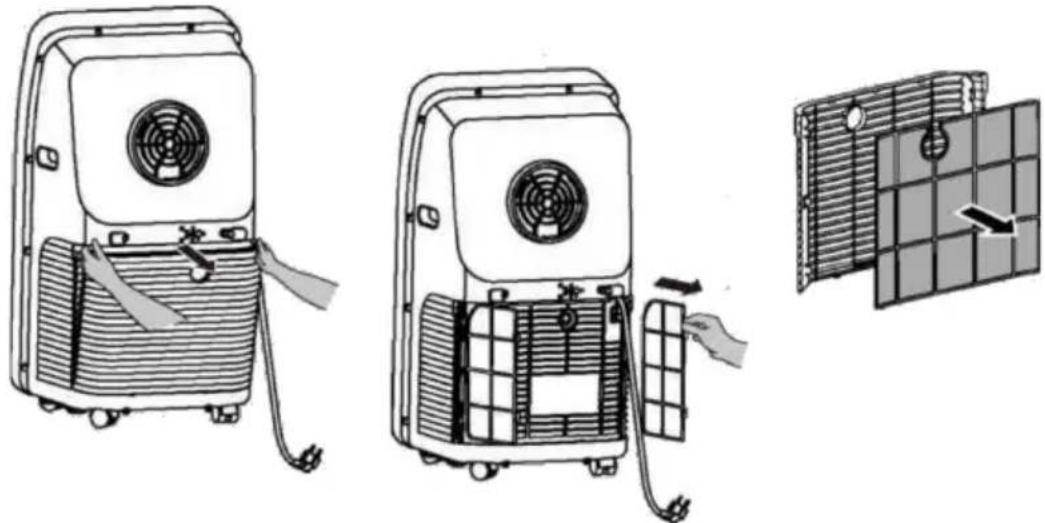
It is recommended to clean the filters every two weeks. If the indoor air quality is poor, the filters should be cleaned more often. If the filters are clogged with dust, the performance of the appliance will be impaired. Follow the cleaning procedure below:
natural_image
Illustration of three different household appliances with a panel array, showing internal components and a hand interacting with one device (no text or symbols present)-
Remove plug from the power supply.
-
Remove the air intake grille and then the
-
filter screen as shown in the image.
-
Put the filter screen into neutral detergent water or warm water to clean, then place in the shade to dry.
-
Reinstall the cleaned, dry filter screen.
-
Plug unit into the power supply, restart it and run as normal.
natural_image
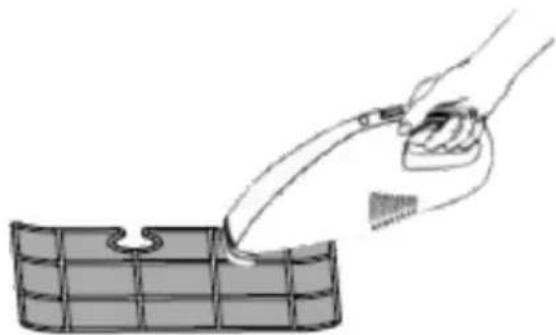
Illustration of a hand holding a tool near a grid-patterned object (no text or symbols)If the filter screen does not appear to be too dirty or dust is barely visible, then you can clean it with a vacuum cleaner to suck up any dust.
In order to avoid filter screen deformation, keep the filter screen away from any sources of heat while drying.
Do not operate the air conditioner without the filter screen installed.
Notes on cleaning the filters
- Do not use water that is too hot for cleaning the filter (optimum is approx. 40°C) and no aggressive cleaning agents (such as alcohol, petrol, benzene, etc.).
• To avoid deformation of the filter, keep cleaned filters away from heat sources and place them in a dry place for air drying.
• Never operate the appliance without the filter.
Store appliance after end of season
If you do not intend to use or store the appliance for a long period of time, please follow these steps:
- Remove the plug from the water drain of the appliance and empty the water tank.
- Let the appliance run in fan mode for 2 hours until the inside of the appliance is dry.
- Switch off the appliance and unplug the power plug from the power outlet.
- Clean the filters and put them back in the appliance. Remove the exhaust hose and store it properly. Remove the battery from the remote control.
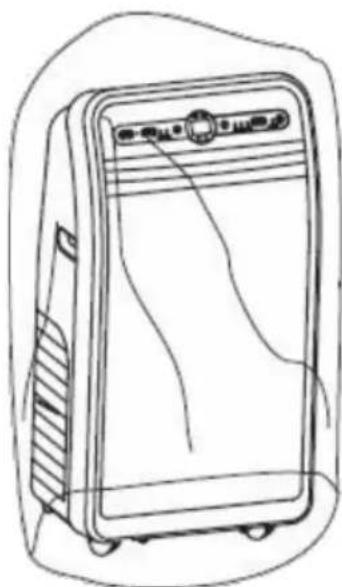
- Cover the appliance with a plastic bag and place it in a dry place.
natural_image
Line drawing of a portable electronic device with control panel and buttons (no text or symbols)Reconnect the appliance at the start of the season
If you have not used the appliance for a longer period of time, please observe the following instructions when putting it back into operation:
• Check that the water drain plug and filters are correctly installed.
- Inspect the power cord for damage. If it is damaged, do not use the appliance and have it replaced by a specialist company.
• Reinsert the batteries in the remote control.
• Install all accessories according to the instructions in the "Installation" section.
SPECIFICATIONS
Air Conditioners
| Cooling Power | 4100W |
Capacity
| Cooling | 14000Btu/H |
| Cooling Range | 17 - 30°C |
| Heating Capacity | 14000Btu/H |
| Heating Range | 17 - 30°C |
Dimensions
| Air Exhaust Hose | Length: 150cm Diameter: 15cm |
| Dimensions | 830 x 443 x 340mm |
| Power Cord Length | 1.8m |
| Weight | 29kg |
| Window Bracket | Min Length: 67.5cmMax Length: 130.0cm |
Electrical
| Power Input Cooling | 1450W |
| Power Input Heating | 1450W |
Hardware
| Compressor Type | Rotary |
Performance
| Air Flow Volume | 360m ^3 /h |
| Moisture Removal | 1.2L/H |
| Noise Level | 62dB(A) |
| Room Size | Max: 30m ^2 |
Power
| Amps | 6A |
| Kilowatt Range | 4.0 - 4.9kW |
| Kilowatts | 4.1kW |
Reservoirs
| Tank Capacity | 0.6L |
Disposal
This marking indicates that this appliance should not be disposed with other house-hold wastes. To prevent possible harm to the environment or human health from uncontrolled waste disposal, recycle it responsibly to promote the sustainable reuse of material resources.
TROUBLESHOOTING
Error Messages
| E1 | Coil temperature sensor error |
| E2 | Error of the indoor temperature sensor |
| E4 | Frost protection function: If the coil temperature is too low, the appliance is switched off. If the temperature rises above 8 °C, the protection is released and the previous operating state is restored. |
| Problem | Possible cause | Possible solution |
| The appliance does not respond. | No display | Check that the power plug is plugged in and that the power cord is undamaged. |
| "FL" is shown on the display. | Switch off the appliance and empty the water tank.Restart the appliance and the display returns to normal | |
| The timer shut-off function has been started. | The appliance can be restarted 3 minutes after it has been switched off. | |
| The appliance starts frequently. | Direct sunlight | Close the curtains. |
| Doors and windows are open or there are many people or heat sources in the room. | Close doors and windows and remove heat sources. | |
| The filters are very dirty. | Clean or replace the filters. | |
| Air inlet or air outlet openings are blocked. | Remove the dirt. | |
| The appliance is very loud. | The appliance stands unevenly or wobbles. | Place the appliance on a firm, level surface on which it cannot wobble. |
| The compressor is not working. | The compressor protection function is active. | Wait 3 minutes for the appliance to cool down and then restart it. |
NOTES
NOTES
Need more information?
We hope that this user guide has given you
the assistance needed for a simple set-up.
For the most up-to-date guide for your product,
as well as any additional assistance you may require,
head online to help.kogan.com
kogan.com
- KOGAN SMARTERHOME™ 4.1KW PORTABLE AIR CONDITIONER
- Note:
- Precautions
- Important Safety Tips
- Usage Notes
- OVERVIEW
- Control Panel & Remote Control Functions
- POWER button
- Automatic Swing Function
- Air Speed Function
- Temperature/Time Up and Down Adjustment
- Mode Selection
- Time Function
- Temperature/Time Display Window
- Remote Control Receiver Window
- Celsius/Fahrenheit Conversion Button
- Remote Control batteries:
- INSTALLATION
- Installation position
- Notes on installation
- Installation accessories for window ventilation
- Installation of the window ventilation (For vertical or horizontal sliding window)
- Drainage Pipe
- OPERATION
- Cool mode
- Fan mode
- Dry mode
- Heat mode
- Timer
- CONNECT TO SMARTERHOME™ APP
- Install App
- Register
- To register:
- Set device in pairing mode
- Add device through network
- Notes:
- GOOGLE HOME CONTROL
- Adding "SmarterHome" to the Google Home app
- AMAZON ALEXA CONTROL
- Adding "SmarterHome" to the Alexa app
- CLEANING & CARE
- Draining the water tank
- Clean appliance surface
- Cleaning the filters
- Notes on cleaning the filters
- Store appliance after end of season
- Reconnect the appliance at the start of the season
- SPECIFICATIONS
- TROUBLESHOOTING
- NOTES
- Need more information?
Brand : Kogan
Model : KAWFROBVACA
Category : Robot vacuum