IZ-8241 - Uncategorized Izzy - Free user manual and instructions
Find the device manual for free IZ-8241 Izzy in PDF.


| Product Type | Digital Air Fryer & Grill |
| Model | IZ-8241 |
| Brand | Izzy |
| Voltage | 220-240 V |
| Frequency | 50-60 Hz |
| Air Fryer Power | 1400 W |
| Grill Power | 1200 W |
| Bucket Capacity | 5 L |
| Programs | Air Fry, Roast, Broil, Bake, Reheat, Toast, Grill |
| Temperature Range (Air Fry) | 60-200 °C |
| Time Range (Air Fry) | 1-60 minutes |
| Grill Default Time | 60 minutes (fixed) |
| Display | Digital with time/temperature indication |
| Shake Reminder | Yes (at half-time for most programs) |
| Standby Mode | After 30 seconds of inactivity |
| Auto Shut-off | At end of program (beeps) |
| Cleaning Method | Hand wash with warm soapy water; dishwasher not recommended |
| Safety Features | Overheat protection, auto shut-off, safety interlocks, earthed plug |
| Spare Parts Availability | Original parts via authorized BENRUBI service centers |
| Repairability | Only by authorized BENRUBI service centers; DIY repairs cancel warranty |
| Warranty | 2 years from purchase date (manufacturing defects) |
| Certifications | EU directives: EMC, Low Voltage, RoHS, Eco-design, Food contact |
| Included Accessories | Detachable non-stick bucket, detachable rack, grill tray, grill glass lid |
Frequently Asked Questions - IZ-8241 Izzy
User questions about IZ-8241 Izzy
0 question about this device. Answer the ones you know or ask your own.
Ask a new question about this device
Download the instructions for your Uncategorized in PDF format for free! Find your manual IZ-8241 - Izzy and take your electronic device back in hand. On this page are published all the documents necessary for the use of your device. IZ-8241 by Izzy.
USER MANUAL IZ-8241 Izzy
natural_image
Black and white photo of a modern air fryer with digital display and control buttons (no visible text or symbols)
Thank you for having chosen an appliance from the IZZY range.
Safety interlocks

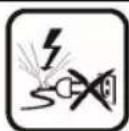
Please read these instructions carefully before using the appliance and save them for future reference. Please keep the sales receipt for guarantee purposes (pls see below “Guarantee and Customer Service”) Any us which does not conform to the instructions will absolve IZZY from an liability.
• Make sure your electricity supply is the same as the one shown on the underside of the appliance.
• Always plug your device into an outlet that is earthed. Failure to comply with this requirement may result in electric shock and possible serious injury.
- Never leave the appliance unattended when it is operating.
- Close supervision is necessary when your appliance is being used near children or infirm persons. Ensure that they do not play with the appliance.
- This appliance is not intended for use by persons with reduced physical, sensory or mental capabilities, children or those with lack of experience and knowledge, unless they have been given supervision or instructic concerning use of the appliance by a person responsible for their safety.
- Switch off and unplug
- After each use
- Before cleaning
-
Before moving
-
Never use the appliance for any other use than indicated.
- The device is intended for indoor use. Do not use the device outdoors.
- The device is intended only for domestic use. Any other use will cancel the warranty.
• Always use the appliance on a secure, dry, clean and heat resist surface. - Do not operate or place the device or parts in places of high humidity or
where it may get wet.
- Never let the body of the appliance, cord or plug get wet. If the appliance does get wet, immediately remove the power cord from the wall outlet and do not put your hands in the water. Never run the wet appliance ar contact one of the authorized BENRUBI service centers.
- Do not place the appliance near heat sources, on or next gas or electric hobs.
- The appliance must have sufficient airflow. Leave more than 10 cn around the appliance.
- Don’t put the appliance near curtains, under shelves or cupboards, or near anything that might be damaged by the escaping steam.
- Don't cover the appliance or put anything on top of it during use.
ATTENTION: During use, be careful and do not touch the air outlet, on the back of the appliance. Hot air comes out.
- Misuse of the air fryer can result in injury.
- Do not let the power cord of the appliance hang over the edge of a table or bench top or where a child could grab it. Do not let the power cord to touch any hot surface.
- Never pull the cord to disconnect the appliance from the electrical supply. Instead grasp the plug and pull it to disconnect.
- Never leave the power cable wrapped during use. Unwind it completely.
- Never use highly corrosive or abstractive cleaning agents. Never use metal scouring pads for cleaning.
CAUTION: The surface of the appliance is hot during operation. Do not touch hot parts of the appliance during operation.
CAUTION: Do not let the resistance of the appliance to get wet.
- It is suggested that it should not be used for more than 3 hours.
- Do not move the appliance when it is in operation.
- Do not touch the appliance with wet or damp hands.
- Do not use an extension power cord.
- This appliance is not intended to be operated by means of an external timer or separate remote-control system.
- Check the power cord periodically for possible damages. If the power cord or the plug of the appliance has been damaged, do not use the appliance and contact an authorized BENRUBI Service Center.
- In case of a possible damage, do not attempt to repair the appliance by yourself. Please contact one of the authorized BENRUBI service centers.
- Any repair made by an unauthorized BENRUBI Service Center CANCELS
THE GUARANTEE.
- Any misuse of the device cancels the warranty.
- Use only original spare parts.
• The appliance conforms to EU directive 2014/30/EU on Electromagnetic Compatibility, the 2014/35/EU Low Voltage Directive, the 2011/65/EU RoHS Directive, the directive 2009/125/EC for eco-design and the EC regulation no. 1935/2004 on materials intended to contact with food.
SAVE THESE INSTRUCTIONS
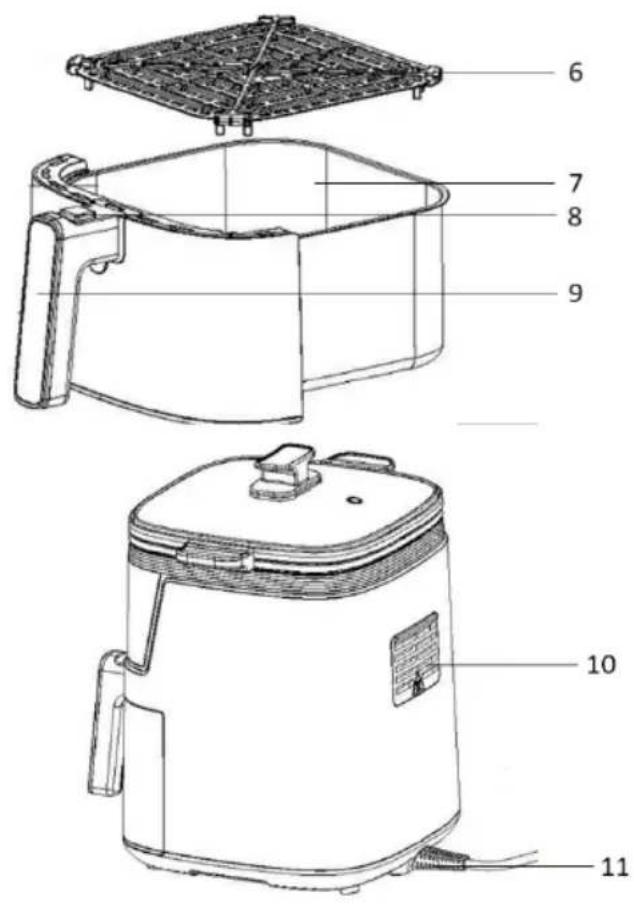
Parts of the Appliance
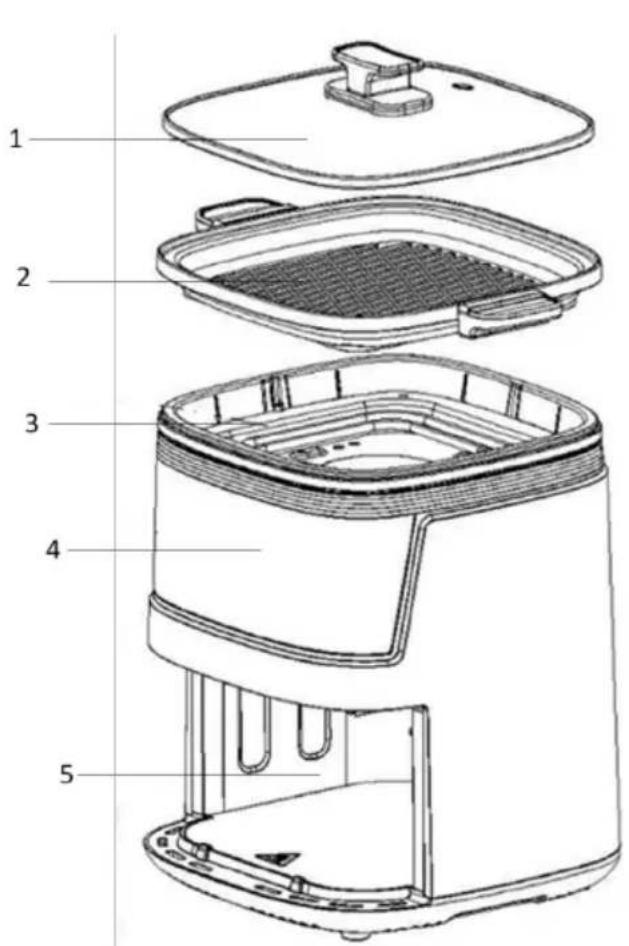
- Grill glass lid
- Detachable grill tray
- Grill resistance
- Control panel
- Bucket cavity
- Detachable non-stick rack
- Detachable non-stick bucket 5lt
- Bucket removal button
- Handle
- Air outlet
- Power cable
Control panel
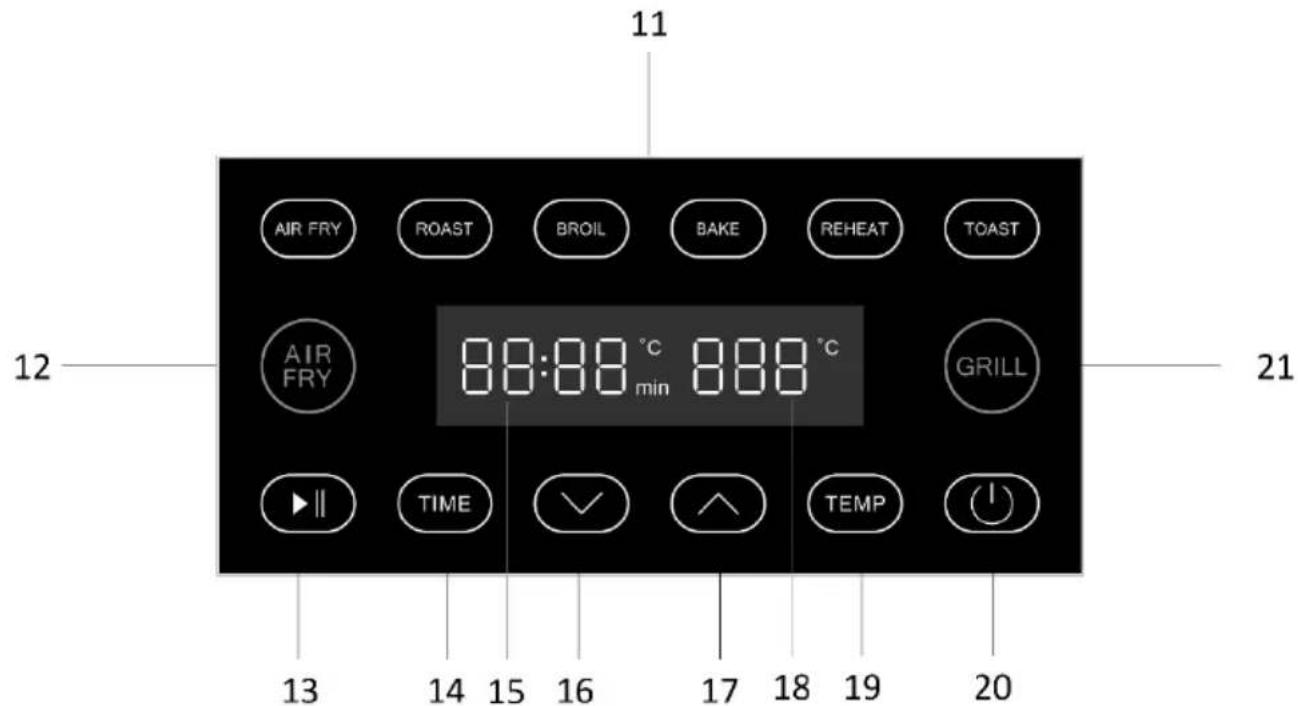
- Air fry program buttons
- "AIR FRY" button
- Start/pause button
- Time regulator button
- Air fry display
- Time/temperature decrease button
- Time/temperature increase button
- Grill display
- Temperature regulator button
- Power button
- "GRILL" button
Programs and Preset Times and Temperatures
The following table lists the programs and the preset temperatures and times. Use this table for reference only.
| AIR FRY | ROAST | BROIL | |
| Temperature (°C) | 200 | 200 | 200 |
| Time (min) | 18 | 25 | 20 |
| Temperature range (°C) | 60-200 | 60-200 | 60-200 |
| Time range (min) | 1-60 | 1-60 | 1-60 |
| Shake reminder (min) | 10 | 12 | 12 |
| BAKE | REHEAT | TOAST | |
| Temperature (°C) | 170 | 120 | 200 |
| Time (min) | 16 | 6 | 4 |
| Temperature range (°C) | 60-200 | 60-200 | 60-200 |
| Time range (min) | 1-60 | 1-60 | 1-10 |
| Shake reminder (min) | 10 | X | 2m 40s |
* Smaller ingredients usually require less cooking time than larger ingredients.
Grill function
GRILL
In grill mode, the default temperature is 200^ C and the default time is 60 minutes. The temperature range on the grill function is 60-200^ C There is no possibility to change the time.
Before the First Use
- Make sure the appliance is switched off and unplugged before use.
NOTE: Smoke and odors may occur during first use.
- Wash the parts of the appliance. See "Care and Cleaning" section.
- Place the appliance on a clean, flat and heat-resistant surface.
- Place the rack (6) in the bucket (7). Remove the grill lid (1).
Note: Do not use the appliance without the detachable rack. - Insert the bucket in the reception (5) without food until it snaps into place.
Note: If the bucket does not fit well into the reception, the appliance will not turn on. - Plug in. A “beep” will be heard and on the control panel (4) the power button (20) will remain on.
- Press the power button (20). A "beep" will sound and all the indication lights on the display scree (4) will turn on.
-
Press “AIR FRY” button (12). The “AIR FRY” program indication will flash and the display will alternate between the preset temperature of 200^ C and the preset time 18 min.
-
Press the time regulator button (14) and then the decrease button (16) and set the time to 10 minutes.
- Press start button (13) and the appliance will start.
- Press "GRILL" button (21). On the grill display (18) the temperature 200^ will be displayed.
- Press start button (13) again and the appliance will start.
Note: If you do not press any key for 30 seconds, the lights will turn off and the appliance will enter
the standby mode and the power indication (15) will remain on.
- On the control panel, indication "AIR FRY" will remain on and on the display (15) the temperature 200^ and the selected time will alternate. On the grill display (18), the temperature 200^ will remain on.
- When the selected program is completed, the display of the air fryer (15) will show “- - - -” while the grill will continue to operate.
- Press power button (20).
- The appliance is ready for use.
Use of the Appliance – Air Fry Function
- Make sure the appliance is switched off and unplugged before use.
Note: It is recommended to preheat the device for 5 minutes without food.
-
Place the appliance on a clean, flat and heat-resistant surface.
-
Place the rack (6) in the bucket (7).
Note: Do not use the appliance without the detachable rack.
- Place the food on the rack (6) and insert the bucket (7) in the reception until it snaps into place.
Note: Make sure the food in the bucket does not come into contact with the heating resistant.
Note: If the bucket with the rack do not fit well into the airfryer cavity, the appliance will not turn on.
-
Plug in. A “beep” will be heard and on the control panel (4) the power button (20) will remain on.
-
Press the power button (20). A "beep" will sound and all the indication lights on the control panel (4) will turn on.
-
Press "AIR FRY" button (12). The indication "AIR FRY" will flash and on the display the preset temperature 200^ and preset time 18min will alternate.
Note: If you do not press any key for 30 seconds, the lights will turn off and the appliance will enter
the standby mode and the power indication (20) will remain on.
-
Press the button of the program of your choice (see section "Table of programs & preset times & temperatures"). The corresponding indication will flash and the preset temperature and the preset time of the program will alternate on the display screen.
-
Press the time regulator button (14) and press successively “” (16) or “” (17) to set the desired time.
-
Press the temperature regulator button (19) and press successively “” (16) or “” (17) to set the desired temperature.
-
Press the start button (13) and the appliance will start. On the control panel the indication of the selected program will remain on and on the display screen (15) the selected temperature and the selected time will alternate.
Note: During cooking, it is recommended to turn or stir the food in the bucket for best results. At about half time of the program, an alert will sound and the indication “” will flash for a few seconds on the display screen (15).
- Press the start/pause button (13), remove the bucket, stir and reinsert the bucket. Press the start/pause button (13) again and the selected program will automatically resume.
-
Alternatively, you can remove the bucket, stir and re-insert the bucket. The program you have selected will automatically resume.
-
When the selected program is finished, a beep will be heard 3 times and the display will show

A beep will be heard again 3 times and the appliance will stop. The indication lights will
turn off and on the control panel (4) the power indication light (20) will remain on.
Note: Before serving, check that the food has been cooked. If it takes extra time to cook, repeat the process by adjusting the time and temperature. Cooking time depends on the density, thickness and humidity of the food.
Notes:
- Carefully remove the bucket from the reception. Always hold the bucket (7) by the handle (9).
- When removing the bucket, be careful as steam may escape.
- Serve using plastic or wooden tongs.
- If you want to change the time or temperature during operation, press "AIR FRY" button (12). The indication light will flash. Press the time regulator button (14) and/or temperature regulator (19) button and with the “” (16) or “” (17) keys set the time and temperature respectively. Press the start/pause button ▷|| (13). The display will alternate with the new time and/or temperature.
- If you want to change the program during operation, press “AIR FRY” button (12) and then the start/pause (13). Select the program of your choice, set the temperature & time and press the start/pause button (13).
- If you want to stop the program before the selected time, press and hold the power button (20).
- Do not cover the device or place anything on it during use.
- Do not fill the basket with oil or any other liquid.
- Do not place flammable containers made of cardboard, paper, plastic and similar materials into the device.
- Do not place glassware, closed containers and similar materials that may break with the temperature.
- Do not use glass or ceramic utensils.
- In the event of a power failure, when the power is restored, the selected program will flash on the control panel, and the selected temperature and remaining time will alternate. Press the start/pause button (13) and the program of your choice will continue. If you do not press any button for about 6 minutes, the lights will turn off and the appliance will turn into standby mode and indication (20) will remain on.

Use of the Appliance – Grill Function
- Make sure the appliance is switched off and unplugged before use.
Note: It is recommended to preheat the device for 5 minutes without food.
-
Place the appliance on a clean, flat and heat-resistant surface.
-
Place the tray (2) on the grill resistance (3).
Note: Do not use the appliance without the detachable grill tray.
Note: If the grill tray does not fit well into the reception, the appliance will not turn on.
- Place the food on the tray (2).
Note: For better result, cover with the lid (1).
-
Plug in. A “beep” will be heard and on the control panel (4) the power button ⏻(20) will remain on.
-
Press the power button (20). A "beep" will sound and all the indication lights on the control panel (4) will turn on.
Note: If you do not press any key for 30 seconds, the lights will turn off and the appliance will enter
the standby mode and the power indication (20) will remain on.
-
Press “GRILL” button (21). The indication “GRILL” will flash and the display will show the preset temperature 200^ C.
-
Press consequently buttons “ ” (16) ñ “ ” (17) to set the desired temperature.
Note: The preset time in "GRILL" mode is 60 minutes and does not change.
- Press start button (13) and the appliance will start. The indication "GRILL" will remain on and the selected temperature will remain on on the display screen (18).
Note: During cooking, it is recommended to turn the food on the tray halfway through the cooking time.
- After the 60 minutes have passed, press and hold the power button (20).
Note: Before serving, check that the food has been cooked. If it takes extra time to cook, repeat the process. Cooking time depends on the density, thickness and humidity of the food.
Notes:
- Carefully remove the bucket from the reception. Always hold the tray (2) by the handles.
- Serve using plastic or wooden tongs.
- If you want to change the temperature during operation, press "GRILL" button (21). The indication light will flash. Press the temperature regulator button (19) and with the “ ” (16) or “ ” (17)
keys set the temperature. Press the start/pause button ▷|| (13). The display will show the new temperature.
- If you want to stop the program before the default time, press and hold the power button ⏻ (20).
- Do not cover the device or place anything on it during use.
- Do not fill the basket with oil or any other liquid.
- Do not place flammable containers made of cardboard, paper, plastic and similar materials into the device.
- Do not place glassware, closed containers and similar materials that may break with the temperature.
- Do not use glass or ceramic utensils.
- In the event of a power failure, when the power is restored, the selected program will flash on the control panel, and the selected temperature and remaining time will alternate. Press the start/pause button (13) and the program of your choice will continue. If you do not press any button for about 6 minutes, the lights will turn off and the appliance will turn into standby mode and the indication (20) will remain on.
Use of the Appliance – Air Fry and Grill Mode
- After turning on the appliance, press "AIR FRY" button (12). The indication "AIR FRY" will flash and on the display the preset temperature 200^ and preset time 18min will alternate.
- Press the button of the program of your choice (see section "Table of programs & preset times & temperatures"). The corresponding indication will flash and the preset temperature and the preset time of the program will alternate on the display screen.
- Press the time regulator button (14) and press successively “” (16) or “” (17) to set the desired time.
- Press the temperature regulator button (19) and press successively “” (16) or “” (17) to set the desired temperature.
- Press the start button (13) and the appliance will start. On the control panel the indication of the selected program will remain on and on the display screen (15) the selected temperature and the selected time will alternate.
- Press “GRILL” button (21). The indication “GRILL” will flash and the display will show the preset temperature 200^ C.
- Press consequently buttons “” (16) ñ “” (17) to set the desired temperature.
Note: The preset time in "GRILL" mode is 60 minutes and does not change. - Press start button (13) and the appliance will start. The indication "GRILL" will remain on and the selected temperature will remain on on the display screen (18).
Note: When using both functions together, you cannot switch off the grill function before the fryer program is complete.
Tips
- Add 1-2 tablespoons of oil (depending on the amount) and stir before cooking.
- Smaller ingredients usually require less cooking time than larger ingredients.
- To ensure uniform cooking, in the middle of the cooking time, it is recommended to mix the food in the frying basket during cooking.
- Snacks that are normally baked in the oven can also be cooked in the fryer.
- Cooking extremely fatty ingredients is not recommended.
- The ideal quantity for preparing crispy potatoes is 300 grams.
- Use pre-made dough to make filling snacks quickly and easily. Pre-made dough also requires less preparation time than homemade dough.
- Place a baking tin or baking tray on the detachable rack if you want to bake a cake or quiche or if you want to fry brittle or stuffed ingredients.
- The appliance is suitable for heating food. To reheat your food, set the temperature to 150^ for up to 10 minutes.
Care and Cleaning
- Before cleaning and storage, unplug the appliance and let it cool down for at least 30 minutes.
• Always clean the appliance and accessories after each use.
Body:
- Wipe with a damp cloth, then dry.
- Never use highly corrosive or abstractive cleaning agents.
- Never use metal scouring pads for cleaning.
Detachable rack, bucket, grill tray & lid:
- Wash with warm soapy water and dry thoroughly.
- Never use highly corrosive or abstractive cleaning agents.
- Never use metal scouring pads for cleaning.
- It is recommended not to wash the parts in the dishwasher.
Technical Characteristics
Model: Air fryer & grill DIGITAL IZ-8241 IZZY
Voltage: 220\~240V
Frequency: 50-60Hz
Air fryer power: 1400W
Grill power: 1200W
Bucket Capacity: 5Lt
Important Information for Correct Disposal of the Product in Accordance with EC Directive 2002/96/EC
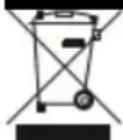
At the end of its working life, the product must not be disposed of as urban waste. It must be taken to a special local authority differentiated waste collection centre or to a dealer providing this service. Disposing of a household appliance separately avoids possible negative consequences for the environment and health deriving from inappropriate disposal and enables the constituent materials to be recovered to obtain significant savings in energy and resources.
As a reminder of the need to dispose of household appliances separately, the product is marked with a crossed-out wheeled dustbin.
Guarantee & Customer Service
- BENRUBI Company guarantees its products for any manufacturing defect or defective materials for a period of two (2) years from the date of purchase or delivery by presenting purchase receipt. If your product malfunctions or you find any defects, please revert to the retail location you have purchased it from or contact an authorized BENRUBI Service Centre. To find the nearest authorized BENRUBI Service Centre, visit our website www.benrubi.gr. It is in the discretion of BENRUBI Company to replace or repair the defective product.
- The warranty does not cover damages resulting from normal wear, breakage, scaling, improper installation or maintenance of the product, mishandling, abnormal working conditions, failure implement the instructions, conversion or repair of the product by an unauthorized technician who does not belong to the BENRUBI Service Centers.
Also, the warranty does not cover the following indicative factors:
• Stains, discoloration or scratches.
- Burns due to exposure to heat or flame.
- Damage from thermal shock (sudden temperature change or change of voltage).
FOR MORE INFORMATION PLEASE CONTACT:
(NEW) H. BENRUBI & FILS SA
27 Aghiou Thoma str, GR15124, Maroussi – Athens,
Tel./Customer Support: +30210 6156400
e-mail: benrubi-sda@benrubi.gr

- Safety interlocks
- THE GUARANTEE.
- SAVE THESE INSTRUCTIONS
- Parts of the Appliance
- Programs and Preset Times and Temperatures
- Grill function
- Before the First Use
- Use of the Appliance – Air Fry Function
- Notes:
- Use of the Appliance – Grill Function
- Use of the Appliance – Air Fry and Grill Mode
- Tips
- Care and Cleaning
- Body:
- Detachable rack, bucket, grill tray & lid:
- Technical Characteristics
- Guarantee & Customer Service
Brand : Izzy
Model : IZ-8241
Category : Uncategorized