IT-350CRS - Oven Imarflex - Free user manual and instructions
Find the device manual for free IT-350CRS Imarflex in PDF.


| Product Type | Countertop Oven |
| Model | IT-350CRS |
| Brand | Imarflex |
| Capacity | 35 Liters |
| Power Supply | 220-240 V, 50/60 Hz |
| Power Consumption | 1500 W |
| Dimensions (W x D x H) | 45 x 35 x 30 cm |
| Weight | 8 kg |
| Control Type | Knobs and Timer |
| Temperature Range | 100°C - 230°C |
| Timer | Up to 60 minutes with auto shut-off |
| Heating Elements | Top and bottom quartz heating elements |
| Cooking Functions | Bake, Broil, Toast, Convection, Keep Warm |
| Interior Material | Non-stick coating |
| Door Type | Drop-down door with cool-touch handle |
| Crumb Tray | Removable for easy cleaning |
| Accessories Included | Baking pan, wire rack, crumb tray |
| Safety Features | Auto shut-off, overheat protection, cool-touch exterior |
| Easy Cleaning | Removable crumb tray and non-stick interior |
| Spare Parts Availability | Replacement racks and pans available from Imarflex service centers |
Frequently Asked Questions - IT-350CRS Imarflex
User questions about IT-350CRS Imarflex
0 question about this device. Answer the ones you know or ask your own.
Ask a new question about this device
Download the instructions for your Oven in PDF format for free! Find your manual IT-350CRS - Imarflex and take your electronic device back in hand. On this page are published all the documents necessary for the use of your device. IT-350CRS by Imarflex.
USER MANUAL IT-350CRS Imarflex
natural_image
Black-and-white photo of a imarflex convection and rotisserie toaster oven with a roasted chicken on the door (no visible text or symbols on the device itself)
natural_image
Illustration of a hand touching a blank sheet of paper (no text or symbols visible)INSULATED DOUBLE GLASS DOOR







When using electrical appliances, basic safety precautions should always be followed, including the following:
- Read all instructions carefully.
- Before using the oven toaster, check if the voltage indicated corresponds with the convenience outlet (230Va.c.).
- Do not use a two-way socket with another appliance.
- Do not use any appliance with a damaged cord or plug. If the cord is damaged it should be replaced with the same type and size or bring the unit to the nearest authorized service center.
- Put the unit on stable surface; keep it away from the edge of counter to avoid accident.
- Keep curtains, furniture, flammable materials, etc. away from the unit and from the convenience outlet where the unit is plugged in.
-
To protect against electric shock, do not immerse the unit in water or any other liquid.
-
Do not place the oven toaster near gas stove or electric stove.
-
The unit needs at least 10 cm clearance space on all sides and at least 30 cm above. This is to allow adequate air circulation.
-
This appliance is not intended for use by persons (including children) with reduced physical, sensory or mental capabilities, or lack of experience and knowledge, unless they have been given supervision or instruction concerning use of the appliances by a person responsible for their safety.
-
Children should be supervised to ensure that they do not play with the appliance.
-
Do not immerse the unit in water.
-
Do not use this unit other than its intended use.
-
Avoid touching the oven surface while cooking is in progress or even after use. While the oven is in use avoid the glass from getting wet to avoid breakage.
-
Use of accessories or equipment not supplied by the manufacturer may cause damage or malfunctioning of your appliance or result in injuries.
-
Switch off the appliance before removing or replacing its accessories.
-
Minor metal contraction sound may occur during operation but this is normal.
-
For household use only; not intended for any business purposes.
-
In case of malfunctions, please bring the unit to the nearest Authorized Imarflex Service Center.
-
This appliance is not intended for outdoor use.
-
Save this instruction for future reference.
-
CAUTION: In order to avoid a hazard due to inadvertent resetting of the thermal cutout, this appliance must not be supplied through an external switching device, such as a timer, or connected to a circuit that is regularly switched on and off by the utility.
DESCRIPTION OF PARTS:
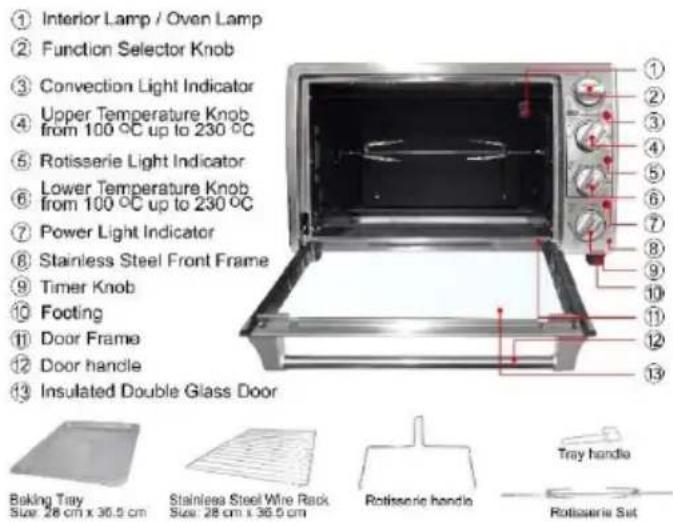
CONTROL PANEL
- Upper Heater- It is normally use for cooking top part of the foods, reheating, pizza, broil, etc.
- Lower Heater- Use for baking breads.
- Up & Down Heater- Use for grilling meats, seafood, etc.
- Rotisserie + Convection + Upper Heater- This setting is normally use for roasting chicken etc; the fan and the rotisserie is working together with the upper heater only. Tips: If you want to use the Convection and upper heater only, do not place the skewer on the unit.
- Convection + Both Heaters- this setting is use for baking cakes.
HOW TO USE
NOTE: For the first use, preheat the convection & rotisseries oven for at least 3 to 5 minutes until burnt smell and light smoke is gone. This is to prevent this smell and smoke mix to the food to be cooked.
- Place the unit on flat surface.
- Check if the timer and function selector switch is at OFF position before plugging the oven into the convenience outlet. Plug the unit.
- Set the Upper & Lower Heater to your desired temperature.
Note: If you will only use one heater, make sure to turn OFF the other heater.
- Set the function switch to desired setting.
- For baking, use edible oil or butter to keep the food from sticking into the pan.
- Turn the Timer to pre-heat the oven for at least 5 minutes or as required by the cooking recipe.
NOTE:
- If you need to set the time below 10 minutes, set the timer switch more than 10 minutes first then set to desired time setting.
- Place the food on the grill rack or tray and close the door. Be careful when putting food, the unit is hot.
Tips: For roasting chicken or grilling meat, place the baking tray on the lower tray holder with a little amount of oil to lessen smoke and for easy cleaning.
- Turn the timer switch to desired cooking time.
NOTE: The cooking time and result of the food to be cooked may depend on the amount and size, trial is advisable to get the desired setting and doneness of the food.
- A beep sound will be heard and the oven toaster will stop cooking once the set time is finished.
CAUTION: Do not touch the unit when it's hot.
Tips: For better performance, let the unit cool down for 15 minutes after every hour of use.
HOW TO USE THE ROTISSERIE
- Plug the unit into the convenience outlet.
- Set the Upper & Lower Temperature Control to max.
- Pre-heat the unit for at least 5 minutes.
- Insert the pointed end of the spit through Skewer, making sure the points of Skewer face in the same direction as pointed end of the Spit. Slide Skewer towards square of the Spit and secure the thumbscrew.
- Place food to be cooked on the Spit by running the Spit directly through the center of the food.
- Place the second Skewer into the other end of the Spit and secure with the Thumbscrew.
- Insert the point end of the Spit into the Drive Socket. Make sure that the Square Skewer end of the Spit rests on the Spit Support.
- Set the Upper and Lower Temperature Control to 230^ C.
- Set the Function Selector Switch to “ ↔ ” function.
- Place the baking tray on the lower rack holder.
- Turn the Timer Switch to desired cooking time.
- Once the cooking cycle ends, remove the spit by placing the Hooks of the Skewer holder under the grooves on other side of the Spit. Lift the left side of the Spit first by lifting it up and out, then pull out of the Drive Socket and carefully remove the roasted food and place it on the platter.
- Unplug the oven after every use.
HOW TO USE THE CONVECTION
- Set the Temperature Control to desired temperature.
- Set the Function Selector Switch to “*”.
- Set the Timer to desired cooking time.
CLEANING AND MAINTENANCE:
- It is important that you clean the oven after every use to prevent grease accumulation and avoid unpleasant odors.
- Turn off the appliance and unplug into the convenience outlet
- Let the unit cool down before moving or cleaning the appliance.
- Do not immerse appliance in water or wash it under waterspout. Use a wet damp cloth in cleaning the unit.
- Wash the grill racks, baking trays with soap and water, Let it dry.
- Do not use abrasive materials to avoid scratches.
- Let all parts dry before use.
COOKING GUIDE
| RECIPE | HEATER | SIZE and SERVING | TEMP | TIME (mins.) |
| Muffins | Lower | - | 150°C | 35 |
| Brownies | Lower | 12 single serving | 180 °C | 30 – 40 |
| Chocolate Chip Cookie | Lower | 2 dozen | 180 °C | 15 - 20 |
| Chocolate Cake | Lower | 12 single serving | 180 °C | 45 - 50 |
| Buko Pie | Lower | 8 single serving | 200 °C | 30 |
| Roasted Chicken | Upper & Lower | 4-pound whole chicken (1.8 kilo) | 230 °C | 60 |
| Porchetta | Upper & Lower | 3-pound pork belly (1.3 kilo) | 230 °C | 45 - 60 |
| Chicken Galantina | Upper & Lower | 4-pound whole chicken (1.8 kilo) | 200 °C | 45 - 60 |
ROASTED CHICKEN
Ingredients:
1 (4 pound) whole chicken
2 tsp. Salt
1 tsp. White sugar
5 cloves garlic, crushed
2 tbsp. Minced fresh sage
1 tbsp. Minced fresh rosemary
3 pcs. White onion quarter
2 medium carrots quarter
1 cup celery stalk chopped
Procedure:
-
In a bowl, mix the salt, sugar, garlic, rosemary and sage. Rub the Chicken with the mixture. Cover chicken, and place in the refrigerator for 24 hours.
-
Preheat oven to 230^ C.
-
Stuff the chicken cavity with the garlic, onion, carrots, celery.
-
Place the chicken on the rotisserie (see "How to use the Rotisserie")
-
Roast for 60 minutes in the preheated oven at 230^ C or until reach the desired doneness.
PORCHETTA
Ingredients:
3-pound pc. Fresh pork belly, skin on
2 tbsp. Crushed red pepper flakes
2 tbsp minced fresh sage
1 tbsp minced fresh rosemary
3 cloves garlic, minced
TT salt and pepper
1 bar cheddar cheese
Procedure:
-
Preheat oven to 230^ C for at least 10 minutes. Have your butcher butterfly pork shoulder to an even 1-inch thickness, you should have a flat piece of meat about 8 inches by 14 inches. Sprinkle with salt and pepper and set aside.
-
Rub the garlic and all the herbs all over the pork belly.
-
Sprinkle with grated cheese and tie the whole pork.
-
Place the pork on the grill rack and place the tray with water on the bottom.
-
Set the function selector to Convection + Both heaters “☐”. Cook for 45 to 60 minutes at 230°C or until reach the desired doneness.
-
Remove and allow to rest for 10 to 20 minutes. Slice into 1-inch-thick pieces and serve.
CHICKEN GALANTINA
Ingredients:
4-pound whole chicken (debone)
4pcs. Calamansi (juice)
12 cup soy sauce
14 kilo ground lean pork
1 can Vienna Sausage (chopped)
1 ¼ cup sweet ham (diced)
4pcs. Egg (2 raw, 2 boiled)
14 cup flour
2pcs. Carrots (1 diced, 1 cut lengthwise)
1 pack cheese (diced)
TT Salt and pepper
Parsley (for garnish)
Procedure:
- Marinate chicken in calamansi juice and soy sauce.
- Preheat oven for 10 minutes over 200^ C with the grill rack.
- In a bowl combine ground pork, ham, sausage, carrots, flour, cheese and raw eggs. Add salt and pepper to taste.
- Fill the chicken with the meat mixture, and insert the 2 boiled eggs.
- Truss the chicken tightly and bake for 45 minutes to 1 hour over 200°C on Convection + Both Heaters “ ☐”.
- To serve: cut crosswise into 14 inch thick slices, put in the platter and garnish with parsley.
BROWNIES
Ingredients:
3/4 cup unsalted butter
2 ounces unsweetened chocolate, finely chopped
1/4 cup + 2 tbsp unsweetened cocoa powder
2 cups granulated white sugar
3 large eggs
1 1/2 tsp vanilla extract
1 cup all-purpose flour
1/2 tsp salt
PROCEDURE:
- Place the grill rack on the lower position. Set the function selector to Convection + Lower Heater and preheat the unit for 10 minutes at 180^ C.
- Line 9-inch square pan with foil, draping foil over edges. Spray foil with nonstick spray.
- Using Imarflex Stand Mixer (IMX-345S), mix butter with chocolate. Add the cocoa, sugar, eggs, vanilla and flour; make sure that each is incorporated before adding the next. Pour batter into prepared pan. Sprinkle salt over the top of the batter.
- Bake brownies for about 30-40 minutes, until edges are set but the center is still a bit soft. A toothpick inserted into the center should come out coated with a little bit of the batter.
Let brownies cool at room temperature for about an hour, then refrigerate just until firm (about another hour). At this point, gently lift brownies from the pan and peel back the foil. Cut brownies into squares and serve.
CHOCOLATE CAKE
Yield: 12 servings
Ingredients
1 + 1/2 cup (170 g) all-purpose flour
3 tbsp unsweetened cocoa powder (dutched/dark)
2 tsp baking powder
1 cup (220 g) sugar
2 tsp vanilla essence
3/4 cup (1.8 dl) milk
3/4 cup (170 g) melted butter
2 pcs. Eggs
Ingredients for frosting
1 stick (1/2 cup) + 3 tbsp (160 g)
softened butter
3 cups (7.2 dl)
powdered sugar or confectioner's sugar
1/2 cup
unsweetened cocoa powder
1 1/2 tsp
vanilla extract
4 to 5 tbsp.
Lukewarm milk
Procedure:
- Place the grill rack on the lower position. Set the function selector to Convection + Lower Heaters “ ☐” and preheat the unit for 10 minutes at 180^ C.
- Grease a 9-inch (23 cm) cake tin.
- Using Imarflex Stand Mixer (IMX-345S), mix flour, cocoa powder, baking powder, sugar and vanilla essence in a bowl.
- Melt the butter at low heat and add to the dry ingredients. Also add milk and eggs
- Mix everything together until smooth using an Imarflex Stand mixer at slow speed
- Transfer to bake tin and bake at 350^ F until a wooden pick inserted in center comes out clean, approximately 45-50 minutes.
- After the cake has cooled, slice the cake through the middle to make two layers (easier if the cake has been in the fridge).
Frosting
- Using an Imarflex Mixer, cream the softened butter with powdered sugar. Add cocoa, vanilla and 4 tbsp. lukewarm milk, and mix until smooth. Do not over-mix. If necessary, add some more milk.
- Use one 1/3 of the frosting between the two layers, 1/3 on top, and the rest around the cake.
This cake should have room temperature when served.
- DESCRIPTION OF PARTS:
- CONTROL PANEL
- HOW TO USE
- NOTE:
- CAUTION: Do not touch the unit when it's hot.
- HOW TO USE THE ROTISSERIE
- HOW TO USE THE CONVECTION
- CLEANING AND MAINTENANCE:
- COOKING GUIDE
- ROASTED CHICKEN
- Ingredients:
- Procedure:
- PORCHETTA
- CHICKEN GALANTINA
- BROWNIES
- CHOCOLATE CAKE
- Ingredients
- Ingredients for frosting
- Frosting
Brand : Imarflex
Model : IT-350CRS
Category : Oven