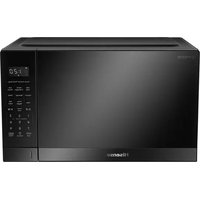
HMAS4211DSV - Microwave HISENSE - Free user manual and instructions
Find the device manual for free HMAS4211DSV HISENSE in PDF.


| Product Type | Microwave Oven |
| Brand | Hisense |
| Model | HMAS4211DSV |
| Capacity | 42 liters |
| Dimensions (H x W x D) | 30.5 x 52.0 x 42.0 cm |
| Weight | 16.5 kg |
| Power Supply | 230 V, 50 Hz |
| Power Consumption | 1450 W |
| Microwave Power Output | 1000 W |
| Grill Function | Yes, 1000 W |
| Convection Function | Yes, 2000 W |
| Display Type | LED Digital |
| Control Type | Touch Control |
| Number of Power Levels | 10 |
| Auto Cook Menus | 15 preset programs |
| Defrost Function | Yes, by weight and time |
| Interior Light | Yes |
| Turntable | Yes, 36 cm diameter |
| Child Lock | Yes |
| Clock Function | Yes, 24-hour format |
| Timer | Up to 99 minutes 99 seconds |
| Cleaning | Wipe with damp cloth; avoid abrasives |
| Safety | Automatic shut-off, door interlock |
| Spare Parts Availability | Service centers and online retailers |
| Repairability Index | 8.0 / 10 |
Frequently Asked Questions - HMAS4211DSV HISENSE
User questions about HMAS4211DSV HISENSE
0 question about this device. Answer the ones you know or ask your own.
Ask a new question about this device
Download the instructions for your Microwave in PDF format for free! Find your manual HMAS4211DSV - HISENSE and take your electronic device back in hand. On this page are published all the documents necessary for the use of your device. HMAS4211DSV by HISENSE.
USER MANUAL HMAS4211DSV HISENSE
User and Installation Manual I Microwave Oven

natural_image
Line drawing of a microwave oven with front panel and side door (no text or symbols)Before installing or using the appliance, please read the manual carefully, and keep it for future reference.
Table of Contents
PRECAUTIONS TO AVOID POSSIBLE EXPOSURE TO EXCESSIVE MICROWAVE ENERGY 4
IMPORTANT SAFETY INSTRUCTIONS 5
CLEANING INSTRUCTIONS 8
SETTING UP YOUR OVEN 10
CONTROL PANEL....12
OPERATION INSTRUCTIONS 13
UTENSILS GUIDELINE 22
COOKING TIPS 23
MAINTENANCE INSTRUCTIONS 24
TROUBLE SHOOTING GUIDE ...... 26
PRECAUTIONS TO AVOID POSSIBLE EXPOSURE TO EXCESSIVE MICROWAVE ENERGY
(a) Do not attempt to operate this oven with the door open since open door operation can result in harmful exposure to microwave energy.
It is important not to defeat or tamper with the safety interlocks.
(b) Do not place any object between the oven front face and the door or allows soil or cleaner residue to accumulate on sealing surfaces.
(c) Do not operate the oven if it is damaged. It is particularly important that the oven door close properly and that there is no damage to the:
(1) DOOR (bent)
(2) HINGES AND LATCHES (broken or loosened)
(3) DOOR SEALS AND SEALING SURFACES
(d) The oven should not be adjusted or repaired by anyone except properly qualified service personnel.
Product Specification
| Model Number | HMAS4211BMV HMAS4211WMV HMAS4211SSV HMAS4211DSV |
| Rate Voltage | 220-240V~ 50Hz |
| Power Consumption (Microwave) | 1600W |
| Rated Microwave Power Output | 1100W |
| Operating Frequency | 2450MHz |
| Oven Capacity | 34L |
IMPORTANT SAFETY INSTRUCTIONS
WARNING: If the door or door seals are damaged, the oven must not be operated until it has been repaired by a trained person.
WARNING: It is hazardous for anyone other than a trained person to carry out any service or repair operation, which involves the removal of any cover, which gives protection against exposure to microwave energy. WARNING: Liquids or other food must not be heated in sealed containers since they are liable to explode.
- Only use utensils that are suitable for use in microwave ovens.
- Metallic containers for food and beverages are not allowed during microwave cooking.
- When heating food in plastic or paper containers, keep an eye on the oven due to the possibility of ignition.
- The microwave oven is intended for heating food and beverages. Drying of food or clothing and heating of warming pads, slippers, sponges, damp cloth and similar may lead to risk of injury, ignition or fire.
- If smoke is observed, switch off or unplug the appliance and keep the door closed in order to stifle any flames microwave heating of beverages can result in delayed eruptive boiling, therefore care has to be taken when handling the container.
-
The contents of feeding bottles and baby food jars are to be stirred or shaken and the temperature is to be checked before consumption, in order to avoid burns.
-
Eggs in their shell and whole hard-boiled eggs shall not be heated in microwave ovens since they may explode, even after microwave heating has ended.
- Failure to maintain the oven in a clean condition could lead to deterioration of the surface that could adversely affect the life of the appliance and possibly result in a hazardous situation.
- The appliance must not be placed in a cabinet.
- Care should be taken not to displace the turntable when removing containers from the appliance.
- The appliance shall not be cleaned with a steam cleaner.
- The appliance must not be installed equal or higher than 900 mm above the floor. Minimum height of free space necessary above the top surface of the oven: 100mm.
Warning: When the appliance is operated in the combination mode, children should only use the oven under adult supervision due to the temperatures generated.

CAUTION: HOT SURFACE
- If the supply cord is damaged, it must be replaced by the manufacturer or its service agent or a similarly qualified person in order to avoid a hazard.
- This appliance can be used by children aged from 8 years and above and persons with reduced physical, sensory or mental capabilities or lack of experience and knowledge if they have been given supervision or instruction concerning use of the appliance in a safe way and understand the hazards involved.
- Children shall not play with the appliance.
- Cleaning and user maintenance shall not be made by children without supervision.
- Do not directly put the glass plate into cold water after use. It needs to place the glass plate for at least 20 minutes, and then put it into the water to avoid cracking.
- Group 2 Class B appliance
Group 2 ISM equipment: group 2 contains all ISM equipment in which radio-frequency energy is intentionally generated and/or used in the form of electromagnetic radiation for the treatment of material, and EDM and arc welding equipment.
Class B equipment is equipment suitable for use in domestic establishments and in establishments directly connected to a low voltage power supply network which supplies buildings used for domestic purposes. - This product internal light source LED light on <60lm.
- After plug in or the appliance end the work, the product automatically falls into standby mode.
CLEANING INSTRUCTIONS
MICROWAVE OVEN CARE

CAUTION
The oven should be cleaned regularly and any food deposits removed.

WARNING
a. Remove the power cord from the wall outlet before cleaning. After cooling products. Don't immerse the appliance in water or other fluids when cleaning.
b. Failure to maintain the oven in a clean condition could lead to deterioration of the surface that could adversely affect the life of the appliance and possibly result in a hazardous situation.
c. Never use hard detergent, gasoline, abrasive powder or metal brush to clean any part of the appliance.
d. Do not remove the waveguide cover.
e. When the microwave oven has been used for a long time, there may be some strange odors exist in oven, following 3 methods can get rid of them:
1) Place several lemon slices in a cup, then heat with high micro power for 2-3 min.
2) Place a cup of red tea in oven, then heat with high micro power.
3) Put some orange peel into oven, and then heat them with high micro power for 1 minute.
f. When the product is not used, it should be placed in dry and ventilated areas as well as possible.

WARNING
Details how to clean surfaces in contact with food:
After use wipe the waveguide cover with a damp cloth, followed by dry cloth to remove any food splashes and grease. Built -up grease may overheat and begin to cause smoke or catch fire.
TIPS FOR CLEANING
Details for cleaning door seals, cavity and adjacent parts:
Exterior:
Wipe the enclosure with a dampened soft cloth
Door:
Using a dampened soft cloth, wipe clean the door and window
Wipe the door seals and adjacent parts to remove any spill or spatter
Wipe the control panel with a slightly dampened soft cloth
Interior walls:
Wipe clean the interior surfaces with a dampened soft cloth
Wipe clean the waveguide cover to remove any food splashed
Turntable / Rotation ring / Rotation axis:
Wash with mild soap water
Rinse with clean water and allow drying thoroughly
SETTING UP YOUR OVEN
Names of Oven Parts and Accessories
Remove the oven and all materials from the carton and oven cavity.
Your oven comes with the following accessories:
Glass tray 1
Turntable ring assembly 1
Instruction Manual 1
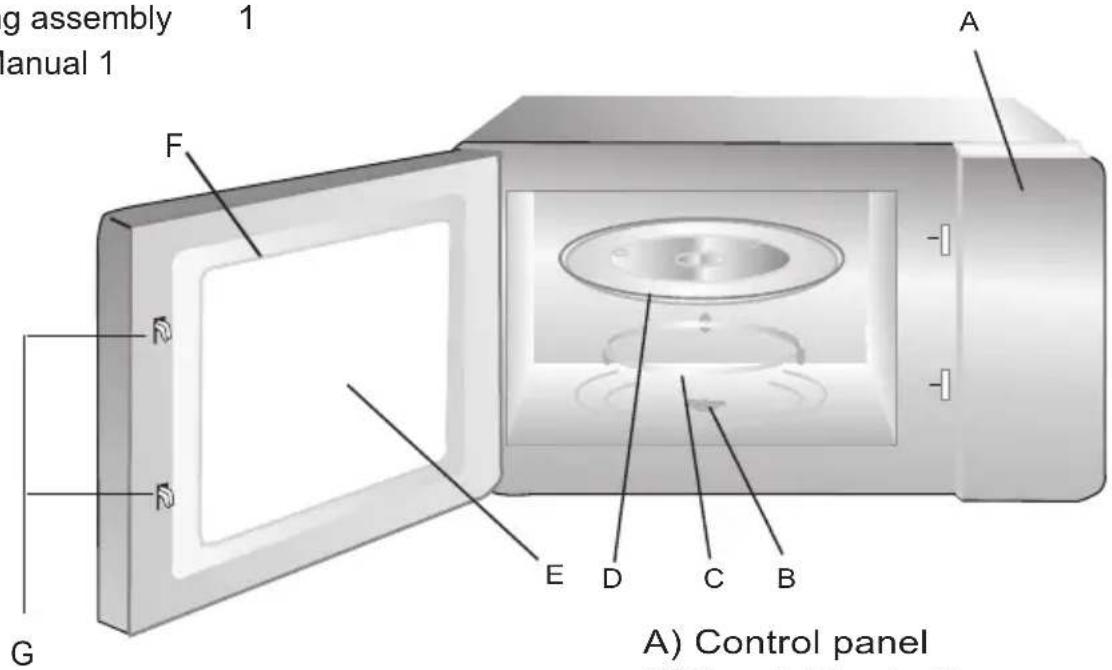
A) Control panel
B) Turntable shaft
C) Turntable ring assembly
D) Glass tray
E) Observation window
F) Door assembly
G) Safety interlock system
Turntable Installation
Hub (underside)
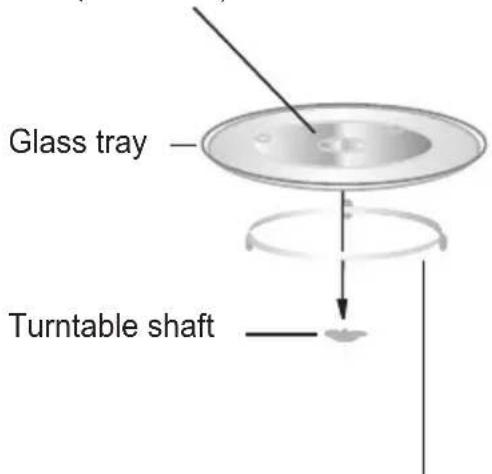
Turntable ring assembly
a. Never place the glass tray upside down. The glass tray should never be restricted.
b. Both glass tray and turntable ring assembly must always be used during cooking.
c. All food and containers of food are always placed on the glass tray for cooking.
d. If glass tray or turntable ring assembly cracks or breaks, contact your nearest authorized service center.
Countertop Installation
Remove all packing material and accessories. Examine the oven for any damage such as dents or broken door. Do not install if oven is damaged.
Cabinet: Remove any protective film found on the microwave oven cabinet surface. Do not remove the light brown Mica cover that is attached to the oven cavity to protect the magnetron.
Installation
- Select a level surface that provide enough open space for the intake and/or outlet vents.
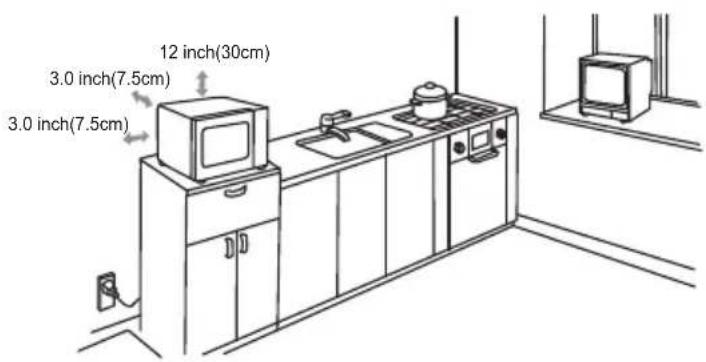
A minimum clearance of 3.0 inches (7.5cm) is required between the oven and any adjacent walls.
(1) Leave a minimum clearance of 12 inches (30cm) above the oven.
(2) Do not remove the legs from the bottom of the oven.
(3) Blocking the intake and/or outlet openings can damage the oven.
(4) Place the oven as far away from radios and TV as possible. Operation of microwave oven may cause interference to your radio or TV reception.
- Plug your oven into a standard household outlet. Be sure the voltage and the frequency is the same as the voltage and the frequency on the rating label.
WARNING: Do not install oven over a range cooktop or other heat-producing appliance. If installed near or over a heat source, the oven could be damaged and the warranty would be void.
Control Panel
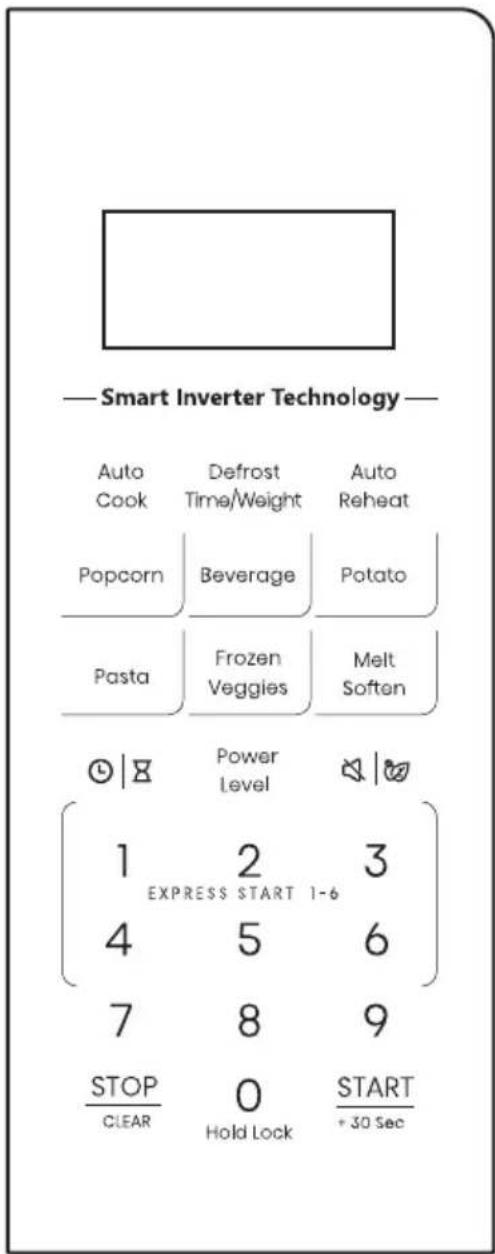
Auto Cook
Use to set the automatic cook programs (See Page 18).
TIME / WEIGHT DEFORST
Press once to set defrost program based on time (See Page14). Press twice to set defrost program based on weight (See Page 15).
Auto REHEAT
Use to set the automatic reheat programs (See Page 17).
Quick Preset Cooking Menu
Use those preset menu to cook food automatically without entering power level or time.
Melt/Soften
Used to Melt/Soften different food (See Page 19).
CLOCK /TIMER
Press and hold to set the clock time (See Page 17).
Press to set the timer function (See Page 17).
Power Level
Use to microwave food with selected power level(See Page 13).
Mute/ECO
Use to activate Mute and ECO function
1-6 Number Pad
Press to directly start the microwave oven to cook corresponding time
STOP/CANCEL
Press to clear all previous settings before cooking starts.
Press once to pause current cooking program or press twice to cancel the program.
LOCK
Press and hold to set child lock (See Page 21).
+30 SEC
Press to add time during the cooking program (See Page 21).
1. FIRST TIME USE
If you are using your microwave oven for the first time, please be sure to:
Clean the glass turntable with hot water, a small amount of dishwashing liquid and a nonabrasive cleaning pad.
Do not immerse the body of the unit in water.
When you plug in the unit, the display will show "1:00".
During cooking, if press STOP/CANCEL once or open the door, the program will be paused. Press the dial to resume cooking, but if you press STOP/CANCEL twice, the program will be canceled.
When the cooking completes, the screen will display "End" with sound every two minutes until you press STOP/CANCEL or open the door.
OPERATION INSTRUCTIONS
1. POWER LEVEL
There are ten microwave power levels, 100P, 90P, 80P, 70P, 60P, 50P, 40P, 30P, 20P and 10P, respectively. Press the “POWER LEVEL” button to enter microwave power mode selection. Press the number buttons to set the microwave power, press the "START/+30s" button to confirm microwave power and enter cooking time setting. Then, press the number buttons to set the cooking time, the maximum time that can be input is 99:99. After entering the cooking time, press “START/+30s” button to start work. An buzzing sound to notify completion of the operation.
| HIGH | 100% and 90% power output | (Applicable for quick and thorough cooking) |
| M.High | 80% and 70% power output | (Applicable for medium express cooking) |
| Med | 60% and 50% power output | (Applicable for steaming food) |
| M.Low | 40% and 30% power output | (Applicable for defrosting food) |
| LOW | 20% and 10% power output | (Applicable for keeping warm) |

CAUTION
a. The max time which can be set is 99 minutes and 99 seconds.
b. Never use the grill rack during microwave cooking.
c. Never operate the oven empty.
d. At the maximum microwave power, the oven will automatically lower the power after a certain time of cooking to lengthen the service life.
e. If you turn the food during operation, press the START/+30s button once and the preset cooking procedure will continue.
f. If you intend to remove the food before the preset time, you must press STOP button once to clear the preset procedure to avoid unintended operation of next time use.
2. DEFROST
There are four defrost mode, defrost by time, dEF1, dEF2 and dEF3, respectively. Press “Defrost” button to select defrosting by time, dEF1, dEF2 and dEF3. After selecting to defrost by time and press the number buttons to input the defrosting time.
The maximum time that can input is 99:99. Or after selecting dEF1, dEF2, or dEF3 for defrosting, press the number buttons to set the defrosting weight within the range of 100-1500g. After entering the cooking weight or time, press the “START/+30s” button start to work. An buzzing sound to notify completion of the operation. The dEF1, dEF2 and dEF3 defrost modes will have a beeping sound to prompt the food to be turned over during defrosting.
Below is some food defrosting time advice:
| Code | Food | Maximum Weight |
| dEF1 | Meat | 100-1500g |
| dEF2 | Poultry | 100-1500g |
| dEF3 | Seafood | 100-1500g |

CAUTION
a. It is necessary to turn over the food during operation to obtain uniform effect.
b. Usually defrosting will need longer time than that of cooking the food.
c. If the food can be cut by knife, the defrosting process can be considered completed.
d. Microwave penetrates around 4cm into most food
e. Defrosted food should be consumed as soon as possible, it is not advised to put back to fridge and freeze again.
3. Preset Menu
There are five automatic menus, potato, pasta, popcorn, frozen vegetable and beverage respectively. Select the desired menu. Press the corresponding button which to be selected continuously to select the desired food weight, and the display shows the corresponding weight. After selecting the cooking weight, press “START/+30s” button to start work. An buzzing sound to notify completion of the operation.
| Display | Food | Weight Range |
| A.1 Potato | The optional weights are 250g, 500g and 750g. | |
| A.2 Pasta | The optional weights are 50g, 100g and 150g. | |
| A.3 | Popcorn | The optional weight is 100g. |
| A.4 | Frozen Vegetable | The optional weights are 200g, 400g and 600g. |
| A.5 Beverage | The optional weights are 1 cup, 2 cups or 3 cups, each one about 250ml. |

CAUTION
a. The temperature of food before cooking would be 20-25°C. Higher or lower temperature of the food before cooking would require increase or decrease of cooking time.
b. The temperature, weight and shape of food will largely influence the cooking effect. If any deviation has been found to the factor noted on above menu, you can adjust the cooking time for best result.
4. CLOCK/TIMER
4.1 CLOCK (24-hour clock)
In standby mode, press and hold down this button to enter the setting interface, and press this button to select 24-hour or 12 hour clock. Press the "START/+30s" button again to confirm the clock system and enter the clock setting. Press the 0 \~ 9 number buttons to input the time. Press the "START/+30s" button to confirm the set time and exit the clock setting mode.
4.2 TIMER
In standby mode, press this button to enter the setting interface, and the countdown function icon and "0:00" will be displayed on the display screen. Press the number buttons to input the time, and the maximum time that can input is 99:99. After setting the time, press the "START/+30s" button to begins the countdown. An buzzing sound to notify completion of the countdown.
5. AUTO REHEAT
Reheat function is mainly to facilitate users to heat food according to the weight of food, there are a total of 6 menus. Press this button to select the desired menu, and the display screen will display the corresponding menu number. Press the "START/+30s" button to confirm the menu and proceed to the next step of component selection. Press "AUTO Reheat" button continuously, select the appropriate weight of food, the corresponding portion
size is displayed on the display screen. After select the weight, press “START/+30s” button to start work, an buzzing sound to notify completion of the operation.
| Display | Food | Weight Range |
| AH-1 Bread | The optional weights are 50g, 100g, 150g and 200g. | |
| AH-2 Pizza | The optional weights are 200g, 300g, 400g and 500g. | |
| AH-3 Rice | The optional weight are 1 bowl, 2 bowls portions and 3 bowls. | |
| AH-4 Currires | The optional weights are 200g, 300g, 400g and 500g. | |
| AH-5 Soup | The optional weight are 1 bowl, 2 bowls and 3 bowls. | |
| AH-6 Casserole | The optional weight are 1 bowl, 2 bowls and 3 bowls. |
6. AUTO COOK
There are a total of 9 menus, and the specific operation steps are as follows:
Press this button to select the desired menu, and the display screen will display the corresponding menu. Press the "START/+30s" button again to confirm the menu and proceed to the next step of component selection. Press this button continuously to select the portion size of the food, and the corresponding portion size will be displayed on the display screen.
After select the weight, press “START/+30s” button to start work, an buzzing sound to notify completion of the operation.
| Display | Food | Weight Range |
| AC-1 Meat Pie | The optional weight are 1 pcs, 2 pcs and 3 pcs. | |
| AC-2 | Frozen Entrée | The optional weights are 200g, 300g, 400g and 500g. |
| AC-3 Risotto | The optional weights are 100g, 200g, 300g and 400g. | |
| AC-4 | Instant Noodle | The optional weight are 1 pcs, and 2 pcs. |
| AC-5 Porridge | The optional weights are 50g, 100g and 150g. | |
| AC-6 legumes | The optional weights are 100g, 200g, 300g and 400g. | |
| AC-7 | Beef Lasagne | The optional weight is 1 portion. |
| AC-8 Fish Filet | The optional weights are 200g, 300g, 400g and 500g. | |
| AC-9 QUINOA | The optional weights are 50g, 100g, 150g and 200g. | |
7. MELT/SOFTEN
Press this button to select the desired menu, and the display screen will display the corresponding menu. Press the "START/+30s" button again to confirm the menu and proceed to the next step of component selection. Press this button continuously to select the portion size of the food, and the
corresponding portion size will be displayed on the display screen. After select the weight, press “START/+30s” button to start work, an buzzing sound to notify completion of the operation.
| Display | Food | Weight Range |
| So-1 Chocolate | The optional weights are 100g, 200g, 300g and 400g. | |
| So-2 Butter | The optional weights are 100g, 200g, 300g and 400g. | |
| So-3 Cream Cheese | The optional weights are 100g, 200g, 300g and 400g. | |
| So-4 Ice cream | The optional weights are 100g, 200g, 300g and 400g. | |
8. MUTE/ECO
8.1 MUTE
Press this button in standby mode to enter the sound on/off selection and display the corresponding on or off information. After selecting the sound to turn on or off, automatically exit selection after 3 seconds, and the buzzer sound will be turned on or off according to the corresponding settings.
8.2 ECO
In standby mode, press and hold down the button to enter ECO mode, and the display screen will shut down. In ECO mode, press any key, the display screen will light up. If not operated for 30 seconds, the display screen will automatically turn off. Long press the button to turn off ECO mode, and the screen will display normally.
9. EXPRESS START
9.1 1-6 NUMBER PAD
In standby mode, you can directly press the 1\~6 number buttons to start the microwave. The working time is 1\~6 minutes, that is, press 1 to work for 1 minute, press 2 to work for 2 minutes, and so on.
9.2 STRAT/+30SEC
In standby mode, after the food is put in and the door is closed, press the "START/+30s" button to quickly start the microwave. The default working time is 30 seconds. In the process of working, press the "START/+30s" button once for 30 seconds. An buzzing sound to notify completion of the operation.
10. STOP/CANCEL
In the process of cooking settings, can press “STOP” button to cancel the settings and return to standby state. In the process of microwave oven working, can press “STOP” button to pause. In the standby state, can press “STOP” button again to cancel the function and return to standby state.
11. CHILD LOCK FUNCTION
Use this feature to lock the control panel when you are cleaning or so that children cannot use the oven unsupervised. All the buttons are rendered inoperable in this mode.
1) Set lock: Hold 0 button about 3 seconds.
2) Cancel lock: Hold 0 button about 3 seconds.
UTENSILS GUIDELINE
It is strongly recommended to use the containers which are suitable and safe for microwave cooking. Generally speaking, the containers which are made of heat-resistant ceramic, glass or plastic are suitable for microwave cooking. Never use the metal containers for microwave cooking and combination cooking as spark is likely to occur. You can take the reference of below table.
| Material of container | Microwave Notes | |
| Heat-resistant ceramic | Yes | Never use the ceramics which are decorated with metal rim or glazed |
| Heat-resistant plastic | Yes | Can not be used for long time microwave cooking |
| Heat-resistant glass | Yes | |
| Grill rack No | ||
| Plastic film | Yes | It should not be used when cooking meat or chops as the over-temperature may do damage to the film |
COOKING TIPS
The following factors may affect the cooking result:
Food arrangement
Place thicker areas towards outside of dish, the thinner part towards the centre and spread it evenly. Do not overlap if possible.
Cooking time length
Start cooking with a short time setting, evaluate it after it times out and extend it according to the actual need. Over cooking may result in smoke and burns.
Cooking food evenly
Food such as chicken, hamburger or steak should be turned once during cooking.
Depending on the type of food, if applicable, stir it from outside to centre of dish once or twice during cooking
Allow standing time
After cooking times out, leave the food in the oven for an adequate length of time, this allows it to complete its cooking cycle and cooling it down in a gradual manner
Whether the food is done
Color and hardness of food help to determine if it is done, these include:
- Steam coming out from all parts of food, not just the edge
- Joints of poultry can be moved easily
- Pork or poultry shows no signs of blood
- Fish is opaque and can be sliced easily with a fork
Browning dish
When using a browning dish or self-heating container, always place a heat-resistant insulator such as a porcelain plate under it to prevent damage to the turntable and rotating ring.
Microwave safe plastic wrap
When cooking food with high fat content, do not allow the plastic wrap come into contact with food as it may melt
Microwave safe plastic cookware
Some microwave safe plastic cookware might not be suitable for cooking foods with high fat and sugar content. Also, the preheating time specified in the dish instruction manual must not be exceeded
MAINTENANCE INSTRUCTIONS
SERVICING
Please check the following before calling for services.
- Place one cup of water (approx. 150ml) in a glass measure in the oven and close the door securely. Oven lamp should go off if the door is closed properly. Let the oven work for 1 min.
- Does the oven lamp light?
- Does the cooling fan work?
(Put your hand over the rear ventilation openings.) - Does the turntable rotate?
(The turntable can rotate clockwise or counter clockwise. This is quite normal.) - Is the water inside the oven hot?
If “NO” is the answer to any of the above questions, please check your wall socket and the fuse in your meter box.
If both the wall socket and the fuse are functioning properly, CONTACT YOUR NEAREST SERVICE CENTER APPROVED.
SERVICING SAFEGUARDS
Caution: MICROWAVE RADIATION
- The high voltage capacitor remains charge after disconnection; short the negative terminal of H. V capacitor to the oven chassis
(use a screwdriver) to discharge before touching.
-
During servicing below listed parts are liable to be removed and give access to potentials above 250V to earth.
-
Magnetron
• High voltage capacitor
• High voltage diode - High voltage fuse
• High voltage transformer
- The following conditions may cause undue microwave exposure during servicing.
Improper fitting of magnetron;
Improper matching of door interlock, door hinge and door;
Improper fitting of switch support;
Door, door seal or enclosure has been damaged.
| Correct Disposal of this product | |
 | This marking indicates that this product should not be disposed with other household wastes throughout the EU. To prevent possible harm to the environment or human health from uncontrolled waste disposal, recycle it responsibly to promote the sustainable reuse of material resources. To return your used device, please use the return and collection systems or contact the retailer where the product was purchased. They can take this product for environmental safe recycling. |
TROUBLE SHOOTING GUIDE
| Error Code | Failure Mode Action | |
| E-1 | Undervoltage fault | First confirm that the startup voltage is within the rated voltage range, if check there is no circuit faults also, pls contact customer service for assistance. |
| E-2 | Overvoltage fault | |
| E-4 | Overheating fault | Unplug the oven and allow it to cool. Recommend waiting at least 30 minutes and listen for the fan. Plug the oven back in, if the error code does not immediately appear again, try to warm a cup of water for 30 seconds. If the error re-occurs, contact customer service for assistance. |
| E-5 | Magnetron malfunction | Check the date of manufacture and confirm whether the life of the magnetron has exceeded the limit. If yes, pls contact customer service for assistance. |
| E-7 | High voltage resonance fault | Unplug the oven, wait for 10 seconds, then plug it back in again. If the error cide does not immediately appear again, try to warm a cup of water for 30 seconds. If the error re-occurs, contact customer service for assistance. |
| E-8 | SUR (surge protection fault) | Move oven to a different outlet, warm a cup of water for 30 seconds. If the error re-occurs, contact customer service for assistance. |
| E-A | Auxiliary power supply fault | First confirm that the startup voltage is within the rated voltage range, and retry in the right voltage. If the error re-occurs, contact customer service for assistance. |
| E-B | Valley detection fault | Unplug the oven, wait for 30 seconds, then plug it back in again. If the error cide does not immediately appear again, try to warm a cup of water for 30 seconds. If the error re-occurs, contact customer service for assistance. |
| E-C | High-voltage output fault | Clear the error and attempt to warm a cup of water for 30 seconds. If the error re-occurs, contact customer service for assistance. |
Hisense
life reimagined

- Table of Contents
- PRECAUTIONS TO AVOID POSSIBLE EXPOSURE TO EXCESSIVE MICROWAVE ENERGY
- IMPORTANT SAFETY INSTRUCTIONS
- CAUTION: HOT SURFACE
- CLEANING INSTRUCTIONS
- MICROWAVE OVEN CARE
- CAUTION
- WARNING
- TIPS FOR CLEANING
- Exterior:
- Door:
- Interior walls:
- Turntable / Rotation ring / Rotation axis:
- SETTING UP YOUR OVEN
- Names of Oven Parts and Accessories
- Turntable Installation
- Countertop Installation
- Installation
- Control Panel
- Auto Cook
- TIME / WEIGHT DEFORST
- Auto REHEAT
- Quick Preset Cooking Menu
- Melt/Soften
- CLOCK /TIMER
- Power Level
- Mute/ECO
- STOP/CANCEL
- LOCK
- +30 SEC
- FIRST TIME USE
- OPERATION INSTRUCTIONS
- POWER LEVEL
- DEFROST
- Preset Menu
- CLOCK/TIMER
- CLOCK (24-hour clock)
- TIMER
- AUTO REHEAT
- AUTO COOK
- MELT/SOFTEN
- MUTE/ECO
- MUTE
- ECO
- EXPRESS START
- 1-6 NUMBER PAD
- STRAT/+30SEC
- STOP/CANCEL
- CHILD LOCK FUNCTION
- UTENSILS GUIDELINE
- COOKING TIPS
- Food arrangement
- Cooking time length
- Cooking food evenly
- Allow standing time
- Whether the food is done
- Browning dish
- Microwave safe plastic wrap
- Microwave safe plastic cookware
- MAINTENANCE INSTRUCTIONS
- SERVICING
- SERVICING SAFEGUARDS
- TROUBLE SHOOTING GUIDE
- Hisense
Brand : HISENSE
Model : HMAS4211DSV
Category : Microwave