
BWC9BX - Range hood BLANCO - Free user manual and instructions
Find the device manual for free BWC9BX BLANCO in PDF.


| Product Type | Range hood |
| Brand | BLANCO |
| Model | BWC9BX |
| Installation Type | Wall-mounted (ductable or recirculating) |
| Modes | Ducted (Fig.1B) and Recirculated (Fig.1A) |
| Minimum Distance from Cooktop | 65 cm (gas), 45 cm (electric/induction) |
| Motor Speeds | 3 speeds + intensive (10 min) |
| Controls | Touch control panel (Fig.13) |
| Timer | 15 minutes |
| Clean Air Function | Motor runs 10 min every hour at speed 1 |
| Lighting | Halogen (replaceable) |
| Grease Filter | Aluminum, washable (every 2 months) |
| Carbon Filter | Active carbon, replaceable (every 4 months) |
| Electrical Class | Class II (no earth wire) |
| Connection | BROWN = L, BLUE = N |
| Recommended Duct Diameter | 150 mm |
| Safety Features | Flambé cooking prohibited; disconnect before maintenance; adequate ventilation required |
Frequently Asked Questions - BWC9BX BLANCO
User questions about BWC9BX BLANCO
0 question about this device. Answer the ones you know or ask your own.
Ask a new question about this device
Download the instructions for your Range hood in PDF format for free! Find your manual BWC9BX - BLANCO and take your electronic device back in hand. On this page are published all the documents necessary for the use of your device. BWC9BX by BLANCO.
USER MANUAL BWC9BX BLANCO
Instructions for the Use and Care and Installation of
BWC9BX
Rangehood
Dear Customer
You will find that the modern look of your Blanco rangehood blends in perfectly with your kitchen décor. It is easy to use and performs to a high standard.
Blanco also makes a range of products that will enhance your kitchen – such as cooktops, ovens, dishwashers, microwaves, sinks and taps. There are models to complement your new Blanco rangehood. Blanco now has a range of laundry products to choose from.
Of course, we make every effort to ensure that our products meet all your requirements, and our Customer Service Department is at your disposal, to answer your questions and to listen to your suggestions.
Please complete the warranty section of this manual and keep your receipt as proof of purchase. Retain all documents relating to the purchase of Blanco product.
Blanco is committed to providing increasingly efficient products that are easy to use, respect the environment and are attractive and reliable.
BLANCO

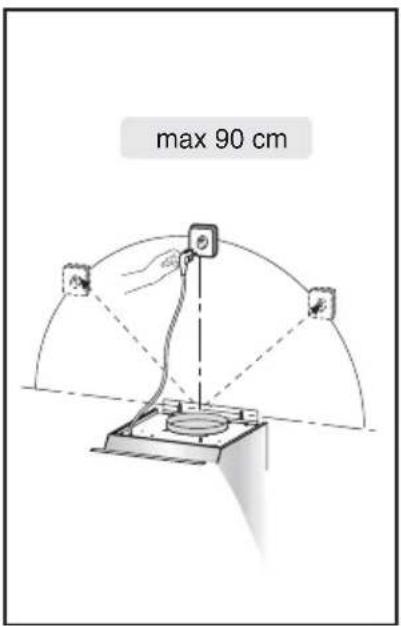
Fig.1


Fig.2
Fig.3

natural_image
Illustration of hands installing or adjusting a device panel with an arrow indicating rotation (no text or symbols present)Fig.4
natural_image
Illustration of a hand holding a tool near a window with a label B (no text or symbols on the diagram itself)Fig.6

Fig.7
natural_image
Technical diagram of a mechanical assembly with labeled components and directional arrows (no readable text or symbols)Fig.8

Fig. 9 C

natural_image
Diagram of a mechanical press or cutting machine with a cylindrical component being processed, showing motion and assembly (no text or symbols)
Fig.10
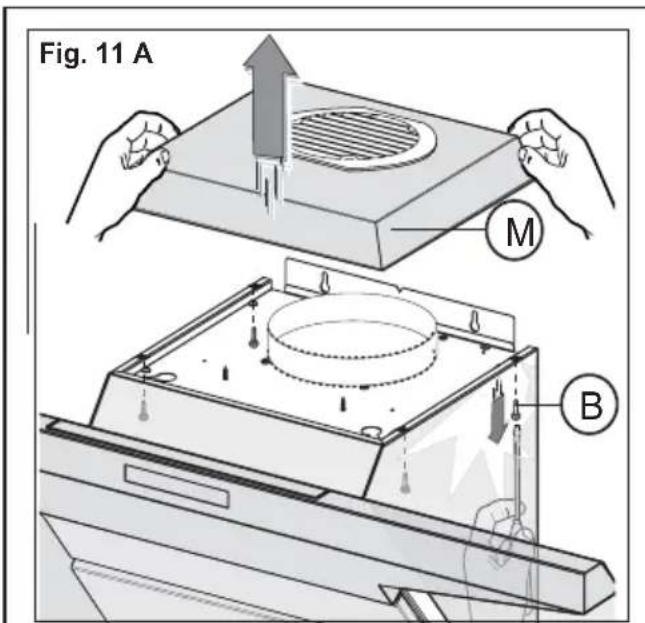

Fig. 11 B

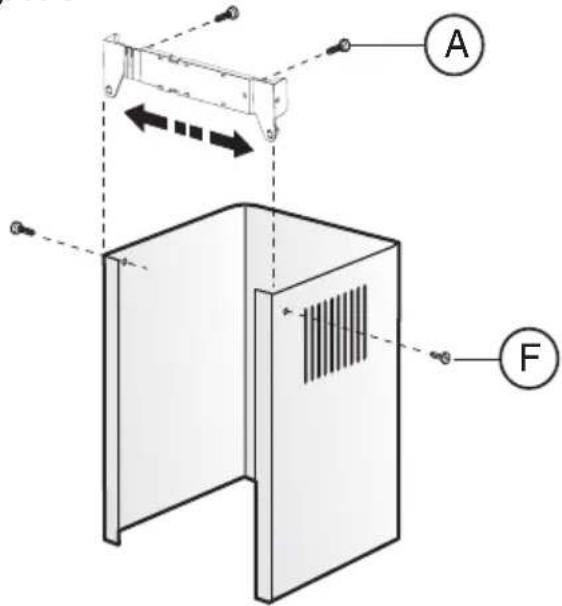
Fig. 11 D

Fig. 11 E

Fig.12

flowchart
graph TD
    A["Sun"] --> B["+"]
    C["Off"] --> D["+"]
    E["●"] --> F["+"]
    G["●"] --> H["○"]
    I["●"] --> J["○"]
    K["●"] --> L["○"]
    M["A"] --> N["○"]
    O["B"] --> P["○"]
    Q["C"] --> R["○"]
    S["D"] --> T["○"]
    U["E"] --> V["○"]
Fig.13
GENERAL
These warnings are provided in the interest of safety. Carefully read the following important information regarding installation safety and maintenance. You MUST read them carefully before installing or using the appliance.
It is most important that this instruction book be retained with the appliance for future reference. Should the appliance be sold or transferred, always ensure that the book is left with the appliance in order that the new owner can get to know the function of the appliance and the relevant warnings.
The appliance has been designed for use in the ducted version (Fig.1B) and recirculated version (Fig.1A).
SAFETY PRECAUTION
- Take care when the rangehood is operating in the same room as an open fireplace or burner that requires air in the environment and uses an energy source other than electrical energy – this because the rangehood removes air from the environment which a burner or fireplace may need for combustion. The negative pressure in the environment must not exceed 4Pa (4x10⁻⁵ bar).
- Provide adequate ventilation in the environment for a safe operation of the rangehood.
- Follow the local laws applicable for external air evacuation.
- If the supply cord is damaged, it must be replaced by the manufacturer or its service agent or a similarly qualified person in order to avoid a hazard.
WARNING!
In certain circumstances electrical appliances may be a danger hazard.
A) This appliance is not intended for use by young children or infirm persons without supervision.
B) Young children should be supervised to ensure they do not play with the appliance.
C) Do not check or remove the filters when the rangehood is operating.
D) Flambè cooking is prohibited underneath the rangehood.
E) Constantly check food frying to avoid that the overheated oil may become a fire hazard.
F) Disconnect the electrical plug prior to any maintenance.
G) Do not touch lighting or adjacent areas when lighting is on - and for a period of time after using the light.
H) Avoid leaving cooktop on (gas and electric) without the saucepan covering the burner or cooking zone. This is because heat transferring upwards to the rangehood will be damaging to the filters and a fire hazard.
I) Ensure adequate ventilation of the room where the rangehood is used at the same time as appliances burning gas or other fuels. Exercise care when a rangehood is installed in an area where a gas burner is operating. Depending on the size of the room, the rangehood may draw from the room air that is necessary for proper combustion of the burner.
J) Ensure the rangehood is cleaned frequently.
L) There is a risk of fire if cleaning is not carried out in accordance with the instructions.
M) For any repairs always contact an authorised Technical Customer Service Centre and ask for original spare parts. Repairs by untrained people may lead to damage and void warranty.
Warnings for Installation:
a) The exhaust air must not be discharged into a flue which is used for exhausting fumes from appliances burning gas or other fuels.
b) The minimum distance from the cooktop surface and the lowest part of the range hood must not be less than 65cm. If the instructions for the cooktop specify a greater distance, please consider this.
c) The regulations concerning the discharge of exhaust air have to be fulfilled.
d) All Blanco rangehoods are used for indoor application/installation only.
Other Information:
This appliance conforms to the European Directive EC/2002/96, Waste Electrical and Electronic Equipment (WEEE). By making sure that this appliance is disposed of in a suitable manner, the user is helping to prevent potential damage to the environment or to public health.
The ☒ symbol on the product or on the packaging label on the carton indicates that the appliance should not be treated as domestic waste, but should be delivered to a suitable electric and electronic appliance recycling collection point. Follow local guidelines when disposing of waste. For more information on the treatment, re-use and recycling of this product, please contact your local authority or domestic waste collection service.
Assembly and electrical connections must be carried out by specialised personnel.
• Electric Connection
The appliance has been manufactured as a class II, therefore no earth cable is necessary.
The connection to the mains is carried out as follows:
BROWN = L line
BLUE = N neutral
If not provided, connect a plug for the electrical load indicated on the description label. Where a plug is provided, the cooker hood must be installed in order that the plug is easily accessible.
An omnipolar switch with a minimum opening of 3mm between contacts, in line with the electrical load and local standards, must be placed between the appliance and the network in the case of direct connection to the electrical network.
- The distance between the surface supporting the cooking containers on the cooking device and the bottom of the kitchen hood must be a minimum of 65 cm (if it is a gas hob) and 45 cm (if it is an electric or induction heating system hob).
If a connection tube composed of two parts is used, the upper part must be placed outside the lower part. Do not connect the cooker hood exhaust to the same conductor used to circulate hot air or for evacuating fumes from other appliances generated by other than an electrical source.
- In the case of assembly of the appliance in the suction version prepare the hole for evacuation of the air.
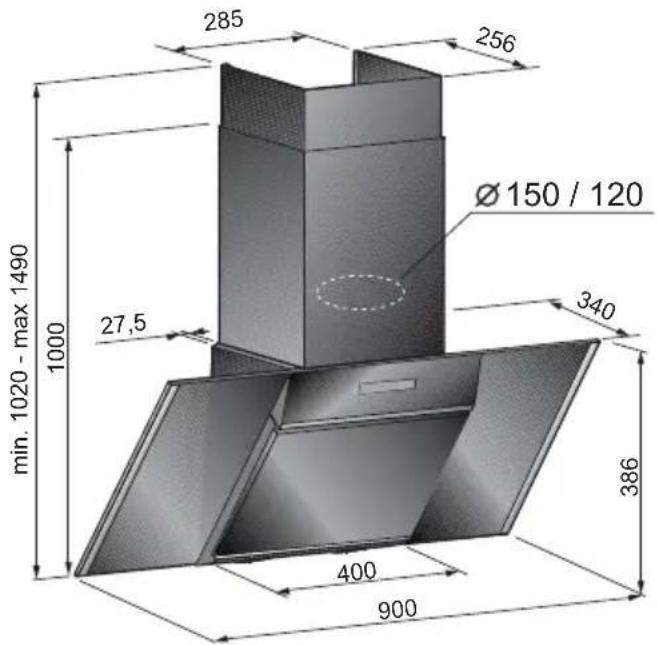
- We recommend the use of an air exhaust pipe with a diameter of 150. If a pipe with a smaller diameter is used, the efficiency of the product may be reduced and its operation may become noisier
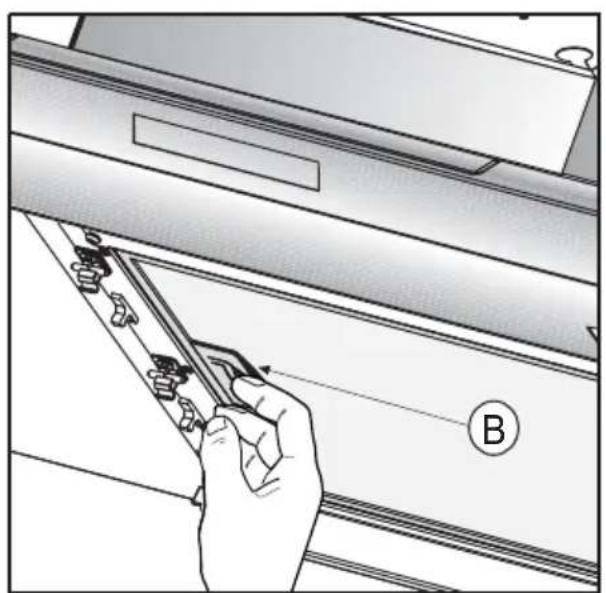
- Before starting to fix the hood, disconnect the anti-grease filter B (Fig.6) for easier appliance handling.
Before this operation, perform the following steps depending on the model purchased:
MODEL 2
Open panel C as shown in Fig.4.
Pull handle B as shown in Fig.6.
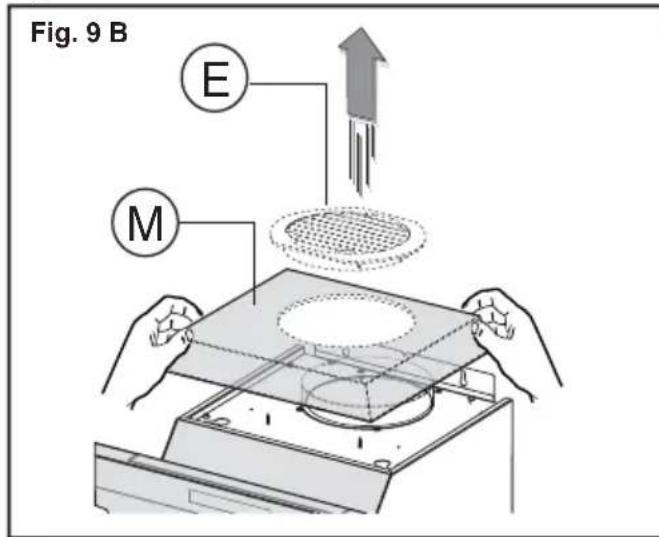
If the appliance has a lid, remove it by removing the 4 screws B as shown in Fig.9A.
• FIXING TO THE WALL
Mark the position of the lower side of the hood on the wall (Fig.2A). Maintain the minimum distance required from the hob as shown in Fig.2B.
- Position the fixing template on the wall, making sure that the line coincides with the line previously made on the wall.
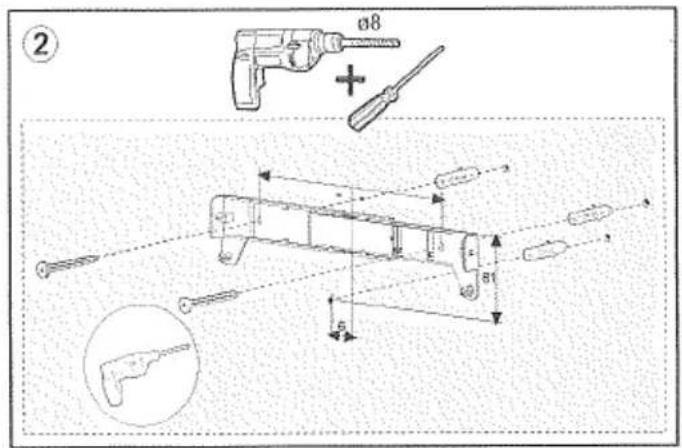
- Mark the fixing holes and cut them into the material (Fig.3).
- Fix the 2 top screws K and screw anchors (Fig.3), without tightening them completely.
- Place the appliance against the wall, align it in horizontal position and tighten screws K (Fig.7).
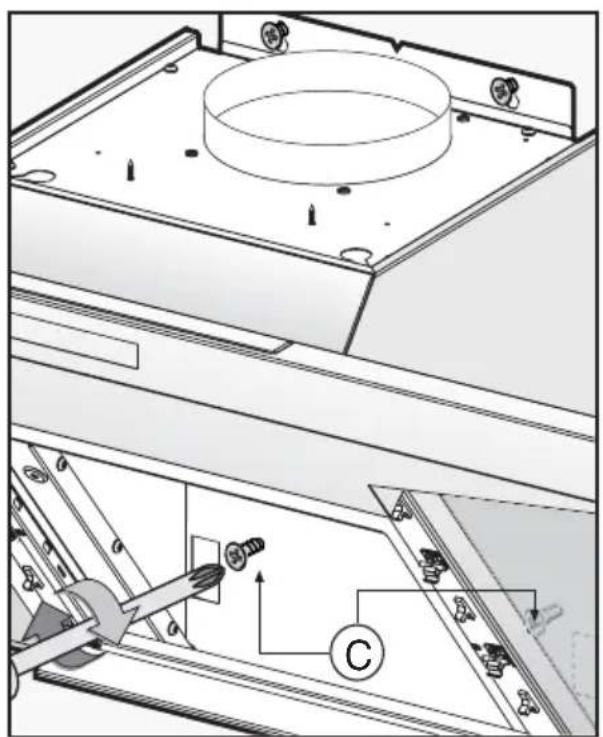
- Once the adjustment has been completed, fix the hood using the 2 screws C (Fig.8).
- When carrying out the fixing operations, use only screws and screw anchors suited to the type of wall (e.g. reinforced concrete, plasterboard etc.).
- If the screws and screw anchors are supplied with the appliance, make sure that they are suited to the type of wall to which the hood must be fixed.
• INSTALLATION OF MODELS WITHOUT FLUE
OPTION 1 - DUCTED
- Remove the 4 screws B as shown in (Fig.9A).
- Remove both grid E on the air outlet hole and lid M as shown in (Fig.9B).
- Connect the rangehood to the flexible hose (not supplied) and the duct to the air exhaust hole previously prepared (Fig.9C).
- Fix the lid once again by using the 4 screws previously removed in (Fig.9A).
• INSTALLATION OF MODELS WITH FLUE
OPTION 2 - DUCTED
Make sure the electrical power supply is within the measurements of the decorative connector.
Adjust the width of the support bracket of the top connector (Fig.11C). Then fix it to the ceiling so that it is on the same axis as the hood using screws A (Fig.11C) adhering to the distance from the ceiling shown in (Fig.11B). Connect flange C to the air exhaust hole using flexible hose L (Fig.11D).
Slide the top duct into the bottom duct. Fix the bottom duct to the hood using screws B (supplied) (Fig.11E).
Pull out the top duct as far as the bracket and fix it using screws F (Fig.11C).
• RECIRCULATING RANGEHOOD
To replace the active carbon filter first remove the aluminium filter by pulling lever B outwards. The filters must then be fitted to the suction inlet of the motor. To fit the filter it must be centred then rotated clockwise 90 degrees to lock (Fig.10).
• OPTIONAL ACCESSORIES - CARBON FILTER
If you have recirculated the rangehood, we recommend that you install carbon filters.
Order from your retailer.
Refer to figure 10 for installation.
USE AND MAINTENANCE
- It is recommended to operate the appliance prior to cooking.
It is recommended to leave the appliance in operation for 15 minutes after cooking is terminated in order to help eliminate rangehood vapours and odours.
The proper function of the rangehood is conditioned by the regularity of the maintenance operations, in particular, the active carbon filter.
- The anti-grease filters capture the grease particles suspended in the air, and are therefore subject to clogging according to the frequency of the use of the appliance.
In order to prevent fire hazard, it is recommended to clean the filter every 2 months by carrying out the following instructions:
- Remove the filters from the rangehood and wash them in a solution of water and neutral liquid detergent, leaving to soak.
- Rinse thoroughly with warm water and leave to dry.
- The filters may also be washed in the dishwasher.
The aluminium panels may alter in colour after several washes. This is not cause for customer complaint nor replacement of panels.
- The active carbon filters help to purify the air that is replaced in the environment. The filters are not washable nor re-useable and must be replaced at maximum every four months. The saturation of the active carbon filter depends on the frequency of use of the appliance, by the type of cooking and the regularity of cleaning the anti-grease filters.
- Clean the fan and other surfaces of the rangehood regularly using a cloth moistened with denatured alcohol or non abrasive liquid detergent.
- The illumination installation is designed for use during cooking and not for prolonged general illumination of the environment. Prolonged use of the illumination installation notably reduces the duration of the bulb.
• LIGHT REPLACEMENT - HALOGEN
Remove the glass retaining ring and glass.
Replace the globe with another of the same type.
Replace the glass and retaining ring.
CONTROLS : (Fig.13)
Touch control A = on/off lights switch
Touch control B = on/off rangehood switch. The appliance switches on at speed level 1, If the rangehood is on depress the touch control for 2 sec. to switch off the rangehood. If the rangehood is at speed level 1 it will not be necessary to depress the touch control to switch the rangehood off. Decreases the motor speed.
Display C = indicates the motor speed level selected and activates the timer.
Touch control D = switches on the rangehood. Increases the motor speed. Touching the key at 3rd speed, the intensive function runs for 10', then the appliance go back to work at the original speed. During this function the display blinks.
Touch control E = The Timer times the functions on activation for 15 minutes, after which they are switched off. The Timer is deactivated by re-pressing Touch control E. When the Timer is activated the decimal point must flash on the display. The Timer cannot be activated if the intensive speed is functioning.
The “clean air” function is activated by pressing Touch control E for 2 seconds when the appliance is switched off. This switches the motor on for 10 minutes every hour at the first speed. During functioning a rotary
movement of the peripheral segments must be visualised on the display. When this time has passed the motor switches off and the fixed letter “C” must be visualised on the display until the motor re-starts after 50 minutes for another 10 minutes and so on. Press any key apart from the light keys to return to normal functioning. Press Touch control E to deactivate the function.
• Active carbon/grease filter saturation:
- When display item C flashes, at a speed where it alternates with the letter F (e.g. 1 and F), the grease filters must be washed.
- When display item C flashes, at a speed where it alternates with the letter A (e.g. 1 and A), the carbon filters must be replaced.
After the clean filter has been positioned correctly, the electronic memory must be reset by pressing button A for approximately 5 seconds, until the indication F or A shown on the display C stops flashing.
THE MANUFACTURER DECLINES ALL RESPONSIBILITY FOR EVENTUAL DAMAGES CAUSED BY BREACHING THE ABOVE WARNINGS.
BWC9BX

natural_image
Isometric line drawing of an open cardboard box with cutouts and accessories (no text or symbols)


natural_image
Technical line drawing of a mechanical assembly with exploded view and component details (no text or symbols)

natural_image
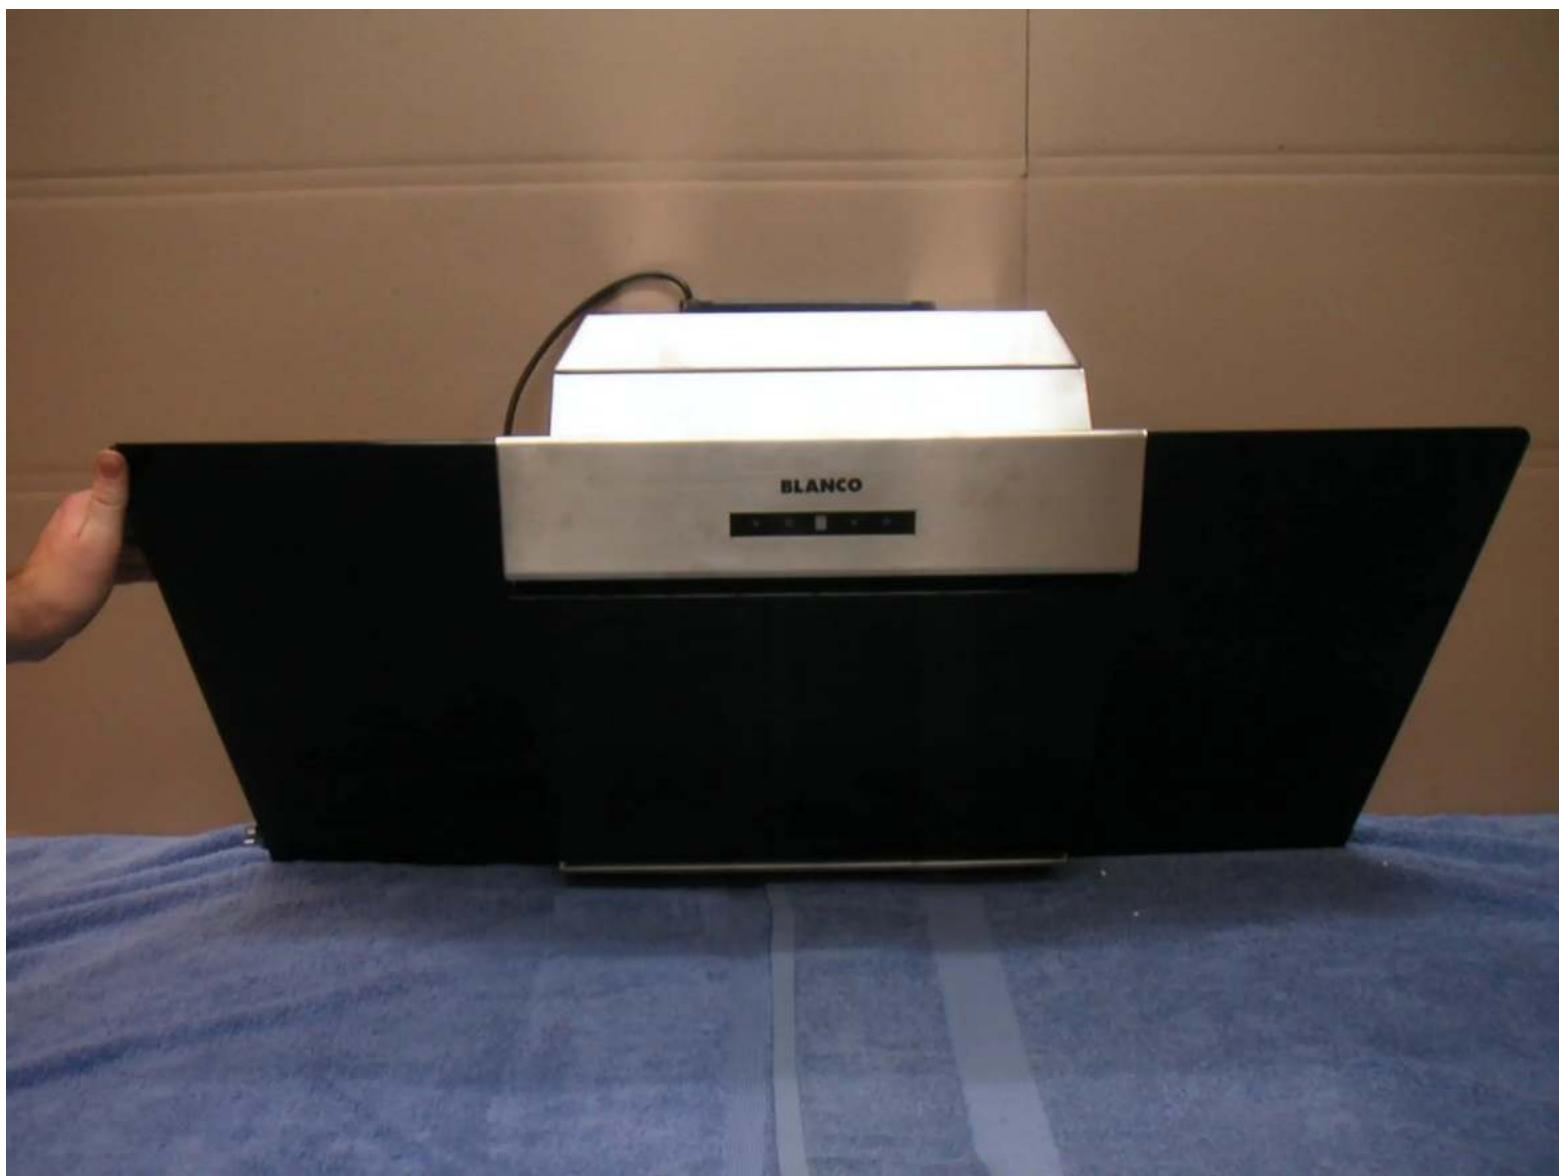
Hand holding a blackboard with a white 'BLANCO' device, placed on a blue patterned cloth (no visible text or symbols on the device itself)
natural_image
Exterior view of a BLANCO air purifier unit on a blue cloth, with additional metal enclosures and a small mechanical part nearby (no visible text or symbols)


- BWC9BX
- Dear Customer
- BLANCO
- GENERAL
- SAFETY PRECAUTION
- WARNING!
- Warnings for Installation:
- Other Information:
- Assembly and electrical connections must be carried out by specialised personnel.
- • Electric Connection
- MODEL 2
- • FIXING TO THE WALL
- • INSTALLATION OF MODELS WITHOUT FLUE
- OPTION 1 - DUCTED
- • INSTALLATION OF MODELS WITH FLUE
- OPTION 2 - DUCTED
- • RECIRCULATING RANGEHOOD
- • OPTIONAL ACCESSORIES - CARBON FILTER
- USE AND MAINTENANCE
- • LIGHT REPLACEMENT - HALOGEN
- CONTROLS : (Fig.13)
Brand : BLANCO
Model : BWC9BX
Category : Range hood