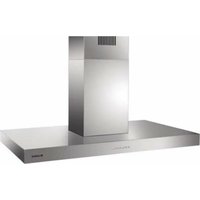
BIC120X - Range hood BLANCO - Free user manual and instructions
Find the device manual for free BIC120X BLANCO in PDF.


| Product Type | Range Hood |
| Brand | BLANCO |
| Model | BIC120X |
| Installation Type | Island or Wall-Mounted Chimney |
| Width | 120 cm |
| Depth | 50 cm |
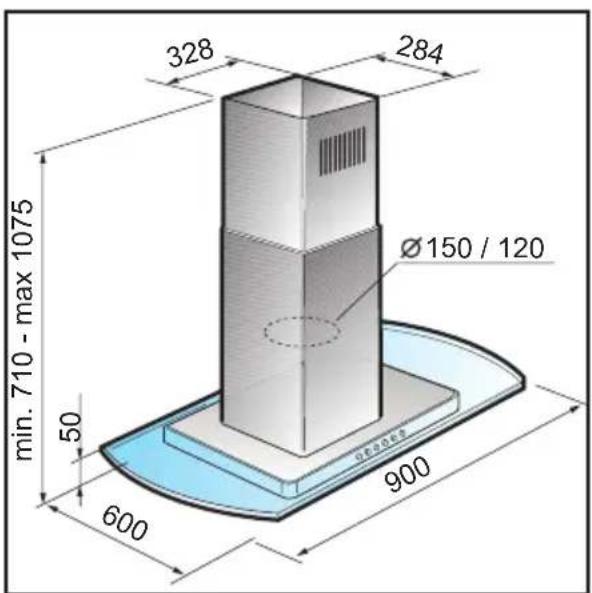
| Height (Adjustable) | 75-110 cm |
| Material | Stainless Steel |
| Number of Speeds | 3 + Boost |
| Controls | Electronic Touch Buttons |
| Lighting | 2 x LED, 3W each |
| Filter Type | Aluminum Grease Filters (dishwasher safe) |
| Grease Filter Efficiency | Class A |
| Ducting | Ducted (150 mm) or Recirculation (optional carbon filter) |
| Max Airflow | 650 m³/h |
| Noise Level (max speed) | 56 dB(A) |
| Energy Class | A+ |
| Electrical Connection | 220-240 V ~ 50 Hz |
| Power Consumption | 200 W |
| Weight | 25 kg |
| Warranty | 2 years |
| Included Accessories | Mounting kit, duct adapter, instruction manual |
Frequently Asked Questions - BIC120X BLANCO
User questions about BIC120X BLANCO
0 question about this device. Answer the ones you know or ask your own.
Ask a new question about this device
Download the instructions for your Range hood in PDF format for free! Find your manual BIC120X - BLANCO and take your electronic device back in hand. On this page are published all the documents necessary for the use of your device. BIC120X by BLANCO.
USER MANUAL BIC120X BLANCO
Instructions for the Use and Care and Installation of
BIC90X
BIC120X
BICG90X
Rangehood
Dear Customer
You will find that the modern look of your Blanco rangehood blends in perfectly with your kitchen décor. It is easy to use and performs to a high standard.
Blanco also makes a range of products that will enhance your kitchen – such as cooktops, ovens, dishwashers, microwaves, sinks and taps. There are models to complement your new Blanco rangehood. Blanco now has a range of laundry products to choose from.
Of course, we make every effort to ensure that our products meet all your requirements, and our Customer Service Department is at your disposal, to answer your questions and to listen to your suggestions.
Please complete the warranty section of this manual and keep your receipt as proof of purchase. Retain all documents relating to the purchase of Blanco product.
Blanco is committed to providing increasingly efficient products that are easy to use, respect the environment and are attractive and reliable.
BLANCO

Fig.1
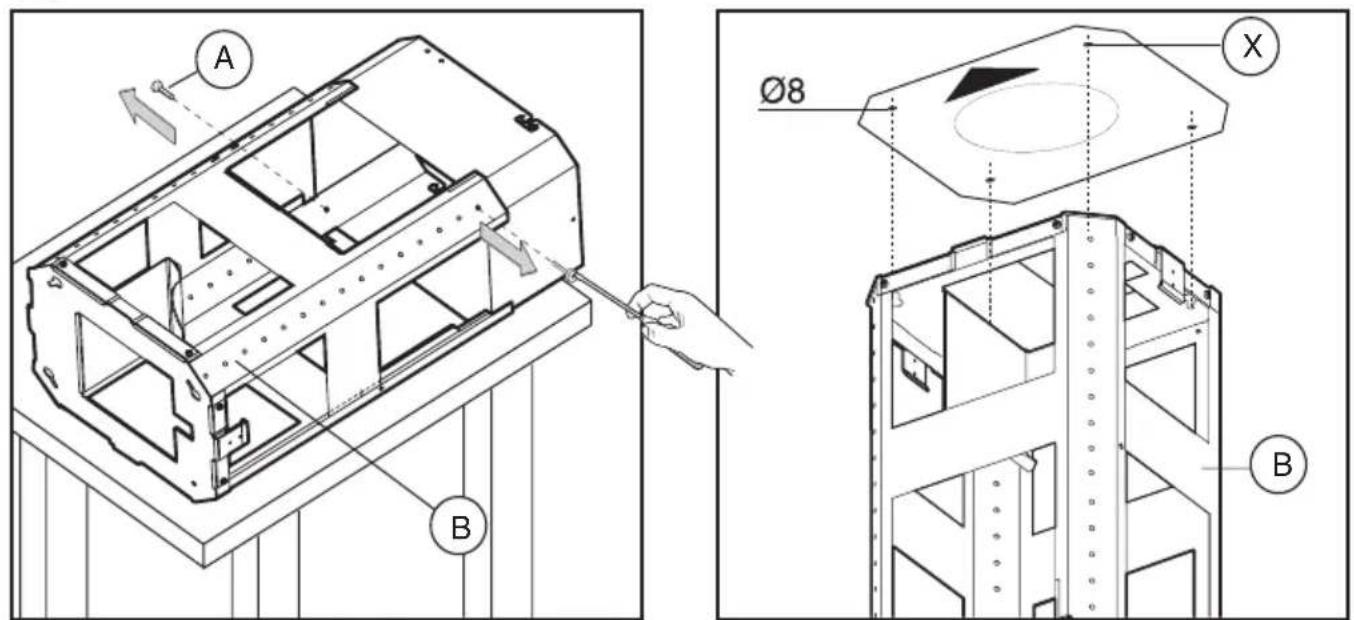
Fig.3

Fig.4

Fig.5 Fig.6

natural_image
Technical illustration of a mechanical assembly with hands operating a coiled spring inside a housing (no text or symbols)Fig.7 Fig.8


Fig.9

Fig.10

Fig.11
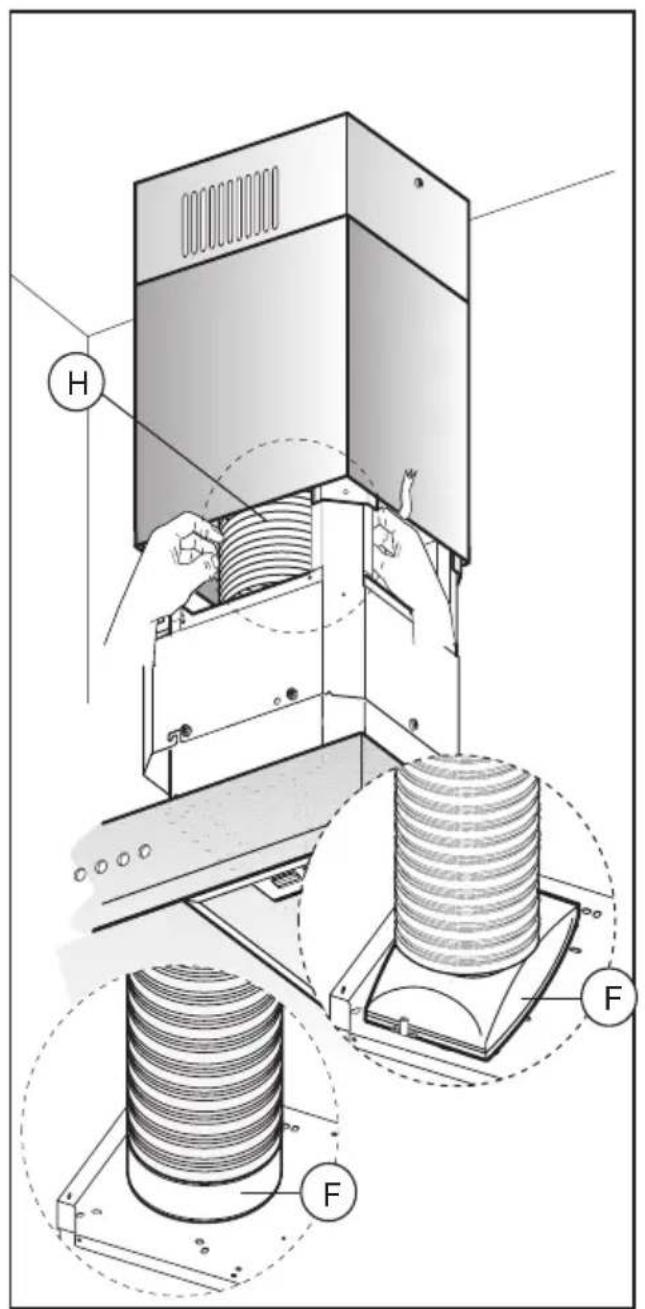
Fig.12
natural_image
Illustration of a vertical industrial elevator with a downward arrow indicating airflow or cooling (no text or symbols present)Fig.13
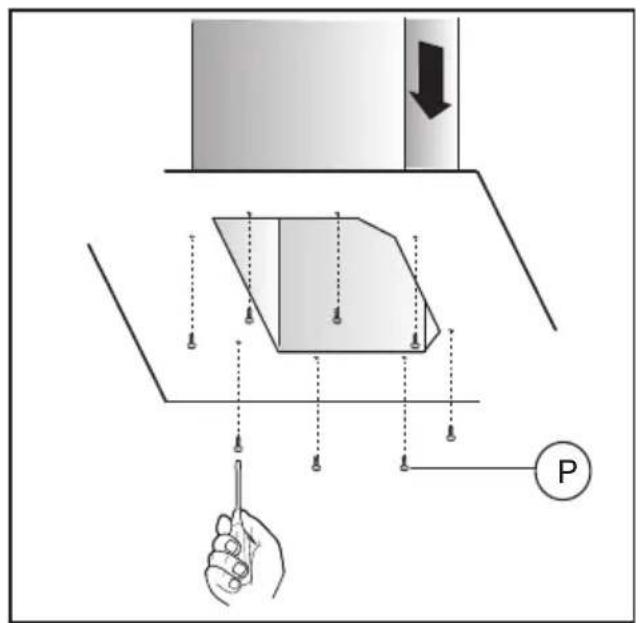
Fig.14


natural_image
Line drawing of a hand holding a small electronic device with a curved component inside, no text or symbols present.Fig.16

natural_image
Technical line drawing of a mechanical component with a magnified inset showing a hand holding a small component (no text or symbols present)Fig.17

flowchart
graph TD
    1["1"] --> A["A"]
    0["0"] --> B["B"]
    1["1"] --> C["C"]
    2["2"] --> D["D"]
    3["3"] --> E["E"]
    4["4"] --> F["F"]
Fig.18 Fig.19

flowchart
graph TD
    A["●"] --> B["0"]
    B --> C["1"]
    C --> D["2"]
    D --> E["3"]
    E --> F["▽"]
    G["G"] --> A
    B["B"] --> A
    C["C"] --> B
    D["D"] --> C
    E["E"] --> D
    F["A"] --> E

Fig.20
GENERAL
These warnings are provided in the interest of safety. Carefully read the following important information regarding installation safety and maintenance. You MUST read them carefully before installing or using the appliance.
It is most important that this instruction book be retained with the appliance for future reference. Should the appliance be sold or transferred, always ensure that the book is left with the appliance in order that the new owner can get to know the function of the appliance and the relevant warnings.
The appliance has been designed for use in the ducted version (Fig.1B) and recirculated version (Fig.1A).
SAFETY PRECAUTION
- Take care when the rangehood is operating in the same room as an open fireplace or burner that requires air in the environment and uses an energy source other than electrical energy – this because the rangehood removes air from the environment which a burner or fireplace may need for combustion. The negative pressure in the environment must not exceed 4Pa (4x10⁻⁵ bar).
- Provide adequate ventilation in the environment for a safe operation of the rangehood.
- Follow the local laws applicable for external air evacuation.
- If the supply cord is damaged, it must be replaced by the manufacturer or its service agent or a similarly qualified person in order to avoid a hazard.
WARNING!
In certain circumstances electrical appliances may be a danger hazard.
A) This appliance is not intended for use by young children or infirm persons without supervision.
B) Young children should be supervised to ensure they do not play with the appliance.
C) Do not check or remove the filters when the rangehood is operating.
D) Flambè cooking is prohibited underneath the rangehood.
E) Constantly check food frying to avoid that the overheated oil may become a fire hazard.
F) Disconnect the electrical plug prior to any maintenance.
G) Do not touch lighting or adjacent areas when lighting is on - and for a period of time after using the light.
H) Avoid leaving cooktop on (gas and electric) without the saucepan covering the burner or cooking zone. This is because heat transferring upwards to the rangehood will be damaging to the filters and a fire hazard.
I) Ensure adequate ventilation of the room where the rangehood is used at the same time as appliances burning gas or other fuels. Exercise care when a rangehood is installed in an area where a gas burner is operating. Depending on the size of the room, the rangehood may draw from the room air that is necessary for proper combustion of the burner.
J) Ensure the rangehood is cleaned frequently.
L) There is a risk of fire if cleaning is not carried out in accordance with the instructions.
M) For any repairs always contact an authorised Technical Customer Service Centre and ask for original spare parts. Repairs by untrained people may lead to damage and void warranty.
Warnings for Installation:
a) The exhaust air must not be discharged into a flue which is used for exhausting fumes from appliances burning gas or other fuels.
b) The minimum distance from the cooktop surface and the lowest part of the range hood must not be less than 65cm. If the instructions for the cooktop specify a greater distance, please consider this.
c) The regulations concerning the discharge of exhaust air have to be fulfilled.
d) All Blanco rangehoods are used for indoor application/installation only.
Other Information:
This appliance conforms to the European Directive EC/2002/96, Waste Electrical and Electronic Equipment (WEEE). By making sure that this appliance is disposed of in a suitable manner, the user is helping to prevent potential damage to the environment or to public health.
The symbol on the product or on the packaging label on the carton indicates that the appliance should not be treated as domestic waste, but should be delivered to a suitable electric and electronic appliance recycling collection point. Follow local guidelines when disposing of waste. For more information on the treatment, re-use and recycling of this product, please contact your local authority or domestic waste collection service.
INSTALLATION INSTRUCTIONS
Assembly and electrical connections must be carried out by specialised personnel.
• Electric Connection
The appliance has been manufactured as a class II, therefore no earth cable is necessary.
The connection to the mains is carried out as follows:
BROWN = L line
BLUE = N neutral
If not provided, connect a plug for the electrical load indicated on the description label. Where a plug is provided, the cooker hood must be installed in order that the plug is easily accessible.
An omnipolar switch with a minimum opening of 3mm between contacts, in line with the electrical load and local standards, must be placed between the appliance and the network in the case of direct connection to the electrical network.
- The minimum distance between the support surfaces of the cooking pots on the cooker top and the lowest part of the cooker hood must be at least 65 cm.
If a connection tube composed of two parts is used, the upper part must be placed outside the lower part.
Do not connect the cooker hood exhaust to the same conductor used to circulate hot air or for evacuating fumes from other appliances generated by other than an electrical source.
Before proceeding with the assembly operations, remove the anti-grease filter(s) (Fig.16) so that the unit is easier to handle.
In the case of assembly of the appliance in the suction version prepare the hole for evacuation of the air.
Perimeter Exhaust System BIC120X.
This system is based on the Venturi Principle:
The air extraction system is defined around the perimeter of the stainless steel panels. The effect of this increases the intake air flow resulting in a more effective air extraction system.
Before installing the appliance, open the panels (A, fig. 20) and remove the anti-grease filter(s) (B, fig. 20).
- We recommend the use of an air exhaust pipe with a diameter of 150. If a pipe with a smaller diameter is used, the efficiency of the product may be reduced and its operation may become noisier
- Hood assembly
Remove the structure from the packaging and remove the 2 screws A to separate the upper part from the lower part (fig.2).
- Position hole template on the ceiling paying attention that the arrow is positioned on the same side as the appliance controls (Fig.3).
Make 4, ∅8 holes in the ceiling and drive in 3 screws without completely tightening them. Pay attention not to insert the screw into the hole marked with an X on the hole template (the screws and expansion plugs must be suitable for the type of wall).
- Take the upper part of the structure B (fig.4) and insert the 3 slots onto the 3 screws that are not completely tightened.
Rotate slightly to fit (fig.4).
Drive in the fourth screw X and tighten the remaining 3 to allow definitive blocking of the upper part of structure B
- Take the lower part of the telescopic structure C and insert it into the upper structure B (fig.5)
Adjust the height by referring to the amounts indicated in (fig.15) and block it using the 8 screws G that are supplied (fig.6).
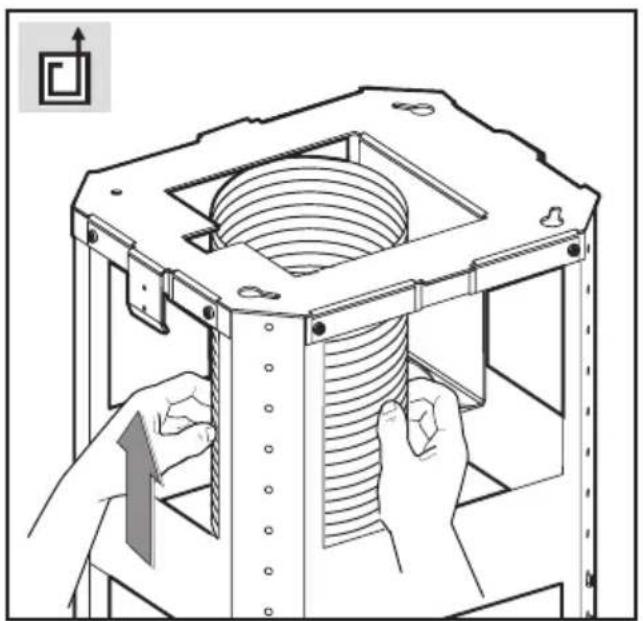
- Ducted version: fix the flexible pipe to the prepared air evacuation hole (fig 7).
- Recirculating version: fix the flexible pipe to the deflector M and fix screw I as indicated in (Fig.8), the active carbon filters must be applied to the suction unit positioned inside the hood (Fig.17).
- If your product is fitted with a connector flange, perform the assembly steps indicated in fig. 9 before fixing the cooker hood to the structure.
Take connector flange F and fit it to the upper part of the cooker hood suction assembly using the 2 screws E (fig. 9).
- Take the upper chimney piece and fix it to the structure using the 2 screws A (Fig.10).
Join the lower chimney piece with the upper one and fix it carefully using adhesive tape L (Fig.11a).
- Unscrew the 2 screws O, max 3 mm (Fig.11a).
Insert the suction unit inside the structure paying attention that the previously unscrewed screws O, hook into the slots in the lower part as indicated in (Fig.11b).
Drive in the 3 screws N (supplied) and tighten the 2 screws O (Fig.11b).
- Fix the air evacuation pipe H (not supplied) onto the connection flange F (Fig.12)
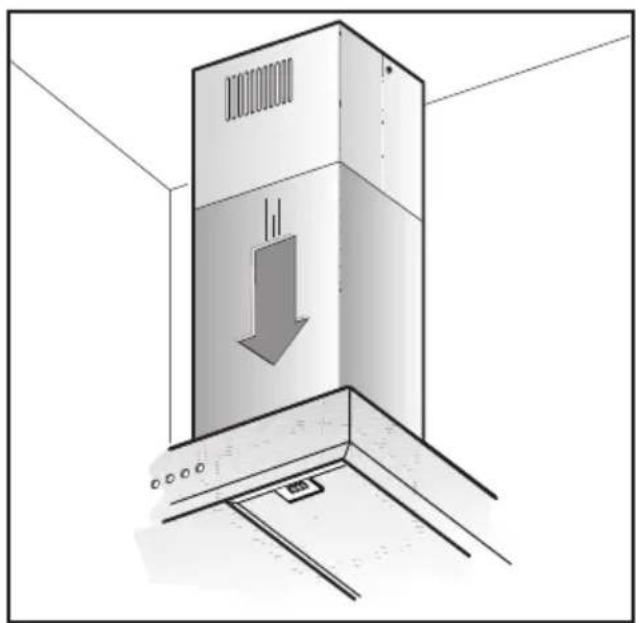
- Remove adhesive tape L and rest the lower chimney piece above the cooker hood (Fig.13).
-If the cooker hood is supplied with a lower chimney piece that must be fixed to the hood body with screws, remove the anti-grease filters from the hood by acting on the relevant handles (Fig.16). Then screw the lower chimney piece pipe to the inside of the hood, using screws P (Fig.14). Re-locate the filters in their seat.
Rangehoods may be ducted in two ways:
-
Ducted to the atmosphere (outside).
-
Recirculating.
We recommend ducting to the atmosphere to ensure optimum performance. Recirculating the air back into the room
should only be used when outside extraction is not possible. To ensure maximum performance when ducting it is important the ducting that carries the fumes away, be as short and as straight as possible.
When incorporating a rangehood in the design of a kitchen the following points need to be considered to achieve the most benefit from the rangehood.
- Ducting from a rangehood carrying the exhaust air, should not exceed a length of three (3) metres.
- For ducted installation we recommend using galvanised or similar metal type flue pipe. PVC pipe is not recommended.
- Ducting containing a 90° degree bend will encounter a loss in efficiency of approximately 35%. Additional 90° degree bends can cause losses of up to 15% per bend.
- Ducting size should always comply with the manufacturers specification.
- We recommend carbon filters be used when re-circulating the air into the room. There will be some loss of air

natural_image
Simple line drawing of a mechanical device with a hanging component and base, no text or symbols present.Recirculated to kitchen area via bulkhead

natural_image
Technical line drawing of a mechanical assembly with no visible text or symbolsRecirculated to kitchen area via ceiling cavity

natural_image
Technical line drawing of a mechanical assembly with no visible text or symbolsDucted to atmosphere through wall
natural_image
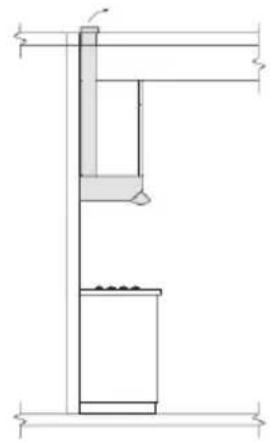
Technical line drawing of a mechanical assembly with no visible text or symbolsDucted to atmosphere through roof
USE AND MAINTENANCE
- It is recommended to operate the appliance prior to cooking.
It is recommended to leave the appliance in operation for 15 minutes after cooking is terminated in order to help eliminate cooking vapours and odours.
The proper function of the cooker hood is conditioned by the regularity of the maintenance operations, in particular, the active carbon filter. - The anti-grease filters capture the grease particles suspended in the air, and are therefore subject to clogging according to the frequency of the use of the appliance.
In order to prevent fire hazard, it is recommended to clean the filter at a maximum of 2 months by carrying out the following instructions: - Remove the filters from the cooker hood and wash them in a solution of water and neutral liquid detergent, leaving to soak.
- Rinse thoroughly with warm water and leave to dry.
- The filters may also be washed in the dishwasher.
The aluminium panels may alter in colour after several washes. This is not cause for customer complaint nor replacement of panels.
- The active carbon filters help to purify the air that is replaced in the environment. Carbon filters are available on request from your retailer.
The filters are not washable nor re-useable and must be replaced at maximum every four months. The saturation of the active carbon filter depends on the frequency of use of the appliance, by the type of cooking and the regularity of cleaning the anti-grease filters.
- Clean the fan and other surfaces of the cooker hood regularly using a cloth moistened with denatured alcohol or non abrasive liquid detergent.
- The illumination installation is designed for use during cooking and not for prolonged general illumination of the environment. Prolonged use of the illumination installation notably reduces the duration of the bulb.
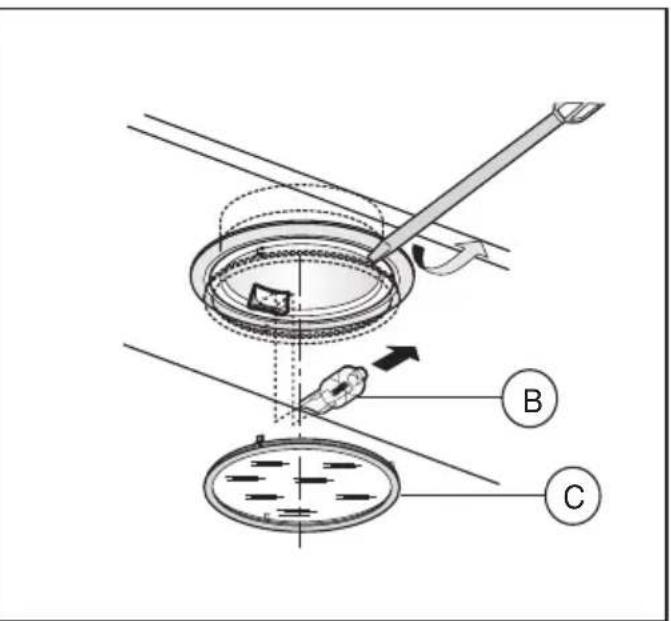
• LIGHT REPLACEMENT - HALOGEN
Remove the glass retaining ring and glass.
Replace the globe with another of the same type.
Replace the glass and retaining ring.
• CONTROLS: (Fig.18) For model BIC120X - BICG90X only:
A = LIGHT
B = OFF
C = SPEED I
D = SPEED II
E = SPEED III
F = AUTOMATIC STOP TIMER - 15 minutes (*)
- INTENSIVE speed function: press key E for two seconds and it will be activated for 10 minutes after which it will return to the previously set speed. When the function is active the LED flashes. To interrupt it before the 10 minutes have expired press key E again.
- By pressing key F for two seconds (with the hood switched off) the “clean air” function is activated. This function switches the appliance on for ten minutes every hour at the first speed. As soon as this function is activated the motor starts up at the first speed for ten minutes, During this time key F and key C must flash at the same time.
After ten minutes the motor switches off and the LED of key F remains switched on with a fixed light until the motor starts up again at the first speed after fifty minutes and keys F and C start to flash again for ten minutes and so on. By pressing any key for the exclusion of the hood light the hood will return immediately to its normal functioning (e.g. if key D is pressed the “clean air” function is deactivated and the motor moves to the 2nd speed straight away. By pressing key B the function is deactivated).
(*) The “automatic stop timer” delays stopping of the hood, which will continue functioning for 15 minutes at the operating speed set at the time this function is activated.
• Active carbon/grease filter saturation: Fig.19B / Fig.20
- When button A flashes at a frequency of 2 seconds, the grease filters must be cleaned.
- When button A flashes at a frequency of 0.5 seconds, the carbon filters must be replaced.
After the clean filter has been replaced, the electronic memory must be reset by pressing button A for approximately 5 seconds, until the light on the button stops flashing.
•CONTROLS :(Fig.19) For model BIC90X only:
A = LIGHT
B = OFF
C = SPEED I
D = SPEED II
E = SPEED III
G = MOTOR WORKING indicator
THE MANUFACTURER DECLINES ALL RESPONSIBILITY FOR EVENTUAL DAMAGES CAUSED BY BREACHING THE ABOVE WARNINGS.
Blanco Contact Information.
NEW SOUTH WALES
Head Office, Sales & Marketing Office
104 Vanessa Street
Kingsgrove NSW 2208
Telephone: 02 9503 2888
Facsimile: 02 9503 2810
NSW Showroom*
40 Ebley Street
Bondi Junction NSW 2022
Telephone: 02 9386 1190
Facsimile: 02 9386 1671
Service and Spare Parts
All General Whitegoods Service
Telephone: 02 8788 8666
Facsimile: 02 9756 1091
AUSTRALIAN CAPITAL TERRITORY
Service and Spare Parts
Detlevs Appliance & Electrical Care
1/88 Sheppard Street
Hume
ACT 2905
Telephone: 02 6280 1033
Facsimile: 02 6260 1035
VICTORIA
State Office and Showroom\*
35 Centre Road
Scoresby VIC 3179
Telephone: 03 8756 7888
Facsimile: 03 8756 7907
Service and Spare Parts
Advantage Appliances
Telephone: 03 9874 4222
Facsimile: 03 9874 6917
QUEENSLAND
State Office and Showroom\*
148 Robinson Road - East
Geebung
QLD 4034
Telephone: 07 3259 2555
Facsimile: 07 3265 6933
Service and Spare Parts
Endeavour Appliances
Telephone: 07 3872 7444
Facsimile: 07 3852 2465
Platinum Appliance Service
Telephone: 07 3862 1154
Facsimile: 07 3862 1114
Roshad (Gold Coast)
Telephone 07 5535 7044
Facsimile 07 5535 7407
SOUTH AUSTRALIA & NORTHERN TERRITORY
Agent and Sales Office
S C Lighting & Electrical Supplies
47 North Terrace
Hackney SA 5069
Telephone: 08 8362 4599
Facsimile: 08 8362 4591
Service and Spare Parts
Prestige Appliance Repair Centre
Telephone: 08 8352 2022
Facsimile: 08 8352 3044
WESTERN AUSTRALIA
1 Alvan Street
SUBIACO WA 6008
Telephone: 08 9382 1611
Facsimile: 08 9382 1622
Service and Spare Parts
Metropolitan Appliance Repairs
Telephone: 08 9330 1724
Facsimile: 08 9317 1296
TASMANIA
Agent and Sales Office
Mark Pearce Agencies
23 Tranmere Road
Howrah TAS 7018
Tel/Fax: 03 6247 9215
Service and Spare Parts
Electrical Equipment Service (Launceston)
Telephone: 03 6339 3873
Facsimile: 03 6339 4588
Baldocks Appliance Service (Hobart)
Telephone: 03 6234 5995
Facsimile: 03 6234 8134
BLANCO CUSTOMER SERVICE 1300 739 033
Website: www.meaappliances.com.au
* Showrooms open six days a week
BLANCO

Performance First
BLANCO COOKING PRODUCT WARRANTY
- Subject to the "Statement of Standard Warranty Conditions" this product is covered by the following Warranty.
TWO (2) YEARS WARRANTY from date of purchase, covering all parts and labour. - The appliance is warranted under normal single family domestic installation and use, as set out in the instruction manual, against manufacturing defects for the Warranty periods shown above.
- Should service be required under this Warranty, the purchaser should contact an approved BLANCO Service Provider during their normal business hours.
- At no time does BLANCO/MEA have liability for any freight or transportation costs or for any damage during transit or for any consequence of failure of this appliance outside of the normal service area, unless such limitation of liability is prohibited by statute.
- This Warranty excludes replacement of parts required due to normal wear and tear including light globes.
- This Warranty only applies, provided the appliance has been used in accordance with the manufacturer's instructions and provided an accident, misuse, neglect or abuse has not damaged the appliance.
- None of the above Warranties purport to exclude, restrict or modify either the application or the exercise of a right conferred by any applicable Statute.
- Please complete the details below, which should be retained for future reference along with your proof of purchase:
Date of Purchase: ....
Model No: ....
Serial No: ....
BLANCO

Performance First
STATEMENT OF STANDARD WARRANTY CONDITIONS
- The Warranty only applies provided that the appliance has been used in accordance with the manufacturer's instructions and provided that the appliance has not been damaged by an accident, misuse, neglect or abuse of any person other than the manufacturer or BLANCO/Major Electrical Appliances ("MEA") or from faulty installation, misadjustment or tampering by unauthorised persons.
- When a service inspection reveals the alleged fault or faults are caused by incorrect operation, contrary to the instruction manual, and otherwise the appliance is in good order and working condition, the purchaser shall be liable for a service fee charged by BLANCO/MEA or one of its' Service Providers.
- If the appliance is used in Commercial Applications or for Rental purposes, a separate warranty of Twelve (12) months covering all parts with Three (3) months on the labour will apply.
- Subject to the provisions of any applicable statute this Warranty applies to the original retail purchaser only and is not transferable.
- Subject to the provisions of any applicable statute, at no time does BLANCO/MEA have liability for freight, transport or travel costs outside normal service areas.
- None of the above Warranties purport to exclude, restrict or modify either the application or the exercise of a right conferred by any applicable statute.
- Subject to any Warranties implied by statute, at no time will BLANCO/MEA or its' Service Providers be liable for any economic loss consequent upon the failure of the appliance.
- This Warranty is only valid for major appliances imported and distributed by BLANCO/MEA, purchased and used in Australia.

BIC120X

BIC90X
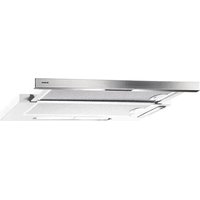
BICG90X



- Dear Customer
- BLANCO
- GENERAL
- SAFETY PRECAUTION
- WARNING!
- Warnings for Installation:
- Other Information:
- INSTALLATION INSTRUCTIONS
- Perimeter Exhaust System BIC120X.
- - Hood assembly
- Rangehoods may be ducted in two ways:
- When incorporating a rangehood in the design of a kitchen the following points need to be considered to achieve the most benefit from the rangehood.
- USE AND MAINTENANCE
- Blanco Contact Information.
- NEW SOUTH WALES
- AUSTRALIAN CAPITAL TERRITORY
- Service and Spare Parts
- VICTORIA
- State Office and Showroom\*
- QUEENSLAND
- SOUTH AUSTRALIA & NORTHERN TERRITORY
- Agent and Sales Office
- WESTERN AUSTRALIA
- TASMANIA
- Baldocks Appliance Service (Hobart)
- BLANCO CUSTOMER SERVICE 1300 739 033
- BLANCO COOKING PRODUCT WARRANTY
- STATEMENT OF STANDARD WARRANTY CONDITIONS
Brand : BLANCO
Model : BIC120X
Category : Range hood