
MCAL-11T - Heating MISTRAL - Free user manual and instructions
Find the device manual for free MCAL-11T MISTRAL in PDF.


| Product Type | Electric Fan Heater |
| Brand | Mistral |
| Model | MCAL-11T |
| Dimensions (H x W x D) | 25 x 18 x 15 cm (estimated) |
| Weight | 1.2 kg (estimated) |
| Power Supply | 220-240 V, 50 Hz |
| Power Consumption | 2000 W (estimated) |
| Heating Element | Ceramic or PTC |
| Heating Capacity | Up to 20 m² (estimated) |
| Thermostat | Adjustable thermostat |
| Fan Speed Settings | 2 levels (low/high) (estimated) |
| Safety Features | Overheat protection, tip-over switch |
| Noise Level | < 45 dB (estimated) |
| Control Type | Manual rotary dials |
| Portability | Built-in carrying handle |
| Color | White/Black (typical) |
| Certifications | CE, RoHS (assumed) |
| Maintenance | Clean grille with dry cloth; no internal user serviceable parts |
| Warranty | 2 years (typical for Mistral) |
| Included Accessories | User manual only |
Frequently Asked Questions - MCAL-11T MISTRAL
User questions about MCAL-11T MISTRAL
0 question about this device. Answer the ones you know or ask your own.
Ask a new question about this device
Download the instructions for your Heating in PDF format for free! Find your manual MCAL-11T - MISTRAL and take your electronic device back in hand. On this page are published all the documents necessary for the use of your device. MCAL-11T by MISTRAL.
USER MANUAL MCAL-11T MISTRAL
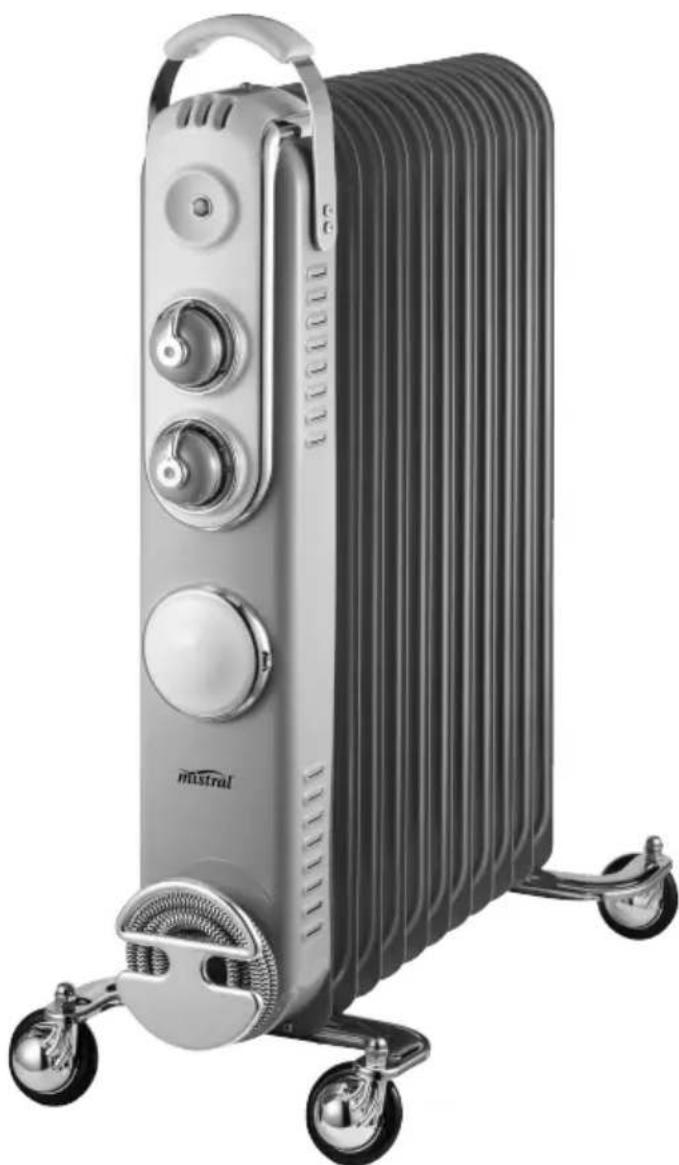
11 Fin Retro Column Heater with Timer
natural_image
Modern flat-screen air conditioner with three rotary switches and wheels (no visible text or symbols)Instruction Manual
Model: MCAL-11T
Important Safeguards
When using electrical appliances, in order to reduce the risk of fire, electric shock, and/or injury to persons, basic safety precautions should always be followed, including:
Safety Precautions
When using this appliance, below safety precautions should always be followed.
- Do not position this heater immediately below a socket outlet.
• To prevent fire or shock hazard, DO NOT expose this appliance to rain or moisture. - Dangerous high voltages are present inside this enclosure. To avoid electric shock, DO NOT open the cabinet, refer servicing to qualified personnel only.
- To protect against fire, electrical shock and injury to persons, do not immerse the unit, plug or cord in water or spray with liquids.
- The apparatus shall not be exposed to dripping or splashing and no objects filled with liquids, such as vases, shall be placed near the product. Dry location use only.
- No naked flames sources, such as candles, should be placed on the product.
- Any ventilation holes should not be impeded by covering with items, such as newspaper, table paper, tablecloths, curtains etc. Slots and opening are provided for ventilation to ensure reliable operation of the product and to protect it from overheating. Never obstruct the air inlet and outlet. Do not use any object to cover this appliance.
- Only connect to a suitable AC 240V\~50Hz mains wall outlet. Do not overload the wall outlet.
- This appliance is not intended to be operated by means of an external timer or separate remote-control system. Other use not recommended may cause fire, electric shock or injury.
- This appliance is not intended for use by persons(including children) with reduced physical, sensory or mental capabilities, or lack of experience and knowledge, unless they have been given supervision or instruction concerning use of the appliance.
- Keep out of reach of children. Children should be supervised to ensure that they do not play with the appliance.
- To disconnect, grip the plug and pull it from the wall outlet. Never pull by the cord. Do not use with wet hands or in damp environments.
- Do not attempt to repair, disassemble or modify the appliance. There are no user serviceable parts inside. Repairs should only be performed by qualified personnel.
- If the supply cord is damaged, it must be replaced by the manufacturer, its service agent or similarly qualified persons in order to avoid a hazard.
- Do not use this appliance outdoors. This appliance is for household use only and not for commercial or industrial use.
- Do not use if there are visible signs of damage to the heater
- Use this heater on a horizontal and stable surface.
- Do not use this heater if it has been dropped.
WARNING: Do not use this heater in small rooms when they are occupied by persons not capable of leaving the room on their own, unless constant supervision is provided.
Warning: In order to avoid overheating, DO NOT COVER the appliance.
WARNING: To reduce the risk of fire, keep textiles, curtains, or any other flammable material a minimum distance of 1 m from the air outlet.
WARNING: FIRE RISK EXISTS IF THE HEATER IS COVERED BY OR POSITIONED CLOSE TO CURTAINS OR OTHER COMBUSTIBLE MATERIALS.
Warning: Do not use without castors. WARNING: This heater is filled with a precise quantity of special oil. Repairs requiring opening of the oil container are only to be made by the manufacturer or his service agent who should be contacted if there is an oil leak;
WARNING: When scrapping the heater, follow the regulations concerning the disposal of oil.
Always
- Always position the heater in accordance with the instructions.
- Always make sure the electrical socket is accessible and located adjacent to, but not above the heater.
- Always use a fire guard when children, animals and infirm persons can come into contact with the heater. Pay attention! The air outlet gets hot during operation.
- Always turn the appliance OFF and unplug it from the mains wall outlet when it is not in use, when moving the appliance from one location to another and before cleaning.
Never
- Never leave the appliance unattended when it is in use. Never leave children unsupervised in a room where the heater is ON and unguarded.
- Never obstruct or cover the air outlet or force items into the heater openings, this could cause overheating and consequent risk of fire. Never insert or allow foreign objects to enter the air outlet as this may cause damage to the appliance.
- Never position or use the heater in the immediate vicinity of water, such as bathtub, shower, washbowls, swimming pool etc.
- Never use aerosols or steam cleaners on or around the heater.
- Never use the fan heater in rooms with explosive gas or while using flammable solvents, varnish or glue.
- Never route the power supply cord under carpet etc.
- Never use the heater to dry clothes, etc.
- Never operate the appliance with a damaged cord or plug, after a malfunction or if it is not working normally, dropped or damaged in any way.
- Never let the power cord hang over the edge of a table or counter or let it touch any hot surfaces.
- Never move the appliance by pulling the cord.
-
Never immerse the product in water or any other liquid for any reasons.
-
Never use accessories that are not recommended or supplied by the manufacturer.
Position Instructions
This heater must be placed on a hard, level, heat resistant surface. When positioning, please keep the following points in mind:
- The heater requires no installation. It should be used solely as a portable appliance. The heater must always be used and stored in an upright position.
- This heater must not be located immediately below an electrical outlet.
- The heater MUST only directly be plugged in to a fixed Domestic Power outlet, DO NOT use in conjunction with Extension cords, Power Boards or Double Adaptors, as these can overheat when overloaded.
- Do not use the appliance in rooms less than 4m2 areas.
- Keep the air inlet and outlet free from objects at least 100cm in front and 50cm behind the heater. Do not hang anything on or in front of the fan heater.
- Never position the heater close to curtains or combustible materials such as furniture, cushions, bedding, paper, clothes, curtains etc. Keep the appliance at least 100cm (1m) from walls and any other combustible materials.
- Never position or use the heater in the immediate vicinity of water, such as bathtub, washbowls, swimming pool etc. where the likelihood of immersion or splashing could occur.
- Keep hearthrugs and other soft furnishings away from the front of the heater. They could obstruct the free flow of hot air and damage both soft furnishings and heater.
Cautions:
Do not operate the appliance on an inclined place. Do not move the appliance while the appliance is switched on.
In order to avoid a hazard due to inadvertent resetting of the thermal cutout, this appliance must not be supplied through an external switching device, such as a timer, or connected to a circuit that is regularly switched on and off by the utility.
This heater is hot when in use or directly after use. To avoid burns, do not let bare skin touch hot surfaces. Keep combustible materials such as furniture, pillows, bedding, papers, clothes and curtains well away from the heater. Do not drape laundry or any other items over the heater.
At the end of the product's serviceable life it should be disposed of carefully and safely in accordance with local authority regulations.
Features of Your 11 Fin Retro Column Heater with Timer

Your Column Heater
Congratulations on the purchase of your new Column Heater.
Before first using your new appliance, it is most important that you read and follow the instruction in this use and care booklet, even if you feel you are quite familiar with this type of appliance.
Your attention is drawn particularly to the section dealing with "IMPORTANT SAFEGUARDS". Find a place and keep this booklet handy for future reference.
Your Column Heater is easy and safe to use. It has been designed to function quietly and safely under normal circumstances. Read all instructions to ensure safe and efficient use.
Heating
The columns or fins are filled with a special oil that conducts heat to the metal surfaces. These in turn warm the air around them which gently and silently heats the room. Be careful because they work under pressure as the oil inside heats up. Like any electrical appliance, this product may cause injury or damage property if used whilst damaged.
Return to place of purchase if faulty , the column heater has not got serviceable parts.
Features & Operation
Castors
Column Heater are heavy, which is why castors are supplied with this product. To reduce packaging, they have been placed unassembled in the carton.


natural_image
Close-up of a metallic wrench with a labeled measurement of 6 (no text or symbols on the wrench itself)Accessories Kit
1 - 2 Brackets
2 - 2 Supports
3 - 4 Wing nuts
4-4 Support wheels
5 - 4 Nuts
6 - Wrench
Castor Wheel Assembly
-
Unpack the castor wheels from the packaging and remove the nut, from the castor wheel shaft.
-
Unpack the castor wheel mounting plate from the packaging. Feed the castor wheel shaft upwards through the underside of the castor wheel mounting plate, and align the rectangular locator on the base of the castor wheel shaft with the slot on the mounting plate. The castor wheel shaft and mounting plate should fit together snuggly.
-
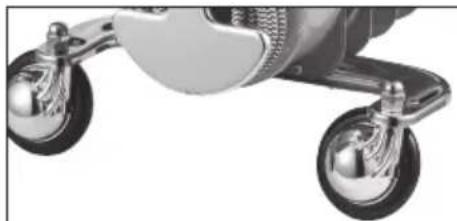
Replace castor nut, over the top of the mounting bracket and secure tightly with the nut provided. The nut may need to be tightened with a spanner (Fig.1).
natural_image
Close-up of a metallic mechanical component with four wheels (no visible text or symbols)Fig.1
Refer to the diagram below which shows how to securely attach the castor brackets to the Column Heater, so it can be wheeled from room to room. The brackets are designed to prevent the fins from touching walls.
This is the only time that you should ever turn the Column Heater on its side or upside-down. After attaching the castor brackets wait 15 minutes for the oil in each column to settle back into position before use.
Turn the apparatus upside down, unscrew the wing nuts from the bracket (fig. 1) and insert the bracket between the first and second element (fig. 2). Insert the end of the bracket into holes "A" and "B" in the metal support (fig. 3) and fasten it by using wing nuts (fig. 4).
Mount the other bracket as described above, positioning it between the last and second-last element of the radiator.

Before connecting or disconnecting the appliance, make sure that the power selector (4) is in the OFF position ("0").
To turn the appliance on, insert the plug in the power outlet, set the power selector (4) in the desired position and turn the adjustable thermostat (3) clockwise to the maximum position.
Once the desired room temperature is reached, turn the thermostat (3) slowly, in a counter clockwise direction, until the appliance is turned off.
At this point, the product will automatically restart when the temperature in the room goes below the set limit.
The indicator light (2) indicates that the appliance is operating and will switch off when the adjustable thermostat is activated.
Always allow the appliance to cool down before storage, if not in use.
Note: After attaching the castors wait at least 15 minutes for the oil in each fins to settle before using the Column Heater.
Mount The Support Wheels
Insert the wheels into holes "C" and "D" in the metal supports and fasten them with the nuts.
Heat Settings

| Low heat | Medium Heat | Maximum Heat | |
| Switch | Switch | | | Switch | | | | |
| 11 Fins 1000W 1400W | 2400W | ||
When you turn on your Column Heater, turn the heat switch marked 'III', and then turn the thermostat as high as it will go. This will set the Column Heater to high, producing the maximum amount of heat possible to reduce the amount of time it takes to warm up the room.
As the room warms up, you may wish to decrease the heat level to maintain a comfortable room temperature. To do this, turn the thermostat down to a lower setting. The Column Heater will cycle on and off to maintain the desired room temperature.
Thermostat knob:
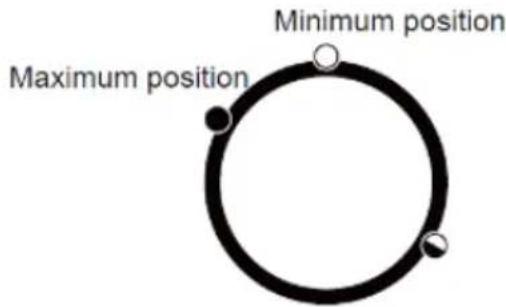
To set a low room temperature, turn the switch marked 'I'.
To set a medium room temperature, turn the switch marked 'II'.
On really cold days these low and medium settings may not be suitable, as heat losses can exceed the heat generated by your Column Heater. Larger rooms and open space areas may also find the low and medium heat settings ineffective.
Note: You will need to experiment with your Column Heater to establish the exact setting required for your particular room or space.
Timer Operation
The heater is fitted with a 24 hour programmable timer, which enables the heater to be set to switch ON and OFF automatically, once a heat setting mode has been selected.
The timer will only work when power is supplied to the unit.
The timer has 3 settings:
- I - ON, the heater can be used manually;
- O-OFF, the heater can be OFF always;
- Timer Operation, the heater can be used in the timer mode and will only operate if some of the pins have been engaged.

To activate the timer operation, select the setting Ⓗ on the timer.
Set the current time (using a 24 hour clock) on the timer, by rotating the dial clockwise until the correct time of day is located opposite the arrow.
Set the timer to Gposition.There are 48 small plastic pins on the timer,each correspond to 20 minutes interval.Push ourward the pins corresponding to the time you want the heater to turn ON and push inward the pins corresponding to the time you want the heater to turn OFF
CAUTION:
A. Do not use the timer function unattended.
B. The heater will not operate if timer is set to the position and the pins are not Activated according to the times required.
C. If the heater looses its electricity supply, e.g. Switched off at the mains socket or in the even of a power failure, the time should be reset after the power on again.
D. The indicator light will be on when the timer is set to ON position or the timing function is activated.
Note: the heater must always be plugged into a power socket, the heater switches must be in the on position and the thermostat must be suitably set to ensure the heater will come on.
NOTE: The programmed timer can be over ridden at any time by switching the timer back to the 'I' (ON, manual) mode. If the heater is required to run continuously the slide switch on the timer should be set to the "I" position.
If it is subsequently required to revert back to timer operation, the slide switch on the timer should be set to the clock position.
Power Cord Tidy
When the Column Heater is not in use, place the power cord in the power cord tidy. This will provide a safe and convenient storage solution. Always ensure the power cord is completely removed from the power cord tidy and uncoiled before use.
Safety Device
This appliance is fitted with a safety cut-off device which automatically turns the unit off when it is tilted or tipped over. Always ensure that the unit is placed on flat solid ground before operating.
Care and Cleaning
- Before cleaning, ensure that the heater is switched in the off position and is unplugged from the socket.
- Clean the exterior surfaces of the heater with a dry, soft cloth.
- Never use any form of detergents or solvents to clean the heater.
- Never spray with liquids or submerge in liquids or water.
- Do not attempt to clean the interior of the heater.
- Do not attempt to open the case of this heater at any time. There are no consumer serviceable parts inside this unit.
- When the heater is stored during the off season, neatly wind the power cord around the base of the heater to prevent any damage to the power cord.
Note: If the cordset of the appliance becomes damaged discontinue use. Repair should be undertaken only by a qualified electrician.
Technical Specifications
Power Supply: AC 240V\~50Hz
Power Consumption: 2400W
NOTE: As a result of continual improvements, the design and specifications of the product within may differ slightly to the unit illustrated on the packaging.
Disposal
Do not dispose of packaging or the product through your household waste!
The product and packaging are made from recyclable materials (plastics, metals, paper).
If the product is no longer suitable for use dispose of it in an environmentally friendly manner in accordance with your local council regulations.
Warranty Conditions for purchase in Australia & New Zealand
Any claim under this warranty must be made within 2 years of the date of purchase of the product. To make a claim under the warranty in Australia, take the product (with proof of purchase) to any Bunnings store (see www.bunnings.com.au in Australia or www.bunnings.co.nz in New Zealand for store locations).
GSM Retail Group bears reasonable, direct, expenses of claiming under the warranty in Australia. You may submit details and proof to a Bunnings store for consideration or contact our service agent below.
This warranty is provided in addition to other rights and remedies you may have under law: our goods come with guarantees which cannot be excluded under the Australian Consumer Law (if purchased in Australia) or the Consumer Guarantees Act 1993 (if purchased in New Zealand). You are entitled to replacement or refund for a major failure and to compensation for other reasonably foreseeable loss or damage. You are also entitled to have the goods repaired or replaced if the goods fail to be of acceptable quality and the failure does not amount to a major failure.
The warranty excludes damage resulting from product misuse or product neglect. The warranty covers domestic use only and does not apply to commercial applications.
This warranty is given by GSM Retail Group
ABN: 53007682475
For Warranty and technical queries: 1300 373 199 Aus Or 0800 200 037 NZ
Warranty Exclusions
Damage to the base or diffuser or any part through accident, misuse or negligence.

Gerard Sourcing & Manufacturing
GSM Retail Group
Consumer Service Centre :
Aus: 1300 373 199
NZ: 0800 200 037
GSM Retail Group has a policy of continual improvement throughout the product range.
As such the unit contained within may differ slightly from the unit illustrated on the pack.
MADE IN CHINA for GSM Retail Group
Mistral is a registered trademark of GSM Retail Group

Cat. No. MCAL-11T
November 2020


- Fin Retro Column Heater with Timer
- Important Safeguards
- Safety Precautions
- Always
- Never
- Position Instructions
- Cautions:
- Features of Your 11 Fin Retro Column Heater with Timer
- Your Column Heater
- Heating
- Features & Operation
- Castors
- Accessories Kit
- Castor Wheel Assembly
- Mount The Support Wheels
- Heat Settings
- Thermostat knob:
- Timer Operation
- CAUTION:
- Power Cord Tidy
- Safety Device
- Care and Cleaning
- Technical Specifications
- Disposal
- Warranty Conditions for purchase in Australia & New Zealand
- Warranty Exclusions
- GSM Retail Group
Brand : MISTRAL
Model : MCAL-11T
Category : Heating