
GCS62 - Network switch IOGEAR - Free user manual and instructions
Find the device manual for free GCS62 IOGEAR in PDF.


| Product Type | 2-Port Cable KVM Switch with HDMI Support |
| Brand | IOGEAR |
| Model | GCS62 (GCS2HU/GCS62HU) |
| Number of Computer Ports | 2 |
| Console Video Port | HDMI (HD) |
| Console USB Ports | 1 for keyboard, 1 for mouse |
| Console Audio Ports | Speaker (3.5mm) and Microphone (3.5mm) |
| Computer Connections | HDMI, USB (2), Audio (speaker/mic) |
| Dimensions (approx.) | 8.5 x 5.5 x 2.5 cm |
| Weight (approx.) | 150 g |
| Power Source | USB bus-powered from connected computers |
| Hotkey Sequences | [Scroll Lock] [Scroll Lock] or [Ctrl] [Ctrl] |
| Port Switching Methods | Remote switch button, mouse scroll wheel double-click, hotkeys |
| Supported Operating Systems | Windows Vista/7/8.1/10, Mac OS X or newer, Sun Solaris, Linux, UNIX |
| Mouse Emulation | On by default, can be toggled |
| Keyboard Emulation | On by default, can be toggled for gaming keyboards |
| Mac Keyboard Emulation | Supported via hotkey [F2] |
| Autoscan Interval | Configurable: 3, 5 (default), 10, or 20 seconds |
| Firmware Upgrade | Yes, via USB connection and utility from iogear.com |
| LED Indicators | Green for active port; both flashing during firmware upgrade |
| Compliance | FCC Part 15 Class B |
| Maintenance | Keep dry, clean with a soft dry cloth |
| Spare Parts / Repairability | No user-serviceable parts; contact support for issues |
| Warranty | Limited warranty, terms in manual |
Frequently Asked Questions - GCS62 IOGEAR
User questions about GCS62 IOGEAR
0 question about this device. Answer the ones you know or ask your own.
Ask a new question about this device
Download the instructions for your Network switch in PDF format for free! Find your manual GCS62 - IOGEAR and take your electronic device back in hand. On this page are published all the documents necessary for the use of your device. GCS62 by IOGEAR.
USER MANUAL GCS62 IOGEAR
2-Port Cable KVM Switch with HDMI® Support
GCS2HU/GCS62HU
PART NO. M1130-a
www.iogear.com
© 2023 IOGEAR® Part No. M1130-a
All rights reserved. IOGEAR and the IOGEAR logo are registered trademarks of Aten Technology, Inc. HDMI and related logo are trademarks or registered trademarks of HDMI Licensing Administrator, Inc. (or affiliate) in the United States and other countries. Windows is either a registered trademark or trademark of Microsoft Corporation in the United States and/or other countries. Mac and macOS are a trademark of Apple Inc., registered in the U.S. and other countries. All other trademarks, names, logos and brands are the properties of their respective owners. Reproduction in whole or in part without permission is prohibited.
Table of Contents
Package Contents 4
System Requirements 5
Overview 6
Standard Installation 7
Advanced Installation 9
LED Indication 12
Port Switching 13
Hotkeys Summary Table 14
Hotkeys Summary Table Cont. 15
Autoscan Interval Table 16
Mac Keyboard Emulation 17
Factory Default Settings 18
Firmware Upgrade 19
Upgrade Fail 23
Compliance Information 24
Limited Warranty 25
Contact 26
Package Contents
• 1 x 2-Port Cable KVM Switch with HDMI Support
- 1 x Manual
- 1 x Warranty Card
System Requirements
Console
- 1 x HDMI display
• 1 x Standard 104 Key wired USB keyboard - 1 x Standard 2 or 3 button wired mouse
- Powered speakers and microphone (optional)
Computers
- 1 x HD port
- 2 x USB ports
• 3.5mm audio ports (optional)
Operating System
- Windows Vista ®
- Windows ^® 7
- Windows ^® 8.1
- Windows ^® 10
• Mac OS ^® X or greater
• Sun Solaris workstation - Linux ^® , UNIX and other USB supported systems*
*Additional drivers and support may be needed

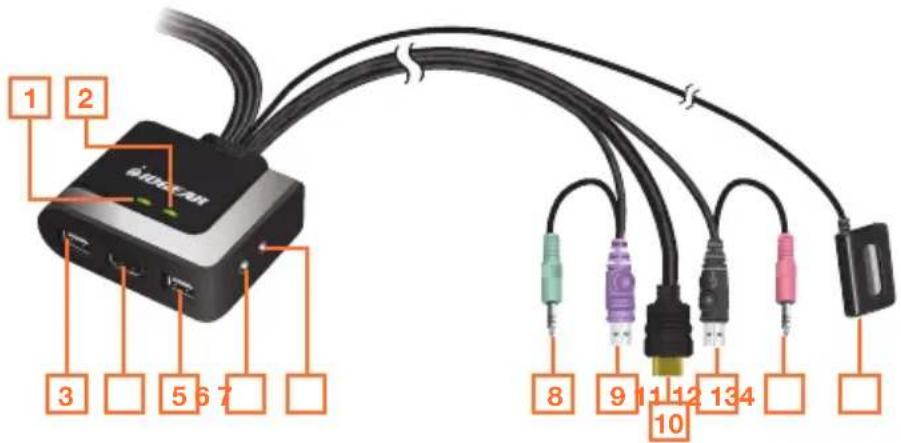
Overview
- PC 1 LED
- PC 2 LED
- Console USB Mouse Port
- Console HD Port
- Console USB Keyboard Port
- Console Speaker Port
-
Console Microphone Port
-
CPU Audio connector
- CPU USB Keyboard connector
- CPU HD connection
- CPU USB Keyboard connector
- CPU Microphone connector
- Remote Switch Button
Standard Installation
Step 1
Please make sure your computers and monitor are powered off before you start.
Step2
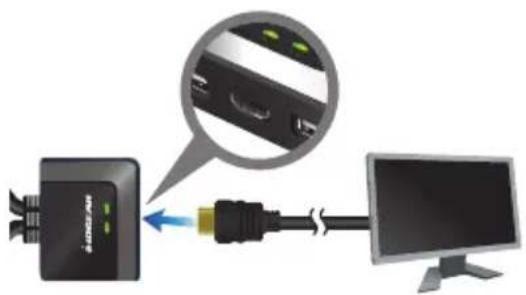
Connect the HD cable from your monitor to the console HD monitor port. Then, turn on the monitor.
Step 3
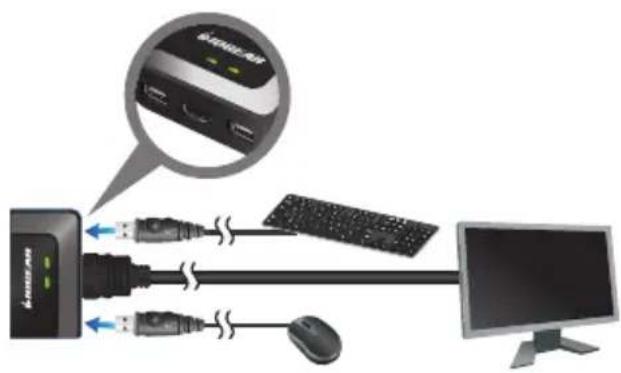
Connect your USB keyboard and mouse to the console USB keyboard port and console USB mouse port.
Step 4
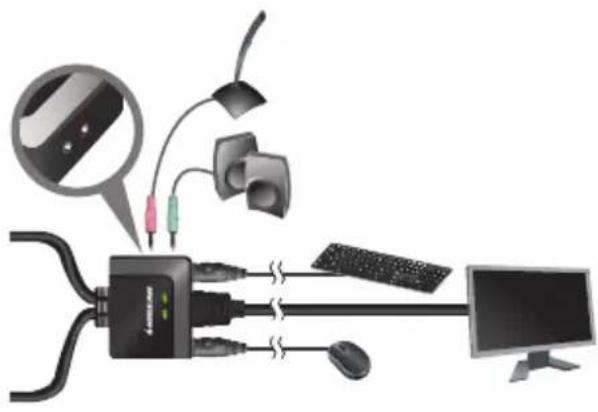
Connect your powered speaker and microphone to the console audio port and console microphone port.
natural_image
Diagram of a computer setup with connected devices including monitor, keyboard, mouse, and cable (no text or labels visible)Step 5
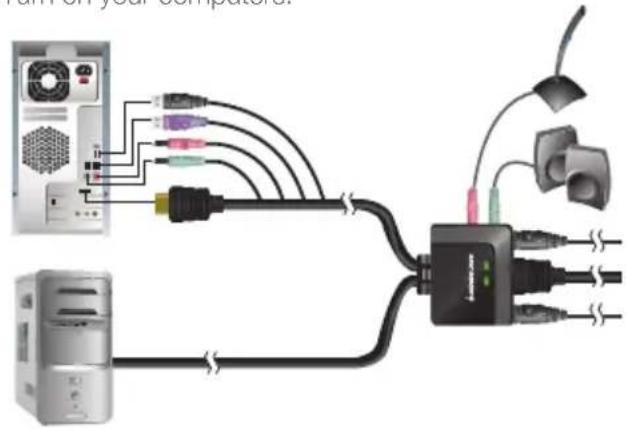
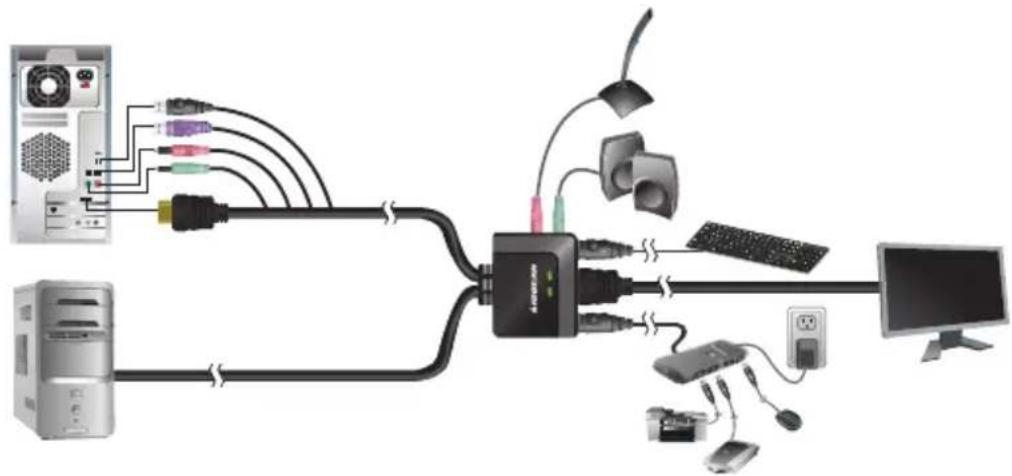
Connect a set of your molded KVM cable to each of your computers – HD cable to the HD output, USB cables to open USB ports from your computer, audio cable to your audio output and mic. cable to the mic. Input.
Final Step
Turn on your computers.
Advanced Installation
Step 1
Please make sure your computers and monitor are powered off before you start.
Step2
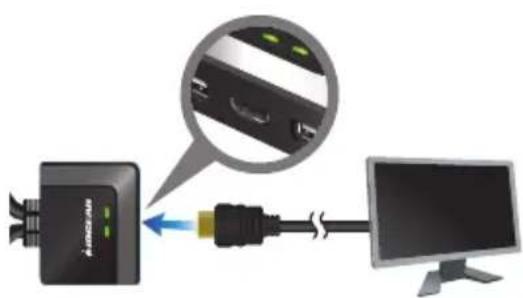
Connect the HD cable from your monitor to the console HD monitor port. Then, turn on the monitor.
Step 3
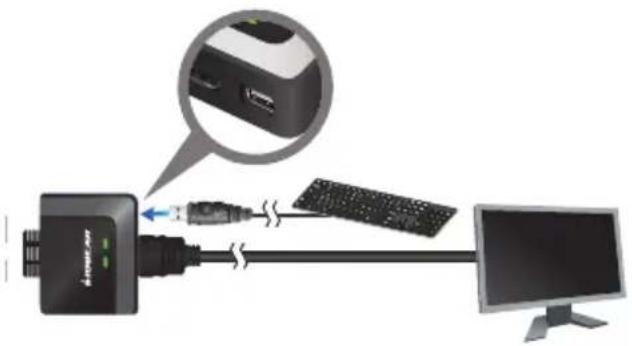
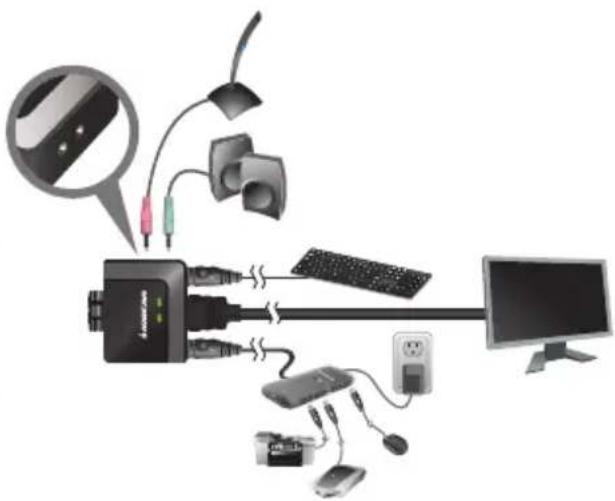
Connect your USB keyboard to the console USB keyboard port.
Step 4
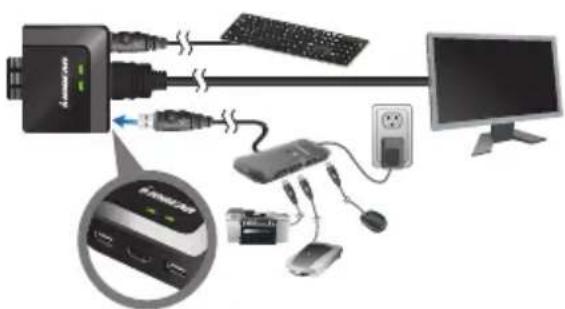
Connect a powered USB hub to the console mouse port, then connect the mouse to any available USB port in the hub. Then, connect any peripherals that you want to share between your computers to the other available USB ports in the hub.
Note: Please make sure mouse emulation has been disabled for this setup to function correctly.
Step 5
Connect your powered speaker and mic. to the console audio port and console mic. port.
natural_image
Diagram of a computer setup with connected devices and a monitor, no visible text or symbolsStep 6
Connect a set of your molded KVM cable to each of your computers – HD cable to the HD output, USB cables to open USB ports from your computer, audio cable to your audio output and mic. cable to the mic. input.
Final Step
Turn on your computers.
flowchart
graph TD
    A["Desktop System"] --> B["Central Device"]
    C["Computer"] --> B
    D["User Interface"] --> B
    E["USB"] --> B
    F["Power"] --> B
    G["External Display"] --> B
    H["Smart Speaker"] --> B
    I["Microcontroller"] --> B
    J["Display Monitor"] --> B
    K["Computer monitor"] --> B
LED Indication
- LED will light up in Green indicating port on focus.
- Both LEDs will be flashing together when the KVM is in Firmware Upgrade Mode.
Port Switching
You can switch port via remote switch button, mouse or hotkey commands.
Port Switching via Remote Switch Button
Simply press the remote switch button once to switch focus to the next port.
Port Switching via Mouse
Simply press scroll wheel button twice rapidly to switch focus to the next port.*
*Note: This feature requires a mouse that has a scroll wheel. Also, this feature can only be used when both Mouse Emulation Mode and Mouse Port-Switching Mode are enabled.
Port Switching via Hotkey Commands
To trigger a Hotkey Mode, simply press [Scroll Lock] [Scroll Lock]. Please refer to Hotkey Summary Table for details.
**Note: If there is a conflict using [Scroll Lock] [Scroll Lock] sequence, you can change to the alternative sequence [Ctrl] [Ctrl] by press and holding the remote switch button for 3 seconds. When you press and hold the remote switch button for 3 second when the sequence is [Ctrl] [Ctrl], it will change the sequence back to [Scroll Lock] [Scroll Lock].
Hotkeys Summary Table
Hotkey combination Description
| [Enter] Switch KVM and audio focus to the next port | ||
| [k] [Enter] Switch KVM focus to the next port | ||
| [s] [Enter] Switch audio focus to the next port | ||
| [a] [Enter] | Activate Autoscan Mode. It will toggle between the two computers every 5 seconds | |
| [Scroll Lock] [Scroll Lock]+ or | [a] [Enter] [n] | Activate Autoscan Mode. It will toggle between the two computers with the specific time depending on the interval [n] that you have input. Please see Autoscan Interval Table for details. |
| [Ctrl] [Ctrl]* + | [x] [Enter] Change hotkey sequence to the alternative sequence | |
| [m] [Enter] Enable/disable mouse emulation | ||
| *Note: If alternative hotkey sequence is chosen | [n] [Enter] | Enable/disable Keyboard emulationNote: Disabling keyboard emulation allows the use of gaming keyboards. |
| [d] [Enter] Capture and store monitor's EDID on specific port | ||
| [w] [Enter] | Enable/disable mouse port-switching functionNote: If you enable this feature when Mouse Emulation Mode is disabled, Mouse Emulation Mode will be enabled automatically | |
| [F2] [Enter] Enable Mac keyboard emulation | ||
Hotkeys Summary Table Cont.
Hotkey combination Description
| [Scroll Lock] [Scroll Lock] + or | [F4] [Enter] | List out current settingsNote: Please have a Notepad or word document opened before you trigger this function. |
| [Ctrl] [Ctrl]* + | [F5] [Enter] Perform a USB keyboard and mouse reset | |
| *Note: If alternative hotkey sequence is chosen | [F6][nn][Enter] | Sets the keyboard language layout.Note: nn is a two digit number that represents one of the following keyboard languages. US English 33; French 08; Japanese 15. |
| [F10] [Enter] Auto detect keyboard operating system | ||
| [r] [Enter] Resets to factory default settings | ||
Autoscan Interval Table
n Description
1 3 seconds
2 5 seconds (default)
3 10 seconds
4 20 seconds
Mac Keyboard Emulation
The PC compatible (101/104 key) keyboard can emulate the functions of the Mac keyboard. The emulation mappings are listed in the table below.
PC Keyboard Mac Keyboard
[Shift] Shift
[Crtl] Ctrl

#
[Ctrl] [1]

[Ctrl] [2]

[Ctrl] [3]

[Ctrl] [4]

[Alt] Alt
[Print Screen] F13
[Scroll Lock] F14

=
[Enter] Return
[Backspace] Delete
[Insert] Help
[Ctrl]

*Note: When using key combinations, press and release the first key (Ctrl), then press and release the second key.
Factory Default Settings
Function Default Setting
Autoscan Interval 5 seconds
Hotkeys [Scroll Lock] [ Scroll Lock]
Keyboard Operating Platform PC compatible
Mouse Emulation On
Mouse Port-Switching Off
Keyboard Emulation On
Firmware Upgrade
Note: In order to perform a firmware upgrade, you need to use a computer that's not connected to the KVM.
Step 1
Go to www.iogear.com to download the latest available firmware or the specific firmware that you wish to upgrade to.
Step 2
Please disconnect all computers from the KVM.
Step 3
Press and hold the remote switch button of the KVM while connecting the 2 USB connections of a set of KVM cable to the computer that you will use to perform the firmware upgrade. When you see the 2 LEDs are flashing on the KVM, you can now release the remote switch button.
Note: The computer that you use to perform the firmware upgrade must be powered on be before you connect the 2 USB connections to it.
Step 4
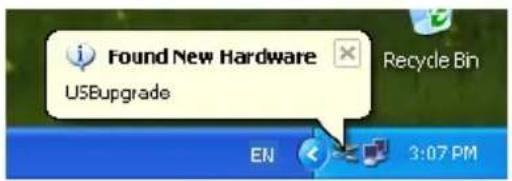
Windows will now install all the required drivers. You may see the below message popup in tray icon area.
Step 5
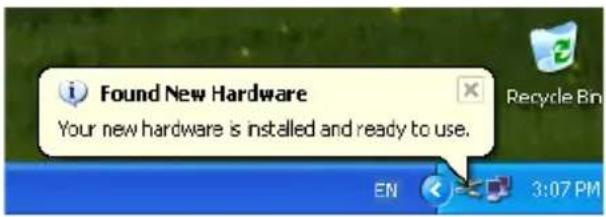
After you see the below message "Your new hardware is installed and ready to use.", extract the downloaded file with WinRAR or compatible software. Then double click on the execute file to begin with the Firmware Upgrade Utility.
Step 6
Read the License Agreement and click "I Agree" then click "Next" if you wish to continue with the firmware upgrade. Otherwise, click "Cancel" to exit.
![Firmware Upgrade Utility Welcome to the Firmware Upgrade Utility. Put your device into Firmware Upgrade Mode. Use the Firmware Upgrade Cable to connect in Firmware Upgrade Port to your computer (or connect via Ethernet). Agreements to the License Agreement, Then Click Next. LICENSE AGREEMENT LICENSE GRANT ATEK International Co., Ltd. ("License") needs to you a non-employee, non-transferable license to access and use FIRMWARE UPGRADE UTILITY (the "Product") during the "Term" set forth below. You may install the Product on a hard disk, other storage device, install and use the Product on a file server for use on a network for the purposes of [3] permanent installation onto hard disk or other storage devices or [2] use of the Product over much networks; and make backup copies of the Product. RESTRICTIONS You agree not to modify, adapt, translate, inverse engineer, recompile, disassemble or otherwise attempt to discover the source code of the Product, or create derivative works based on the Product, or remove any proprietary notices or labels on the Product, including copyright, trademark or patent pending notices. You may not authorize the Product or otherwise allow others to use the Product licensed to you. I Agree I Don't Agree Help About Back Next > Cancel](/content/2026/05/940860/images/007ffa996ca2015debeabdbdfe8f3f2bfca99038ff1c86b61e989c91a09bf7a8.jpg)
Step 7
Choose the correct KVM that you wish to perform firmware upgrade from the "Device List" and then click "Next" to continue. Then the Firmware Upgrade Utility will verify if there is a KVM connected to the computer by the firmware upgrade cable. (Check Firmware Version checkbox is optional)
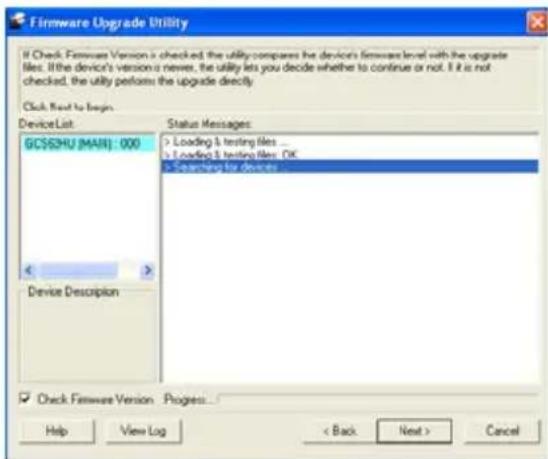
Step 8
If you have checked the "Check Firmware Version" checkbox, then the utility will check the current firmware that is on your KVM. If the current firmware is newer than the firmware that you wish to upgrade to, a window will popup and prompt you to ask if you wish to proceed. Simply click "Yes" to start the upgrade and "No" to cancel the upgrade.
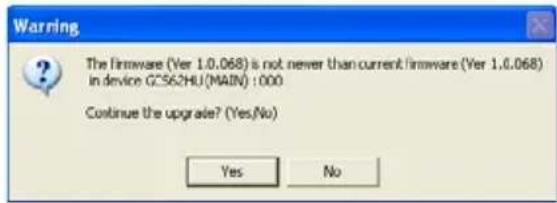
Note: If you did not check the "Check Firmware Version" checkbox, utility will perform the upgrade automatically no matter what version of firmware you have in the KVM.
Step 9
When the firmware upgrade is done, you will see "Firmware upgrade OK" in the "Status Messages" window. Then simply click "Finish" to complete the whole firmware upgrade process.
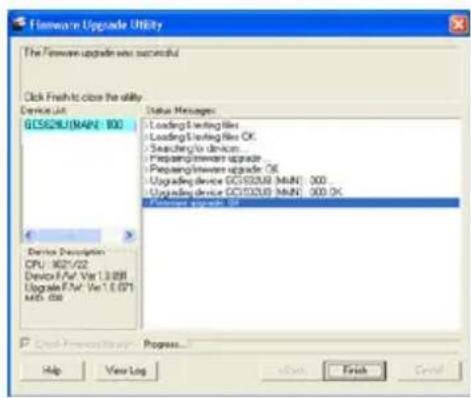
Final Step
Now the KVM will reset by itself and it will be ready for usage after the reset.
Upgrade Fail
Unplug the 2 USB connections from your computer that has performed the firmware upgrade. Then, repeat the firmware upgrade process by following the procedure of Firmware Upgrade section starting from step 3.
Compliance Information
FCC Statement
This equipment has been tested and found to comply with the limits for a Class B digital device, pursuant to Part 15 of the FCC Rules. These limits are designed to provide reasonable protection against harmful interference when the equipment is operated in a commercial environment. This equipment generates, uses, and can radiate radio frequency energy and, if not installed and used in accordance with the instruction manual, may cause harmful interference to radio communications. Operation of this equipment in a residential area is likely to cause harmful interference in which case the user will be required to correct the interference at his own expense.
The device complies with Part 15 of the FCC Rules. Operation is subject to the following two conditions:
(1) this device may not cause harmful interference, and
(2) this device must accept any interference received, including interference that may cause undesired operation.
Limited Warranty
IN NO EVENT SHALL THE DIRECT VENDOR'S LIABILITY FOR DIRECT, INDIRECT, SPECIAL, INCIDENTAL OR CONSEQUENTIAL DAMAGES RESULTING FROM THE USE OF THE PRODUCT, DISK, OR ITS DOCUMENTATION EXCEED THE PRICE PAID FOR THE PRODUCT.
The direct vendor makes no warranty or representation, expressed, implied, or statutory with respect to the contents or use of this documentation, and especially disclaims its quality, performance, merchantability, or fitness for any particular purpose. The direct vendor also reserves the right to revise or update the device or documentation without obligation to notify any individual or entity of such revisions, or updates. For further inquiries please contact IOGEAR.
Contact
WE'RE HERE TO HELP YOU! NEED ASSISTANCE SETTING UP THIS PRODUCT?
Make sure you:
- Visit www.iogear.com for more product information
- Visit www.iogear.com/support for live help and product support
IOGEAR
www.iogear.com iogear.custhelp.com support@iogear.com

natural_image
Solid dark gray rectangular shape with no visible text, symbols, or features.
natural_image
Solid dark gray rectangular shape with no visible text, symbols, or features.
natural_image
Solid dark gray rectangular shape with no visible text, symbols, or features.
IOGEAR®
© 2023 IOGEAR®
- 2-Port Cable KVM Switch with HDMI® Support
- Table of Contents
- Package Contents
- System Requirements
- Console
- Computers
- Operating System
- Overview
- Standard Installation
- Step 1
- Step2
- Step 3
- Step 4
- Step 5
- Final Step
- Advanced Installation
- Step 6
- LED Indication
- Port Switching
- Port Switching via Remote Switch Button
- Port Switching via Mouse
- Port Switching via Hotkey Commands
- Hotkeys Summary Table
- Hotkeys Summary Table Cont.
- Autoscan Interval Table
- Mac Keyboard Emulation
- PC Keyboard Mac Keyboard
- Factory Default Settings
- Function Default Setting
- Firmware Upgrade
- Step 2
- Step 7
- Step 8
- Step 9
- Upgrade Fail
- Compliance Information
- FCC Statement
- Limited Warranty
- Contact
- WE'RE HERE TO HELP YOU! NEED ASSISTANCE SETTING UP THIS PRODUCT?
- IOGEAR®
Brand : IOGEAR
Model : GCS62
Category : Network switch