
GCS632U - Network switch IOGEAR - Free user manual and instructions
Find the device manual for free GCS632U IOGEAR in PDF.


| Product Type | 2-Port USB KVM Switch with Audio |
| Brand | IOGEAR |
| Model | GCS632U |
| Computer Connections | 2 |
| Console Ports | 1 x USB keyboard, 1 x USB mouse, 1 x VGA (HDB-15 female), 1 x Stereo earphone jack |
| KVM Cable Connectors | 2 x USB Type A plug, 2 x VGA (HDB-15 male), 2 x Stereo earphone plug (6 ft / 1.8 m cables) |
| Maximum Video Resolution | 2048 x 1536 @ 32-bit color |
| Video Enhancement | VSE (Video Signal Enhancement) technology |
| Port Selection | Hotkeys (Scroll Lock + Scroll Lock, or Ctrl + Ctrl, or via Hotkey Mode) |
| AutoScan Mode | Yes, with 5-second interval (default) |
| USB Emulation | USB sniffing technology for error-free boot-up |
| Platform Support | Windows, Mac, Sun Solaris (multi-platform keyboard support) |
| Audio Support | Share multimedia speakers between computers (2-piece powered speakers only) |
| Power Source | Self-powered via USB bus; no external power adapter required |
| Operating Temperature | 0°C to 50°C (32°F to 122°F) |
| Storage Temperature | -20°C to 60°C (-4°F to 140°F) |
| Humidity | 0% to 80% RH, non-condensing |
| Dimensions (L x W x H) | 8.1 x 6.9 x 2.6 cm (3.2 x 2.7 x 1.0 in) |
| Weight | 0.38 kg (0.84 lb) |
| Package Contents | KVM switch with built-in cables, user manual, quick start guide, warranty registration card |
| Warranty | 3-Year Limited Warranty |
| Certifications | FCC Class B, CE |
| Additional Features | Plug-n-Play monitor support, no software required, LED status indicators |
Frequently Asked Questions - GCS632U IOGEAR
User questions about GCS632U IOGEAR
0 question about this device. Answer the ones you know or ask your own.
Ask a new question about this device
Download the instructions for your Network switch in PDF format for free! Find your manual GCS632U - IOGEAR and take your electronic device back in hand. On this page are published all the documents necessary for the use of your device. GCS632U by IOGEAR.
USER MANUAL GCS632U IOGEAR
2-Port USB KVM Switch with Audio
GCS632U
PART NO. M0104
Welcome
Thank you for purchasing one of the most feature-rich keyboard, video, and mouse switches on the market. IOGEAR®'s MiniView™ Micro USB PLUS switches are first-rate connectivity accessories designed to help reduce the frustration of managing multiple computer systems. With the MiniView™ Micro USB PLUS by IOGEAR®, you can access two USB computers from a single USB console (USB keyboard, USB mouse and monitor). MiniView™ Micro USB PLUS allows you to change ports easily by entering Hot Key combinations from the keyboard. Setup is fast and easy; plugging cables into their appropriate ports is all that is entailed.
We hope you enjoy using your MiniView™ Micro USB PLUS, yet another fibstrate connectivity solution from IOGEAR®.
Table of Contents
Package Contents 4
Overview 5
Features 6
Requirements 7
Introduction 8
Installation 9
Operation 11
Appendix 27
Specification 28
Technical Support 30
Radio & TV Interference Statement 31
Limited Warranty 32
Federal Communications Commission (FCC) Statement 33
CE Compliance 34
Contact 35
Package Contents
This package contains:
• 1 MiniView™ Micro USB PLUS 2 Port KVM Switch (cables built-in)
• 1 User Manual
• 1 Quick Start Guide
• 1 Warranty Registration Card
If any items are damaged or missing, please contact your dealer.
Overview
Introducing the two port MiniView™ Micro USB PLUS KVM switch from IOGEAR® – A simple solution for those with more PCs than hands. Use one USB keyboard, one monitor and one USB mouse to control two USB computers. This self-powered KVM switch features the unique USB sniffing technology for USB mouse & keyboard emulation to ensure smooth operation, as well as support for Plug-n-Play monitors and most wheel mice. Our patented VSE Video Signal Enhancement® technology provides rich, 32-bit color at resolutions up to 2048 x 1536.
Another big plus of this switch is the capability to provide audio support, it allows you to share your multimedia speakers among the two connected computers.
This switch also offers multi-platform support, it is compatible with Macs and Sun Solaris workstations. IOGEAR® made a huge breakthrough in supporting Mac and Sun, by allowing Mac and Sun special keys to be functional, either with the Mac or Sun keyboard as the console keyboard, or with a standard PC keyboard. When use a PC keyboard, a special set of hot keys are designated to emulate the Mac and Sun special keys.
With KVM cables (6' long) molded into the unit, all you need to do is to plug it into your computers, and you've got a complete KVM solution from IOGEAR®.
Features
• Use one USB keyboard, monitor and USB mouse to control two USB computers.
- 6' long molded-in cables to simplify setup.
- Share your multimedia speakers among the two connected computers.
• Full support for Mac and Sun systems.
• Supports special keys on Mac and Sun keyboards.
• Port selection through convenient Hot Keys.
• USB sniffing technology allows complete USB mouse and keyboard emulation for error-free boot-up.
• Plug-n-Play monitor support.
• Support video resolutions up to 2048 x 1536
• No software required.
• Built in AutoScan mode.
• LEDs allow for easy status monitoring.
• 3 Year Limited Warranty.
Requirements
Console
- A VGA, SVGA, or Multisync monitor capable of the highest resolution that you will be using on any computer in the installation
• A USB Keyboard - A USB Mouse
Computers
The following equipment must be installed on each computer that is to be connected to the system:
• A VGA, SVGA or Multisync card
• A USB type A port Requirements
• A multimedia sound card for audio sharing
Audio
• Only 2-piece, powered speakers system supported
Introduction
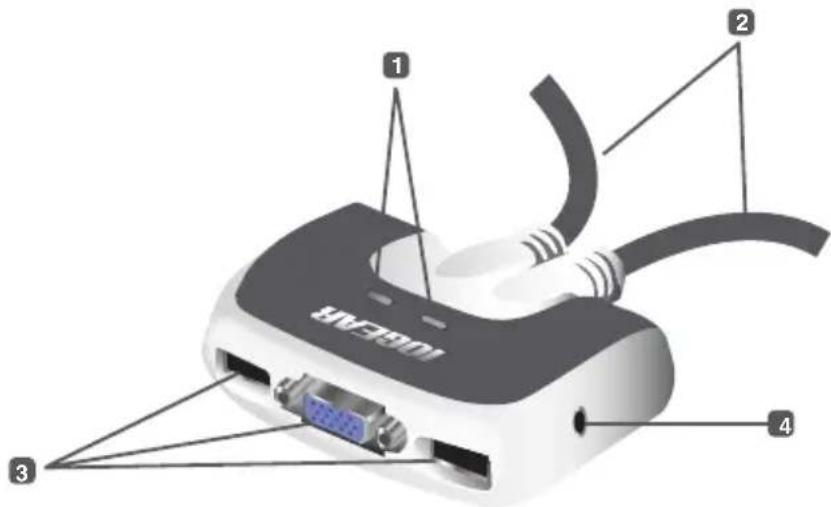
- Port LEDs (Refer to Appendix for LED indications)
- KVM Cables
- Console Ports
- Speaker Jack
Installation
Step. 1
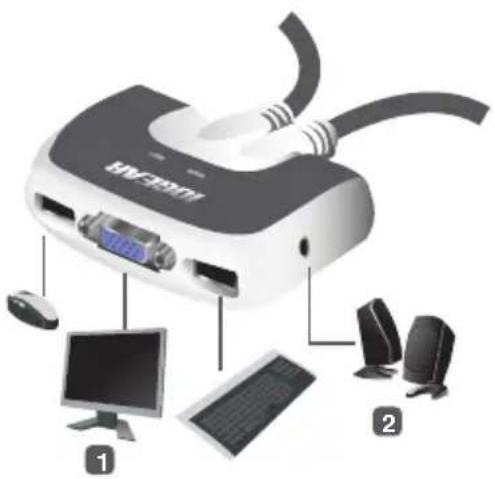
Before you begin, make sure that the power to all the devices you will be connecting up have been turned off.
NOTE: To prevent damage to your installation due to ground potential difference, make sure that all devices on the installation are properly grounded.
-
Plug your keyboard, monitor, mouse, into their respective ports on the GCS632U. The keyboard and mouse ports are labeled with an icon, located at the bottom of the switch, to indicate which is which.
-
Plug your speakers into the speakerjack on the GCS632U.
NOTE: 2-piece powered speakers only
Step. 2
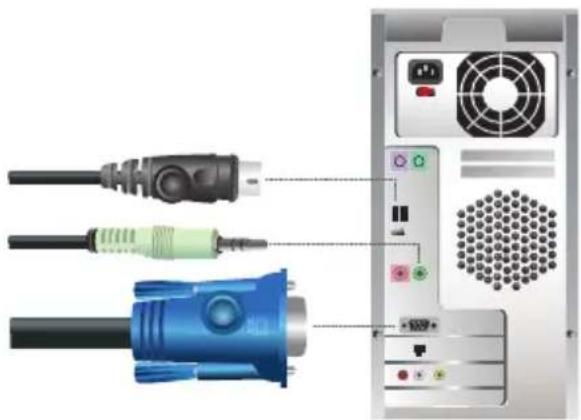
- Plug the USB, video, and speaker connectors of the attached KVM cables into their respective ports on the computers you are installing.
NOTE: The computer attached to the cable with one dot at its base is the Port 1 computer; the computer attached to the cable with two dots at its base is the Port 2 computer (see hotkey port selection).
- Repeat the above step for your second computer.
- Turn on the power to the computers and refer to Operations Instructions.
NOTE: The GCS632U's Power On default is to link to the first computer you turn on.
natural_image
Diagram showing connections between a computer tower, two USB cables, and a connected interface panel (no text or symbols visible)Operation
Hotkey Operation
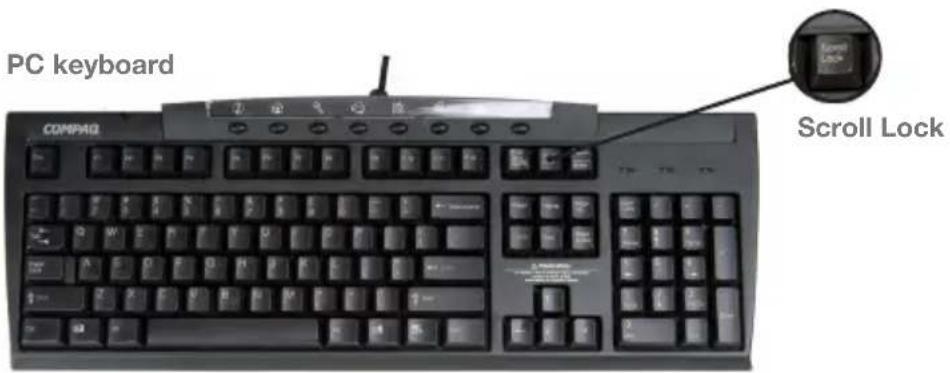
The hotkey operations of the KVM assume the use of a PC-Compatible keyboard with the Scroll Lock key. If you are using a Mac Keyboard (or a keyboard that does not have Scroll Lock
key), refer to the section in the manual "Alternate Port Switching Keys" for information on re-configuring the KVM's hotkeys, and page 15 for Mac keyboard operation.
Port Switching
To toggle between the two computers, quickly tap the Scroll Lock key twice:
[Scroll Lock], [Scroll Lock]
NOTE 1: Please make sure the keyboard is plugged into the keyboard port on the KVM; otherwise the hotkeys will not work. Keyboard and mouse ports are labeled on the bottom side of the KVM with a small picture of a keyboard and mouse.
NOTE 2: You can change this hotkey to [ctrl] [ctrl].
Hotkey Setting Mode (HSM)
For all Hotkey operations, you must use the number keypad on the right side of your keyboard
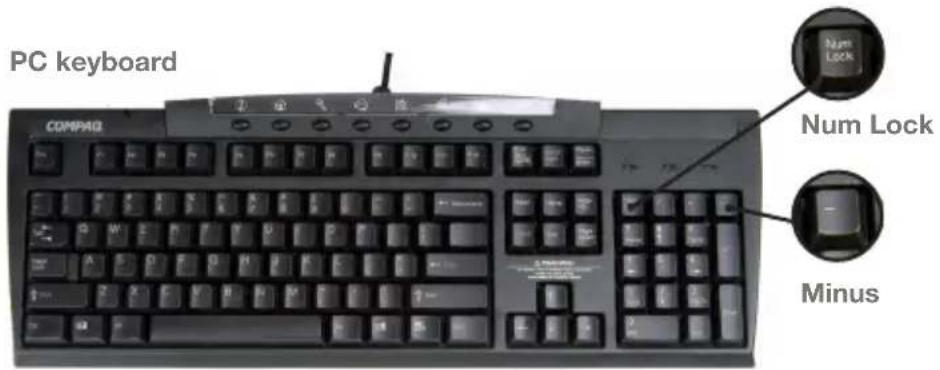
To Invoke Hotkey Mode (PC-Compatible Keyboard):
-
Press and hold down Num Lock key
-
While holding down Num Lock key, also press down Minus key (-) for one second
-
Release minus key and within one second, release Num Lock key
The KVM will now enter Hotkey mode, and the Caps Lock and Scroll Lock LEDs flash in succession to indicate this. On PC-Compatible keyboards this LED is usually located on top right-hand corner.
If the KVM did not enter Hotkey mode, repeat the above procedure keeping in mind that this procedure must be done quickly and in the time-frame indicated.
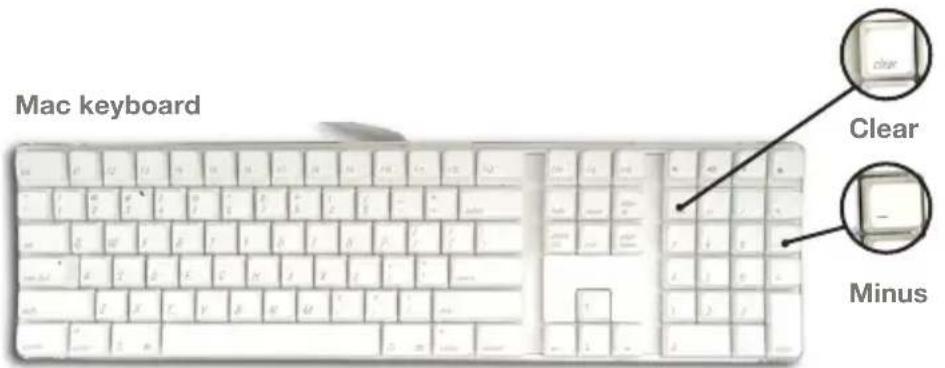
To Invoke Hotkey Mode (Mac Keyboard):
- Press and hold Clear key for two seconds
- Press and hold Minus key [-] key for one second
- Release Minus key [−] and within one second also release Clear key
The KVM will now enter Hotkey mode; indicated by blinking of the Caps Locks LED. On some Mac keyboards, this LED is on the Caps Lock key itself.
If the KVM did not enter Hotkey mode, repeat the above procedure keeping in mind that this procedure must be done quickly and in the time-frame indicated.
NOTE:
If using the Num Lock and Minus key to invoke Hotkey function is not optimal, refer to the next page for instructions on changing the hotkey invocation keys.
When Hotkey Mode is active, ordinary keyboard and mouse functions are suspended – only Hotkey compliant keystrokes can be input. At the conclusion of some hotkey operations, you automatically exit Hotkey mode. With some operations, you must exit manually by pressing the Esc or Spacebar on your keyboard.
Switching Ports
You may also switch ports on the KVM by doing the following:
- Invoke Hotkey Mode
- Press and release the computer's port number (1 or 2)
- Press [Enter]
The KVM focus switches to the specified port and automatically exits Hotkey mode
Auto Scan Mode
You may also switch ports on the KVM by doing the following:
- Invoke Hotkey Mode
- Press and release the [A] key
Once scanning begins, it continues until you press the [Esc] or [Spacebar] to exit.
NOTE: While Auto Scan mode is in effect, ordinary keyboard and mouse functions are suspended.
Alternate Hotkey Invocation Keys
In case the default Hotkey Mode invocation keys (Num Lock and Minus) are not optimal in your setup, you may change them to Ctrl and F12, respectively.
To switch the Hotkey Invocation Keys, do the following:
- Invoke Hotkey Mode
- Press and release H
- This will change the Hotkey Invocation key to Ctrl and F12 (instead of Num Lock and Minus).
NOTE: This procedure is a toggle between the two methods. To revert back to the original HSM invocation keys, repeat the above procedure.
Alternate Port Switching Keys
The port switching keys can be changed from tapping Scroll Lock key twice, to tapping Ctrl key twice.
If you have a MAC keyboard (or a keyboard that does not have Scroll Lock key), change the port switching keys by doing the following:
- Invoke Hotkey Mode
- Press and release T
The port switching key will now be the Ctrl key. To switch between computers, simply tap the Ctrl key twice: [Ctrl], [Ctrl]
NOTE: This procedure is a toggle between the two methods. To revert back to the original port switching keys, repeat the above procedure.
Restore Defaults
To restore the GCS632U to its factory default settings, do the following:
- Invoke Hotkey Mode
- Press and release [R] key.
- Press [Enter]
The GCS632U's factory default settings are as follows:
Hotkey Invocation [Num Lock] [-]
Port Switching [Scroll Lock] [Scroll Lock]
Keyboard Platform [Auto]
Keyboard Language [English]
Multi Platform (Mac, Sun, Win) and Multi Language Setup
The default port settings are for a Windows Compatible operating platform, and US English keyboard language code (Refer to the previous section).
Some multi platform operations require you to change the Keyboard platform in order to fully support all the functions under that particular platform. Once the appropriate Keyboard Platform is set, such as Mac or Sun, you will be able to use all the special keys on these special platform keyboards (Mac and Sun).
Following is a matrix table showing the required Keyboard Platform under various multi platform operations:
| Operation Keyboard | Platform |
| Using a PC keyboard to control a Window based PC | Auto |
| Using a Mac keyboard to control a Mac | Auto |
| Using a Sun keyboard to control a Solaris based Sun | Auto |
| Using a PC keyboard to control a Mac | Mac |
| Using a PC keyboard to control a Solaris based Sun | Sun |
Keyboard Operating Platform
The GCS632U default configuration is for a PC-Compatible keyboard operating platform.
To change the keyboard operating platform, do the following:
Function Key Operation
[F2] Sets the MAC keyboard operating platform
[F3] Sets the Sun keyboard operating platform
[F10] Auto detects the keyboard operating platform (PC - Compatible systems only)
- Bring the KVM focus to the desired port
- Invoke Hotkey Mode
- Press and release the appropriate function key (see table):
Keyboard Language
Language Code
US English 33
French 08
Japanese 15
After completing a setting, you automatically exit Hotkey Mode.
Using a PC keyboard to emulate a Sun Keyboard
After you set up the appropriate Keyboard Platform, you will be able to use a PC (101/104) key keyboard to emulate the functions of the Sun keyboard when the Control key [Ctrl] is used in conjunction with other keys. The corresponding functions are shown in the table to the right.
NOTE: When using [Ctrl] combinations, press and release the [Ctrl] key, then press and release the activation key.
Windows Keyboard Sun Keyboard
[Ctrl] [T] Stop
[Ctrl] [F2] Again
[Ctrl] [F3] Props
[Ctrl] [F4] Undo
[Ctrl] [F5] Front
[Ctrl] [F6] Copy
[Ctrl] [F7] Open
[Ctrl] [F8] Paste
Windows Keyboard Sun Keyboard
[Ctrl] [F9] Find
[Ctrl] [F10] Cut
[Ctrl] [1]

[Ctrl] [2]

[Ctrl] [3]

[Ctrl] [4]

[Ctrl] [H] Help
Using a PC keyboard to emulate a Mac Keyboard
After you set up the appropriate Keyboard Platform, you will be able to use a PC (101/104) key keyboard to emulate the functions of the Mac keyboard. The corresponding functions are shown in the table to the right.
NOTE: When using key combinations, press and release the first key [Ctrl] or [Alt]), then press and release the activation key.
Windows Keyboard Mac Keyboard
| [Shift] Shift |
| [Control] Ctrl |
| [Win] | # |
| [Ctrl] [1] |
| [Ctrl] [2] |
| [Ctrl] [3] |
| [Ctrl] [4] | ▲ |
PC Keyboard Mac Keyboard
| [Alt] L Alt/Option |
| [Prt_Sc] F13 |
| [Scroll Lock] F14 |
| [Desktop Menu] = |
| [Enter] Return |
| [Ins] Help |
| [Ctrl] [Win] F 15 |
List Hotkey Settings
To see a list of the current hotkey settings, do the following:
- Open a text editor (such as Notepad, Textedit, or Word)
- Invoke Hotkey Mode
- Press F4 to 'paste' the KVM configuration on your text editor
USB Reset
If the USB loses focus and needs to be reset, do the following:
- Invoke Hotkey Mode
- Press and release F5 function key
Appendix
LED Display Table
Activity Indication
Off Port is not selected
On (Steady) Port is connected to an active computer
Flashing (On and Off Equal) Port is connected to an active computer and is being accessed in Auto Scan Mode
Specification
| Function Specification | ||
| Computer Connection 2 | ||
| Port Selection Hot Keys | ||
| LEDs Selected 2 | ||
| Console Connectors | Keyboard 1 x Type A USB port | |
| Mouse 1 x Type A USB port | ||
| Video 1 x HDB-15 female | ||
| Audio 1 x Stereo earphone jack | ||
| KVM Cable Connectors | Keyboard & Mouse 1 x Type A USB plug | |
| Video 1 x HDB-15 male | ||
| Audio 1 x Stereo earphone plug | ||
| Scan Interval 5 Seconds (Default) | ||
| Operating Temperature 0 - 50°C | ||
| Storage Temperature -20 - 60°C | ||
| Humidity 0 - 80% RH Noncondensing | ||
| Housing Plastic | ||
| Weight 0.38 kg | ||
| Dimensions (L x W x H) 8.1 x 6.9 x 2.6 cm | ||
Technical Support
If you need technical support, please check out our IOGEAR Tech Info Library (T.I.L.) at www.iogear.com/support for the latest tips, tricks, and troubleshooting. The IOGEAR T.I.L. was designed to provide you with the latest technical information about our products. Most of the answers to your questions can be found here, so please try it out before contacting technical support.
WARNING!!! This equipment generates, uses and can radiate radio frequency energy and, if not installed and used in accordance with the instruction manual, may cause interference to radio communications. This equipment has been tested and found to comply with the limits for a Class B computing device pursuant to Subpart J of Part 15 of FCC Rules, which are designed to provide reasonable protection against such interference when operated in a commercial environment. Operation of this equipment in a residential area is likely to cause interference, in which case the user at his own expense will be required to take whatever measures may be required to correct the interference.
Limited Warranty
WE'RE HERE TO HELP YOU!
NEED ASSISTANCE SETTING UP THIS PRODUCT?
Make sure you:
- Visit www.iogear.com for more product information
- Visit www.iogear.com/support for live help and product support
Warranty Information
This product carries a 3 Year Limited Warranty. For the terms and conditions of this warranty, please go to http://www.iogear.com/support/warranty
Register online at http://www.iogear.com/register
Important Product Information
Product Model ____
Serial Number ____
Federal Communications Commission (FCC) Statement
This equipment has been tested and found to comply with the limits for a Class B digital device, pursuant to Part 15 of the FCC Rules. These limits are designed to provide reasonable protection against harmful interference in a residential setting. This product generates, uses, and can radiate radio frequency energy and, if not installed and used as directed, it may cause harmful interference to radio communications. Although this product complies with the limits for a Class B digital device, there is no guarantee that interference will not occur in a particular installation.
CE Compliance
This device has been tested and found to comply with the following European Union directives: Electromagnetic Capability (89/336/EMC), Low Voltage (73/23/EEC) and R&TTED (1999/5/EC).
Contact
IOGEAR
Toll Free 866-9-IOGEAR (USA)
Phone: 949-453-8782
19641 Da Vinci, Foothill Ranch, CA92610
www.iogear.com
support@iogear.com
© 2012 IOGEAR®. All Rights reserved. Part No. M0104.
IOGEAR and the IOGEAR logo are trademarks or registered trademarks of IOGEAR, Inc. Microsoft and Windows are registered trademarks of Microsoft Corporation. IBM is a registered trademark of International Business Machines, Inc. IOGEAR makes no warranty of any kind with regards to the information presented in this document. All information furnished here is for informational purposes only and is subject to change without notice. IOGEAR assumes no responsibility for any inaccuracies or errors that may appear in this document.
About Us

FUN
IOGEAR offers connectivity solutions that are innovative, fun, and stylish, helping people enjoy daily life using our high technology products.

GREEN
IOGEAR is an environmentally conscious company that emphasizes the importance of conserving natural resources. The use of our technology solutions helps reduce electronic waste.
- Welcome
- Table of Contents
- Package Contents
- This package contains:
- Overview
- Features
- Requirements
- Console
- Computers
- Audio
- Introduction
- Installation
- Step. 1
- Step. 2
- Operation
- Hotkey Operation
- Port Switching
- Hotkey Setting Mode (HSM)
- To Invoke Hotkey Mode (Mac Keyboard):
- NOTE:
- Switching Ports
- Auto Scan Mode
- Alternate Hotkey Invocation Keys
- Alternate Port Switching Keys
- Restore Defaults
- Multi Platform (Mac, Sun, Win) and Multi Language Setup
- Keyboard Operating Platform
- Function Key Operation
- Language Code
- Using a PC keyboard to emulate a Sun Keyboard
- Using a PC keyboard to emulate a Mac Keyboard
- List Hotkey Settings
- USB Reset
- Appendix
- LED Display Table
- Activity Indication
- Specification
- Technical Support
- Limited Warranty
- WE'RE HERE TO HELP YOU!
- NEED ASSISTANCE SETTING UP THIS PRODUCT?
- Federal Communications Commission (FCC) Statement
- CE Compliance
- Contact
- IOGEAR
- About Us
- FUN
- GREEN
Brand : IOGEAR
Model : GCS632U
Category : Network switch