
T859M6OBC - Heat pump AEG - Free user manual and instructions
Find the device manual for free T859M6OBC AEG in PDF.


| Product Type | Heat Pump Tumble Dryer |
| Brand | AEG |
| Model | T859M6OBC |
| Energy Efficiency Class | A+++ |
| Annual Energy Consumption | 235 kWh |
| Capacity (Cotton) | 8 kg |
| Installation Type | Freestanding |
| Noise Level | 65 dB(A) |
| Dimensions (H x W x D) | 850 x 596 x 638 mm |
| Weight | 50 kg |
| Power Consumption | 900 W |
| Drying Programs | Cotton, Synthetics, Delicates, Wool, Mix, Quick 30 min, Anti-Allergy, Refresh |
| Heat Pump Technology | Yes |
| Sensor Drying | Yes |
| Anti-Crease Function | Yes, 120 min |
| Reverse Tumble | Yes |
| Delay Start | Up to 24 hours |
| Display | LED |
| Child Lock | Yes |
| Drum Light | Yes |
| Condenser Cleaning Indicator | Yes |
| Spare Parts Availability | 10 years |
| Warranty | 2 years |
| Maintenance | Clean lint filter after each cycle; clean condenser every 6 months |
Frequently Asked Questions - T859M6OBC AEG
User questions about T859M6OBC AEG
0 question about this device. Answer the ones you know or ask your own.
Ask a new question about this device
Download the instructions for your Heat pump in PDF format for free! Find your manual T859M6OBC - AEG and take your electronic device back in hand. On this page are published all the documents necessary for the use of your device. T859M6OBC by AEG.
USER MANUAL T859M6OBC AEG
natural_image
Simple line drawing of a washing machine with signal waves (no text or symbols)CONTENTS
- SAFETY INFORMATION......3
- CONDITIONS OF USE....7
- SAFETY INSTRUCTIONS....7
- PRODUCT DESCRIPTION....9
- CONTROL PANEL....10
- Wi-Fi - CONNECTIVITY SETUP 11
7.PROGRAMS 14 - OPTIONS....17
- BEFORE FIRST USE....19
- DAILY USE....21
- HINTS AND TIPS....24
- CARE AND CLEANING....26
- TROUBLESHOOTING....29
- TECHNICAL DATA....32
- WARRANTY - AUSTRALIA AND NEW ZEALAND....33
- ENVIRONMENTAL CONCERNS....35
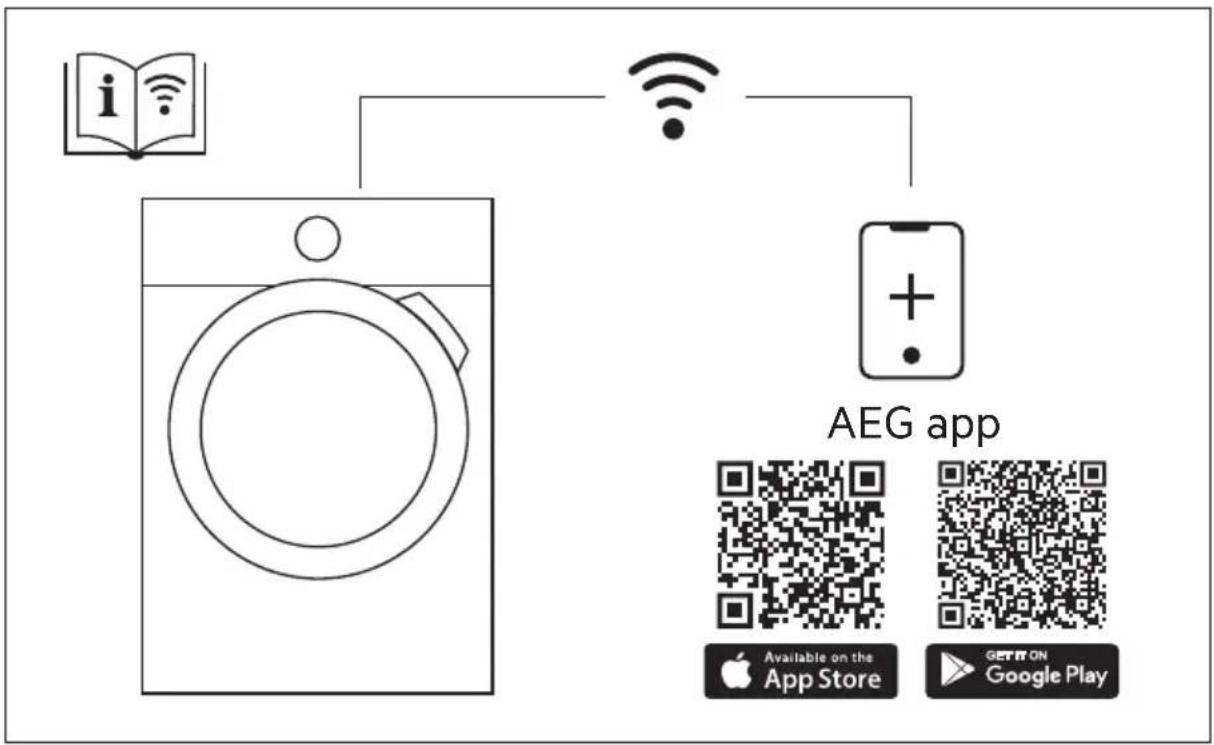
flowchart
graph TD
    A[" washing machine"] -->|Wireless network| B["AEG app"]
    B --> C["App Store: Apple App Store"]
    B --> D["Google Play: Google Play"]
IMPORTANT INFORMATION THAT MAY IMPACT YOUR MANUFACTURER'S WARRANTY
Adherence to the directions for use in this manual is extremely important for health and safety. Failure to strictly adhere to the requirements in this manual may result in personal injury, property damage and affect your ability to make a claim under the AEG manufacturer's warranty provided with your product. Products must be used, installed and operated in accordance with this manual. You may not be able to claim on the AEG manufacturer's warranty in the event that your product fault is due to failure to adhere to this manual.
FOR PERFECT RESULTS
Thank you for choosing this AEG product. We have created it to give you impeccable performance for many years, with innovative technologies that help make life simpler features you might not find on ordinary appliances. Please spend a few minutes reading to get the very best from it.
Visit our website for:

Get usage advice, brochures, trouble shooter, service information: www.aeg.com

Register your product for better service: www.registeraeg.com

Buy Accessories, Consumables and Original spare parts for your appliance: www.aeg.com/shop
CUSTOMER CARE AND SERVICE
Always use original spare parts.
When contacting our Authorised Service Centre, ensure that you have the following data available: Model, PNC, Serial Number.
The information can be found on the rating plate.
⚠ Warning / Caution-Safety information
i General information and tips
Environmental information
Subject to change without notice.
1. ⚠ SAFETY INFORMATION
Before the installation and use of the appliance, carefully read the supplied instructions. The manufacturer is not responsible if an incorrect installation and use causes injuries and damage. Always keep the instructions with the appliance for future reference.

- Read the supplied instructions.

Warning: Risk of fire / Flammable materials.
The appliance contains flammable gas, propane (R290), a gas with a high level of environmental compatibility. Keep fire and ignition sources away from the appliance. Be careful not to cause damage to the refrigerant circuit containing propane.
1.1 Children and vulnerable people safety

WARNING!
Risk of suffocation, injury or permanent disability.
- This appliance can be used by children aged from 8 years and above and persons with reduced physical, sensory or mental capabilities or lack of experience and knowledge if they have been given supervision or instruction concerning the use of the appliance in a safe way and understand the hazards involved.
- Children between 3 and 8 years of age and persons with very extensive and complex disabilities shall be kept away from the appliance unless continuously supervised.
- Children of less than 3 years of age should be kept away from the appliance unless continuously supervised.
- Do not let children play with the appliance.
- Keep all packaging away from children and dispose of it appropriately.
- Keep detergents away from children.
- Keep children and pets away from the appliance when the door is open.
- If the appliance has a child safety device, it should be activated.
- Children shall not carry out cleaning and user maintenance of the appliance without supervision.
1.2 General Safety
- Do not change the specification of this appliance.
- If the tumble dryer is put on top of a washing machine, use the stacking kit. The stacking kit, available from your authorized vendor, can be used only with the appliance specified in the instructions supplied with the accessory. Read it carefully before installation (refer to the Installation leaflet).
- The appliance can be installed as freestanding or below a kitchen counter with correct space (refer to the Installation leaflet).
- Do not install the appliance behind a lockable door, a sliding door or a door with a hinge on the opposite side, that would prevent the appliance door from being fully open.
- The ventilation opening in the base must not be covered by a carpet, mat, or any floor covering.
- WARNING: The appliance must not be supplied through an external switching device, such as a timer, or connected to a circuit that is regularly switched on and off by a utility.
- Connect the mains plug to the mains socket only at the end of the installation process. Make sure that the mains plug is accessible after installation.
- Ensure good air ventilation in the room where the appliance is installed to avoid the backflow of unwanted gases into the room from appliances burning gas or other fuels, including open fires.
- WARNING: Do not install the appliance in an environment with no air exchange.
The appliance contains flammable gas, propane (R290), a gas with a high level of environmental compatibility. Keep fire and ignition sources away from the appliance. Be careful not to cause damage to the refrigerant circuit containing propane. - WARNING: In the appliance enclosure or in the built - in structure, keep ventilation opening clear of obstruction.
-
WARNING: Do not damage the refrigerant circuit.
-
If the mains power supply cable is damaged, it must be replaced by the manufacturer, its Authorised Service Centre or similarly qualified persons to avoid an electrical hazard.
- Do not exceed the maximum load of 9.0 kg (refer to the "Programme chart" chapter).
- Do not use the appliance if items have been soiled with industrial chemicals.
- Wipe away lint or packaging debris that has accumulated around the appliance.
- Do not run the appliance without a filter. Clean the lint filter before or after each use.
- Do not dry unwashed items in the tumble dryer.
- Items that have been soiled with substances such as cooking oil, acetone, alcohol, petrol, kerosene, spot removers, turpentine, waxes and wax removers should be washed in hot water with an extra amount of detergent before being dried in the tumble dryer.
- Items such as foam rubber (latex foam), shower caps, waterproof textiles, rubber backed articles and clothes or pillows fitted with foam rubber pads should not be dried in the tumble dryer.
- Fabric softeners, or similar products, should only be used as specified by the product manufacturer's instructions.
- Oil-affected items can ignite spontaneously, especially when exposed to heat sources such as in a tumble dryer. The items become warm, causing an oxidation reaction in the oil. Oxidation creates heat. If the heat cannot escape, the items can become hot enough to catch fire. Piling, stacking or storing oil-affected items can prevent heat from escaping and create a fire hazard.
-
If it is unavoidable that fabrics that contain vegetable or cooking oil or have been contaminated by hair care products be placed in a tumble dryer they should first be washed in hot water with extra detergent -this will reduce, but not eliminate, the hazard.
-
Remove all objects from items that could be a source of fire ignition such as lighters or matches.
- WARNING: Never stop a tumble dryer before the end of the drying cycle unless all items are quickly removed and spread out so that the heat is dissipated.
- Before any maintenance operation, deactivate the appliance and disconnect the mains plug from the socket.
2. CONDITIONS OF USE
This appliance is intended to be used in household and similar applications such as:
- farm houses;
- by clients in hotels, motels, bed & breakfast and other residential type environments;
- areas for communal use in blocks of flats or in launderettes.
3. SAFETY INSTRUCTIONS
3.1 Installation

Warning: Risk of fire / Flammable als.
- Remove all the packaging.
- Do not install or use a damaged appliance.
- Follow the installation instructions supplied with the appliance.
- Do not install the appliance in an environment with no air exchange The appliance contains flammable gas, propane (R290), a gas with a high level of environmental compatibility. Keep fire and ignition sources away from the appliance. Be careful not to cause damage to the refrigerant circuit containing propane.
• Always take care when moving the appliance as it is heavy. Always use safety gloves and enclosed footwear. - Do not install or use the appliance where the temperature can be lower than 5°C or higher than 35°C.
-
The floor area on which the appliance is to be installed must be flat, stable, heat resistant and clean.
-
Make sure that there is air circulation between the appliance and the floor.
• Always keep the appliance vertical when it is being moved. - The rear surface of the appliance must be put against a wall.
- When the appliance is in its permanent position, check if it is levelled correctly with the aid of a spirit level. If it is not, adjust the feet accordingly.
3.2 Electrical connection

WARNING!
Risk of fire and electric shock.
- Connect the mains plug to the mains socket only at the end of the installation. Make sure that there is access to the mains plug after the installation.
- WARNING: This appliance is designed to be installed / connected to a grounding connection in the building.
- Make sure that the parameters on the rating plate are compatible with the
electrical ratings of the mains power supply.
• Always use a correctly installed shockproof socket.
- Do not use multi-plug adapters and extension cables.
- Do not pull the mains cable to disconnect the appliance. Always pull the mains plug.
- Do not touch the mains cable or the mains plug with wet hands.
3.3 Use

WARNING!
Risk of injury, electric shock, fire, burns or damage to the appliance.

Warning: Risk of fire / Flammable materials. The appliance contains flammable gas, propane (R290), a ga with a high level of environmental compatibility. Keep fire and ignition sources away from the appliance. Be careful not to cause damage to the refrigerant circuit containing propane.
- This appliance is for household (indoors) use only.
- Do not dry damaged (torn, frayed) items that contain padding or fillings.
- If laundry has been washed with a stain remover, carry out an additional rinse cycle before starting a drying cycle.
- Dry only fabrics that are suitable to dry in the appliance. Follow the cleaning instruction on the item label.
- Do not drink or prepare food with the condensed water/distilled water. It can cause health problems to people and pets.
- Do not sit or stand on the open door of the appliance.
- Do not dry dripping wet clothes in the appliance.
3.4 Internal lighting

WARNING!
Risk of injury.
• Visible LED radiation, do not look directly into the beam.
• To replace the internal lighting, contact the Authorised Service Centre.
3.5 Care and cleaning

WARNING!
Risk of injury or damage to the appliance.

Warning: Risk of fire / Flammable materials. The appliance contains flammable gas, propane (R290), a gas with a high level of environmental compatibility. Keep fire and ignition sources away from the appliance. Be careful not to cause damage to the refrigerant circuit containing propane.
- Do not use water spray and steam to clean the appliance.
- Clean the appliance with a moist soft cloth. Use only neutral detergents. Do not use abrasive products, abrasive cleaning pads, solvents or metal objects.
- Be careful when you clean the appliance to prevent damage to the cooling system.
3.6 Compressor

WARNING!
Risk of damage to the appliance.
- The compressor and its system in the tumble dryer is filled with a special agent which is free from fluoro-chlorohydrocarbons. This system must stay tight. The damage of the system can cause a leakage.
3.7 Service
• To repair the appliance contact the Authorised Service Centre.
- Use original spare parts only.
3.8 Disposal

WARNING!
Risk of injury or suffocation.

Warning: Risk of fire / Risk of damage and damage to the time.
- Disconnect the appliance from the mains electrical and water supplies.
- Cut off the mains electrical cable close to the appliance and dispose of it.
• The appliance contains flammable gas (R290). Contact your municipal
authority for information on how to discard the appliance correctly.
- Remove the door catch to prevent children or pets from becoming trapped in the drum.
- Dispose of the appliance in accordance with local requirements for the disposal of Waste Electrical and Electronic Equipment (WEEE).
4. PRODUCT DESCRIPTION
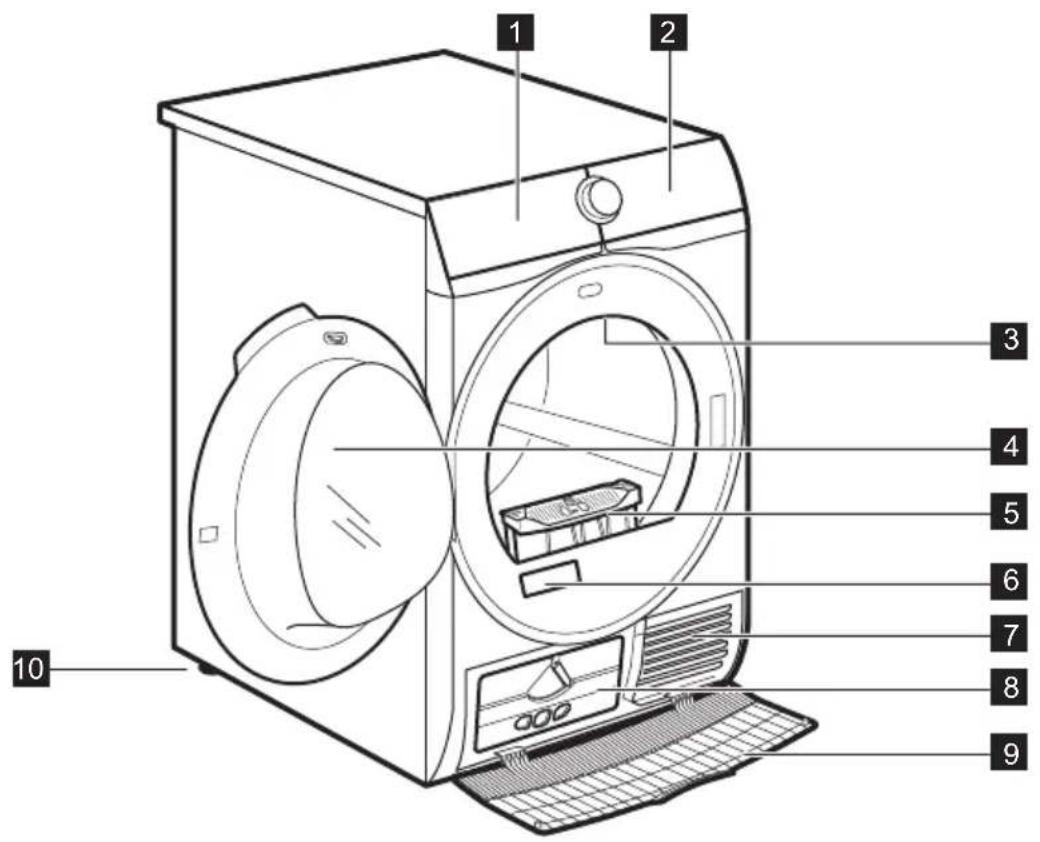
1 Water container
2 Control panel
3 Internal lighting
4 Appliance door
5 Filter
6 Rating plate and QR Code
7 Airflow slots
8 Condenser lid
9 Condenser cover
10 Adjustable feet

For ease of loading laundry or ease of installation the door is reversible (see the separate leaflet).
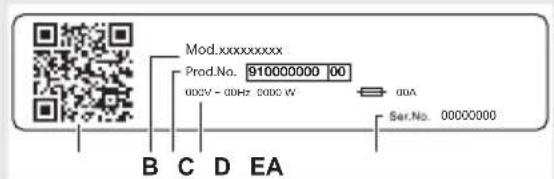
The rating plate reports:
A. QR code
B. model name
C. product number
D. electrical ratings
E. serial number
5. CONTROL PANEL
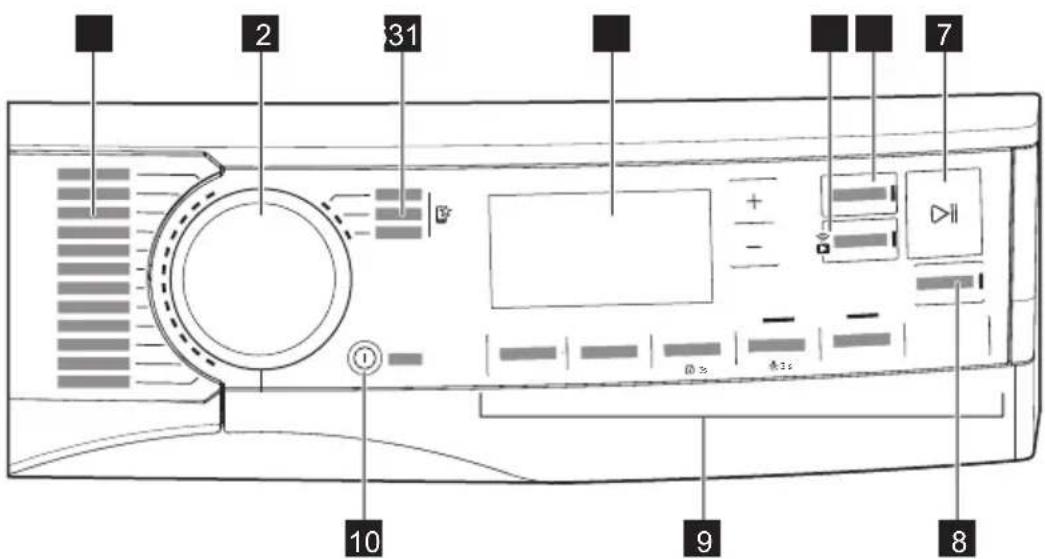
1 Programs
2 Program dial
3 Favourite programs
4 Display
5 Remote Start button
6 Finish In button
7 ▷∥ Start/Pause button
8 SyncDry button
9 Options
10 On/Off button with Auto Off function
5.1 Display
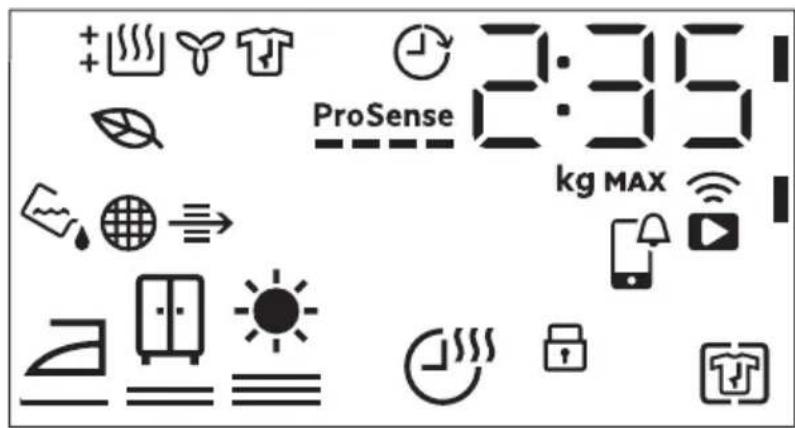
| Symbol on the display Symbol description | |
| 2:35 | cycle time indication |
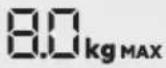 | maximum load |
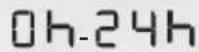 | finish in selection (up to 24h) |
 | wireless connection |
 | remote control |
 | Check APP notification |
| [CAA1] | + Anti Crease option on |
| [TCDC] | child lock on |
 | laundry dryness: iron dry, cupboard dry, extra dry |
 | Time Dry option on |
| [SDC4] | indicator: drain the water container |
| [CSB4] | indicator: clean the filter |
| [2220] | indicator: check the condenser |
| [ATT72] | ECO mode drying |
| [CCDD] | indicator: drying phase |
| [CCAT] | indicator: cooling phase |
| [VEOR] | indicator: crease guard phase |
| [SDIXH] | Finish In option on |
| [WWYN] | ProSense indicator |
| [WZEC] | indicator: maximum load exceeded |
6. WI-FI - CONNECTIVITY SETUP
This chapter describes how to connect the smart appliance to the Wi-Fi network and to link it to a mobile devices.
By this functionality you can receive notifications, monitor and control your tumble dryer from your mobile devices.
To connect the appliance to enjoy the full range of features and services you need:
- Wireless network at home with internet connection enabled.
- Mobile device connected to wireless network.
Frequency 2.4 GHz according to local country regulation
Protocol IEEE 802.11b/g/n
Max power According to local country regulation

Minimum requirements: Operating system compatibility iOS 15/Android 7.1 and above. Install the AEG App, create an account and accept the Terms and Conditions and AEG Privacy Policy to use the connected features. Stable Internet and good Wi-Fi connection with 2.4GHz wireless frequency is required. Minimum requirements, apps and services are subject to change without notice.
6.1 QR code on rating plate
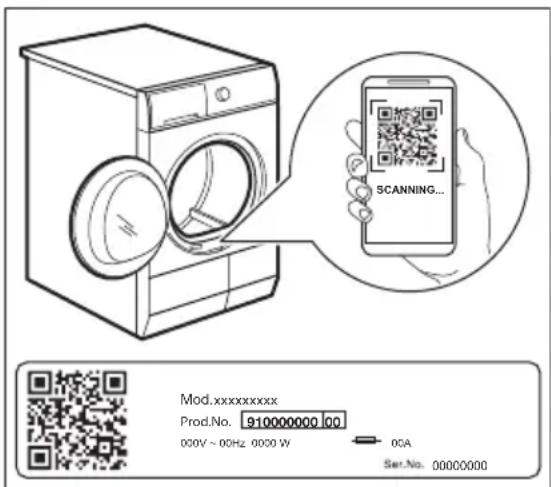
QR code can be used in two ways:
- Scan the QR code with the built-in camera app to register your product.
- Pairing your smart device with appliance to simplify the process. Scan the QR code with QR code scanner built-in AEG App application.
6.2 Installing AEG App
When connecting the tumble dryer to the application, stand near it with Your smart device.
Make sure that your smart device is connected to the wireless network.
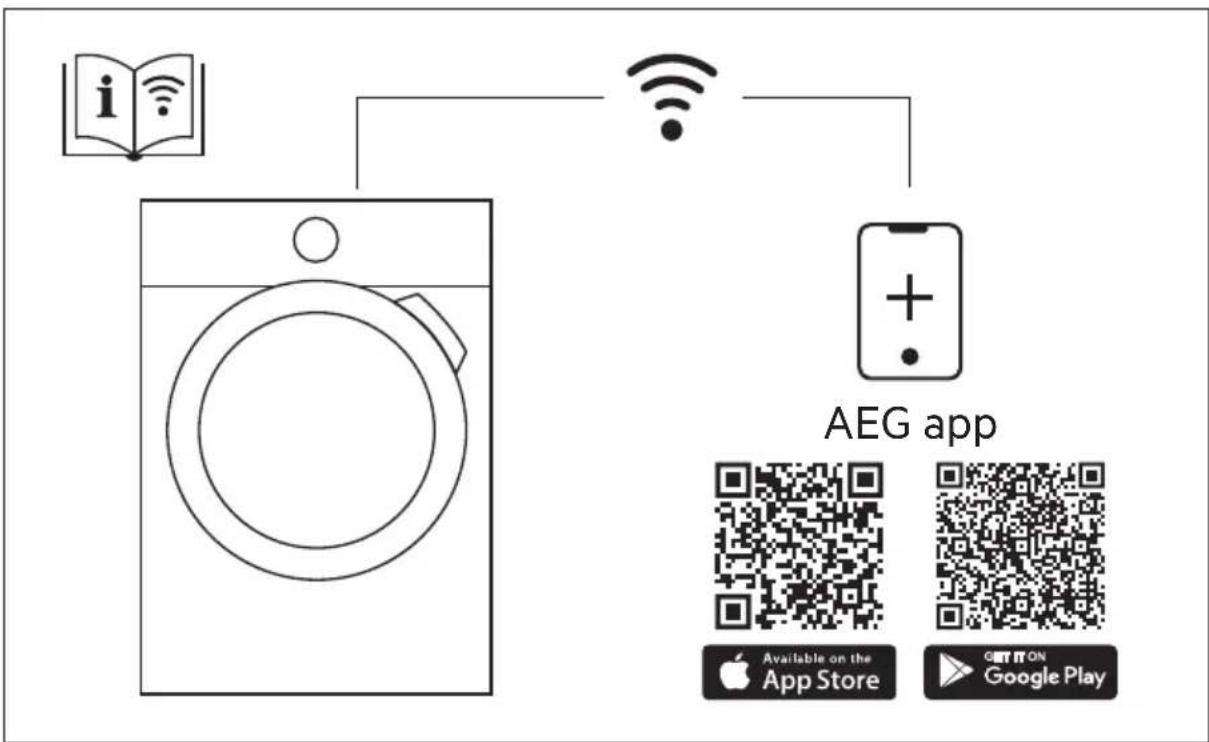
- Go to the App Store on your smart device or scan QR code (see chapter "QR code on rating plate").
- Download and install AEG App.
- Make sure you started a Wi-fi connection in the dryer. If not go to the section below.
- Start the application. Select the country and language and login with Your email and password. If you do not have an account, create a new one following the instructions in AEG App.
6.3 Wireless connection configuration
Before you begin the configuration download and install AEG App application on your smart device.
- Push the On/Off button to switch on the appliance.
- Wait approximately 8 seconds.
- Press and hold the Remote Start button for around 3 seconds until you hear a single 'click' sound.
The symbols: On and appear on the display. After few seconds only flashing symbol: remains. Appliance is starting up the connection, it takes around 10 second for the wireless module to activate. When ready the symbol: (Access Point) appears on the display. Access Point is open for around 3 minutes.
-
Configure the AEG App on your smart device and follow the on screen instructions to connect the appliance to your WiFi network.
-
If the connection is established, symbol is off and the WiFi icon stays lit steadily.


Each time you switch the appliance on, the appliance attempt to connect to the network automatically. When the connection is established the symbol: stops flashing.
To switch off the wireless connection, touch and hold down Remote Start button until you hear a single 'click' sound. The symbol: 0000000000000000000000000000000000000000000

Appliance stores last connection configuration. To use wireless features of the appliance the wireless connection must be in On mode.
To remove the wireless credentials, touch and hold down Remote Start button for around 10 seconds until you hear 2 'beeps' sound. The symbol:
- - - appears on the display.
6.4 Remote Start

AEG App allows you to control your laundry through a mobile device.
It contains a large number of programs, useful features and product information tailored perfectly to the appliance.
Through the app you can select the programs already available from the appliance control panel, plus unlock additional programs available only from a mobile device.
Additional programs can change over the time along with new versions of the app.
It's personalized laundry care - all from your mobile device.
The Remote Start enables you to start a cycle in remote control.

The Remote Control activates automatically when you press the Start/Pause button to start the program, but it is also possible to start a drying program remotely.

When the appliance receives a pause/cancel command from the app, the tumble dryer performs a “safety cooling down” to reduce the internal temperature. The duration of this cool down may be variable, up to few mins. The tumble dryer is still active and when the appliance eventually stops, then the user can change options/programs/etc
Remote Start
A quick touch of this button activates the Remote Start function that allows you to start, pause and stop the appliance remotely.
The related led comes on and the related icon appears on display.

If you set a program via App and it does not match with the knob position, text appears alternating with program duration.
Press and hold this button for longer time to provide two other functions:
- hold it down for 3 seconds as long as a click sounds: the Wi-Fi is turned on and off.
- hold it down for 10 seconds as long as a double beep sounds and — appears on the display: to reset the Network Credentials.
6.5 Over-the-air update

WARNING!
During the update it is highly recommended to not turn off or unplug the appliance.
The App may propose an update for downloading new features.
The update is accepted via App only.
If a program is running, the App notifies that the update will start at the end of the program cycle.
During the update, the appliance shows UPd in the display.
The appliance will be ready for use again after the update is completed, without any notification of successful update.
If an error occurs, the appliance shows
Err on the display: just press any button or turn the knob to return to normal use.
6.6 Wi-Fi Always On
The Wi-Fi Always On function can be activated only via AEG Home app.
7. PROGRAMS
7.1 AEG App and additional hidden programs
AEG App provides you with a wide choice of additional hidden programs.
Connect the appliance to AEG App and you will be able to choose a drying program that suits your needs most. This feature keeps the appliance connected to the network even when the appliance is turned off, so that it can always be woken up and managed remotely from your device.
The indicator goes on and off intermittently (1 second on, 5 seconds off).
It is possible to turn the appliance on by pressing the On/Off button or through the App.

The Wi-Fi Always On function may affect your energy consumption. Wi-Fi Always On function is disabled by default.
You can also memorize any of the hidden cycles in the favourite programs
positions. To select the program from the appliance directly refer to the
"Favourite programs ➕ paragraph in "Options" section.

Program names are subject to change depending on market requirements without notice.
The AEG App will give you a complete description of each program.
| Sportswear | Curtains | Denim |
| Daily Training | Pillow | Silk |
| Down Jackets | Towels | Baby |
| Soccer/Rugby | Pet Hair | Linen |
| Skiing Gear | Easy Iron | Drying Rack |
| Running Shoes | Anti-Allergy |
7.2 Programs
| Programs | Load 1) | Properties / Fabric mark 2) | |
| MixDry 5.0 kg | Designed for routine drying of what you wash without sorting. Dries evenly clothes made of cotton, cotton-synthetic blends and synthetic. | / [IMAGE] | |
| 3)Cottons Eco | 9.0 kg | Cotton fabrics program designed for maximum energy saving. | / [IMAGE] |
| Cottons 9.0 kg | White and coloured cotton fabrics program. Default setting is for ready to store dryness level. | / [IMAGE] | |
| Synthetics 4.0 kg | Blended garments containing mostly synthetic fibres like polyester, polyamide, etc. | / [IMAGE] | |
| Delicates 2.0 kg | Recommended for generic delicate fabrics such as viscose, rayon, acrylic and their blends. | / [IMAGE] | |
  | 1.0 kg | Gently dries for machine and hand-washable wool-lens. Remove immediately the items when the programme is completed.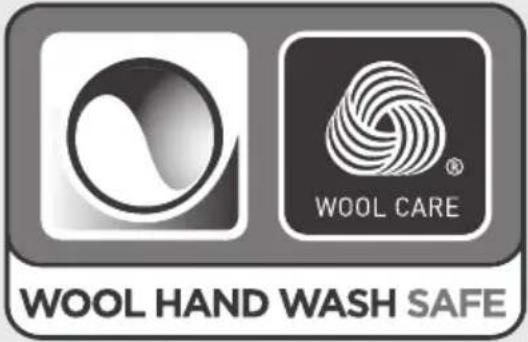 The wool drying cycle of this machine has been approved by The Woolmark Company for the drying of wool garments labelled as "hand wash" provided that the garments are dried according to the instructions issued by the manufacturer of this machine.Follow the garment care label for other laundry instructions. M2140The Woolmark symbol is a Certification mark in many countries. The wool drying cycle of this machine has been approved by The Woolmark Company for the drying of wool garments labelled as "hand wash" provided that the garments are dried according to the instructions issued by the manufacturer of this machine.Follow the garment care label for other laundry instructions. M2140The Woolmark symbol is a Certification mark in many countries. | |
| Quick 3kg 3.0 kg | Fast cycle for everyday clothes made of cotton, cotton-synthetic blends and synthetic. Ideal for light items. |  | |
| Programs | Load^1) | Properties / Fabric mark ^2) |
| Bedlinen XL 4.5 kg | Dries up to three bed linen sets at once. Minimises twists and tangles of large items to ensure every bed linen reaches a uniform dryness without wet spots. | |
| Outdoor | 2.0 kg | Maintains the functionality of outdoor fabrics made of technical textile and restores water repellency on water-proof jackets and shell jackets with removable linings (suitable for drying in tumble dryer). |
| Hygiene | 5.0 kg | Dries and sanitizes your garments and other items maintaining the temperature above 60°C over time, removing 99.9% of bacteria and viruses ^4) .Note: This cycle should only be used for wet items. Not suitable for delicate items. |
| Duvet 3.0 kg | Ensures proper drying of inner parts through single or double duvets, pillows, and padded blankets. | |
| Refresh 1.0 kg | For dry clothes onlyShort low temperature cycle that helps in removing odours from a small amount of garments. Indicated also for dry clothes that were in storage for long time. |
1) The maximum weight refers to dry items.
2) For fabric mark meaning see chapter DAILY USE: Preparing the laundry.
3) Cotton Eco program is the reference program for Energy Label, tested according to AS/NZS2442.2.
4) Tested for Candida albicans, MS2 Bacteriophage and Escherichia coli in external test performed by Swissatest Testmaterialien AG in 2021 (Test Report No. 20212038).
Programs and options selection compatibility
| Options | ||||
| Program 1) | Dryness Level | Time Dry | + Anti Crease | Silent |
| MixDry | ||||
| Cottons Eco | ■ | |||
| Cottons | ■ | ■ | ■ | |
| Synthetics | ■ | ■ | ■ | |
| Delicates | 2) | ■ | ||
| 3) | ||||
| Quick 3kg | 2) | ■ | ||
| Bedlinen XL | ■ | ■ | ||
| Outdoor | 2) | ■ | ||
| Hygiene | 2) | ■ | ||
| Duvet | 2) | ■ | ||
| Refresh | ■ | |||
1) Aside from the program, you can set one or more options at the same time.
2) Set by default
3) See chapter OPTIONS: Time Dry on Wool program
8. OPTIONS
8.1 Dryness Level
| This option helps to achieve requested laundry dryness. You can select the level of dryness: | |
| a- = ≡ | ready to iron - iron dry level |
| b- = ≡ | ready to store - cupboard dry level1) |
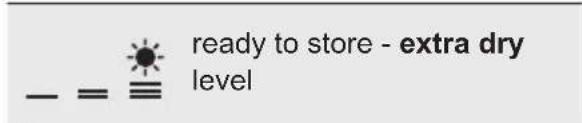
1) Default selection which is related to the programme
8.2 Time Dry
For: Cottons, Bedlinen XL, Synthetics and MixDry programs. Lets the user to set drying time from minimum 10 min to maximum of 2 hours (in 10 min steps). When this option is maximum, load indicator disappears.

The cycle lasts as long as set drying time regardless of the size of a load and its dryness.
| TIME DRYING RECOMMENDATION | |
| up 10 min | action of cool air only (no heat-er). |
| 10 - 40 min | additional drying to improve dryness after previous drying cycle. |
| >40 min | full drying of the small laundry loads up to 4 kg, well spun (>1200 rpm). |
Time Dry on Wool program
Option applicable to Wool program to adjust final dryness level to more dry or less dry.
8.3 + Anti Crease
Extends up to 120 minutes the anti-crease phase (30 minutes) at the end of the drying cycle. After drying phase drum rotates from time to time to prevent creases. Laundry can be removed during the anti-crease phase.
8.4 Silent
The appliance operates with low noise without effect on the drying quality. The appliance operates slowly with longer cycle time.
8.5 End Signal
The acoustic signal sounds at the following:
- cycle end
- start and end of crease guard phase The acoustic signal is by default always on. You can use this option to activate or deactivate the sound.
8.6 Finish In

This option allows choosing the time at which a program should terminate. Once activated the machine waits for the right moment to begin the drying process.
Finish In time is the sum of stand by time and drying time.
To set the Finish In option:
- Set the drying program and options.
- Touch Finish In button.
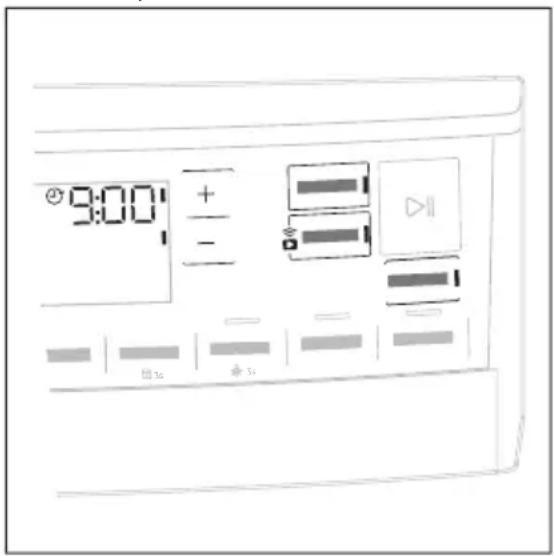
- Touch the + or - button until the display shows the desired time within the program should end (e.g. 12 h if the program has to finish within 12 hours.)
-
Touch the Start/Pause button. The drum starts rotating to perform the ProSense estimation, if foreseen in the selected program.
-
The appliance starts the countdown to the end of the program and the program will start at the right moment for ending.
8.7 Favourite programs

These selector positions are available after the appliance have been connected to Wi-Fi.
The favourite programs can be set and saved via App only choosing from the available ones which are divided into the
three categories indicated on the control panel.
Once the favourite programs have been set, you can select one of them via App or by turning the program dial to relevant position: the relevant led comes on and the information on the display are updated accordingly.

The favourite program can be cancelled through the related App command or pressing the Factory Default key combination.
8.8 SyncDry function
This feature lets your tumble dryer to automatically set the most appropriate program that matches the last washing program recently executed. All you need to do is start the drying program once your tumble dryer is loaded. No other program settings or options are required on the tumble dryer.
Once the washing program has come to an end, the washing machine transfers the program data via the home router Wi-Fi to the AEG Cloud, as well as to your tumble dryer.

In order to use the SyncDry function, the AEG tumble dryer and washing machine must be connected to the same home network and paired with the AEG Home application.
9. BEFORE FIRST USE

Rear drum locks are removed automatically when dryer is activated for the first time. Possible to hear some noise.
To unlock the rear drum locks:
- Switch on the appliance.
- Set any program.
- Press the Start/Pause button.
Drum starts to rotate. Rear drum locks are automatically deactivated.
To activate the function:
- Once the wash cycle has come to an end, place the clean laundry in the tumble dryer.
- Touch SyncDry button.
- All display symbols will stay lighted off except Wi-Fi icon and ProSense bars that run an animation for a few seconds as the appliance is retrieving data from the cloud.
- Display will update itself automatically with the suggested program. After 10 seconds, if data retrieving is unsuccessful, the button LED is switched off and the machine gives an acoustic error signal. Then previously selected program is restored.
- Touch Start/Pause button to begin drying process.

When SyncDry program is set, user is still allowed to change options or select another program by rotating knob or using APP. In such cases SyncDry button LED will turn off to indicate that the program is not anymore the suggested one; SyncDry automatic program can be selected again by pressing related button until data is available on Cloud.
Before you use the appliance to dry items:
- Clean the tumble dryer drum with a moist cloth.
- Start a 1 hour program with moist laundry.

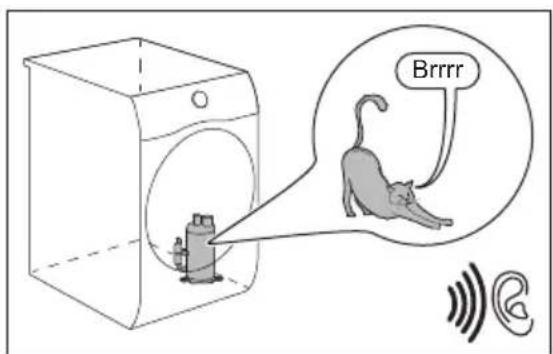
At the beginning of the drying cycle (first 3-5 min) there could be a slightly higher sound level. This is due to the compressor starting up. This is normal for compressor powered appliances such as refrigerators and freezers and tumble dryers.
9.1 Unusual smell
The appliance is tightly packed.
After product unpacking you can feel an unusual smell. This is normal for brand new products.
Appliance is built of several different types of material which all together can generate unusual smell.
Over usage time, after few drying cycles unusual smell gradually disappears.
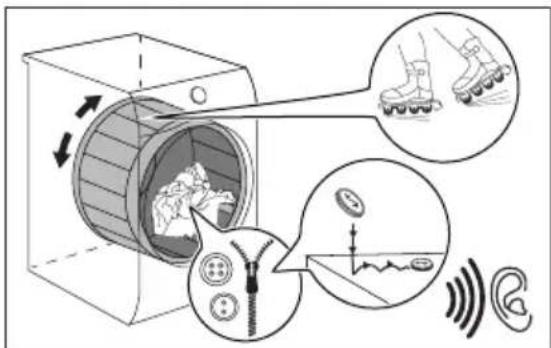
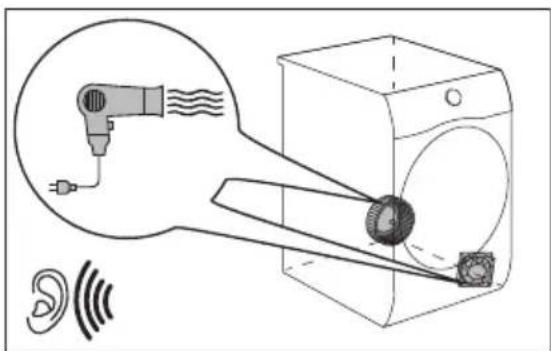
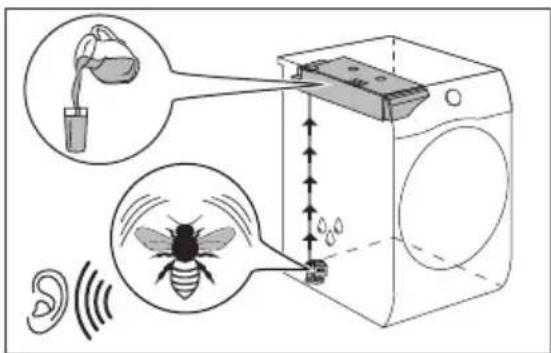
9.2 Noises

Different noises may be heard at different times during the drying cycle. They are perfectly normal operating sounds.
Working compressor.
Rotating drum.
Working fans.
Working pump and transferring condensation to the tank.
10. DAILY USE
10.1 Preparing the laundry

Very often the clothes after washing cycle are kneaded and tangled altogether. Drying kneaded and tangled clothes is inefficient. To assure proper air flow and even drying it is recommended to shake and load one by one the clothes to the tumble dryer.
To assure proper drying process:
- Close the zips.
- Close the fasteners of duvet covers.
- Do not dry ties or ribbons loose (e.g. apron ribbons). Tie them before you start a program.
- Remove all items from pockets.
- Turn items with the internal layer made of cotton inside out. Cotton layer must be faced outwards.
• Always set the program suitable for the type of laundry.
- Do not put light and dark colours together.
- Use suitable program for cottons, jersey and knitwear to reduce shrinkage.
- Do not exceed the maximum load stated in the programs chapter or shown on the display.
- Dry only the laundry that is suitable for tumble drying. Refer to the fabric label on the items.
- Do not dry large and small items together. Small items can be trapped inside the large items and remain wet.
- Shake the large clothes, fabrics before placing in the tumble dryer. It is to avoid moist places inside the fabric after the drying cycle.
| Fabric label Description | |
| Laundry is suitable for tumble drying. | |
| Laundry is suitable for tumble drying at higher temperatures. | |
| Laundry is suitable for tumble drying at low temperatures only. | |
| Laundry is not suitable for tumble drying. | |
10.2 To achieve best drying results
- The selected program must be adequate to the type of dried clothes.
- The filter must be clean. Clogged filter makes drying inefficient.
- It is recommended to shake items before loading. Loose items are more liable for drying.
- The recommended load of dried items must be respected.
- The airflow slots must be clean.
10.3 Loading the laundry

CAUTION!
Ensure the laundry is not trapped between the appliance door and the rubber seal.
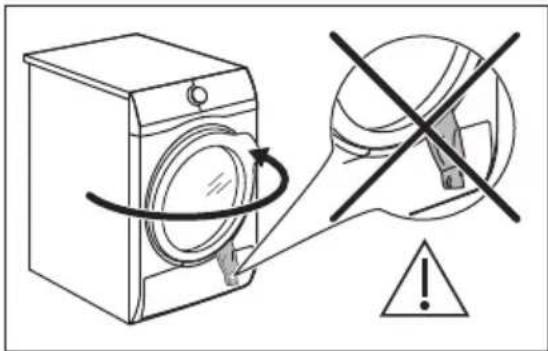
- Pull open the appliance door.
- Load the laundry one item at a time.
- Close the appliance door.
10.4 Turning on the appliance
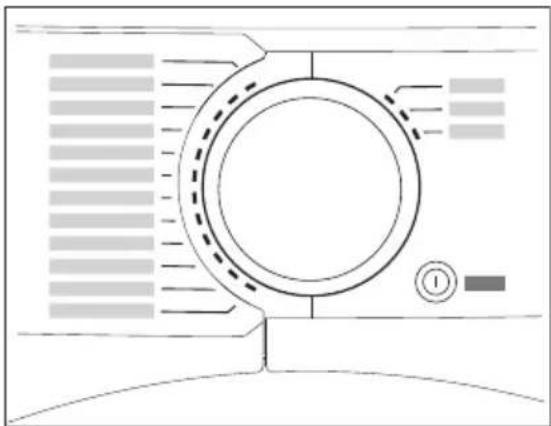
natural_image
Diagram of a circular device with ventilation grilles and control buttons, no text or symbols presentTo turn on the appliance:
Push the On/Off button.
If the appliance is on, some indicators appear on the display.
10.5 Auto Off function
To decrease the energy consumption, the Auto Off function turns the appliance off automatically:
- if the Start/Pause touch button is not touched within 5 minutes.
- 5 minutes after a cycle ends.
Push the On/Off button to turn on the appliance.
If the appliance is on, some indications appear on the display.
10.6 Setting a program
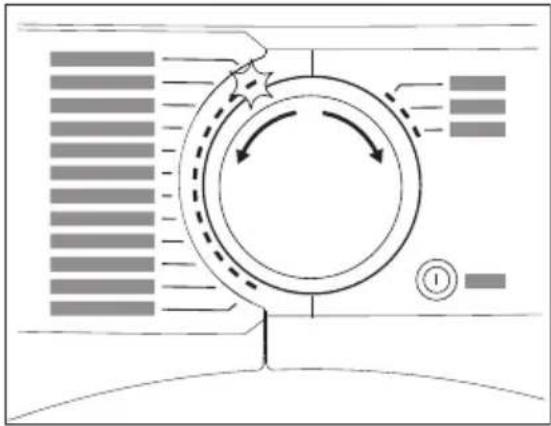
natural_image
Diagram of a circular device with directional arrows and control buttons, no readable text or symbols present.Use the program dial to set the program. The approximate program duration appears on the display.

Real drying time will depend on type of the load (quantity and composition), the room temperature and the humidity of your laundry after spin drying phase.
10.7 Options
Together with the program you can set 1 or more options.
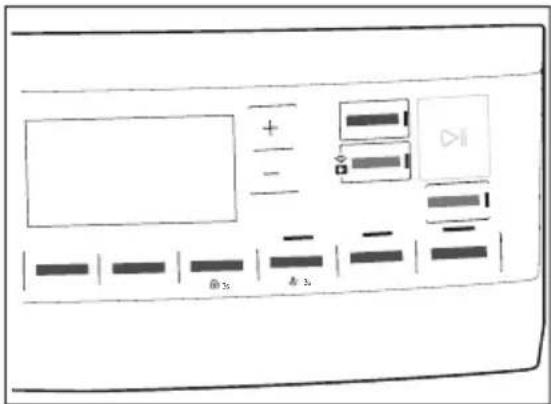
To activate or deactivate an option touch the relevant button.
its symbol appears on the display or the led above the corresponding button lights up.
10.8 Child lock option
The child lock can be set to prevent children from playing with the appliance. The child lock option locks all touch buttons and the program dial (this option does not lock the On/Off button).
You can activate the child lock option:
- before you touch the Start/Pause button - the appliance cannot start
• after you touch the Start/Pause button - programs and option selection is unavailable.
Child lock option activation:
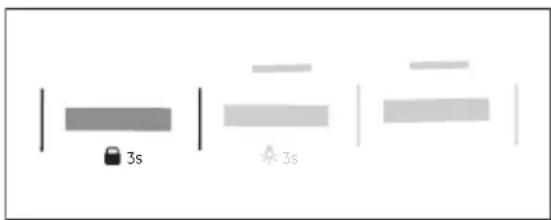
- Turn the dryer on.
- Select 1 of the available programs.
- Touch and hold down + Anti Crease button by around 3 seconds.
The symbol 📋 appears on the display. - To deactivate the child lock, touch the above button again until the symbol disappears.
10.9 Starting a program
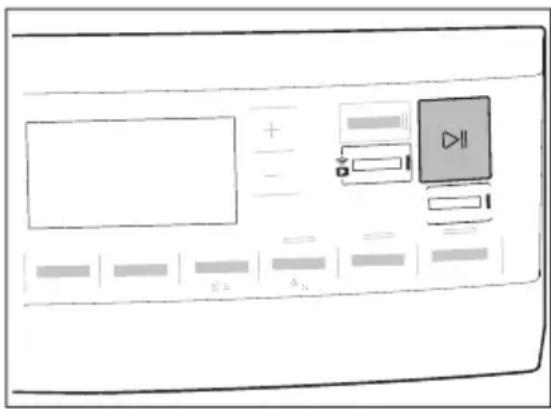
To start the program:
Touch the Start/Pause button.
The appliance starts and the LED above the button stops flashing and stays on.
10.10 The ProSense load detection

The ProSense The ProSense technology detects the laundry load size defining the program duration.
After setting a drying program, the
ProSense icon lights up on the display if the program supports it.
Touching the Start/Pause button, the ProSense starts the laundry load detection:
-
The appliance detects the load in the first minute: the indicator flashes, the bars under the icon move back and ProSense forth and the drum rotates shortly.
-
When the drum stops rotating, the display shows the new program duration adjusted according to the detected load. The number of bars, from 1 to 4, represents the estimated load amount. 4 bars represent the maximum load amount for the selected program.

In case of drum overload, the maximum declared load indicator comes on again
with the indicator blinking. In this case, during these 30 seconds, it is possible to open the door and remove the exceeding garments. Once removed, touch the Start/Pause button to start the program again. If the laundry amount will not be reduced, the program starts anyway. In this case, it will be not possible to guarantee the best results.
10.11 Program change
To change a program:
- Push the On/Off button to turn the appliance off.
- Push the On/Off button again to turn on the appliance.
- Set a new program.
10.12 Program end

Clean the filter and drain the water container after each drying cycle. (See chapter CARE AND CLEANING.)
If the drying cycle is finished, the symbol
☐ appears on the display. If the End
Signal option is activated, the acoustic signal sounds intermittently for 1 minute.

If you do not turn off the appliance, the anti-crease phase starts (not active with all programs). Flashing symbol signals the execution of the anti-crease phase. Laundry can be removed during this phase.
To remove the laundry:
- Push the On/Off button for 2 seconds to turn the appliance off.
- Open the appliance door.
- Remove the laundry.
- Close the appliance door.
Possible causes of unsatisfactory drying results:
11. HINTS AND TIPS
11.1 Ecological hints
- Spin the laundry well before drying.
- Do not exceed the load sizes which are specified in the programs chapter.
- Clean the filter after each drying cycle.
- Do not use fabric softener to wash and then dry. In the tumble dryer laundry becomes soft automatically.
- The water from the water container can be used to iron the clothes. You must first filter the water to eliminate remaining textile fibres (simple coffee filter is suitable).
• Always keep the airflow slots at the bottom of the appliance clear. -
Make sure there is good airflow where the appliance is to be installed.
-
Inadequate default dryness level settings. See chapter Adjustment of default dryness level
- Room temperature is too low or too high. Optimal room temperature is between 18^ - 25^ .
10.13 Drum light on
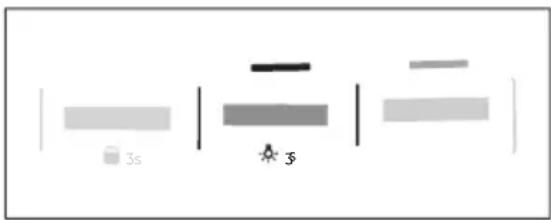
Touch and hold down Silent button by around 3 seconds.
The light inside the drum is on.
11.2 Adjustment of default dryness setting
HOW TO ACHIEVE THE BEST DRYING:
- Try to adjust the dryness level options (see chapter OPTIONS: Dryness Level).
- If you want to further increase the laundry dryness results, you can modify the default dryness setting (see below). This adjustment will act on most programs, except Wool, Duvet, Down Jackets, Refresh programs if available on the machine.
To change the default dryness setting:
- Turn the appliance on.
- Select 1 of the available programs.
- Touch and hold down the Time Dry and + Anti Crease buttons at the same time.
One of the symbols appears on the display:
| Dryness setting | Display symbol | |
| Maximum dryness | ||
| Extra dryness |  |  |
| Standard dryness | COE | |
- Touch the Start/Pause button repeatedly until you reach the desired dryness level.
- To memorise the setting touch and hold down the Time Dry and + Anti Crease buttons at the same time for approximately 2 seconds.

Changing the dryness setting will change the cycle duration.

In case of wifi network connected machine, when the new setting is memorized a ProSense bars animation is performed for a few sec to indicate that your appliance is updating data used by syncDry function to the cloud. If you interrupt this operation (like switching off the machine or moving the knob) the data synchronization will be done during the first wi-fi reconnection.
11.3 Water container indicator
By default, the water container indicator is on. It comes on when the program is completed or when it is necessary to empty the water container.

It is recommended to install included draining kit to automatically drain the water from the water container. In this case we can deactivate the indicator of the water container.
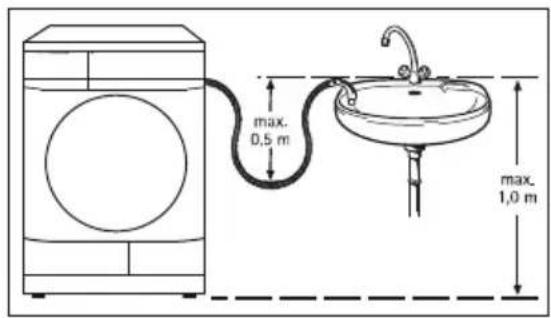
Deactivating the tank indicator
To deactivate the indicator:
- Turn the appliance on.
- Select 1 of the available programs.
- Touch and hold down Silent and End Signal buttons at the same time.
One of 2 configurations is possible:
• the Tank indicator: is on if the symbol appears - the water container indicator is permanently activated
- the Tank indicator: is off if the symbol appears - the water container indicator is permanently deactivated
11.4 Operating hours counter
This function gives a possibility to display the total operating time of the appliance in hours, which is counted from the moment it is first switched on. The actual operating time of the cycles is shown (does not include pauses or delayed start time).
To visualise this value, proceed as follows:
- Switch the appliance on by pressing the On/Off button.
- Press and hold the Time Dry and Dryness Level buttons for some seconds.
- After 3 seconds the total hours operated by the appliance are shown in the display: e.g. if the operating time is 1276 hours, the display shows the text Hr for 2 seconds then 12 for 2 seconds followed by 76. This value is displayed with a sequence of two digits at a time: the first two digits
indicate thousands and hundreds, the second two digits indicate tens and units.
To exit this mode, either press any button, turn the selector knob or switch the appliance off.
11.5 Factory Defaults
This function allows to restore the factory default settings. The saved options and working modes will be reset. It will also remove WiFi network credentials from the appliance memory and reset personalized program settings.
To activate this option follow steps below:
12. CARE AND CLEANING
12.1 Cleaning the filter
At the end of each cycle the ⚙️ Filter symbol comes on the display and you must clean the filter.

The filter collects the lint during the drying cycle.

To achieve the best drying performances clean the filter regularly, clogged filter lead to longer cycles and energy consumption increase.
Use your hand to clean the filter, and if necessary, a vacuum cleaner.

CAUTION!
Avoid the use of water to clean the filter. Instead throw away lint in the dustbin (avoid dispersion of plastic fiber in water ambient).
-
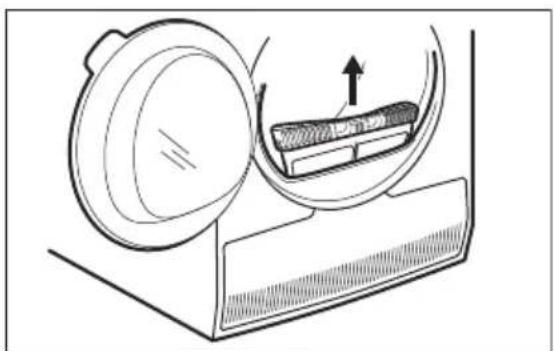
Open the door. Pull the filter up.
-
Switch the appliance on by pressing On/Off button.
- Wait approximately 8 seconds.
- Press and hold the Silent and + Anti Crease buttons for some seconds.
- The appliance will acknowledge the operation by displaying - - -

If the procedure does not work (this could be due to timeout or wrong keys combination), switch the appliance off and repeat the sequence from the beginning.
natural_image
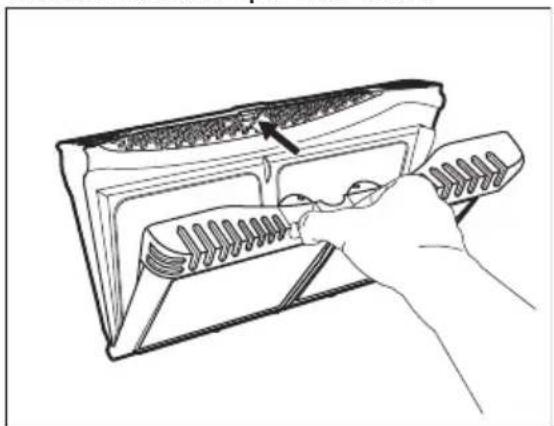
Diagram of a mechanical device with a lid and internal component, showing motion direction (no text or symbols)- Push the hook to open the filter.
natural_image
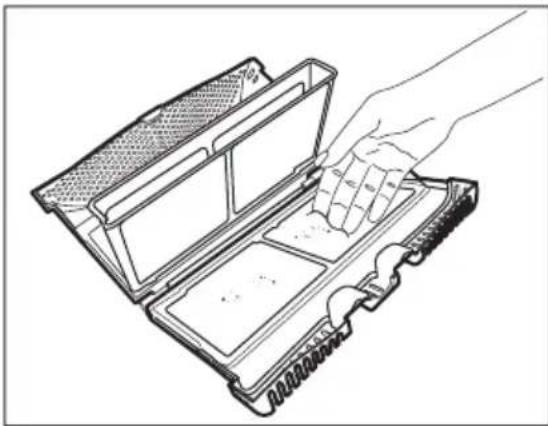
Line drawing of a hand holding a device with a scroll wheel, showing internal components (no text or symbols)- Gather lint with hand from both internal parts of the filter.
natural_image
Line drawing of a hand inserting a component into an open device (no text or symbols)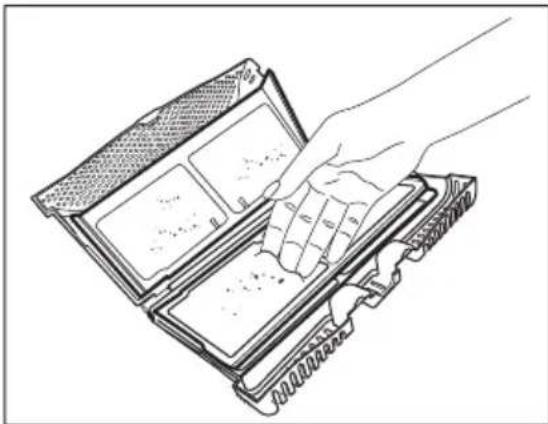
natural_image
Line drawing of a hand opening a device with internal compartments (no text or symbols)Throw the lint in the dustbin.
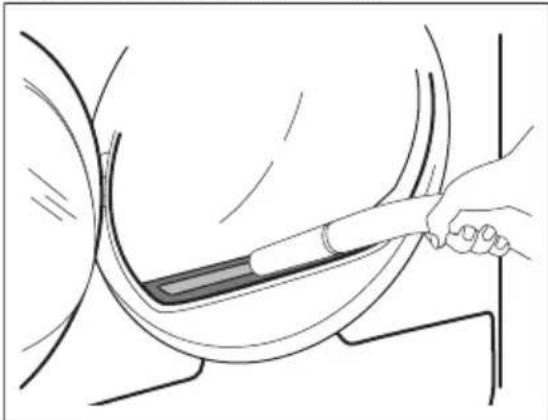
- If necessary, clean the filter with a vacuum cleaner. Close the filter.
- If necessary, remove lint from the filter socket and gasket. You can use a vacuum cleaner. Place the filter back inside the filter socket.
natural_image
Line drawing of a hand holding a tool interacting with a car wheel (no text or symbols)12.2 Emptying the water container
Empty the condensed water container after each drying cycle.
If the condensed water container is full, the program stops automatically. The Tank symbol comes on the display and you must empty the water container.
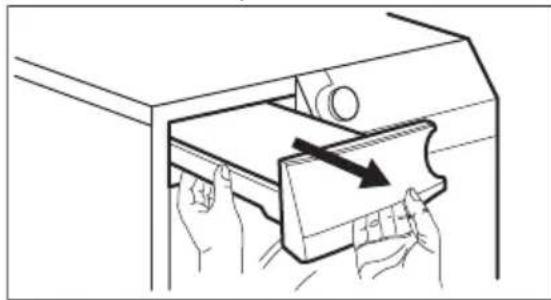
To empty the water container:
- Pull the water container out keeping it in a horizontal position.
natural_image
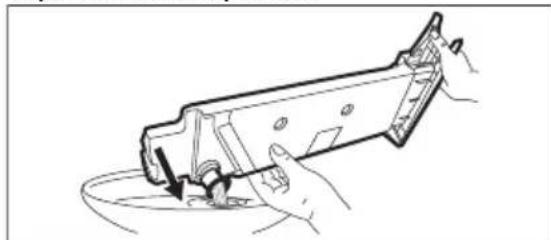
Line drawing of hands inserting a component into a drawer with an arrow indicating direction (no text or symbols)- Pull the plastic connection out and drain the water into a basin or equivalent receptacle.
natural_image
Line drawing of a hand using a tool to clean or inspect a mechanical component (no text or symbols present)- Push the plastic connection back in and place the water container back into position.
- To continue the program press the Start/Pause button.
12.3 Cleaning the condenser
If the symbol Condenser flashes on the display, inspect the condenser and its compartment. If it is dirty, clean it. Do the check not less than once a 6 months.

WARNING!
Do not touch the metal surface with bare hands. Risk of injury. Wear protective gloves. Clean carefully to avoid damaging the metal surface.
To inspect:
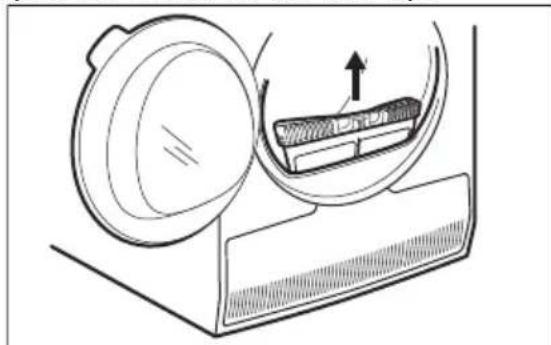
- Open the door. Pull the filter up.
natural_image
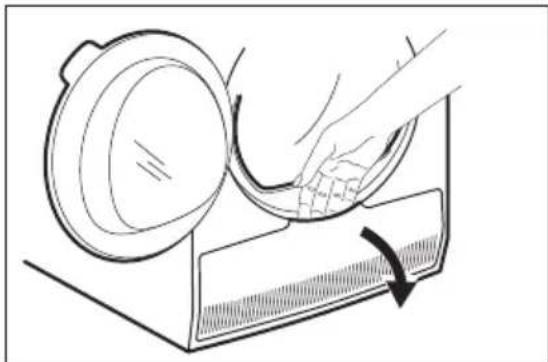
Diagram of a mechanical device with a lid and internal component, showing motion direction (no text or symbols)- Open the condenser cover.
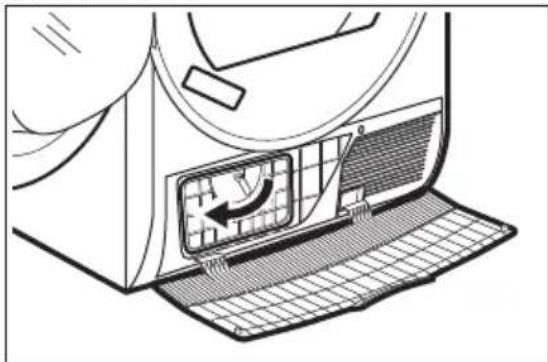
natural_image
Line drawing of a hand placing a circular object onto a surface with a curved arrow indicating motion (no text or symbols)- Turn the lever to unlock the condenser lid.
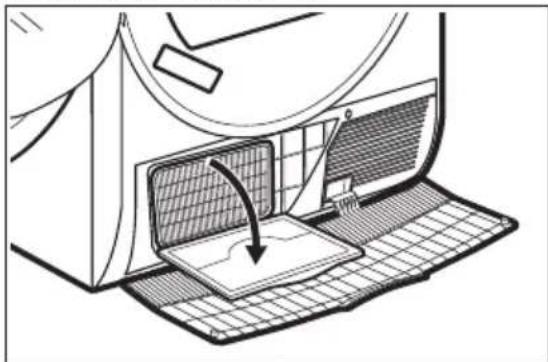
natural_image
Diagram of a refrigerator interior showing airflow direction and ventilation grilles (no text or symbols)- Lower the condenser lid.
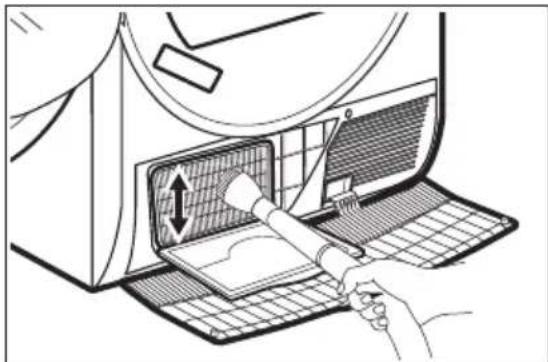
natural_image
Diagram of a laptop with a grid base and an arrow indicating the open panel (no text or symbols present)- If necessary, remove the fluff from the condenser and its compartment. You can use a vacuum cleaner with a brush attachment.
natural_image
Line drawing of a hand using a tool to clean or adjust a device inside a machine (no text or symbols visible)- Close the condenser lid.
- Turn the lever until it clicks into position.
- Put the filter back.
12.4 Cleaning the drum

WARNING!
Disconnect the appliance before you clean it.
Use a standard neutral soap detergent to clean the inner surface of the drum and drum lifters. Dry the cleaned surfaces with a soft cloth.

CAUTION!
Do not use abrasive materials or steel wool to clean the drum.
12.5 Cleaning the control panel and housing
Use a standard neutral soap detergent to clean the control panel and housing.
Use a moist cloth to clean. Dry the cleaned surfaces with a soft cloth.

CAUTION!
Do not use furniture cleaning agents or cleaning agents which can cause corrosion.
12.6 Cleaning the airflow slots
Use a vacuum cleaner to remove fluff from the airflow slots.
13. TROUBLESHOOTING

WARNING!
Refer to Safety chapters.
13.1 Error Codes
The appliance does not start or it stops during operation.
First try to find a solution to the problem (refer to the table). If the problem persists, contact the Authorised Service Centre.

WARNING!
Deactivate the appliance before carrying out any check.
In case of major problems, the acoustic signals operate, the display shows an error code and the Start/Pause button may flash continuously:
| Error code Possible cause Remedy | ||
| E50 | Appliance motor overloaded. Too much laundry or entrap in the drum. | The program was not completed. Remove the laundry from the drum, set the program and restart the cycle. |
| E90 or E91 | Internal fail. No communication between electronic elements of the appliance. | The program was not finished properly or the appliance stopped too early. Switch the appliance off and on again. If the error code appears again, contact the Authorised Service Centre. |
| EH0 | The mains supply is unstable. When | the appliance is showing EH0, please wait until main supply is stable than press start. If the appliance pause the cycle without any indication then press the cycle start. If the warning will occur check the power cord / socket integrity or main supply. |
If the display shows other error codes, deactivate and activate the appliance. If the problem continues, contact the Authorised Service Centre.
In case of different problem with the tumble dryer check the table below for possible solutions.
13.2 Troubleshooting
| Problem Possible cause Remedy | ||
| The tumble dry-er does not operate. | The tumble dryer is not connected to the mains supply. | Connect it to the mains socket.Check the fuse in the fuse box (domestic installation). |
| The door is open. Close the door. | ||
| The On/Off button was not pushed. Push the On/Off button. | ||
| The Start/Pause button was not touched. | Touch the Start/Pause button. | |
| The appliance is in standby mode. Push the On/Off button. | ||
| Unsatisfactory drying result. | Incorrect program selection. | Select a suitable program.1) |
| The filter is clogged. | Clean the filter.2) | |
| Dryness Level option was set toiron dry.3) | Change Dryness Level option to a higher level. | |
| The load was too large. Do not exceed the maximum load size. | ||
| The airflow slots are clogged. Clean the airflow slots at the bot-tom of the appliance. | ||
| There is some dirt on the humidity sensor in the drum. | Clean the front surface of the drum. | |
| The dryness level was not set to the desired level. | Adjust the dryness level.4) | |
| The condenser is clogged. | Clean the condenser.2) | |
| The loading door does not close | The filter is not locked into posi-tion. | Put the filter in the correct position. |
| Laundry is trapped between the door and the seal. | Remove trapped items and close the door. | |
| It is not possible to change the program or op-tion. | After a cycle starts it is not possi-ble to change the program or op-tion. | Turn the tumble dryer off and on.Change the program or option as required. |
| It is not possible to select an op-tion. An acoustic signal is emi-ted. | The option you tried to select is not available for the selected program. | Turn the tumble dryer off and on.Change the program or option as required. |
| There is no drum light | Defective drum lamp. Contact the service centre to re-place the drum lamp. | |
| Unexpected duration time appears on the display. | The drying duration is calculated according to load size and dampness. | This is automated - the appliance is working correctly. |
| A program is inactive. | The water container is full. Drain the water container, push the Start/Pause button.2) | |
| The drying cycle is too short. | The load size is small. Select a time program. The time value must be related to the load. To dry one item or a small amount of laundry we recommend short drying times. | |
| The laundry is too dry. Select an appropriate time program or a higher dryness level (e.g. extra dry) | ||
| Drying cycle too long5) | The filter is clogged. Clean the filter. | |
| The load is too large. Do not exceed the maximum load size. | ||
| The laundry was not spun sufficiently. | Spin the laundry well in the washing machine. | |
| Too low or too high room temperature - this is not the appliance malfunction. | Ensure a room temperature higher than +5°C and lower than +35°C. Optimal room temperature to achieve best drying results is between 18°-25°C. | |
| The display shows:UPd | All buttons are inactive, except the Start/Pause. | The appliance downloads the APP updates. Wait until the update process is complete. If you deactivate the appliance during update, it resumes when you activate the appliance again. |
| No wireless connection or connection often brakes off. | The wireless home network does not work. | Check wireless home network configuration. Restart the router. If problem still exists contact your wireless service provider. |
| The smart device or the appliance or both are not paired with the wireless network. | Repeat connection configuration steps on smart device or the appliance or both. | |
| The connection with the appli-ance through the AEG App application does not work fre-quently. | Poor or missing connection be-tween the tumble dryer and router. | Assure proper connection between the appliance and the home router.Move the router closer to the appli-ance. Equip your home network with wireless range extender.Do not use at the same time microwave oven and remote control.The microwave oven can disrupt the connection signal. |
1) Follow the program description — see the PROGRAMS chapter.
2) See the CARE AND CLEANING chapter.
3) Only dryers with the Dryness Level option.
4) See the HINTS AND TIPS chapter.
5) Note: After a maximum of 6 hours the drying cycle ends automatically.
13.3 Possible causes of unsatisfactory drying results:
- The filter is clogged. Clogged filter makes drying inefficient.
- The airflow slots are clogged.
-
The drum is dirty.
-
Inadequate default dryness level settings. See chapter Adjustment of default dryness level
- Room temperature is too low or too high. Optimal room temperature is between 18^ - 25^ .
14. TECHNICAL DATA
| Height x Width x Depth 850 x 596 x 638 mm (maximal 663 mm) | |
| Max. depth with the appliance door open 1108 mm | |
| Max. width with the appliance door open 958 mm | |
| Adjustable height 850 mm (+ 15 mm - feet regulation) | |
| Drum volume 118 l | |
| Maximum load 9.0 kg | |
| Voltage 220-240 V | |
| Frequency 50 Hz | |
| Total power 700 W | |
| Left-on mode power absorption 1) | 0.05 W |
| Off mode power absorption 1) | 0.05 W |
| Power consumption in networked stand-by2)1) | 2.0 W |
| Time to networked standby1) | 15 min. |
| Type of use Household | |
| Permitted ambient temperature + 5°C to + 35°C | |
| Level of protection against ingress of solid particles and moisture ensured by the protective cover, except where the low voltage equipment has no protection against moisture | IPX4 |
| Gas designation R290 | |
| Gas weight 0,149 kg | |
1) With reference to EN 61121.
2) The energy consumption of the connected function is approximately 17,5 kWh per year. To disconnect this function, please refer to the chapter "Wi-fi - Connectivity setup".
15. WARRANTY - AUSTRALIA AND NEW ZEALAND
FOR SALES IN AUSTRALIA AND NEW ZEALAND
ALL AEG BRANDED APPLIANCES
This document sets out the terms and conditions of the product warranties for AEG Appliances. It is an important document. Please keep it with your proof of purchase documents in a safe place for future reference should there be a manufacturing defect in your Appliance. This warranty is in addition to other rights you may have under the Australian Consumer Law.
1. In this warranty:
a) ‘ACL’ or ‘Australian Consumer Law’ means Schedule 2 to the Competition and Consumer Act 2010;
b) 'Appliance' means any Electrolux product purchased by you and accompanied by this document;
c) 'ASC' means Electrolux's authorised serviced centres;
d) 'AEG' is the brand controlled by Electrolux Home Products Pty Ltd of 163 O'Riordan Street, Mascot NSW 2020, ABN 51 004 762 341 in respect of Appliances purchased in Australia and Electrolux (NZ) Limited (collectively "Electrolux") of 3-5 Niall Burgess Road, Mount
Wellington, in respect of Appliances purchased in New Zealand;
e) 'Warranty Period' means the period specified in clause 3 of this warranty;
f) 'you' means the purchaser of the Appliance not having purchased the Appliance for re-sale, and 'your' has a corresponding meaning.
-
Application: This warranty only applies to new Appliances, purchased and used in Australia or New Zealand and is in addition to (and does not exclude, restrict, or modify in any way) other rights and remedies under a law to which the Appliances or services relate, including any non-excludable statutory guarantees in Australia and New Zealand.
-
Warranty Period: Subject to these terms and conditions, this warranty continues for in Australia for a period of 60 months and in New Zealand for a period of 60 months, following the date of original purchase of the Appliance.
-
Repair or replace warranty: During the Warranty Period, Electrolux or its ASC will, at no extra charge if your Appliance is readily accessible for
service, without special equipment and subject to these terms and conditions, repair or replace any parts which it considers to be defective. Electrolux may, in its absolute discretion, choose whether the remedy offered for a valid warranty claim is repair or replacement. Electrolux or its ASC may use refurbished parts to repair your Appliance. You agree that any replaced Appliances or parts become the property of Electrolux.
5. Travel and transportation costs:
Subject to clause 7, Electrolux will bear the reasonable cost of transportation, travel and delivery of the Appliance to and from Electrolux or its ASC. Travel and transportation will be arranged by Electrolux as part of any valid warranty claim.
- Proof of purchase is required before you can make a claim under this warranty.
- Exclusions: You may not make a claim under this warranty unless the defect claimed is due to faulty or defective parts or workmanship. This warranty does not cover:
a) light globes, batteries, filters or similar perishable parts;
b) parts and Appliances not supplied by Electrolux;
c) cosmetic damage which does not affect the operation of the Appliance;
d) damage to the Appliance caused by:
- negligence or accident;
– misuse or abuse, including failure to properly maintain or service;
– improper, negligent or faulty servicing or repair works done by anyone other than an Electrolux authorised repairer or ASC; - normal wear and tear;
– power surges, electrical storm damage or incorrect power supply;
– incomplete or improper installation;
– incorrect, improper or inappropriate operation;
– insect or vermin infestation;
– failure to comply with any additional instructions supplied with the Appliance; In addition, Electrolux is not liable under this warranty if:
– the Appliance has been, or Electrolux reasonably believes that the Appliance has been, used for purposes other than those for which the Appliance was intended, including where the Appliance has been used for any non-domestic purpose;
– the Appliance is modified without authority from Electrolux in writing;
– the Appliance's serial number or warranty seal has been removed or defaced.
8. How to claim under this warranty:
To enquire about claiming under this warranty, please follow these steps:
a. carefully check the operating instructions, user manual and the terms of this warranty;
b. have the model and serial number of the Appliance available;
c. have the proof of purchase (e.g. an invoice) available;
d. telephone the numbers shown below.
-
Australia: For Appliances and services provided by Electrolux in Australia: Electrolux goods come with guarantees that cannot be excluded under the Australian Consumer Law. You are entitled to a replacement or refund for a major failure and for compensation for any other reasonably foreseeable loss or damage. You are also entitled to have the Appliance repaired or replaced if the Appliance fails to be of acceptable quality and the failure does not amount to a major failure. 'Acceptable quality' and 'major failure' have the same meaning as referred to in the ACL.
-
New Zealand: For Appliances and services provided by Electrolux in New Zealand, the Appliances come with a guarantee by Electrolux pursuant to the provisions of the Consumer Guarantees Act, the Sale
of Goods Act and the Fair Trading Act. Where the Appliance was purchased in New Zealand for commercial purposes the Consumer Guarantee Act does not apply.
- Confidentiality: You accept that if you make a warranty claim,
Electrolux and its agents including ASC may exchange information in relation to you to enable Electrolux to meet its obligations under this warranty.
| Important Notice | |
| Before calling for service, please ensure that the steps listed in clause 8 above have been followed. | |
| SERVICE AUSTRALIAaeg.com/au | |
| FOR SERVICEor to find the address of your nearest authorised service centre in AustraliaPLEASE CALL 1300 363 664OR EMAILcustomercare@aegaustralia.com.auFor the cost of a local call (Australia only) | FOR SPARE PARTSor to find the address of your nearest spare parts centre in AustraliaPLEASE CALL 13 13 50OR EMAILcustomercare@aegaustralia.com.auFor the cost of a local call (Australia only) |
| SERVICE NEW ZEALANDaegnewzealand.co.nz | |
| FOR SERVICEor to find the address of your nearest authorised service centre in New ZealandPLEASE CALL 0800 234 234OR EMAILcustomercare@electrolux.co.nz(New Zealand only) | FOR SPARE PARTSor to find the address of your nearest spare parts centre in New ZealandPLEASE CALL 0800 10 66 20OR EMAILcustomercare@electrolux.co.nz(New Zealand only) |
AEG_Warr_May_17
16. ENVIRONMENTAL CONCERNS
Recycle materials with the symbol Put the packaging in relevant containers to recycle it. Help protect the environment and human health by recycling waste of electrical and electronic appliances. Do not dispose of
appliances marked with the symbol ⚙️ with the household waste. Return the product to your local recycling facility or contact your municipal office.
flowchart
graph TD
    A["i"] --> B[" washing machine"]
    C["Wi-Fi"] --> B
    D["AEG app"] --> B
    E["Apple App Store"] --> F["Google Play"]
    style A fill:#f9f,stroke:#333
    style B fill:#ccf,stroke:#333
    style C fill:#cfc,stroke:#333
    style D fill:#fcc,stroke:#333
    style E fill:#cff,stroke:#333
The software in this product contains components that are based on free and open source software. AEG gratefully acknowledges the contributions of the open software and robotics communities to the development project.
To access the source code of these free and open source software components whose license conditions require publishing, and to see their full copyright information and applicable license terms, please visit: http://aeg.opensoftwarerepository.com (folder NIUS)
- CONTENTS
- IMPORTANT INFORMATION THAT MAY IMPACT YOUR MANUFACTURER'S WARRANTY
- FOR PERFECT RESULTS
- CUSTOMER CARE AND SERVICE
- ⚠ SAFETY INFORMATION
- Children and vulnerable people safety
- WARNING!
- General Safety
- CONDITIONS OF USE
- SAFETY INSTRUCTIONS
- Installation
- Electrical connection
- Use
- Internal lighting
- Care and cleaning
- Compressor
- Service
- Disposal
- PRODUCT DESCRIPTION
- The rating plate reports:
- CONTROL PANEL
- Display
- WI-FI - CONNECTIVITY SETUP
- QR code on rating plate
- QR code can be used in two ways:
- Installing AEG App
- Wireless connection configuration
- Remote Start
- Remote Start
- Over-the-air update
- Wi-Fi Always On
- PROGRAMS
- AEG App and additional hidden programs
- OPTIONS
- Dryness Level
- Time Dry
- Time Dry on Wool program
- + Anti Crease
- Silent
- End Signal
- Finish In
- Favourite programs
- SyncDry function
- BEFORE FIRST USE
- To unlock the rear drum locks:
- Before you use the appliance to dry items:
- Unusual smell
- Noises
- DAILY USE
- Preparing the laundry
- To achieve best drying results
- Loading the laundry
- CAUTION!
- Turning on the appliance
- Auto Off function
- Setting a program
- Options
- Child lock option
- Child lock option activation:
- Starting a program
- The ProSense load detection
- Program change
- Program end
- HINTS AND TIPS
- Ecological hints
- Drum light on
- Adjustment of default dryness setting
- HOW TO ACHIEVE THE BEST DRYING:
- Water container indicator
- Deactivating the tank indicator
- Operating hours counter
- Factory Defaults
- CARE AND CLEANING
- Cleaning the filter
- Emptying the water container
- Cleaning the condenser
- Cleaning the drum
- Cleaning the control panel and housing
- Cleaning the airflow slots
- TROUBLESHOOTING
- Error Codes
- Possible causes of unsatisfactory drying results:
- TECHNICAL DATA
- WARRANTY - AUSTRALIA AND NEW ZEALAND
- In this warranty:
- Travel and transportation costs:
- How to claim under this warranty:
- ENVIRONMENTAL CONCERNS
Brand : AEG
Model : T859M6OBC
Category : Heat pump