SmarterHome G80 - Robot vacuum Kogan - Free user manual and instructions
Find the device manual for free SmarterHome G80 Kogan in PDF.


| Product Type | Robot Vacuum and Mop Cleaner with Auto Empty Dock |
| Model | KAVACRBG80P |
| Dimensions (Vacuum) | 320 x 320 x 76 mm |
| Weight (Vacuum) | 2.8 kg |
| Battery | 2600 mAh, 14.4V, 36.0 Wh Li-ion |
| Charging Time | 300 min (5 hours) for full charge |
| Dustbin Capacity | 250 ml |
| Water Tank Capacity | 240 ml |
| Auto-Empty Dock Dimensions | 320 x 240 x 165 mm |
| Auto-Empty Dock Weight | 2.7 kg |
| Rated Power (Vacuum) | 42 W |
| Rated Input (Dock) | 100–240 V, 50/60 Hz |
| Suction Power Levels | Silent, Standard, High (3 levels) |
| Water Flow Levels | Low, Standard, High (3 levels) |
| Connectivity | Wi-Fi 2.4 GHz, Kogan SmarterHome App, Google Home, Amazon Alexa |
| Cleaning Modes | Auto, Spot, Edge, Scheduled, DND |
| Sensors | Cliff sensors, Infrared receiver, Collision sensors |
| Filtration System | HEPA filter, Sponge filter, Dust bag in dock |
| Maintenance Frequency | Brushes weekly, filters weekly, sensors monthly. Replace side brushes and filters every 3 months. |
| Safety Warnings | Not for outdoor use, keep away from liquids and heat, do not use on long‑hair carpets, keep children/pets away |
| Spare Parts / Repairability | Replaceable side brushes, filters, dust bag, rolling brush. Contact help.kogan.com for repair. |
| Operating Temperature | 0–40 °C |
Frequently Asked Questions - SmarterHome G80 Kogan
User questions about SmarterHome G80 Kogan
0 question about this device. Answer the ones you know or ask your own.
Ask a new question about this device
Download the instructions for your Robot vacuum in PDF format for free! Find your manual SmarterHome G80 - Kogan and take your electronic device back in hand. On this page are published all the documents necessary for the use of your device. SmarterHome G80 by Kogan.
USER MANUAL SmarterHome G80 Kogan
natural_image
Line drawing of a robotic vacuum cleaner next to a cylindrical device (no text or symbols)KOGAN SMARTERHOME™ G80 ROBOT VACUUM AND MOP CLEANER
WITH AUTO EMPTY DOCK
KAVACRBG80P
Safety & warnings 3
Components 6
Overview 7
Assembly 11
Before first use 14
Connect to SmarterHome ^TM app 16
Google Home control 20
Amazon Alexa control 23
Operation 25
Cleaning & care 30
Specifications 37
Troubleshooting 38
SAFETY & WARNINGS
Ensure to read all instructions and warnings in this user guide prior to first use. Retain this user guide for future reference.
- The vacuum can be used adults and by persons with reduced physical, sensory, or mental capabilities, or lack of experience and knowledge if they have been given supervision or instruction concerning use of the vacuum in a safe way and understand the hazards involved.
- Do not allow children to use this appliance as a toy.
- Children must be supervised to ensure they do not play with the appliance.
- Keep children and pets away from the vacuum.
- This vacuum can only be used for indoor domestic floor cleaning. Do not use outdoors, on objects, or in commercial/industrial environments.
- Do not use the vacuum in the environments where it may fall (for example, on top of furniture or on balconies).
- The operating environment of this vacuum is between 0–40°C.
- Do not use this vacuum if there are liquids on the ground.
- Remove any cables or wires on the floor before cleaning to prevent them from being tangled or dragged by the vacuum.
- Remove any fragile articles or miscellaneous items that may block the path of the vacuum. Not removing these may lead their damage.
- Do not place anything (including children and pets) on the vacuum.
- When the vacuum is operating, keep hair, fingers and other parts of human body and pets away from the brushes.
- Do not use the vacuum to clean flammable items (for example, burning cigarette butts).
- Do not use the vacuum to clean long-haired carpets. Some darker carpets also might not be able to be cleaned normally.
- Do not use the appliance to vacuum hard or sharp objects (for example, glass, nails).
- Do not use the protective cover of the laser radar or bumper as a handle to carry the vacuum.
- Do not use the mopping function on carpet or on top of furniture.
- Ensure the power cord is unplugged before cleaning or maintaining the appliance.
- Ensure there is no water in the dustbin/water tank when charging the vacuum.
- Do not place objects (including children and pets) on a stationary or moving appliance.
- Please do not use the product to sweep burning objects (such as burning cigarette end)
- Before cleaning or performing maintenance ensure the power is off and the vacuum has been disconnected from power,
- Do not use this product in any way that deviates from the instructions provided in this User Guide.
Battery and Charging
- Do not use any third-party batteries, non-rechargeable batteries charging bases, or chargers.
- Do not disassemble, repair, or modify the battery or auto-empty dock by yourself.
- Do not place the auto-empty dock near heat sources (for example, heating radiators).
- Do not use a damp cloth or wet hands to wipe or clean the auto-empty dock.
- Dispose of used batteries properly and send them to professional recycling agencies.
- If the power cord is damaged or broken, cease use immediately and contact help.Kogan.com for support.
- When transporting the vacuum, ensure that the appliance is turned off and the original packaging box is used for packaging.
- If the machine is left unused long, it should be fully charged and then placed in a cool and dry place. Charge the vacuum at least every 3 months to avoid damaging batteries due to excessive discharge.
- The charging base is only suitable for charging the vacuum robot KAVACRBG80P supplied with the Li-ion cylindrical rechargeable battery CMICR18650F8M7-4S1P (Rating: 14.4V, 2600mAh, 36.0Wh). It is not suitable to charge any other vacuums or batteries.
- Warning: Do not recharge non-rechargeable batteries.
Auto-empty Dock
- Do not leave the appliance unattended when it is plugged in. Always remember to unplug it from the outlet when not in use and before servicing.
- Do not allow the appliance to be used as a toy. Close attention is necessary when the appliance is used by or near children.
- Use the appliance only as described in this manual and with the attachments provided by Kogan.com.
- Do not use the appliance if the cord or plug is damaged. If the appliance is not working properly, has been dropped, damaged, left outdoors, or submerged in water, cease use immediately and contact help.Kogan.com
- Do not handle the plug or appliance with wet hands.
- Do not insert any objects into the openings of the appliance.
-
Do not use the appliance if any of the openings are blocked. Keep it free from dust, lint, hair, and anything else that may restrict airflow.
-
Keep hair, loose clothing, fingers, and all body parts away from the openings and moving parts of the appliance.
- Do not use the appliance to pick up flammable or combustible liquids, such as gasoline, or use it in areas where such liquids may be present.
- Do not attempt to pick up anything that is burning or smoking, such as cigarettes, matches, or hot ashes.
- Do not use the appliance without the dust bag and filters properly in place.
- Ensure that children are supervised to prevent them from playing with the appliance.
- The appliance is only to be used with the provided power supply unit.
- Do not leave appliance when plugged in. Unplug from outlet when not in use and before servicing.
- Do not use this appliance outdoors.
- The appliance is only to be used with the power supply unit provided with the appliance.
COMPONENTS
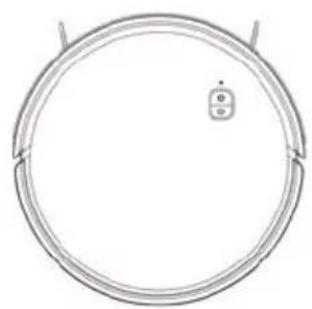
natural_image
Simple line drawing of a circular object with a small icon at the center (no text or symbols)Robot vacuum cleaner
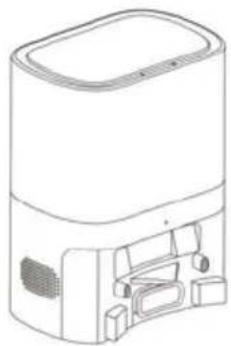
natural_image
Line drawing of a portable electronic device with front panel and side ports (no text or symbols)Auto-empty dock
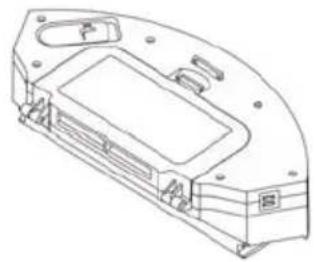
natural_image
Technical line drawing of a mechanical housing or enclosure component (no text or symbols)Dustbin/Water tank
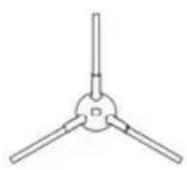
Side brush
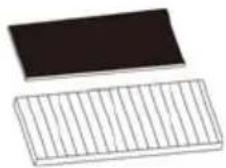
HEPA & sponge filter
natural_image
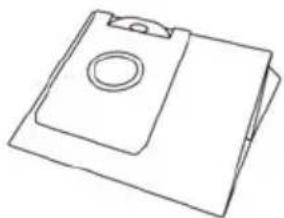
Line drawing of a clipboard with a circular hole and a rectangular cover (no text or symbols)Dust bag
natural_image
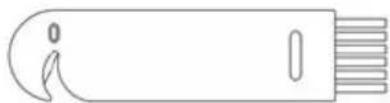
Simple line drawing of a medical or laboratory device with no text, numbers, or symbolsCleaning brush
natural_image
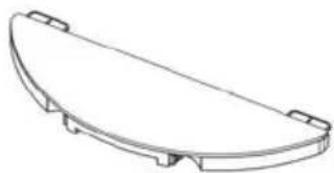
Line drawing of a curved mechanical component with mounting brackets (no text or symbols)Mopping module
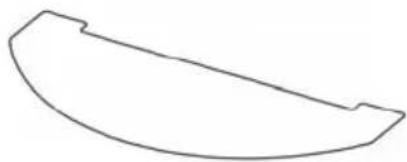
natural_image
Simple curved line drawing without any text, numbers, or symbolsMop cloth
User guide
natural_image
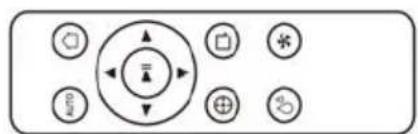
Pure electrical circuit lines without any symbolsRemote (optional)
OVERVIEW
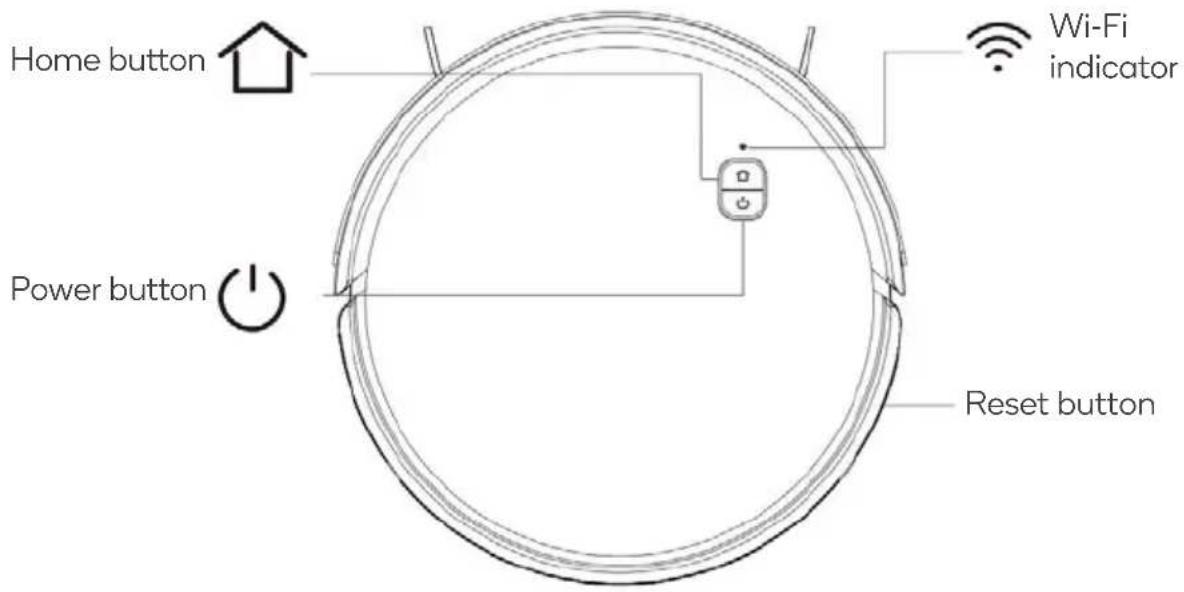
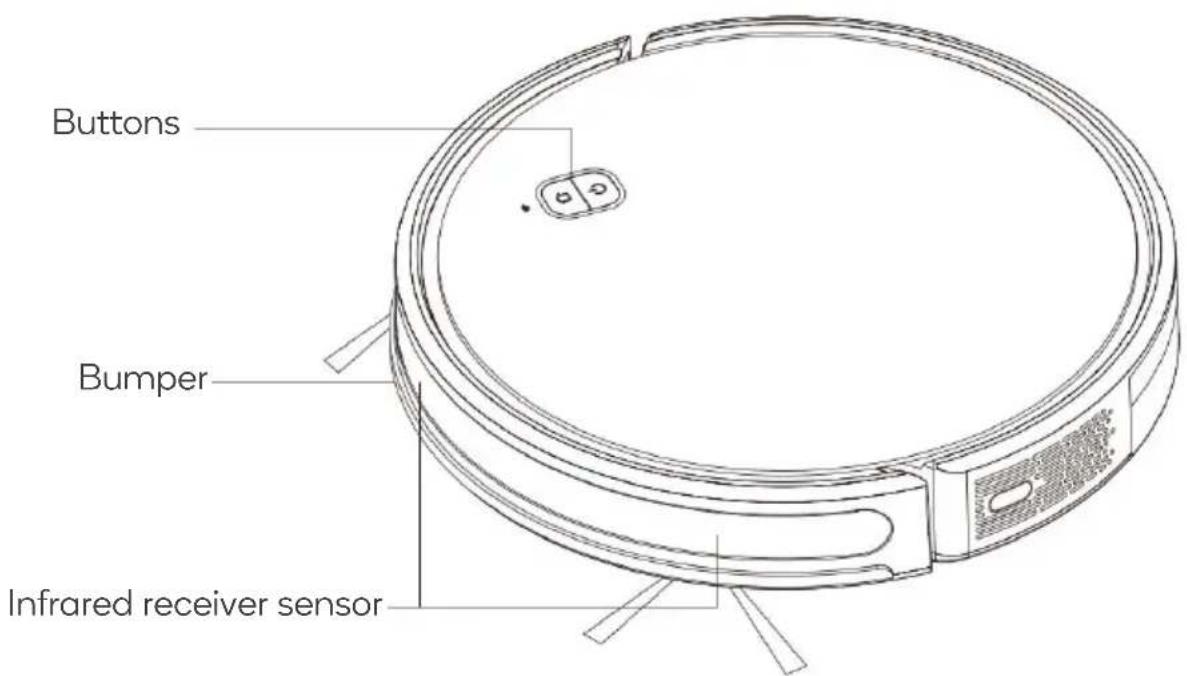
Home button
Press it to recharge/pause.
Power button
- Press the button to start cleaning/pause.
- Press and hold the button for 3 seconds to power on/off.
Wi-Fi indicator
• Off: Wi-Fi not networked.
- Flashing: Ready to be paired.
• On: Network connected.
Reset button
Use a pin to press this button to reset the vacuum.
Button indicators

| Indicator | Status |
| Solid blue | Vacuum is cleaning, returning to the auto-empty dock to charge, or is fully charged |
| Flashing blue | Vacuum is charging |
| Flashing red | Low battery |
| Flashing red | There is an error with the vacuum. Ensure the dustbin/water tank is secured to the vacuum. |
| Off | Vacuum is on standby |
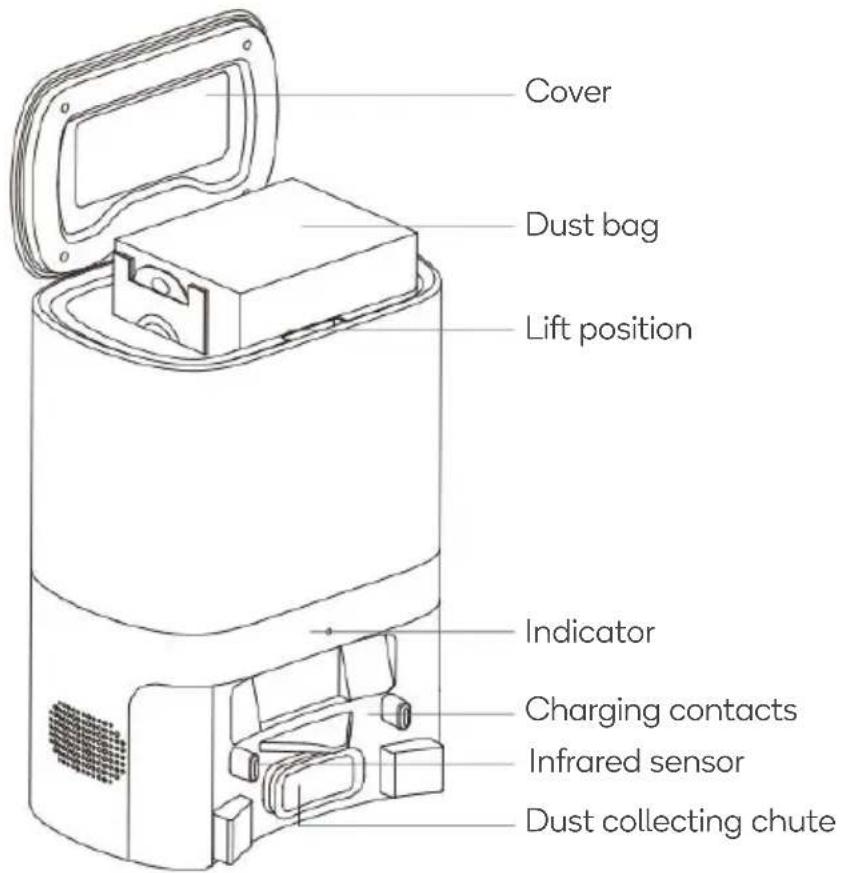
Auto-empty Dock
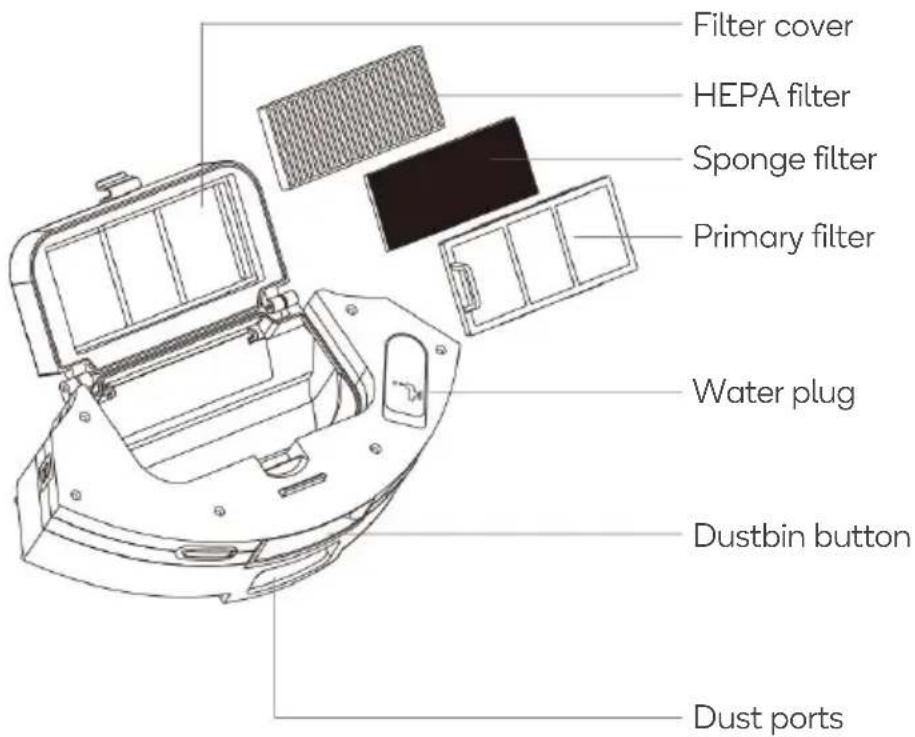
Dustbin/Water tank
Remote Control
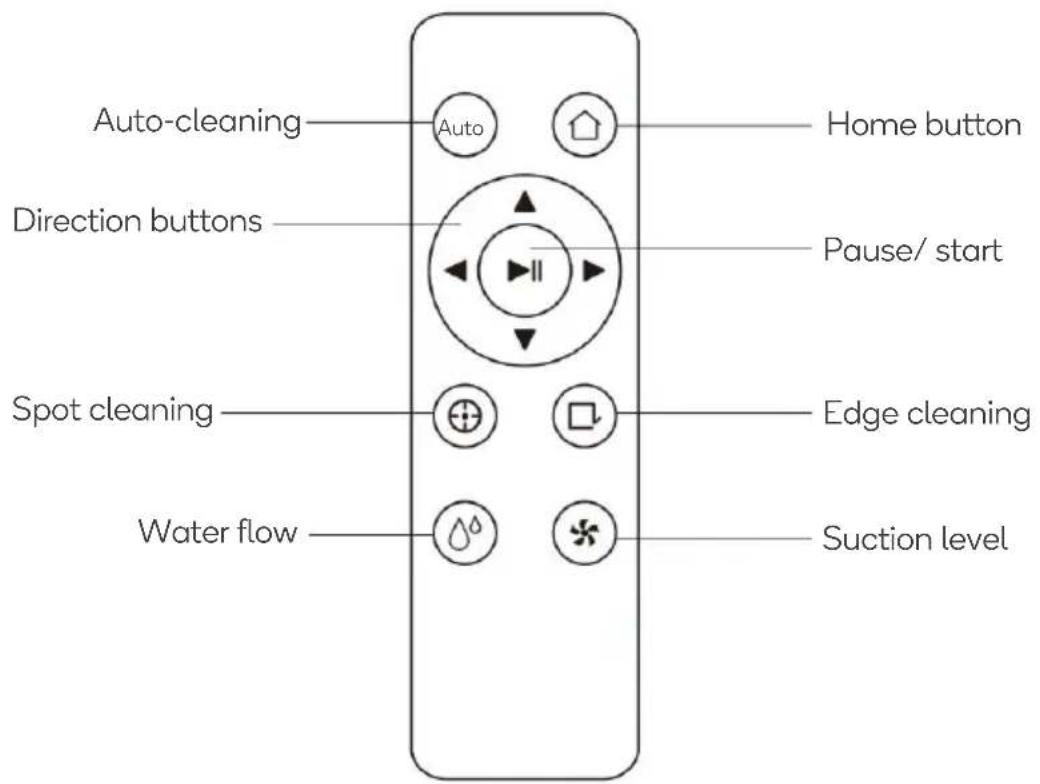
ASSEMBLY
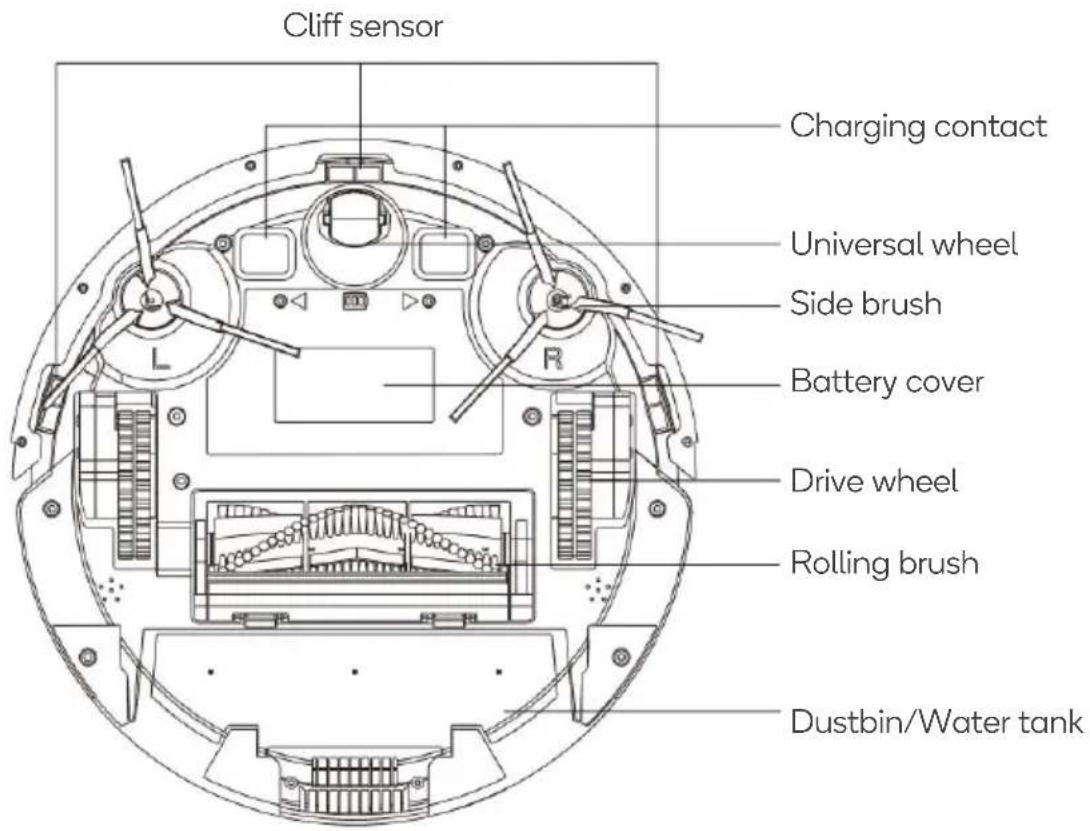
- Remove the protective material from both sides of the vacuum.
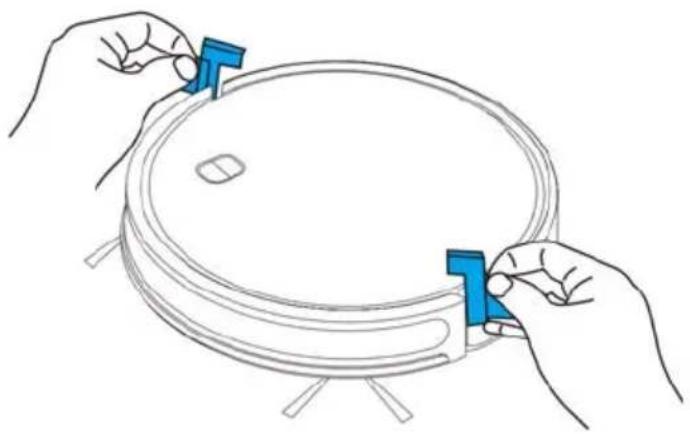
natural_image
Line drawing of two hands holding a circular object with blue clip labels (no text or symbols)- Attach the left and right side brushes (L, R) to the corresponding letter on the underside of the vacuum. There should be a clicking sound when each side brush is secured.
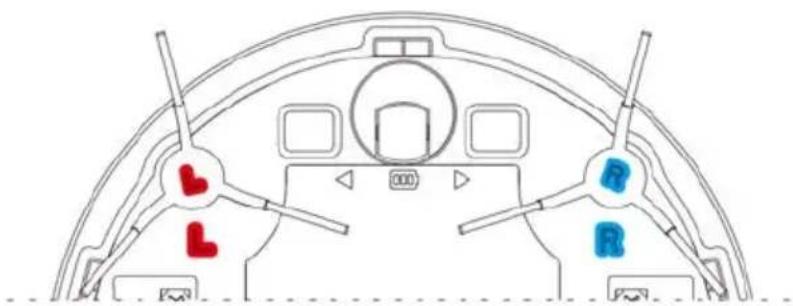
natural_image
Top-down schematic of a ship's cockpit showing steering wheel, propeller, and control panel (no text or labels)- Place the auto-empty dock against the wall on a flat surface. Ensure there are no other wires, cables, or other loose items around its vicinity.
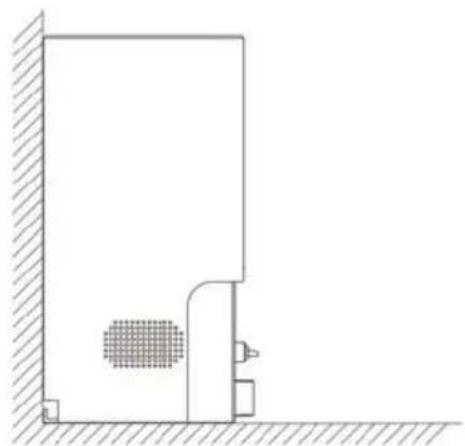
natural_image
Simple line drawing of a door or enclosure with a textured grille and side-mounted sensors, no text or symbols present.- Ensure there is a 50cm clearance either side, and 150cm clearance in front of the auto-empty dock. Connect the power cord into a wall outlet.
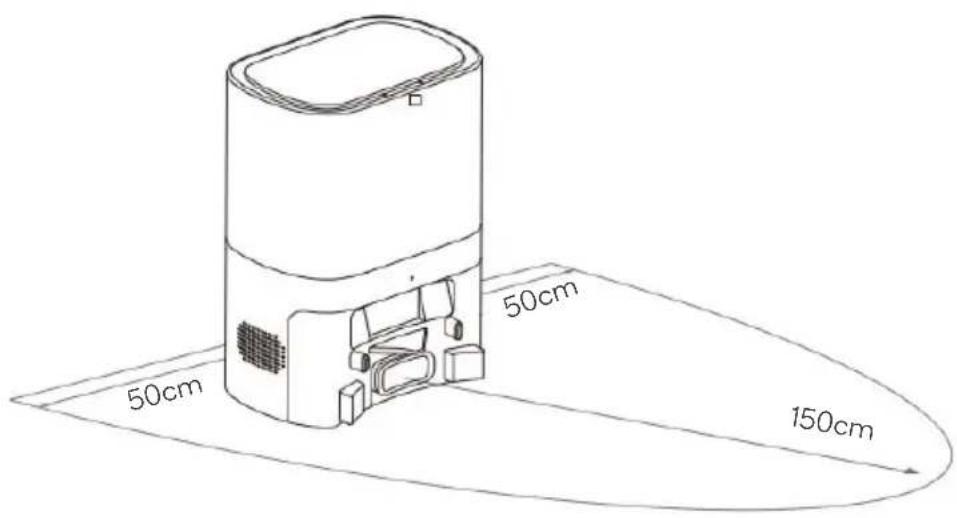
Note:
- Do not freely move the auto-empty dock.
-
Avoid placing the dock in direct sunlight as this may interfere with the infrared signal and cause the vacuum cleaner to fail to return to the charging base.
-
If using the mopping function, open the water plug and fill the dustbin/water tank with water. Replace the water plug. Do not pour detergent into the dustbin/water tank.
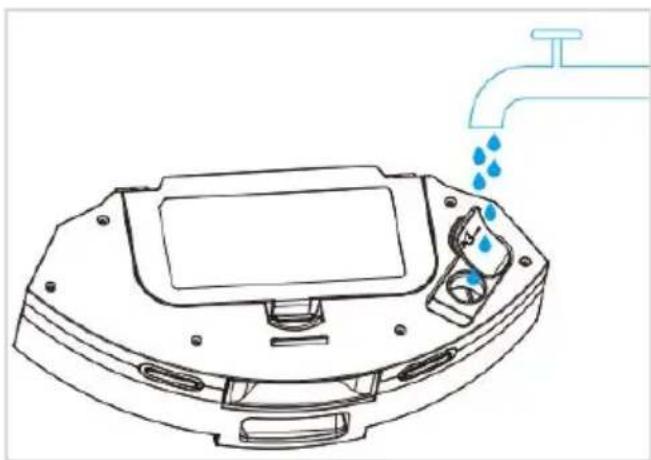
natural_image
Line drawing of a robotic device with water droplets falling from its tip, connected to a faucet (no text or symbols)- Whilst pressing and holding the dustbin button, insert the dustbin/water tank into the vacuum.
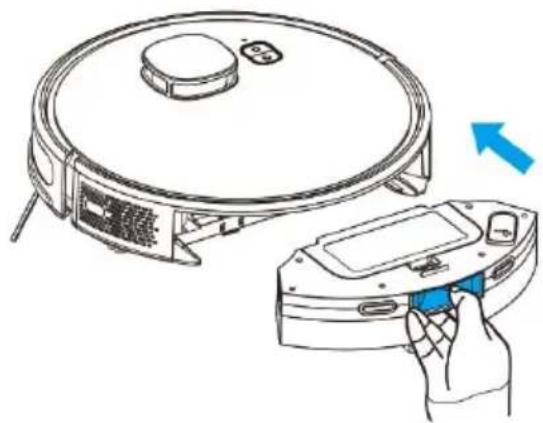
natural_image
Line drawing of a robotic vacuum cleaner with a hand inserting a device into it (no text or symbols)- If using the mopping function, attach the mop cloth to the mopping module, then insert the mopping module into the dustbin/water tank.
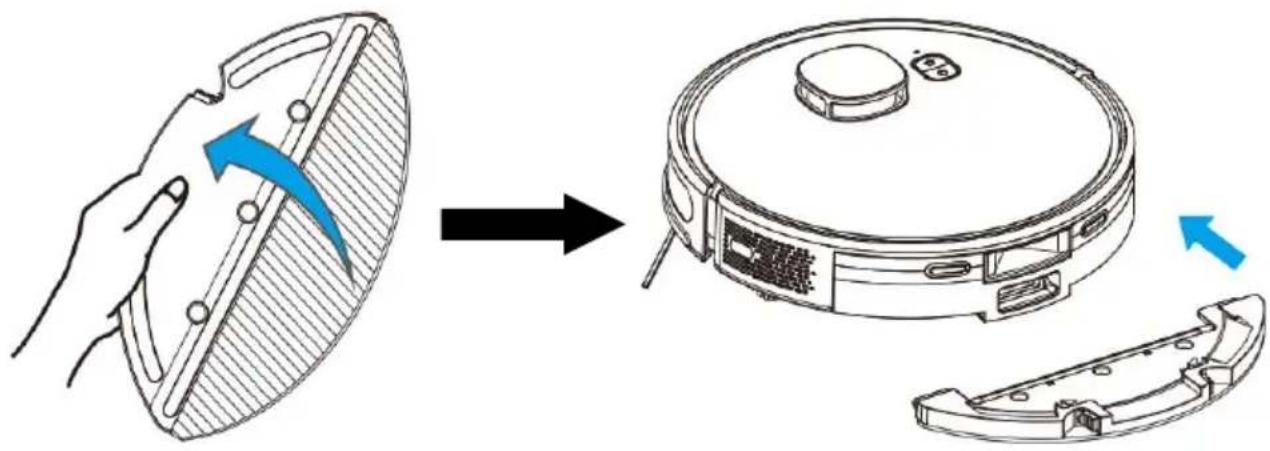
BEFORE FIRST USE
Checks to the area
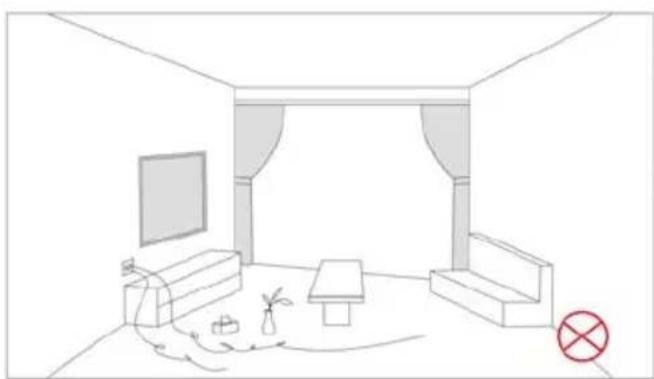
- Ensure there are no loose wires or cables scattered on the ground. This is to prevent the vacuum becoming entangled or dragged along.
- Ensure all fragile items, those easy to topple, dangerous items, and valuables are removed. This is to prevent items being damaged and to avoid personal injuries.
- Do not use the vacuum to clean liquids.
- To reduce the likelihood of accidental damage, it is recommended to block off steps or steep drop-offs.
natural_image
Line drawing of a cozy living room with TV, sofa, coffee table, and floor (no text or symbols)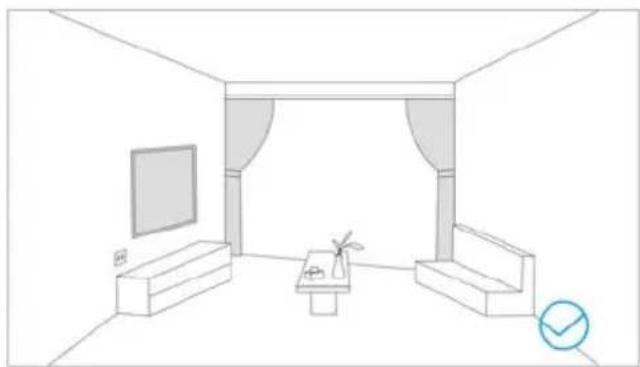
natural_image
Line drawing of a modern living room interior with TV, sofa, and coffee table (no text or symbols)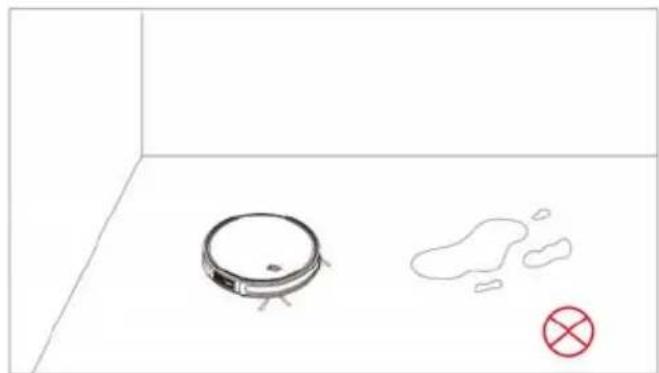
natural_image
Simple line drawing of a robot on a floor with a red prohibition symbol (no text or labels)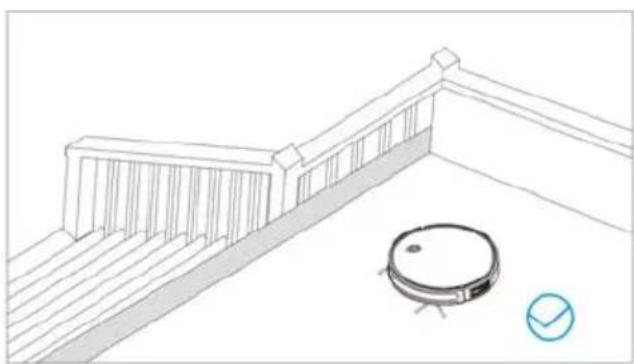
natural_image
Line drawing of a robotic vacuum cleaner on a balcony with railings and a circular icon nearby (no text or symbols)Charging
-
Press and hold the power button to turn on the vacuum.
-
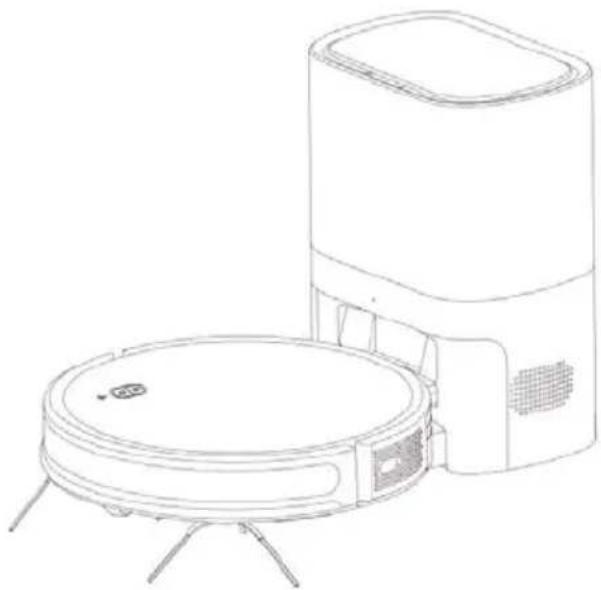
When the indicator lights on the home and power button illuminate, place the vacuum against the charging contacts on the auto-empty dock. The vacuum will prompt 'Start charging' to notify it is charging.
-
Charge the vacuum for 16 hours during the initial 3 uses. During subsequent charges, when the indicator lights turn a solid blue, the vacuum will be fully charged.
natural_image
Line drawing of a robotic vacuum cleaner next to a rectangular device (no text or symbols)Note:
If the battery is at a low level, the vacuum cannot be powered. Place the vacuum against the charging contacts and the vacuum will power on automatically.
CONNECT TO SMARTERHOME™ APP
Install App
Download the "Kogan SmarterHome" app from the Play Store (Android) or App Store (iOS).
Play Store (Android)
App Store (iOS)

To register:
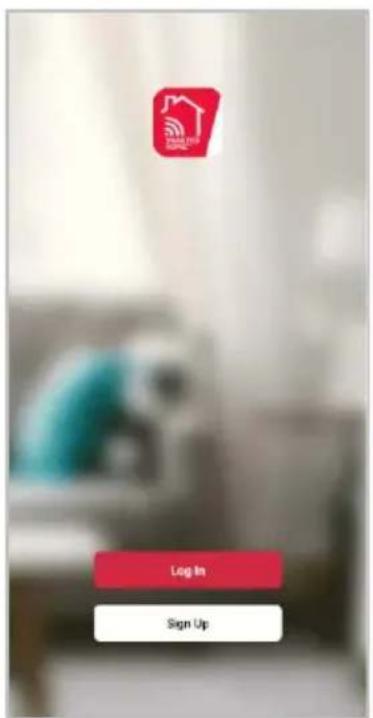
- If you already have a SmarterHome account, select 'Log In'. To register a new account, select 'Sign Up'.
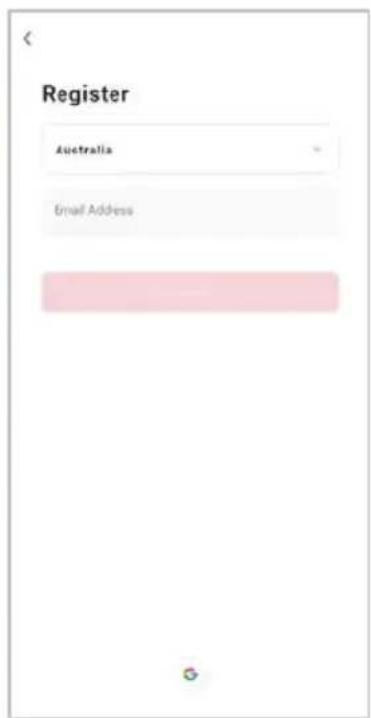
- The system will automatically recognise your country. If needed, you can manually select your country from the drop-down box. Enter your email address and tap 'Get Verification Code' to continue.
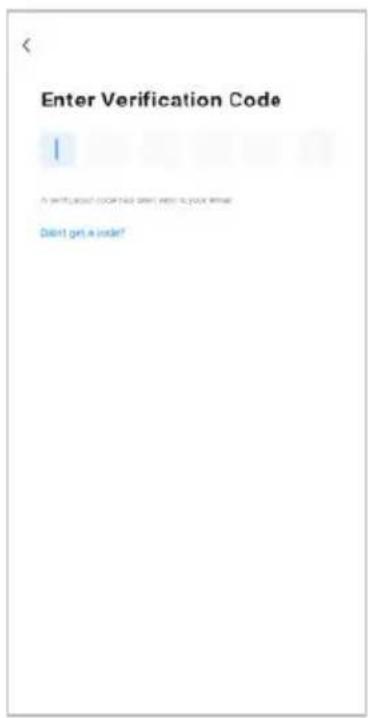
- A 6-digit code will be sent to the submitted email address. Enter this code before the one-minute timer expires.
- Continue to the next page and complete your SmarterHome profile.
Set device in pairing mode
When the device is first turned on, it may automatically enter pairing mode (both buttons are slowly flashing purple).
If not automatically in pairing mode when powered on, you can manually set the device in pairing mode by pressing and holding the home and power buttons simultaneously for 3 seconds until they begin slowly flashing purple and the voice prompt “Wi-fi lost, please follow the App instructions for reconnection” is heard.
Add device through network
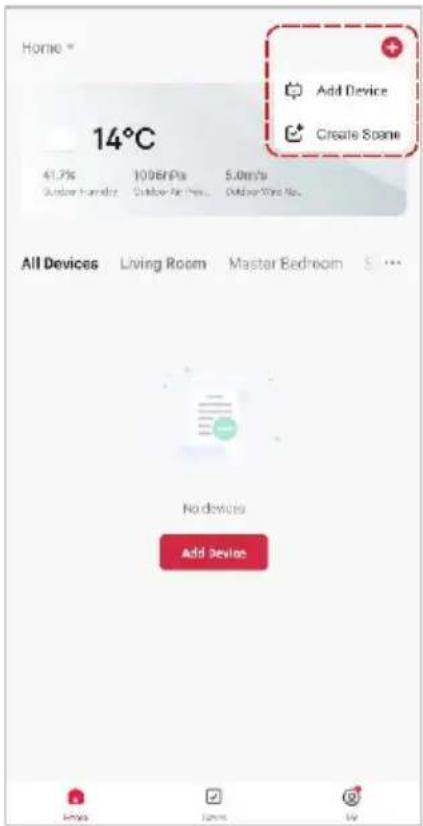
- Once registered, tap "Add Device" on the app's home page, or the "+" in the upper right corner, to add a new device through the network.
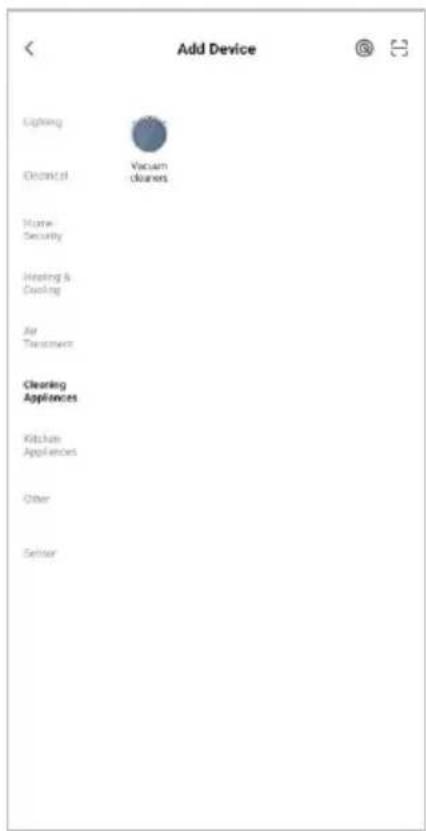
- Select the product type from the list of options in the app (Cleaning Appliances > Vacuum cleaners).
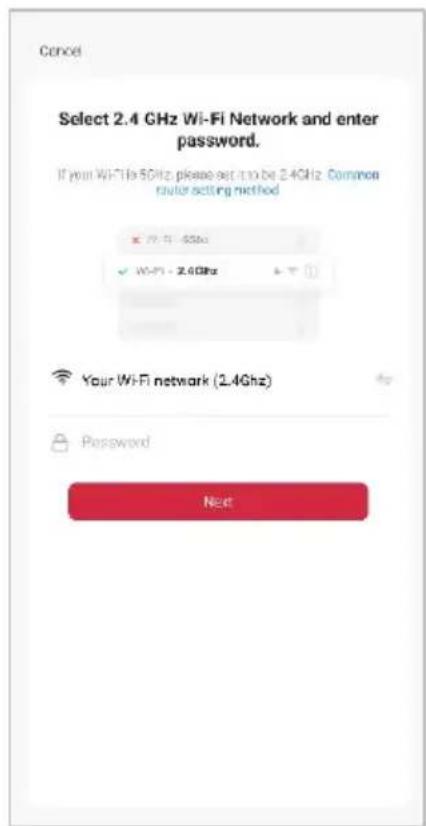
- Enter your Wi-Fi details. It is important that your SmarterHome™ device and the app are connected to the same Wi-Fi network during setup.
Notes:
• The device and the app have to use the same Wi-Fi network.
• The device is only compatible with 2.4Ghz networks.
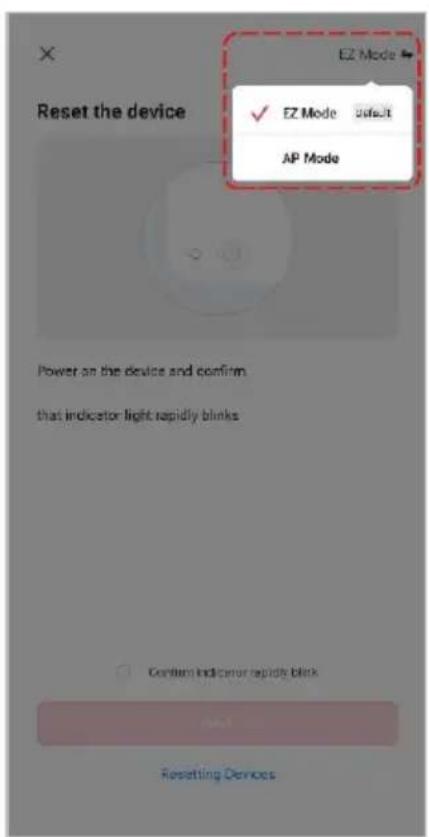
- Adjust your connection method by tapping on the mode type in the top-right corner of the screen. Select "AP Mode" for the set-up type.
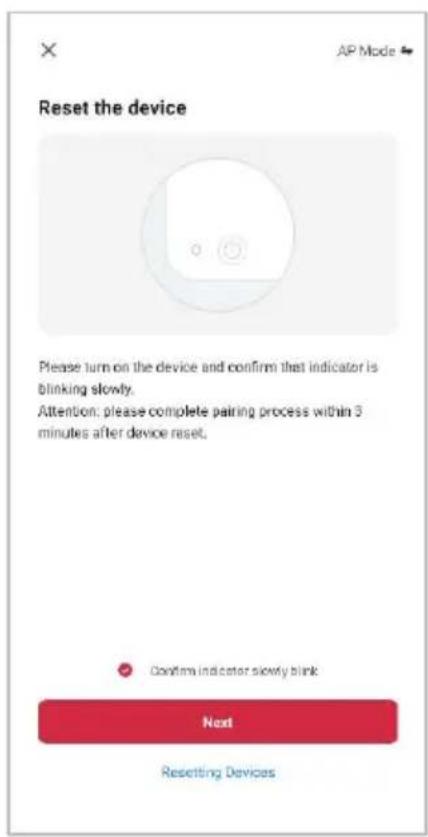
- Ensure that the device is in pairing mode, with the power and home buttons are slowly flashing purple, select "Confirm indicator is slowly blink" and tap "Next".
- Follow the in-app prompts to continue AP Mode connection, which will pair your mobile phone to the device's Wi-Fi hotspot to ensure a connection. This may be named "SL-KoganSmart", "SmartLife-XXXX", or another similar name.
Note:
If the Wi-Fi hotspot does not appear on your phone in the list of available networks, your device may not be set in AP Pairing Mode correctly. Try repeating the steps outlined above to ensure your device is ready for connection.
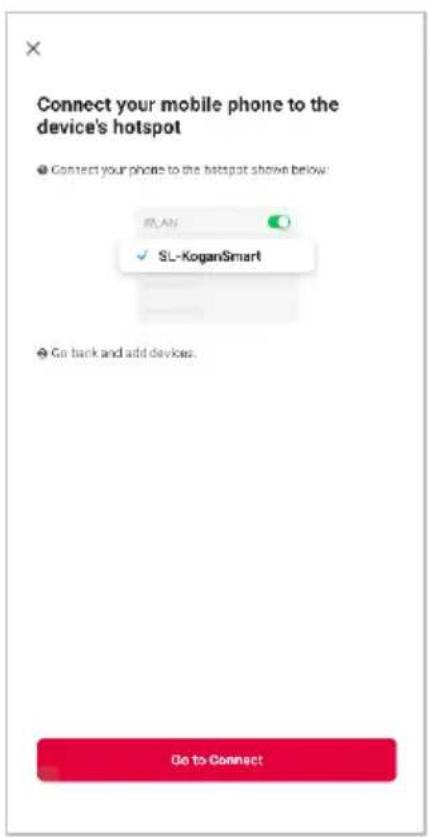
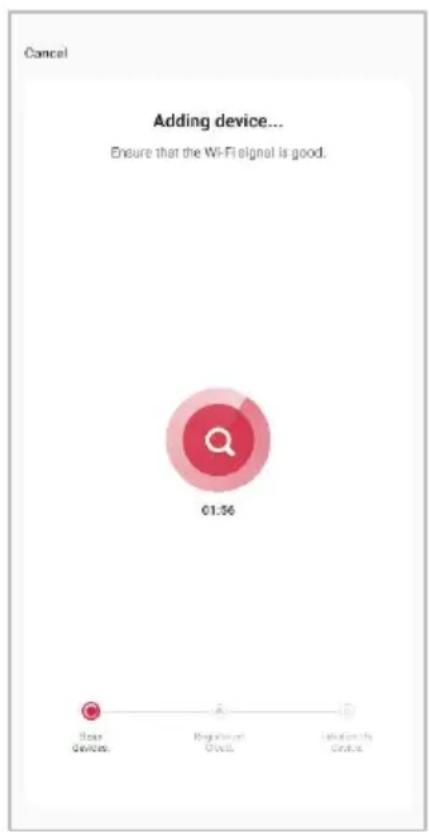
- The device will commence the pairing process and connect to the app. Ensure your Wi-Fi router, mobile phone, and the SmarterHome™ device are kept close until connection is complete.
- After successfully being added, you will have the option to rename the device and assign it to a location. It will now be listed on the app's home page. Tap the device listing to enter its control page.
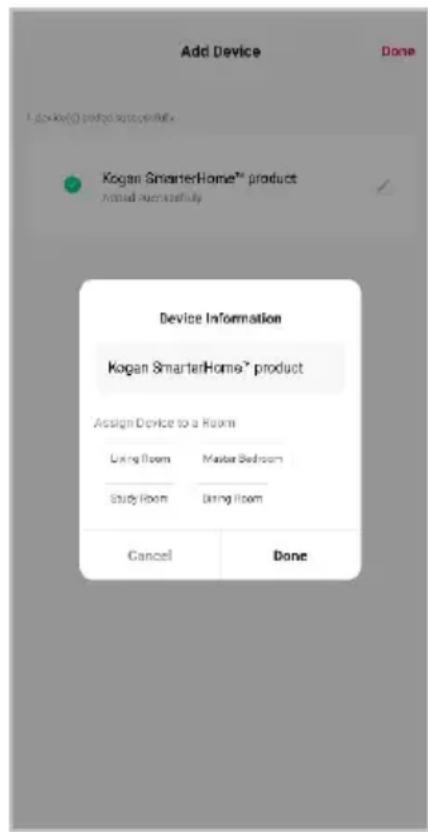
Note:
Once connected, you can select Create Scene from the “+” in the upper right corner (or from the Scene tab) to group connected SmarterHome™ products and automate their functions.
GOOGLE HOME CONTROL
Note:
You will need to have set up a Google Home account prior to linking your Kogan SmarterHome™ device.
Adding "SmarterHome" to the Google Home app
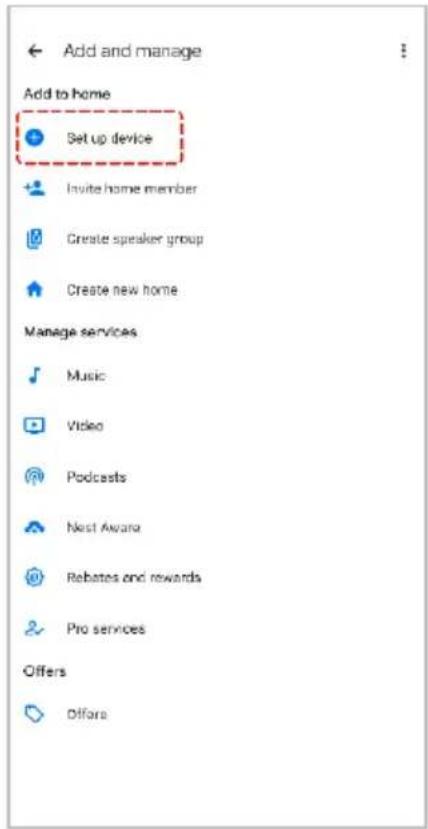
- From the home page of the Google Home app, select the "+" icon (top left corner, see arrow in the below screenshot) to access the 'Add and manage' page.
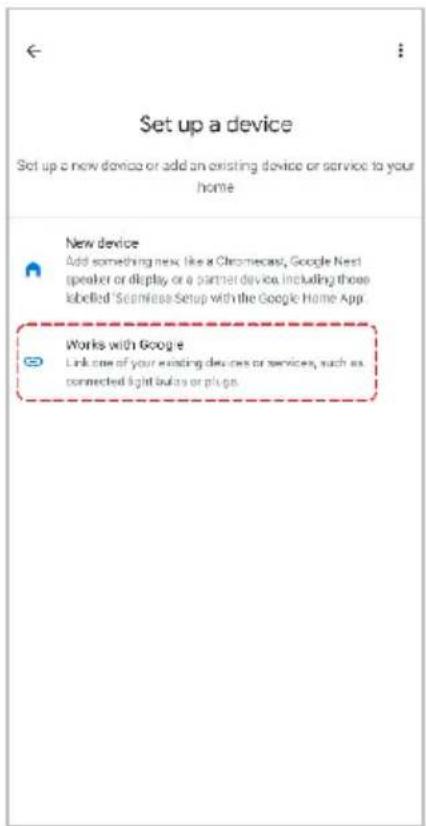
- Select 'Set up device', then select the 'Works with Google' option.
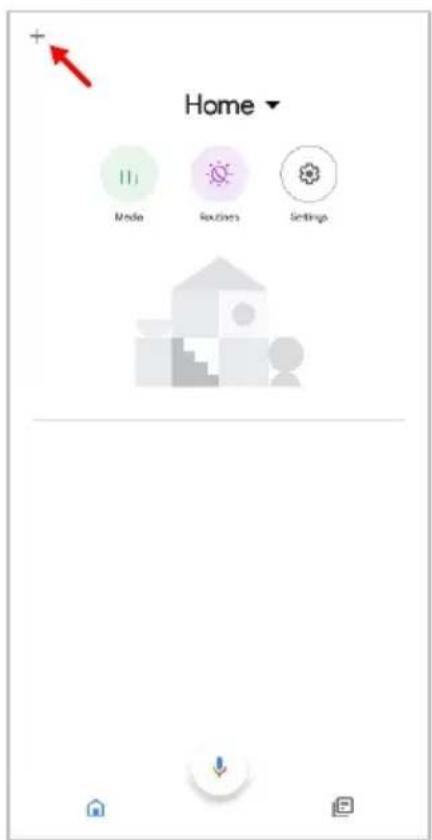
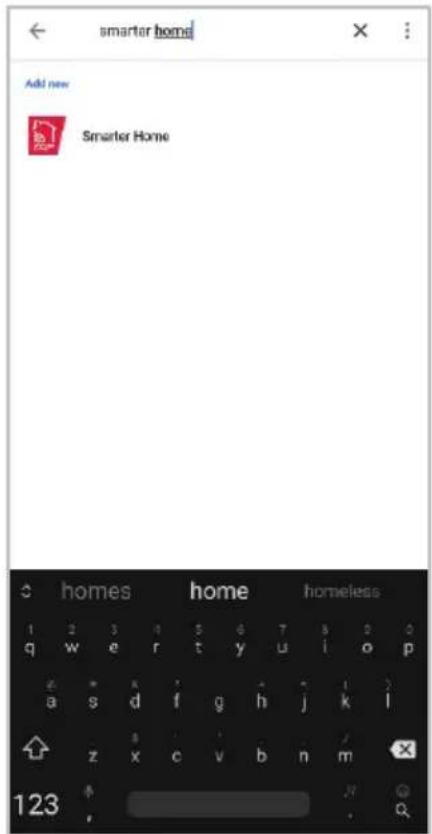
- Select the search bar and type 'Smarter Home' to locate the Kogan SmarterHome™ service.
- From here, you will be prompted to sign into your SmarterHome™ account using either your email or mobile phone number, depending on which method you used to register your account.
- Select "Kogan SmarterHome™" from the app options.
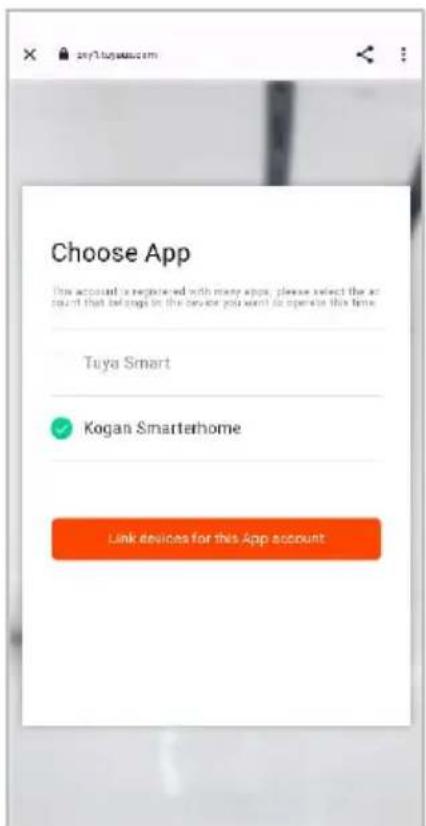
-
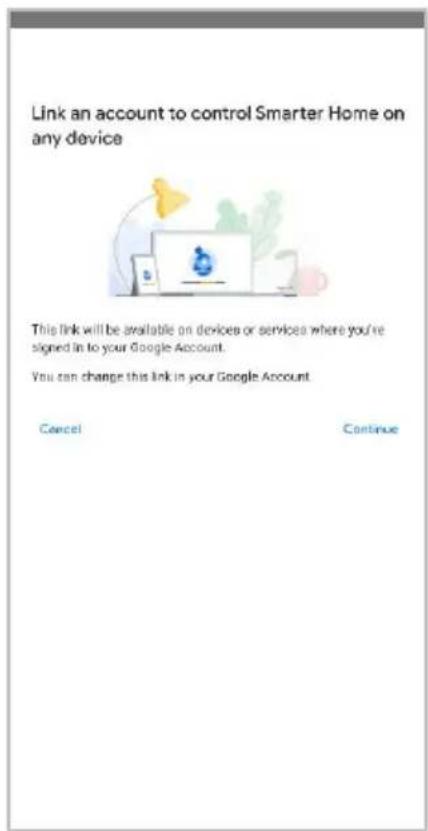
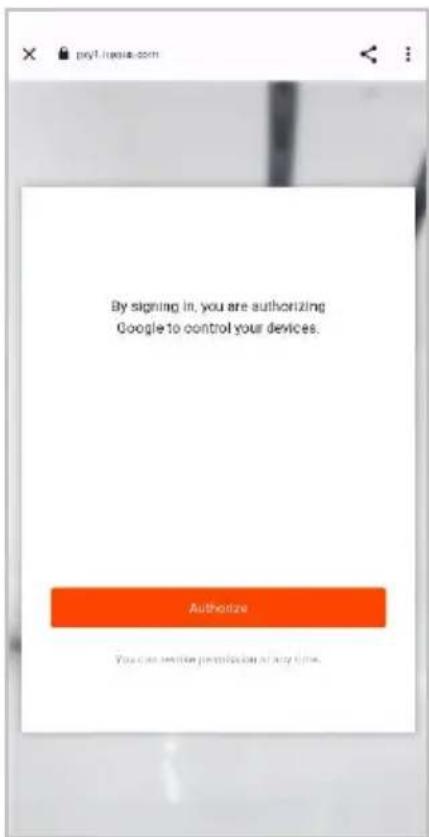
Tap 'Authorise' to grant Google permission to access the SmarterHome™ app and your devices.
-
Once connected, the app will display any compatible devices linked to your SmarterHome™ account. From here you can assign them to rooms and set up any routines. Tap on any of the devices to view a list of available commands.
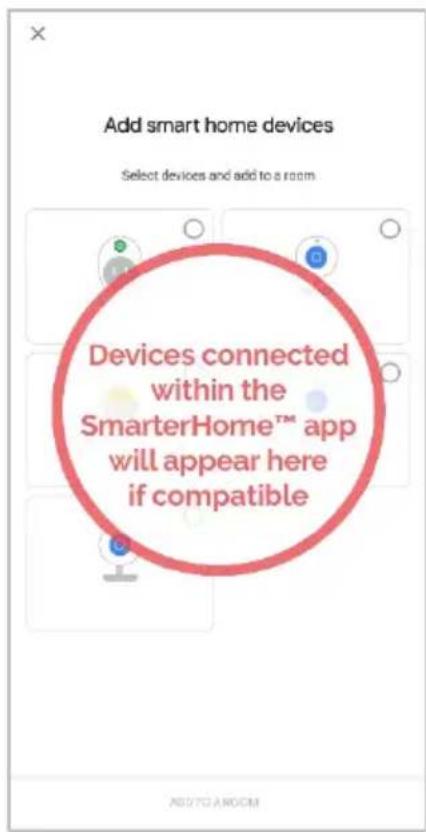
Note:
Please note that Google Home can only control the base/core functions of any compatible SmarterHome™ devices. To make full use of this product's smart functionality, please use the Kogan SmarterHome™ app.
AMAZON ALEXA CONTROL
Note:
You will need to have set up an Alexa account prior to linking your Kogan SmarterHome™ device.
Adding "SmarterHome" to the Alexa app
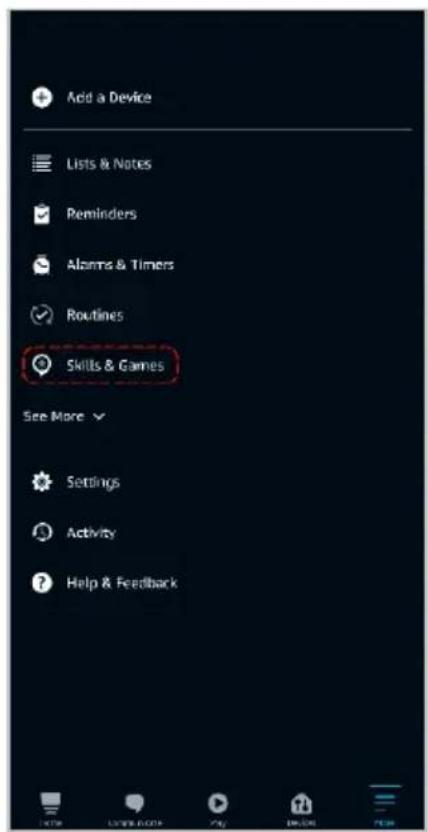
- From the home page of the Alexa app, select the “≡” icon in the bottom-right and select “Skills & Games” from the sidebar.
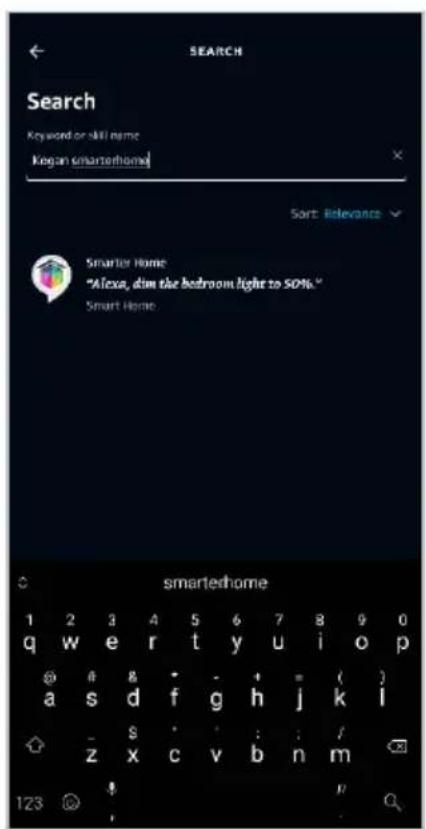
- Select the search bar and type 'Smarter Home' to locate the Kogan SmarterHome™ skill.
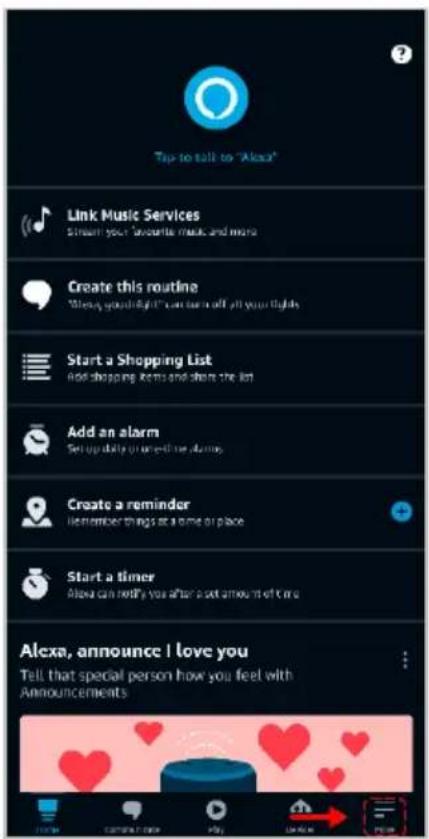
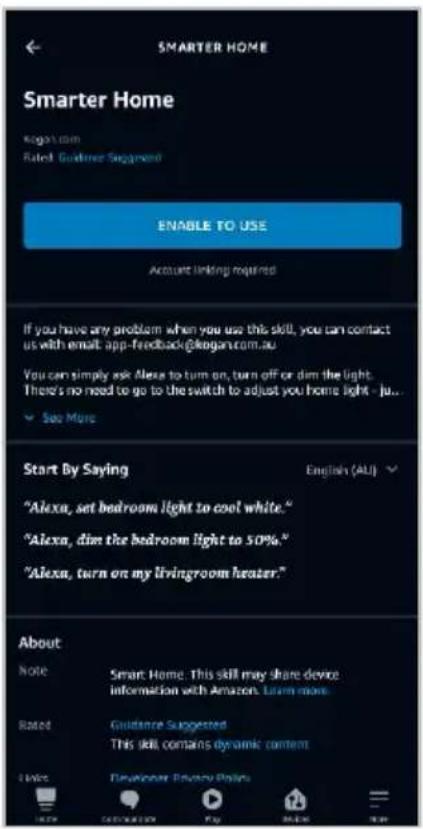
- Tap 'Enable to Use' to add the Kogan SmarterHome™ skill to Alexa.
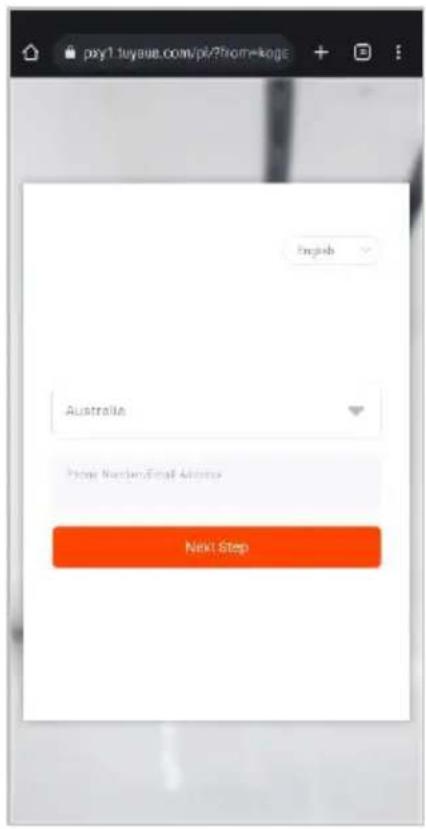
- From here, you will be prompted to sign into your SmarterHome™ account using either your email or mobile phone number, depending on which method you used to register your account.
- Select "Kogan SmarterHome™" from the app options.
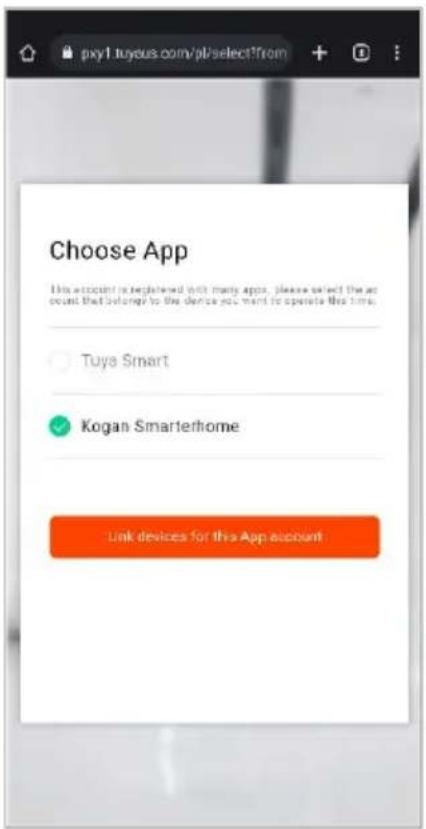
OPERATION
Powering ON/OFF
Press and hold the power button for 3 seconds. The indicators on the power and home buttons will illuminate, indicating the vacuum is turned on.
When the robot vacuum cleaner is in standby, press and hold the power button for 3 seconds. The indicators on the power and home buttons should disappear, indicating the vacuum is turned off.
Notes:
• The vacuum cannot be turned off during charging.
- During the first use, ensure the vacuum is located against the charging contacts of the auto-empty dock.
App Interface
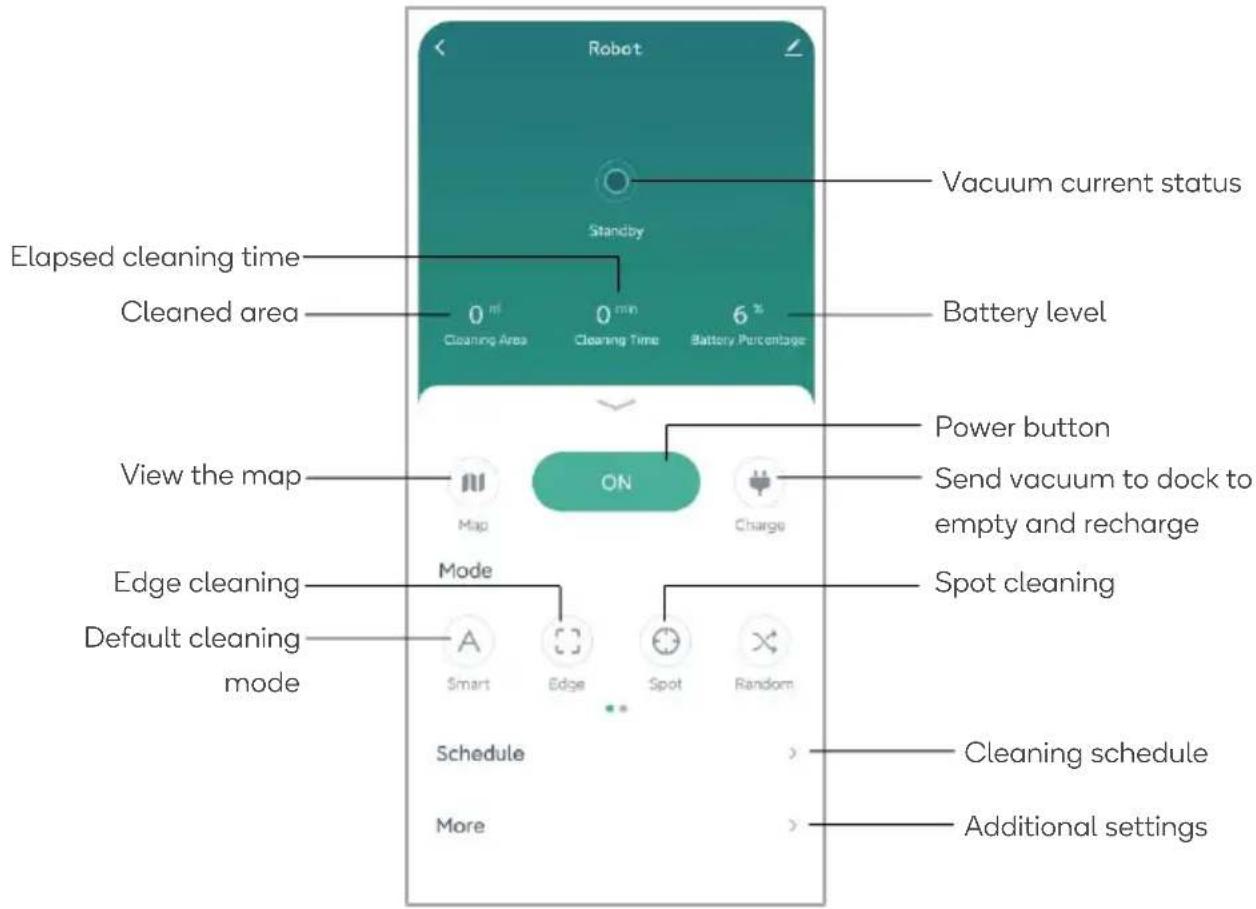
Mapping and general cleaning
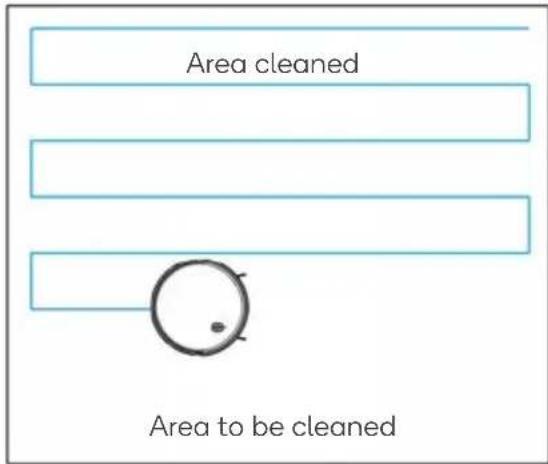
Once the vacuum is powered, press the power button. On first use, the vacuum will start mapping out the area then begin cleaning. This map will be remembered by the vacuum on subsequent cleans.
As an area is cleaned, the app will display the trail the vacuum has cleaned. Once the whole area has been mapped and cleaned, the vacuum will automatically return to the auto-empty dock. It will then empty the collected dust into the dustbag and start charging.
Notes:
- Do not use this vacuum to clean liquids.
- If the battery level is less than 15% before cleaning, the vacuum will not turn on and will need to be charged.
- If the battery is less than 15% whilst cleaning, the vacuum will automatically return to the auto-empty dock to charge.
- Do not move the vacuum randomly/frequently during operation.
- If moving temporarily, place the vacuum back to as close to its original position as possible. When the vacuum resumes use, it will try to reposition its coordinates.
- After positioning successfully, it will continue to work according to its planned path. If positioning fails, it will stop its previous task and build a new map for cleaning. In this case, the vacuum may fail to recharge and not return to the auto-empty dock.
Charging
• Automatic charging: The robot will return to the auto-empty dock automatically after cleaning.
- Manual charging: When paused, pressing the home button while will send the vacuum back to the auto-empty dock.
Note:
If the vacuum cannot find the auto-empty dock, it will automatically return to the starting position. Manually place the vacuum back to the auto-empty dock for charging.
Virtual Walls
A magnetic strip (not supplied) can be installed in doorways to set a virtual wall and stop the vacuum entering a restricted area (such as bathroom or kitchens).
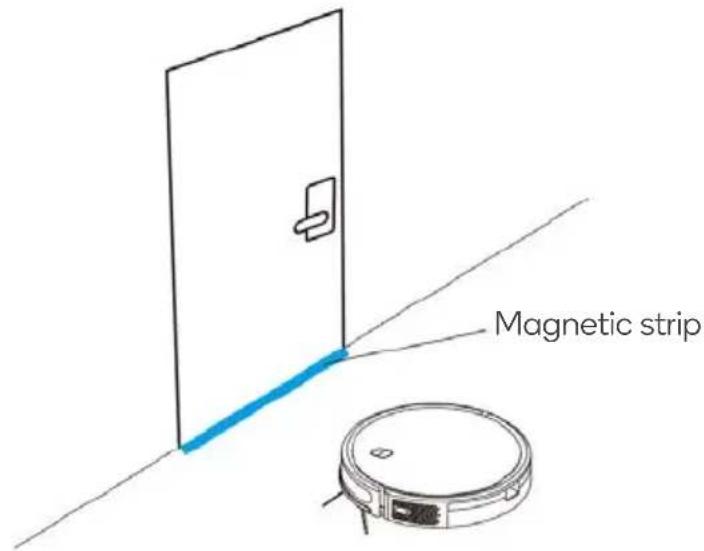
Note:
Fix the magnetic strip to the ground to avoid it peeling off. Ensure the strip does not interfere with the opening and closing on the door.
Spot Cleaning
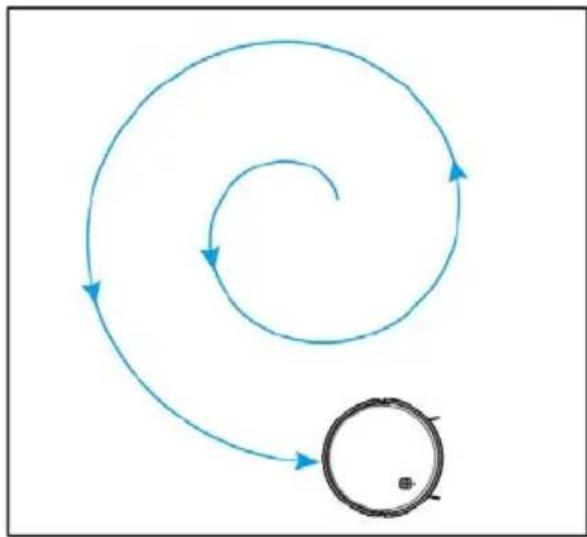
Spot cleaning focuses on specific areas to efficiently clean up local messes or spills.
To enable spot cleaning:
- Press spot cleaning button on the remote
- Use the SmarterHome™ app to specify the desired location on the map.
The vacuum will sweep the area in a spiralling motion with a diameter of 1.2m. Note: The direction key on the SmarterHome™ app can also be used to manually control the machine to the desired position.
flowchart
graph TD
    A["Start"] --> B{Loop Point}
    B --> C["Loop Back"]
    C --> D["End"]
Edge Cleaning
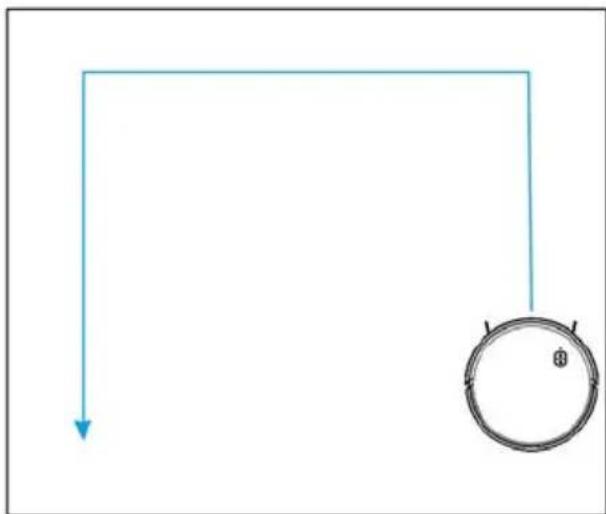
Edge cleaning is a feature that enables the vacuum to focus on thoroughly cleaning along the edges of the walls, furniture, and other obstacles in your living space. This feature ensures that the vacuum effectively removes dirt, dust, and debris from hard-to-reach areas, providing a more comprehensive and meticulous cleaning result.
To enable edge cleaning, press the edge cleaning button on the remote or by using the SmarterHome™ app.
natural_image
Simple diagram showing a downward arrow and a circular object with a number 8, no text or symbols present.Scheduled Cleaning
Scheduled cleaning can be set up using the SmaterHome™ app. The vacuum will start cleaning automatically at the appointed time and return to the charging base after cleaning.
DND (do not disturb) Mode
When activated, DND mode ensures that the vacuum does not start cleaning or make any noise during specific periods or when you prefer uninterrupted activities or rest.
In DND mode, the vacuum will continue to function normally, but it will not initiate any cleaning cycles or emit audible alerts. This mode is particularly useful when you need quiet time, such as during sleep hours, important meetings, or when you simply want to avoid any interruptions.
DND mode can be enabled using the SmarterHome ^TM app.
Suction Power
The vacuum features 3 suction power levels (silent, standard and high). To cycle through the 3 levels, press the suction power button on the remote. This can also be adjusted through the SmaterHome™ app.
Water Flow
The vacuum features 3 water flow levels (low, standard and high). To cycle through the 3 levels, press the water flow button on the remote. This can also be adjusted through the SmarterHome™ app.
Wi-Fi Reset (pairing mode)
If your vacuum fails to connect to the SmarterHome™ app (Wi-Fi password or router configuration has changed etc.) you will need to reset the Wi-Fi settings on the vacuum and reconnect it.
Press and hold the power and home buttons simultaneously for 3 seconds until the voice prompt “Wi-Fi has been reset” is heard and the wi-fi indicator begins flashing.
CLEANING & CARE
- Ensure the vacuum is turned off before performing any maintenance or cleaning.
- Only remove and reattach the components outlined in this user guide when cleaning. Do not completely disassemble the vacuum.
Rolling brush
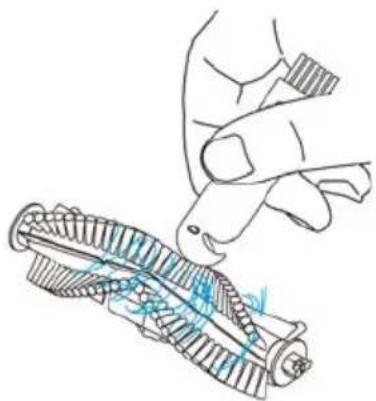
The rolling brush should be cleaned once a week.
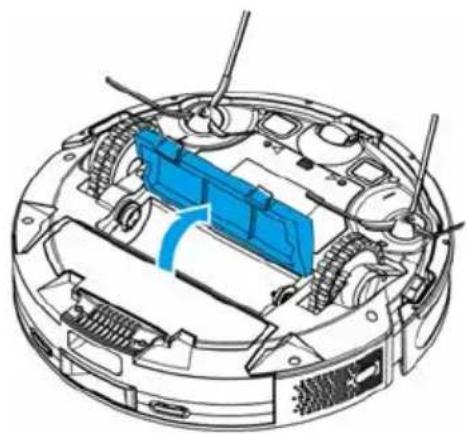
- Turn over the vacuum and press the buckle on the rolling brush cover. Remove the cover.
natural_image
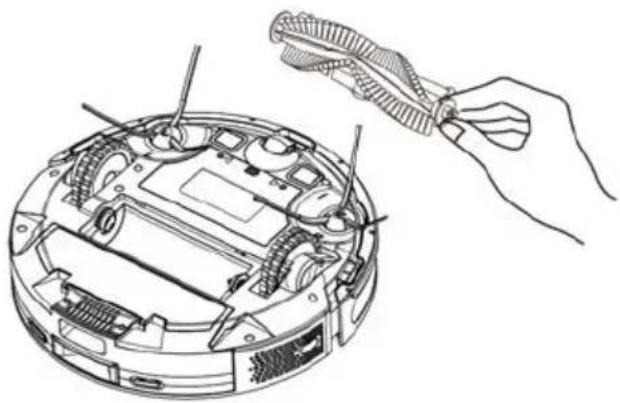
Technical diagram of a mechanical device showing internal components and a blue highlighted component (no text or symbols)- Remove the rolling brush.
natural_image
Technical line drawing of a robotic vacuum cleaner with hands operating the component (no text or symbols)- Use the cleaning brush to remove the dust in the cavity of the brush and clear any entanglements.
natural_image
Illustration of a hand using a tool to interact with a mechanical component (no text or symbols present)Side Brushes
The side brushes should be cleaned once a week.
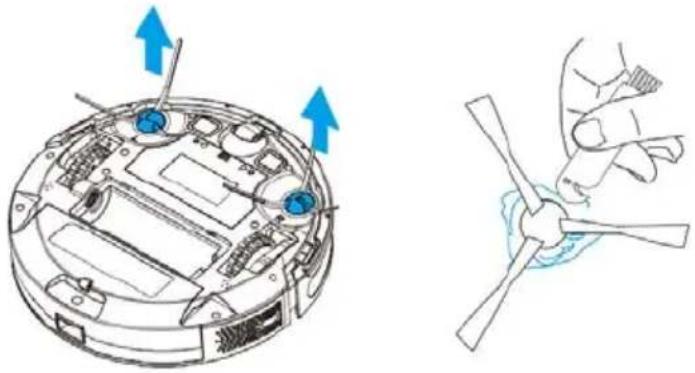
- Turn over the vacuum and pull out the side brushes vertically.
- Use the cleaning brush to clear dust and tangled debris, then reattach the side brushes.
- Press and reattach the left and right side brush (L, R) against the corresponding letters on the bottom of the vacuum. There should be a clicking sound when each side brush is secured.
natural_image
Technical diagram showing a circular device with internal components and a hand holding a propeller (no text or symbols present)Notes:
- It is recommended to replace the side brushes every three months for optimal cleaning.
- Do not use damp cloths or any liquids to clean the vacuum.
Dustbin
The dustbin should be emptied after every use.
-
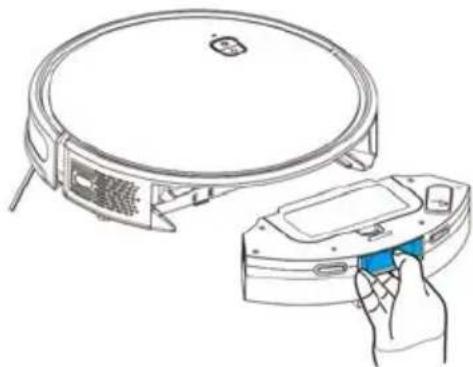
Press and hold the dustbin button to remove the dustbin
-
Press and hold the dustbin button, then open the dustbin and empty.
natural_image
Line drawing of a circular vacuum cleaner next to a handheld electronic device with a blue clip, both without any text or symbols.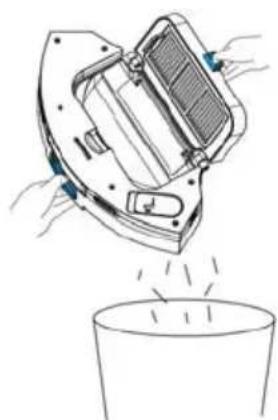
natural_image
Illustration of a hand pouring liquid into a cup (no text or symbols)Filters
The filters should be cleaned once a week.
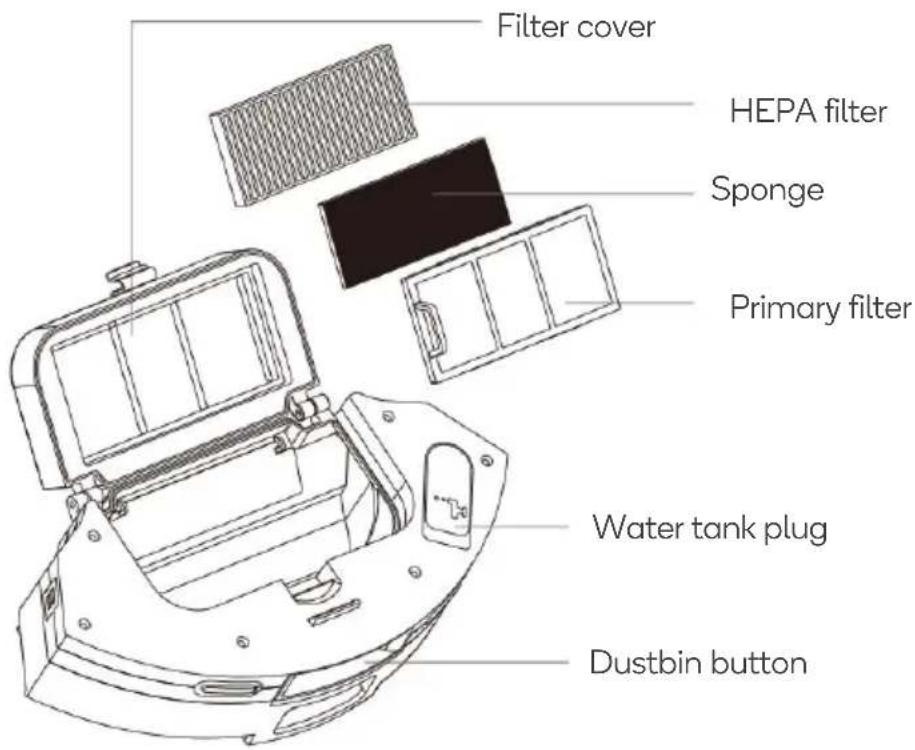
- Lift the filter cover and remove the HEPA filter and sponge layer.
- Flush the primary filter, HEPA filter, sponge and dustbin under a water tap. Use your fingers to flush through harder to reach areas.
- After washing, shake off the water droplets, and air dry the primary filter, HEPA filter, sponge, and dustbin. Allow at least 24 hours for the components to dry. When dry, insert the filters and sponge, then close the filter cover.
Notes:
- Do not wash with detergent.
- Do not use brushes to clean the filters.
- Ensure the filter and sponge are air dried for at least 24 hours before reassembly.
- It is recommended to replace the filters every three months.
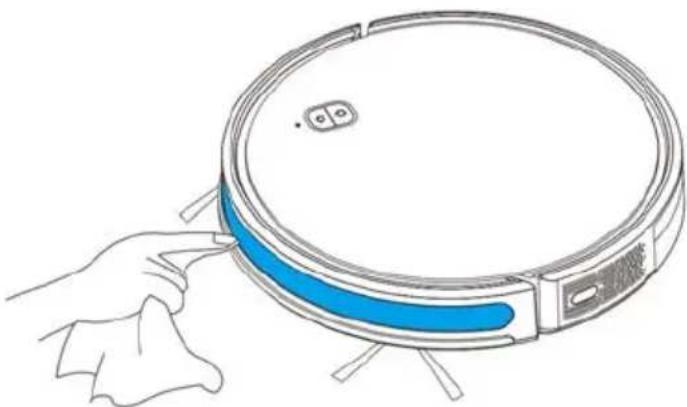
Infrared Receiver Sensor
The infrared receiver sensor should be cleaned once a month. Gently wipe the sensor with a soft dry cloth.
natural_image
Line drawing of a robotic vacuum cleaner with a blue stripe, being handled by a hand (no text or symbols)Cliff Sensors
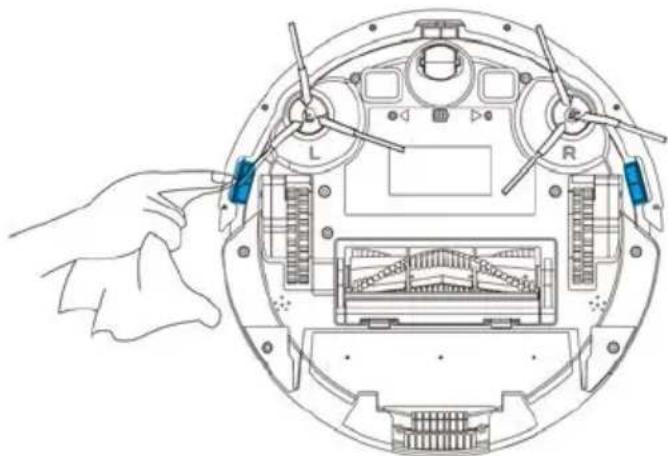
The cliff sensors should be cleaned once a month. Gently wipe the sensor with a soft dry cloth.
natural_image
Technical line drawing of a circular electronic device with labeled components (no text or symbols)Charging contacts
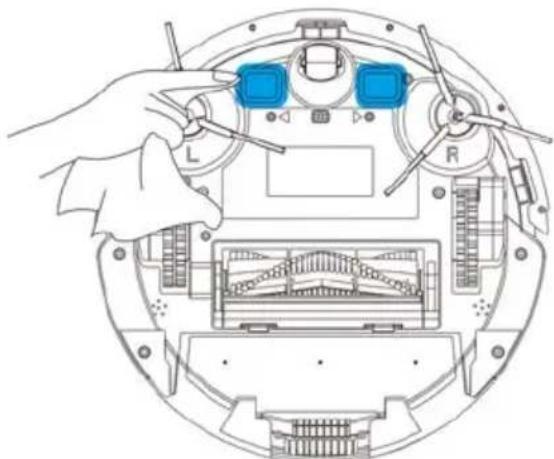
The charging contacts should be cleaned once a month. Gently wipe the charging contacts with a soft dry cloth.
natural_image
Technical line drawing of a mechanical device with labeled components (no text or symbols)Auto-Empty Dock
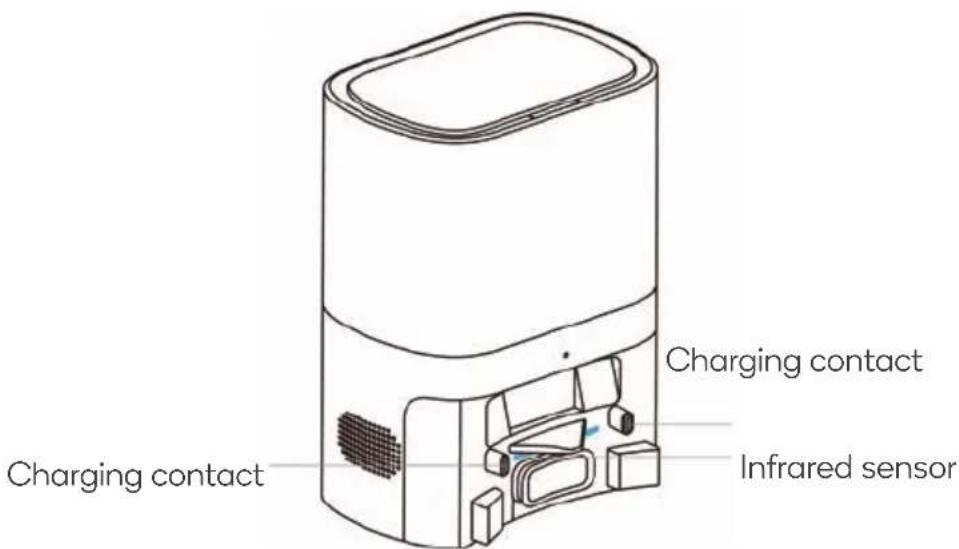
The charging contacts and infrared sensor on the auto-empty dock should be cleaned once a month. Gently wipe the areas with a soft dry cloth.
Firmware updates
Check the app for any firmware updates. The battery capacity shall not be less than 50% when updating.
It is recommended to place the device against the charging contacts during any update.
Storage
Store the vacuum in a cool, dry place.
If the vacuum will not be used for an extended period, ensure to charge it fully at least every 3 months. This will prevent the battery from over-discharging.
Changing the Dust Bag
natural_image
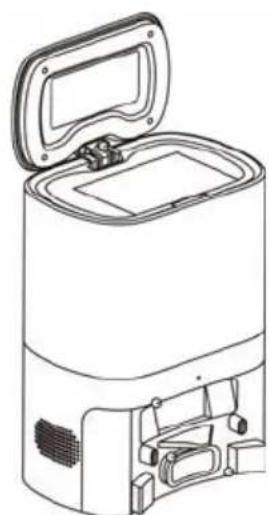
Line drawing of a portable air purifier with lid open and internal compartments (no text or symbols)- Unplug the power cord and open the auto-empty dock cover.
natural_image
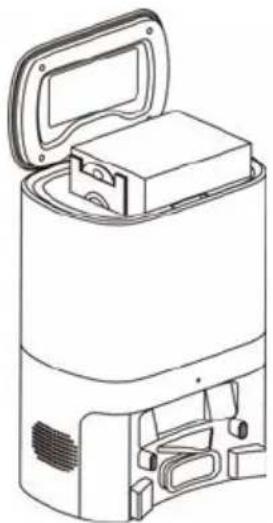
Line drawing of a portable electronic device with open lid and internal compartments (no text or symbols)- Pull up the handle on the dust bag.
natural_image
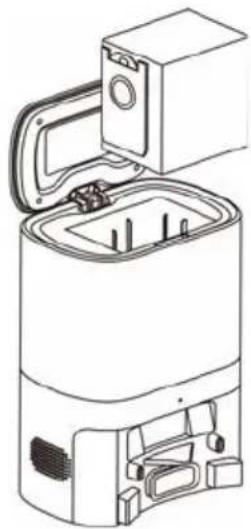
Line drawing of a kitchen appliance with lid, drawer, and ventilation slots (no text or symbols)- Remove the dust bag from the auto-empty dock.
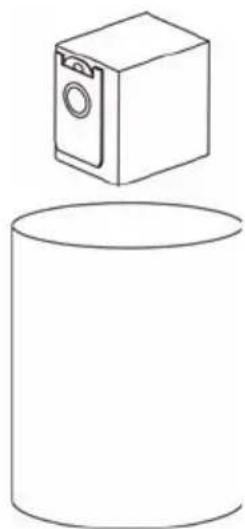
natural_image
Simple line drawing of a cylindrical container with a small rectangular object above it (no text or symbols)- Discard the used dust bag
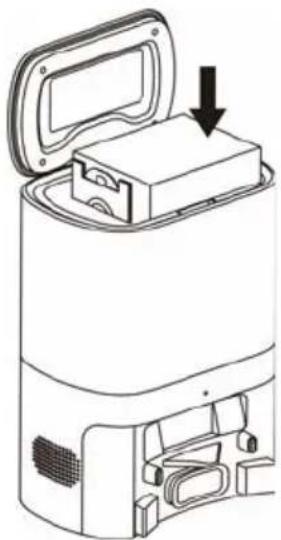
natural_image
Diagram of a device with an open lid and internal compartments, showing a downward arrow indicating a component (no text or symbols present)- Insert the new dust bag into the auto-empty dock and ensure that the dust bag handle is not pulled out.
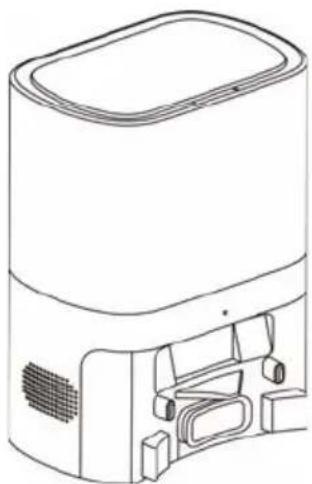
natural_image
Line drawing of a cylindrical device with internal components and ventilation slots (no text or symbols)- Close the cover of the auto-empty dock, then switch on the power supply.
Auto-empty Dock Filter
If the indicator on the auto-empty dock is flashing red after the dust bag is changed:
- Unplug the auto-empty dock, then turn it upside down.
- Check if the dust filter is blocked. If blocked, use a screwdriver to unscrew the dust filter cover, then clean the filter using a soft, dry brush.
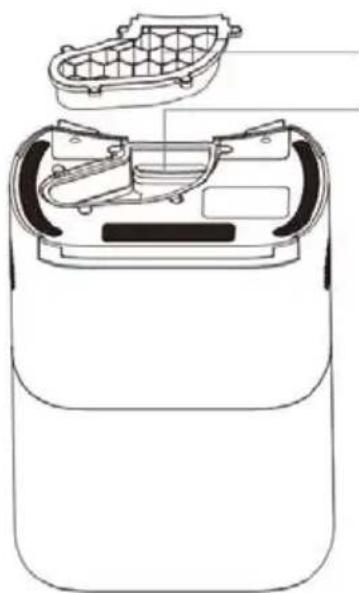
natural_image
Technical line drawing of a battery internal structure showing internal components and housing (no text or symbols)Dust filter cover
Dust filter
SPECIFICATIONS
Vacuum
| Overall dimension | 320x320x76mm |
| Net weight | 2.8kg |
| Battery | 2600mAh |
| Rated voltage | 14.4V |
| Rated power | 42W |
| Charging time | 300min |
| Capacity of dust bin | 250ml |
| Capacity of water tank | 240ml |
Auto-empty Dock
| Overall dimension | 320x240x165mm |
| Net weight | 2.7kg |
| Rated Input | 100-240V, 50/60Hz |
| Rated Output | 19V=1A |
| Rated power | 680W |
TROUBLESHOOTING
| Problem | Reason/Solution |
| The vacuum is not turning on. | · The battery level is too low. Place the vacuum against the charging contacts of the auto-empty dock. The vacuum will then begin charging and turn on.· The ambient temperature is below 0°C or above 40°C.Ensure the vacuum is only used when the temperature is between 0-40°C. |
| The vacuum is not charging. | · Move the vacuum away from the auto-empty dock and check whether the indicator is illuminated.· Ensure the power cord is well connected.· The charging contacts on the auto-empty dock are not connected with the charging contacts on the vacuum.· Clean the charging contacts on the auto-empty dock and vacuum.· Ensure the side brushes are not covering the charging contacts. If so, turn the brushes to expose the charging contacts. |
| The vacuum did not return to the auto-empty dock. | The vacuum is too far away from the auto-empty dock. Place the vacuum close to the auto-empty dock. |
| The vacuum is displaying abnormal behaviour. | Turn off and restart the vacuum. |
| There is an abnormal noise during cleaning. | The brushes or wheels may be entangled with foreign objects. Stop the vacuum and clean the brushes and wheels. |
| The cleaning performance has degraded. | · There is dust build-up in the filter. Clean or replace the filter.· The dustbin is full. Empty the dustbin.· The roller brush is entangled with foreign objects. Clean the roller brush. |
| Dust or ash is dropping out of the vacuum. | |
| The vacuum cannot be connected to the Kogan SmarterHomeTM app. | The Wi-Fi signal is weak. Ensure that the vacuum is located in an area with strong Wi-Fi signals.The Wi-Fi connection is abnormal. Reset the Wi-Fi settings, ensure you have the latest version of the Kogan SmarterHomeTM appTM, and try to connect to the Wi-Fi network again.The Wi-Fi password entered is incorrect.Ensure the Wi-Fi network being connected is 2.4GHz. |
| Scheduled cleaning wasn’t carried out. | Battery is low. Scheduled cleaning will be started only when the battery power is 15% or above. |
| Error Prompt | Solution |
| Error 1: Insert the dustbin | The vacuum is unable to clean when the dustbin is taken out. Reinstall the dustbin. |
| Error 2: Put the machine on the floor before starting | Pick up the vacuum and place it on a flat surface and resume cleaning. |
| Error 3: Please lay the machine flat on the ground and then start it | Pick up the vacuum and place it on a flat surface and resume cleaning. |
| Error 4: Please check whether the front bumper is stuck | The edge or collision sensor is stuck. Remove any obstructions and resume cleaning. |
| Error 5: Low battery; please charge | Place the vacuum on the auto-empty dock. |
| Error 6: The machine is trapped | The vacuum is stuck. Pick it up and place it on a flat surface and then restart. |
| Error 7: Please check whether the wheel is stuck | The driving wheel is stuck. Clean the wheel and restart cleaning. |
| Error 8: Please check whether the rolling brush is stuck | The rolling brush is stuck or dirty. Clean the rolling brush and restart cleaning. |
| Error 9: Please check whether the side brush is stuck | One of the side brushes is stuck or dirty. Clean the side brushes and restart cleaning. |
Need more information?
We hope that this user guide has given you the assistance needed for a simple set-up.
For the most up-to-date guide for your product, as well as any additional assistance you may require, head online to help.kogan.com
kogan.com
- KOGAN SMARTERHOME™ G80 ROBOT VACUUM AND MOP CLEANER
- SAFETY & WARNINGS
- Battery and Charging
- Auto-empty Dock
- COMPONENTS
- OVERVIEW
- Home button
- Power button
- Wi-Fi indicator
- Reset button
- Button indicators
- Dustbin/Water tank
- Remote Control
- ASSEMBLY
- Note:
- BEFORE FIRST USE
- Checks to the area
- Charging
- CONNECT TO SMARTERHOME™ APP
- Install App
- To register:
- Set device in pairing mode
- Add device through network
- Notes:
- GOOGLE HOME CONTROL
- Adding "SmarterHome" to the Google Home app
- AMAZON ALEXA CONTROL
- Adding "SmarterHome" to the Alexa app
- OPERATION
- Powering ON/OFF
- Mapping and general cleaning
- Virtual Walls
- Spot Cleaning
- Edge Cleaning
- Scheduled Cleaning
- DND (do not disturb) Mode
- Suction Power
- Water Flow
- Wi-Fi Reset (pairing mode)
- CLEANING & CARE
- Rolling brush
- Side Brushes
- Dustbin
- Filters
- Infrared Receiver Sensor
- Cliff Sensors
- Charging contacts
- Firmware updates
- Storage
- Changing the Dust Bag
- Auto-empty Dock Filter
- SPECIFICATIONS
- TROUBLESHOOTING
- Need more information?
Brand : Kogan
Model : SmarterHome G80
Category : Robot vacuum